
1C:Enterprise 8.3. Administrator Guide. Contents
SYSTEM COMPONENTS STARTUP
When 1C:Enterprise is installed, a folder named 1C Enterprise 8 is created in the Start – Programs menu. This folder has a menu structure similar to the one shown in the fig. 15:
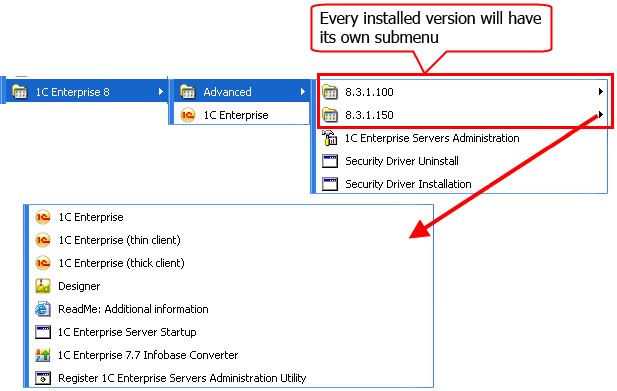
Fig. 15. Menu Structure
|
Items |
Assignment |
|
1C Enterprise |
Runs the launcher (1cestart.exe). |
|
8.3.1.100 8.3.1.150 |
Folders with links to version-specific components (in the example there are two versions installed: 8.3.1.100 and 8.3.1.150). |
|
Install HASP Device Driver |
Initiates security driver installation. |
|
Uninstall HASP Device Driver |
Initiates security driver uninstall. |
|
1C Enterprise 8 (thin client) |
Runs the software in the 1C:Enterprise thin client mode. |
|
1C Enterprise (thick client) |
Runs the software in the 1C:Enterprise thick client mode. |
|
Designer |
Runs the software in the Designer mode. |
|
ReadMe – Additional information |
Additional information not included in the documentation. |
|
1C Enterprise 7.7 IB Converter |
1C:Enterprise 7.7 infobase conversion software. |
|
Administration of 1C Enterprise Server |
Server cluster administration utility (if the 1C:Enterprise server cluster access components have been installed). |
|
Start 1C Enterprise server |
Runs 1C:Enterprise server as a service (if Install 1C:Enterprise server as Windows service was checked upon server installation) or as an application (if Install 1C:Enterprise server as Windows service was not checked upon server installation). In this case the server is shut down as a regular application. |
|
Stop 1C:Enterprise Server |
Stops the 1C:Enterprise server functioning as a Windows service (if the Install 1C:Enterprise server as Windows service check box is selected when the server is installed). |
|
Register MSC ñonsole |
Registers 1C:Enterprise servers administration utility (radmin.dll) for a specific version. Once registered, the servers of this version can be connected to using this administration utility. |
4.1. SYSTEM OPERATION MODES
1C:Enterprise can operate in one of the following modes:
|
Operation mode |
Explanation |
|
Designer |
Configuration development mode. Allows to edit the structures of data, update configurations, generate user list specifying system access rights, dump and restore data. |
|
1C:Enterprise |
Execution mode. Basing on the data structures described in the Designer, performs data input and process information processing (working with catalogs, documents, reports, etc.). There are three different variants of the executable mode: • thin client – the 1cv8c executable file • web client – no executable file exists (web browser is used instead) • thick client – the 1cv8 executable file The thick client can execute configurations developed for the previous 1C:Enterprise versions as well as the configurations developed in the managed application mode. Both the thin and the web clients can only execute the configurations developed in the managed application mode. |
4.2. CLIENT APPLICATION OR DESIGNER STARTUP
You can launch 1C:Enterprise in a certain operation mode in various ways:
Using launcher (1cestart) – recommended
Using interactive launcher (1cv8s)
Using the executable file of the thick client (1cv8) or thin client (1cv8c) of the specific version
Using web browser (web client only)
The following configuration files are used to launch the system:
Local configuration file – 1CEStart.cfg, for details see page 241
Local configuration file for all users – 1CEStart.cfg, see page 241
Shared configuration file – 1CSECmn.cfg, for details see page 240 (for Windows OS only)
The startup options are described in detail below.
4.2.1. Launcher
Location of the 1cestart file:
For Windows:
○ 32-bit version: C:\Program Files\1cv8\common ○ 64-bit version: C:\Program Files (x86)\1cv8\common For Linux:
○ 32-bit version: /opt/1C/v8.3/i386
○ 64-bit version: /opt/1C/v8.3/x86_64
The launcher enables you to run client applications of all types (a thick client, a thin client, or a web client) and Designer.
The launcher can be run either without parameters, or you can specify a reference to a specific infobase.
If the client computer is running Windows:
The launcher can also be located in a network share (no additional software components are required for it to operate) and it enables both initial installation of the system on a computer and subsequent installation of new 1C:Enterprise versions. If the launcher identifies a common configuration file in the directory where it was started from, the link to the file is saved to the CommonCfgLocation parameter of the local configuration file.
If the system is installed with the launcher, an operating system overload alert may appear.
4.2.1.1. Startup without Options
If the launcher is started without any options specified, the following startup procedure is used:
If the launcher is started from a network drive, it attempts to locate a shared configuration file in the directory it is run from. If such a file is located, the options are read from the file.
It attempts to find a local configuration file. If such a file is located, the options are read from the file.
Search for the installed platform versions in compliance with the data obtained from the InstalledLocation parameters of the configuration files. If this parameter is not available in the configuration files, startup is aborted and an error message is displayed.
The highest number of installed 1C:Enterprise version is identified.
The highest number is identified for a version available for installation from the directories specified in the DistributiveLocation parameters of the configuration files.
If a later version is available for installation, this new version is installed automatically with the parameters obtained from the InstallComponents parameters of the configuration files. If this parameter is missing, the thin and thick clients and 1C:Enterprise servers access components are installed.
Software is installed in the following cases:
○ The user starting the launcher is a member of the local administrators group.
○ The user starting the launcher is not a member of the local administrators group but software installation is permitted for the user and the computer (AlwaysInstallElevated register key).
Interactive launcher is run from the version directory (it is either the existing version or the one installed in the previous step). The software is run with the /AppAutoCheckVersion option.
4.2.1.2. Startup with Infobase Specified
If the launcher is started with the infobase name specified (in the /IBName option), the following startup procedure is used:
Parameters are read from the local (1CEStart.cfg, see page 241) and shared (1CSECmn.cfg, see page 240) configuration files.
A common infobase list is generated based on the local infobase list (ibases.v8i, see page 235) and the CommonInfoBases parameters of the configuration files.
If the specified infobase name is not found in the resulting list, startup is aborted and an error message is displayed.
If an infobase with the specified name is located, startup options are identified based on the infobase properties and the appropriate client is launched with the options specified. The following options are identified based on the infobase properties:
○ Client type
○ Version number required for operation
○ Other options stored in the infobase properties
The software is launched with the /AppAutoCheckVersion option.
4.2.2. Interactive Launcher
Location of the 1cv8s file:
For Windows:
○ 32-bit version: C:\Program Files\1cv8\common ○ 64-bit version: C:\Program Files (x86)\1cv8\common For Linux:
○ 32-bit version: /opt/1C/v8.3/i386
○ 64-bit version: /opt/1C/v8.3/x86_64
The launcher enables you to start client applications of all types (a thick client, a thin client, or a web client) and Designer.
The interactive launcher relies on certain 1C:Enterprise components so in the future the client application of the version matching the interactive launcher version will be launched faster than the executable file for a specific client.
The interactive launcher can either be launched interactively (Start – Programs –
1C Enterprise 8 – Advanced – 8.3.3.657 – 1C Enterprise) or using the launcher (see page 59).
Upon the first startup event the interactive launcher generates a unified infobase list that is stored in ibases.v8i (see page 235). This list includes all the infobases created in all the 1C:Enterprise versions. The user will be prompted to confirm moving infobase list for the versions 8.0 and 8.1 to this list. Further updates of the infobase list are not possible. Upon the initial startup the launcher also searches for the configuration template directories for the previous versions and records the identified locations in the ConfigurationTemplatesLocation parameter of 1CEStart.cfg (see page 241).
The interactive launcher can be run either without any options or with a reference to a specific infobase.
4.2.2.1. Startup without Options
If the interactive launcher is started without any options, a window will be displayed to select an infobase (see page 73).
When a specific infobase is selected, the interactive launcher uses the following procedure:
If the interactive launcher is run from a specific version directory without /AppAutoCheckVersion option:
○ Only the executable files of the version located in directory the interactive launcher is run from will be used for startup;
○ If automatic client type selection is specified for the launched infobase, thin client is run and the /AppAutoCheckMode option is sent to the client (see page 66).
If the interactive launcher is run by the launcher or interactively with /AppAutoCheckVersion option specified:
○ A version required to start the infobase is identified and the executable files for the required version are searched for (see page 65);
○ If this required version is not installed or cannot be installed on the computer, startup is aborted and an error message is displayed;
○ Next the launched client and other startup options are identified and the required client is attempted to be run with the required options from the version directory (including /AppAutoCheckVersion option);
○ If the required client is not found in the version directory, startup is aborted and an error message is displayed.
4.2.2.2. Startup with Options
Running the interactive launcher with the option specifying a specific infobase (/IBName option) is similar to running the launcher (see page 65).
4.2.3. Required Client of a Specific Version
A required client (thick or thin client) can be started only from the specific version directory, in two ways:
By selection of a corresponding menu item. For example, the following command should be used to run thick client for the version 8.3.3.657 (if this version is installed on the computer): Start – Programs – 1C Enterprise 8 – Advanced – 8.3.3.657 – 1C Enterprise (thick client).
By starting an executable file of the required client. For example, to launch the client specified in the previous paragraph you should run 1cv8.exe located at:
C:\Program Files\1ñv8\8.3.3.657\bin.
The procedure to launch the thin client is similar to the above procedure with the following differences:
You should select 1C Enterprise 8 (thin client) from the menu.
The executable file is named 1cv8c.
If a client is launched without the /AppAutoCheckVersion or /AppAutoCheckMode options, the selected client of a specific version will attempt to launch the specified infobase.
4.2.4. Web Client
In order to launch the web client, one should start a web browser and enter the desired infobase URL. At that the web browser should be specifically configured to make this possible. For details of the configuration, see page 173. For details of configuring web servers to work with the web client, see page 151.
4.2.4.1. Interface Language and Regional Settings
The web client interface language can be specified in the following manner (in the increasing priority order):
In the preferred languages settings of the web browser
In the command line (L option)
When an interface language is selected, the following actions are carried out:
When a query to a resource corresponding to the infobase (e.g., http://localhost/ demo) is processed, a localization language is selected:
○ When the L option is available in the URL, the value of this option is analyzed. If a language cannot be selected in the analysis process, the Accept-Language title is analyzed;
○ If the option is not available in the URL, the standard HTTP title AcceptLanguage is analyzed (it contains the preferred languages selected in the web browser);
An available language is selected from a set of localizations installed on the web server:
○ If an exact match is not found (for example, the option specifies en_US as a language), the language name is truncated and a new search is carried out (in our example it will be a search for en);
If the analysis does not reveal a corresponding language, English (en) will be the default language:
○ The selected language will be added to the base URL for the application (in our example the resulting URL will be http://localhost/demo/en) and the web browser will be automatically redirected to this new URL.
Regional settings of the web client session (impacting the way the Number and Date values are displayed) may be specified as follows (in the order of increasing priority):
in the preferred languages settings of the web browser
in the command line (the VL parameter)
Regional settings of the session are selected as follows:
If the URL contains the VL parameter, the code specified in the parameter defines the localization, the regional settings of which are used. If the value of the parameter is the code of a localization which does not exist, the web client fails.
If the URL does not contain the parameter, the standard HTTP header – Accept-Language (containing the preferred languages installed in the browser) – is analyzed.
NOTE
The Safari web browser does not support setting the preferred languages. The OS interface language is used instead.
4.2.4.2. POST Query Authentication
Occasionally, you might need to launch 1C:Enterprise bypassing the standard user authentication window. This is the case when 1C:Enterprise authentication must be performed with the use of a special form (integrated in a website, for instance), or the infobase login and password are stored in a separate database.
To satisfy these requirements, web client session authentication may be performed with the help of the POST query to a special infobase resource: e1cib/start. In this case, the launch process may be presented as follows:
1. A POST query for client authentication is executed.
2. If authentication is successful, a session is created under the account transferred in the POST query.
3. The web client is launched, and the following parameters from the POST query are transferred into the command line thereof: LowClientConnectionSpeed, LaunchParameter, LocaleCode and Zone.
4. The web client launched connects to the session authenticated in step 2.
TIP
Using the HTTPS protocol for authentication is recommended.
The following parameters are transferred in the query:
Usr required
User name.
Pwd optional
|
User password. The default value is an empty string. LowClientConnectionSpeed |
optional |
|
Connection speed. Possible values: on – slow connection. off – normal connection (default value). LaunchParameter |
optional |
|
The parameters that should be forwarded to the application (simil parameter of the web client’s command line). The default value is an empty string. SystemLanguage |
ar to the C optional |
|
Interface language. If not set: for the interface language and regional settings |
|
|
definition, see page 61. LocaleCode |
optional |
|
Interface language. If not set: for the interface language and regional settings |
|
|
definition, see page 61. Zone |
optional |
|
Separator values. For details on setting separator values and the web client, see |
|
|
"The 1C:Enterprise 8.3. Developer Manual". AuthFailHandling |
optional |
Defines the system’s behavior in the event of authentication error. Possible values:
error – returns an error code (error code – 403) and an error message text.
start – launches the web client requiring authentication with 1C:Enterprise tools.
redirect – navigates to the URL specified by the AuthFailRedirectURL parameter.
The default value is error.
AuthFailRedirectURL optional
Contains the URL to navigate to in the event of an authentication error, if the AuthFailHandling parameter is set to redirect. The URL should be absolute.
NOTE
The parameters forwarded in the body of the query have priority over the web client launch command line parameters.
Example:
Below is an example of an HTML page which shows how the inherent authentication form works for the infobase located at http://localhost/demoapp.
<HTML  xmlns="http://www.w3.org/1999/xhtml"><HEAD>
<META  http-equiv="Content-Type" content="text/html;  charset=utf-8" />
<BODY>
<FORM  action="http://localhost/demoapp/e1cib/start"  method="post">
User: <INPUT id="usr" name="usr"  /><BR />
Password: <INPUT id="pwd" type="password"  value="" name="pwd" />
<BR />Slow connection: <INPUT  id="lowclientconnectionspeed" type=
"checkbox"  name="lowclientconnectionspeed" /><BR />
Startup options: <INPUT id="launchparameter"  name="launchparameter" /><BR />
Interface language: <SELECT id="systemlanguage"  name="systemlanguage">
<OPTION value="ru">Russian</OPTION>
<OPTION value="en  selected="">English</OPTION>
</SELECT><BR />
Session locale code: <SELECT id="localecode"  name="localecode">
<OPTION value="ru">Russian</OPTION>
<OPTION value="en"  selected="">English</OPTION>
</SELECT><BR />
Data area: <INPUT id="zone" name="zone"  />
<INPUT id="authfailhandling" type="hidden"  value="error" name="authfailhandling" />
<P><INPUT   type="submit"        value="ÎÊ"             />             </P>
</FORM>
</BODY>
</HTML>
The following authentication form will be shown:
 Fig. 16. The POST query form
4.2.5. Special Startup Options
4.2.5.1. /IBName
/IBName is intended to specify the name of the infobase to be launched. If this option is used, the launcher (or the executable file of a specific client) searches for the specified infobase in the infobase list.
If multiple infobases exist with the specified name, startup will be aborted and an error message will be displayed.
If the infobase is found, an attempt will be made to run it according to the options and the selected launcher (or executable file of a specific client).
NOTE
If quotation marks are used in the infobase name, double quotation marks should be used when the name is specified in the option: ""StroyTorgVse"" Infobase.
4.2.5.2. /AppAutoCheckVersion
This option is intended to automatically select the software version to start, which is required to operate the selected infobase.
If /AppAutoCheckVersion is specified in the command line, the procedure is as follows:
The version of the infobase launched is determined;
If the version is 8.1 or 8.0, the location of the executable files for the required version is identified and the corresponding executable file of the version in question is run. At that for 1C:Enterprise 8.0 the DESIGNER command line option is replaced with CONFIG option (for compatibility reasons).
When version 8.2 or later is used:
○ If the full version number is specified, the required version is searched for (InstalledLocation options in the configuration files). If the required version is not installed on the computer, a distribution kit for the required version is searched for (DistributiveLocation parameters in the configuration files). If the version is located, it will be installed. Otherwise startup is aborted and an error message is displayed.
○ If an incomplete version number is specified, the system attempts to obtain the required number among the versions used (DefaultVersion parameter in the configuration files). If the full version number cannot be identified, the highest number of an installed version is searched for (InstalledLocation parameters in the configuration files) as well as the highest number of the version that can be installed (DistributiveLocation parameters in the configuration files). If the number of the version that is available for installation is higher than the number of the version already installed on the computer, the version with the higher number is installed.
○ After that the interactive launcher is run for the required version with the /AppAutoCheckVersion option.
4.2.5.3. /AppAutoCheckMode
This option is intended to automatically select the client application version that is required for operation.
If /AppAutoCheckMode is specified in the application command line, the procedure used is as follows:
The default operation mode for the launched infobase is determined;
The operation mode for a specific user is determined (higher priority than that of the infobase default operation mode);
If the determined operation mode does not match the client being launched, the required client of the same version is restarted. Otherwise the system proceeds with startup of the client being launched.
4.2.6. Infobase Connection Modes
Multiple ways of infobase location and connection to an infobase are available (they can be selected in the infobase creation dialog, see page 74):
An infobase is located on a local computer or on a computer in the local network.
The infobase is used by thick and thin clients in the file-mode.
When thin client operates in the file mode, a dedicated environment is arranged on the computer the thin client is running on. The following actions are carried out in the framework of this dedicated environment:
○ The back end components required for operation are loaded;
○ The application configuration is loaded;
○ Other actions required to arrange normal operation with the infobase.
At that the thin client and this dedicated environment interact via the same protocols that are used in the client/server mode or when web server is used. Thus, in respect to the thin client this environment serves as a server. While in respect to the operating system this dedicated environment is not a separate process and runs within the thin client process.
An infobase is located on the 1C:Enterprise server.
The infobase is used by thick and thin clients in the client/server mode.
An infobase is located on a web server.
The infobase is used by thin and web clients in file mode or client/server mode.
In order to connect to the infobase via a web server, the web server should be installed and configured accordingly. For details on settings of various web servers, see page 151.
When connecting to an infobase via a web server you should specify the URL as an infobase connection string, e.g. http://MyServer/DemoBase.
4.2.7. Selecting an Infobase
The next step in launching 1C:Enterprise is selecting an infobase. This is done in the 1C:Enterprise startup window.

Fig. 17. 1C:Enterprise Startup
The Infobases list contains a list of infobases. Every line in the list corresponds to a directory containing 1C:Enterprise infobase files (for file mode) or to a server and the infobase on the server (for client/server mode).
Select one infobase from this list. Left-click an infobase name to select it.
You can use the Edit, Change, or Remove buttons to manage the 1C:Enterprise infobase list (or the F2, Ins, and Del hotkeys). For the button functions, see page 73.
You can resize the window. The window position and size are saved to be used in the next session.
When all the required 1C:Enterprise startup options are specified, click the 1C:Enterprise button to run the software in the 1C:Enterprise mode or alternatively click the Designer button to run in the Designer mode. To cancel startup, click Exit.
4.2.8. User Authentication
If the selected infobase has a list of authorized users (this list can be created and edited in the 1C:Enterprise Designer), the 1C:Enterprise. Infobase access dialog is displayed.
 Fig. 18. User Authentication
Specify user name in this dialog in one of the following manners:
Click the User field and select the required name from the drop-down list;
Type the user name in the User field if the list is lengthy or if Show in List property is unchecked in the user settings (see page 98).
If the user has a password assigned, enter it in the Password field. When the username and password are specified, the launch process will continue after pressing the OK button.
To cancel startup, click Cancel.
4.2.9. Using Client Certificates
When you use public communication channels (e.g. the Internet), you need to protect against others intercepting or forging the contents of communication. We shall now review how to establish a secure connection in a 1C:Enterprise-based system.
4.2.9.1. General Information
Let’s examine a general scheme for a secure connection. It is based on the public key infrastructure (PKI) that links public keys with a particular user via an identification center.
To understand how this infrastructure works, let's look at a simple example. Imagine a world where everyone is able to verify the identification documents of any person in an agency that has issued the documents.
So one person (Passerby) in that world meets another person (Police officer) who wants to check that the person he has met is really the Passerby. To this effect, the Police officer then asks the Passerby to present his ID card. Before presenting his certificate, the Passerby would like to make sure that the person in front of him is a real Police officer. He asks the Police officer for his identity certificate, contacts the Ministry for Police Administration and checks the ID certificate number to see whether the person in front of him is who he claims to be, i.e. a Police officer. The authentication is successful, and the Passerby presents his ID card to the Police officer. The latter can see the ID card number and the agency that issued it – the Ministry for Document Issue. The Police officer contacts the Ministry and with the ID card number verifies whether the man is really the Passerby.
But if the Passerby comes to a foreign country, this algorithm will not work as the Police officer in the foreign country knows nothing about the Ministry for Document Issue. Therefore the Passerby will be detained until his identity is verified by other means.
Now let's consider this simple situation in terms of PKI and network infrastructure objects. The 1C:Enterprise client application takes the role of the Passerby. The web server, through which the client application intends to access an infobase, is the Police officer. The Certification Authorities assume the role of the Ministry for Document Issue and the Ministry for Police Administration. The certificate issued for the HTTPS connection serves as the Passerby’s ID card and the Police officer’s ID certificate.
The scheme now looks as follows: when attempting to connect to a web server, the client application verifies its certificate. The verification is executed through the Certification Authority specified in the web server certificate (if such a Certification Authority is included in the list of Root Certification Authorities on the computer where the client application is installed). In the case of successful verification, the client application presents its client certificate to the web server. The web server checks the certificate by using its own list of root Certification Authorities. If the authentication is successful, the client application and the web server establish a secure connection (HTTPS connection). In this case the client application encrypts and decrypts data by using the public key of the server, while the server encrypts and decrypts data via its private key. It is obvious that the private keys of the client application and the web server are different, and each party does not know the private key of the other.
This scheme of establishing a secure connection in general. The next section will cover it in detail.
4.2.9.2. Secure connection schemes
A secure connection can be established between a thin client or a web client and a web server used to connect to an infobase. There are a number of schemes for establishing secure connections (depending on the availability of certain certificates on both sides of the connection) that will be examined below. However, remember that any HTTPS connection is encrypted once it has been established.
|
Server |
Client |
Details |
|
Certificate+ Root- |
Certificate- Root- |
Certificates of the client and the server are not verified. Only this option is available for versions under 8.3.1. |
|
Certificate+ Root- |
Certificate- Root+ |
Only the server certificate is verified. The certificate of the client is not verified. |
|
Certificate+ Root+ |
CertificateRoot- OR Certificate- Root+ |
This scenario is not supported. |
|
Certificate+ Root+ |
Certificate+ Root- |
The server certificate is not verified, the client certificate is verified. |
|
Certificate+ Root+ |
Certificate+ Root+ |
Certificates of both parties are verified. |
The table applies the following terms:
Certificate indicates whether a relevant certificate is available (Certificate+) or unavailable (Certificate-), where the "relevant certificate" stands for:
○ a server certificate for the server
○ a client certificate for the client
Root indicates whether a list of certificates of Certification Authorities (CA) to verify a certificate presented is available (Root+) or unavailable (Root-). The list of Certification Authorities should enable verification of the certificate presented by the client application or by the web server.
For the web server, availability/unavailability of a certificate or a list of root certificates depends on whether certificates are added to the certificate store used by the web browser.
For a thin client, the certificate (and lists of root certificates) can be specified via parameters of the startup command line or parameters of the infobase startup (see page 87).
4.2.9.3. Certificate sources and formats
Certificates can be sourced by:
System certificate store, for Windows.
Network Security Services (NSS, http://www.mozilla.org/projects/security/pki/nss/), for Linux or Windows.
File certificates, for Linux or Windows.
To use certificates from NSS certificate stores, the following NSS should be installed in the NSS library system:
For Windows – nspr4.dll (or libnspr4.dll), ssl3.dll, nss3.dll and other related libraries. The directory with a compiled version of NSS and NSPR libraries should be added to the PATH environment variable. If Mozilla Firefox
is installed, add the directory of the web browser location to the PATH environment variable.
For Linux – libnspr4.so, libssl3.so, libnss3.so and other related libraries. If the NSS certificate store is selected as a source of certificates but the required NSS libraries are unavailable, the client application can only connect to a server that does not require a client certificate, and the server certificate will not be verified in this case. Nevertheless, the channel is still encrypted with server certificate keys.
If the libraries listed above are unavailable, you will not be able to establish a connection using the certificates from the NSS store.
Acceptable formats for file certificates:
PEM (base-64 encoded X.509) – encrypted keys and certificates of the X.509 standard in text format. These certificates and keys are encrypted in base-64. Private keys and certificates are password-protected. This certificate file format is used by default by the Apache web server, for instance. If the private key of any client certificate is stored in a separate file, the file contents should be added to the client certificate file.
P12/PFX (PKCS#12) – encrypted keys of the PKCS#12 standard. The file can be password-protected. This is the main format for exporting and importing certificates from system certificate stores in Windows and NSS certificate stores. The format is used, for example, by the Microsoft Internet Information Services web server. The client certificate file should include its private key.
The file format is selected based on its extension:
*.p12, *.pfx – the P12 file format,
*.pem – the PEM file format,
the PEM file format is the default setting.
4.3. SYSTEM RESTART
In some situations an infobase cannot be opened. A user gets a corresponding notification and is prompted to attempt to connect to the infobase again in 60 seconds.
These situations include:
The configuration is already open in the Designer mode (when an attempt is made to launch it in the Designer mode),
Exclusive mode is selected for the infobase,
Client application and 1C:Enterprise server versions do not match,
No 1C:Enterprise server can be found,
No database server can be found,
Connection to the infobase has been denied by the administrator.
In these situations a window is displayed to inform the user of the reason (in the screenshot below the reason is opening the infobase by the Designer) and to prompt the user to either select automatic restart in one minute or cancel startup.

Fig. 19. Waiting for Restart
A prompt to restart the Designer is also displayed after an infobase is restored and when an infobase is updated dynamically in the client/server mode.
If in the 1C:Enterprise mode a critical error occurs, restart is prompted using the same parameters of the current user.