
Lesson 3. Catalogs
Estimated duration of the lesson is 2 hours 10 minutes.
CONTENT:
- What Catalogs are
Forms of Catalogs
A "Simple" Catalog
- Configuration Object Presentation
Object Affiliation with Subsystems
Catalog Code and Description
The Command of Adding a New Item
The Navigation Panel and the Sections Panel
Creating New Catalog Items
During this lesson we will familiarize ourselves with the Catalog configuration object. You will learn what this object is used for, how it is structured, and what its main properties are.
Using practical examples, you will learn to create catalogs, and to define the primary items of their structure and populate them with data.
Additionally, you will learn more about a particular configuration object - the Form. You will learn what types of forms exist for the Catalog configuration object and the situations they are used in.
Finally, at the end of the lesson, we will discuss some theory regarding the mechanism for modifying a configuration.
What Catalogs are
The Catalog configuration object is intended to operate lists of data. Normally, every company uses lists of employees, lists of products, customers (clients), vendors (suppliers), etc. The properties and structure of these lists are defined in the configuration objects of the Catalog type. These objects are used by the platform to create database tables for storage of information contained in the catalogs.
A catalog consists of items. For example, an employee serves as an item of the employees catalog while a product is an item for the products catalog, etc. A user can add their own items into catalogs: add new employees, create a new product or enter a new client.
In a database, every single item of a catalog is an individual record in the main table that stores information from this catalog (fig. 3.1).
Normally, every catalog item will include additional information to further define that item. For example, all the items in the Products catalog may contain additional information about the manufacturer, shelf life, etc. This information set is identical for all the items in a catalog, and it is defined using the attributes of the Catalog configuration object, and are, in turn, objects of the configuration (fig. 3.2).
Since these configuration objects are relationally linked to the Catalog object, they are referred to as subordinate to this object.
A developer creates the majority of attributes manually but every Catalog configuration object has a set of default standard attributes: Code and Description, etc. (see fig. 3.2). Note that availability of standard attributes and depends on the catalog properties.
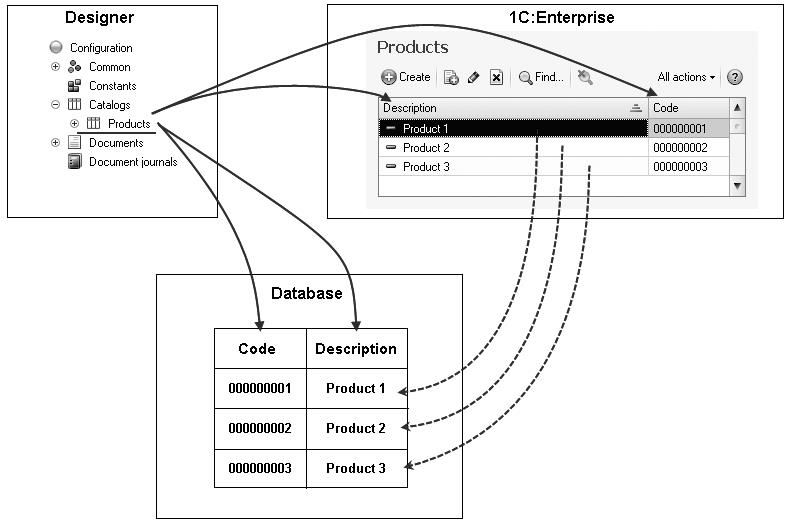
Fig. 3.1. Products catalog in the Designer mode, in the 1C: Enterprise mode, and in the database
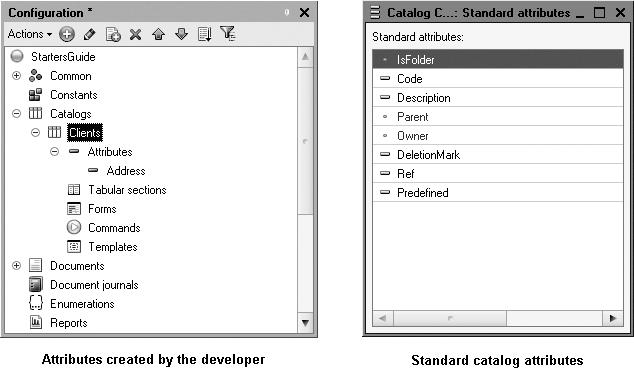
Fig. 3.2. Standard catalog attributes and developer-created attributes
For example, a hierarchical catalog will have Parent standard attribute available. If a catalog is subordinate to another configuration object, it will have Owner attribute. If you select zero for the length of standard Code attribute, the catalog will not have this attribute available. The same is true for the Description attribute. But at least one of the two attributes (either Code or Description) should be available for a catalog because otherwise the catalog will be nonsense.
So in a database a catalog is stored as a table with its rows holding list items and an individual column corresponding to every attribute (either a default one or a developer-created). Hence, the cells of this table store values of a specific attribute for a certain catalog item (fig. 3.3).
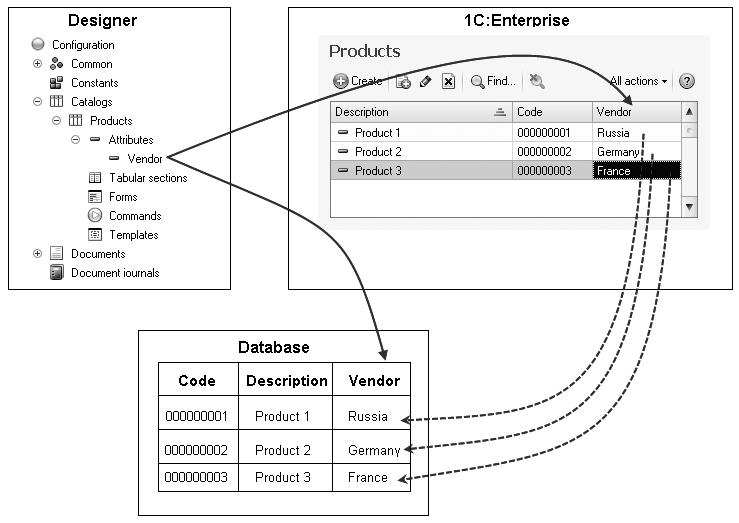
Fig. 3.3. Products catalog in the Designer mode, in the 1C: Enterprise mode, and in the database
Additionally, every catalog item can contain a certain set of information that is identical in structure, but varies in quantity. This information is intended for different catalog items.
So, for example, each item of the Employees catalog may include information about family members of the employee. For one employee, that will only be a spouse, while another family may consist of a spouse, a son, and a daughter.
To define this type of information, you may use the tabular sections of the Catalog configuration object. These sections are basically subordinate configuration objects of the catalog. In this case the database will have additional tables where tabular sections will be stored that are subordinate to a specific catalog item (fig. 3.4).
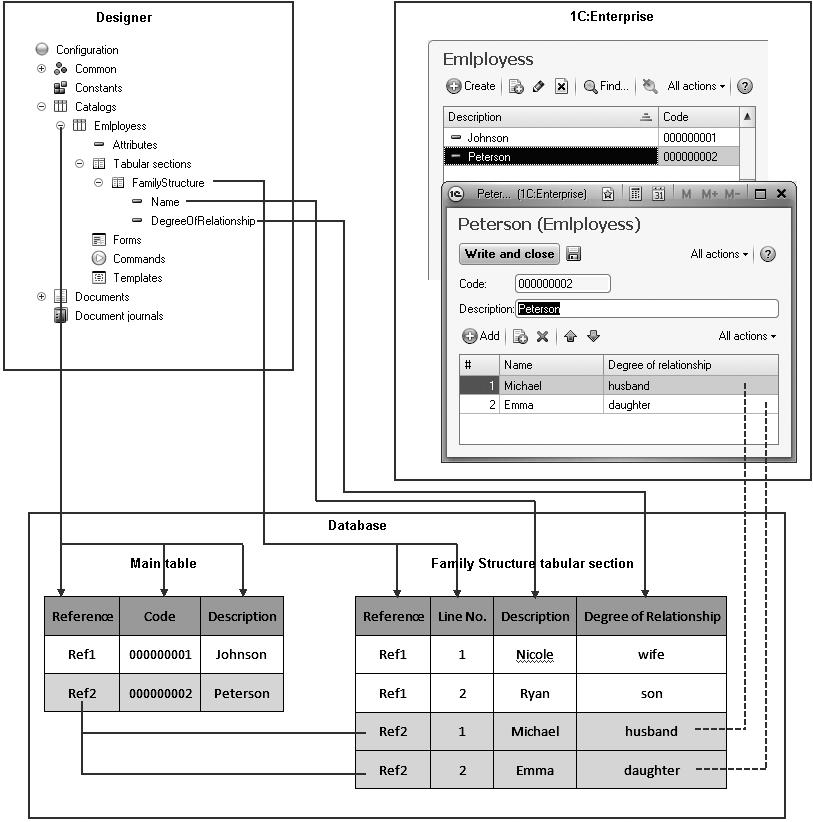
Fig. 3.4. Products catalog in the Designer mode, in the 1C: Enterprise mode, and in the database
Note that the software will hide from you the entire technical part related to data storage: multiple tables are created in the database for a catalog; these tables are connected using a unique field (Link); table fields have specific types, etc. All of these aspects are handled automatically. The only thing you have to do is add to the Catalog configuration object a subordinate Tabular section object.
For convenience, catalog items may be grouped based on some principle.
For example, in the Household Appliances catalog, the following groups can be created: Refrigerators, Televisions, Washing machines, etc. The Hierarchical property of the Catalog configuration object defines if such groups can be created in the catalog. In this case, a catalog item that is identified as a group will be the parent for all the items and groups that are included in the group. This type of hierarchy is referred to as hierarchy of folders and items (fig. 3.5).
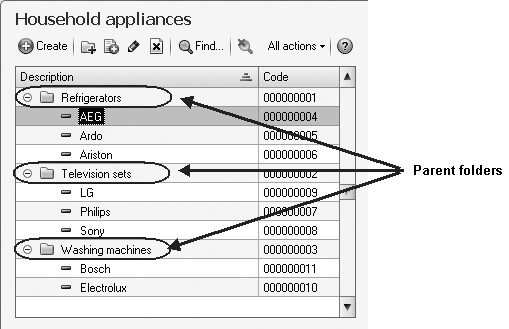
Fig. 3.5. Hierarchical catalog with hierarchy of folders and items
Another type of hierarchy that may exist is item hierarchy. In this case, the parent will not be a group of catalog items but one of the catalog items itself. For instance, this kind of hierarchy can be used in creating the catalog Departments, in which one department can be the parent for several other departments that it includes (fig. 3.6).
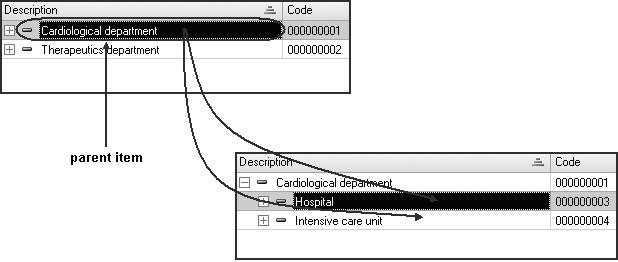
Fig. 3.6. Hierarchical catalog with hierarchy of items
Items from one catalog may be subordinate to items or folders from another catalog. For instance, the UnitsofMeasure catalog may be subordinate to the Products catalog. Then we can indicate the units of measure, in which each item of the Products catalog is received.
Within 1C: Enterprise this is accomplished by defining a list of catalog owners for every Catalog configuration object. In this case, the Products catalog will be the owner for the UnitsofMeasure catalog (fig. 3.7).
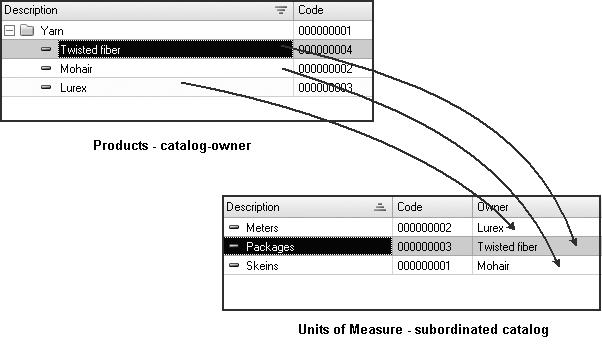
Fig. 3.7. Products Catalog - owner of the UnitsofMeasure catalog
Sometimes there are situations where a catalog will need to always have certain items, regardless of user actions. Suppose that the standard business processes in a company are such that all the products are first received at the main warehouse, and are then sent to other warehouses as required. In that case the Main warehouse must always exist in the Warehouses catalog. Otherwise the receipt of goods will not be accomplished correctly. The Catalog configuration object makes it possible to define any number of such catalog items. They are referred to as predefined catalog items (fig. 3.8).
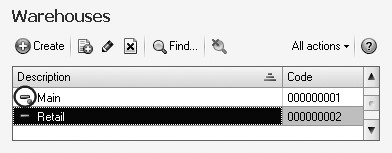
Fig. 3.8. Warehouses catalog with predefined Main item
The predefined items are different from regular items in that they are created in the Designer and the user cannot remove them. All the other actions on such items are available to the user. Renaming is possible as well. In the interface predefined catalog items are labeled with a special icon (see fig. 3.8).
Forms of Catalogs
Depending on what we want to do with a catalog, we will need to display the catalog in various views. For example, in order to select a certain catalog item, it is more convenient to view the catalog as a list, while to modify one of its items, it is better to view all of the attributes of the catalog item on a single form (fig. 3.9).
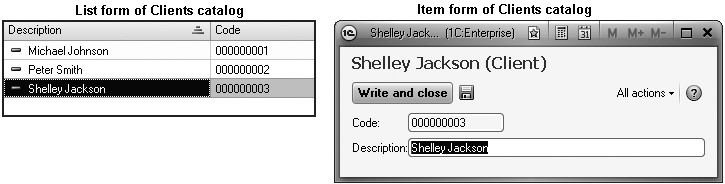
Fig. 3.9. List form and edit form of Clients catalog item
All the forms that are needed to display the data contained in a catalog can be generated automatically. At that the platform is aware what forms should be used when.
In general, no more than five forms are needed to display a catalog in various situations.
Note that in various Designer locations the same forms have slightly different names (table 3.1). The table below lists various names of the forms:
- In the catalog context menu (open the default form…), in the configuration tree, and in the catalog properties palette.
- In the form wizard.
- On the Forms tab of the catalog editor.
Table 3.1. Catalog Forms
|
In the context menu and in the properties palette (fig. 3.12) |
In the form wizard (fig. 3.11) |
On the Forms tab (fig. 3.10) |
|
Object form |
Catalog item form |
Item |
|
Folder form |
Catalog folder form |
Folder |
|
List form |
Catalog list form |
List |
|
Choice form |
Catalog choice form |
Choice |
|
Folder choice form |
Catalog folder choice form |
Folder choice |
The thing is that properties of configuration objects are displayed in the context menu and in the properties palette. They are the same for all the configuration objects. At the same time the form wizard and form tab display presentation of these properties in the view that is better understandable for a developer. So they are different for different configuration objects (fig. 3.10, 3.11, 3.12).
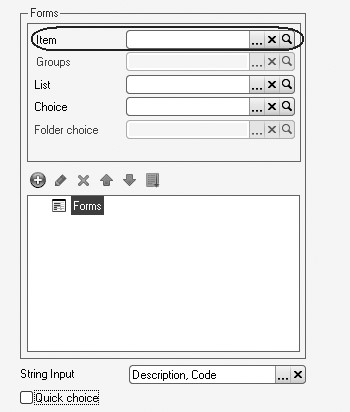
Fig. 3.10. Catalog forms names on the Forms tab

Fig. 3.11. Catalog form names in the Form Wizard
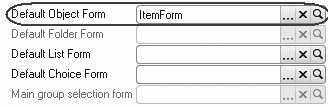
Fig. 3.12. Catalog form names in the properties palette
Item form is used to create or edit a catalog item.
Folder form is used to create or edit a catalog folder. A folder normally contains much less information than a catalog item itself. So it requires a separate form that is not the same as the item form (fig. 3.13)
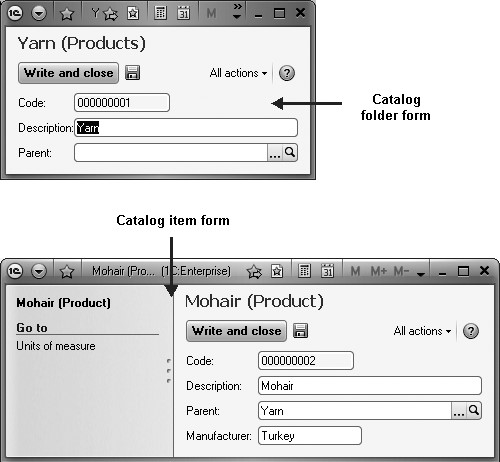
Fig. 3.13. Item form and Folder form of a catalog
List form is used to display a list of catalog items.
Choice form is used to select one of the catalog items in a field of some form. At the same time the choice form is simpler than the list form because a list form may display multiple attributes. And when you select an item (e.g. in a document), you only need to know its name. So a separate simpler form can be used for selection (fig. 3.14)
Folder selection form is used when you need to select one of the catalog folders instead of an item in a field of some form. A folder selection form is simpler than item selection form because a folder normally contains much less information than a catalog item itself.
For all the referential configuration objects (catalogs, documents, etc.) object form will be used but you need to understand that when we mention an object we refer to an infobase object, i. e. an item of the object storage. For a catalog it will be a catalog item, for a document it will be a document, for a chart of accounts Chart of Accounts it will be an account, etc.

Fig. 3.14. Choice form and List form of a catalog
Any form can be defined in the Designer. The Form exists as a subordinate configuration object in order to create these definitions (fig. 3.15).
As a rule, the Form configuration object it will be subordinate to one of the application objects, but it can also exist independently.
As it is needed, the 1C: Enterprise platform uses the definition contained in the Form configuration object to create the Form program object the user will work with.
Hence, forms serve as visual representations of data contained in the database. Forms present this data in a format that is convenient for the users and makes it possible to define functions that will assist the user in working with the displayed data.
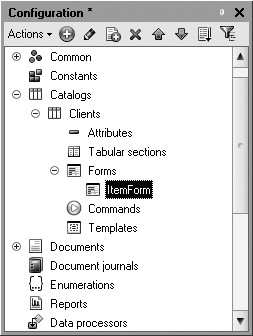
Fig. 3.15. Catalog form item in the Designer
LEARN MORE!
For details on the structure of the 1C: Enterprise script objects intended to work with the catalogs, see "Developer's Quick Reference. Catalogs" on the page 782.
A "Simple" Catalog
Now that we are somewhat familiar with the features of Catalog configuration objects, we will create a few of these objects, in order to define the catalogs that will be used in our database.
Since our company, Jack of All Trades, provides household appliance services, we will obviously need to store a certain number of information lists for the records.
First of all, we will need a list of company employees who will provide the services.
Then we will need a list of the customers the company works with.
Next we will need a list of services available from our company, and a list of materials that may be consumed.
Besides, we will also need a list of warehouses where the Jack of All Trades company will store materials.
We will start with the simplest first: the employee list and the customer list.
First we will create a catalog to store the names of our clients.
In the Designer Mode
First open our training configuration in the Designer, highlight the Catalogs branch in the configuration object tree and click Add in the configuration window command bar (fig. 3.16).
Fig. 3.16. Creating a new catalog configuration object
In the configuration object editor we will define Clients as the name for the catalog. Based on the name, the platform will automatically create the synonym Client. As a reminder, the Synonym property serves to represent the object in software interface.
Also a developer can specify additional properties that will define custom presentation of the objects. These properties are optional. If they are not defined, the synonym of the catalog configuration object is used to represent this object in the 1C: Enterprise interface. But this is not always the best option as you will further understand.
Configuration Object Presentation
An object presentation determines the object name in the singular and is used in the standard commands, for example in the commands used to create such objects - Client: New. An object presentation is required when the synonym for such an object is defined in the plural or when it describes multiple objects. So commands to open the catalog list and to create new catalog item are automatically added to the interface.
If a synonym is defined in the plural, it is absolutely suitable for the command to open the list - Clients - when you need to view all the customers. But it is not a good option for the command of creating a new catalog item - one client.
For such a command, we need a presentation in the singular - Client. Object presentation is used to describe how the command of adding a new client will be displayed in the interface. In will also be used in the title of the client form (unless extended object presentation is available) and in the presentation of the customer reference.
Extended object presentation defines the title of the object form, e.g. a form of creating a new catalog item. If this property is omitted, Object presentation property is used instead.
List presentation defines the name of a list of objects and is used in the name of standard commands, e.g. a command to open a list of objects - Clients: Open. List presentation should be specified when the synonym is defined in the singular.
For example, it is frequently needed for documents (Receipt of goods). In this case the list presentation should include a configuration object name in the plural (Receipt of goods).
Extended list presentation defines the title of the list form, for example for the catalog list form. If this property is omitted, List presentation property is used instead.
Now let us define two properties: Object presentation - Client and List presentation - Clients. The latter property could be omitted because the catalog synonym matches the List presentation property (fig. 3.17).
The list presentation seems to suggest List of clients as a name but in the application interface the lines List of employees, List of customers, List of warehouses following each other will not look good.
Object Affiliation with Subsystems
Now click Next and go to the Subsystems tab of the Catalog configuration object editor. This tab defines the subsystems where this catalog will be displayed.
In the subsystem list we see the subsystems earlier created in the process of defining the application structure. We can now suggest that the list of clients should be available in the Rendering Services section because every service is related to a specific client. Accounting records generated in the Accounting section can also be viewed by client.

So in the list we should now check the Accounting and RenderingServices subsystems (fig. 3.18).

Fig. 3.18. Defining a list of subsystems where a catalog is displayed
Now open the editor for one of the checked subsystems (for example, Accounting) and navigate to the Content tab. We will see that the objects of this subsystem now include a new catalog configuration object - Clients (fig. 3.19).
Note that the Content tab also makes it possible to modify the list of objects included in the subsystem.
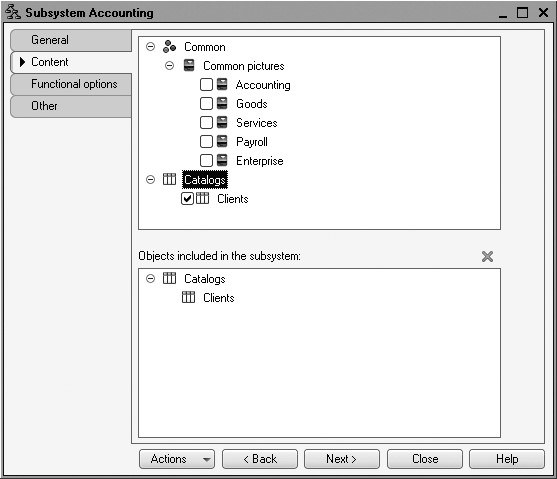
Fig. 3.19. Content of objects included in a subsystem
Catalog Code and Description
Now we will return to the Catalog configuration object editor and navigate to the Data tab.
Here what we want to look at is the length of code and description.
The code length is an important catalog property. As a rule, the catalog code is used to identify a catalog item and contains a unique value for each catalog item. The platform can check for uniqueness of the codes and provide automatic numbering for catalog items. So the code length will influence the number of items included into a catalog.
Maximum code length is 9 characters. This means that we will be able to use the codes from 1 to 999999999 which is perfectly enough for our small company named Jack of All Trades.
Now let us look at the length of the description. For us, 25 characters would clearly be too few, so we will increase the length to 50 (fig. 3.20).
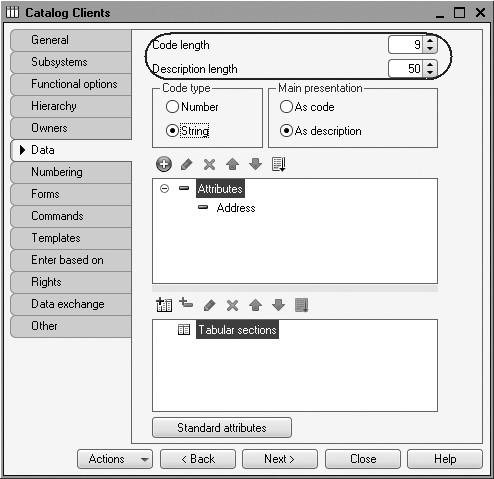
Fig. 3.20. Defining the length for catalog code and description
The Command of Adding a New Item
Before we start 1C:Enterprise up, we will configure the application interface so that it is more convenient to add new catalog items.
The thing is that there is a general standard algorithm in the 1C:Enterprise used to arrange standard commands to open lists and create new configuration objects. We will now discuss this algorithm using catalogs as an example. But it also applies to documents, chart of accounts, etc.
The command of opening a catalog list, same as the command of creating new items for the catalog are added to the interface of those sections (subsystems) where the catalog itself is displayed. But by default the command of creating new items is not visible in the application interface.
This is because you normally always need to view catalog lists. But new catalog items are created less frequently. Hence the respective command should only be enabled for those catalogs (configuration objects) where creation of new items is the major activity for the users in this specific section of the application.
Let us make the standard command to create new clients available on the action panel of the RenderingServices section.
To do so, highlight the Subsystems branch in the configuration object tree, open its context menu and select All subsystems (fig. 3.21).
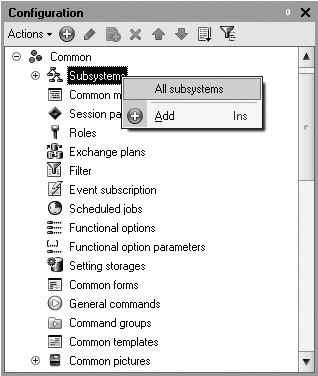
Fig. 3.21. Opening Subsystem Setup Window
In the All subsystems window that opens highlight RenderingServices in the Subsystems list on the left. The right-hand Command Interface list will display all the commands of the selected subsystem.
When a catalog is created, the folder named Navigation Panel.Normal had the command Clients added to open this list. It is enabled by default. The Action Panel.New now has the new command: Client: New that is used to create a new catalog item. This command is not visible by default.
Now let us make this command visible (fig. 3.22).
For the Accounting subsystem no commands need to be added to the action panel because it does not make sense for work in the application.
In this case we assume that most everyday operations with clients are executed by the accounts manager responsible for rendering of services. These operations include creation of new clients in the database when needed. And the accounting department simply processes the data in the database to obtain regulated reports.
This is why the command of creating a new client is added to the Rendering Services subsystem where the manager operates in while the accounting will not have the command visible because we do not expect accountants to add new clients.
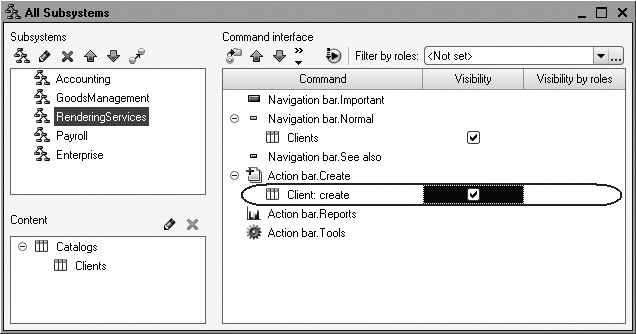
Fig. 3.22. Subsystem Setup Window
But an accountant still has this opportunity: a new client can be created via the list of clients (by opening the client list and adding a new one). Availability of the command to create a new item without using the item lists only depends on convenience reasons, not on the user rights limitations. This is why here we provide this convenient feature to the manager instead of the accountant.
Now close the Clients catalog editor and start 1C:Enterprise in the debugging mode. Confirm your intention to update the configuration in the prompt displayed by the Designer. You will see the automatically generated window listing the changes in the configuration structure. In this case we have added the Clients catalog.
Click Accept (fig. 3.23).
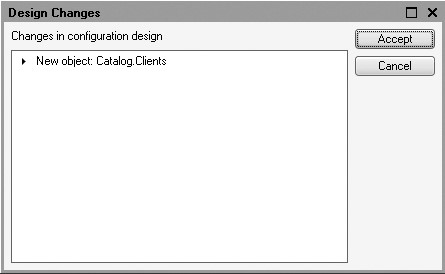
Fig. 3.23. List of modifications in the configuration structure
In the 1C:Enterprise Mode
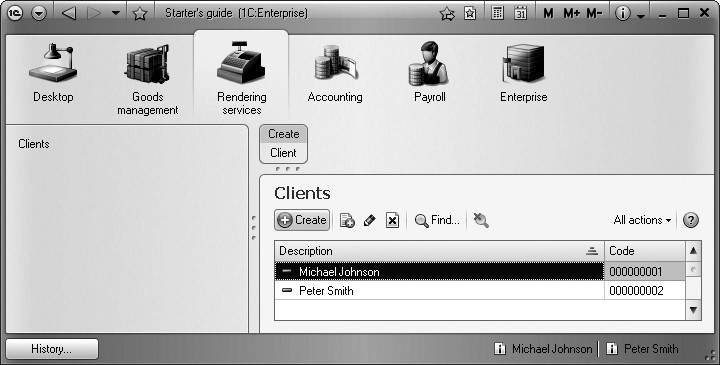
The Navigation Panel and the Sections Panel
The software window will be opened in the 1C:Enterprise mode. You see that if we now navigate to Rendering Services or Accounting section, navigation panel will be displayed in the left vertical pane of the window (fig. 3.24).
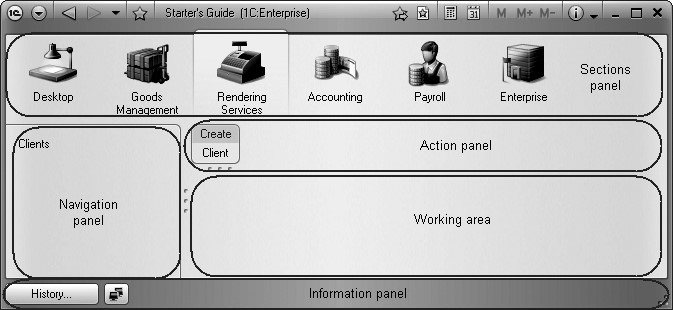
The navigation panel demonstrates the structure of the selected section. Normally, navigation panel is intended to quickly navigate to various lists within the selected software section.
Now it contains the command to open our first list - Clients. Note that the name of the Clients command is defined by the List presentation property that we have defined for this catalog. If this property is not defined, the synonym value of the Catalog configuration object is used to present the list.
Also we see action panel appear in the Rendering Services section (see fig. 3.24). Action panel includes the commands corresponding to the current section selected in the sections panel. These commands are divided into the following default groups: New, Reports, Tools, and developer-created groups. The New group contains commands used to create new infobase objects, such as documents and catalog items.
Currently the action panel of the Rendering Services section has the group to create items of our first catalog Clients in the New group. This is the command we have made visible for the interface of this section. Now we will use this command to create new items for the catalog without opening the list of clients.
Note that the name of the default command to create a new item is defined by the Object presentation property that we have defined for this catalog. If we had omitted the property, the name of the command would have used the synonym of the Catalog configuration object: Clients - Clients. This is both inconvenient because it fully matches the command used to open the list and not exactly correct because when we create a new item for the catalog, we only create a single new client.
Note that the Accounting section does not have any action panel because for this subsystem we have not toggled on visibility of the command to create new items from the New command group. Besides, there are no other visible commands from the Reports or Tools groups. So if there are no commands in a group, the entire group will not be visible. And if no groups are visible, the action panel itself is not visible.
Creating New Catalog Items
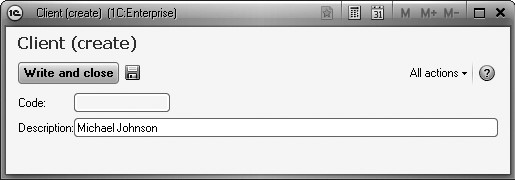
For now our catalog is empty so we will add some items here. To do so, use the Client command from the action panel of the Rendering Services section.
We will have a form opened to create a catalog item - the default object form (fig. 3.25).
Let us use Michael Johnson as the name for the new client. We will not enter any code because it is generated automatically.
Click Save and Close.
A message will be displayed in the lower right corner informing you of the item that has been created or modified.
Besides, clicking a link in the information panel (in the bottom of the application window) will open this item. The panel (see fig. 3.24) automatically displays the information about the last system actions. It provides you an additional freedom of not using the list to make sure the required item has been recorded.
Now let us add yet another client named Peters Smith.
The last client named Shelley Jackson we will add using the form of the client list.
To do so, use the Clients command from the navigation panel of the Rendering Services section. The default form of the list will be opened in the application work area, to the right of the navigation panel (fig. 3.26).
To add a new item to the catalog, use the New button in the command bar of the form or press Insert.
Click New.
Note that the Name field is marked by red dotted line when a new client is added. This means that by default fill check is applied to this field. If you leave this field empty and attempt to save the client, an error message will be displayed (fig. 3.27).
This happens because fill check is automatically applied to some standard object attributes, e.g. a catalog name (if main presentation of the catalog uses its description).
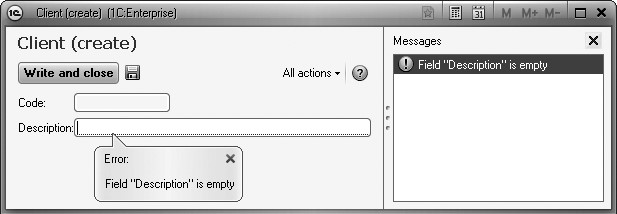
Fig. 3.27. The error message upon new catalog item entry
Now let us enter Shelley Jackson as the client name.
After we add items, the catalog will look as follows (fig. 3.28).
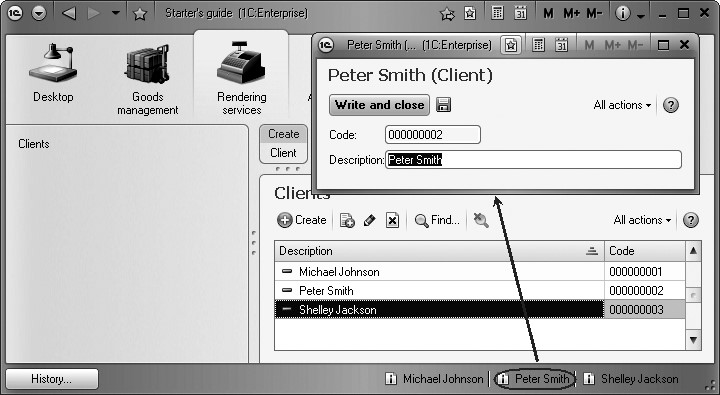
To open an existing catalog item for editing, double-click it. Clicking the link in the information panel enables us to open one of the last modified catalog items for editing as well (see fig. 3.28).
Theory. Fill Check for Standard Attributes
Now close 1C:Enterprise and return to the Designer mode.
To view the content and the properties of the standard catalog attributes, click Standard Attributes on the Data tab of the catalog configuration object Clients.
Highlight the Name attribute in the list, open its context menu and select Properties (fig. 3.29).
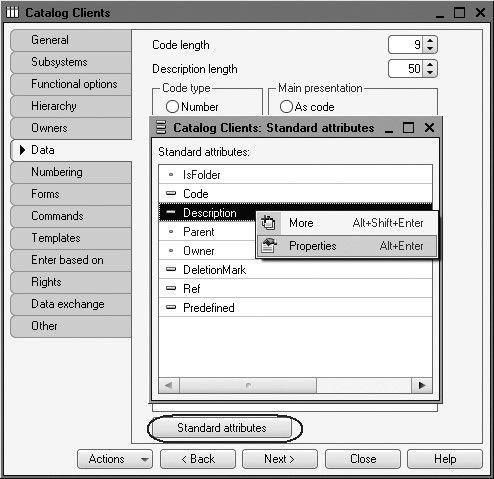
Fig. 3.29. Content of catalog standard attributes
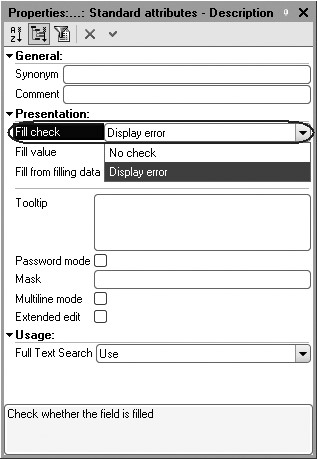
Fig. 3.30. Properties palette of the Description standard attribute
The properties palette of the Description standard attribute displays that by default the Fill check property has the value Display error (fig. 3.30).
This means that if the Description attribute is left blank, an error message will be displayed (see fig. 3.27).
A Catalog with a Tabular Section
Now we can proceed to creating the second catalog that will be used in our configuration - Employees.
This catalog will be somewhat more complex than the Clients catalog. This time we will store not only an employee's last name, first name and middle initial, but will include information on his past employment.
This information will be uniform in structure (organization, start and end dates, and job title), but the number of previous jobs will be different for each employee. Therefore, we will use a tabular catalog component to store this kind of information.
In the Designer Mode
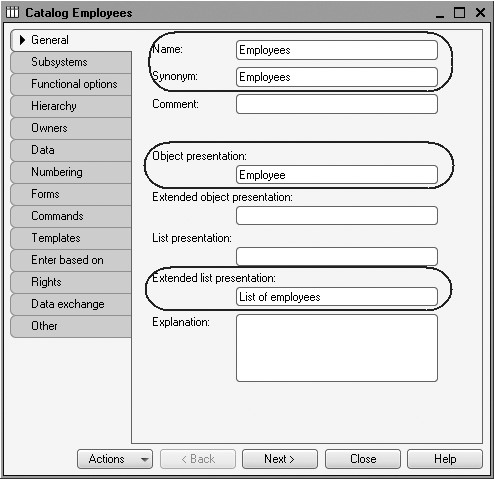
Let us add a new Catalog configuration object. We will name it Employees.
Based on the name the synonym will be populated automatically.
Define Employee for Object presentation.
We will not enter any List presentation while the Extended list presentation will be Employee list (fig. 3.31).
Click Next and navigate to the Subsystems tab.
The logics of our configuration suggest that the list of employees should be available in the sections Rendering Services and Payroll. True, when a service is provided we need to specify the employee in charge. This information will be used to calculate the wages for every employee.
So in the list of subsystems we should check Rendering Services and Payroll (fig. 3.32).
Switch to the Data tab. Leave the default values for the code length and type unchanged and enter 50 characters for the catalog description length.
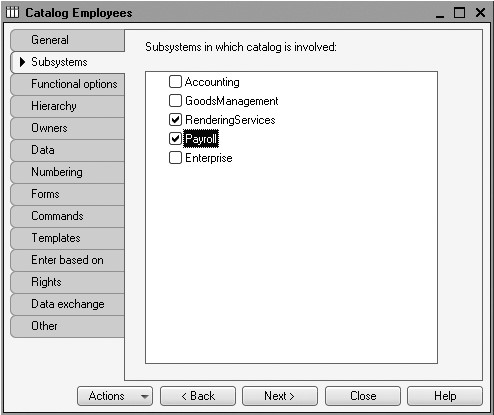
Fig. 3.32. Defining a list of subsystems where a catalog is displayed
The Tabular Section
Our goal is to create a catalog with a tabular section. So we will add a new tabular section to this catalog named PastEmployment.
To do so, click Add tabular section over the list of tabular sections of the catalog (fig. 3.33).
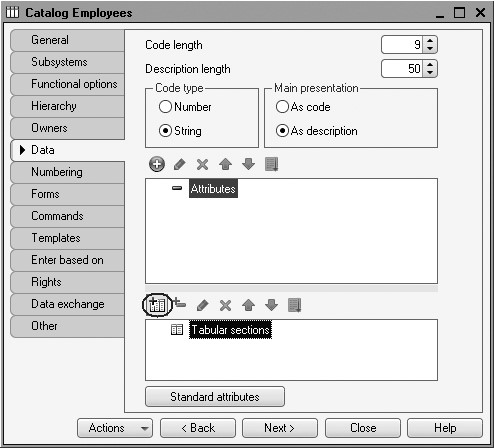
Fig. 3.33. Adding new tabular section to a catalog
Enter the name for the tabular section: PastEmployment (fig. 3.34).

Fig. 3.34. Adding new tabular section to a catalog
Let us now create the attributes for the PastEmployment tabular section.
To do so, click Add attribute over the list of tabular sections of the catalog (fig. 3.35):
We will add the attributes below:
Organization - type String, length 100;
StartDate - type Date, date format - Date;
EndDate - type Date, date format - Date;
JobTitle - type String, length 100.
For the StartDate and EndDate attributes we selected the Date date format (fig. 3.36) because in 1C:Enterprise 8 the Date data type values contain both date and time. In this case, the time of day when the jobs started and ended are not important.
Finally, we will edit the command interface so that it is more convenient to add new catalog items. Let us make the standard command to create new employees available on the action panel of the Payroll subsystem.

Fig. 3.35. Adding a new attribute to tabular section of a catalog
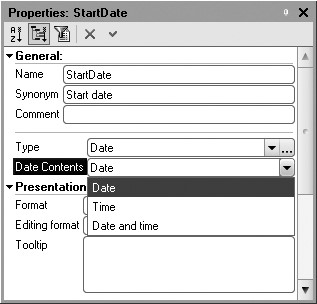
Fig. 3.36. Attribute properties for catalog tabular section
To do so, highlight the Subsystems branch in the configuration object tree, open its context menu and select All subsystems.
In the window that opens highlight Payroll in the Subsystems list on the left.
The right-hand Command Interface list will display all the commands of the selected subsystem.
In the Action panel.New enable visibility for the command Employee: New.
We also see that the folder named Navigation Panel.Normal had the command Employees added to open this list. It is enabled by default (fig. 3.37).

For the RenderingServices subsystem we will not add any commands to the action panel because it is unlikely that we will need to add new employees to the list when in this section.
Not we have completed the procedure of creating the Employees catalog.
Now close the Employees catalog editor and start 1C:Enterprise in the debugging mode.
Confirm your intention to update the configuration in the prompt displayed by the Designer. You will see the automatically generated window listing the changes in the configuration structure.
In this case we have added the Employees catalog. Click Accept (fig. 3.38).
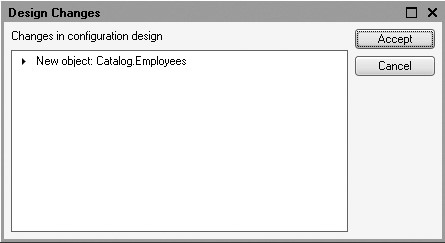
Fig. 3.38. List of modifications in the configuration structure
In the 1C:Enterprise Mode
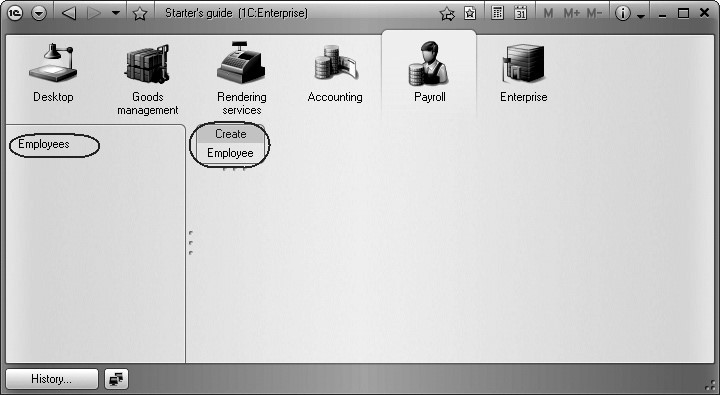
In the 1C:Enterprise window that opens we will see that the Employees command is now available on the navigation panel of the sections Rendering Services and Payroll. This command opens the list of employees (fig. 3.39).
The name of the command is determined by the object synonym because for this catalog we have not defined any List presentation.
Also the action panel of the Payroll now has the Employee command to create new employees (see fig. 3.39). The name of the command is determined by the Object presentation property we have defined for this catalog.
Now we will use this command to create new items for the catalog without opening the list of employees.
Filling in the Tabular Section
Use the Employee command.
We will have a form opened to create a catalog item - the default object form. The title of the form is defined by the Object presentation property.
This form includes a tabular section with the attributes defined for the catalog in the Designer.
Now let us create the employees as follows (fig. 3.40, 3.41, 3.42):
- Alexander D. Johnson.
- Past employment:
- Company - NTI Company,
- Start date - 2/1/2000,
- End date - 4/16/2003,
- Job title - Senior Technician.
- John A. Walkman.
- Past employment 1:
- Company - Global Automation Solutions, LLC,
- Start date - 22/01/1996,
- End date -12/31/2002,
- Job Title - Engineer;
- Past employment 1:
- Company - QDA Telecommunications Group,
- Start date - 20/06/1986,
- End date - 21/01/1995,
- Job title - Production manager;
- Michelle V. Turner:
- Past employment:
- Company - Wilson and Beane Construction,
- Start date - 2/6/2001,
- End date - 4/3/2004,
- Job title - master builder.
Rows of the catalog tabular section can be added using the Add button (fig. 3.40). They can be arranged randomly using Up and Down buttons in the command bar of the tabular section (fig. 3.41).
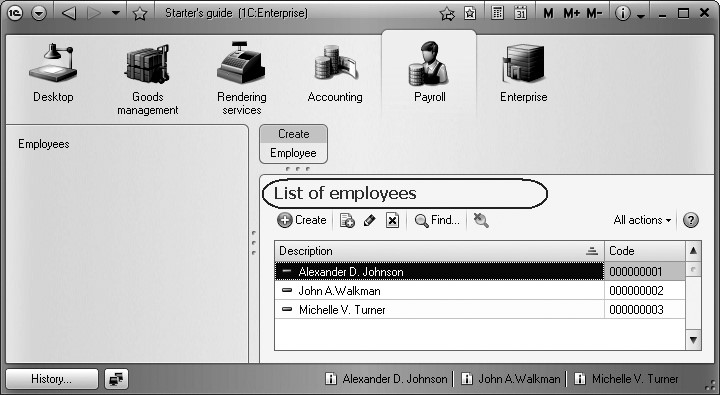
To view the list of the added employees, use Employees command from the navigation panel of the Payroll section.
The default form of the list will be opened in the application work area, to the right of the navigation panel.

Fig. 3.40. Filling in Employees catalog item
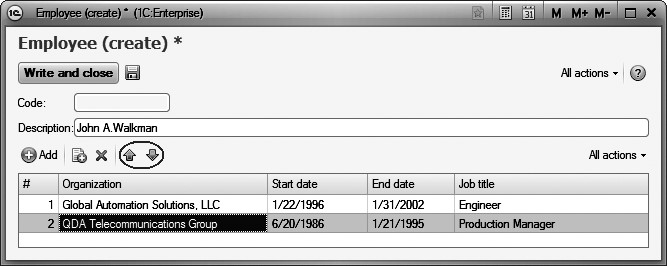
Fig. 3.41. Filling in Employees catalog item
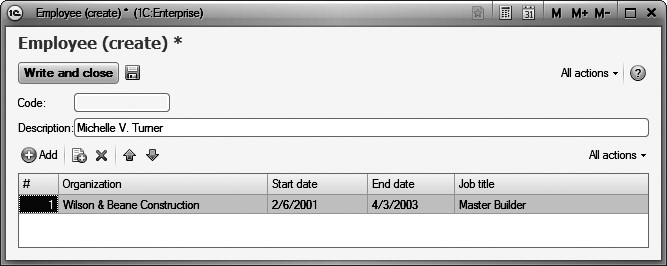
Fig. 3.42. Filling in Employees catalog item
Note that the title of the form is determined by the Extended list presentation property that we have defined for this catalog (fig. 3.43).
Now we can proceed to creating the next catalog - Goods.
A Hierarchical Catalog
The Products catalog will contain information about services that the Jack of All Trades provides, and the resources that may be used in doing so.
This catalog will not be complex. Its only distinctive feature will be its hierarchical structure. To make the catalog user-friendly, we will join services into one group and resources into another.
Additionally, since Jack of All Trades provides a wide range of services, they will also be broken down logically into several groups. The same is true for resources.
In the Designer Mode
Let us create a new Catalog configuration object and name it Products. Based on the name the synonym will be populated automatically.
Since Products is not used in the singular, no other properties to define object presentation in the application interface need to be defined. Instead of the Object presentation and List presentation the object Synonym will be used - Products.
Switch to the Subsystems tab.
The logics of our configuration suggest that the list of products should be available in the sections Goods Management, Rendering Services and Accounting. True, this catalog is directly related to the first two sections and the list of materials and services may frequently be needed for analysis in accounting.
So we will check these subsystems in the list (fig. 3.44).
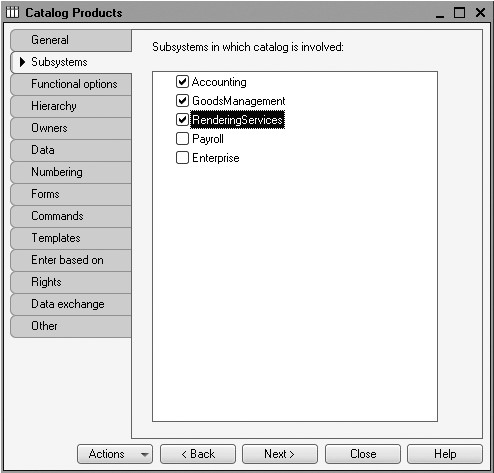
Fig. 3.44. Defining a list of subsystems where a catalog is displayed
Our job is to create a hierarchical catalog. So we will navigate to the Hierarchy tab and check Hierarchical Catalog (fig. 3.45).
On the Data tab leave the default values for the code length and type unchanged and enter 100 characters for the catalog description length.
Before we start 1C:Enterprise up, we will configure the application interface so that it is more convenient to add new catalog items. Let us make the standard command to create new items of the products list available on the action panel of the GoodsManagement and RenderingServices sections.
To do so, highlight the Subsystems branch in the configuration object tree, open its context menu and select All subsystems.
In the window that opens highlight GoodsManagement in the Subsystems list on the left.

Fig. 3.45. Checking the hierarchical catalog property
The right-hand Command Interface list will display all the commands of the selected subsystem.
In the Action panel.New enable visibility for the command Product: New.
We also see that the folder named Navigation Panel.Normal had the command Products added to open this list. It is enabled by default (fig. 3.46).
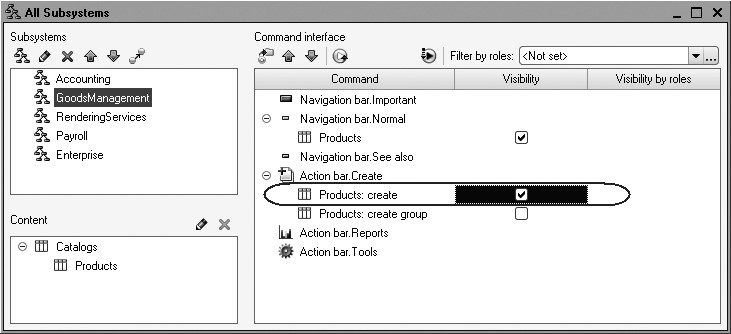
Fig. 3.46. Subsystem Setup Window
Highlight RenderingServices in the list of subsystems and follow the same steps.
And for the Accounting subsystem we will not add any commands to the action panel because it is unlikely that we will need to update the products list when in this section.
NOTE
You can also open and customize command interface fragment for a specific subsystem from the editor of this subsystem by clicking Command Interface button.
Now we will populate the Products catalog. As we fill in the catalog, we will demonstrate how to create groups and move items from one group to another.
Now close the Products catalog editor and start 1C:Enterprise in the debugging mode.
Confirm your intention to update the configuration in the prompt displayed by the Designer. You will see the automatically generated window listing the changes in the configuration structure. In this case we have added the Products catalog.
Click Accept (fig. 3.47).

Fig. 3.47. List of modifications in the configuration structure
In the 1C:Enterprise Mode
In the 1C:Enterprise window that opens we see that the navigation panels of the Goods Management, Rendering Services, and Accounting now have the Products command (see fig. 3.48).
The name of the command is determined by the object synonym because for this catalog we have not defined any other presentations.
Now select Products command in the navigation panel of the Goods Management section.
The default form of the list will be opened in the application work area, to the right of the navigation panel.
Creating Items in a Hierarchical Catalog
We will create two groups in the catalog root: Materials and Services.
To do so, click Add New Group in the command bar of the list form (fig. 3.48).
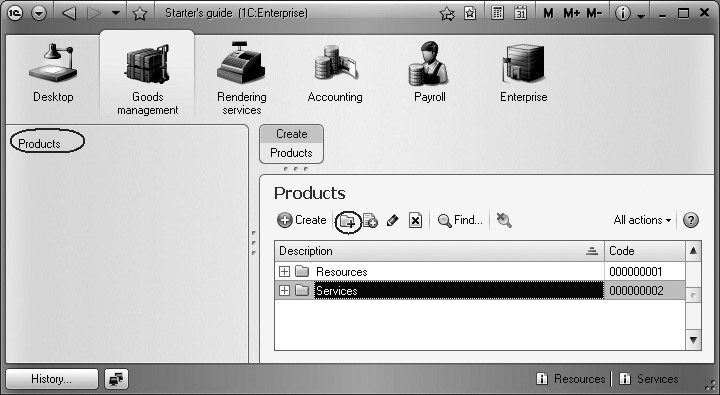
Fig. 3.48. Creating groups in the Products catalog
We will enter names for the groups: Resources, Services. We will not fill in the Parent and Code fields.
Now expand the Resources group by clicking + and create five items in this group:
- Line Transformer, Samsung;
- Line Transformer, GoldStar;
- Transistor, Philips 2N2369;
- Tubing, rubber;
- Electrical conductor.
To add an item to an opened group of a catalog, click New in the command bar of the catalog list form.
We will have a form opened to create a catalog item - the default object form. Note that if a new item is added from a list form into some opened group, this group will be used as a parent automatically.
In this case the group Resources is the parent (fig. 3.49).
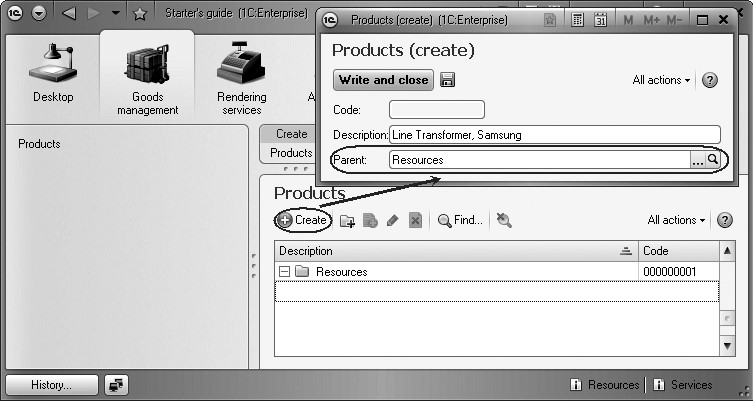
Fig. 3.49. Creating items in the Resources group
To create a new catalog item, you can also use the Product command that is now available in the action panel of the Goods Management and Rendering Services sections (see fig. 3.48).
In this situation if an item is added using the command of the action panel, it is not connected to the products list in any way. So the software is not aware what group the item should be added to and you will need to specify a parent manually (fig. 3.50).
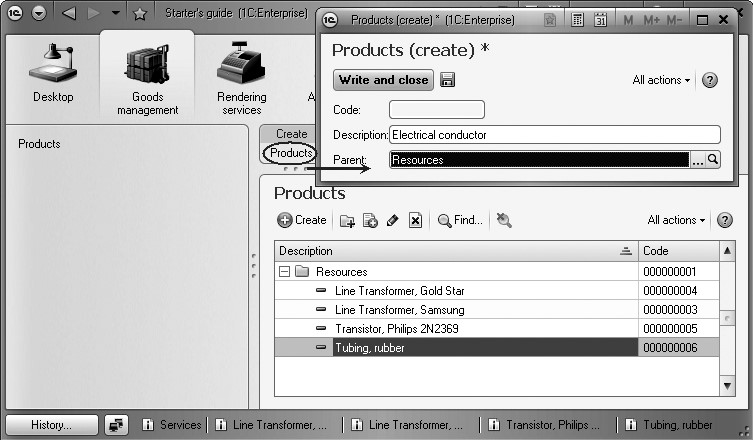
Fig. 3.50. Creating items in the Resources group
You do not need to open the products list when you create new materials and services. The fact that an item is added to the catalog is confirmed by a message in the bottom corner of the application.
Now we will expand the Services group and also create some items in this group that will be services of TV sets repair (fig. 3.51).
- Diagnostics;
- Domestic television repair;
- Imported television repair.
Also services related to washing machine installation:
- Water hookup;
- Electrical hookup.
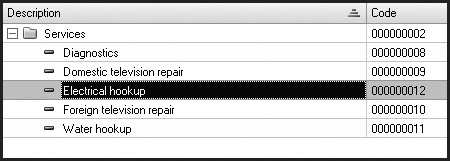
Fig. 3.51. Creating items in the Services group
Moving Items to Other Groups
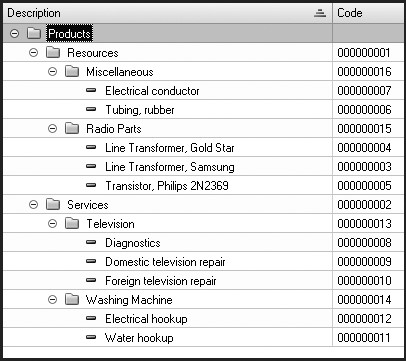
Now we will divide services into two logical groups: television repair and washing machine installation services.
To do so, we will create two more groups in the Services group: Televisions
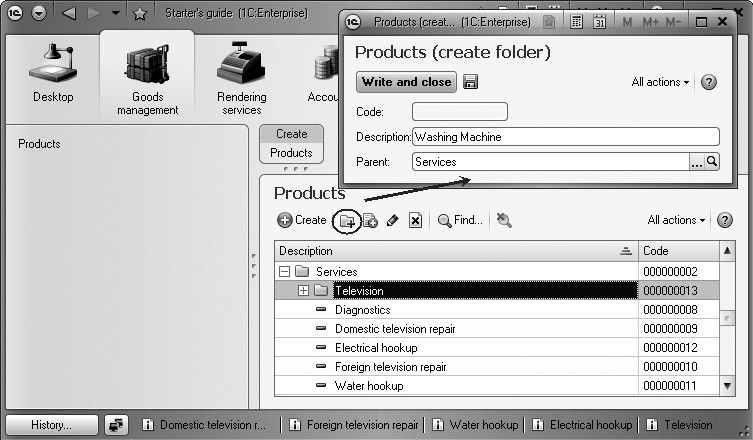
Fig. 3.52. Creating new groups in the Services group
To move the services to their corresponding groups, in the list window put the cursor on the service you want to move, and use All Actions 4 Move to group. In the window that opens select a new group.
You can highlight multiple items in the list (to do so, press and hold Ctrl and left-click them) and move them all at once.
Or you can drag and drop a highlighted catalog item to a required group.
You can also open a highlighted catalog item for editing and change the Parent field (fig. 3.53).
We will now move the services named Diagnostics, Domestic television repair, and Imported television repair to the Televisions group.
Move the services Water hookup and Electrical hookup to the Washing Machines group.
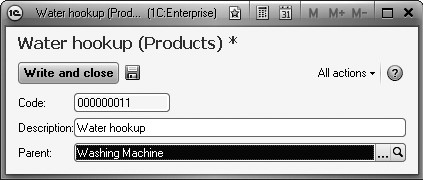
Fig. 3.53. Moving catalog item to another group
Now create two groups in the Resources group: Radio Parts and
Miscellaneous.
Put Electrical conductor and Tubing, rubber into the Miscellaneous group.
The rest of the materials go into the Radio Parts group.
If we now switch to tree view of the list (All Actions - View Mode - Tree), we will see the products list presented as a tree as follows (fig. 3.54):
A Catalog with Predefined Items
Finally, we will create the Warehouses catalog, which will contain the information on warehouse used by Jack of All Trades.
This catalog will contain one predefined item, the Main warehouse where all the materials will be delivered to.
Our goal is to create a catalog with predefined items.
In the Designer Mode
First we will open the Designer and create a new Catalog configuration object named Warehouses. Based on the name the synonym will be populated automatically.
Enter Warehouse for Object presentation. Instead of the List presentation property object Synonym will be used - Warehouses (fig. 3.55).
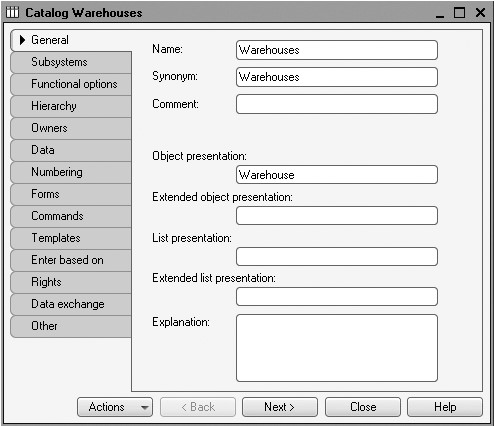
Fig. 3.55. Defining major catalog properties

Fig. 3.56. Defining a list of subsystems where a catalog is displayed
Switch to the Subsystems tab.
The logics of our configuration suggest that the list of warehouses should be available in the sections Rendering Services and Goods Management since deliveries of materials and rendering of services are normally recorded for warehouses. So we will check these subsystems in the list (fig. 3.56).
The Quick Choice Property
We will now fill in another catalog property Warehouses - Quick Choice. To do so, switch to the Forms tab and check the appropriate box (fig. 3.57).
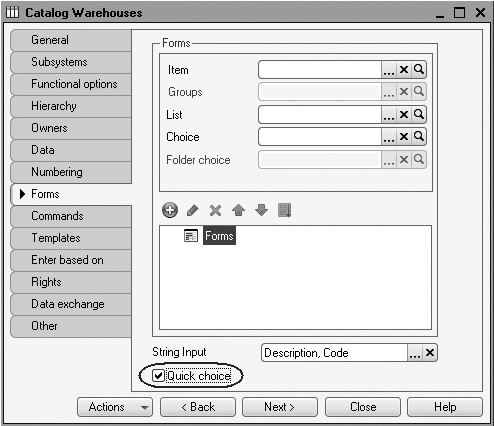
Fig. 3.57. Checking Quick Choice property
The thing is that by default when we click selection button  in the field with a catalog item, the default form is opened for selection of a catalog item. It may not always be convenient, especially when
the catalog is not hierarchical and is known to include only a small number of
items.
in the field with a catalog item, the default form is opened for selection of a catalog item. It may not always be convenient, especially when
the catalog is not hierarchical and is known to include only a small number of
items.
Quick Choice property is exactly intended to select items from a small dropdown list filled with items of this catalog instead of using a dedicated form (fig. 3.58).

Fig. 3.58. Warehouse selection from a drop-down list
This option is the most convenient one for the list of warehouses because there will likely be a small number of warehouses.
For the other catalogs we have not defined the Quick Choice property. This is because Products is a hierarchical catalog and quick selection does not make sense for this catalog. At the same time the list of employees and in particular the list of customers may be very large so a drop-down list will not be very convenient to scroll down.
Predefined Items
On the Other tab, we will click the Predefined button.
The list of predefined catalog items will be opened.
At this point the list is empty, so we will click Add and create a predefined item named Main (fig. 3.59).
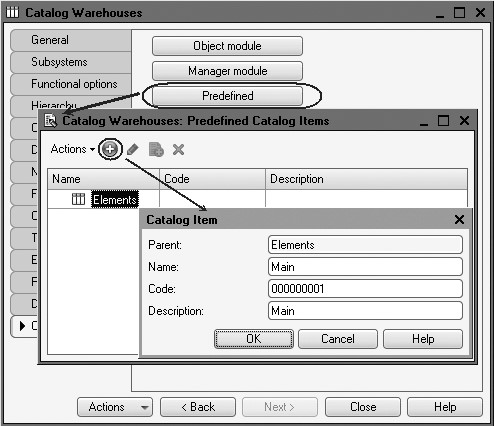
Fig. 3.59. Filling a predefined catalog item
Note that in addition to the description we will specify a name for the predefined catalog item.
In the future when we use the 1C:Enterprise script we will be able to refer to this catalog item using the name that we assigned to it in the Designer. The thing is that the description of a predefined catalog item can be edited by a user while the name is not visible to the user so it cannot be modified.
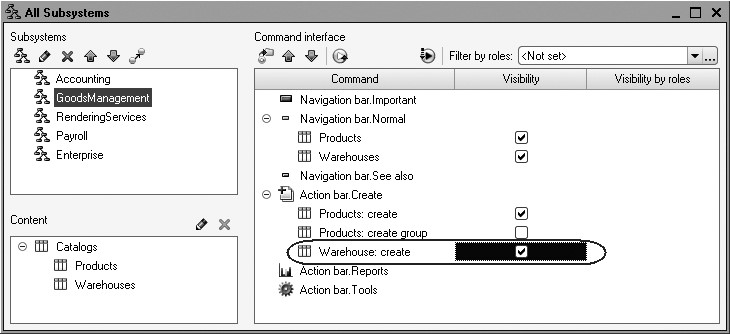
Before we start 1C:Enterprise up, we will configure the application interface so that it is more convenient to add new catalog items. Let us make the standard command to create new warehouses available on the action panel of the GoodsManagement section.
To do so, highlight the Subsystems branch in the configuration object tree, open its context menu and select All subsystems.
In the window that opens highlight GoodsManagement in the Subsystems list on the left.
The right-hand Command Interface list will display all the commands of the selected subsystem.
In the Action panel.New enable visibility for the command Warehouse: New.
We also see that the folder named Navigation Panel.Normal had the command Warehouses added to open this list. It is enabled by default (fig. 3.60).
Now close the Warehouses catalog editor and start 1C:Enterprise in the debugging mode.
Confirm your intention to update the configuration in the prompt displayed by the Designer. You will see the automatically generated window listing the changes in the configuration structure. In this case we have added the Warehouses catalog.
Click Accept (fig. 3.61).
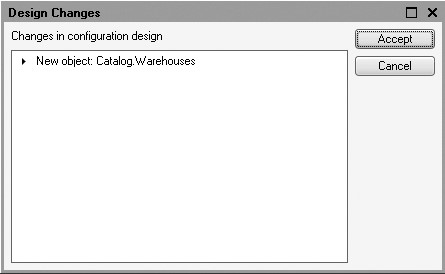
Fig. 3.61. List of modifications in the configuration structure
In the 1C:Enterprise Mode
In the 1C:Enterprise window that opens we see that the action panel of the Goods Management section now has the Warehouse command to create new warehouses.
The name of the command is determined by the Object presentation property we have defined for this catalog (fig. 3.62).
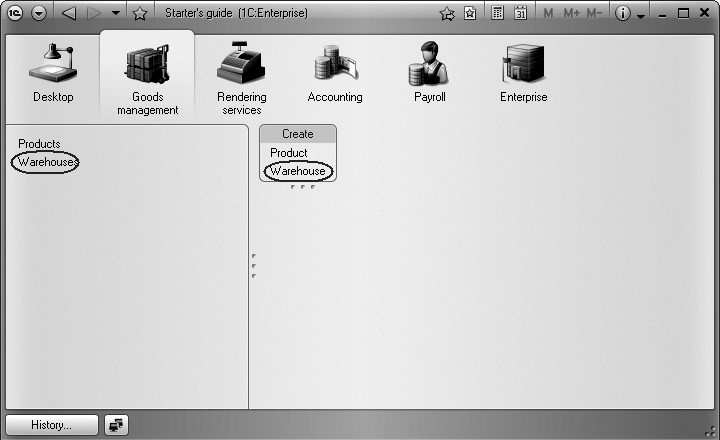
Fig. 3.62. The Goods Management section
Also the navigation panels of the Rendering Services and Goods Management sections now have the Warehouses command to open the list of warehouses.
The name of the command is determined by the object synonym because for this catalog we have not defined any List presentation (see fig. 3.62).
Now select Warehouses command in the navigation panel of the Goods Management section.
The default form of the list will be opened in the application work area, to the right of the navigation panel.
The list of warehouses already has one item named Main. This is a predefined item we have created in the Designer.
Using the Warehouse command in the action panel we will add another warehouse to the catalog. This warehouse will be named Retail (fig. 3.63).
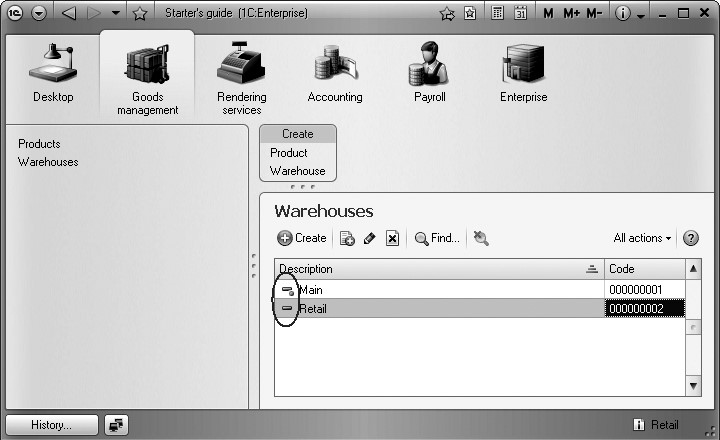
Fig. 3.63. Items of the Warehouses catalog
With that we will wrap up our preliminary work of creating catalogs, and will discuss some theory to address the predefined items and the prompts that you will see on the screen when launching and continuing with the debugging.
Theory
Predefined Items
Note that the system uses different icons for normal and predefined catalog items.
In spite of the fact that you can modify the code or description for both items, only regular catalog items can be marked for deletion (or deleted). If you attempt to mark a predefined item for deletion, a warning will be displayed (fig. 3.64).
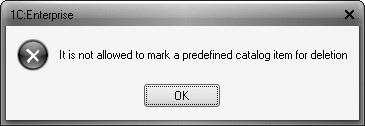
Fig. 3.64. Error message upon deletion of a predefined catalog item
So we can identify the two distinctive features of predefined items:
- Configuration functions may depended on predefined items (since they can be addressed by their identifiers from within the 1C:Enterprise script), and
- Predefined items are database objects that cannot be deleted in the 1C:Enterprise mode.
This demonstrates the main difference between regular and predefined catalog items, from the configuration's perspective.
Regular items are "temporary" as far as the configuration is concerned. A user can make them come and go. Therefore, the configuration may be able to draw distinctions between them, but cannot use them to perform any functions due to their "temporary" nature.
In contrast, predefined items are "permanent." They stay put in spite of user actions, and cannot disappear. Therefore, the configuration can be confident that they will be there and can rely on them when executing various functions. This is why each predefined items has a unique identifier, so that they can be referenced from within the 1C:Enterprise script.
The Base Configuration and Database Configuration
Up to this point we have not dug deeply into the structure of the 1C:Enterprise 8, but this is a good point for a few words on the subject.
Remember that from the user's perspective, the 1C program consists of the platform and the configuration. We have already mentioned that at any given moment we will use one of many possible configurations. But at this point we need to say this is not exactly true.
Why is it not true? Because every infobase has a minimum of two configurations.
Why it is not exactly true? Because in practice a user will always work with only one configuration. Another configuration is intended for developers or for those who will modify the configuration (for example, database administrators). It is not visible to the user.
The configuration intended for the developer is referred to as the Base configuration (or simply the Configuration). This is the one we have edited in the Designer.
The configuration that users operate with is referred to as the Database Configuration.
Base configuration can be edited. Database configuration cannot be edited. Updates to the database configuration can only be made based on the source configuration.
But you may naturally ask the question: if we have two configurations with one that can be edited and another one that users operate, why is it that the configuration being edited is referred to as the source configuration? From the end-user's perspective, the source one is the one they work with.
But the point is that the name "base" is given from the developer's perspective and makes great practical sense.
In general, the 1C:Enterprise infobase can store more than two configurations: the base configuration, the database configuration, and multiple vendor configurations.
Besides, a repository may exist outside of an infobase. It stores a configuration that is intended for shared applications.
A specific number of configuration files may exist outside of the infobase as well, including newly delivered files (fig. 3.65).
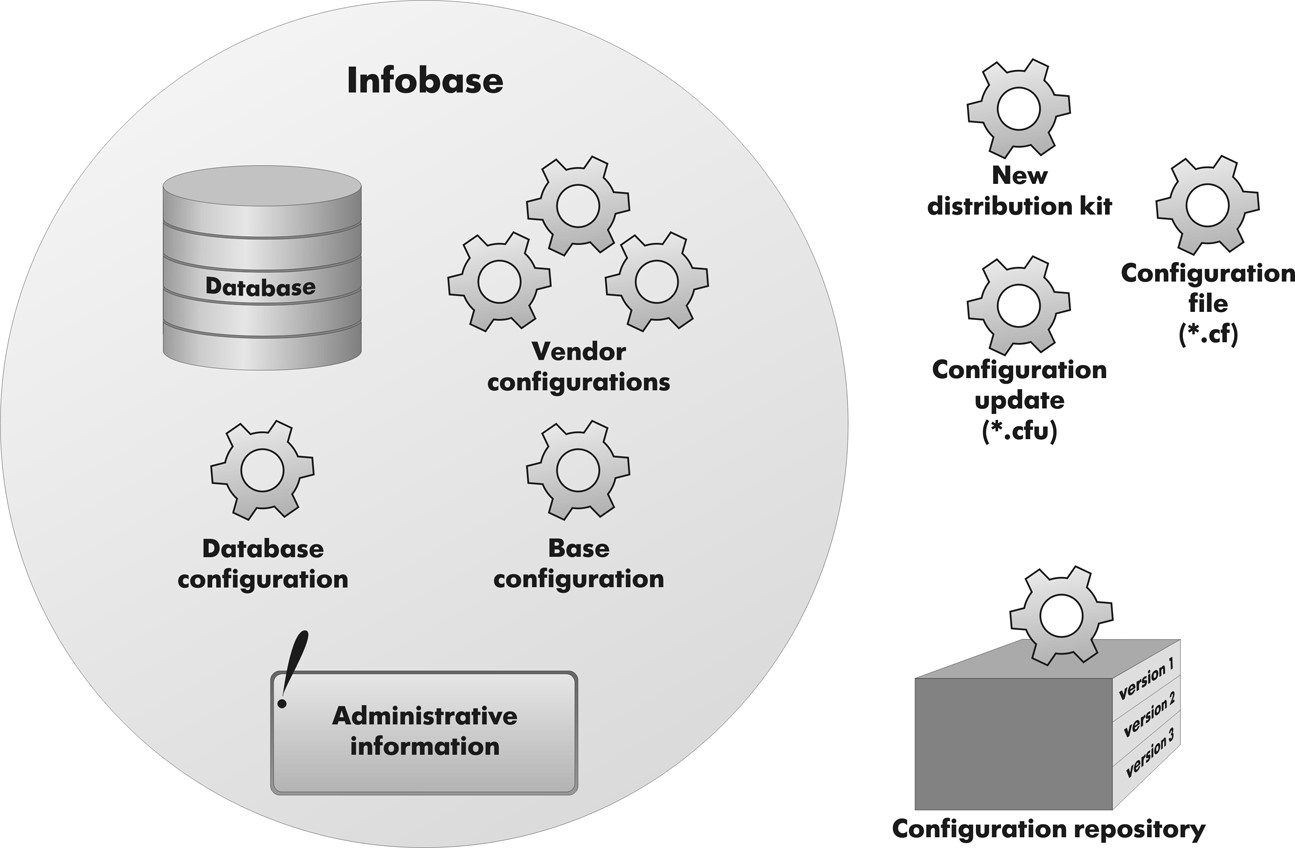
Fig. 3.65. Configuration structure
A vendor configuration within an infobase tracks the prior states of distributions. There are also times when the configuration simultaneously draws on multiple vendors, each of which supports only its own part in the form of a separate configuration. In this case, the infobase will contain multiple vendor configurations (the prior state of distributions for each of the individual vendors).
New distribution files may exist in the form of configuration files (full distribution) or update files (update distribution).
The configuration repository contains a configuration for shared applications. This configuration is stored in the form of discrete objects arranged by configuration version, rather than as a complete configuration. This allows us to get any version of a configuration from the repository by "assembling" the version we want from the individual objects.
Now imagine that there is a way to make comparisons and updates between all these configuration types. In this case, it is easy for things to get into a muddle, so the name Base Configuration is the best way to reflect the overall goal of these changes.
Now that we are back to the source configuration and database configuration, note that internal division into two configurations makes it possible to make modifications without any user work interruptions. This is possible because all the modifications are introduced into the source configuration that users do not work with.
Then, when the developer is confident that all the modifications are correct, they can use the source configuration to quickly update the database configuration.
If such modifications do not affect the database structure (e.g., tables do not need to be modified, only code of a specific module is changed), database configuration can be updated without interrupting user work. This process is referred to as the dynamic update.
Users will only see the changes after they restart their application. The DatabaseConfigurationChangedDynamically() 1C:Enterprise script method allows to use software tools to define if the application should be restarted.
But if such modifications affect database structure (e.g. a catalog has a new attribute or an existing attribute has a new type), all the user sessions should be terminated.
The developer can compare the source configuration and the database configuration at any time, and can roll-back to the original version of the source configuration by pulling from the database configuration (if, for example, the introduced changes are a total mess).
So, the relationship between the two configurations can be depicted as follows (fig. 3.66):
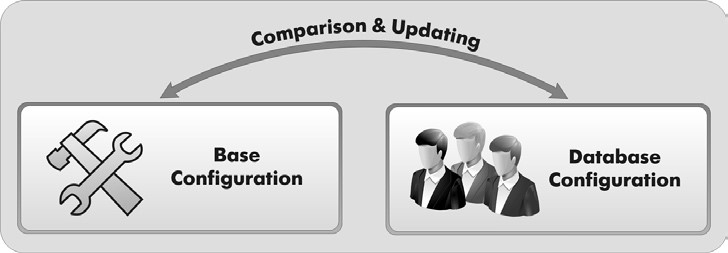
Fig. 3.66. Relationship between two configurations
When the developer is working in the source configuration, the system will always provide them an indication of whether or not the working version of the source configuration is different from the saved version, and whether the saved version of the source configuration is different from the database version.
If the developer is editing the source configuration and the edited version of the source configuration differs from the one that is saved, an asterisk (*) will be displayed in the title of the configuration tree window, indicating that the configuration has been modified (fig. 3.67).

Fig. 3.67. Configuration Tree Window title
If the saved version of the source configuration is different from the database configuration, an exclamation mark (<!>) will be displayed in the title of the configuration tree window (fig. 3.68).

Fig. 3.68. Configuration Tree Window title
To save the source configuration, select Configuration4Save Configuration and to update a database configuration use Configuration4Refresh Database Configuration.
When executing the Debugging4Start Debugging, the system will first save the source configuration and then compare it to the database configuration. If the configurations are different, the developer will be prompted to update the database configuration as you saw in the preceding examples.
When executing the Debugging4Continue command, after the actions described above, the system will also prompt you to restart the application in order to terminate the current debugging session.
This is how the software attempts to make things simpler for a developer and automate the most frequent actions.
It is important to note that at the moment the database configuration is updated, the system creates (modifies) within the database those data structures that we defined as configuration objects.
In this manner the user adds regular catalog items to the database structure created automatically based on the Catalog configuration object.
Predefined items of the catalog are added to the structure automatically based on the same description of that structure, that is an object of the Catalog configuration.
This results in an important fact (discussed in the previous section): if a configuration is "indifferent" to regular catalog items, predefined items are important to it since functions of a configuration may be connected to them.
Quiz
- What are the uses of the Catalog configuration object?
- What are the distinctive characteristics of catalogs?
- How do I use the attributes and tabular sections of a catalog?
- What is the purpose of hierarchical catalogs and meaning of parents?
- What is the purpose of subordinate catalogs and meaning of owners?
- What are the default forms of catalogs?
- What are predefined items?
- What is the difference between regular catalog items and predefined items from the configuration's perspective?
- How can users tell the difference between regular catalog items and predefined items?
- How does one create a Catalog configuration object and define its structure?
- How does one add new items to a catalog?
- How does one create a new catalog group?
- How does one move items from one catalog group to another?
- What are the uses of the source configuration and database configuration?
- How does one modify the database configuration?
- What is the relationship between configuration objects and database objects?
- What is a subordinate configuration object?
- What is the purpose of catalog attributes fill check?
- What is Quick Choice and when should one use it?
- How does one display a catalog and define a presentation for the catalog in various sections of the application interface?
- How does one display the commands to create new catalog items in the interface of subsystems?
- How does one edit command interface of subsystems?