
NOTE: This page has been translated automatically from Russian to English. Original page.
1C + Apache + SSL: why you should use SSL (visual demonstration)
Consider the Apache install on WindowsXP and publication database file version on a Web server.
It should be noted that when working with a web server is not recommended to use the file, and the server version of the work of 1C: Enterprise, as a bunch of web server + database file causes significant degradation of performance if the number of remote users, even by 3 people.
What you will need:
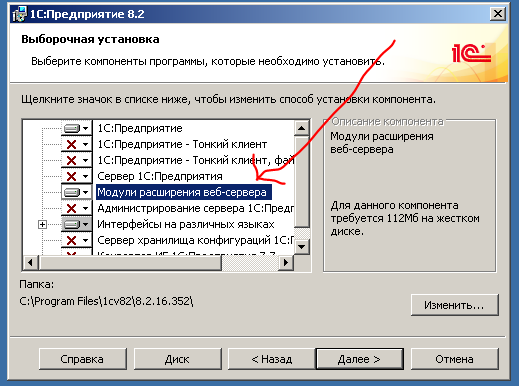
- Computer 1 ( "Server"). On it is installed Platform 8.2 (the installation platform be sure to select "expand the Web server plug-ins") and web server. On port 443 must be accessible to the server (or any other).
- Computer2 ( "Customer"). Must "see" Computer1 network. On it is installed thin client or just a browser.
- Apache 2.2 distribution with embedded the OpenSSL ( http://httpd.apache.org/download.cgi ) - Including the Win32 the Binary 0.9.8t the OpenSSL (the MSI Installer).
Installing Apache for Windows
- Download the Apache 2.2 distribution with embedded the OpenSSL ( http://httpd.apache.org/download.cgi ) - Including the Win32 the Binary 0.9.8t the OpenSSL (the MSI Installer).
- Run (need admin rights), next, agree to the license agreement, next.
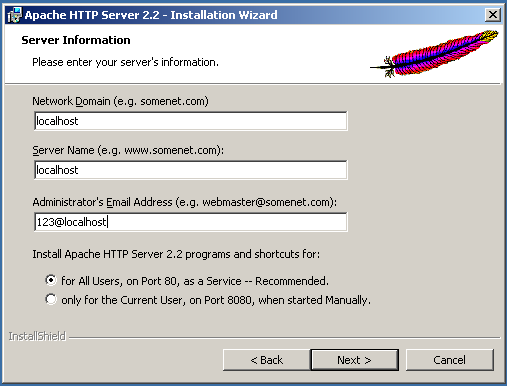
- Fill in the network domain, server name, administrator's e-mail. We prescribe anything, such as the localhost, 123 @ localhost
- Choose Typical installation. Next. Next. Install.
- Wait until established. Finish
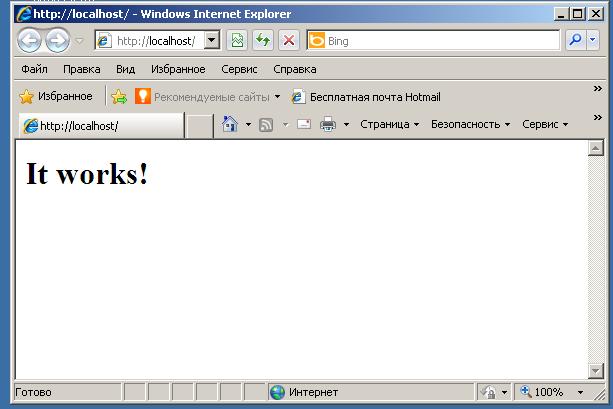
- Check the Apache performance. Go http: // localhost / from your local computer and http: // [ip address of the computer] on the other. «It Works!» Should appear.
1C Publishing databases on the Web server.
Everything is simple.
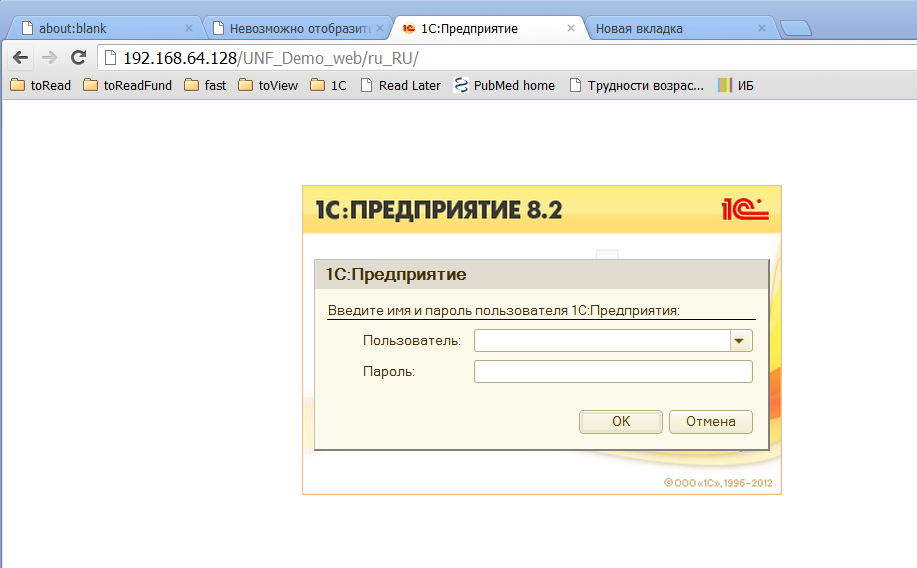
Administrative Tools -> Publish to the Web server.
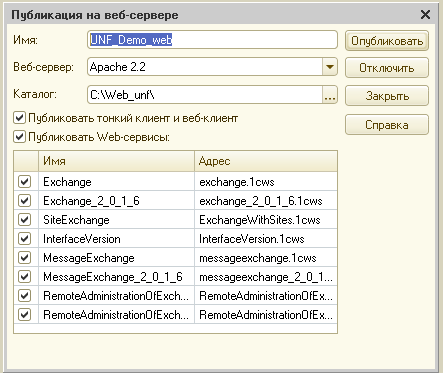
Name - something that will be in the address bar. For example, mysite.ru/UNF_Demo_web
Product - any folder. There will be a small configuration file. The shorter the path to it, and the smaller the gaps in it, so it is sometimes less bugs in Apache.
Click "Publish", a couple of times we agree to restart the web server.
All! The publication is made, start the browser on the client, go to the address [myhost] / [Name].
This is usually all and end. However, since access is by http, through unprotected channel, transmitted information, including passwords may not be accessible to third parties.
We will not be unfounded, we shall see.
Retrieve your password
Using any sniffer, you can track the request to the server where the client sends some data, as soon as the user enters a login and password, and click OK.
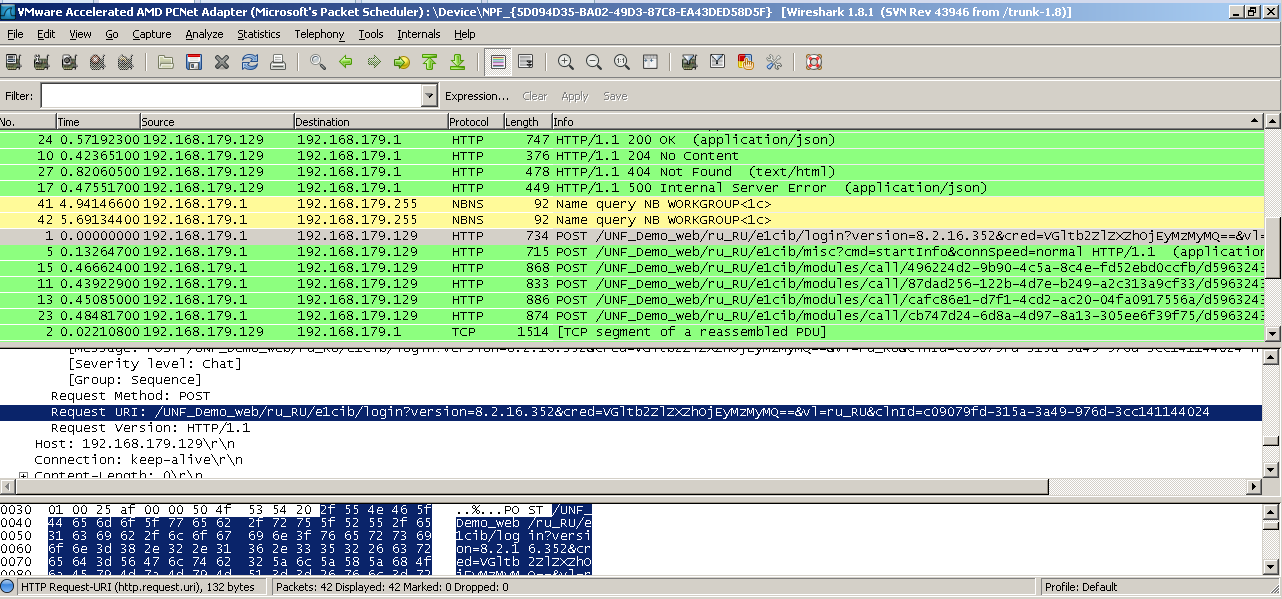
It is obvious that the password is hidden somewhere in the credential option ( "Certificate»): cred = VGltb2ZlZXZhOjEyMzMyMQ == - others do not fit within the meaning of. However, an explicit password, we're not seeing. So maybe some of the password protection is still used?
Let us study the login page under the debugger. On line 147 of file loader.js observe:
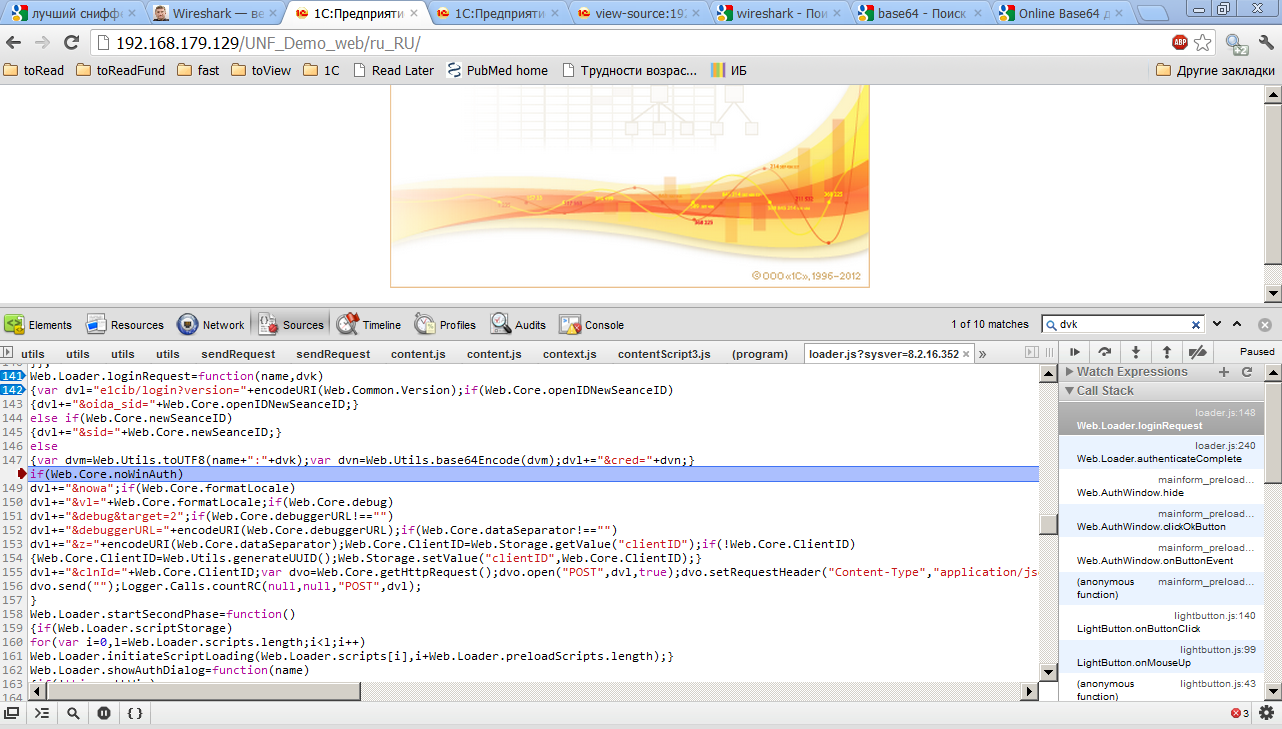
Variables: name (containing the user name - timofeeva), dvk (contains the password in cleartext - 123321).
Dvm = name + ":" + dvk // Now dvm = "timofeeva: 123321"
Then dvm applied base64encode function and the result of (string «VGltb2ZlZXZhOjEyMzMyMQ ==» is stored in dvn As such, data and authorization are transferred to the server BASE64 -.. Is a method of encoding information when all the characters "narrowed" to print only, not English. It is difficult to restore this line, for example, in 1C. the company has a global context method Base64Znachenie (), and there are many online services.
We use one of them, and get timofeeva: 123321, ie username and password separated by a colon.
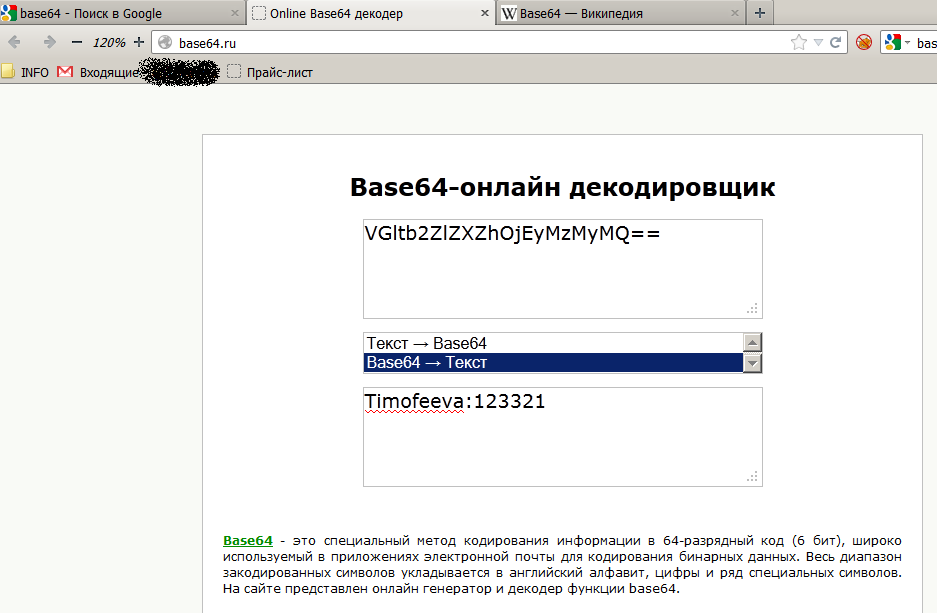
Thus, we found that data encryption is not used for authorization, and of any pest, having the opportunity to listen to the traffic, can easily learn the username and password.
Therefore, we proceed to the next step and include wider support SSL.
Enable SSL support for Apache
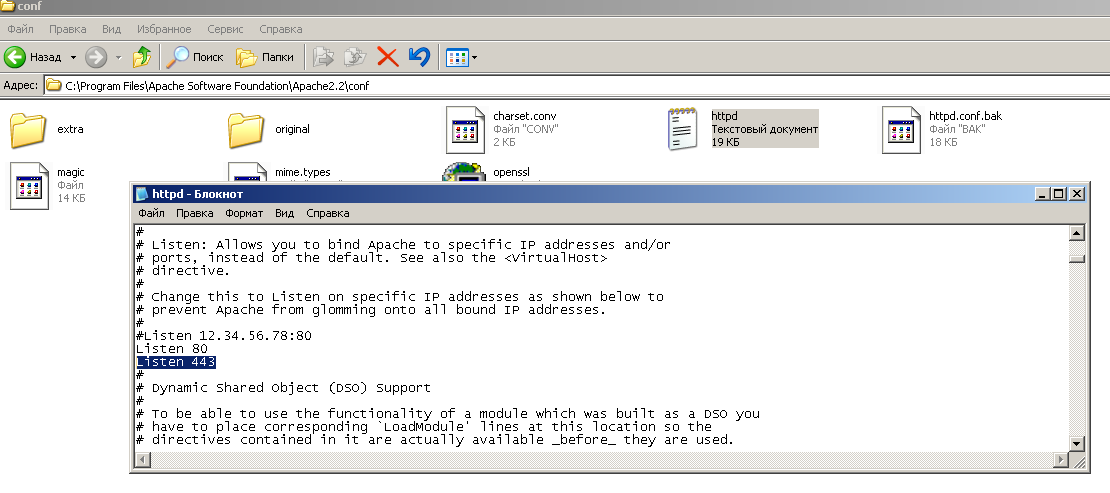
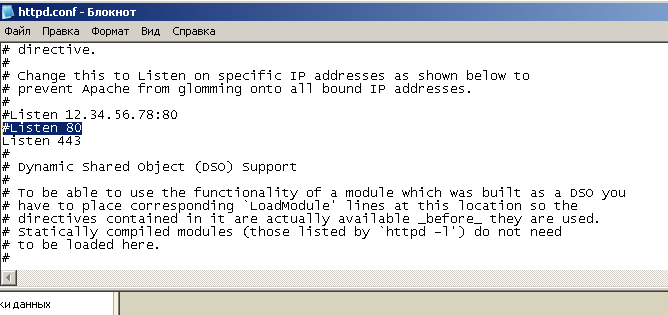
Open the httpd.conf file in the folder C: \ Program Files \ Apache Software Foundation \ Apache2.2 \ conf. Find the line Listen 80 under it appends Listen 443 (the standard https port)
Copy files and ssleay32.dll libeay32.dll from C: \ Program Files \ Apache Software Foundation \ Apache2.2 \ bin to C: \ WINDOWS \ system32.
Copy openssl.cnf file from C: \ Program Files \ Apache Software Foundation \ Apache2.2 \ conf in C: \ Program Files \ Apache Software Foundation \ Apache2.2 \ bin.
Create keys. Because we create them yourself and do not sign a certification authority, when you first visit the page browsers will scold and warn bezopasnosti.Dlya this:
At the command prompt, go to the bin folder of apache:
cd "C: \ Program Files \ Apache Software Foundation \ Apache2.2 \ bin"
execute the command
openssl req -config openssl.cnf -new -out my- server.csr We answer your questions, you can fill in the fields, in principle, anything - most importantly do not forget your password (pass phrase).
perform
openssl rsa -in privkey.pem -out my-server.key
Here you will need the password you specified in the preceding paragraph.
perform
openssl x509 -in my-server.csr -out my-server.cert -req -signkey my-server.key -days 5999
Where the last option - the expiry of the validity period of the certificate.
perform
openssl x509 -in my-server.cert -out my-server.der.crt -outform DER
Ssl Create a folder in C: \ Program Files \ Apache Software Foundation \ Apache2.2 \ conf files and move my-server.key and my-server.cert from C: \ Program Files \ Apache Software Foundation \ Apache2.2 \ bin in C: \ Program Files \ Apache Software Foundation \ Apache2.2 \ conf \ ssl.
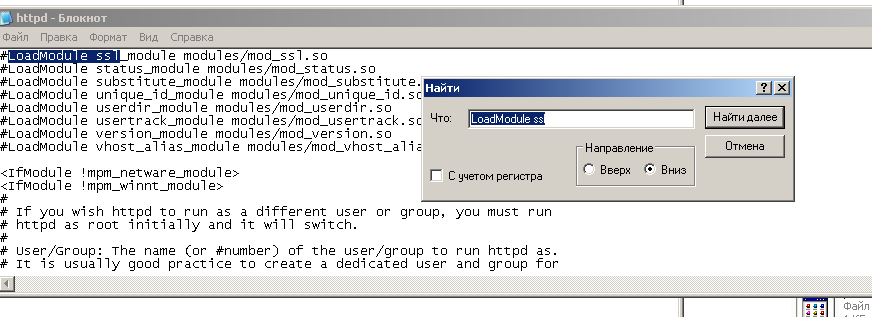
In httpd.conf, look for the line
#LoadModule Ssl_module modules / mod_ssl.so
and uncomment it (remove the pound sign).
Go to the end of the httpd.conf, there are string

SSLRandomSeed startup builtin
SSLRandomSeed connect builtin
Remove them.
Instead, insert the following

SSLRandomSeed startup builtin
SSLRandomSeed connect builtin
SSLMutex default
SSLSessionCache none
SSLEngine On
SSLCertificateFile conf / ssl / my-server.cert
SSLCertificateKeyFile conf / ssl / my-server.key
Pay attention to the last block with a string containing localhost: 443
Instead, it is necessary to enter localhost actual address of your server, and for which treatment will go. For example, mysite.ru:443
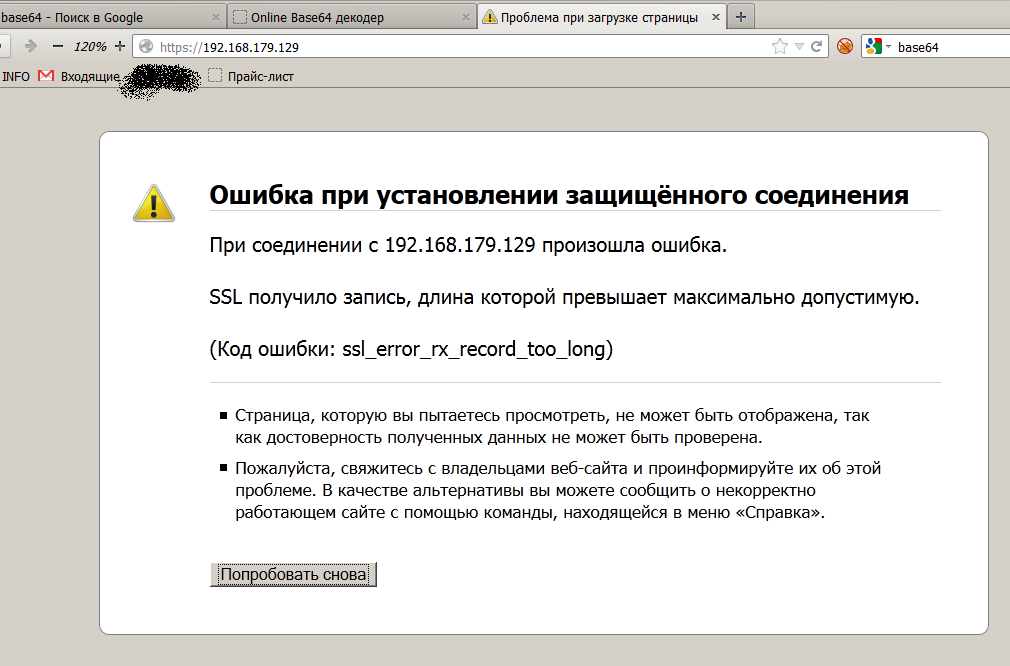
If you do not, the customer will see a strange error message (in firefox - "SSL received a record whose length exceeds the maximum allowed."). And an even greater oddity he would add that in different browsers will have different messages.
Write the changes and close the httpd.conf
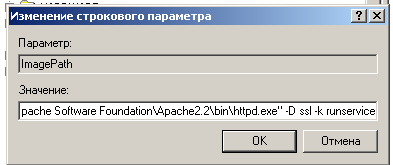
Start the Registry Editor (Start-Run - regedit), go to the branch HKEY_LOCAL_MACHINE \ SYSTEM \ CurrentControlSet \ Services \ Apache2.2.
We find the parameter ImagePath, and add value to its key -D ssl. Those. should be able to "C: \ Program Files \ Apache Software Foundation \ Apache2.2 \ bin \ httpd.exe" -D ssl -k runservice.
All is ready. Restart apache. Open Apache Monitor from the notification area and click restart. If everything is fine, then the log will be printed Apache service has restarted.
If something is wrong, and apache does not start, you can see the details (such as the line number with the error in the httpd.conf) in the event log (Control Panel- Administrative Tools - Event Viewer - branch of "application".)
We verify our work
Go to the server, for me it https://192.168.179.129/UNF_Demo_web .
Because we have generated a certificate for yourself, you need to confirm the security exception. We agree with all the requests, and finally runs the 1C: Enterprise.
Everything works, and on the ssl channel. We fellows? NO.
correct defects
As is known, the system security is the least secure of her element.
Uberёm letter s in the address bar. Any user may still go through http. And all the efforts of the security disappeared.
Disable the full port 80, by removing or commenting out (adding # to the beginning of the line) the line Listen 80 in the configuration file httpd.conf. Restart the service apache.
Ok, now Page http://192.168.179.129/UNF_Demo_web not work.
Now we see that the insecure http connection, but port 443 is not working too. Http://192.168.179.129:443/UNF_Demo_web an error.

conclusion
We got a running Apache web server with the published base 1C. Access is only possible by secure protocol https. Configuring https takes so many resources, but provides protection against interception of passwords.
When implementing solutions to control the shape, if you want to use one database to geographically separated offices, using Apache web server + browser / thin client looks more attractive than the use of a terminal server (Apache free) or the VPN-connection (Apache easier to set up).