
NOTE: This page has been translated automatically from Russian to English. Original page.
Windows Azure. Part 3: Publishing 1C on the IIS 7.5 Web server
The following issues will be addressed:
1. Configure the IIS Web Server 7.5 to work with the database 1C
2. 1C Publishing database on the IIS 7.5 Web server
3. Connecting with the "thin client" from your home / office computer to 1C, deployed on a virtual machine
Step 1: Configure the IIS Web Server 7.5 to work with the database 1C
Step 1. Step 1: Create a folder that will determine the external path to our database
For example, the folder name will be: "1sTestBase"
Our path to the virtual machine was specified when creating the VM: http://VM1CTest.cloudapp.net
Hence the full path to our database will: http://VM1CTest.cloudapp.net/1sTestBase
A folder is created inside the "wwwroot" folder - here by default looks IIS Web Server 7.5

Step 1. Step 2. Start the Server Manager, and disclose the IIS Web Server 7.5

Step 1. Step 3: Convert a folder in our application (Application)

Icon Our folder created in step №1 must change

Step 1. Step 4. Determine that all the files that are stored in this folder to be processed 1C library

Hit twice the left mouse button.

Add a script that will transfer the management of the library, provided a platform 1C
If the version of the platform will change in the future, you will need to quickly change the path to the library, the appropriate platform version

Step 1. Step 5. Since a virtual machine running a 64-bit operating system and connect to the database are customers with 32-bit operating system, you must enable support for 32-bit OS.
Positioning on the Application Pools

change to false to True

Step 1. Step 6: Control the library wsisapi.dll whether we really connected


Step 1. Step 7. Set the access rights
We are interested in 3 folders:
1. C: \ Program Files (x86 ) \ 1cv8 \ 8.3.2.172 \ bin ( in that folder is wsisapi.dll Library)
2. C: \ inetpub \ wwwroot \ 1sTestBase (this we have created a folder that will be used for access from the outside)
3. D: \ 02_Base \ TestAzureBase (it pumped database 1C, and to which we need to be accessed by the thin client)
For all the folders you need for the user to set access IIS_IUSRS "Full control"
For folders with our database for the user Users, set access "Modify"
Establishes rules for the folder bin (C: \ Program Files ( x86) \ 1cv8 \ 8.3.2.172 \ bin)

Establishes rules for 1sTestBase folder (C: \ inetpub \ wwwroot \ 1sTestBase)

Set right on the folder TestAzureBase (D: \ 02_Base \ TestAzureBase )
First to IIS_IUSRS
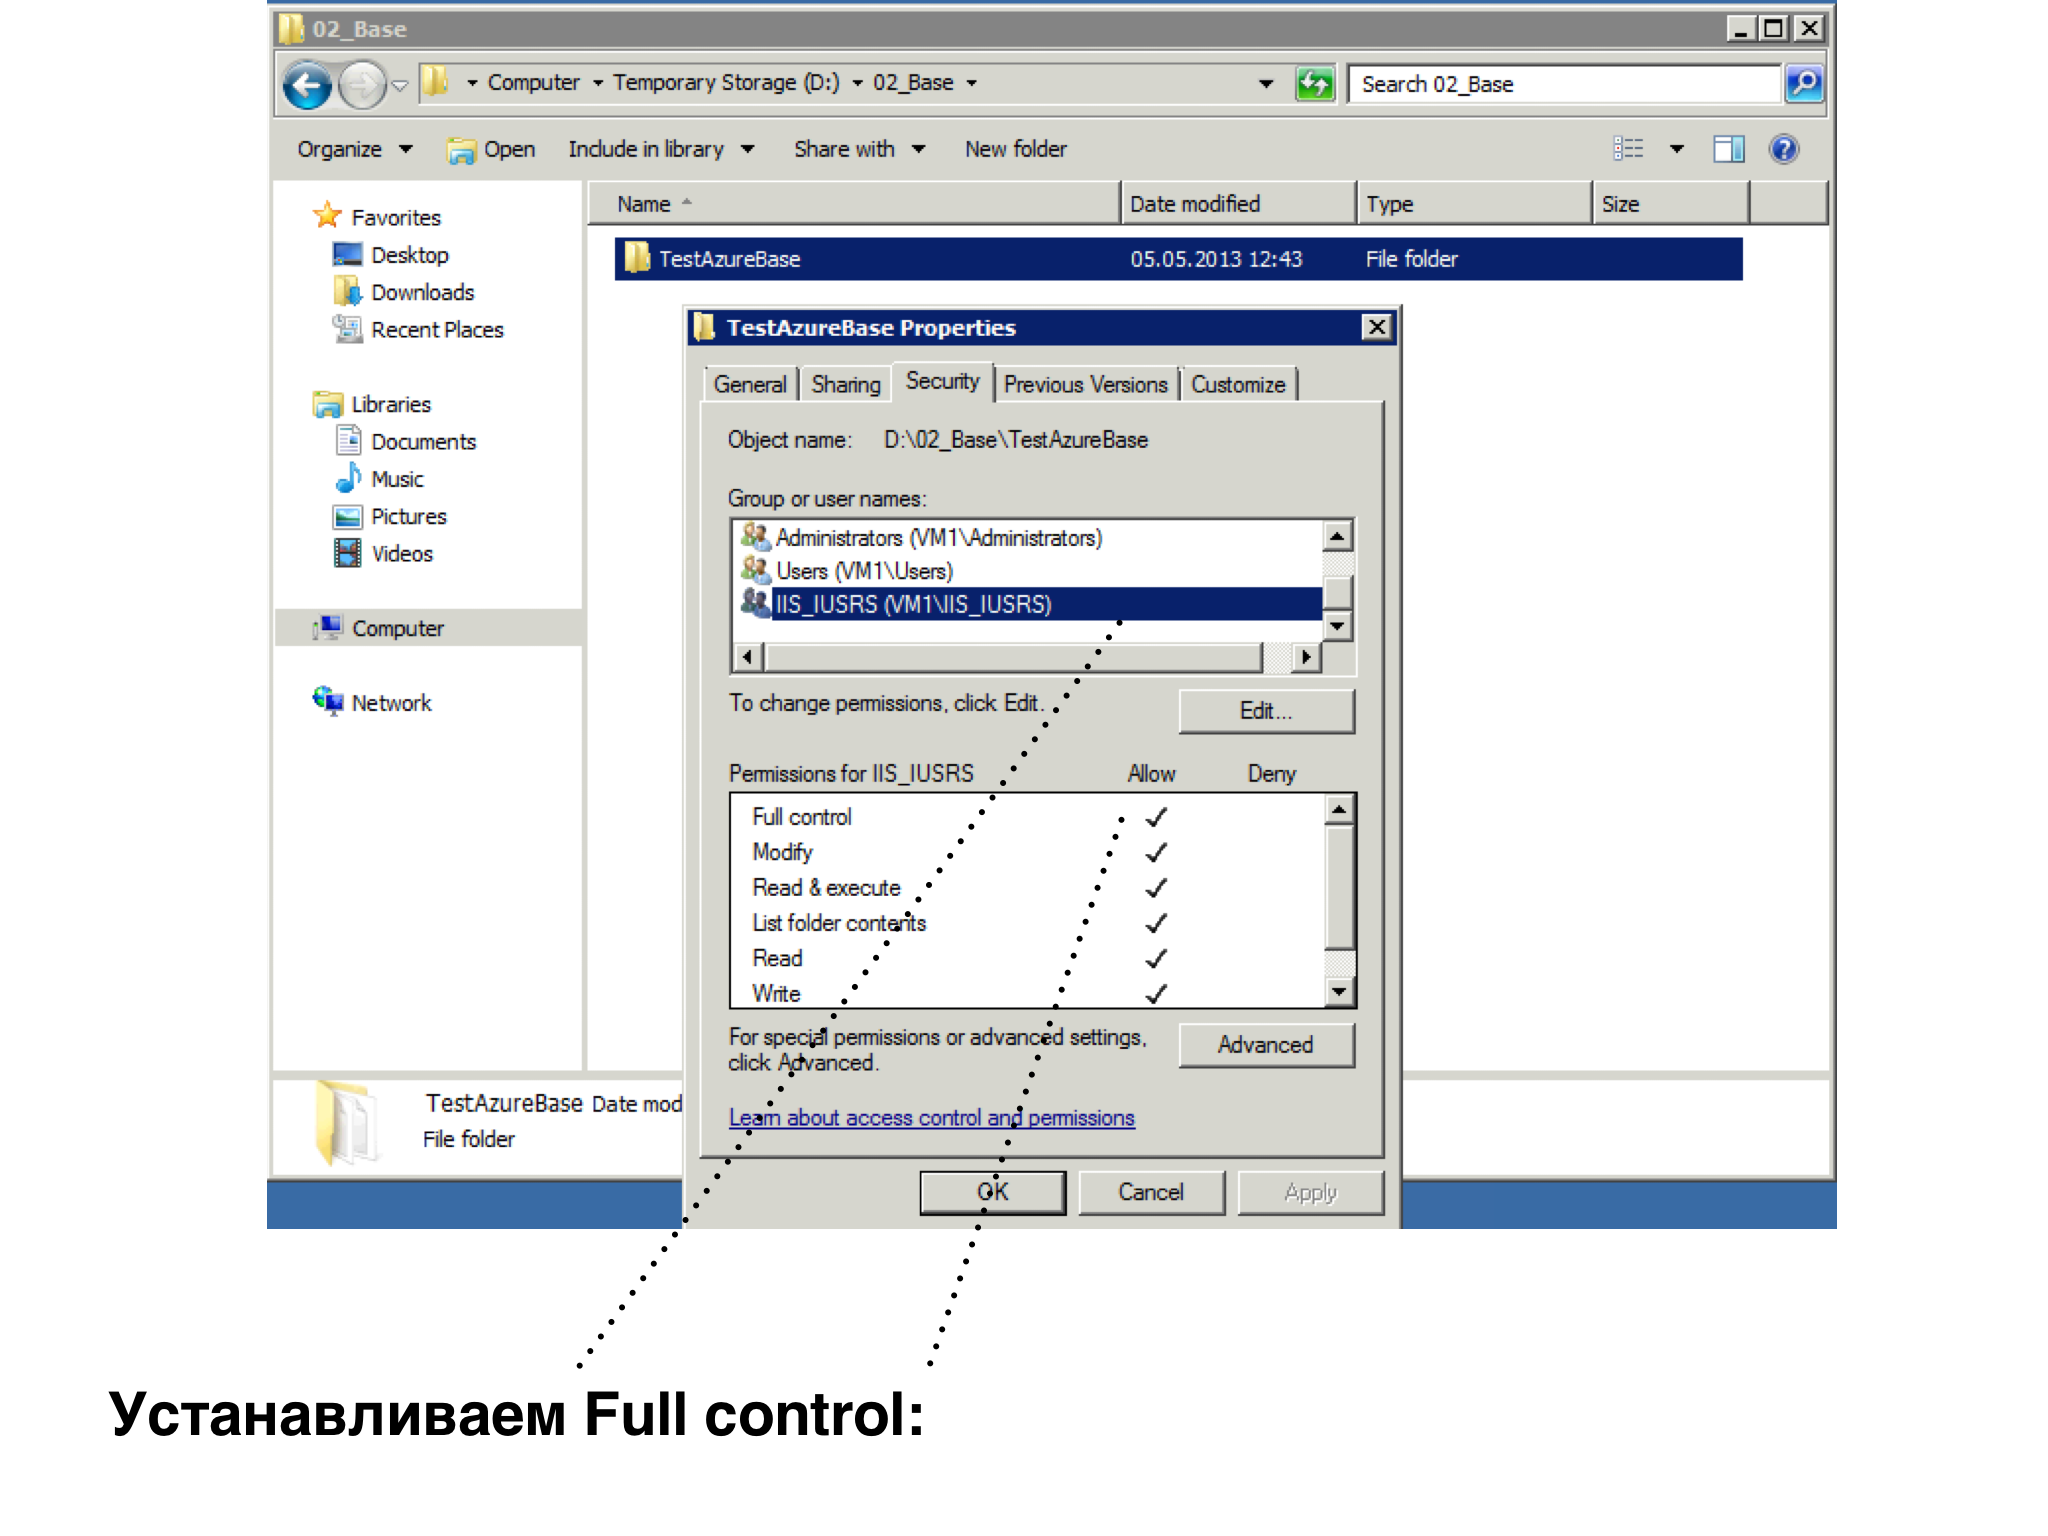
Then for Users

Step 2: 1C Publishing databases on the IIS 7.5 Web server
Step 2: Step 1: Create a default.vrd file that will indicate where we have located our database
This file can be created manually in Notepad ++, or get it by publishing configuration via configurator
You can also download the image in this article

Note that the file is created in UTF8 encoding
option "Base" shows the way to our 1sTestBase folder, which we set up in IIS 7.5
option "Ib", points the way, where is our database (configuration 1C) - shows that the database is on a different drive
Thus, the external connection looks default.vrd file fulfills its library wsisapi.dll base and launches the specified path in the parameter "Ib"

Actually this is the configuration of the publication on the IIS 7.5 Web server
Step 3: Connect using "thin client" from your home / office computer to 1C, deployed on a virtual machine
In order to successfully connect to the database deployed to Windows Azure, you must resolve the issue of licenses 1C.
The following scenarios:
1. On the virtual machine installed 1C software licenses
2. In the home / office computer and the virtual machine prokinut USB-port (in this case, USB-keys with 1C licenses installed on the computer and the virtual machine sees them through the pick USB-ports)
3. In the home / office computer and the virtual machine is organized VPN-tunnel. In this case, the virtual machine is considered as a network computer, and therefore, it is possible to specify which computers are USB-network keys from licenses 1C
4. USB-key with a license 1C is installed on the local computer, and in this case, the organization of connections for "thin client" USB-key on the local machine will be involved
We consider the case №4, when the USB-dongle is installed on the local computer. Also on your computer must be running the client program 1C "Thin Client", or the connection is on the thin client support during the installation 1C.
Step 3: Step 1. Run 1C and see the startup screen

Step 3: Step 2: Select the option to create a database


Step 3: Step 3: Let's test the configuration on the "Standard Library subsystems"
This configuration was used to test the Windows Azure technology, but you can use any other configuration with support for controlled forms

Step 3: Step 4: Specify the settings for connecting to our database

Step 3. Step 5. Specify the startup options

Step 3. Step 5: The base is added. Run

Step 3. Step 6: Everything is going according to plan. The user specifies.


So, we were able to run the database 1C, deployed on Windows Azure technology.
To be continued...