
The Goods receipt document
Now that you are familiar with the Document configuration object, you will create a few such objects for recording the events that take place within Jack of All Trades.
The company provides television repair and washing machine installation services. In both cases, there is a requirement for certain materials that are expended during service provisioning. Therefore, two of the critical events in the life of our company are receipt of materials and rendering of services.
To reflect these events in the database, you will create two documents: Goods receipt and Service.
The Goods receipt document records the delivery of the materials your company needs, while the Service document records the provided services and expended materials.
In Designer mode
In 1C:Enterprise mode
Let us test the resulting document.
- Start 1C:Enterprise in the debug mode.
You can see that the Goods receipts command is now available in the Accounting and Inventory sections (fig. 4.12).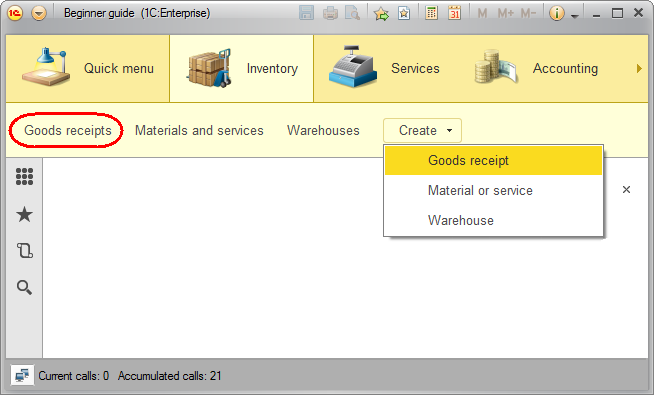
Fig. 4.12. Inventory section
The command name is determined by the List presentation property that you defined for this document.
Also the Goods receipt command is added to the Create menu of the Inventory section. The command name is determined by the synonym because you have not defined the Object presentation for this document (see fig. 4.12).
Adding a document
Let us add the Goods receipt document.
- Open Designer and add a Document configuration object.
- On the Main tab, in the Name field, type GoodsReceipt.
The platform fills the synonym based on the name.
Let us also define the document presentations in the 1C:Enterprise interface. You do not have to fill Object presentation because the synonym will be used instead. This is totally suitable because the document name is specified in the singular.
On the contrary, you have to specify List presentation in the plural. - In the List presentation field, type Goods receipts (fig. 4.4).

Fig. 4.4. Specifying main document properties - Click Next.
This opens the Subsystems tab.
The configuration logic suggests that the list of goods receipts should be available in the Inventory and Accounting sections. Indeed, this document is directly related to the first section and the list of documents that record delivery of materials can be frequently needed for accounting analysis. - Select the Accounting and Inventory check boxes (fig. 4.5).
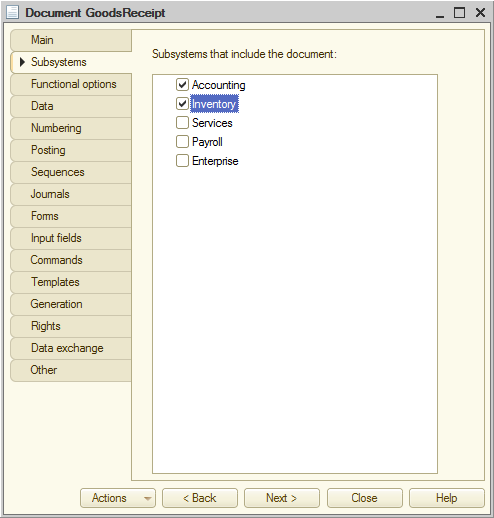
Fig. 4.5. Specifying subsystems where the document is available - Click the Data tab, click Add
 above the list of document attributes, and create the Warehouse attribute (fig. 4.6).
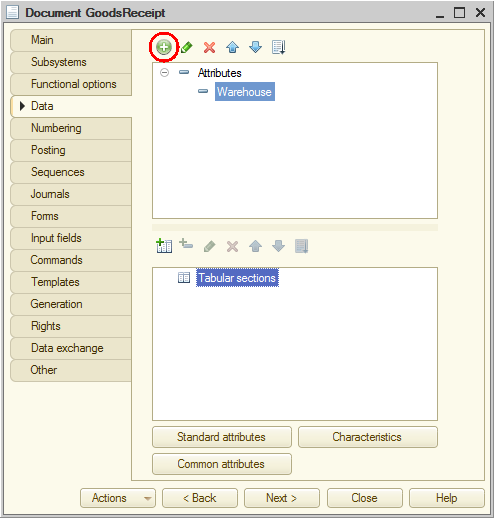
Fig. 4.6. Creating a document attribute
Attributes of reference type
Let us select a reference data type for the Warehouse attribute.
- Double-click the Warehouse attribute and then, in the property palette, in the Type list, select CatalogRef.Warehouses.
This data type is available in the configuration because you created the Warehouses catalog configuration object (fig. 4.7).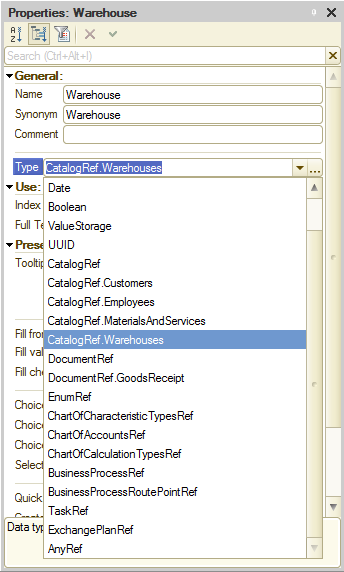
Fig. 4.7. Document attribute properties
"Fill value" property of a configuration object attribute
Now let us streamline the document creation. In the company that you are automating all the goods are received at the main warehouse.
- In the property palette of the Warehouse attribute, in the Fill value field, select the Main predefined item.
When a user starts creating a document, its Warehouse field is filled with the Main value, so they do not have to enter it manually (fig. 4.8).
Fig. 4.8. Selecting the default fill value for the Warehouse attribute
Now let us add the Materials tabular section. - Click Add tabular section
 above the list of tabular sections (fig. 4.9).
Fig. 4.9. Creating a tabular section for a document
Tabular section fill check
Let us prohibit saving goods receipts with empty tabular sections.
- In the Fill check field, select Display error.
In doing so you specify that a GoodsReceipt document must include a tabular section (the list of received materials). Otherwise an error message is displayed when a user attempts to save the document.
Let us create the attributes for the Materials tabular section. - On the Data tab, click Add attribute
 above the list of tabular sections and add the following attributes (fig. 4.10):
- Material. Type: CatalogRef.MaterialsAndServices
- Quantity. Type: Number, length: 15, precision: 3, non-negative
- Price. Type: Number, length: 15, precision: 2, non-negative
- Total. Type: Number, length: 15, precision: 2, non-negative
- For each tabular section attribute, in the Fill check field, select Display error.
In doing so you specify that when a document is saved, in addition to the availability of tabular section records, the platform checks that all of the attributes of each record are filled.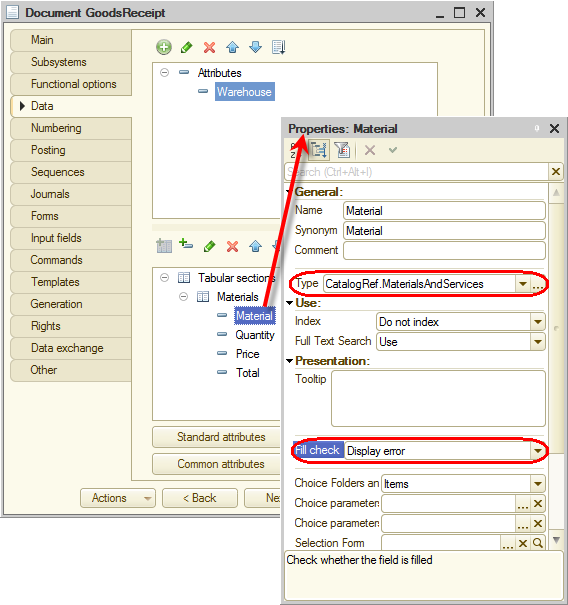
Fig. 4.10. Creating document tabular section attributes - Click the Numbering tab and ensure that the Autonumbering check box is selected.
This property defines automatic generation of unique numbers for documents that users create.
Finally, let us add the document creation command to the Inventory subsystem. - In the configuration object tree, right-click the Subsystems branch and then click All subsystems.
- In the All Subsystems window, click the Inventory subsystem.
The Command interface list on the right displays all of the commands of the selected subsystem. - In the Action panel.Create group, enable visibility for the Goods receipt: create command (fig. 4.11).
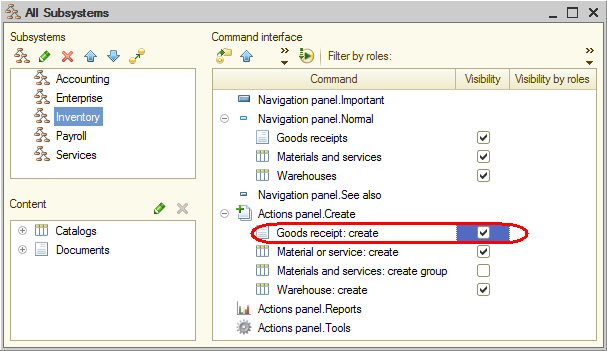
Fig. 4.11. Specifying subsystem command interface settings
Adding Goods receipt documents
For now there are no Goods receipt documents in the database. Let us create one.
- In the Inventory section, on the Create menu, click Goods receipt.
This opens the default object form. The Goods receipt form title matches the document synonym.
The date field is automatically filled with the current date and zero time because the document has not yet been posted. Once you post the document, it is changed to the actual time stamp.
The Number field is empty but the platform will generate a unique number for the document because the Autonumbering property is enabled for the document. The new number is generated when you save the document.
Note that the Warehouse field is already filled with the Main value exactly as you selected in the properties of this attribute. - Fill the tabular section of the goods receipt with the television repair materials as shown on the figure (fig. 4.13).
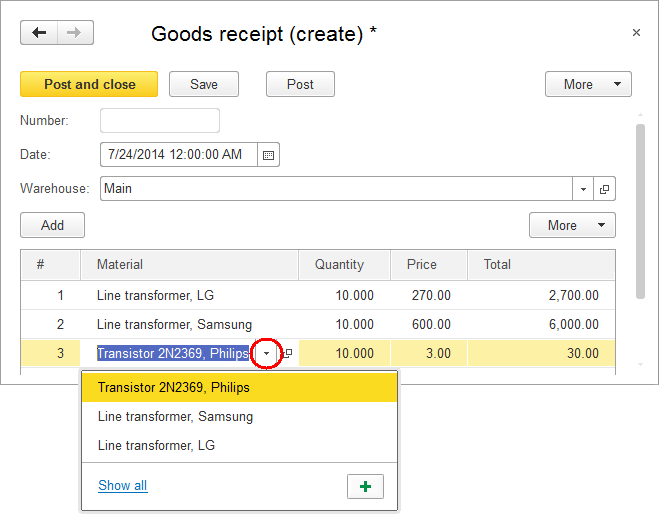
Fig. 4.13. Creating a Goods receipt document
Note that clicking the Material column, which is not yet filled, opens the list of items from the MaterialsAndServices catalog. This is because this attribute has reference data type and references the MaterialsAndServices catalog (see fig. 4.13). - Click Post and close.
This saves and posts the document. An automatically generated number and the posting time are assigned to the document. - Follow the same steps to create a second document with washing machine installation materials received to the Main warehouse (fig. 4.14), then click Post and close.

Fig. 4.14. Creating the second Goods receipt document
This saves and posts the document. An automatically generated number and the posting time are assigned to the document.
Note that when you fill the document, the entire tabular section and each column are marked by red dotted line. It means that the fill check is applied to them. If you do not add any rows to the tabular section or leave any tabular section column empty and attempt to save the document, an error message is displayed (fig. 4.15).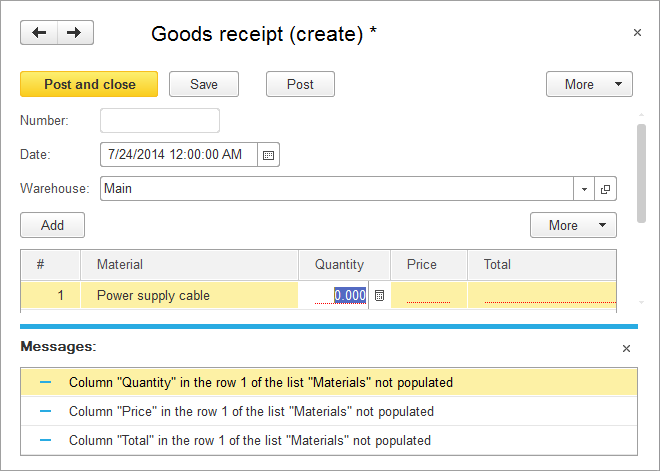
Fig. 4.15. Error message when saving a document
Let us view the list of created documents. - Run the Goods receipts command.
It opens the list form where you can see two documents marked with icons indicating that these documents have been posted (a green checkmark over the document icon, fig. 4.16).
Fig. 4.16. List of goods receipts