
In Designer mode
Introduction to Designer
Now let us start 1C:Enterprise in Designer mode.
- In the 1C:Enterprise startup window, select the newly created infobase, and click Designer (see fig. 1.8).
The Designer window is displayed (fig. 1.9).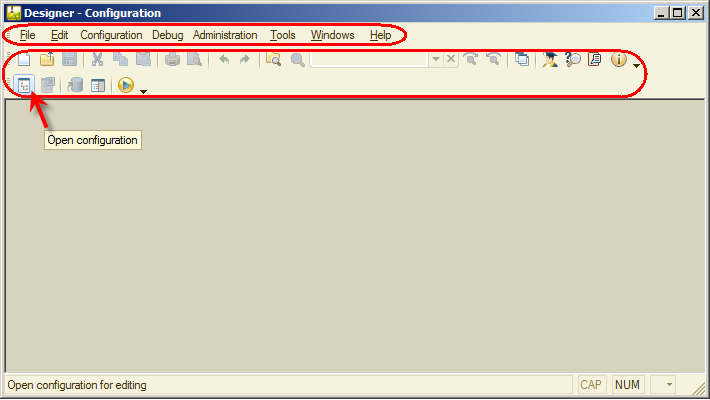
Fig. 1.9. Designer window
This is the tool you will use to create your applied solution. The Designer mode menu bar is located right below the window title. It includes menus: File, Edit, Configuration, Debug, and more. Each menu contains commands that perform various actions in Designer.
The Designer mode toolbar is located under the menu bar. The toolbar contains the icons for accessing frequently used actions that are also available in the menus.
Hence, many common actions can be performed using any of the two methods: by selecting a menu command or by clicking a toolbar button.
A large number of unfamiliar icons often confuse a novice developer. But there is nothing to worry about. In time, you will be able to distinguish them easily. Simply point to any button to view a tooltip that describes the button function (see fig. 1.9).
Chances are that you will initially prefer the menus but eventually you will begin to use the toolbar more because it saves clicks. You have the option to customize the toolbar by adding or removing buttons (fig. 1.10).
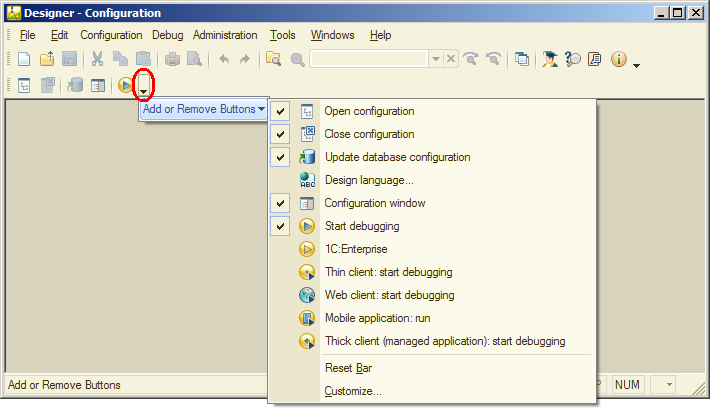
Fig. 1.10. Customizing Designer toolbar
Configuration object tree
To be able to perform any operations on your configuration, you have to open it first.
- On the Configuration menu, click Open configuration.
-OR-
Click the Open configuration button on the toolbar (see fig. 1.9).
This opens the configuration object tree (fig. 1.11).
Fig. 1.11. Configuration object tree
The configuration object tree is an important developer tool. It contains virtually all the information about the configuration structure.
You may already be asking yourself: why does the tree contain items before you have created any?
The answer is that, for developer convenience, all configuration items are combined into groups, and at this point the tree contains these groups. If you run along the tree and click the  icons, you will find that all the groups are empty. The only exception is the Common / Languages group where you can see the English item. The platform created that item on its own because, in this case, Designer is using the English interface.
You are ready to begin actually doing things, but first we need to go over some terminology. You may already have noticed that when talking about the contents of the configuration we have consciously avoided using specific terms. Now is a good time to define some terms and talk about configuration objects.
Understanding configuration objects
A configuration is essentially a definition. It defines the data that users can access in 1C:Enterprise mode.
In addition, a configuration defines all of the data processing operations available. Besides, a configuration defines how the data is displayed on screen and in printouts, and so forth. The 1C:Enterprise platform then uses this definition to create a database that has the appropriate structure and provides user access to the data.
To ensure quick and easy customization of 1C:Enterprise for specific applied solutions, all of the definitions stored within a configuration are represented as logical items named configuration objects. Perhaps you have had a chance to flip through 1C: Enterprise. Developer Guide, which provides a brief definition of a configuration object.
We will not repeat that definition in this book, since our task is not to present the strategies behind the 1C:Enterprise system design as metadata structures focused on business essentials, but to teach you how to use 1C:Enterprise features correctly and efficiently.
Therefore, we will explain the nature of configuration objects at the mundane level. This explanation will nonetheless allow you to understand the role of objects in the tasks that you will solve in this tutorial.
On the one hand, configuration objects are the pieces of a set of building blocks the configuration is assembled of. A set of building blocks normally comes with a certain assortment of pieces. The pieces can be different: long, short, rectangular, square, and so on. Now imagine that you can make as many of each type of pieces as you need (say, 5 long pieces and 3 short ones). You can connect the pieces to each other in various ways.
The same is true for configuration objects. You can only create configuration objects of certain types. However, you can create as many objects of each type as you need. The difference between objects of different types is that they have different properties (to be exact, different sets of properties). Objects can interact with each other and you can define these interactions.
What else makes configuration objects similar to pieces in a set of building blocks? A set of building blocks usually includes pieces that can be attached to each other, as well as other pieces, such as wheels, that cannot be attached to each other, but can be connected to an axle so that the wheel will be able to rotate. In other words, different pieces of a single set behave in a different manner.
Likewise, configuration objects have different behaviors, and that behavior depends on the object type. Some objects can perform certain actions, while others cannot do so, but have their own specific set of actions.
We will explain another characteristic of configuration objects using a car as an example. A car consists of a large number of parts. An engine is one of those parts. In turn, however, an engine also consists of a set of parts, while a single part can be used in different engines.
In the same way, "complex" configuration objects consist of "simple" objects and the same "simple" objects may be used to make up "complex" objects. This structure simplifies the work with configuration objects, since, if we know how a certain "simple" object works, we will deal with it in the same manner when it is a part of a "complex" object.
And finally, the most important property of a configuration object is its practical application. Configuration objects are not merely abstract constructs the developers use to describe a task at hand. Rather, they correspond to the actual objects involved in company operations.
For example, all companies use various documents that describe the facts of business transactions. In the same manner, a configuration contains objects of the Document type.
Additionally, all companies must maintain lists of employees and catalogs of goods or services. Configurations have objects of the Catalog type, which allow developers to create digital versions of these lists.
As mentioned above, based on the configuration objects, the platform creates database tables that store data. In the documentation, as a rule, a single name is used for describing a configuration object and the corresponding set of database tables.
For example, if a configuration contains the Employees catalog object, the set of tables created by the platform based on this configuration object is also referred to as the Employees catalog.
We will stay away from that sort of "fuzzy" writing style, and whenever we are talking about the configuration, we will use the unambiguous term: the Employees catalog configuration object. In those places where we are talking about the database, we will simply refer to the Employees catalog.
Adding configuration objects
Before you begin adding your first configuration objects, note that in order to develop a configuration that automates a company’s economic activity, a developer can use only a limited set of configuration objects that is built into the platform. A developer cannot create custom configuration objects. They only can add standard objects available in the system to a configuration.
Before you begin, you have to learn how to perform some basic actions in Designer.
To open a configuration
- On the Configuration menu, click Open configuration.
To close a configuration
- On the Configuration menu, click Close configuration.
Respective toolbar buttons are available as well.
Once the configuration is open, its content is displayed in the configuration object tree window (see fig. 1.11). You can close this window just like any other window, but if you do so, the configuration itself remains open (in other words, it can still be edited).
To view the configuration tree window
- On the Configuration menu, click Configuration window.
There are several methods of adding configuration objects. You can use any method that you like.
To add configuration objects (method 1)
- Click the required configuration object tree branch, click the Actions button in the configuration window command bar, and then click Add (fig. 1.12).

Fig. 1.12. Adding a configuration object
To add configuration objects (method 2)
- Right-click the required configuration object tree branch, then click Add (fig. 1.13).
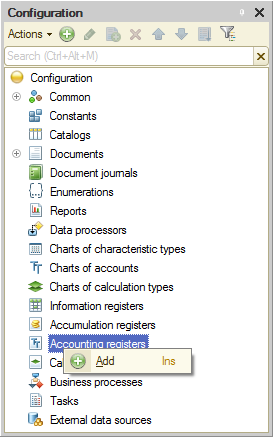
Fig. 1.13. Adding a configuration object
To add configuration objects (method 3)
- Click the required configuration object tree branch, and then click the Add button
 in the configuration window command bar (fig. 1.14).
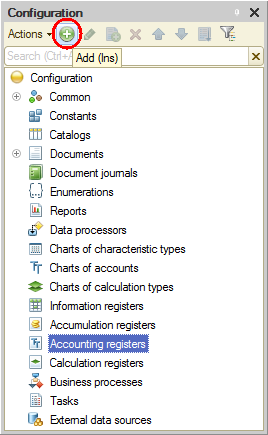
Fig. 1.14. Adding a configuration object
We prefer the last method so we will mainly use it in the future.
Property palette
So, let us begin.
Let us define a name for our configuration and use this example to introduce the property palette. Developers can use the property palette to define various properties of configuration objects that they create.
A property palette is a dedicated auxiliary window that is intended for editing configuration object properties and other related data. Since different configuration objects have very different properties, the content of this window varies depending on the selected configuration object.
- In the configuration object tree, double-click the Configuration root item.
This opens the configuration property palette. - In the Name field, type BeginnerGuide.
The synonym is filled automatically (fig. 1.15) but you can specify it explicitly if needed. The synonym serves as a title for the main applied solution window.
Fig. 1.15. Configuration property palette
Important! This tutorial is designed and thoroughly tested using 1C:Enterprise version 8.3.5. It includes a few synchronous method calls. In 1C:Enterprise versions 8.3.6 or later synchronous method calls are disabled by default. - If you are using 1C:Enterprise version 8.3.6 or later, scroll down the property palette to find the Synchronous call usage mode for extensions and add-ins property and change its value to Use.
Sometimes the property palette is opened automatically in response to certain developer actions. But you can always open the property palette manually.
To open a property palette
- Right-click an object and then click Properties.
In this case the property palette is opened in a similar manner and docks within the Designer mode workspace. It means that when you select any configuration object, its property palette is always opened. However, there is a handy option to undock the property palette using the push-pin icon in the title of the property palette window (fig. 1.16).
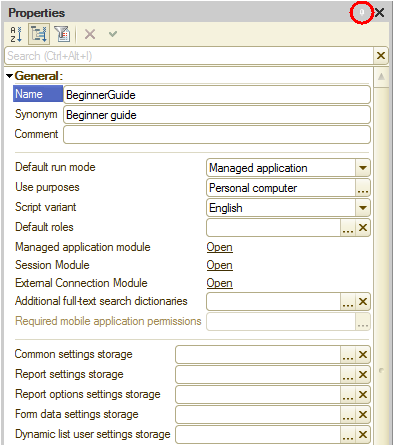
Fig. 1.16. Undocking the property palette
In the undocked state, when you move the pointer to any other window, the property palette is minimized to a button near the right edge of the Designer mode window (fig. 1.17).

Fig. 1.17. The property palette button
When you point to the button, the property palette is opened up again. In addition to the property palette, other Designer windows (such as the configuration object tree window) behave in a similar way (they can be docked, hidden and so on).
Debugging in 1C:Enterprise mode
Now let us check your first changes in 1C:Enterprise mode.
- On the Debug menu, click Start debugging.
-OR-
On the Designer mode toolbar, click the Start debugging button .
.
The platform checks whether the configuration was changed and prompts you to update the database configuration (fig. 1.18).
Fig. 1.18. Database configuration update dialog box
At this point we will not discuss what it means as it will be explained in the Base configuration and database configuration section. - Click Yes.
Then the 1C:Enterprise window is displayed (fig. 1.19).