
Trial balance
Now all that is left for you to do is create a report for the accounting department at Jack of All Trades, and you will be done with learning accounting registers.
The only report the accounting department of your company uses is the Trial balance report (fig. 16.19).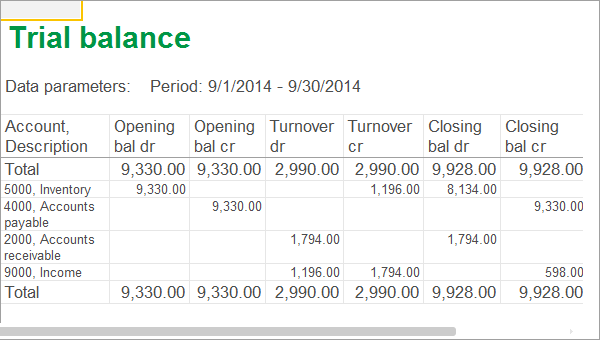
Fig. 16.19. Resulting report
In Designer mode
Let us proceed to report creation.
- Create a report configuration object named TrialBalance.
- Run the Data composition schema wizard.
- Add Data set – query and run the Query builder.
In 1C:Enterprise mode
Let us check the report.
- Start 1C:Enterprise in the debug mode.
- In the Accounting section, open the report and click Create (fig. 16.27).
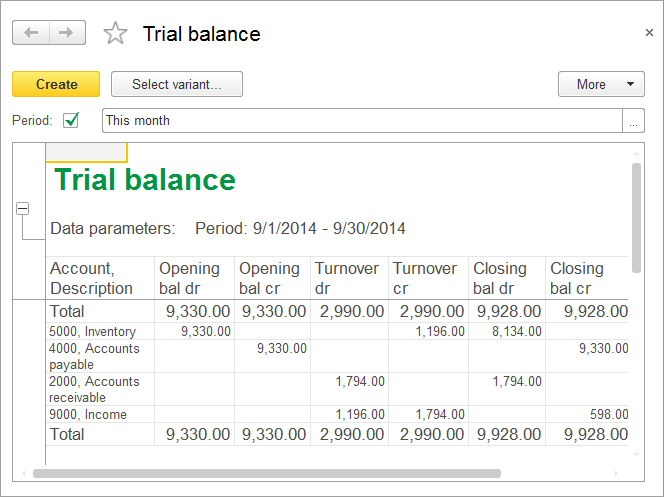
Fig. 16.27. Resulting report
You see that the default report period is specified as This month (a standard period). The standard report period feature is very convenient when users frequently need to generate the report for a specific period of time. In this scenario you can predefine the required period in the settings, so the user does not have to specify it before generating the report. But if they want, they can select another period from the list of standard ones in 1C:Enterprise mode.
Query for a data set
The Trial balance accounting report is a table with its rows listing all the accounts in the chart of accounts, and its columns displaying the opening balance, turnover, and the closing balance for the debits and credits of each account.
- Select the following tables as the data sources (fig. 16.20):
- Main chart of accounts object (referential) table
- Primary.BalanceAndTurnovers accounting register virtual table

Fig. 16.20. Query tables - Select the Ref field from the Main table.
- Select the following fields from the PrimaryBalanceAndTurnovers table (fig. 16.21):
- SumOpeningSplittedBalanceDr
- SumOpeningSplittedBalanceCr
- SumTurnoverDr
- SumTurnoverCr
- SumClosingSplittedBalanceDr
- SumClosingsplittedBalanceCr
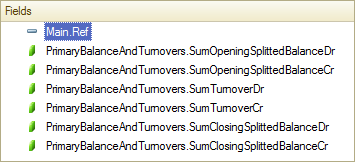
Fig. 16.21. Fields selected for the query - Click the Links tab and specify that you want to select all records from the main table and only those that match the link condition from the register table (fig. 16.22).
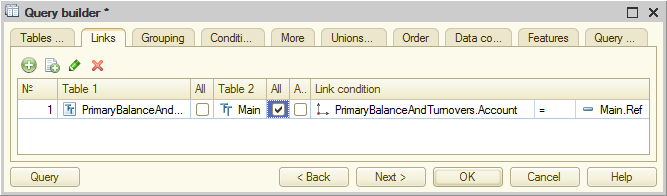
Fig. 16.22. Table link condition - Click the Unions/Aliases tab and set the following aliases for the report fields (fig. 16.23):
- Account
- OpeningBalDr
- OpeningBalCr
- TurnoverDr
- TurnoverCr
- ClosingBalDr
- ClosingBalCr
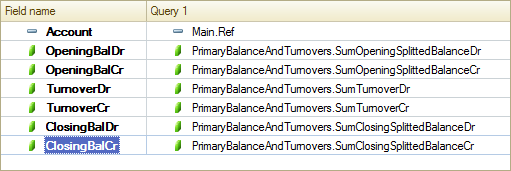
Fig. 16.23. Unions/aliases - Click OK.
This completes the query creation.
Resources
Let us add the resources.
- On the Resources tab, select all available resources.
Parameters
Normally, accounting reports are generated for a specific period: month, quarter, year, and so on. We will use this report to show how to set the report period using the "standard period" feature.
- On the Parameters tab, add the Period parameter of the StandardPeriod type.
- For the BeginOfPeriod and EndOfPeriod parameters, specify the calculation expressions (listing 16.5) and prohibit user editing.
Listing 16.5. Expressions for calculating the BeginOfPeriod and EndOfPeriod parameters&Period.StartDate &Period.EndDate
- For the Period parameter, in the Usage column, select Always.
As a result, the check box that shows whether the report period is used is hidden from the report form. This is required because accounting reports are always generated for a specific period.
The resulting data composition parameters should look as shown in fig. 16.24.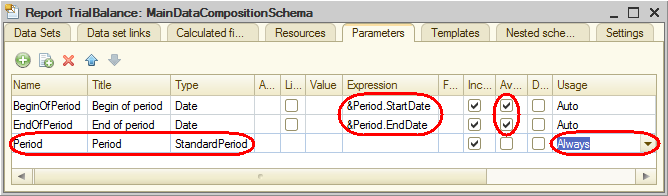
Fig. 16.24. Data composition schema parameters
Note that the beginning and end dates of a standard period include time as well. But here, unlike the BeginOfPeriod and EndOfPeriod parameters, the beginning date has the time 00:00:00 while the end date has the time 23:59:59. Hence, the last day is included in the report and there is no need to use the EndOfPeriod() function.
Settings
Let us specify the report structure.
- On the Settings tab, add the <Detailed records> grouping.
- On the Selected fields tab, select the Account field, then expand this field and select its Description attribute.
- Select all register fields and arrange them as shown in fig. 16.25.

Fig. 16.25. Report groupings and fields - On the Other settings tab, set the report title to Trial balance, and set Vertical placement of overalls to Begin and end.
- On the Parameters tab, for the Period parameter, select This month (fig. 16.26).
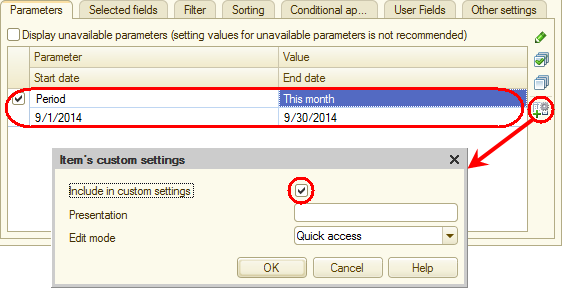
Fig. 16.26. Creating quick settings for the report period
This is how you ensure that the current month is always specified as a report period when the report form is opened. Remember that the beginning and end dates of the period are changed dynamically based on the report generation date. - Click the Custom settings item property
 button to specify that Period is included in the list of custom settings and this setting is available directly in the report form (Quick access edit mode).
Let us specify the subsystems where the report is available. - Close the data composition schema wizard and then, in the editor of the TrialBalance report configuration object, click the Subsystems tab.
- Select the Accounting check box.