
Quick menu. Customizing the start page
The Quick menu section of an applied solution is intended to encompass the documents, reports, catalogs, and other items that are frequently used by a specific user.
The work area of the Quick menu section contains a user-specific start page, which includes the forms of documents, reports, and other entities that a user accesses on a daily basis. The command bar of the Quick menu section contains the most important commands that are chosen based on the user role.
For example, a stock clerk needs easy access to the list of materials and the list of goods receipts, while a manager needs the list of customers, the list of Services documents, and so on.
When 1C:Enterprise is started, the Quick menu section is active and the forms available in this section are displayed in the applied solution work area (fig. 23.11).

Fig. 23.11. The Quick menu for a user that has the CEO role
So a user does not have to browse through the sections in search of a command they need. Instead, they can immediately start working once they start 1C:Enterprise.
But the Quick menu should not be overloaded with forms and commands because this can reduce the applied solution usability.
In Designer mode
Let us proceed to the customization of the Quick menu.
- In the configuration object tree, right-click the BeginnerGuide root item and then click Open main section command interface (fig. 23.12).
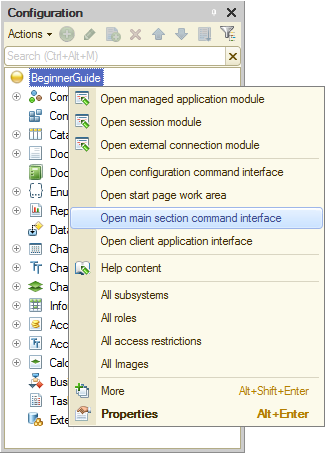
Fig. 23.12. Opening the main section command interface settings
The dialog box that is opened lists all of the configuration objects grouped by type, and also the commands that perform various operations on these objects. You can double-click the commands to add them to the right pane, which represents the main section command interface, and then specify their visibility for each role.
For the Technician role the most important commands are creation of Goods receipt documents and Services documents, as well as creation of the Materials report and the Revenue by technician report. - Move the following commands to the command interface:
- Goods receipt: create
- Services: create
- Materials
- Revenue by technician
- Set general visibility for each of these commands.
- Hide the document creation commands from all roles except Technician.
- Hide the report creation commands from all roles except CEO and Technician (fig. 23.13).

Fig. 23.13. Main section command interface settings window
For the Payroll accountant role the most important commands are creation of Employee accruals documents and creation of the Employee accruals report. - Move the following commands to the command interface:
- Employee accruals: create (document)
- Employee accruals (report)
- Set general visibility for each of these commands.
- Hide the Employee accruals: create command for all roles except Payroll accountant.
- Hide the Employee accruals command for all roles except Payroll accountant and CEO.
Let us add commands for the Accountant role. - Move the following commands to the command interface:
- Input opening material balances: create
- Trial balance
- Set general visibility for each of these commands.
- Hide the Input opening material balances: create command for all roles except Accountant.
- Hide the Trial balance command for all roles except Accountant and CEO.
For the CEO role the most important commands are creation of the following reports: Materials, Revenue by technician, Employee accruals, and Trial balance.You have already added all of these commands to the main section commands panel and made them visible for CEO.
For the Administrator the main section commands panel remains empty. In the next lesson you will fill it with commands related to data exchange.
The resulting main section command interface settings should look as shown in fig. 23.14.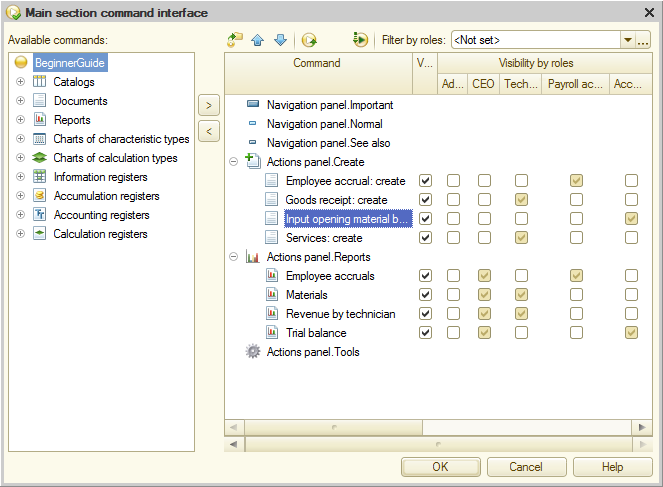
Fig. 23.14. Main section command interface settings window
Now let us customize the start page. - In the configuration object tree, right-click the BeginnerGuide root item and then click Open start page work area (see fig. 23.12).
This opens the start page settings window (fig. 23.15). - In the Starting page template list, select Two columns, different width (2:1).

Fig. 23.15. Start page settings window
It means that the forms on the start page are arranged in two columns, and the left column is twice as wide as the right one.
You have the option to select another template: two columns of equal width or a single column. But the first option (2:1) better suits your needs because you can put the most frequently used forms to the left column so that they easily catch the eye.
Note that you cannot add automatically generated forms to the start page. So, before adding a form to the start page, you have to explicitly create it in the configuration. You will create each form when you actually need it.
Attention! To be able to create forms or any other configuration objects, you have to run Designer as Administrator. Other roles do not have rights to access newly created objects.
Let us customize the start page for the Technician role by adding the list of Services documents to the left column and the list of Goods receipt documents to the right column. These list forms are not available in the configuration, so you have to create them first. - Create the list forms for the following configuration objects:
- Services document
- GoodsReceipt document
- In the GoodsReceipt document list form, add the Warehouse column (fig. 23.16).
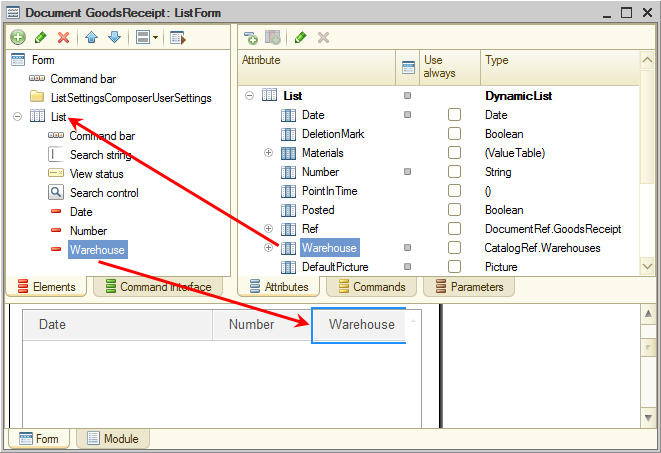
Fig. 23.16. Creating the Goods receipt document list form - In the Services document list form, add the following columns: Warehouse, Customer, and Technician.
- In the Starting page work area window, in the left pane, click Add
 .
.
- Select the Services document list form (fig. 23.17).
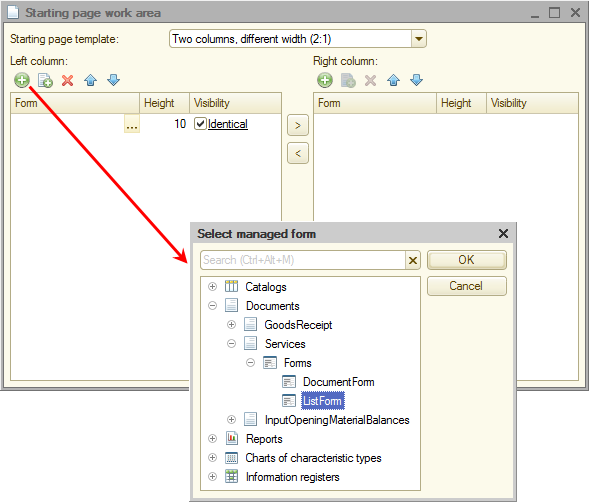
Fig. 23.17. Customizing the start page for users with Technician role - In a similar manner, add the GoodsReceipt list form to the right column.
- For each of the two forms, click the link in the Visibility column and make them visible to the Technician role only (fig. 23.18).
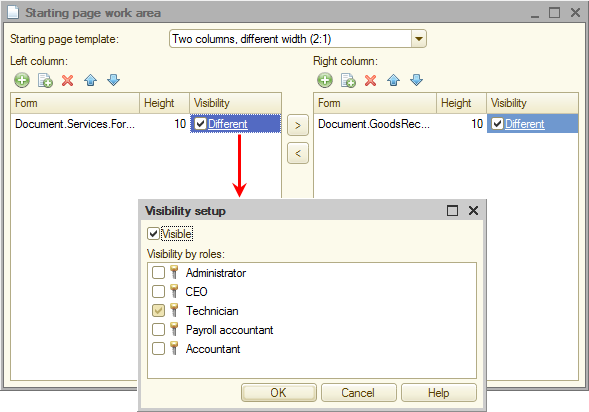
Fig. 23.18. Customizing the start page for users with Technician role
Now let us customize the start page for the Accountant role. The accountant will probably often need the trial balance report, so let us add it to the left column of their start page, leaving the right column empty. - For the TrialBalance report, create a report form.
- In the Starting page work area window, add the form to the left column and make is visible for the Accountant role only.
Then let us customize the start page for the Payroll accountant role. Payroll accountants mostly use documents and reports related to employee accruals. So let us add the list of Employee accruals documents to the right column. As for the accruals report, they can always open it from the main section commands panel. - For the EmployeeAccruals document, create a list form.
- In the Starting page work area window, add the form to the right column and make it visible for the Payroll accountant role only.
Then let us customize the start page for the CEO role. This is a role for someone with supervisor responsibilities. They do not need to enter any documents (and they do not even have rights for this). But to make decisions, they need to view reports.
The commands that open the most important reports required by CEO are located in the main section commands panel. Let us add a single Revenue by technician report to the CEO start page. - For the RevenueByTechnician report, create a report form.
- In the Starting page work area window, add the form to the left column and make is visible for the CEO role only.
Let us keep the Administrator start page empty for now. Later you will add a data exchange management form there.
As a result, the start page customization window should look as shown in fig. 23.19.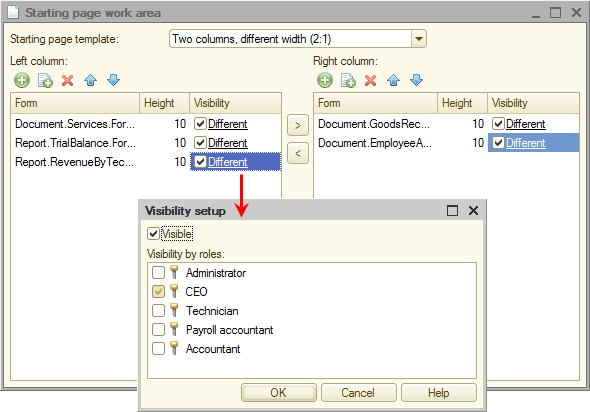
Fig. 23.19. Start page settings window
If a user only has a single form visible on the start page (for example, CEO has a single Revenue by technician report, while Payroll accountant has a single list of employee accruals), the form is scaled to fit the window width, regardless of which column it originally belongs, left or right.
If the start page includes multiple forms visible to a single role and all of the forms belong to a single column, they are arranged vertically on the start page.
In 1C:Enterprise mode
Now if you switch to 1C:Enterprise mode and select user Delgado (who has the Accountant and Payroll accountant roles), you will see the start page shown in fig. 23.20.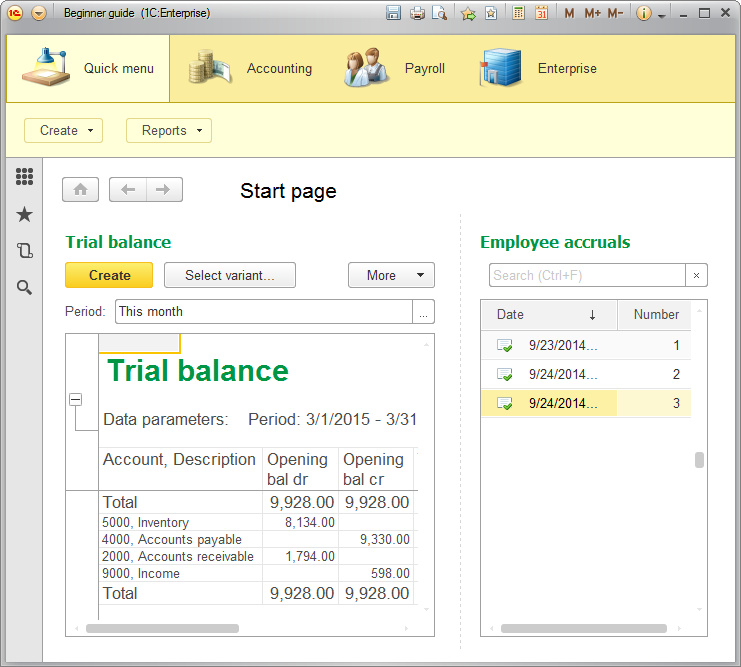
Fig. 23.20. Start page of a user with Accountant and Payroll accountant roles
Attention! To run 1C:Enterprise as a specific user, you have to update the database configuration, restart 1C:Enterprise, select the infobase, click the 1C:Enterprise button (this starts the thin client), and select the required user. If you run 1C:Enterprise in the debug mode as you usually do (from Designer), the platform considers that you log on using the same user account that you used to start Designer (the Administrator account).
Note that the start page also contains the list of Employee accruals documents because user Delgado has two roles: Accountant and Payroll accountant. And this user also has access to the Accounting, Payroll, and Enterprise sections in compliance with the rights that you specified for the roles during the previous lesson.
And for user Johnson (who has the CEO role) the start page looks as shown in fig. 23.21.

Fig. 23.21. Start page of a user with the CEO role
Note that a CEO needs the "pretty" gauge chart report view. You cannot specify a default report option in the configuration, so you have to run the applied solution as CEO and select the Revenue amounts report option. This makes the option the default one for the current user.
For user Turner (who has the Technician role) the start page looks as shown in fig. 23.22.
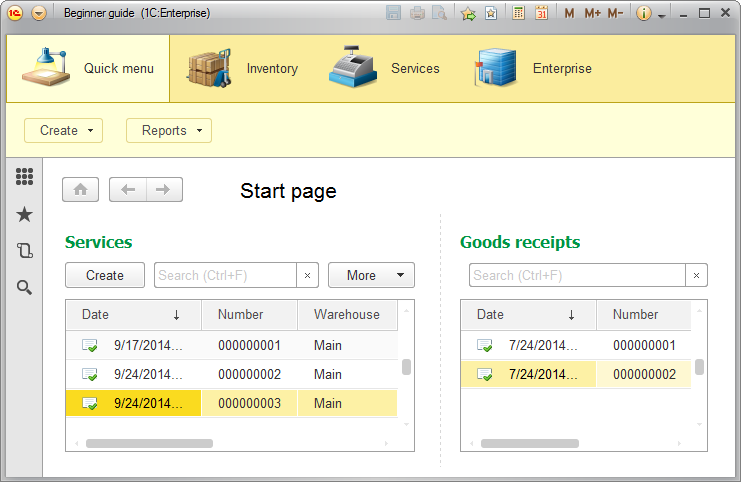
Fig. 23.22. Start page of a user with the Technician role
This user has access to the Inventory, Services, and Enterprise sections in compliance with the rights that you specified for the role in the previous lesson.
When Technician opens a document, the Start page button (with a house icon) is available to the left of the document title. This button opens the start page (fig. 23.23).
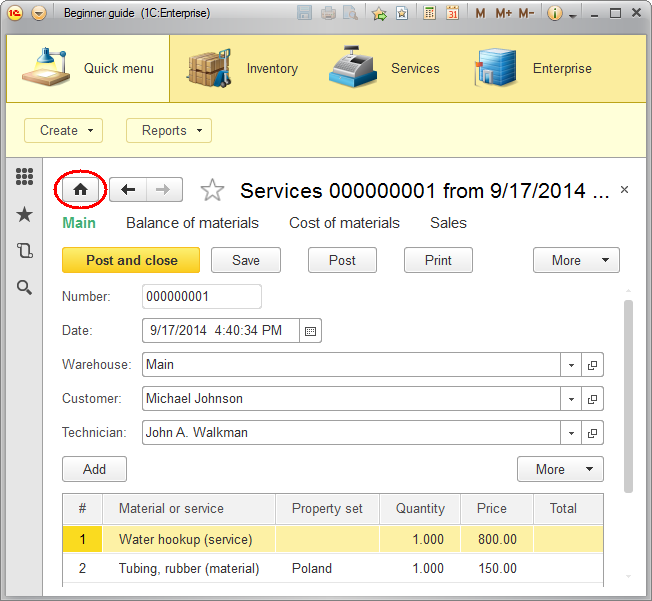
Fig. 23.23. Returning to the start page
So you customized the start page for each role. When you open the applied solution in 1C:Enterprise mode as a user with a specific role (for example, Technician), the start page displays the document list forms that they need for their work. And the Quick menu section commands panel contains the commands that create these documents and open reports that are most important to technicians.
Besides the start page, each user can access the functionalities available in other applied solution sections, provided that they have the rights for this.
And finally, users can customize their start pages (on the main menu, point to View and click Start page setup). But note that users only can add forms explicitly created by developers to their start pages.
If a user wants to minimize the command interface to expand the work area, they can hide all of the applied solution panels except for the Tools panel (on the main menu, point to View and click Hide all panes, see fig. 23.24).
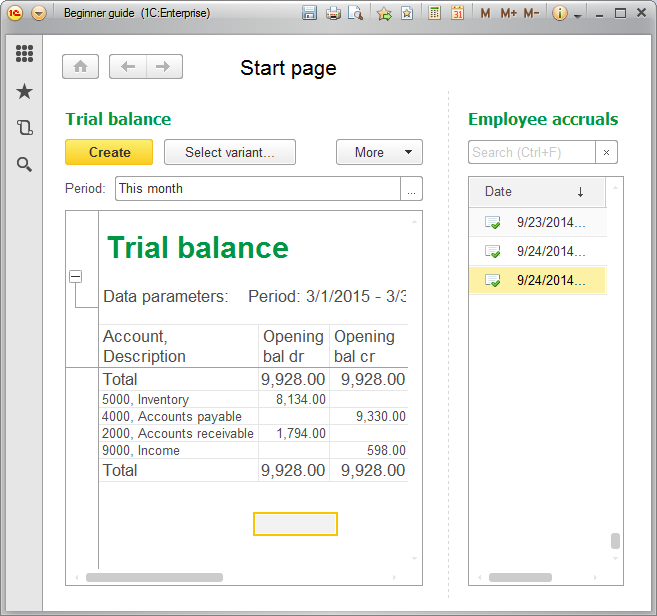
Fig. 23.24. Minimalistic applied solution interface
Of course commercial solutions have different user roles and start page arrangements, which are determined by typical work routines and customer requests.
In the last two lessons we demonstrated the principles of role-based applied solution interface arrangement, as well as user rights-based access restrictions that are applied to individual commands or entire sections.