
CHAPTER 5. ADMINISTRATION
This section covers those aspects of 1C:Enterprise administration that are specific for client/server mode.
5.1. INFOBASE
5.1.1. Creating a Backup Copy of Client/Server Infobase
IMPORTANT!
A backup is required before you carry out any operation that can damage the infobase data.
Creating a backup copy with DBMS tools (or copying the 1Cv8.1CD file) helps obtain the most accurate copy of the existing database and an opportunity to roll back to exactly the same state from which a backup copy was created. At the same time, when dumping an infobase into a file and then subsequently loading it, we presume that the data in the base is correct. If there are any errors in the database, dumping will still be successful, but loading may fail.
To create a backup copy:
For a file variant: copy the 1Cv8.1CD file. No connections to the infobase will be made during the process (including connections from the Designer).
For a client/server variant: by creating a backup copy of the appropriate DBMS. For information on backup as it applies to specific SQL servers, see:
Microsoft SQL Server 2000: http://msdn.microsoft.com/en-us/library/aa196685 Microsoft SQL Server 2005:
http://msdn.microsoft.com/en-us/library/ms187048(v=SQL.90).aspx Microsoft SQL Server 2008:
http://msdn.microsoft.com/en-us/library/ms187048(v=SQL.100).aspx
Microsoft SQL Server 2008 R2:
http://msdn.microsoft.com/en-us/library/ms187048(v=sql.105).aspx
Microsoft SQL Server 2012: http://msdn.microsoft.com/en-us/library/ms187048.aspx
PostgreSQL 8.1: http://www.postgresql.org/docs/8.1/static/backup.html
PostgreSQL 8.2: http://www.postgresql.org/docs/8.2/interactive/backup.html
PostgreSQL 8.3: http://www.postgresql.org/docs/8.3/interactive/backup.html
PostgreSQL 8.4: http://www.postgresql.org/docs/8.4/interactive/backup.html
PostgreSQL 9.0: http://www.postgresql.org/docs/9.0/interactive/backup.html
IBM DB2 v9.1: http://publib.boulder.ibm.com/infocenter/db2luw/v9/topic/com.ibm.db2.udb.
IBM DB2 v9.5: http://publib.boulder.ibm.com/infocenter/db2luw/v9r5/topic/com.ibm.db2.
luw.admin.ha.doc/doc/c0052073.html
IBM DB2 v9.7: http://publib.boulder.ibm.com/infocenter/db2luw/v9r7/topic/com.ibm.db2.
luw.admin.ha.doc/doc/c0052073.html
IBM DB2 v10.1: http://publib.boulder.ibm.com/infocenter/db2luw/v10r1/topic/com.ibm.
db2.luw.admin.ha.doc/doc/c0052073.html Oracle Database 10g Release 2:
http://download.oracle.com/docs/cd/B19306_01/backup.102/b14192/toc.htm Oracle Database 11g Release 1:
http://download.oracle.com/docs/cd/B28359_01/backup.111/b28270/toc.htm Oracle Database 11g Release 2:
http://docs.oracle.com/cd/E11882_01/backup.112/e10642/toc.htm
5.1.2. Infobase Conversion for Use in Client/Server mode
Dumping/restoring an infobase can be used, for example, to convert a file mode infobase into a client/server mode.
IMPORTANT!
Before restoring or dumping operations, close all the infobase sessions.
Dump the infobase (using Administration – Dump Infobase). Next, create an empty infobase in the client/server mode. Open the infobase in the Designer mode and then restore the initial infobase (select Administration – Restore Infobase).
5.2. SERVER CLUSTER ADMINISTRATION
This utility is a snap-in module of the Microsoft Management Console and can be used on computers with Microsoft Management Console installed. Microsoft Management Console is a standard tool available in Microsoft Windows 2000/XP/ Server 2003/Vista/Server 2008. When 1C:Enterprise is installed to operate client/
server infobases under any of these operating systems, the 1C Enterprise 8 folder in the Start menu will include an item that will launch this utility.
The features available in server cluster administration utility are similar to those of server cluster software administration (see page 161).
5.2.1. Launching the Administration Utility
This utility can be launched only on computers with Microsoft Management Console installed. The utility is launched using Start – Programs – 1C Enterprise 8 – Advanced – Administration of 1C Enterprise server for 32-bit utility version or Start – Programs – 1C Enterprise 8 (x86-64) – Advanced – Administration of 1C Enterprise server for 64-bit utility version.
There is also an alternative way to launch the utility. Launch Microsoft Management Console. To do so, use the following command line:
mmc
When Microsoft management console is launched, select Console – Add/Remove Snap-in… menu item.

Fig. 27. Adding a snap-in
The Add/Remove Snap-in dialog will be displayed. Click the Add button in this dialog.
The Add Standalone Snap-in dialog will be displayed. Select
1C:Enterprise 8.3 Servers from the list, click Add and Close buttons to complete the operation and close the dialog.

Fig. 28. Selecting a snap-in
Then, click OK in the Add/Remove Snap-in dialog. This will connect the administration utility to the Microsoft Management Console.
5.2.2. Registering the Working Server Instance
When the administration utility is launched for the first time, the central servers tree contains only the working server installed on the computer where the administration utility is running (supposing the server agent runs on this computer).
To display the list of central servers, select and expand the branch 1C:Enterprise 8.3 central servers in the central servers tree.

Fig. 29. Central servers tree
The central servers tree contains the list of central servers connected to the utility. Each central server is identified by the name of the computer it runs on. The properties field displays the list of central servers with the network address of the central server and its description.
5.2.2.1. Connecting the Utility to a Central Server
To connect the utility to a new central server, select New – 1C:Enterprise 8.3 central server from the context menu or a similar command of the utility main menu.
This command opens the central server properties dialog.
 Fig. 30. New central server
Populate the fields of the dialog with the following data:
Protocol
The central server connection protocol. Select a value from the list. Default value is tcp. This field is intended for the protocol that will be used by the administration utility to connect to the central server agent. The only supported value is tcp.
Name
Network address of the central server where the server agent runs.
IP port
The network port number of the server agent launched on the central server. The default value is 1540. The server agent port is specified when it is launched (see page 94).
Description
An arbitrary description of the central server.
NOTE
The addresses of identical servers should be identical when server cluster and central server are configured. Identity of various addresses of the same server is not verified. For example, if a central server has an address Server in the cluster console, in the working server list it should also be entered as Server instead of using 54.34.86.12 (even if DNS specifies that Server is 54.34.86.12) or localhost.
5.2.2.2. Viewing and Editing Central Server Properties
To view and edit the central server properties, select the required server from the list of central servers and use Properties context menu command or a similar command of the utility main menu.
This command opens the central server properties dialog described in the previous section (see page 115).
5.2.2.3. Detaching the Utility from a Central Server
To detach the utility from a central server, select the server from the list of central servers and use the Delete context menu command or a similar command of the utility main menu.
5.2.2.4. Disconnecting the Utility from a Central Server
The 1C:Enterprise server cluster administration utility can be disconnected from a central server without deleting the central server connection parameters.
To disconnect the utility from a central server, select the server from the list of central servers and use the Disconnect context menu command or a similar command of the utility main menu.
5.2.3. Managing the Central Server Administrators List
A server cluster supports creation of a list of central server administrators so that only authenticated users could execute certain administrative actions (for example, adding a new cluster or viewing the list of central server administrators).
By default, the list of central server administrators is empty. This means that the system will not require authentication of the central server administrator to perform the actions listed.
To open the list of central server administrators, select the desired server from the central servers tree, switch to the Administrators branch and expand it:

Fig. 31. List of server cluster administrators
The central servers tree lists the administrators of the selected central server. Every administrator is identified by their name. The properties field contains the list of administrators for the selected central server with the administrator’s name and description.
If a non-central working server contains a non-empty list of central server administrators, the list of administrators will contain an administrator with a defined OS user authentication under which the ragent of the cluster’s central server runs, or an administrator that has the same user name and password as one of the administrators of the cluster’s central server.
5.2.3.1. Adding a Central Server Administrator
To add a new central server administrator, select the required server from the central servers tree, switch to the Administrators branch and use New – Administrator context menu command or a similar command of the utility main menu. This command will open the central server administrator properties dialog.
 Fig. 32. New central server
administrator
Fig. 32. New central server
administrator
Populate the fields of the dialog with the following data:
Name
The central server administrator name.
Description
An arbitrary description of the central server administrator.
Password authentication
A checkbox defining password authentication. It is checked by default.
Password
Password of the central server administrator.
Confirm password
Password confirmation.
OS authentication
Checkbox defining if operating system authentication tools should be used.
OS user
Operating system user. This can be set in the following format:
\\domain name\user name. Example: \\domainname\username. A user may be defined by directly entering the corresponding string or by selecting a user among all the operating system users visible from the computer where the infobase administration utility runs. To do so, click the "…" button and select the desired operating system user in the dialog displayed.
IMPORTANT!
The central server administrator names must be unique for every central server.
Two methods of central server administrator authentication are supported:
with a password
with operating system means
Password authentication will open the central server administrator authentication dialog. Enter the user name and password in this dialog.
Operating system tools authentication will not require entering the login and password while the authentication dialog is not displayed at all. The system analyses which operating system user establishes the connection and thus identifies the corresponding central server administrator.
IMPORTANT!
If no authentication type is selected for an administrator, the administrator will only be able to carry out the actions that do not require authentication.
5.2.3.2. Viewing and Editing Central Server Administrator Properties
To view and edit the central server administrator properties, select the required administrator from the list of central server administrators and use Properties context menu command or a similar command of the utility main menu.
This command will open the central server administrator properties dialog.
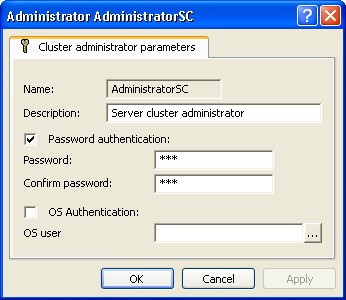
Fig. 33. Central server administrator properties
All the properties except the administrator name can be edited. The values in the fields Password and Confirm password will be hidden. 5.2.3.3. Deleting a Central Server Administrator
To delete a central server administrator, select the required administrator from the list of central server administrators and use the Delete context menu command or a similar command of the utility main menu.
5.2.3.4. Central Server Administrator Authentication
The system will automatically require authentication of the central server administrator if an action that requires authentication is attempted (provided that the list of central server administrators is not empty). This will display the central server administrator authentication dialog.
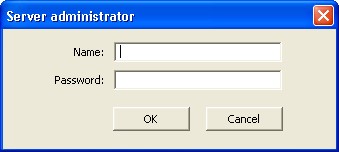 Fig. 34. Administrator authentication
Fill in the fields of the dialog with the following data:
Name
The central server administrator name.
Password
Password of the central server administrator.
5.2.4. Management of the Cluster List
To open the list of the clusters registered on the central server, select the required server from the central servers tree and switch to the Clusters branch and expand it.

Fig. 35. List of clusters
The central servers tree lists the clusters of the selected central server. Every cluster is identified by its network port number. The properties field contains the list of clusters for the selected central server with the cluster port numbers and descriptions.
5.2.4.1. Adding a Cluster
To add a new cluster to the central server, select the required server from the central servers tree, switch to the Clusters branch and use New – Cluster context menu command or a similar command of the utility main menu.
This command will display the cluster properties dialog.
 Fig. 36. New cluster
Fill in the fields of the dialog with the following data:
Cluster name
Any description of the cluster.
Computer
The name of the central server where the cluster is located. Not editable.
IP port
The network port number of the cluster manager. The default value is 1541.
IMPORTANT!
The cluster manager network port numbers must be unique within each central server.
Secure connection
Cluster security level. Select the value from the list (available values: disabled, connection only, continouosly). The default value is disabled. For details on use of cluster security levels, see page 46.
Restart interval ___ sec.
The timeout after a process is launched for the working process to be restarted.
Zero means that working processes will not be restarted automatically.
Allowed memory ___ KB
Defines the maximum size of the virtual address space. If this value is exceeded continuously for a specific time (see the following parameter), the working process will be restarted automatically. Zero means that no memory critical is defined so working processes are not restarted automatically.
Allowed memory exceeding interval ___ sec.
Defines the period when the maximum volume of the virtual address space of a working process is exceeded continuously (see the previous parameter). After this period, the working process is restarted automatically. Zero means that working processes will not be restarted automatically.
Stop disabled processes after ___ seconds
The timeout for an expired working process to be forced to terminate irrespective of existing connections. All the connections to this process will terminate abnormally. The value of this property can be edited during the cluster operation. Zero value means that no forced process termination will be applied.
Fault-tolerance level
The level of resilience defines the maximum number of working servers of the cluster that can failure at the same time without causing an abnormal termination of sessions of any users connected. For a detailed description of this property, see page 33.
Load balancing mode
The parameter defines which criteria will be used to select a work process when a new connection is being established. For more details on this property, see page 46.
5.2.4.2. Viewing and Editing Cluster Properties
To view and edit cluster properties, select the desired cluster from the list of central server clusters and use the Properties context menu command or a similar command of the utility main menu.
This command opens the cluster properties dialog.
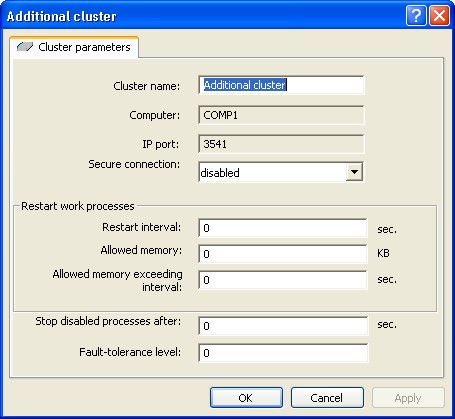 Fig. 37. Server cluster properties
5.2.4.3. Calling an application operation
Requirements will only take effect after the application operation is executed. Before the application is executed, a list of requirements edited in the cluster console has no impact on the server cluster work. A full or partial application operation can be executed.
The partial application will reassign services supporting migration between working servers without data loss. Other services will be reassigned only if new functionality assignment requirements make it impossible for those servers to remain where they are, or if working servers, where those services were run at the moment partial application operation was being called, are unavailable. The full application operation impacts all services and does not take into account their formal characteristics.
Operation of the full application can cause abnormal termination of all client applications connected to the server cluster where the operation is being executed. The same can occur in the case of a partial application if reassignment for all servers – but not just for servers allowing migration without data loss – is selected.
To call the application operation, select the Apply requirements of functionality purpose (partial) or Apply requirements of functionality purpose (full).
5.2.4.4. Deleting a Cluster
To delete a cluster, select the required cluster from the list of central server clusters and use the Delete context menu command or a similar command of the utility main menu.
CAUTION
Deleting a cluster will result in abnormal termination of all connections to the cluster being deleted.
5.2.5. Managing the Cluster Working Servers List
To open the list of cluster working servers, select the required server from the central servers tree, choose a cluster registered on this server, then switch to the Working servers branch and expand it:

Fig. 38. List of working servers
The central servers tree lists the working servers of a cluster. Every working server is identified by its network name. The properties field contains the list of working servers for the selected cluster with the server name, network port number of the server agent running on this server and server description.
When a cluster is created by default, the working server where it is created is added to the cluster. The Central server check box is selected for this working server.
5.2.5.1. Adding a Working Server to a Cluster
To add a new working server to a cluster, select the required central server from the central servers tree, choose the desired cluster registered on this server, switch to the Working servers branch and use the New – Server context menu command or a similar command of the utility main menu.
This command opens the properties dialog of the working server:
 Fig. 39. New working server
Populate the fields of the dialog with the following data:
Server description
An arbitrary description of the cluster server.
Computer
Network address of the working server where the server agent runs.
NOTE
If an IP address of the network address of the 1C:Enterprise working server (the Computer property) is specified in dot notation, then the address is not required in DNS (the hosts file).
IP port
The network port number of the server agent launched on the specified computer. The default value is 1540.
IP port ranges
The range of network ports that will be used to assign addresses to the working processes created on this server. The default value is 1560:1591.
Maximum memory in working processes
The maximum amount of memory (in bytes) available for all working processes on this working server.
Its value can vary from -1 to 9 223 372 036 854 775 807:
-1 means that the maximum memory capacity available for all working processes on this working server is not limited.
0 means that the value is automatically defined as 80% of the server RAM.
Each working process of the cluster defines the memory occupied by all working processes of the cluster on this working server (let us call this value ProcessMemory). The value is updated every 2 seconds. Upon the server call, the system records the current ProcessMemory value as at the beginning of the call (this value is called ProcessMemoryCurrent). The memory consumed during the call is calculated during the call execution (we call this value MemoryPerCall).
If Maximum memory in working processes is exceeded due to the memory consumption during one server call by less than the Safe memory consumption per call value, then this call will not be disrupted. Where the MemoryPerCall value has exceeded Safe memory consumption per call during a call, and the ProcessMemoryCurrent+MemoryPerCall value has exceeded Maximum memory in working processes, the call will be aborted with an exception. In this case, the technological log will record the EXCP event that contains:
exception text
exception context
Safe memory consumption per call
The memory amount in bytes that can be safely consumed during a server call.
Its value can vary from -1 to 9 223 372 036 854 775 807:
-1 means that any server call can be considered dangerous if the maximum memory amount of the working server is reached during the server call;
0 means that the amount value is automatically defined as 5% of the maximum memory capacity of the working process on this server.
Highest memory in working processes that allows to consider server performing
The aggregate RAM capacity consumed by working processes of this working server which, if reached, will stop assigning new infobase connections to this working server. The value 0 means that no limit is set.
Number of infobases per process
The number of infobase connections which can be processed by a single working process of this server. The value 0 means that no limit is set.
If the number of infobases exceeds the defined number, the server cluster creates an additional working process on this working server.
Number of connections per process
The number of connections to infobases that can be processed by a single working process of this server. The value 0 means that no limit is set.
If the number of connections processed by the working process exceeds the number defined, the server cluster creates an additional working process on this working server.
Port of the main cluster manager
The port number of the main cluster manager running on the working server. This network port is used during the generation of the server cluster address to be used by the client application. The address looks as follows: <Computer property>:<Port of the main cluster manager>. If the Computer property value is COMP1 and the Port of the main cluster manager property value is 2541, then the server cluster address will look as follows: COMP1:2541.
Manager for each service
Manages the process of assigning an individual cluster manager for each service type (see page 23). If this check box is selected, an individual cluster manager will be created for each service type. If not, all cluster services are assigned to the same manager of the cluster to which this working server belongs.
TIP
This property can be set at the trial operation stage.
Central server
If checked, the cluster register will be synchronized with this server, and the address of this server can be used for a client application to connect to the cluster.
5.2.5.2. Viewing and Editing Cluster Server Properties
To view and edit cluster server properties, select the required cluster from the list of cluster servers and use the Properties context menu command or a similar command of the utility main menu.
This command will open the properties dialog of the working server.
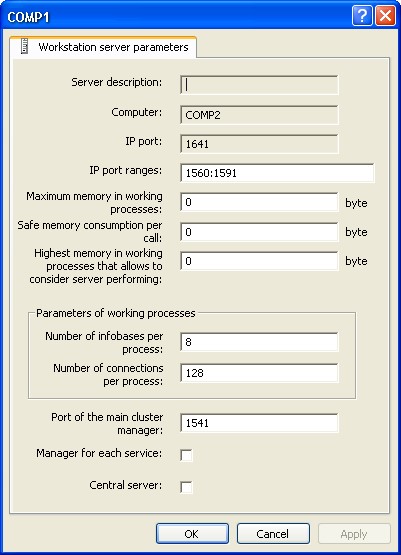 Fig. 40. Working server properties
In addition to the properties displayed in the dialog when a new server is created, the properties dialog for an existing server also displays the auxiliary network port of the server agent that is automatically set by the system when the server agent is launched, and that is used for interaction between server cluster processes.
Only the range of network ports can be edited in the properties of an existing server.
5.2.5.3. Deleting a Server from a Cluster
The working server deletion can result in abnormal termination of client applications. To avoid this, the following requirement (of maximum priority) for assigning functionality should be added to the server to be deleted:
Object type: Any requirement object.
Requirement Type: Do not assign.
Infobase name: not to be specified.
Additional parameter value: not to be specified.
Then you should apply a new set of requirements and wait until the existing connections are disabled. Then the working server can be deleted by using the Delete command of the context menu or a similar command in the main menu. You cannot delete the last working server with the Central server flag checked.
5.2.5.4. Requirements of functionality purpose
To view the list of requirements for assigning functionality that are specified for a particular working server, select a required server in the central server tree. Then the required cluster and working server should be selected. The Requirements of functionality purpose branch should be selected for the server selected.

Fig. 41. Requirements of functionality purpose
To create a new requirement, select the New – Requirement of functionality purpose command in the context menu or in the Action menu of the main menu.

Fig. 42. New requirement for assigning functionality purpose
For a detailed description of the requirements for assigning functionality, see page 38.
The requirements defined are processed according to their position in the requirement list of a particular server. In fact, the processing order (requirement priority) is defined by the Number column in the list of requirements for assigning functionality. The smaller its order number is, the earlier the requirement is processed (the higher its priority is). To change the priority of any specific requirement, place the cursor at the necessary requirement and select the Increase requirement priority or Reduce requirement priority commands (as applicable) in the context menu (or in the Action menu of the main menu.

Fig. 43. Changing the priority of the requirement
5.2.6. Managing the Infobase List
To open the list of infobases registered in the cluster, select the required server from the central servers tree, choose the desired cluster registered on this server, then switch to the Infobases branch and expand it.
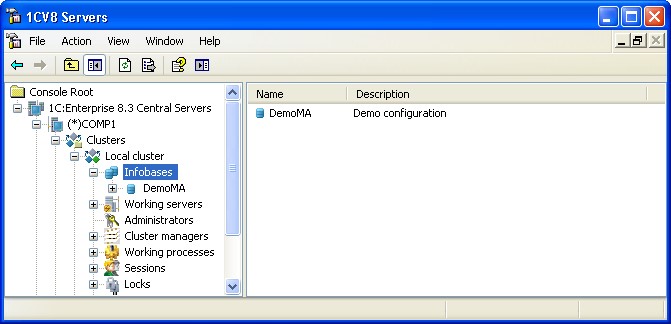
Fig. 44. Infobase list
The central servers tree lists the cluster infobases. Every infobase is identified by its name. The properties field contains an infobase list of the selected cluster with the infobase name and its description.
5.2.6.1. Registering a New Infobase
There are two ways to register a new infobase in a server cluster:
from the client application
directly in the server cluster
When a new infobase is added in a client application, the system automatically registers it in the server cluster.
To register a new infobase using the server cluster administration utility, select the required central server from the central servers tree, choose the desired cluster registered on this server, switch to the Infobases branch and use New – Infobase context menu command or a similar command of the utility main menu.
This command opens the infobase properties dialog (see fig. 45).
The infobase parameters are similar to the parameters of a new infobase created using 1C:Enterprise startup window. For description of these parameters, see "1C:Enterprise 8.3. Administrator Guide".
Pay special attention to the Allow license issuing by 1C:Enterprise server. This parameter manages provision of client licenses by the 1C:Enterprise server. If the parameter is set to Yes, the 1C:Enterprise server will grant client licenses if a client application is unable to obtain a client license on its own (obtaining client licenses through the 1C:Enterprise server is described in "1C:Enterprise 8.3. Administrator Guide"). If the parameter is set to No, the 1C:Enterprise server will not grant client licenses. In this case a client application which is unable to obtain a license on its own will display the following diagnostic message: License not found. Software protection key or acquired software license not found!
 Fig. 45. New infobase
IMPORTANT!
The infobase names must be unique within a cluster.
During registration of a new infobase, the system checks if a database with this name already exists on the specified database server. If it exists, the system will connect to it. If the existing database already contains the data of the 1C:Enterprise infobase, it will be connected to the existing infobase. If the database does not contain data of the infobase, a new 1C:Enterprise infobase will be initialized in this database.
5.2.6.2. Viewing Infobase Properties
To view and edit infobase properties, select the infobase from the infobase list and use the Properties context menu command or a similar command of the utility's main menu (see fig. 46).
Using the infobase parameters window, you can edit the names of the database server and of the used database, change the type of the database management system used, modify the database user name and password.
It's also possible to edit the properties related to opening user sessions with this infobase.
 Fig. 46. Infobase properties
Session opening lock is on
If checked, locking initialization of sessions with the infobase is enabled. At that:
The existing session may continue their operation;
The existing sessions may launch background jobs;
The existing sessions may establish connections;
No new sessions can be initialized;
No new connections can be established except for the connections of the existing sessions.
Start (start date/time of the lock)
The locking will be enabled if the current time is higher than the value specified in this property.
End (end date/time of the lock)
If the value of this property is not zero and is lower than the current time or equals it, the locking ends.
Message
The text that will be included in the error message when a connection to the locked infobase is attempted.
Permission code
The string that should be added to the /UC command line option or to the UC connection string option in order to connect to the infobase despite of the connections lock enabled.
Lock parameter
Random text. This can be used for various purposes in configurations.
Scheduled jobs lock is enabled
If checked, the lock of scheduled jobs is enabled for this infobase.
External session management
A string describing the parameters of the web service of external session management. The format of the web service parameter string is: Parameter=Value;. 4 parameters should be specified:
wsdl – the URL to get the web service description in the WSDL format.
ns – the web service namespace.
srvc – the name of a web service to perform external session management.
port – the name of the port of the web service used.
Example of a string with a web service description:
wsdl=http://server/sm/ws/manager?wsdl;ns=http://v8.1c.ru/SessionManager;srvc=manager;port=managerSoap;
For a detailed description of external session management, see page 32.
External management required
If the check box is selected, an error occurs when the web service for external session management is unavailable, and the infobase cannot be connected to. If deselected and the web service is not available, connection is possible and the number of concurrent connections is not limited.
Security profile
Where the security profile name is specified in this field (see page 161), the applied solution (on the 1C:Enterprise server side) will begin to function subject to restrictions imposed by the specified security profile. For details on the security profile description, see page 47.
Safe mode security profile
If the security profile name is specified in this field, the specified profile will define the restrictions imposed on the applied solution fragments that are functioning in safe mode. For details on the security profile description, see page 47.
5.2.6.3. Deleting an Infobase
To delete an infobase, select the required infobase from the infobase list and use the Delete context menu command or a similar command of the utility main menu.
This command will open a confirmation prompt: Do you want to delete the Infobase? If you confirm your intention, the system will suggest one of the three options to delete the infobase:

Fig. 47. Infobase deletion mode
Delete database – if you select this option, the infobase will be unregistered in the server cluster and the database corresponding to this infobase on the database server will be deleted.
Clear database – if you select this option, the infobase will be unregistered in the server cluster and all the data will be deleted from the database on the database server. The database itself will not be deleted from database server.
Leave unchanged – if you select this option, the infobase will only be unregistered in the server cluster. The database will not be changed.
If you select Delete database but there are users connected to this database, the infobase will be unregistered in the server cluster, and the attempt to delete the database will result in an error message, for example:
 Fig. 48. Error deleting infobase
5.2.7. Managing the Cluster Administrators List
You can create a separate list of administrators for every cluster registered on the central server so that only authenticated users could carry out administrative operations on the cluster.
By default, the list of cluster administrators is empty. This means that the system will not require authentication of the cluster administrator.
To open the list of cluster administrators, select the desired server from the central servers tree, choose the required cluster registered on this server, then switch to the Administrators branch and expand it.

Fig. 49. List of cluster administrators
The central servers tree lists the administrators of the selected cluster. Every administrator is identified by their name. The properties box contains the administrators list of the selected cluster with the administrator’s name and description.
5.2.7.1. Adding a Cluster Administrator
To add a new cluster administrator, select the required server from the central servers tree, choose the required cluster registered on this server, switch to the Administrators branch and use the New – Administrator context menu command or a similar command of the utility main menu.
This command displays the cluster administrator properties dialog.
 Fig. 50. New cluster administrator
Populate the fields of the dialog with the following data:
Name
Cluster administrator name.
Description
An arbitrary description of the cluster administrator.
Password authentication
A checkbox defining password authentication. It is checked by default.
Password
Password of the cluster administrator.
Confirm password
Password confirmation.
OS authentication
Checkbox defining if operating system authentication tools should be used.
OS user
Operating system user. This can be set in the following format: \\domain name\ user name. Example: \\domainname\username. A user may be defined by directly entering the corresponding string or by selecting a user among all the operating system users visible from the computer where the infobase administration utility runs. To do so, click the "…" button and select the desired operating system user in the dialog displayed.
IMPORTANT!
The cluster administrator names must be unique within each cluster server.
The system allows two methods of cluster administrator authentication:
with a password
with operating system means
In case of a password authentication, the system calls the cluster administrator authentication dialog (see page 137) where the username and password should be specified.
If operating system authentication is used, no user name or password should be entered to log in and the authentication dialog is not displayed. The system analyses which operating system user establishes the connection and thus identifies the corresponding cluster administrator.
If no authentication type is selected for an administrator, the administrator will only be able to carry out the actions that do not require authentication.
5.2.7.2. Viewing and Editing Cluster Administrator Properties
To view and edit cluster administrator properties, select a required administrator in the list of cluster administrators and execute the Properties command from the context menu or a similar command from the utility main menu. This command opens the cluster administrator properties dialog.

Fig. 51. Cluster administrator properties
Except for the administrator name, all the properties can be edited while the values in the fields Password and Confirm password will be hidden.
5.2.7.3. Deleting a Cluster Administrator
To delete a cluster administrator, select the administrator from the list of cluster administrators and use the Delete context menu command or a similar command of the utility main menu.
5.2.7.4. Cluster Administrator Authentication
The system will automatically require authentication of the cluster administrator if this administrator attempts to execute an action that requires authentication (provided that the list of cluster administrators is not empty). The cluster administrator authentication dialog will open.
Populate the fields of the dialog with the following data:
Name
Cluster administrator name.
Password
Password of the cluster administrator.
5.2.8. Viewing the List of Cluster Managers
The system enables you to view and change the list of cluster managers. Default settings provide for one manager who acts as the main manager and is defined in any cluster.

Fig. 52. Cluster managers
The cluster automatically defines the number and the location of cluster managers. This depends on the requirements for assigning functionality (see page 38) and the following working server properties: Manager for each service and Central server (see page 120). The administrator is unable to add or delete cluster managers manually.
To view a cluster manager description, use the Properties command in the cluster manager context menu.
You can change the cluster manager description in the dialog that appears.
 Fig. 53. Cluster manager properties
5.2.9. Viewing the Working Processes List
There are two ways to display the list of working processes:
for the entire cluster
for a selected cluster server
To open the list of working processes for the entire cluster, select the required server from the central servers tree, choose the desired cluster registered on this server, then switch to the Working processes branch and expand it:

Fig. 54. List of working processes
To open the list of working processes for a selected server of a cluster only, select the required server from the central servers tree, choose the desired cluster, identify the cluster server you need, then switch to the Working processes branch and expand it (see fig. 55).

Fig. 55. List of working processes for a specific working server
The central server tree contains a list of working processes. Each working process can be identified by the server name and its order number in this working server. The properties field displays service information describing a specific working process. The parameters displayed are described below.
To view and change working process properties, select a required working process in the list of working processes and execute the Properties command from the context menu or a similar command from the utility main menu. For details on administration utility see page 111. The administrator cannot add or delete working processes manually.
The command displays the working process properties dialog.
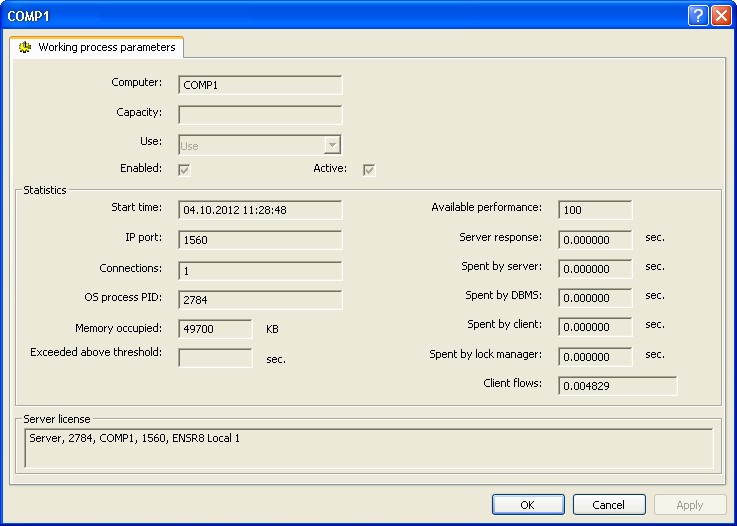
Fig. 56. Working process properties
In addition to the properties displayed in the dialog when a new working process is created, the properties dialog for an existing working process contains the following non-editable fields:
Computer
The working server the working process runs on.
Capacity
The relative performance value.
Use
Working process use flag. The property can have the following values:
Use
Do not use
Use as backup
Central cluster server agent starts all used working processes. If any of used working processes occurs to be inactive then cluster starts it again. If a working process is designated as unused, it will be stopped after all connections are disabled or after a period of time defined by the Stop disabled processes after property of the cluster.
The number of working processes and their use flag are defined by the server automatically. This process can be managed via the working server settings (see page 33) and the requirements for assigning functionality (see page 38).
Enabled
The working process is currently enabled and can be used by the system.
Active
The working process is currently used and active.
Start time
The time when the working process was last launched.
IP port
Network port of the working process that is dynamically selected by the system from the range of network ports specified for this server. The port is selected when the working process is launched.
Connections
The current number of connections served by the working process.
OS process PID
Process number in terms of the OS under which the working process is run.
Memory occupied
The volume of memory used by the working process.
Exceeded above threshold
Time (in seconds) over which the Memory used parameter exceeds the value specified in the Allowed memory parameter of the server cluster. For details, see page 120.
Available performance
Currently available performance. For details, see page 33.
Server response
The average time spent to serve one connection. This is equal to the total amount of values of the following four fields:
Spent by server
Spent by DBMS
Spent by client
Spent by lock manager
Spent by server
The average time the working process takes to serve one connection.
Spent by DBMS
The average time the database management system takes to serve one connection.
Spent by client
The average time the client takes to serve one connection.
Spent by lock manager
The average time the lock manager takes to serve one connection.
Client flows
The average number of client threads processed by the working process. This is used by the system to calculate the working process performance.
For details on performance parameters of a working process, see page 38.
Server license
This field displays information on a version and features of a server license used by this working process. For a description of the string created, see page 183.
You can only edit performance and working process use flag in the properties of an existing working process.
5.2.10. Managing a Sessions List
There are two ways to display the list of sessions:
for the entire cluster
for a specific infobase
To open the list of sessions for the entire cluster, select the required central server from the central servers tree, choose the desired cluster registered on this server, then switch to the Sessions branch and expand it.
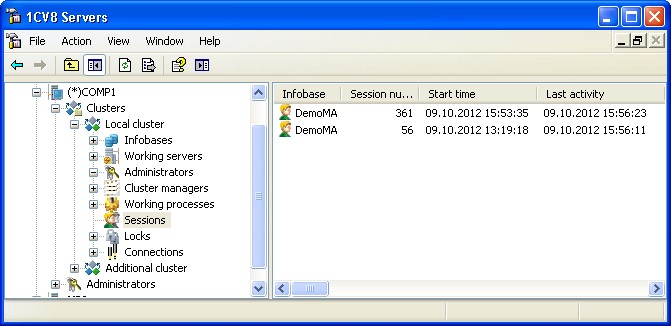
Fig. 57. List of server cluster sessions
To open the list of connections for a specific infobase, select the required central server from the central servers tree, choose the desired cluster, define the infobase you need, then switch to the Sessions branch and expand it.

Fig. 58. List of infobase sessions
The properties field lists the sessions with the following information:
Infobase
The name of the connected infobase.
Session number
Number of the session.
Start time
The time when the session was created.
Last activity
The time when some session activity was last recorded.
Computer
The network host name of the user who ran the client application that initiated the session. The host name field will be empty if the session is created to serve a web client, a thin client connected via the web server or to serve a web service.
User
Name of the infobase user.
Application
Client application operation mode (see page 27).
Language
Application localization language.
Server
The name of the connected server of the cluster.
Port
The network port number of the working process serving this connection.
Process
The number of the working server process serving this connection (in terms of the operating system).
Connection
The number of the connection with this session.
Connecting to DBMS
Identifier of the database server process. This is displayed if the session is currently accessing the database.
Held
Database server process ID. This is displayed only if, at the moment the session has captured the database connection, the DBMS is being called, or a transaction is open, or the TempTablesManger object with at least one temporal table created is being stored.
Locked by DBMS
The period of time during which the current session is connected with the database from the capture up to the current moment. This is displayed only if the DBMS is captured by the session.
Control blocked
User name (session number) if the process waits for a transactional lock to be released.
DBMS call duration (current)
The duration of the current call to the database management system measured from the beginning of the call (in seconds).
DBMS calls duration (5 min.)
The duration of the call to the database management system over the last 5 minutes (in seconds).
DBMS call duration (total)
The duration of the calls to the database management system measured from the beginning of the first call (in seconds).
DBMS data (5 min)
The volume of the data transferred by this client connection between the 1C:Enterprise server and the database server over the last 5 minutes (in bytes).
DBMS data (total)
The volume of the data transferred by this client connection between the 1C:Enterprise server and the database server from the beginning of this session (in bytes).
Call time (current)
Current execution time of the last incomplete server call.
Calls duration (5 min)
The time this connection was calling the server over the last 5 minutes.
Calls duration (total)
The total time of server calls in seconds measured from the moment of client connection startup (in seconds).
Call count (5 min)
The number of calls sent to the server by this connection over the last 5 minutes.
Number of calls (total)
The number of calls sent by this connection to the server from the beginning of the client connection (in units).
Data volume (5 min)
The volume of the data sent and received over the last 5 minutes (in bytes).
Data volume (total)
The volume of the data sent and received since the beginning of the client connection (in bytes).
Memory (current)
The RAM capacity used since the current call started (in bytes).
Memory (5 min)
The RAM capacity used in the call process within the last 5 minutes (in bytes).
Memory (total)
The RAM capacity used in the call process since the start of the session (in bytes)
Read (current)
The data volume read since the current call started (in bytes).
Read (5 min)
The data volume read from the disk by this session within the last 5 minutes (in bytes).
Read (total)
The data volume read from the disk by this session since it started (in bytes).
Write (current)
The data volume written to the disk since the current call started (in bytes).
Write (5 min)
The data volume written to the disk by this session within the last 5 minutes (in bytes).
Write (total)
The data volume written to the disk by this session since it started (in bytes).
License
This field displays information on the particular version and features of the client license used by this session. For a description of the string created, see page 183.
5.2.10.1. Viewing Session Properties
To view session properties, select the required session from the list of sessions and use the Properties context menu command or a similar command of the utility main menu.
This command will display the session properties dialog (see fig. 59).
The session properties dialog contains the following information (no properties can be edited):
Infobase
The name of the infobase the session is established with.
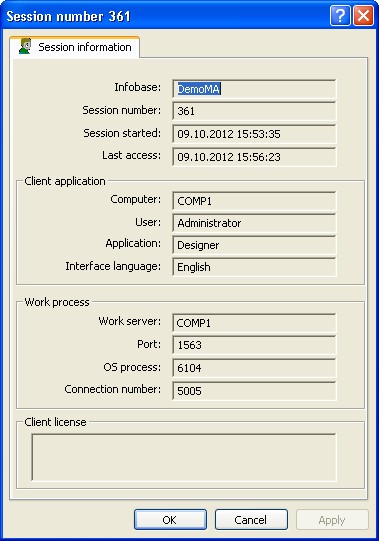 Session number
Number of the session.
Session started
The time when the session was created.
Last access
The time when some session activity was last recorded.
Computer
The network host name of the user that ran the client application that initiated the session. The host name field will be empty if the session is created to serve a web client, a thin client connected via the web server or to serve a web service.
User
Name of the infobase user.
Application
Client application operation mode (see page 27).
Interface language
Localization language of the client application.
Work server
The name of the connected server of the cluster.
Port
The network port number of the working process serving this connection.
OS process
The number of the working server process serving this connection (in terms of the operating system).
Connection number
The number of the connection with this session.
Client license
This field displays information on the particular version and features of the client license used by this session. For a description of the string created, see page 183.
5.2.10.2. Terminating a Session
To end a session, select the session from the list of sessions and use the Delete context menu command or a similar command of the utility main menu.

Fig. 60. Session break
IMPORTANT!
Be careful with this feature as terminating an active user session with an infobase can cause data loss.
To end a session, you need to have administrative rights for the server cluster (see page 116).
5.2.11. Managing the Connections List
There are several ways to display the list of connections:
for the entire cluster
for a specific working process of the cluster
for a specific infobase
for a specific working process of the cluster server
To open the list of connections for the entire cluster, select the required central server from the central servers tree, choose the desired cluster registered on this server, then switch to the Connections branch and expand it.

Fig. 61. Cluster connections
To open the list of connections for a specific cluster working process, select the required central server from the central servers tree, choose the desired cluster, switch to the Working processes branch to identify the working process you need, then switch to the Connections branch and expand it:

Fig. 62. Working process connections
To open the list of connections for a specific infobase, select the required central server from the central servers tree, choose the desired cluster, define the infobase you need, then switch to the Connections branch and expand it:
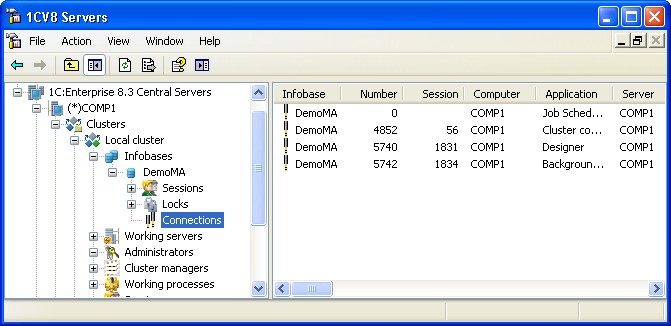
Fig. 63. Infobase connections
To open the list of connections for a specific cluster server working process, select the required central server from the central servers tree, choose the desired cluster and cluster server, identify the working process you need, then switch to the Connections branch and expand it:
Fig. 64. Working process connections
The central servers tree does not display connections. The properties field lists the connections with the following information:
Infobase
The name of the connected infobase. The field is empty for service connections.
Number
The number of connection. The number of each subsequent connection to the infobase exceeds the previous connection number by one. A new connection will only have 1 for its number if no infobase connections existed prior to this one. Zero is assigned as the number only for the service connections that are not related to any infobase. Hence, the connections are numbered from 1 both in the file mode and client/server modes only after all the clients are disconnected from the infobase (including scheduled and background jobs).
Session
The number of the session the selected connection is related to.
Computer
The network host name of the user who established the connection.
Application
Identifies the application that uses this connection (see page 27).
Server
The name of the connected server of the cluster.
Server port
The network port number of the working process serving this connection.
Connected in
The time when this connection was established.
If a connections list is opened for a specific infobase, the properties field includes additional columns that are intended to analyze the database locks in real time.
5.2.11.1. Viewing the Connection Properties
To view the connection properties, select the required connection from the list of connections and use the Properties context menu command or a similar command of the utility main menu.
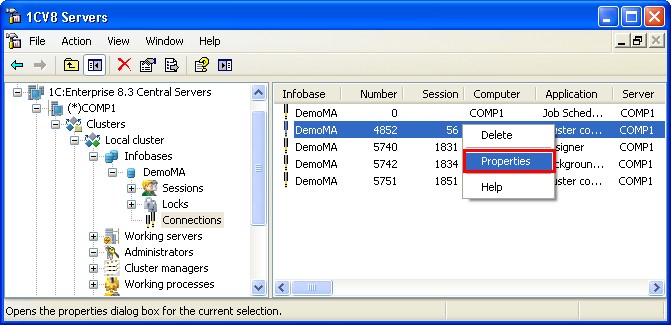
Fig. 65. List of infobase connections
This command opens the connection properties dialog.

Fig. 66. Connection properties
The connection properties dialog contains the following information (no properties can be edited):
User
The user account under which this connection is executed.
Computer
Host name of the computer that initiated the connection.
Application
Application name (see page 27) that initiated the infobase connection.
Infobase exclusively
The sigh of exclusive infobase lock enabled (see page 32).
Database
Database connection established sign.
Exclusive
The sign of the infobase operating in exclusive mode.
Server
The name of the connected server.
Server port
The network port of the server that is used for interaction.
Start session
The time when the connection was established.
Connection
Identifier of the current connection.
Connection to DBMS
Identifier of the database server process. This is displayed if the connection is accessing the database when the properties dialog is opened.
Locked in the DBMS
The duration of the database server call by the time the properties dialog is opened. This is displayed if the connection is accessing the database when the properties dialog is opened.
DBMS call duration (total)
The duration of the calls to the database management system measured from the beginning of the first call (in seconds).
DBMS call duration (5 min.)
The duration of the call to the database management system over the last 5 minutes (in seconds).
DBMS call duration (current)
The duration of the current call to the database management system measured from the beginning of the call (in seconds).
DBMS data size (total)
The volume of the data transferred by this client connection between the 1C:Enterprise server and the database server from the beginning of this session (in bytes).
DBMS data size (5 min)
The volume of the data transferred by this client connection between the 1C:Enterprise server and the database server over the last 5 minutes (in bytes).
Locked by DBMS
The identifier of the process that locked this process.
Locked
User name (connection number) if the process waits for a transactional lock to be released.
Calls duration (total)
The total time of server calls in seconds measured from the moment of client connection startup (in seconds).
Calls duration (5 min.)
The time this connection was calling the server over the last 5 minutes.
Call time (current)
Current execution time of the last incomplete server call.
Number of calls (total)
The number of calls sent by this connection to the server from the beginning of the client connection (in units).
Number of calls (5 min)
The number of calls sent to the server by this connection over the last 5 minutes.
Data volume (total)
The volume of the data sent and received since the beginning of the client connection (in bytes).
Data volume (5 min)
The volume of the data sent and received over the last 5 minutes (in bytes).
Memory (total)
The RAM capacity used in the call process since the connection started (in bytes).
Memory (5 min)
The RAM capacity used in the call process within the last 5 minutes (in bytes).
Memory (current)
The RAM capacity used since the current call started (in bytes).
Read from disc (current)
The data volume read since the current call started (in bytes).
Read from disc (total)
The data volume read from the disk by this session since the connection started (in bytes).
Read from disc (5 min)
The data volume read from the disk by this connection within the last 5 minutes (in bytes).
Write to disc (total)
The data volume written to the disk by this connection since the session started (in bytes).
Write to disc (5 min)
The data volume written to the disk by this session within the last 5 minutes (in bytes).
Write to disc (current)
The data volume written to the disk since the current call started (in bytes).
5.2.11.2. Deleting a Connection
To end a connection, select the connection from the list of connections and use the Delete context menu command or a similar command of the utility main menu:

Fig. 67. Deleting a connection
IMPORTANT!
Be careful with this feature as ending an active user connection to the infobase can cause data loss.
If a lengthy database call is sent to Microsoft SQL Server, IBM DB2 or Oracle Database, the 1C:Enterprise attempts to delete the connection. The attempt will be successful if the user account that is used to connect to the database server has sufficient rights (for details on the required database user rights, see documentation for the database management system used). If a connection is broken successfully, the following message is displayed to the user: Session closed by administrator. It is impossible to delete a connection for PostgreSQL database. An attempt to run the command that deletes a connection will not result in any actions.
If a client runs some code on the 1C:Enterprise server, the server will attempt to break the connection between the client application and the server. To break a connection, you need to have administrative privileges for the server cluster (see page 116) and for the infobase. If a connection is broken successfully, the following message is displayed to the user: Session closed by administrator.
5.2.12. Managing the Locks List
There are two ways to display the list of locks:
for the entire cluster (all the locks or locks by connections);
for a specific infobase (all the locks or locks by connections).
To open the list of locks for the entire cluster, select the required central server from the central servers tree, choose the desired cluster registered on this server, then select and expand the Locks branch.
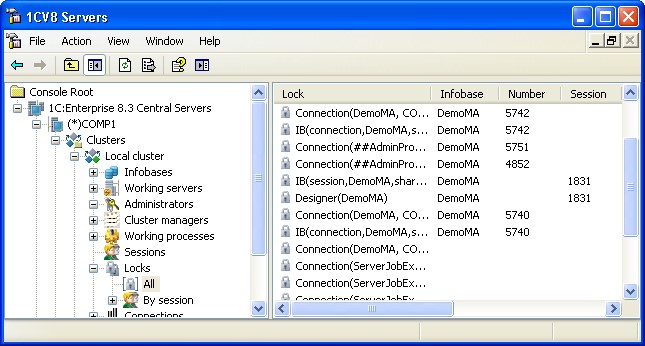
Fig. 68. List of cluster locks
If you then select the All branch, all the cluster locks will be listed.
You can also expand the By session branch and select the session you want. In this case the list of locks will contain only the locks for the selected session:

Fig. 69. List of cluster locks by sessions
To open the list of locks for a specific infobase, select the required central server from the central servers tree, choose the desired cluster and the infobase, then switch to the Locks branch and expand it.
If you select the All branch next, the list of all the locks of this infobase will be displayed:

Fig. 70. List of all locks
You can also expand the By session branch and select the desired session. In this case the locks will be listed for the selected session:

Fig. 71. List of locks by sessions
If you select to view the list of locks for a specific connection, the central servers tree contains the list of its connections. Every connection is identified by its number and user host name.
The properties field lists the locks with the following information:
Lock
Represents the types of locks and the major parameters. The following types of locks exist:
Infobase locks:
○ DB – 1C:Enterprise database lock. Parameters:
□ Lock source (session or connection)
□ Infobase name
□ Shared or exclusive
○ IB – infobase lock. Parameters:
□ Lock source (session or connection)
□ Infobase name
□ Shared or exclusive
○ Designer – exclusive lock of the Designer. Parameters:
□ Infobase name
○ DB object – exclusive lock of 1C:Enterprise database object. Parameters:
□ Infobase name Cluster locks:
○ Cluster manager – activity of a cluster manager process. Parameters:
□ Server name
□ Ports of cluster manager process
○ Work process – activity of a 1C:Enterprise working process. Parameters:
□ Server name
□ Ports of the cluster working process
○ Connection – a TCP connection with a cluster working process or a scheduled job. Parameters:
□ Server context name (may match the infobase name)
□ Host name and identifier of the application that initiated the connection
□ Infobase names and connection numbers if the connection is associated with one or multiple infobases
Infobase
The name of the infobase the lock is related to. The name will be left blank if the lock is not related to an infobase.
Number
Number of connection with the infobase. It can be blank if:
The lock is not related to an infobase, or
The lock source is a session that is not attached to any connection.
Session
The number of the session that initiated the lock. It can be blank if:
The lock is not related to an infobase, or
The lock source is a connection that has no sessions attached.
Computer
Client host name of the computer that initiated the lock. It is blank if the lock source is a server process.
Application
The name of the client application that initiated the lock. It is blank if the lock source is a server process.
Server
The name of the working process server that is responsible for the lock. It is blank if the lock source is a server process or a session with no connections attached.
Port
Network port of the working process that is responsible for the lock. It is blank if the lock source is a server process or a session with no connections attached.
Locked in
The time when the lock was enabled.
5.2.13. Working with a List of Security Profiles
To display the list of infobases registered in the cluster, select the required server in the central server tree, select the required cluster registered in this server, and then select and expand the Security profiles branch.
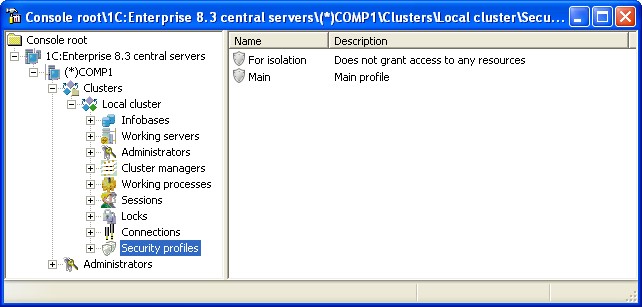
Fig. 72. List of security profiles
The central server tree contains a list of cluster security profiles. Each security profile is identified by its name. The property field should specify a list of security profiles of the selected cluster with the profile name and its description.
5.2.13.1. Adding a Profile
To add a new security profile to the cluster, select the required central server in the central server tree, select the required cluster registered in this server, then select the Security profiles branch and execute the New – Security profile command of the context menu or a similar command in the main menu of the utility. This command execution opens the security profile property dialogue box.

Fig. 73. New Security Profile
The data to be entered in the dialogue field is as follows:
Name
Security profile name. The name should be specified within the cluster.
Description
An arbitrary description of the security profile.
Can be used as a safe mode security profile
This parameter indicates that the profile name can be specified as the SafeMode parameter value of the SetSafeMode() method of the global context, the Create() and Connect() methods of the external processors manager, the Create() and Connect() methods of the external reports manager, and get as a result of the SafeMode() functions of the global context.
server file system:
This parameter defines whether file resources on the computer on which the 1C:Enterprise server is installed can be accessed from the applied solution. For details on this parameter, see page 48.
COM objects:
This parameter defines whether the applied solution can interact with COM objects on the computer on which the 1C:Enterprise server is installed. For servers running using Linux, this parameter makes no sense. For details on this parameter, see page 52.
add-ins:
This parameter defines whether the applied solution can interact with external components on the 1C:Enterprise server. For details on this parameter, see page 64.
external reports and data processors:
This parameter defines whether external reports and data processors as well as the Execute() operator and the Evaluate() function can be used in the applied solution. For details on this parameter, see page 53.
operating system applications:
This parameter defines whether the applied solution can access the operating system on the 1C:Enterprise server side. The list of applications depends on the operating system that runs the 1C:Enterprise server. For details on this parameter, see page 54.
Internet resources:
This parameter defines whether the applied solution code executed on the 1C:Enterprise server can interact with internet resources. For details on this parameter, see page 55.
privileged mode:
This parameter defines whether the privileged mode can be managed from the applied solution running on the 1C:Enterprise server side if this profile is specified as a security profile of the safe mode. For details on this parameter, see page 56.
5.2.13.2. Viewing and Changing Profile Properties
To view and change security profile properties, select the required profile from the list of the cluster security profiles and execute the Properties command in the context menu or a similar command on the main menu of the utility. This command execution displays the security profile property dialogue box.
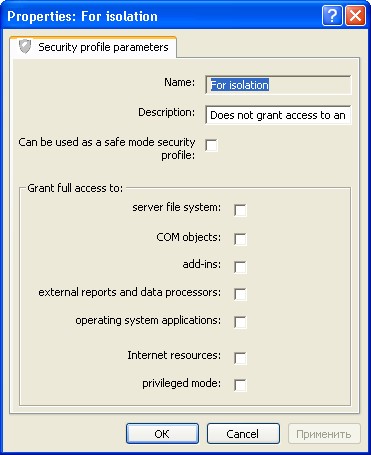
Fig. 74. Security profile properties
Some parameters of the profile allow you to set exceptions from the general prohibition rule. For instance, you can prohibit the use of all directories in the server file system except for those specified in the exception list.
To create an exception from any security profile restriction, place the cursor on the required item subordinate to the selected virtual directory and select the New – <item> command in the context menu, e.g. the New – Virtual directory command.
In the window that opens, the Description property serves to describe the item being created, and the other parameters are defined in the corresponding section of the general description of the security profile (see page 47).
5.2.13.3. Deleting a Profile
To delete a security profile, select the required profile from the list of security profiles and execute the Delete command in the context menu or a similar command in the main menu of the utility.
5.3. SERVER CLUSTER ADMINISTRATION SOFTWARE
5.3.1. Access to the cluster from 1C:Enterprise script
The interface of the 1C:Enterprise server cluster administration is described in the Syntax Assistant, in the section Tools for Integrating with Other Systems – COM connector – Server Cluster Administration.
Two objects are used in server cluster administration: the Server Agent Connection and the Working Process Connection.
The Server Agent Connection can be established using the ConnectAgent() method of the COM connector object:
COMConnector = New COMObject  ("V83.COMConnector");
ServerAgentConnection =  COMConnector.ConnectAgent("TestSrv");
The Server Agent Connection allows you to:
authenticate, add, delete or obtain the list of central server administrators and cluster administrators
create, delete or obtain the list of clusters
create, delete or obtain the list of servers
create, delete or obtain the list of the cluster working processes
obtain the list of cluster services
obtain the list of infobase sessions
obtain the list of cluster connections
obtain the list of infobase connections
obtain the list of the infobases registered in the cluster
obtain the list of cluster locks
obtain the backup list
obtain other information
The working process connection can be established using the ConnectWorkingProcess() method of the COM connector object:
COMConnector = New COMObject  ("V82.COMConnector");
WorkingProcessConnection = COMConnector.
ConnectWorkingProcess("TestSrv:1562");
The working process connection allows you to:
authenticate infobase users
create, delete or obtain the list of infobases registered in the cluster
obtain the list of infobase connections
disconnect the infobase
connect to an infobase (COM connection)
obtain other information
For details on software administration, see the built-in help: Script – Tools for Intergating with Other Systems – COM Connector – Server Cluster Administration.
5.3.2. External session management
To allow for external session management, you need to implement a web service providing a specific set of methods and a control mechanisms. This web service can be enabled both with the aid of 1C:Enterprise tools and by external tools.
Below is a description of the web service and an example of its implementation via 1C:Enterprise tools.
5.3.2.1. A web service description
The web service name is not specified. The timeout to execute the methods is not limited.
onStartSession
Description:
The method is called by the server cluster when starting the session (except for a background job session and WS connection session). The method determines whether a new session with specified parameters can be created. The server cluster is informed of the decision via the return code.
Parameters:
CallNo input
Type: Number. Call number. Each time the cluster calls the web service, the number is incremented by 1. The web service can prompt for synchronization of session data on the basis of CallNo.
The call number is unique in terms of an infobase.
ClusterID input
Type: String. Server cluster ID. It contains a string presentation of a unique ID (UUID).
ClusterName input
Type: String. Name of the server cluster containing the infobase.
InfoBaseName input
|
Type: String. Name of the infobase with which the session being created will |
|
|
interact. SessionID |
input |
|
Type: String. Session ID. It contains a string presentation of a unique ID |
|
|
(UUID). UserID |
input |
|
Type: String. Server cluster ID. It contains a string presentation of a unique |
|
|
ID (UUID). UserName |
input |
|
Type: String. User Name. AppID |
input |
Type: String. Name of an application attempting to access the infobase. For details on this parameter value, see the description of the ApplicationPresentation() function of the global context.
Zone input
Type: String. Contains initial separator values for the session being created. The string is passed in the format specified for the –Z application startup command string.
LanguageCode input
Type: String. Message language code for the session being created.
ErrorDescription output
Type: String. Describes the reason for the ban on creating a session that can be read and understood by the user. It is populated if the Web service method returns 1.
Returned value:
Type: Number. The returned value can be as follows:
0 – the session can be created.
1 – the session cannot be created. The user starting a session receives an enter error message with a text of the exception from the ErrorDescription parameter, or the following text: Session initiation forbidden by external session management service, if the ErrorDescription parameter value is an empty string.
2 – synchronization is needed. In this case the server cluster will call the synchronize method with a session list that does not contain this session, and then it will recall the onStartSession method. External session management calls are not synchronized, and it is the external session management service that verifies whether session list synchronization is required. The order number of the call can be used as source information (the CallNo parameter). Skipping some call numbers after a delay can be considered as a condition requiring synchronization.
onFinishSession Description:
This method is called at the end of the session.
Parameters:
CallNo input
|
Type: Number. Call number. The call number is unique in terms of an infobase. ClusterID |
input |
|
Type: String. Server cluster ID. It contains a string presentation of a unique |
|
|
ID (UUID). SessionID |
input |
Type: String. Session ID. It contains a string presentation of a unique ID (UUID).
Returned value:
Not available. synchronize
Description:
This method is intended to synchronize data on sessions created between a server cluster and a web service executing an external session management process. It is called by the server cluster if the onStartSession() method has returned 2.
Parameters:
CallNo input
Type: Number. Call number.
The call number is unique in terms of an infobase.
ClusterID input
Type: String. Server cluster ID. It contains a string presentation of a unique ID (UUID).
ClusterName input
Type: String. Name of the server cluster containing the infobase.
InfoBaseName input
Type: String. Name of the infobase for which the information on the number of sessions is being synchronized.
CurrentSessions input
Type: Sessions. This contains data on all the sessions created for a specific infobase via the external session management process. The object contains the Content property representing the Session object collection which describes one session. The collection can be empty.
The Sessions object description (in the XSD format):
<xs:schema  xmlns:ns1="http://v8.1c.ru/8.1/data/core" xmlns:tns=
"http://v8.1c.ru/SessionManagement"
xmlns:xs="http://www.w3.org/2001/XMLSchema"
targetNamespace="http://v8.1c.ru/SessionManagement"
attributeFormDefault="unqualified"  elementFormDefault="qualified">
<xs:import  namespace="http://v8.1c.ru/8.1/data/core"/>
<xs:complexType  name="Session">
<xs:sequence>
<xs:element  name="SessionID" type="xs:string"/>
<xs:element  name="SessionID" type="xs:string"/>
<xs:element  name="UserName" type="xs:string"/>
<xs:element  name="AppID" type="xs:string"/>
<xs:element  name="Zone" type="xs:string"/>
<xs:element  name="LanguageCode" type="xs:string"/>
<xs:sequence>
</xs:complexType>
<xs:complexType  name="Sessions">
<xs:sequence>
<xs:element  name="Content" type="tns:Session" minOccurs="0"  maxOccurs="unbounded"/>
<xs:sequence>
</xs:complexType>
</xs:schema>
Returned value:
Not available.
5.3.2.2. Example of implementation
Here is an example of an external session management web service.
NOTE
The example given in this section is not a complete solution. It is provided to help demonstrate the general concept of possible implementation
This example will implement the following operation scheme:
The administrator can limit the number of concurrent sessions for an infobase.
To this effect, specify the infobase name and the number of concurrent sessions.
If the infobase is not in the list, the number of sessions is not limited.
While working with an infobase, you can see which sessions this infobase has.
The web service is a simple configuration comprised of one catalog and one web service. The catalog contains a list of infobases, a session number limit and the order number of the most recent call. The web service executes actions related to session recording.
The catalog has the following characteristics:
Name: AvailableSessions
Code length: 0 Description length: 50 Attributes:
○ Name: Count, type Number(2), non-negative
○ Name: LastCallNumber, type Number(10), non-negative Tabular section:
○ Name: CurrentSessions
○ Attributes:
□ Name: SessionID, type: String(40), of variable length
□ Name: UserID, type: String, open ended
□ Name: UserName, type: String, open ended
□ Name: AppID, type: String, open ended
□ Name: Zone, type: String, open ended
□ Name: LanguageCode, type: String, open ended
This catalog will store the infobase name (the Description standard attribute), the maximum number of simultaneous sessions for this infobase (the Count attribute) and the order number of the web service call (the LastCallNumber attribute). The LastCallNumber attribute will check whether you need to synchronize the data of the 1C:Enterprise server cluster and web service. The tabular section will contain data on the sessions allowed by the web service. The session record will be created in the onStartSession() method and deleted in the onFinishSession() method. Thus, comparing the maximum number of sessions allowed for this infobase and the number of recorded sessions makes it possible to determine whether it is possible to create a new session or not.
You also need to create the web service described above (see page 163) and place the following program code in the web service module. The Web service must contain a reference to the XDTO package http: //v8.1c.ru/SessionManagement, describing the Sessions object. For details on this package, see page 163.
Web service operation text
Function onStartSession(CallNo, ClusterID, ClusterName, InfoBaseName, SessionID,
UserID, UserName, AppID, Zone, LanguageCode, ErrorDescription)
ErrorDescription  = "";
Result  = Catalogs.AvailableSessions.FindByDescription(InfoBaseName, True);
If  Result.IsEmpty() Then
// If  there is no infobase with the specified name in the catalog,
//  no limits are set for it
Return  0;
EndIf;

Object  = Result.GetObject();
Object.LastCallNumber  = Object.LastCallNumber + 1;

//  Checking whether the call sequence is violated
// If  it is violated, synchronization is required
If  Object.LastCallNumber <> CallNo Then
Return  2;
EndIf;

If  Result.CurrentSessions.Count() > Result.Count Then
// The  maximum number of sesions is reached, no more can be created
Object.Write();
Return  1;
Else
//  Sessions can be created
Row =  Object.CurrentSessions.Add();
Row.SessionID  = SessionID;
Row.UserID  = UserID;
Row.UserName  = UserName;
Row.AppID  = AppID;
Row.Zone  = Zone;
Row.LanguageCode  = LanguageCode;
Object.Write();
Return  0;
EndIf;
EndFunction

Function onFinishSession(CallNo, ClusterID,  SessionID)
Query  = New Query;
Query.Text  =
"SELECT
|    AvailableSessions.Ref
|FROM
|   Catalog.AvailableSessions AS  AvailableSessions
|WHERE
|   AvailableSessions.CurrentSessions.SessionID  = &SessionID";

Query.SetParameter("SessionID",  SessionID);
QueryResult  = Query.Execute();
SelectionDetailedRecords  = QueryResult.Choose();
While  SelectionDetailedRecords.Next() Do
//  Delete the session from the service base
Object  = SelectionDetailedRecords.Ref.GetObject();
Result  = Object.CurrentSessions.FindRows(New Structure("SessionID",  SessionID));
For  Each Row From Result Do
Object.CurrentSessions.Delete(Object.CurrentSessions.IndexOf(Row));
EndDo;
Object.LastCallNumber  = CallNo;
Object.Write();
EndDo;
Return  Undefined;
EndFunction

Function synchronize(CallNo, ClusterID,  ClusterName, InfoBaseName, CurrentSessions)
Result  = Catalogs.AvailableSessions.FindByDescription(InfoBaseName, True);
If  Result.IsEmpty() Then
// If  there is no infobase with the specified name in the catalog,
//  no limits are set for it
Return  Undefined;
EndIf;
//  Repopulating the session list based on server data
Object  = Result.GetObject();
Object.CurrentSessions.Clear();
For  Each Session From CurrentSessions.Content Do
Row =  Object.CurrentSessions.Add();
Row.SessionID  = Session.SessionID;
Row.UserID  = Session.UserID;
Row.UserName  = Session.UserName;
Row.AppID  = Session.AppID;
Row.Zone  = Session.Zone;
Row.LanguageCode  = Session.LanguageCode;
EndDo;
Object.LastCallNumber  = CallNo;
Object.Write();
Return  Undefined;
EndFunction
After the configuration is created, the web service has to be published on the web server (see "1C:Enterprise 8.3. Administrator Guide").
Let the publication name be sc, the web service name be SessionControl, this web service namespace be http: //v8.1c.ru/SessionManagement, and the XDTO batches include http: //v8.1c.ru/SessionManagement. The service is published on the localhost computer.
After the web service has been published and the publication checked, a string should be generated to inform the server cluster of the web service created.
For string details, see page 131.
The string will look as follows:
wsdl=http://localhost/sc/ws/SessionControl?wsdl;ns=http://v8.1c.ru/SessionManagement;srvc=
SessionControl;port=SessionControlSoap;
You should also create a client/server infobase whose sessions will be managed by the web service created. Name this infobase TestDB. It can be any infobase (even an empty one). When the infobase is created, specify (by using the cluster console) the string generated above (wsdl=…) as the External session management (URL) property value and select External management required.
Run the session management infobase in the 1C:Enterprise mode, and, in the AvailableSessions catalog, create an item with the TestDB value for its Description standard attribute and specify 2 for the Count attribute. So we have now set that up to 2 concurrent sessions are available for the TestDB infobase.
Now the TestDB infobase can be accessed two times at most.
5.3.3. The Server Cluster Administration Server
5.3.3.1. General information
You can use a special cluster administration server to administer the server cluster. The server comprises the server itself (ras) and a command line utility (rac) that allows you to manage the server cluster.

Fig. 75. Administration server
Versions of the server cluster and the administration server (ras) must match, and if the command line utility (rac) is used, the following restrictions must be taken into account:
The command line utility (rac) of version 8.3.1 and 8.3.2 cannot be used with the administration server (ras) of version 8.3.3 and later.
The command line utility (rac) of version 8.3.3 and later cannot be used with the administration server (ras) of version 8.3.1 and and 8.3.2.
Both the administration server and the command line utility can work under any supported OS. Several administration servers can be connected to the same server cluster simultaneously. One administration server can interact with one server agent.
The administration server (ras) can be run both in the application mode and in the Windows service or Linux daemon mode. The general working process is as follows:
The administration server is run (in application or service/daemon mode).
The command line utility connects to the administration server to execute required actions.
The administration server connects to the server cluster for the time operations which are being executed and disconnects when the operations are completed. Thus, you don’t need to stop the administration server during scheduled operations on the server cluster which are connected with its (cluster) shutdown and restart. A change to the server cluster version is an exception. In this case, you will need to change the administration server version for the version similar to the server cluster version.
The administration service and the administration utility are components of the 1C:Enterprise server when the system is installed (see page 69).
The 1545 network port is used for the administration server and the administration utility interaction. It can be redefined by the --port command line parameter at the administration server (ras) start.
The administration utility allows you to execute all the operations required to administer the server cluster. However, the utility does not support the features listed below: OS authentication for administrators of the server cluster, the working server and the infobase.
The administration utility (rac) accepts all the required parameters from the command line and outputs the data into the standard output stream (stdout). If this operation is completed successfully, the utility return code will be equal to 0. If not, the completion code will be different from 0 and the error message will be written into the standard error stream (stderr).
The utility work result is a description of one or multiple data objects (e.g., a list of infobases registered in the infobase server cluster) displayed in the form of a table as follows:
<Parameter name> : <Parameter value>
Where each parameter is displayed in a new row and contains an empty string as an indication that the object description has been completed. Note that <Parameter name> matches with the command line option names of the utility. If the parameter cannot be specified via the command line (or if it is a read-only parameter), the parameter name derives from the property name of the corresponding COM object according to the following rule: all individual words (or abbreviations) of the property name are written in separate lowercase words and separated by a hyphen ("-"). Thus, the MemoryExcessTime working process property will be converted into the memory-excess-time name.
If the process is completed successfully, cluster item creation commands (except for administrators) will write the created item ID into the output stream in the format described above.
Strings that allow for arbitrary characters are output in "double quotation marks". Please note that in this case "double quotation marks" in the strings themselves will be doubled.
Dates are displayed in XML format (http://www.w3.org/TR/2012/REC-xmlschema112-20120405/#dateTime).
For more information about administration server (ras) or administration utility (rac) parameters, run a relevant executable file with the help parameter via the command line:
ras help
rac help
A set of Java packages designed for implementing interaction between administration servers and Java applications is available for download at http://1c-dn.com/ developer_tools/1c_enterprise_8_administrative_service_api/.
5.3.3.2. Administration server startup
For Windows OS
In application mode
The administration server in the application mode is started using the following command line:
ras cluster --port=<port> <host[:port]>
The following keys can be used in the start command: cluster
Startup of the administration server in the server cluster administration mode.
--port or -p
Indicates a network port for the administration utility to interact with the administration server. The default value is 1545.
<host[:port]>
Specifies the address of the service agent of the server cluster that will be administered by the administration server being started.
If the agent address is not defined explicitly, the default address is localhost:1540.
In service mode
To start the administration server in service mode, you need to register the server as a service. This operation can be executed with the help of the sc.exe utility. You will need administrator rights to do this.
As an example, let us review a sample batch command file that registers the server as a service.
register-service.bat file:
@echo off
rem %1 – full number of 1C:Enterprise version
set SrvUserName=<user name>
set SrvUserPwd=<user password>
set CtrlPort=1540
set AgentName=localhost
set RASPort=1545
set SrvcName="1C:Enterprise 8.3 Remote  Server"
set BinPath="\"C:\Program  Files\1cv8\%1\bin\ras.exe\"
cluster  --service --port=%RASPort% %AgentName%:%CtrlPort%"
set Desctiption="1C:Enterprise 8.3  Administration Server"
sc stop %SrvcName%
sc delete %SrvcName%
sc create %SrvcName% binPath= %BinPath% start=
auto  obj= %SrvUserName% password= %SrvUserPwd% displayname= %Desctiption%
Before using this command file, specify the username and password of the account under which the server administration service will operate (the set SrvUserName= and set SrvUserPwd= lines). This command file registrs the administration server with the following parameters:
Service name: 1C:Enterprise 8.3 Remote Server.
Displayed name: 1C:Enterprise 8.3 Administration Server.
Administration server port: 1545.
1C:Enterprise server cluster address: localhost:1540.
Service run mode: Automatic.
Here is an example of command file use:
register-ras 8.3.1.100
For Linux OS
In application mode
The administration server in the application mode is started by the following command line:
./ras cluster --port=<port> <host[:port]>
The following keys can be used in the start command:
cluster
Start the administration server in the server cluster administration mode.
--port or -p
Indicates a network port for the administration utility to interact with the administration server. The default value is 1545.
<host[:port]>
Specifies the address of the service agent of the server cluster that will be administered by the server being started.
If the agent address is not specified explicitly, the default address is localhost:1540.
In daemon mode
To start the administration server (ras) in daemon mode you need to start the administration server using a special command line option:
./ras cluster --daemon --port=<port> <host[:port]>
Command lineoptions to start the administration server (ras) under Window OS and Linux OS are similar.
5.4. DBMS ADMINISTRATION
When operating 1C:Enterprise-based systems, you can execute the following operations that do not affect the applied solution operability or presentation of the structure of data used to work with 1C:Enterprise (including the option to restructure the database and to save changes after restructuring is completed):
Use of encryption at the DBMS level.
○ Available for DBMS:
□ Microsoft SQL Server 2008 and later.
□ Oracle Database.
○ Documentation on the mechanism:
□ Microsoft SQL Server 2008:
http://msdn.microsoft.com/en-us/library/bb510663(v=sql.100).aspx □ Microsoft SQL Server 2008 R2:
http://msdn.microsoft.com/en-us/library/bb510663(v=sql.105).aspx □ Microsoft SQL Server 2012:
http://msdn.microsoft.com/en-us/library/bb510663(v=sql.110).aspx □ Oracle Database 10g R2:
http://docs.oracle.com/cd/B19306_01/network.102/b14268/asotrans.htm □ Oracle Database 11g R1:
http://docs.oracle.com/cd/B28359_01/network.111/b28530/asotrans.htm □ Oracle Database 11g R2:
http://docs.oracle.com/cd/E25178_01/network.1111/e10746/asotrans.htm
Option of using the server cluster – a group of computers connected through high speed channels and representing a united hardware resource for the user.
○ Available for DBMS:
□ IBM DB2.
□ Microsoft SQL Server.
□ Oracle Database.
□ PostgreSQL.
○ Documentation on the mechanism:
□ IBM DB2 v9.1: http://publib.boulder.ibm.com/infocenter/db2luw/v9/topic/com.ibm.
db2.udb.admin.doc/doc/c0006354.htm
□ IBM DB2 v9.5: http://publib.boulder.ibm.com/infocenter/db2luw/v9r5/topic/com.
ibm.db2.luw.admin.ha.doc/doc/t0051382.html
□ IBM DB2 v9.7:http://publib.boulder.ibm.com/infocenter/db2luw/v9r7/topic/com.
ibm.db2.luw.admin.ha.doc/doc/t0051382.html
□ IBM DB2 v10.1:
http://publib.boulder.ibm.com/infocenter/db2luw/v10r1/topic/com.ibm.db2.luw.admin.
Use of data compression at the DBMS level.
○ Available for DBMS:
□ Oracle Database (only via compressed table space).
○ Documentation on the mechanism:
□ Oracle Database 11g R2: http://docs.oracle.com/cd/E18283_01/server.112/ e17120/tables002.htm#insertedID6
Option of changing the location of predefined table spaces.
○ Available for DBMS:
□ IBM DB2.
□ Oracle Database.
□ PostgreSQL.
○ Predefined table spaces:
□ IBM DB2:
• For indices – V81C_INDEXSPACE.
• For data – V81C_LARGESPACE.
• For LOB – V81C_LOBSPACE.
□ Microsoft SQL Server 2000:
http://msdn.microsoft.com/en-us/library/aa196694(v=sql.80).aspx □ Microsoft SQL Server 2005:
http://msdn.microsoft.com/en-us/library/ms189134(v=sql.90).aspx □ Microsoft SQL Server 2008:
http://msdn.microsoft.com/en-us/library/ms189134(v=sql.100).aspx □ Microsoft SQL Server 2008 R2:
http://msdn.microsoft.com/en-us/library/ms189134(v=sql.105).aspx □ Microsoft SQL Server 2012:
http://msdn.microsoft.com/en-us/library/ms189134(v=sql.110).aspx □ Oracle Database 10g R2:
http://docs.oracle.com/cd/B19306_01/server.102/b14210/hafeatures.htm#CJACEEIA □ Oracle Database 11g R1:
http://docs.oracle.com/cd/B28359_01/server.111/b28281/architectures.htm □ Oracle Database 11g R2:
http://docs.oracle.com/cd/E15586_01/server.1111/e17157/architectures.htm
□ PostgreSQL 8.2: http://www.postgresql.org/docs/8.2/interactive/high-availability.html
□ PostgreSQL 8.3: http://www.postgresql.org/docs/8.3/interactive/high-availability.html
□ PostgreSQL 8.4: http://www.postgresql.org/docs/8.4/interactive/high-availability.html
□ PostgreSQL 9.0: http://www.postgresql.org/docs/9.0/interactive/high-availability.html
□ PostgreSQL 9.1: http://www.postgresql.org/docs/9.1/interactive/high-availability.html
□ PostgreSQL 9.2: http://www.postgresql.org/docs/9.2/interactive/high-availability.html
• User’s temporary table space – V81C_USERTEMP.
• System temporary table space – V81C_SYSTEMPBP.
□ Oracle Database:
• For indices – V81C_INDEX.
• For data – V81C_DATA.
• For LOB – V81C_LOB.
• Temporary table space – V81C_TEMP. □ PostgreSQL:
• For indices – V81C_INDEX.
• For data – V81C_DATA.
• Temporary table space – arbitrary name to be specified via the postgresql.conf configuration file.
Option to change the location of the file with a database.
○ Available for DBMS:
□ Microsoft SQL Server.
Changing the transaction log location.
○ Available for DBMS:
□ IBM DB2.
□ Microsoft SQL Server.
□ Oracle Database.
□ PostgreSQL.
Execution of administrative tasks that do not change the database structure but serve to guarantee adequate performance.
○ Tasks:
□ Integrity check.
□ Reindexing.
□ Defragmentation.
□ Reorganization.
□ Backing up (see page 111).
□ Clearing the procedure cache.
□ Gathering statistics.
Available for DBMS:
○ IBM DB2.
○ Microsoft SQL Server.
○ Oracle Database.
○ PostgreSQL.