
CHAPTER 3. INSTALLATION OF SYSTEM COMPONENTS
3.1. 1C:ENTERPRISE SERVER INSTALLATION
1C:Enterprise is a collection of software modules designed to develop and use solutions (configurations) for accounting and enterprise business activities automation, as well as configurations or configuration collections.
1C:Enterprise software modules are universal and can work with any configuration (within the scope of the corresponding License Agreement).
A security driver to prevent unauthorized access is installed along with 1C:Enterprise software.
The installer makes it possible to install multiple 1C:Enterprise versions on a single computer, select a set of components to install and choose a version of 1C:Enterprise server installation.
3.1.1. General Information on Installation Procedure
There are significant differences between installation procedures of 1C:Enterprise under Microsoft Windows operating systems (hereinafter Windows) and under Linux operating systems (hereinafter Linux).
For Windows-based installations a dedicated installer is used.
No such installer is available for Linux, so specific instructions on actions to be taken to carry out an operation will be provided in the respective sections.
When the 1C:Enterprise server is installed under Linux OS, the server will not be launched after installation.
Before installation, please ensure that your computer is virus-free and that the hard drive does not contain any errors and enough disk space is available for the installation.
NOTE
During the installation process, you may need the distribution packages of the operating system running on the computer. You may also need to possess the local or network administrator rights.
3.1.2. Windows Installer
3.1.2.1. Available Installers
The following installers are available:
1C:Enterprise 8 – allows to install any component except 64-bit 1C:Enterprise server mode.
1C:Enterprise 8. Thin Client – for installation of only the components that are required to access 1C:Enterprise server and of the thin client itself.
1C:Enterprise 8 (x86-64) – installs 64-bit 1C:Enterprise server version.
All the installers share the same operation principles so we will provide the general information on 1C Enterprise 8 installer.
3.1.2.2. General Information on Installer
A dedicated wizard carries out the installation procedure. You can navigate between the wizard pages with the Next >> button. To launch the wizard, run setup.exe from the directory of the distribution kit you have selected. On every page, you will need to provide some information that will be further used for 1C:Enterprise installation.
Every wizard step is briefly described below.
NOTE
If you run setup.exe using /S option, the software will be installed in "silent" mode based on the settings stored in 1CEStart.cfg (see "1C:Enterprise 8.3. Administrator Guide"). If the file is not available, default installation will be carried out.
Welcome
This is the initial window of the 1C:Enterprise installation wizard.

Fig. 17. Welcome
Components Selection
On this page, you should select the components to install. The assortment of the components depends on what you need to install. Some standard installation scenarios are described below (see page 77).

Fig. 18. Component selection
If a certain component needs to be installed, check it. If some component is not needed, deny its installation. To select a component, click an icon to the left of the component name (or press the Spacebar). In the menu that opens select the item you need (see fig. 19).

Fig. 19. Component installation menu
The components to be installed and the denied components are identified in the manner shown in fig. 20.
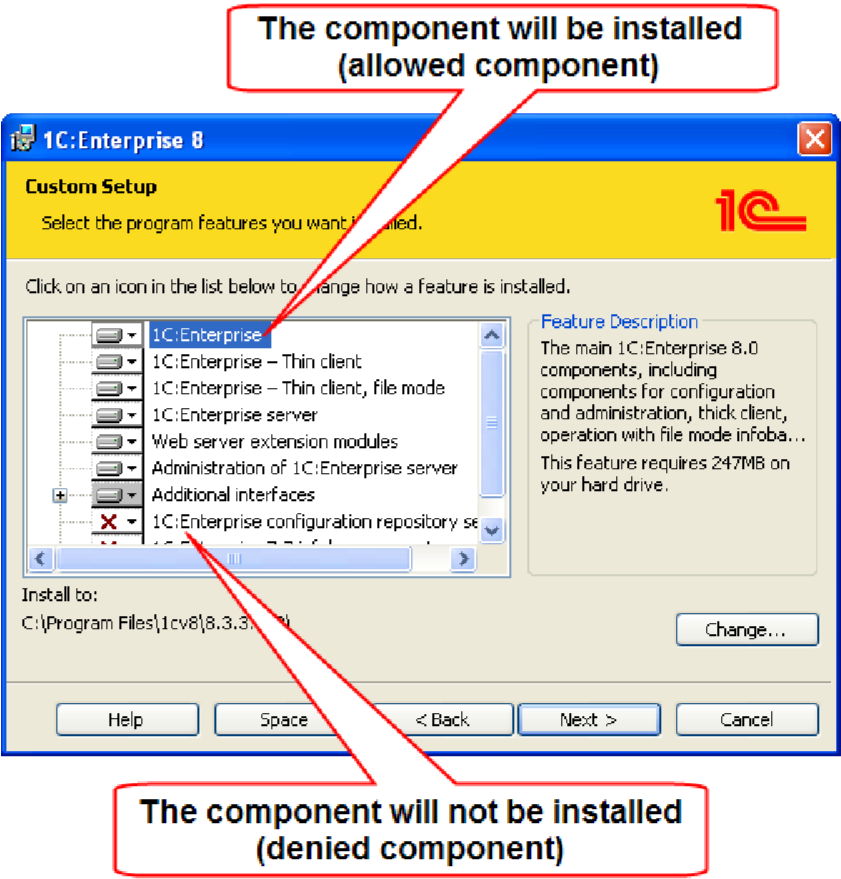
Fig. 20. Allowed and denied components
You will find a brief explanation of the installed components below:
|
Component |
Brief Description |
|
1C:Enterprise |
Basic 1C:Enterprise components, including components for administration, configuration development, thick and thin clients |
|
1C:Enterprise – Thin client |
Only the components of the thin client intended to work in the client/server mode |
|
1C:Enterprise – Thin client, file mode |
Thin client components, including those intended to work with the file infobase |
|
Component |
Brief Description |
|
1C:Enterprise server |
1C:Enterprise server components including administration server and administration utility |
|
Web server extension modules |
Web servers extension modules that are required for web client and web services operation |
|
Administration of 1C:Enterprise server |
Additional components that are required to administer the 1C:Enterprise server cluster |
|
Additional interfaces |
User interfaces in various languages |
|
1C:Enterprise configuration repository server |
Components of the 1C:Enterprise configuration repository server, including the administration server and the administration utility |
|
1C:Enterprise 7.7 infobase converter |
Converter for 1C:Enterprise 7.7 infobases |
Selecting Default Interface Language
At the next step, the installer will prompt you to select a default interface language.
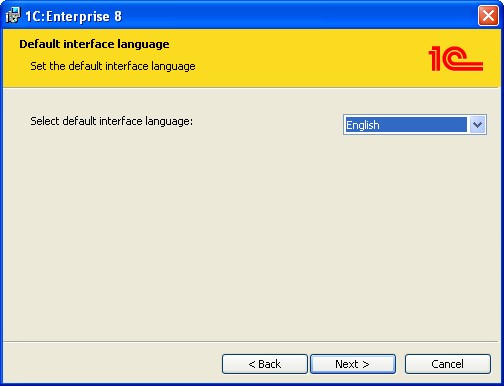
Fig. 21. Selecting interface language
You should specify one of the available interface languages as the default one.
When installation has been completed, the cong.cfg file describing the interface language will be created in the C:\Program Files\1Cv8\conf configuration files directory (for the file description, see "1C:Enterprise 8.3. Administrator Guide").
If in your work you need to use an interface language that is different from the one installed as the default language, you should specify this language using the /L command line option.
|
Interface Language |
Language Code |
|
English |
en |
|
Bulgarian |
bg |
|
Vietnamese |
vi |
|
Georgian |
kk |
|
Kazakh |
ka |
|
Latvian |
lv |
|
Lithuanian |
lt |
|
German |
de |
|
Polish |
pl |
|
Romanian |
ro |
|
Russian |
ru |
|
Turkish |
Tr |
|
Ukrainian |
uk |
|
Azerbaijani |
az |
|
Chinese |
zh |
1C:Enterprise Server Installation
If 1C:Enterprise 8 Server component is selected to be installed, the wizard page will be available where you will need to select the installation mode for the 1C:Enterprise server and the user account the server will run under if it is installed as a Windows service.

Fig. 22. 1C:Enterprise server installation mode
NOTE
If you choose to install the server as a service, you will need to specify the password for the user selected because otherwise the installer will be unable to launch the server.
If some 1C:Enterprise version is already installed on the computer with its server installed as a Windows service, the installer will reinstall the service. Installation Initialization
Once you click the Install button, the actual installation process will begin:
The required folders are created;
The files for the selected components are copied;
Configuration files are created;
Software components are registered;
A desktop shortcut is created to launch 1C:Enterprise;
1C:Enterprise server is launched if installation as a Windows service is selected for the server.

Fig. 23. Installation initialization
At that, in the Add/Remove Programs of the Windows control panel you will find an individual record for every version that will be displayed as follows: 1C:Enterprise 8.3 (8.3.3.658).
Security Driver Installation
When installation is completed, the installation wizard will prompt you to install the HASP Device Driver security driver for protection from unauthorized use.

Fig. 24. Security driver installation
The driver needs to be installed if a dongle will be plugged into a USB port of this computer:
The user has a License Agreement for 1C:Enterprise operation on a single workstation;
The user has a Supplemental License Agreement for 1C:Enterprise operation on a single additional workstation;
The user has a License Agreement for 1C:Enterprise server use.
NOTE
We recommend installing security driver prior to plugging the dongle into a USB port of the computer.
The driver can also be installed using the Start – Programs – 1C Enterprise 8 – Advanced – Install HASP Device Driver.
Installation Complete
If installation is successful, the final installation wizard page is displayed. Once you click the Finish button on the page, the installation will be completed.
If Show the readme file is checked, a file will be opened that contains the information that we recommend reading prior to using this software version.

Fig. 25. Installation complete
3.1.2.3. Component Registration
The installation program registers a number of components (the cluster console, COM connection, etc.). Registration is performed as follows:
Cluster console. The installation utility performs "for computer" registration, and registration with the Start – All Programs – 1C:Enterprise 8 – Advanced – <version number> – Register MSC console (RegMSC.cmd command file) menu constitutes the "for user" registration.
COM connection. The utility performs "for computer" registration. "For user" registration may be performed with the following command:
regsvr32 -n -i:user comcntr.dll
3.1.3. Standard 1C:Enterprise Installation Scenarios
This section provides tips on carrying out standard versions of 1C:Enterprise installation.
3.1.3.1. Windows
This section covers standard examples of 1C:Enterprise components installation on a computer running a Windows operating system.
For every installation version, we will provide a list of the installed components and the specific issues that should be taken into account in the installation process (if any).
Cluster Master Server Installation
The installer copies the required files to the computer and can configure the central server agent to be run as an application or as a Windows service. The service runs under a dedicated user account USR1CV8 that is also created in the process of installing 1C:Enterprise server cluster and is included to the group USERS or to a similar localized group.
The following components need to be selected for the server cluster to be installed: 1C:Enterprise server and Administration of 1C:Enterprise server.
If you decide to install 1C:Enterprise server as a Windows service (recommended), you should select a user and enter the user password. If the password is left blank, the installer will not be able to launch the server.
A user is selected among list of existing users or a standard local user is created with the name USR1CV8 (if the user already exists, it will be created again). In the latter case, the specified password is assigned to the user named USR1CV8. This user account is not removed when 1C:Enterprise is uninstalled. The user is granted the following rights: Log on as a service and Log on as a batch job, and is included to the Performance Log Users group.
The user and the password are only used when 1C:Enterprise server is created as a service. In any case, the user is granted required rights to the directory containing server service files. Server cluster startup is executed during installation. Once installation is complete, the cluster is fully operational.
If you decide to install the server as an application, once installation is completed, you will need to start the server cluster up manually.
IMPORTANT!
Depending on server installation version (service or application), different directories for server files will be selected. For details on this issue, see page 56.
Adding a Server to a Server Cluster
Use this procedure when you need to add a new physical server to an existing server cluster (for example, to improve performance).
Let us examine the situation where the server cluster to be extended is located on the COMP1 computer, and you need to set up an additional working server on COMP2. The actions required to add the working server are as follows:
The 1C:Enterprise server should be installed on the COMP2 computer (for details, see page 78).
Then, using the server console, connect to the cluster server (COMP1), to which the working server has to be added (see page 114).
Add a new working server (on the COMP2 computer) to the cluster on COMP1 (see page 124).
Specify the requirements for assigning functionality for the working server on
COMP2 (see page 38), if required.
Once the server is added, it is advisable to unregister the master server on the computer that was added as an additional server to the cluster (COMP2).
Cluster management actions can be performed either via the cluster console (see the references above), or via the administration server and administration utility (see page 170).
3.1.3.2. Linux
This section covers standard examples of 1C:Enterprise server installation on a Linux machine.
NOTE 1
For 64-bit 1C:Enterprise server file names should include .x86_64 string in the file names instead of the .i386 string. Example: 1C_Enterprise83-ws-8.3.1-100.i386.rpm will be named 1C_Enterprise83-ws-8.3.1-100.x86_64.rpm instead.
NOTE 2
For the 64-bit 1C:Enterprise server (for Debian Linux), specify the _amd64 string instead of _i386 in file names. For instance, the name of the 1c-Enterprise83ws_8.3.1-100_i386.deb file will be named 1c-Enterprise83-ws_8.3.1-100_amd64.deb.
NOTE 3
Installation files for systems (for Debian Linux) will have a name that differs from the name of the same files for RPM systems only by its extension: deb. For instance, the name of the 1c_enterprise83-ws-8.3.1-100.i386.rpm file will be 1C_Enterprise83-ws-8.30.1-100.i386.deb.
In what follows all the information will be provided for the rpm-version of the installation packages.
Installation is carried out using the packages manager of the operating system used.
1C:Enterprise back end distribution kit for Linux consists of six rpm packages. Generally, the files of rpm packages are named as follows:
1C_Enterprise83-common-8.3.<X>-<Y>.i386.rpm
1C_Enterprise83-common-nls-8.3.<X>-<Y>.i386.rpm
1C_Enterprise83-server-8.3.<X>-<Y>.i386.rpm
1C_Enterprise83-server-nls-8.3.<X>-<Y>.i386.rpm
1C_Enterprise83-ws-8.3.<X>-<Y>.i386.rpm
1C_Enterprise83-ws-nls-8.3.<X>-<Y>.i386.rpm
1C_Enterprise83-crs-8.3.<X>-<Y>.i386.rpm (only for i386 architecture)
Where <X> and <Y> are the respective positions in 1C:Enterprise version. For example, for 1C:Enterprise version 8.3.1.100 the above files will be named as follows:
1C_Enterprise83-common-8.3.1-100.i386.rpm
1C_Enterprise83-common-nls-8.3.1-100.i386.rpm
1C_Enterprise83-server-8.3.1-100.i386.rpm
1C_Enterprise83-server-nls-8.3.1-100.i386.rpm
1C_Enterprise83-ws-8.3.1-100.i386.rpm
1C_Enterprise83-ws-nls-8.3.1-100.i386.rpm
1C_Enterprise83-crs-8.3.1-100.i386.rpm The packages include the following components:
1C_Enterprise83-common – common 1C:Enterprise components;
1C_Enterprise83-server – 1C:Enterprise server components;
1C_Enterprise83-ws – an adapter needed to publish 1C:Enterprise web services on a web server based on Apache HTTP Server 2.0 or Apache HTTP Server
2.2;
1C_Enterprise83-crs – 1C:Enterprise Configuration Repository server components (the 1C:Enterprise configuration repository server is a 32-bit application).
If a package name contains -nls suffix, this package is an additional national resource for the respective package (excluding English and Russian languages). For example, the package named 1C_Enterprise83-server-nls contains additional national resources for 1C:Enterprise server components.
In the installation process, you should note the following dependencies of packages on each other:
1C_Enterprise83-common – no dependencies;
1C_Enterprise83-server depends on 1C_Enterprise83-common;
1C_Enterprise83-ws depends on 1C_Enterprise83-common;
1C_Enterprise83-crs depends on 1C_Enterprise83-common, 1C_Enterprise83server and on 1C_Enterprise83-ws;
The national resources packages depend on their respective components.
So in order to install a package, you first need to install all the packages it depends on. For example, to install 1C:Enterprise server components, you first need to install 1C_Enterprise83-common followed by 1C_Enterprise83-server.
Working Server Installation
The following packages must be installed to deploy the cluster working server:
1C_Enterprise83-common-8.3.<X>-<Y>.i386.rpm
1C_Enterprise83-common-nls-8.3.<X>-<Y>.i386.rpm
1C_Enterprise83-server-8.3.<X>-<Y>.i386.rpm
1C_Enterprise83-server-nls-8.3.<X>-<Y>.i386.rpm
If you expect to use the computer to publish 1C:Enterprise web services, you should install 1C_Enterprise83-ws. The packages 1C_Enterprise83-Server and 1C_Enterprise83-ws do not depend on each other. Hence, they can be installed on the same computer both together and independently.
During 1C:Enterprise server components installation, an operating system user account is created with the name usr1cv8. 1C:Enterprise server processes run under this user account. Immediately after installation of 1C_Enterprise83-server, the 1C:Enterprise server is ready to be launched.
Installation should be carried out under the root user account. Adding a Server to a Server Cluster
This scenario is used when you need to add a physical server to an existing server cluster (e.g. to increase its performance). Let us examine the situation where the server cluster to be extended is located on the COMP1 computer, and you need to set up an additional working server on COMP2. The actions required to add a working server are as follows:
The 1C:Enterprise server should be installed on the COMP2 computer (for details, see page 81).
Then, using the server console, connect to the cluster server (COMP1) to which the working server has to be added (see page 114).
Add a new working server (on the COMP2 computer) to the cluster on COMP1 (see page 124).
Specify the requirements for assigning functionality for the working server on COMP2 (see page 38), if required.
After the server has been added, it is recommended that you delete the main server registration on the computer that has been added as an additional cluster server (COMP2).
Cluster management actions can be performed either via the cluster console (see the references above), or via the administration server and administration utility (see page 170).
Web Client Operation
If a web client will be used to access the information base, the following packages will be installed on the computer with a web server:
1C_Enterprise83-common-8.3.<X>-<Y>.i386.rpm
1C_Enterprise83-common-nls-8.3.<X>-<Y>.i386.rpm
1C_Enterprise83-server-8.3.<X>-<Y>.i386.rpm
1C_Enterprise83-server-nls-8.3.<X>-<Y>.i386.rpm
1C_Enterprise83-ws-8.3.<X>-<Y>.i386.rpm
1C_Enterprise83-ws-nls-8.3.<X>-<Y>.i386.rpm
The packages will be installed under the root account.
The web client will be published with the webinst command-line utility (this utility is described in the "1C:Enterprise 8.3. Administrator Guide").
3.1.4. Additional Software Installation and Setup
3.1.4.1. Linux
Kerberos Authentication Setup
This section covers the setup procedure of Kerberos authentication for 1C:Enterprise server on a basic system consisting of three computers: a domain controller, 1C:Enterprise cluster central server and a workstation. A Basic System Description
The basic system includes the computers as follows:
Active Directory domain controller: ○ Hostname – main
○ IP address – 192.168.39.150
○ Domain name – krb.local
1C:Enterprise cluster central server:
○ Operating system: Fedora 6
○ Hostname – srv1c
○ IP address – 192.168.39.151
○ Kerberos implementation by MIT installed with RC4-HMAC algorithm support (krb5-workstation package) Workstation.
Domain Controller Setup
In this section, we assume that Active Directory domain controller is configured and operating. In this case to configure Kerberos authentication:
Manually register all the Linux machines in the DNS server. Windows machines are registered automatically when they are included into a domain. In our example, you will need to manually register the 1C:Enterprise cluster central server (since it is running a Linux version of the server) and include the workstation into the domain (it will be registered automatically).
Next, you will need to create a domain user account that will be associated with the authorization requests sent to the 1C:Enterprise server. In our example, it will be the domain user named usr1cv8 with pass1cv8 as the password. In the user account properties uncheck Use DES encryption types with this account. If your Kerberos implementation does not support RC4-HMAC encryption algorithm, you should definitely check it.
Next, you should generate a file containing the private key for the domain user named usr1cv8. Use the ktpass utility to do so. This utility is included in the Windows Support Tools package (located in the SUPPORT subdirectory of Microsoft Windows installation disk).
Run ktpass utility from the command line. For our example the command line should read:
C:\>ktpass -princ  usr1cv8/srv1c.krb.local@KRB.LOCAL -mapuser usr1cv8 -pass pass1cv8 -out  usr1cv8.keytab
C:\>
If RC4-HMAC algorithm is not supported, the command line should be:
C:\>ktpass -crypto DES-CBC-CRC -princ  usr1cv8/srv1c.krb.local@KRB.LOCAL
-mapuser  usr1cv8 -pass pass1cv8 -out usr1cv8.keytab
C:\>
This action generates a file named usr1cv8.keytab in the current directory (in the example, it is the root directory on C: drive). The service principal name usr1cv8/srv1c.krb.local will be associated with the user named usr1cv8.
NOTE 1
Please note that if 1C:Enterprise 8.3 is run by the username usr1cv8, then the service principal name usr1cv8/srv1c.krb.local should be used, while the name of the domain user (usr1cv8 in this example) can be left unchanged.
NOTE 2
When a secret key file is generated (with the ktpass utility), an authorized name of the computer on which the 1C:Enterprise server is installed in the service member name (the -prinñ parameter) will be specified in lower case letters. Otherwise the authentication mechanism may not work properly.
The pass parameter passes the usr1cv8 – pass1cv8 password of the domain user account.
The name of the file with a key is to be specified in the out parameter. This is usr1cv8.keytab in our example. However, where 1C:Enterprise 8.3 is run under the username usr1cv8, then specify usr1cv8.keytab as the name of the file containing the key.
1C:Enterprise Cluster Central Server Setup
In this section, we assume that 1C:Enterprise server cluster is already installed and running on the cluster central server.
First, you should specify the DNS server for the cluster central server. It should be a DNS domain controller.
NOTE
The setup process depends on the specific Linux distribution kit used. In this example we will manually edit /etc/resolv.conf to include the domain controller IP address in the file.
The resulting file should include the strings as follows:
nameServer 192.168.39.150
search krb.local
Next, you should test DNS operation. Use ping command to do this:
srv1c:~#ping main –c 1
PING main.krb.local  (192.168.39.150)56(84)bytesofdata.
64 bytes from 192.168.39.150: icmp_seq=1  ttl=128 time=0.177 ms

--– main.krb.localpingstatistics ---
1 packets transmitted, 1 received, 0% packet  loss, time 0ms
rtt min/avg/max/mdev = 0.177/0.177/0.177/0.000  ms
srv1c:~#
IMPORTANT!
Significant discrepancy of system clocks is not allowed for the machines participating in authentication because authentication packets (tickets) have a limited lifetime.
Therefore, the time of the cluster central server should be synchronized with the domain controller. Use ntpdate command to do this:
srv1c:~#ntpdate main
4 Jun 11:51:53 ntpdate[2527]: step time Server  192.168.39.150 offset -56.766439 sec
srv1c:~#
Now you need to configure Kerberos. This is done by editing /etc/krb5.conf. At that, you will need the NETBIOS name of the domain controller. This is usually the domain name in uppercase letters. So in our example the NETBIOS name will be KRB.LOCAL. The resulting file /etc/krb5.conf should have the content as follows:
srv1c:~#cat/etc/krb5.conf
[logging]
Default = FILE:/var/log/krb5libs.log
Kdc = FILE:/var/log/krb5kdc.log
admin_Server = FILE:/var/log/kadmind.log

[libdefaults]
default_realm = KRB.LOCAL
dns_lookup_realm = false
dns_lookup_kdc = false
default_tkt_enctypes = rc4-hmac
default_tgs_enctypes = rc4-hmac

[realms]
KRB.LOCAL = {
kdc=main.krb.local:88
default_domain=krb.local
}

[domain_realm]
krb.local = KRB.LOCAL
.krb.local = KRB.LOCAL
KRB.LOCAL = KRB.LOCAL
.KRB.LOCAL = KRB.LOCAL

[kdc]
Profile = /var/kerberos/krb5kdc/kdc.conf

[appdefaults]
Pam = {
Debug = true
ticket_lifetime = 36000
renew_lifetime = 36000
forwardable = false
krb4_convert = false
}

srv1c:~#
If RC4-HMAC is not supported, the values for options default_tkt_enctypes and default_tgs_enctypes should be as follows:
...
default_tkt_enctypes = des-cbc-crc des-cbc-md5
default_tgs_enctypes = des-cbc-crc des-cbc-md5
...
Now you should test the authentication system. To do so, run kinit <name>, where "name" is the name of an arbitrary user registered in the domain krb.local. In the example we will use user as the name. This is followed by user password. The command is completed by pressing Enter. If no messages are displayed by the program, all the steps are correct.
You can make sure everything is correct using klist command. As you will see below, we receive the so called ticket-granting ticket from the KDC (Key Distribution Center implemented by the domain controller). Next, using kdestroy you should clear the local ticket cache to return to the initial state.
srv1c:~#kinit user
Password for user@ KRB.LOCAL:
srv1c:~#klist
Ticket cache: FILE:/tmp/krb5cc_0
Default principal: user@KRB.LOCAL

Valid starting Expires Service principal
06/04/08 11:29:21 06/04/08 21:28:28  krbtgt/KRB.LOCAL@KRB.LOCAL
renew until 06/05/08 11:29:21

Kerberos 4 ticket cache: /tmp/tkt0
Klist : You have no tickets cached
srv1c:~#kdestroy
srv1c:~#
Next, you should use any tool available to locate the private key file usr1cv8.keytab generated during domain controller setup in the 1C:Enterprise cluster central server. This file should be copied to the directory that 1C:Enterprise server is installed to (by default it is /opt/1C/v8.3/i386 or /opt/1C/v8.3/x86-64 for 64-bit server version). The rights and the file owner should be specified as follows:
srv1c:~#cd /opt/1C/v8.3/i386
srv1c:i386# chown usr1cv8:grp1cv8  usr1cv8.keytab
srv1c:i386# chmod 600 usr1cv8.keytab
srv1c:i386#
If you want to, you can save the file to any other directory provided that you edit the variable SRV1CV8_KEYTAB in the configuration file so that it points to the new location of the private key file.
After that use klist to make sure all the settings are correct. Run the command as follows to do this:
srv1c:~#klist -e -k -t /opt/1C/v8.3/i386/usr1cv8.keytab
In our example, the command execution results should be follows:
Keytab name:  FILE:/opt/1C/v8.3/i386/usr1cv8.keytab
KVNO Principal
----------------------------------------------------------------
13 usr1cv8/srv1c.krb.local@KRB.LOCAL (ArcFour  with HMAC/md5)
If RC4-HMAC is not supported, the result of the command execution will be as follows:
Keytab  name:FILE:/opt/1C/v8.3/i386/usr1cv8.keytab
KVNO Principal
---–  -------------------------------------------------------------
13 usr1cv8/srv1c.krb.local@KRB.LOCAL (DES cbc  mode with RSA-MD5)
You can see that the private key file content is exactly what we need (the Principal column shows the service name we specified when generating the private key file and the encryption algorithm is correct (ArcFour with HMAC/md5 for RC4-HMAC or DES cbc mode with RSA-MD5 for DES)).
Next, you will need to check if Kerberos can operate without password using the private key. Using kinit instruct to use authentication information from file (in our case it is /opt/1C/v8.3/i386/usr1cv8.keytab or /opt/1C/v8.3/x86-64/usr1cv8.keytab for 64-bit server) and read the key for the service from the file usr1cv8/ srv1c.krb. local@KRB.LOCAL. As a result, kinit should run without displaying any messages or prompting for any passwords. It should be completed by returning control to the command line:
srv1c:~#kinit -k -t  /opt/1C/v8.3/i386/usr1cv8.keytab usr1cv8/srv1c.krb.local@KRB.LOCAL
srv1c:~#
Now let us consider operation results when klist command is used. If operation is successful, the information will be displayed with its content similar to the one below:
srv1c:~#klist
Ticket cache: FILE:/tmp/krb5cc_0
Default principal:  usr1cv8/srv1c.krb.local@KRB.LOCAL

Valid starting Expires Service principal
06/04/08 11:44:54 06/04/08 21:43:58  krbtgt/KRB.LOCAL@KRB.LOCAL
renew until 06/05/08 11:44:54

Kerberos 4 ticket cache: /tmp/tkt0
klist: You have no tickets cached
srv1c:~#
If anything is wrong in the setup, the following will be displayed by the command:
srv1c:~#klist
klist: No credential scache found (ticket  cache FILE:/tmp/krb5cc_1000)
Kerberos 4 ticket cache: /tmp/tkt1000

klist: You have no tickets cached
srv1c:~#
If operation test is successful, it means that 1C:Enterprise cluster server is capable of processing authentication requests. At that, no server restart is required except for when the private key file location is changed in the configuration file.
3.2. DATABASE SERVERS INSTALLATION
The following can be used as a 1C:Enterprise database server:
IBM DB2 (for Windows and Linux),
Microsoft SQL Server (for Windows only),
Oracle Database (for Windows and Linux), PostgreSQL (for Windows and Linux).
3.2.1. IBM DB2 Installation
The database server is installed from IBM DB2 distribution package.
The IBM DB2 versions supported by 1C:Enterprise are available online at
http://1c-dn.com/library/system_requirements/.
To facilitate configuring IBM DB2 for operation with 1C:Enterprise platform, IBM DB2 has the value 1C added for the DB2_WORKLOAD group registry variable.
If you specify DB2_WORKLOAD=1C, the IBM DB2 will automatically configure all the required values for the registry variables to optimize DB2 operation with 1C:Enterprise platform.
The following command is used to specify the registry variable:
db2set DB2_WORKLOAD=1C
Once you specify 1C as the value for the DB2_WORKLOAD group registry variable, restart the database server.
NOTE 1
For details on the meanings of the IBM DB2 profile registry variables, see IBM DB2 documentation at http://publib.boulder.ibm.com/infocenter/db2luw/v9/ topic/com.ibm.db2.udb.admin.doc/doc/c0004934.htm.
NOTE 2
For details on the syntax of the db2set command, see IBM DB2 documentation at http://publib.boulder.ibm.com/infocenter/db2luw/v9/topic/com.ibm.db2.udb.admin. doc/doc/c0007340.htm.
To find out what values will be used with DB2_WORKLOAD=1C specified, you can use the following command:
db2set -gd DB2_WORKLOAD=1C
This command will list the IBM DB2 registry variables along with their values corresponding to the DB2_WORKLOAD=1C group registry variable.
If 1C:Enterprise server runs as a service, the following actions are required:
Include the user account that runs 1C:Enterprise server (USR1CV8 by default) into the DB2ADMNS group;
For the used DB2 instance, select DB2ADMNS as the value for the SYSADM_ GROUP parameter.
For information on IBM DB2 installation, see the server documentation:
IBM DB2 v9.1:
http://publib.boulder.ibm.com/infocenter/db2luw/v9/topic/com.ibm.db2.udb.doc/doc/t0024287.htm IBM DB2 v9.5: http://publib.boulder.ibm.com/infocenter/db2luw/v9r5/index.jsp IBM DB2 v9.7:
http://publib.boulder.ibm.com/infocenter/db2luw/v9r7/topic/com.ibm.db2.luw.qb.server.doc/ doc/r0025127.html
3.2.2. Microsoft SQL Server Installation
The database server is installed from the Microsoft SQL Server distribution package.
NOTE
If you select Microsoft SQL Server 2000, Service Pack 2 should be installed on top of Microsoft SQL Server 2000 to ensure error-free 1C:Enterprise operation (Service Pack 4 recommended).
User account that 1C:Enterprise server uses to access MS SQL Server, must be a member of processadmin or sysadmin fixed server role.
Installation instructions can be found in the server documentation:
SQL Server 2005: http://msdn.microsoft.com/en-us/library/ms143516(SQL.90).aspx SQL Server 2008: http://msdn.microsoft.com/en-us/library/ff928358(v=sql.10).aspx
SQL Server 2008 R2: http://msdn.microsoft.com/en-us/library/bb500469(v=sql.105).aspx
SQL Server 2012: http://msdn.microsoft.com/en-us/library/bb500469(v=sql.11).aspx
3.2.3. Oracle Database Installation
The database server is installed from Oracle Database distribution package.
The Oracle Database versions supported by 1C:Enterprise are available online at
http://1c-dn.com/library/system_requirements/.
Installation instructions can be found in the server documentation:
Oracle Database 10g Release 2:
http://download.oracle.com/docs/cd/B19306_01/em.102/b16227/toc.htm Oracle Database 11g Release 1:
http://download.oracle.com/docs/cd/B28359_01/em.111/b31207/toc.htm Oracle Database 11g Release 2:
http://docs.oracle.com/cd/E11882_01/em.112/e12255/toc.htm
A database server in 1C:Enterprise corresponds to DATABASE as defined in Oracle Database. A database in 1C:Enterprise corresponds to a database schema in Oracle Database. When an infobase is created in 1C:Enterprise, a user and their database schema are created in Oracle Database.
When working with Oracle Database, 1C:Enterprise 8 uses the following tablespace:
for data – V81C_DATA,
for indexes – V81C_INDEX, for LOB – V81C_LOB.
If tablespace with the names already exist, they will be used. Otherwise, they will be created when an infobase is created. At that, the datafiles will have the default paths.
When DATABASE is created, select AL32UTF8 as the value for the CHARACTER SET for this DATABASE.
Prior to using Oracle Database server with 1C:Enterprise, you need to configure multilingual collation for the database server. To do so:
Copy the lx327c5.nlt file from the 1C:Enterprise Platform 8.3 Collations for Oracle DBMS archive, which is included in 1C:Enterprise 8.3 distribution package, into an empty directory on the hard drive containing the Oracle Database.
Launch Oracle Locale Builder (lbuilder).
Launch nlb-files generation (Tools – Generate NLB) by specifying the folder containing the lx327c5.nlt file.
Stop all Oracle Database services launched from the Oracle Database home directory (ORACLE_HOME).
Create a backup copy of the lx0boot.nlb and lx1boot.nlb files from the ORACLE_ HOME/nls/data folder.
Copy the lx1boot.nlb and lx327c5.nlb files from the folder where they were created by the Oracle Locale Builder utility to ORACLE_HOME/nls/data. Agree to overwrite the lx1boot.nlb file during copying.
Start Oracle Database services.
3.2.4. PostgreSQL Installation
The database server is installed from the 1C:Enterprise distribution package. PostgreSQL database management system can operate both under Windows and under Linux.
UTF-8 encoding will be specified during database cluster initialization.
When working with PostrgeSQL, 1C:Enterprise 8 allows you to use the following tablespaces:
For data – v81c_data;
For indices – v81c_index;
If table spaces with such names exist, they will be used; if not, it is recommended that you create them.
create tablespace v81c_index location  <Folder name>;
create tablespace v81c_data location  <Folder name>;
Where <Folder Name> stands for a full path to the directory where files of the table space being created will be stored.
In case the specified table spaces are unavailable, the pg_default table space is used.
The PostgreSQL versions supported by 1C:Enterprise are available online at
http://1c-dn.com/library/system_requirements/.
A modified version of PostgreSQL is needed for shared operation of 1C:Enterprise. This version is available online at https://1c-dn.com/user/updates/postgresql/ (access to partner section is required).
1C:Enterprise can interact with the cluster created with the help of the following PostgreSQL DBMS:
PostgreSQL 8.1.5-X.1C – 9.1.2-1.1C.
PostgreSQL 9.2.1-2.1C.
Standard version of PostgreSQL, provided that the local settings of the cluster and the infobase being created match.
No actions are required when you move to another (either a higher or lower) 1C:Enterprise version without changing the PostgreSQL version.
Infobases created with the help of PostgreSQL v. 9.2.1-2.1C or higher cannot be used with 1C:Enterprise 8.3.2 or later. Do not create an infobase using PostgreSQL
9.2.1-2.1C if you need to work with it with the help of any later version of the platform.
3.2.4.1. PostgreSQL Installation for Windows
To install this version, run setup.bat and follow the instructions of the installer.
3.2.4.2. PostgreSQL Installation for Linux
The distribution package of PostgreSQL modified version includes 11 packages. These packages should be installed in the following order:
postgresql-libs-8.3.<X>-<Y>.1C.i386.rpm
postgresql-8.3.<X>-<Y>.1C.i386.rpm
postgresql-Server-8.3.<X>-<Y>.1C.i386.rpm
postgresql-contrib-8.3.<X>-<Y>.1C.i386.rpm
Where <X> and <Y> are the respective positions in the PostgreSQL version.
When this is accomplished, a user named postgres emerges in the system, and a script /etc/init.d/postgresql is created to start and stop the DBMS.
Next, specify the required value of the LANG variable and run /etc/init.d/postgresql to create the database initially. You can do so using the following command:
LANG=ru_RU.utf-8 /etc/init.d/postgresql start
This will create a database stored at /var/lib/pgsql/data. All the actions above must be performed under the root user.