
CHAPTER 4. SYSTEM COMPONENTS STARTUP
When 1C:Enterprise is installed, a folder named 1C Enterprise 8 is created in the Start – Programs menu. This folder will have a menu structure similar to the one shown in fig. 26:
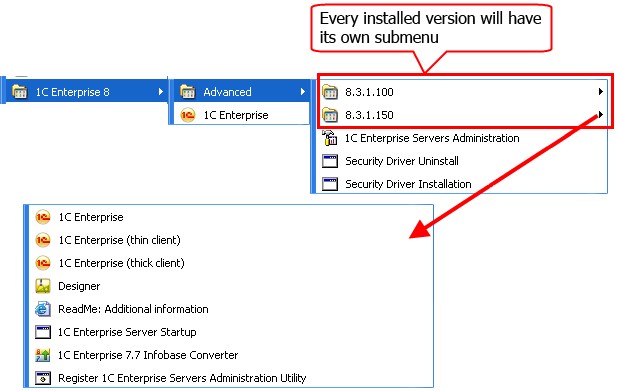
Fig. 26. Menu structure
|
Items |
Purpose |
|
1C Enterprise |
Runs the launcher (1CEStart.exe) |
|
8.3.3.658 8.3.3.659 |
Folders with links to run components of a specific version (in the example two versions are installed: 8.3.3.658 and 8.3.3.659) |
|
Install HASP Device Driver |
Initiates security driver installation |
|
Uninstall HASP Device Driver |
Initiates security driver uninstall |
|
1C Enterprise 8 (thin client) |
Runs the software in the 1C:Enterprise thin client mode |
|
1C:Enterprise (thick client) |
Runs the software in the 1C:Enterprise thick client mode |
|
Designer |
Runs the software in the Designer mode |
|
ReadMe - Additional information |
Additional information not included in the documentation |
|
1C Enterprise 7.7 IB Converter |
1C:Enterprise 7.7 infobase conversion software (outdated version) |
|
Administration of 1C Enterprise Server |
Server cluster administration utility (if the 1C:Enterprise server cluster access components have been installed) |
|
Start 1C Enterprise server |
Runs 1C:Enterprise server as a Windows service (if Install 1C:Enterprise server as Windows service was checked upon server installation) or as an application (if Install 1C:Enterprise server as Windows service was not checked upon server installation). In this case the server is shut down as an ordinary application |
|
Stop 1C Enterprise server |
Stop the 1C:Enterprise server functioning as a Windows service (if the Install 1C:Enterprise server as Windows service check box is selected when the server is installed) |
|
Register MSC console |
Registers 1C:Enterprise servers administration utility (radmin.dll) for a specific version. After registration the servers of this version can be connected to using this administration utility |
4.1. SERVER AGENT STARTUP
To launch the 1C:Enterprise server cluster, you should start the server agent (ragent). All the subsequent actions will be performed by the system automatically. On startup, the server agent searches for the list of clusters registered on this computer.
If the list is located, the server agent runs the specified cluster managers. These managers supply the agent with the information on the working processes to be run in each cluster, and the agent starts these processes independently or with the help of agents running on other working servers of the cluster.
If no cluster list is found, the server agent creates a default cluster. The default cluster parameters are as follows:
Network port number – 1541;
Network ports range – 1560:1591;
Support of multiple working processes is disabled;
A single working process, the port number is selected from the specified range.
4.1.1. Windows
4.1.1.1. Running as an Application
Server agent may be launched as an application. To do so, execute the following command:
ragent -debug
-port  <port> -regport <port> -range <range>
-seclev  <level> -d <directory>
IMPORTANT!
Parameter names and their values should be Space-separated.
The run command may use the following options:
-port <port>
Network port number of the server agent (ragent). This port is used by cluster console to send a request to the central server. Agent cluster port is also specified as the network port of the working server. Default value: 1540.
-regport <port>
Network port number of the master cluster manager (rmngr) created by default when ragent is first run. Default value: 1541.
-seclev <level>
Security level of the cluster agent process. It defines the security level of the connections with ragent process. Possible values for the level:
0 (by default) – unsecure connections;
1 – secure connections only for the time of user authentication; 2 – continuously secure connections.
-range <ranges>
Network port ranges for dynamic distribution. Cluster processes service ports are selected from these ranges when they cannot be selected based on the settings of the corresponding working server. Default value: 1560:1591. Range values examples: "45:49", "45:67,70:72,77:90".
-debug
Running server cluster in the configuration debug mode.
-d <directory>
The directory where server cluster service files will be located or are located now (including cluster list and cluster infobase list). If the option is omitted, the default directory is used. %USERPROFILE%\Local Settings\ Application Data\1C\1Cv8 (%LOCALAPPDATA%\1C\1Cv8 for Windows Vista and later). If the directory path contains any spaces, the entire path should be enclosed in quotation marks, i.e.
-d "c:\Server data\cluster 2"
NOTE
The directory name must not end with "\" if it is quoted. Correct: "c:\my path", incorrect: "c:\my path\".
For details on connection security level, see page 48.
A server agent run as an application can be shut down using the Ctrl + C shortcut.
4.1.1.2. Running as a Service
If you selected to run central server agent as a service when you installed the server cluster, this service will be launched automatically and started every time the operating system starts.
If the central server agent is installed as an application, you can register the service manually and launch it afterwards.
The service name differs in the 32- and 64-bit versions of 1C:Enterprise.
|
1C:Enterprise version |
Service name |
|
32-bit version |
1C:Enterprise 8.3 Server Agent |
|
64-bit version |
1C:Enterprise 8.3 Server Agent (x86-64) |
The service is registered using the following command:
ragent -instsrvc | -rmsrvc -usr <name>  -pwd <password>
-start|-stop  -debug
-port  <port> -regport <port> -range <range>
-seclev  <level> -d <directory>
IMPORTANT!
Option names and their values should be Space-separated.
NOTE
Operations such as registration, cancelling registration, startup and shutdown of the agent cluster service (ragent) should be performed by the Administrator account. Privileges required for work are checked during the operation, and if they are unavailable, the system prompts for privilege escalation.
-instsrvc
Cluster agent registration as a Windows service. If ragent is run with this option, it will register in Windows service list and will be shut down.
The -instsrvc key is not compatible with -rmsrvc.
-rmsrvc
Unregistering cluster agent as a Windows service. If ragent is run with this option, it will unregister the agent in Windows service list and will be shut down.
The -rmsrvc key is not compatible with -instsrvc.
-start
Run ragent registered as a Windows service. Runs ragent already registered as a Windows service and shuts down.
-stop
Stop ragent registered and launched as a Windows service. Stops ragent already registered and launched as a Windows service and shuts down.
-debug
Running server cluster in the configuration debug mode.
TIP
Since server performance is lower in the debug mode, we recommend you to use debug mode only for the servers that are under debugging.
-usr <name>, -pwd <password>
Name and password of the Windows user account ragent should be run as a Windows service under. They can only be used in conjunction with -instsrvc option when ragent is registered as a Windows service.
-port <port>
Network port number of the server agent (ragent). This port is used by cluster console to send requests to the central server. Agent cluster port is also specified as the network port of the working server. Default value: 1540.
-regport <port>
Network port number of the master cluster manager (rmngr) created by default when ragent is first run. Default value: 1541.
-range <ranges>
Network port ranges for dynamic distribution. Cluster processes service ports are selected from these ranges when they cannot be selected based on the settings of the corresponding working server. Default value: 1560:1591. Range values examples: "45:49", "45:67,70:72,77:90".
-seclev <level>
Security level of the cluster agent process. It defines security level for the connections with ragent process. The following values are possible for the level:
0 (by default) – unsecure connections;
1 – secure connections only for the time of user authentication; 2 – continuously secure connections.
-d <directory>
The directory where server cluster service files will be located or are located now (including cluster list and cluster infobase list). If the option is omitted, the default directory is used: %USERPROFILE%\Local Settings\ Application Data\1C\1Cv8 (%LOCALAPPDATA%\1C\1Cv8 for Windows Vista and later).
NOTE
The directory name must not end with "\" if it is quoted. Correct: "c:\my path", incorrect: "c:\my path\".
Example:
ragent -instsrvc -usr usr1cv8 -pwd SuperSecurePassword
For details on connection security level, see page 48.
The default service is run automatically on computer startup. Service startup can also be performed using Windows features: My computer – Manage – Computer
Management – Services and Applications – Services – 1C:Enterprise 8 Server Agent. Shutdown is also performed using Windows features.
To unregister the service:
ragent -rmsrvc
4.1.2. Linux
The installer configures the server processes so that they are launched in daemon mode, i.e. without reference to the control terminal. It makes it possible to run 1C:Enterprise server processes when operating system starts without any user logging in.
When necessary, server agent may be launched with command line options.
4.1.2.1. Server Agent Startup
The following command line options are used to launch the server agent:
./ragent –daemon –debug
-port  <port> -regport <port> -range <ranges>
-seclev  <level> -d <directory>
IMPORTANT!
Option name and its value should be separated by a space.
-daemon
This key can be used to start a server agent in the daemon mode, i.e., as a background application that does not interact with the terminal from which this application is started. Starting a server agent with this key does not mean that it will automatically be executed after the system is restarted.
-debug
Starts a server cluster in the configuration debug mode.
-port <port>
Network port number of the server agent (ragent). This port is used by cluster console to send requests to the central server. Agent cluster port is also specified as the network port of the working server. Default value: 1540.
-regport <port>
Network port number of the master cluster manager (rmngr) created by default when ragent is first run. Default value: 1541.
-range <ranges>
Network port ranges for dynamic distribution. Cluster processes service ports are selected from these ranges when they cannot be selected based on the settings of the corresponding working server. Default value: 1560:1591. Range values examples: "45:49", "45:67,70:72,77:90".
-seclevel <level>
Optional. Security level of the cluster agent process. It defines the security level of the connections with ragent process. Possible values for the level:
0 (by default) – unsecure connections;
1 – secure connections only for the time of user authentication; 2 – continuously secure connections.
For details on connection security level, see page 48.
-d <directory>
A directory where the service files of a server cluster are located (or will be located), including the list of clusters and a list of cluster infobases. If the parameter is not specified, a default directory is used: ~/.1cv8. If a directory path contains spaces, insert it in quotes, for example:
-d "~/cluster data"
A server agent started as an application can be stopped by pressing Ctrl + C.
4.1.2.2. Server Agent Startup with a Script
A dedicated script is intended to manage 1C:Enterprise server agent: /etc/init.d/ srv1cv8. The script always registers the server in daemon mode. The script uses the following command line options:
/etc/init.d/srv1cv8 start|stop|restart|info|status
-start
It launches the server. The script allows to launch a single instance of 1C:Enterprise server.
-stop
It stops the server. At that, it only stops the server that was earlier launched by the script (see start).
-restart
Restarts the server. Equivalent to a sequence of stop and start commands.
-info
It displays the information on server settings: ports specified at startup, cluster directory, configuration debugging mode status, connections security level.
-status
Information on the server status is displayed (whether it is started or not, and whether it is operating at a given moment in time, if started).
To set the 1C:Enterprise service agent start parameters, you can use the /etc/sysconfig/srv1cv8 configuration file (if the product was installed for an RPM system) or the /etc/init.d/srv1cv8 configuration file (if the product was installed for a DEB system). For description of the configuration file parameters, see "1C:Enterprise 8.3. Administrator Guide".
Sample configuration file:
#------------------------------------------------------------
# 1C:Enterprise Server configuration  parameters
#------------------------------------------------------------
# 1C:Enterprise Server keytab file.
# default – usr1cv8.keytab file in  1C:Enterprise Server
# installation directory
#SRV1CV8_KEYTAB=
# Number of the cluster port created by  default during first
# launch of ragent
# default – 1540
SRV1CV8_PORT=1540
# Number of cluster agent main port. This port  is used by the
# cluster console to address the central  Server. Cluster agent
# port is also specified as the IP port of the  working Server.
# default – 1541
SRV1CV8_REGPORT=1541
# Port range for connection pool
# example values:
# 45:49
# 45:67,70:72,77:90
# default – 1560:1691
SRV1CV8_RANGE=1560:1691
# 1C:Enterprise Server configuration debug  mode
# 0 – default – off
# 1 – on
SRV1CV8_DEBUG=0
# Path to directory with claster data
# default – $HOMEDIR/.1cv8/1C/1cv8
SRV1CV8_DATA=$HOMEDIR/.1cv8/1C/1cv8
# Security level:
# 0 – default – unprotected connections
# 1 – protected connections only for the time  of user
# authentication
# 2 – permanently protected connections
SRV1CV8_SECLEV=0
#------------------------------------------------------------
# end of config
#------------------------------------------------------------
4.1.2.3. Installing 1C:Enterprise Server Autostart
To automatically start 1C:Enterprise server when your OS launches, perform one of the following commands:
For RPM systems:
chkconfig -add srv1cv8
For DEB systems:
update-rc.d srv1cv8 defaults
These commands add the 1C:Enterprise server start script (see page 100 for details) into a list of automatically started services. In this case, the server parameters will be obtained from configuration file /etc/sysconfig/srv1cv8 (if the product was installed for an RPM system) or file /etc/init.d/srv1cv8 (if the product was installed for a DEB system). For a description of configuration file parameters see "1C:Enterprise 8.3. Administrator Guide".
4.2. SUPPORT OF MULTIPLE COLLABORATIVE SERVER PROCESSES
In most cases, one server agent runs on one working server.
If multiple clusters are created by one server agent, it prevents network ports conflicts. If clusters are created by different server agents, you will need to prevent cluster managers network ports conflicts manually.
Always remember to prevent network ports conflicts of working processes on the server (if this server is used in different clusters), even when such clusters run under the same server agent.
Situation when two or more server agents run simultaneously on the same computer managing their own sets of clusters is quite normal though rare and specific. It may be necessary, for example, when different 1C:Enterprise server versions should be used on the same computer.
In order to provide parallel functioning of two server agents managing different clusters, the following conditions should be met:
Server agents must have different network ports;
Server agents must access different directories of service files;
Server clusters created for each server agent must have different network ports;
Network port ranges used by working processes on the server should not overlap (if the server is used in different clusters).
4.2.1. For Windows OS
Below is a description of the operations to be performed to launch a second 1C:Enterprise server instance on the computer.
TIP
Any second 1C:Enterprise server instance will be installed as an application rather than a Windows service. If necessary, the server may be registered as a service later by specifying the necessary parameters during registration.
NOTE
Operations such as registration, cancelling registration, startup and shutdown of the agent cluster service (ragent) should be performed by the Administrator account. Privileges required for work are checked during the operation, and if they are unavailable, the system prompts for privilege escalation.
You should remember that the installation utility does not enable one to change the server’s network ports, and therefore a new instance of the server will not operate after installation.
Examples will be provided for launching the 1C:Enterprise server in an operating system of similar bitness (i.e., a 32-bit server in a 32-bit OS, or a 64-bit server in a 64-bit OS). If a 32-bit 1C:Enterprise server is launched in a 64-bit Windows OS, the path C:\Program Files should be replaced with C:\Program Files (x86) in all the examples below.
4.2.1.1. Running Different Versions of the 1C:Enterprise Server at the Same Time
As a Service
To launch and run 1C:Enterprise Server 8.3 as a Windows service at the same time that 1C:Enterprise Server 8.1 is operating, do the following:
Navigate to the bin directory of the newly installed version of the 1C:Enterprise Server. 1C:Enterprise Server 8.3.1.150 is used in the example.
c:
cd "c:\Program  Files\1cv8\8.3.1.150\bin"
Remove the 1C:Enterprise Server 8.3 registration.
ragent -rmsrvc
Remove the contents of the cluster register directory. The location of the catalog is determined by the method used for installing 1C:Enterprise Server 8.3 (see page 58 for details).
rmdir -s -q "c:\Program Files\1cv8\srvinfo"
Register the service with other network port settings.
ragent -instsrvc -port 2540 -regport 2541 -range 2560:2590 -usr .\usr1cv8 -pwd UsrPwd8 -d "d:\DbData\srvinfo"
The example shows registration of a server with the following port settings:
○ Network port number of the server agent – 2540.
○ Network port number of the cluster manager – 2541.
○ Port range for dynamic selection – 2560:2590.
○ Cluster register data is located in the d:\DbData\srvinfo directory.
○ User account under which the 1C:Enterprise server service runs – usr1cv8.
○ Password of the user account under which the 1C:Enterprise server service runs – UsrPwd8.
○ In order to enable debugging for the service registered, the -debug key will be added into the command line.
Launch the 1C:Enterprise server.
ragent -start
As an Application
If the 1C:Enterprise server is launched as an application, do the following to change the network ports:
Quit server instance by pressing Ctrl + C in a console window with the working server.
Navigate to the bin directory of the newly installed version of the 1C:Enterprise server. 1C:Enterprise Server 8.3.1.150 is used in the example.
c:
cd "c:\Program  Files\1cv8\8.3.1.150\bin"
Remove the contents of the cluster register directory. The location of the catalog is determined by the method used for installing 1C:Enterprise Server 8.3 (see page 58 for details).
rmdir -s -q "%USERPROFILE%\Local Settings\Application Data\1C\1cv8"
Launch the 1C:Enterprise server with new network port settings and other parameters.
ragent -port 3540 -regport 3541 -range 3560:3590 -d "d:\DbData\srvinfo"
The example shows registration of the server with the following port settings:
○ Network port number of the server agent – 2540.
○ Network port number of the cluster manager – 2541.
○ Port range for dynamic selection – 2560:2590.
○ Cluster register data is located in the d:\DbData\srvinfo directory.
○ In order to enable debugging for the service registered, the -debug key will be added to the command line.
○ The same launch command line will be used in subsequent launch operations. To simplify this, it may be inserted in a Windows command file.
4.2.1.2. Running the Same Version of the 1C:Enterprise Server on Several Servers at the Same Time
As a Service
1C:Enterprise does not provide any default tools to register multiple instances of 1C:Enterprise server service of the same version. Use the sc.exe utility to complete such registration. Please differentiate service names, network port numbers and cluster catalog addresses.
Let us review a sample command file that registers the server service.
register-service.bat file:
@echo off
rem %1 – full number of 1C:Enterprise version
rem %2 – first two figures of the port  numbers. Use 15 for ports 1540,1541,1560:1591
rem %3 – is a directory that contains data of  the cluster register.

set SrvUserName=<user name>
set SrvUserPwd=<user password>
set RangePort=%260:%291
set BasePort=%241
set CtrlPort=%240

set SrvcName="1C:Enterprise 8.3 Server  Agent %CtrlPort% %1"
set BinPath="\"C:\Program  Files\1cv8\%1\bin\ragent.exe\" -srvc -agent -regport %BasePort% -port  %CtrlPort%
-range %RangePort% -d \"%~3\" -debug"
set Desctiption="1C:Enterprise 8.3 server  agent. Parameters: %1, %CtrlPort%, %BasePort%, %RangePort%"

if not exist "%~3" mkdir  "%~3"

sc stop %SrvcName%
sc stop %SrvcName%
sc create %SrvcName% binPath= %BinPath% start=  auto obj= %SrvUserName% password=
%SrvUserPwd%  displayname= %Desctiption% depend=  Dnscache/Tcpip6/lanmanworkstation/lanmanserver
Prior to applying this command file, details (username and password) of a real account under which the server cluster service will be run (the set SrvUserName= and set SrvUserPwd= strings) should be specified in this file. This command file registers the specified version of the 1C:Enterprise server. A service name is a string that contains the following information:
1C:Enterprise 8.3 Server Agent,
Network port number of the main cluster manager, Full version number of 1C:Enterprise.
If you register a 8.3.1.100 server that uses a network port of the main cluster manager 2540, the name of the service would look as follows: 1C:Enterprise 8.3 Server Agent 2540 8.3.1.100.
Example:
register-service 8.3.1.100 25  "c:\cluster_data\cluster 1"
register-service 8.3.1.100 35  "c:\cluster_data\cluster 2"
In this scenario, the first string registers the server service with the following parameters:
Name of service: 1C:Enterprise 8.3 Server Agent 2540 8.3.1.100.
Server ports: 2540, 2541, 2560:2591.
A directory containing cluster register data: c:\cluster_data\cluster 1.
Description of service: 1C:Enterprise 8.3 server agent. Parameters: 8.3.1.100, 2540, 2541, 2560:2591.
The second row registers the server service with the following parameters:
Name of service: 1C:Enterprise 8.3 Server Agent 3540 8.3.1.100.
Server ports: 3540, 3541, 3560:3591.
A directory containing cluster register data: c:\cluster_data\cluster 2.
Description of service: 1C:Enterprise 8.3 server agent. Parameters: 8.3.1.100, 3540, 3541, 3560:3591.
If you need to cancel registration of a server service, you can use the following command file:
unregister-service.bat file:
@echo off
rem %1 – full number of 1C:Enterprise version
rem %2 – first two figures of the port  numbers. Use 15 for ports 1540,1541,1560:1591
set SrvcName="1C:Enterprise 8.3 Server  Agent %240 %1"
sc stop %SrvcName%
sc stop %SrvcName%
Example:
unregister-service 8.3.1.100 25
This command file stops the service and cancels its registration. The name of the service is created by the same rules that are applied when a new (customized) 1C:Enterprise server service is registered.
As an Application
To run the same version of the 1C:Enteprise server operating as an application use the command line. In this case command line options must differ not only by network port numbers, but also and by addresses of cluster directories:
start "Server 1" "C:\Program  Files\1cv8\8.3.1.100\bin\ragent.exe" -port 2540 -regport 2541
-range  2560:2590 -d d:\ClusterData\Srv1
start "Server 2" "C:\Program  Files\1cv8\8.3.1.100\bin\ragent.exe" -port 3540 -regport 3541
-range  3560:3590 -d d:\ClusterData\Srv2
In this example two instances of 1C:Enterprise server are started with the following parameters:
First server has Server 1 in the window title, operates at 25õõ network ports and stores cluster data at d:\ClusterData\Srv1.
Second server has Server 2 in the window title, operates at 35õõ network ports and stores cluster data at d:\ClusterData\Srv2.
4.2.1.3. Changing the Network Ports
of a 1C:Enterprise Server Instance which is Currently Running
Changing the network ports of a currently operating 1C:Enterprise server instance is not supported. Should such a need arise, do the following:
Create a new server instance with the desired network port settings and other parameters.
Register the existing infobases on the new server.
Transfer the clients to the new server.
Quit and remove the previous 1C:Enterprise server instance (with cluster data).
4.2.2. For Linux OS
Below is a description of operations to be performed to launch a second 1C:Enterprise server instance on the computer.
You should remember that the installation utility does not enable one to change the server’s network ports, so a new instance of the server will not operate after installation.
NOTE
The 1C:Enterprise server in Linux OS is always installed in daemon mode.
Only different versions of 1C:Enterprise servers may concurrently run under Linux OS.
4.2.2.1. As Daemon
To change the network ports of a running server instance, do the following:
Quit the 1C:Enterprise server.
/etc/init.d/srv1cv83 stop
Remove the cluster directory.
rm -rf /home/usr1cv8/.1cv8
Change the 1C:Enterprise server startup settings by specifying the appropriate network port settings and other parameters (including the cluster register directory). See "The 1C:Enterprise 8.3. Administrator Guide" for a description of the configuration file.
Launch the 1C:Enterprise server.
/etc/init.d/srv1cv83 start
4.2.2.2. As an Application
If the 1C:Enterprise server runs as an application, do the following to change network ports:
Quit the server instance by pressing Ctrl + C in a console window with the working server.
Remove the contents of the cluster register directory. As usual, this is the .1cv8 directory of a home directory of the user account under which the server runs.
rm -rf /home/<ÏîëüçîâàòåëüCåðâåðà>/.1cv8
Navigate to a catalog with the 1C:Enterprise binary files.
For a 32-bit version:
cd /opt/1C/v8.3/i386
For a 64-bit version:
cd /opt/1C/v8.3/x86_64
Launch the 1C:Enterprise server with new network ports settings and other parameters.
./ragent -port 2040 -regport 2041 -range 2060:2090 -d /home/usr1cv8/dbinfo/.1cv8
The example shows the launch of a server with the following port settings:
○ Network port number of the server agent – 2040.
○ Network port number of the cluster manager – 2041.
○ Port range for dynamic selection – 2060:2090.
○ Cluster register data is located in the /home/usr1cv8/dbinfo/.1cv8 directory.
○ In order to enable debugging for the service registered, the -debug key will be added to the command line.
○ The same launch command line will be used in subsequent launch operations. To simplify this, it may be inserted in a Linux command file.