
Homework
In the homework section the tutorial suggests you to improve the application you have created. The point of the homework is to show how you can solve issues using the 1C:Enterprise platform.
In the real developers rarely stop supporting released applications. A good application is constantly being improved according to user requirements.
Homework 1
Task. Create the button on the desktop that will update both tables. Currently the user has to click twice for it, we need to facilitate the application usage.
Solution. As it commonly happens in real life tasks, this one has several solutions. A qualified developer chooses the way based on application features, customer requirements, and implementation efforts.
In your case, there are two obvious option:
1. Create a big button in the button group, near the document adding buttons.
2. Create a button in the command bar of the form. Currently the bar functionality is poor.
The solutions have equal nature, you have to add a button to the form, update the command, and associate the command with the button.
Choose the first option, the button will be bigger, it is more user-friendly.
Add a new button to ButtonsGroup.
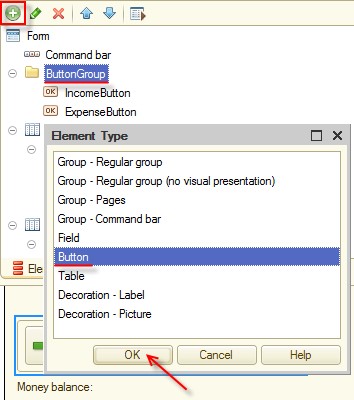
Figure 16-1. New button
Name it RefreshAll, type Refresh in the Title field, and set the font size to 14.
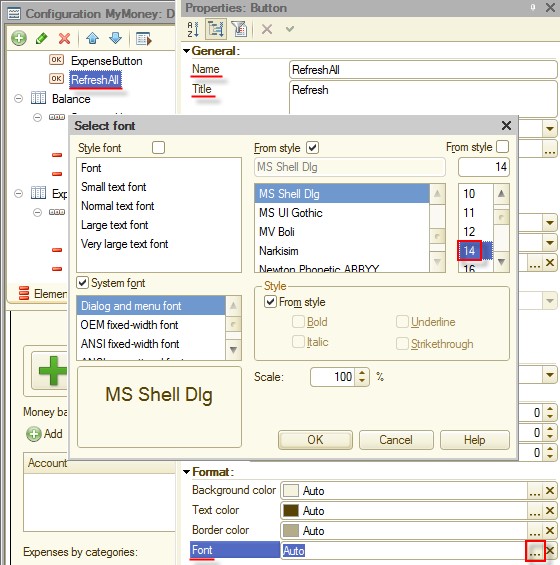
Figure 16-2. New group
Create the RefreshAll command.
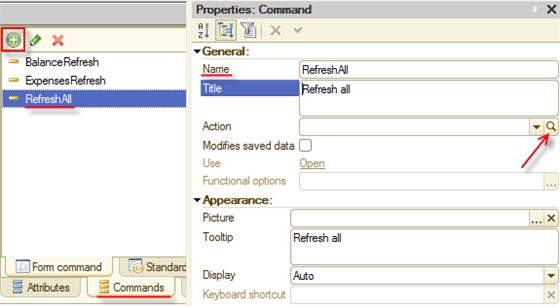
Figure 16-3. New command
Click Create on client.
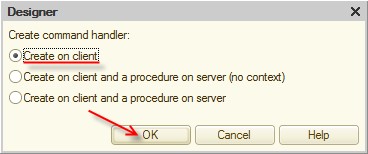
Figure 16-4. Command handler
In the generated procedure call both procedures of the fillings. You can do it, for example, by copying the script from the OnOpen() procedure.
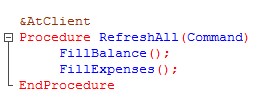
Figure 16-5. RefreshAll procedure
In the properties of the RefreshAll button, select RefreshAll as the command to be executed on click.
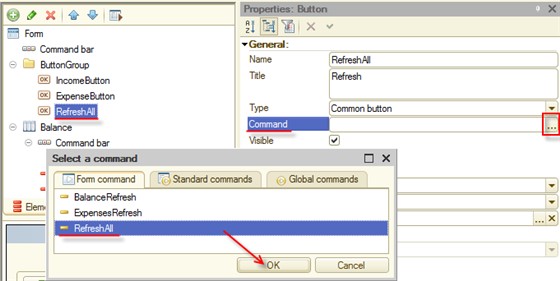
Figure 16-6. Button command
Set
Representation to Picture and text. The tutorial includes
the Refresh.png picture file. Select
it as a button picture (as you did with Income
and Expense in the Adding desktop buttons chapter) and set Width to 16.
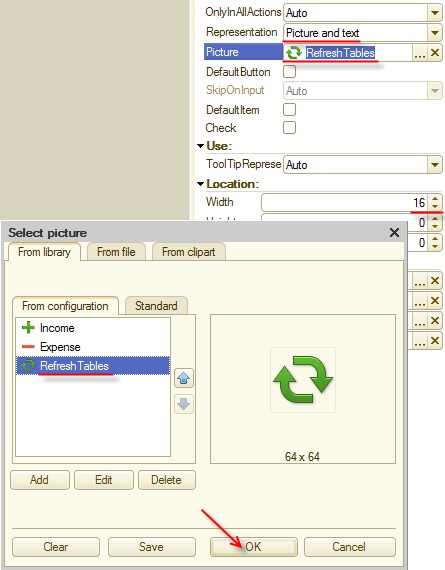
Figure 16-7. Button picture
Run the application in 1C:Enterprise mode to make sure that the button updates both tables. For this, add any expense by category.
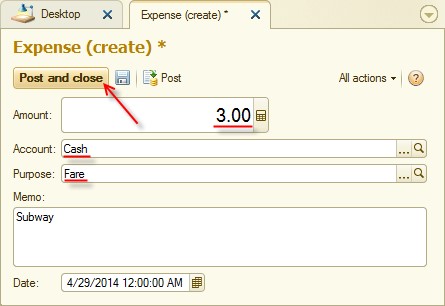
Figure 16-8. New Expense document
Once you
click  Refresh, you
can see that the data is updated in both tables.
Refresh, you
can see that the data is updated in both tables.
Homework 2
Task. Provide users with the option to see the turnover of the specified period. It is a common scenario when users want to know how much money they spent during a day, month, or year.
Solution. Open the desktop form module and find the FillExpenses() procedure. Place the cursor to the Turnovers() method and press Ctrl+F1 to call the Syntax Assistant. You can see that Begin of period and End of period can be specified for the Turnovers() method.
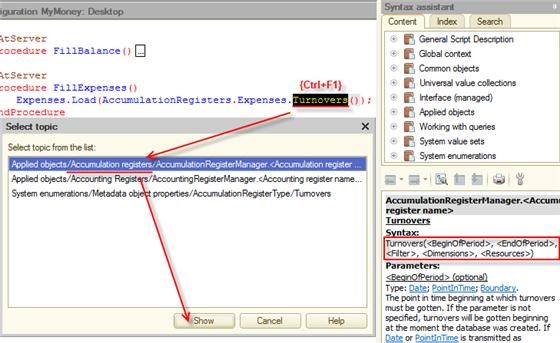
Figure 17-1. Register method details in the Syntax assistant
All you have to do is add two attributes of the data type and pass them to the Turnovers() method.
It
is time to do it. Add a group where the attributes will be placed to the form.
Click  , then, click Group - Regular group no visual presentation) and click OK.
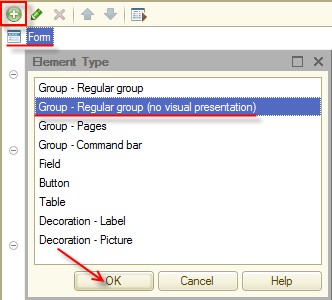
Figure 17-2. New group
Name the new group PeriodGroup and place it above the Expense table. Set the Group property value to Horizontal.
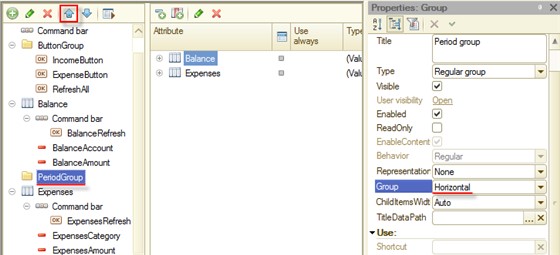
Figure 17-3. Group properties and position
Add two form attributes BeginDate and EndDate. Set the type to Date and Date Contents to Date and time.
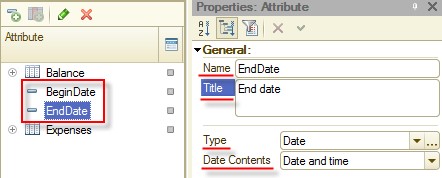
Figure 17-4. New form attributes
Drag the attributes you have created to PeriodGroup. Check that
BeginDate is the first attribute in the group.
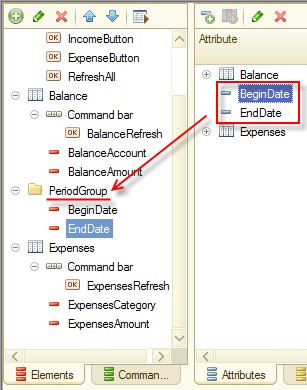
Figure 17-5. New form attributes
Note that the preview pane contains a group with two attributes of the Date type above the Expenses table.
Now change the form module as it is shown on the figure 17-6.

Figure 17-6. FillExpenses() procedure
Run the application in 1C:Enterprise mode to test the changes. To do it, analyze the Expenses register records and choose the period where only a part of posted documents are included.
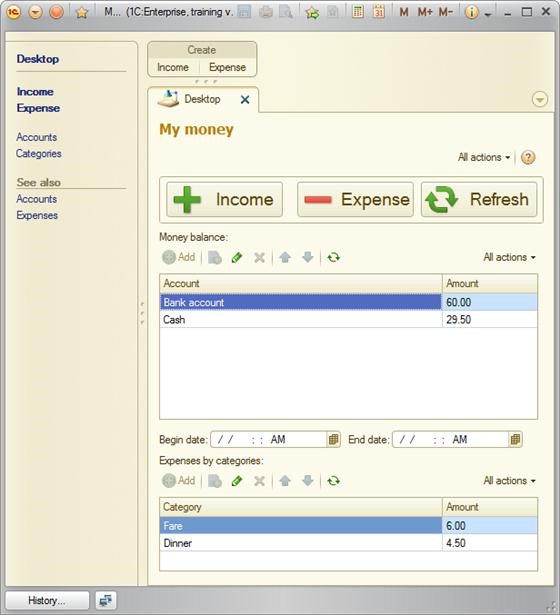
Figure 17-7. New desktop
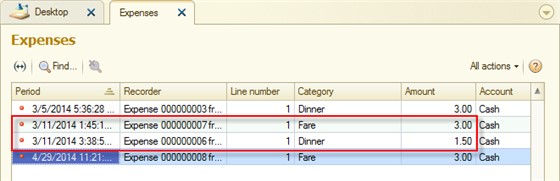
Figure 17-8. Expenses register records
On the
desktop, set Begin date and End date and click Refresh.
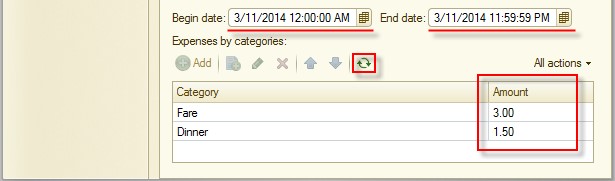
Figure 17-9. Setting the period
Now
you see turnovers of the specified period only. If you clear the dates and
click Refresh, you
see all of the turnovers again.
Homework 3
Task. In the Mobile platform chapter, when you installed the application to the mobile device, you saw that it did not contain accounting data. In this chapter you will supply the application with the synchronization mechanism. In the real-life it is common when the application is a part of a big accounting system, or when you want to prevent users from duplicate data entry.
You can imagine a scenario where, when one copy of the application is installed on the personal computer and the other one on a mobile device. Both copies must be filled with the same data. The desktop copy will be the main (master) one, and the mobile copy will be subordinated. If fact, you can have several mobile copies.
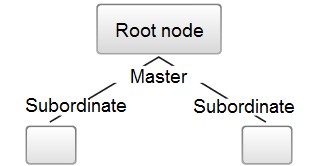
Figure 18-1. Application interaction schema
Solution. To solve the task, use the built-in the 1C:Enterprise platform mechanisms of data synchronization through web services using SOAP:
Exchange plan will collect the data to be syncronized.
Web service will syncronize the collected data.
Note. Exchange plan is a built-in mechanism intended for syncronizing data between homogeneous and heterogeneous 1C:Enterprise applications.
It is based on the XML format. You can use Exchange plans for building distributed infobases and synchronizing data with third-party applications that support the XML format.
Note. The 1C:Enterprise platform includes the fully fledged SOAP implementation and you do not have to worry about the technical aspects of data synchronization. Moreover, 1C:Enterprise solutions can serve as web service providers for both 1C:Enterprise-based and third-party applications, and also can use third-party web services.
We will not go into details of the task, it has a lot of solutions, we will describe the one that requires minimal application redesign.
First, add Personal computer to Use purposes in the property palette of the main configuration node.
This will supply the desktop version with extended functionality.
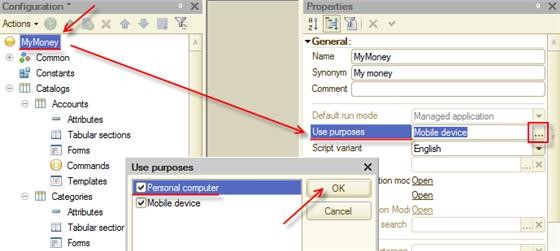
Figure 18-2. Enabling Personal computer features
Add an Exchange plan that will register data changes in all application copies and generate exchange files.
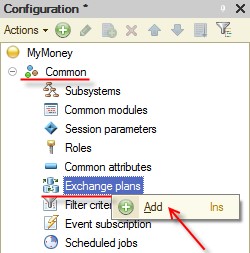
Figure 18-3. Adding the exchange plan
Name it Mobile and then click Content.
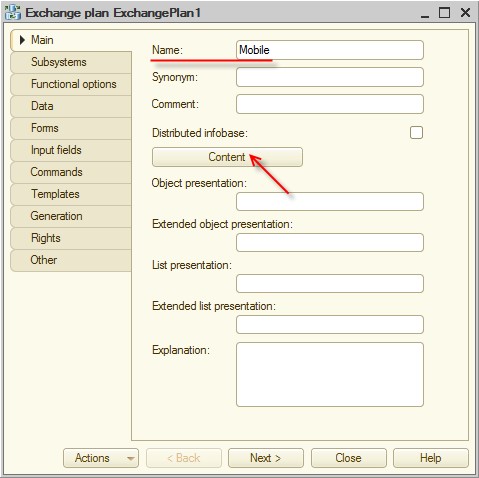
Figure 18-4. Exchange plan
Select the check marks for all objects.
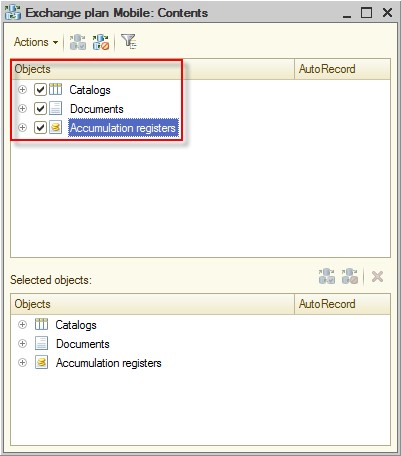
Figure 18-5. Exchange plan content
These are all settings you have to set for the exchange plan. Close the exchange plan window.
Create an XDTO package.
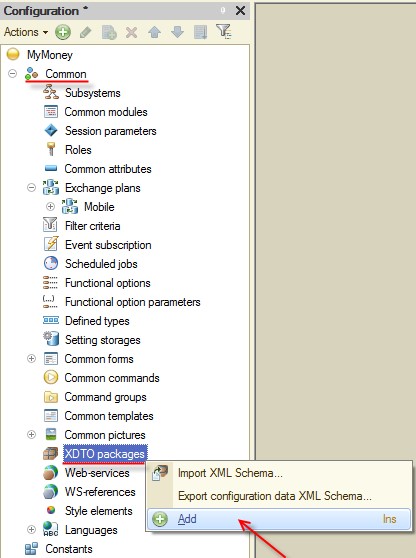
Figure 18-6. Adding the XDTO package
Note. XDTO packages are intended to define a system of types and values for interacting with external data sources, for example, web services.
Click the added XDTO package and type WebExchange in the Name field of the property palette.
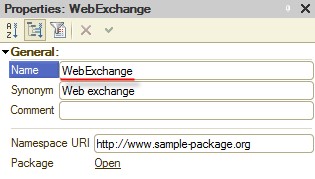
Figure 18-7. Naming the package
In the Namespace URI field type http://localhost/ws1, then press
Enter. Once you press it, the platform asks you to confirm the namespace change. Click Yes.
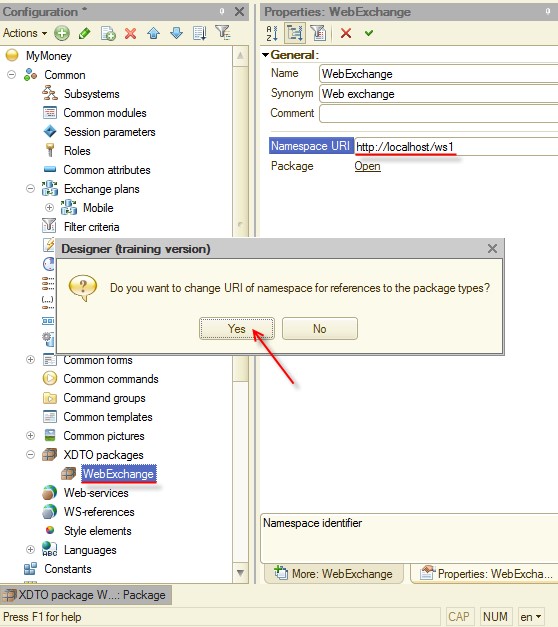
Figure 18-8. Changing the namespace URI
In the window with the list of namespaces to be updated, select all namespaces and click OK.
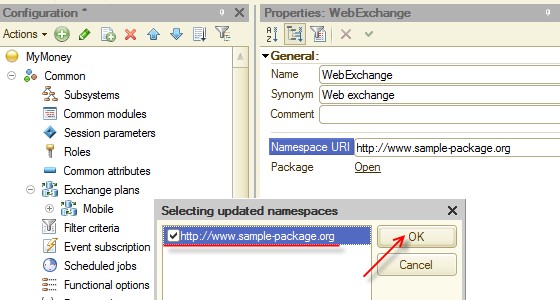
Figure 18-9. Selecting the namespaces to be updated
The main application must contain details of the web service that subordinate applications will call to synchronize data.
Add a Web service.
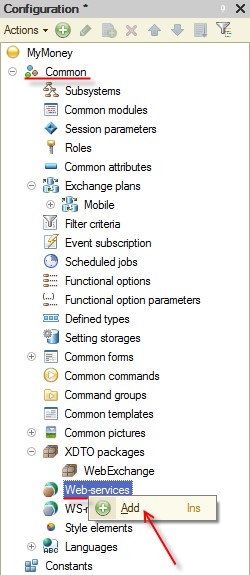
Figure 18-10. Adding a web service
Name it WebExchange and proceed to the Other tab.
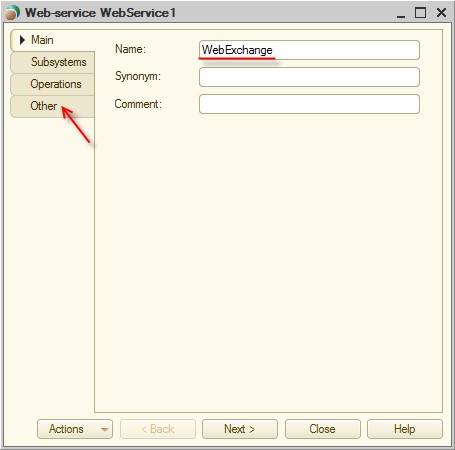
Figure 18-11. Specifying the web service parameters
Type http://localhost/ws1 as Namespace URI, check that Publishing file name is ws1.1cws, and then click  in the XDTO
packages field.
in the XDTO
packages field.
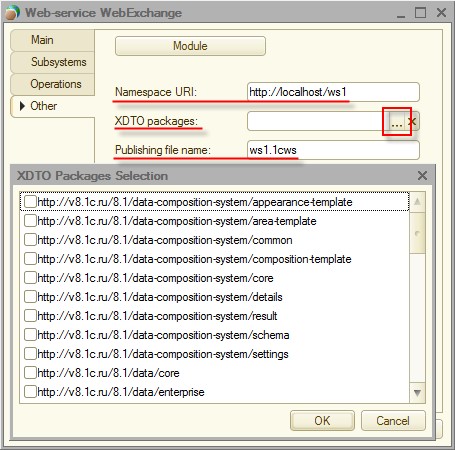
Figure 18-12. Specifying the web service parameters
Select the following XDTO packages:
• http://v8.1c.ru/8.1/data/core
• http://v8.1c.ru/8.1/data/enterprise/current-config
• http://localhost/ws1 Then click OK.
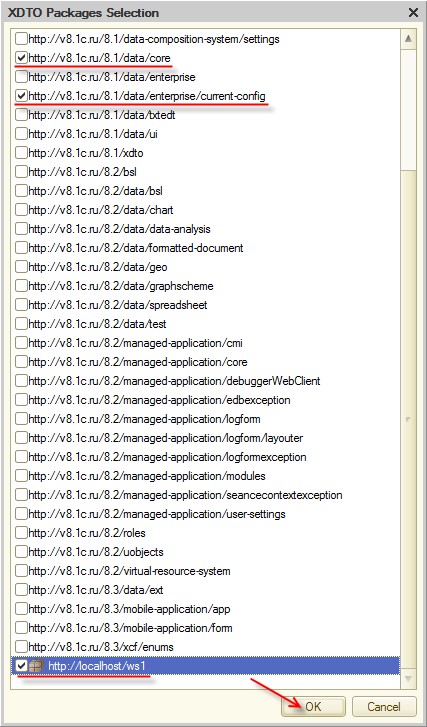
Figure 18-13. Selecting the XDTO packages
Proceed to the Operations tab and click Add
operation  .
.
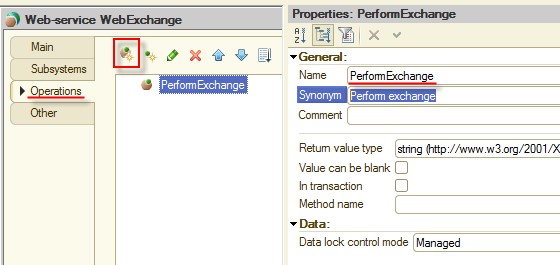
Figure 18-14. Adding the operation
Select
Value can be blank and then click of the Return
value type. In the opened window click Value
storage of the http://v8.1c.ru/8.1/data/core
branch and click OK.
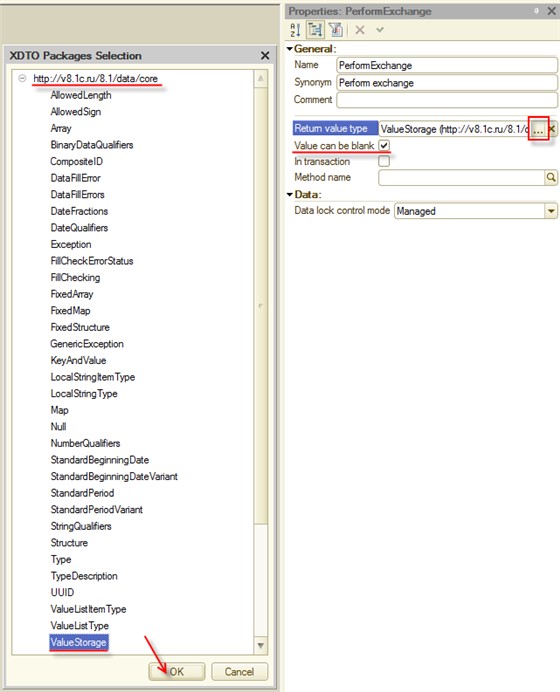
Figure 18-15. Specifying the operation properties
Add two
parameters for the PerformExchange
operation. To add a parameter, click  . Name them DeviceCode and DeviceData.

Figure 18-16. Operation parameters
Leave the DeviceCode value type as is. Set the DeviceData value type to ValueStorage (http://v8.1c.ru/8.1/data/core). Set Transfer direction to Input - Output.
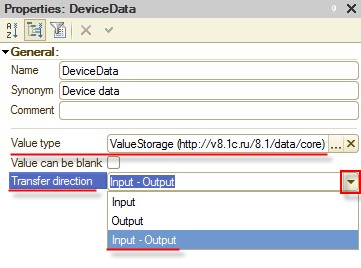
Figure 18-17. Operation parameter properties
Now
create a method that will implement the PerformExchange
operation. To start creating the method, click the  button of the Method name parameter in the PerformExchange
operation property palette.
button of the Method name parameter in the PerformExchange
operation property palette.
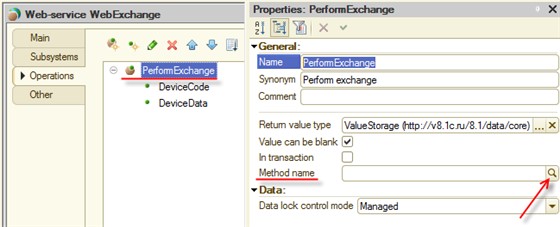
Figure 18-18. Creating the operation method
Once
you click , the PerformExchange() function is generated in the web service module.
The platform generates a function but not a procedure because in the web
service logic it must return a value. In the function, you have to type a
script that will perform actions required for data synchronization. It will
have a pretty simple logic.
First, remember that web service actions you are about to define are called from a mobile device but are performed in the main application.
Second, the script must retrieve a data package from the mobile device that called it and must update data in the main application.
Third, when data from the mobile device is retrieved and saved, the script must generate a data package to be sent to the mobile device. If there is no data to be sent, the package must be sent anyway so the exchange plan commits the synchronization.
Also, keep in mind that you can have several mobile devices.
All these points are easily implemented with the 1C:Enterprise script. To keep the tutorial simple, just take the content of the web service module from the Web service module.txt file.
Some explanations for the module are given below:
• In section 1. Initialization, there is verification whether the Mobile exchange plan parameters are not filled (in case of initial run). If the parameters are empty, the main node code is set to 001 and the main node name is set to Main. Then the script attempts to find a record matching the mobile device code in the Mobile exchange plan. If the record is not found, a new device is recorded to the Mobile exchange plan.
• In section 2. Retrieving data from the mobile device, based on the code of the mobile device that call the web service, the script registers new data from the exchange package passed in the DeviceData parameter.
• In section 3. Exporting data to the mobile device the script generates a package with the data changes of the main application to send it to the mobile device as a value that the PerformExchange() function returns. Thus, all main infobase synchronization features are prepared. The web service in the main application waits for a call from the mobile device. When it is called, it gets a package with upto-date data from the mobile device and sends back a package with synchronization confirmation and data that the mobile application does not have.
All you left to do is create a mobile part that will be call the web service, pass a package, and retrieve data from the main application.
Allow users to set up the synchronization rate-create a command that they will run from the application menu.
Create a common command.
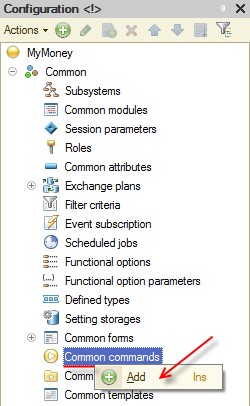
Figure 18-19. Exchange common command
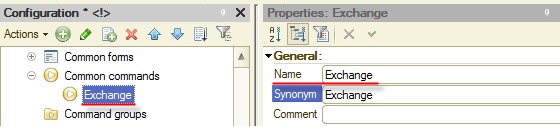
In the property palette, type the command name Exchange.
18-20. Common command name
Select Action panel.Tools as Group.
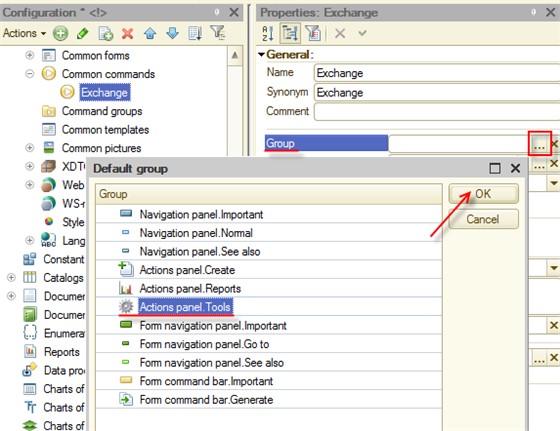
Figure 18-21. Command group
The command module is generated when you add a new command. You can always open it by double-clicking the command in the metadata tree or by clicking the Command module link in the property palette.
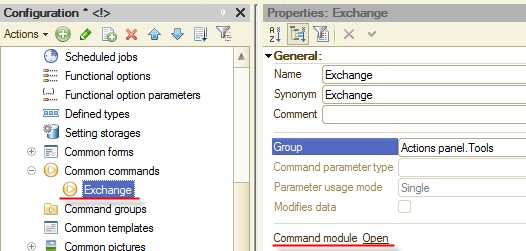
Figure 18-22. Opening the command module
In the Exchange module you must define the behavior of the subordinate applications:
• Calling the WebExchange web service of the main application.
• Passing the package with data received from the Mobile exchange plan. (The exchange package is passed in the DeviceData parameter and the device code is passed in DeviceCode).
• Receiving a data package for the Mobile exchange plan from the web service.
• Saving the received data.
To keep the tutorial simple, take the content of the common command module from the Exchange common command.txt file.
Some explanations for the module are given below:
• The Address variable contains a string address for connecting to the main application web service. Instead of the IP address given in the file, type the address of the computer where your web service runs. /ws/ws1.1cws?wsdl is the address of the application on the web server (see the Web client chapter). Note: To find out the computer IP address, see its network connection properties. The mobile device and the server should be in the same network. The easiest way of doing that is using a Wi-Fi router. Both the computer with web server and the mobile device should be connected to it. Correct the connection string in the module based on your web application and web server settings.
• In 1. Initialization section, there is a verification whether the parameters are filled. In case of initial run, the current node gets a unique code and the main application node gets code 001 in the Mobile exchange plan.
• In 2. Exchange with the main base section the script passes the mobile device code and a data package from the Mobile exchange plan to the WebExchange web service of the main application.
• In 3. Processing data received from the main base section the script processes and saves data received from the WebExchange web service of the main application.
As you see, creating the mobile device part is as easy as creating the main application part.
There is just a little left:
• Save the improvements you have made.
• Publish the WebExchange web service on the web server.
• Update the application on the mobile device.
Save the configuration.
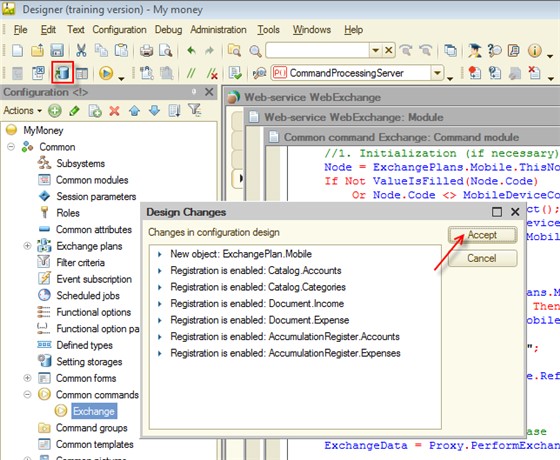
Figure 18-23. Saving the configuration
Update the web server publication as you did it in the Web client chapter. Note that the Publish web services check box must be selected.
Important. Make sure the web service publication name is different from the name of mobile publication you made in the Mobile platform chapter!
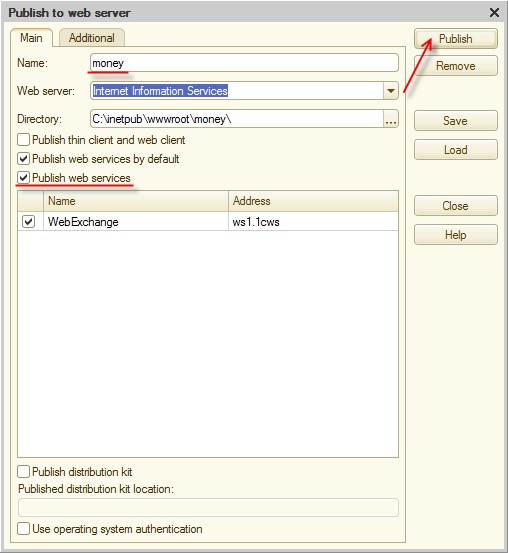
Figure 18-24. Publishing to a web server
Update the mobile application on the web server.
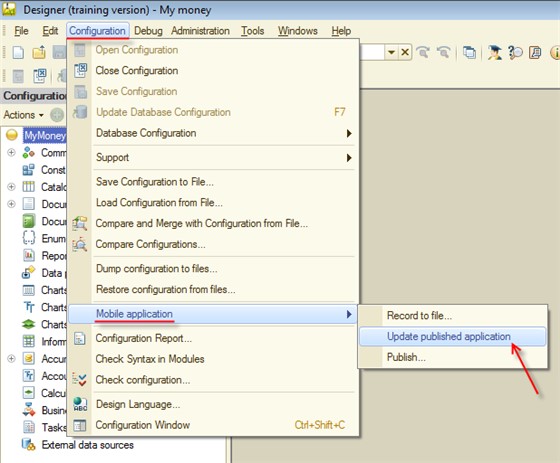
Figure 18-25. Updating the published application
Now, check whether the mobile application URL is set on the mobile device and start it.
Note. In the previous chapters we showed you iPad screenshots, but in this chapter, for variety's sake, we will show you screenshots made on an Android-based device. Installing the 1C:Enterprise mobile platform to an Android-based device is even easier than to an iOS-based device, just copy the .apk file with the platform to your device, start it, and follow the instructions.
Start the 1C:Enterprise platform on your mobile device, call the application list menu (on the most devices, hold the application name in the list for this), and then tap Edit.
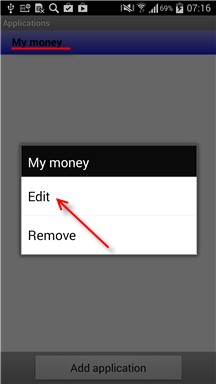 Figure
18-26. Calling the application list menu
Figure
18-26. Calling the application list menu
Check out the update address and tap Open.
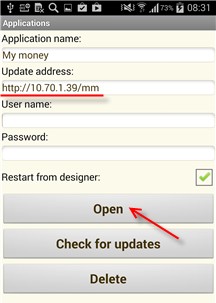
Figure 18-27. Updating the application
The platform connects to the web server, retrieves an up-to-date application version, updates the application on the mobile device, and starts it.
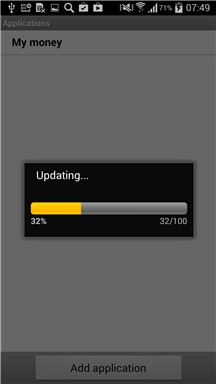
Figure 18-28. Updating the application
Once the application is started, you can see the new interface that includes the improvements you did in homework 2 and 3.
Note. Before taking the screenshots you see below, we made some changes in the interface to make it more appropriate for a small display of the mobile phone. For example, we set Representations of the Income, Expense, and Refresh buttons to Picture instead of Picture and text and decreased their width to 10.
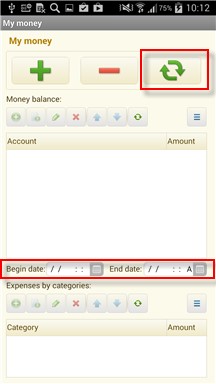
Figure 18-29. Updated mobile application

Figure 18-30. Menu command
The application still has no data. Tap Exchange to synchronize it.
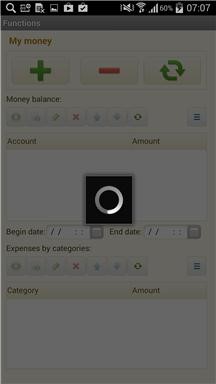
Figure 18-31. Data synchronization
Once you tap Exchange, the application connects to the web server and retrieves data from the main application.
When
the synchronization is finished, you can check out whether all data is in the
mobile application by clicking .
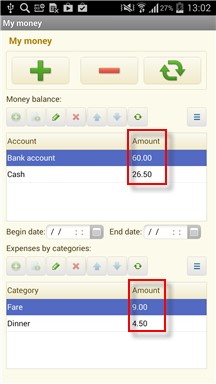
Figure 18-32. Synchronized data
Check out that data is transferred to both directions by adding add the
Income document on the mobile device and send it to the main application.
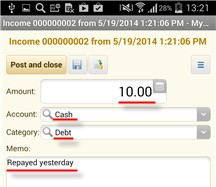
Figure 18-33. Mobile application document
On the
mobile device, tap Exchange. You can
see that the balance in the desktop copy has changed.
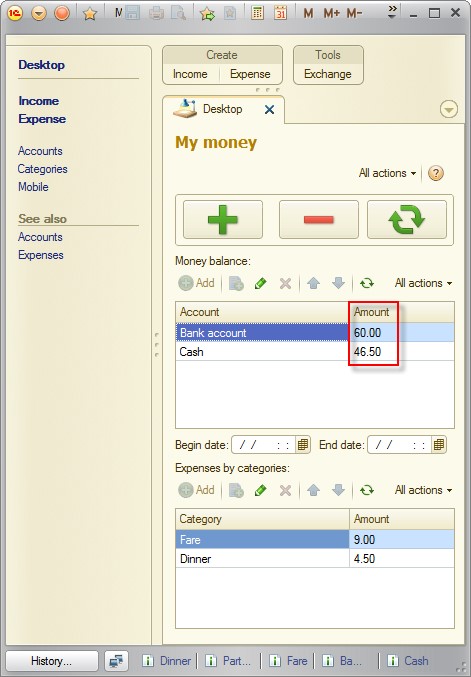
Figure 18-34. Synchronized data
After the synchronization is complete, you can find the document in the main infobase. You can also see a new Categories catalog item in the main application, and balance is synchronized too.
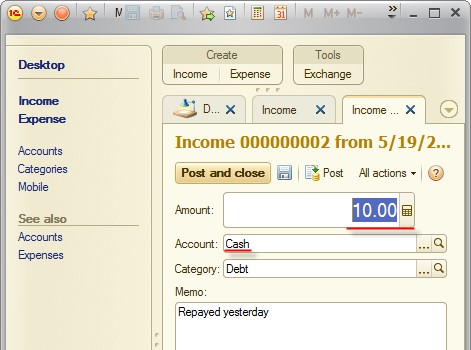
Figure 18-35. Document in the desktop copy
The homework task is complete, data is synchronized in both directions.
Mobile application building example
As we told in the Mobile platform section, you can run a mobile application in two ways:
• Plug it to the installed mobile platform for developers. This way is described in the Mobile platform and Homework 3 sections.
• Generate an application package, which can be distributed in the App Store and Play Store. One can download the application from these stores and use it without going into inner implementation details. In other words, 1C:Enterprise mobile applications are downloaded, installed, and run exactly like any other mobile application. A user just has to tap the application icon and the applied solution is run without any developer options.
In this section, the example is implemented on Microsoft Windows 7 x64 for Android.
To create an iOS package, you need Apple ID as a developer and a Mac computer with the Xcode development environment. Development of iOS packages is not described in the tutorial.
Note. In the example, the software of the following versions is used:
• 1C:Enterprise 8 (training version) 8.3.4.408
• 1C:Enterprise 8 mobile platform 8.3.4.17 Mobile application builder application 1.0.2.8 Andriod SDK:
Android SDK Tools 22.3
Android SDK Platform-tools 19.0.1
SDK Platform API 17 (4.2.2)
• Java Development Kit (JDK) 1.7.0.45
• Apache Ant 1.9.3
Installing and setting up third-party software
Before you start building the mobile application distribution package, check whether there are all necessary components on your computer.
You need three third-party applications: Apache Ant, Java Development Kit (JDK), and Android SDK.
If you do not have Apache Ant installed on your computer, you can get it at http://www.apache.org/dist/ant/binaries/. Apache Ant is also available in the installation wizard. Click Custom setup, then click 1C mobile application builder and third-party apps, and then click Download Apache Ant.
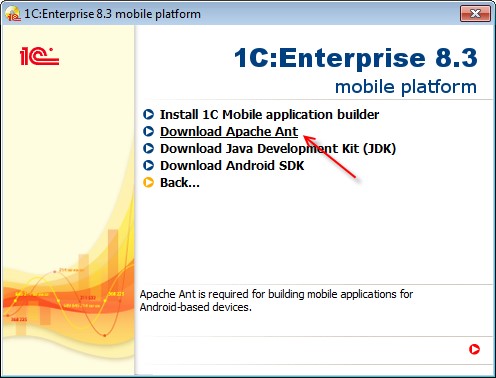
Figure 19-1. Download Apache Ant
To know more about Apache Ant, visit http://ant.apache.org/.
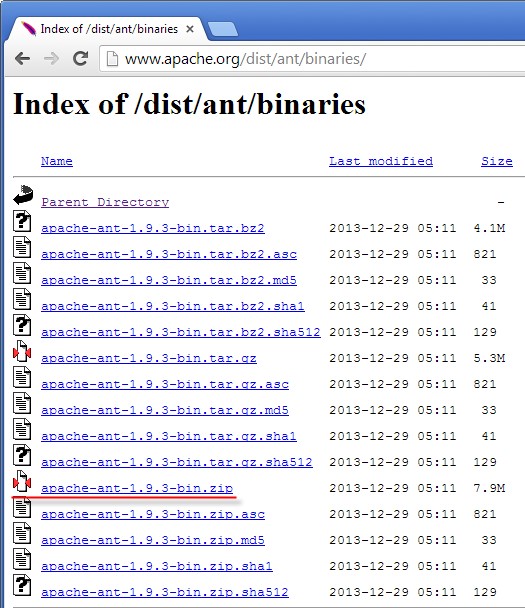
Figure 19-2. Apache Ant
Create a directory C:\mobile.1c on your computer (the letter case is important) to collect all software components you need. When the archive with Apache Ant is on your computer, unpack it to c:\mobile.1c. In the tutorial example it is placed in C:\mobile.1c\apache-ant-1.9.3.
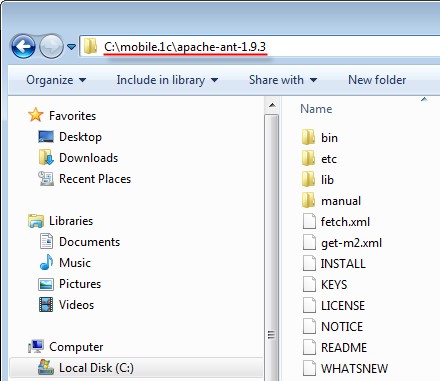
Figure 19-3. Installed Apache Ant
If you do not have JDK installed on your computer, you can get it at http://www.oracle.com/technetwork/java/javase/downloads/. JDK is also available in the installation wizard. Click Custom setup, then click 1C mobile application builder and extra apps, and then click Download Java Development Kit (JDK).
Click Java download.
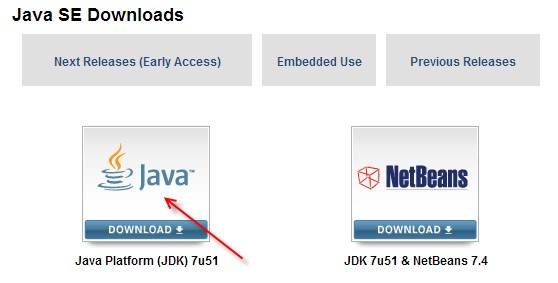
Figure 19-4. Java download
Click Accept Licencse Agreement.

Figure 19-5 Accept License Agreement
Select the distribution package that is suitable for your operating system.

Figure 19-6. JDK distribution package
When the package is on your computer, start the installation and answer in the affirmative for all questions. Remember the path where the component is installed.
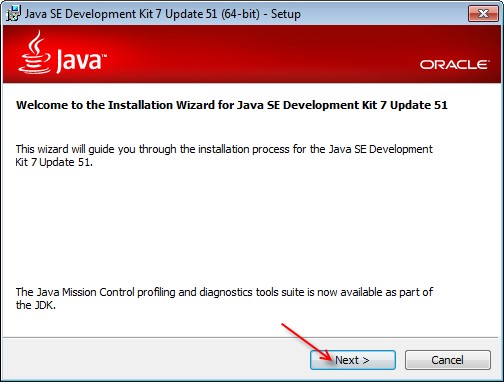
Figure 19-7. Installing JDK
To check whether JDK is installed correctly, press Windows logo key + R, type cmd, and click OK. In the Command Prompt window, type java -version and press Enter.
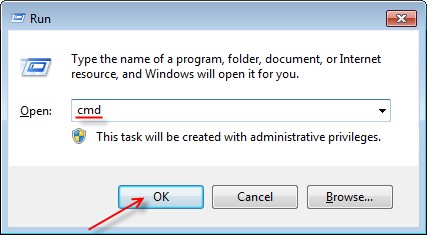
Figure 19-8. Starting the Command Prompt program
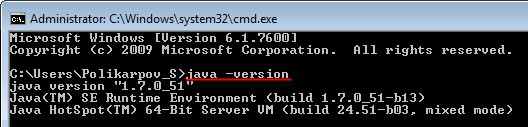
Figure 19-9. Java version
The third required software component is Android SDK.
If you do not have Android SDK installed on your computer, you can get it at http://developer.android.com/sdk/index.html. Android SDK is also available in the installation wizard. Click Mobile platform and then click Android SDK.
Click USE AN EXISTING IDE and then click Download the SDK Tools for Windows.
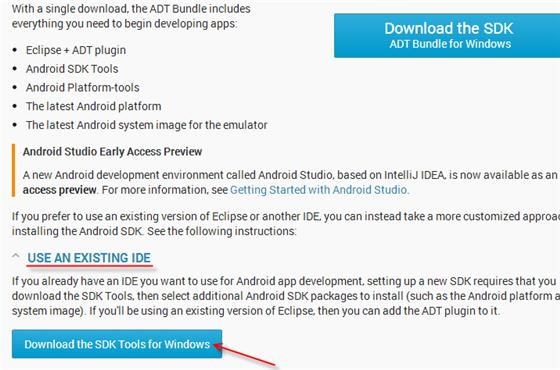
Figure 19-10. Android SDK distribution package
In the Android SDK Tool Setup window, click Next. Set c:\mobile.1c\android-sdk as a Destination Folder and click Next. Then answer in the affirmative for all questions.
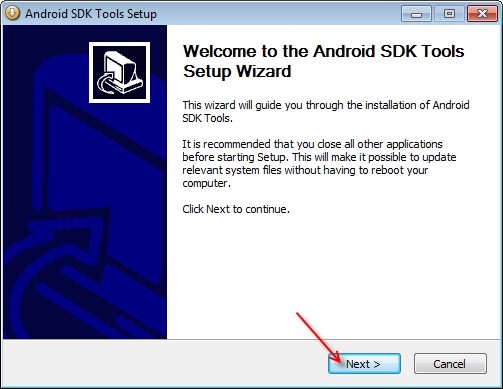
Figure 19-11. Installing the Android SDK
These components must be installed in a strict order. JDK must be installed before Android SDK.
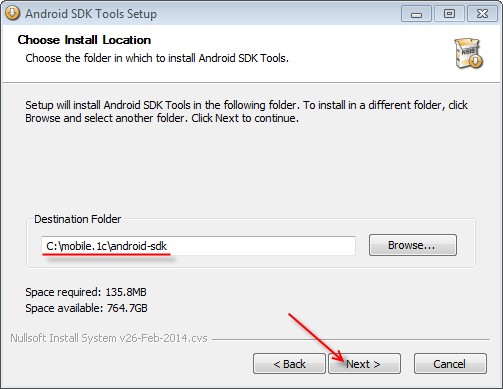
Figure 19-12. Android SDK destination folder
Once Android SDK is installed, the wizard prompts you to start it. If it does not, click Start, click All Programs, click Android SDK Tools, and then click SDK Manager.
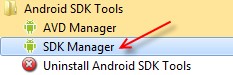
Figure 19-13. Starting SDK Manager
When you start the SDK Manager for the first time, it updates the list of available components (packages). Depends on your Internet connection speed, it may takes up to a few minutes.
Important! Some of the SDK manager features require Internet connection.
When the package list is updated, select the ones that are necessary for compiling the 1C:Enterprise mobile application distribution package.
In the Tools branch, clear all marks and then select only Android SDK Platform-tools and Android SDK Build-tools of the latest revisions.
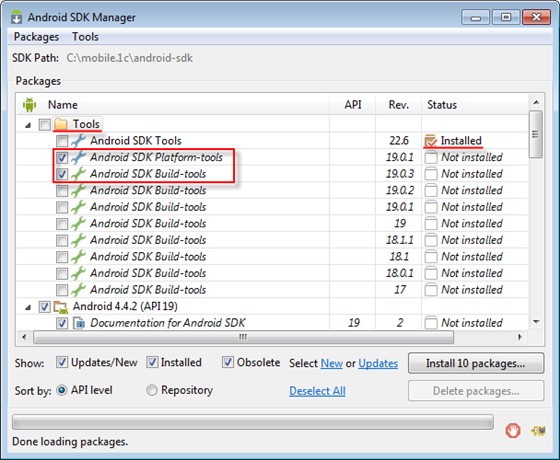
Figure 19-14 Tools branch
Note that, the check box of Android SDK Tools is cleared, but its Status is Installed. It is ok. You need this item but it has alteady been installed.
Proceed to the Android branches. There are several Android branches. You need to select those that meet the requirements of the 1C:Enterprise platform and clear all the rest. Start with clearing all the marks.
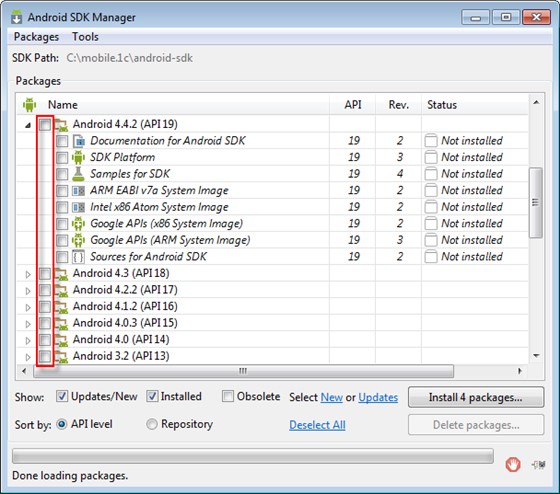
Figure 19-15. Clearing all Android marks
In the Android 4.2.2 (API 17) branch select SDK Platform, ARM EABI v7a System Image, and Intel x86 Atom System Image.
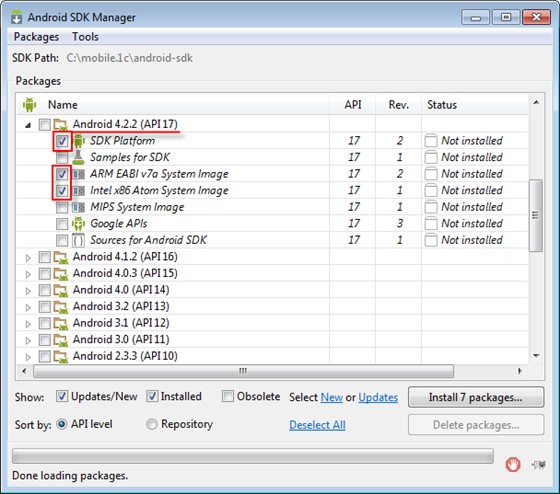
Figure 19-16. Selecting Android 4.2.2 (API 17) components
Proceed to the Extras branch. Select Android Support Library, Google USB Driver, and Intel x86 Emulator Accelerator (HAXM).

Figure 19-17. Extras branch
Click Install 8 packages and accept the license agreements of all the components you are installing. Then click Install.
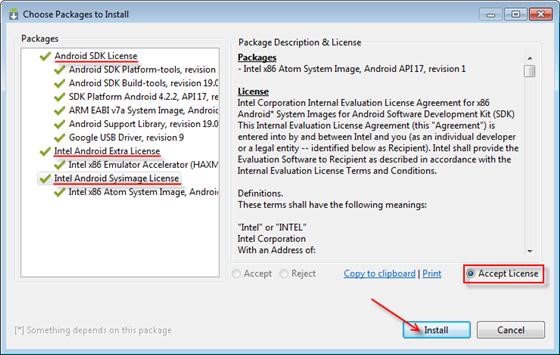
Figure 19-18. License agreements
Once you
click Install, the SDK Manager
starts downloading and installing the components you selected. It may take a
few minutes, depending on your Internet connection speed. You can see the
progress indicator and details in the separate window.

Figure 19-19. Installing the components
Once the components are installed, you can see that Status of these components is changed to Installed, and the check boxes are cleared.
You can close the SDK Manager now.
Installing and setting up Mobile application builder
Now, when all required software have been installed, it is time to install Mobile application builder, which is included into the 1C:Enterprise mobile platform distribution package. You can find it in the \mobile\MobileAppBuilder directory. You can also start the installation using the link in the installation program.
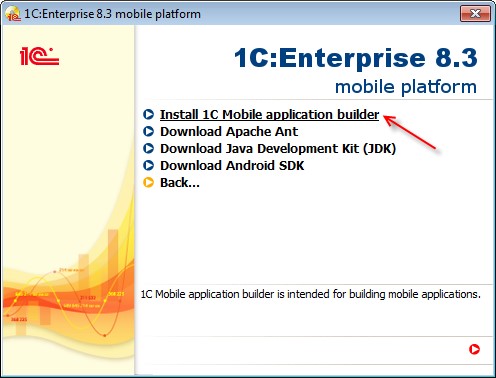
Figure 19-20. Installing the application
When the Mobile application builder is installed, start it in Designer mode to create a user with administrative rights.
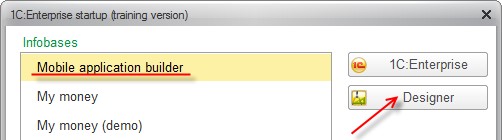
Figure 19-21. Starting the appication in Designer mode

Figure 19-22. Opening the user management window
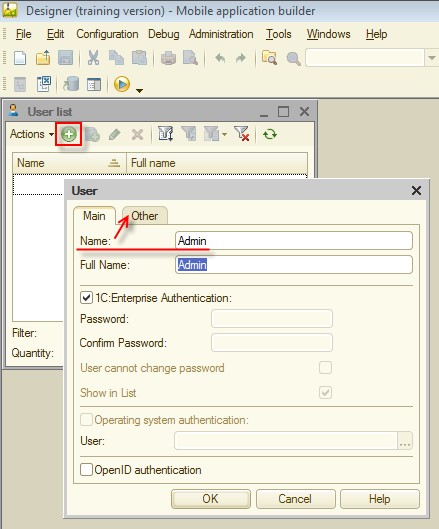
Figure 19-23. Creating a user
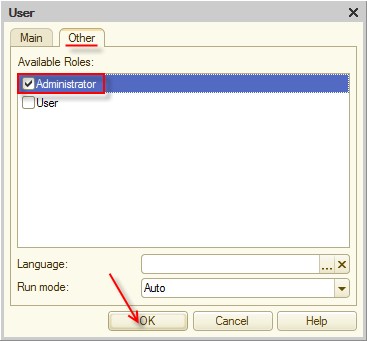
Figure 19-24. Administrative privileges
Once you create the user, exit the Designer and start the appication in the 1C:Enterprise mode.
It is time to set up the appication parameters. In the Tools menu, click Application settings.
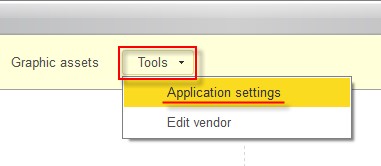
Figure 19-25. Application settings
In the Paths table, click Create and then type the paths to the installed components. Once you have typed all the paths, click Save and close.
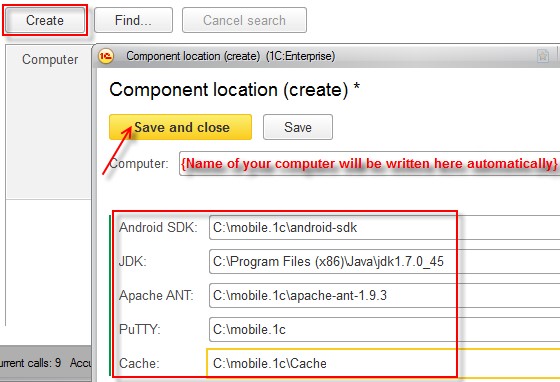
Figure 19-26. Application component paths
There are two things that require explanation. Cache is a directory where temporary files are stored. The path you see in the figure 19-26 (C:\mobile.1c\Cache) is just an example. You can use any path you want.
In the figure you also can see C:\mobile.1c as a PuTTY path. We do not use PuTTY in the example but Mobile application builder requires all the component paths to be filled, so just type any path.
Note. Most fields in the application have tooltips. To see a tooltip, click a field and press F1.
Proceed to the next step. In the Tools menu, click Edit vendor. Leave Description unchanged. Type the prefix.
Important. Each vendor must have its own Application ID prefix. Application ID is a Java package name, must comply with the rules of Java package naming.
Google also has the recommendation about package IDs:
"The name should be unique. The name may contain uppercase or lowercase letters ('A' through 'Z'), numbers, and underscores ('_'). However, individual package name parts may only start with letters.
To avoid conflicts with other developers, you should use Internet domain ownership as the basis for your package names (in reverse). For example, applications published by Google start with com.google. You should also never use the com.example namespace when publishing your applications."
Source: http://developer.android.com
Specify the platform for which you want to build your application. Select For Android.

Figure 19-27. Editing vendor
Click Save to save the changes. Now it is time to create a developer key. The developer key is a unique set of parameters to distinguish you from other android developers. Click Create developer key and fill the field. When the fields are filled, click Generate key.

Figure 19-28. Creating developer key
During the key generation, you will see Command Prompt windows. Do not close them! Once the key is generated, the windows are closed automatically, and all Developer key parameters are updated.

Figure 19-29. Developer key parameters
Click Save and close.
Now you can set up mobile application building parameters: the 1C mobile platform version and the path to graphic assets.
Graphic assets are a .zip archive that contains icons and splashes of the mobile application. Graphic assets for the tutorial are included. You can find them in the mobile\_mobile_icons.zip file.
Click Graphic assets and then click Create.
Fill Description and click Load graphic assets (in the Mobile application builder version 1.0.3.2 and later the link is named Import graphic assets).
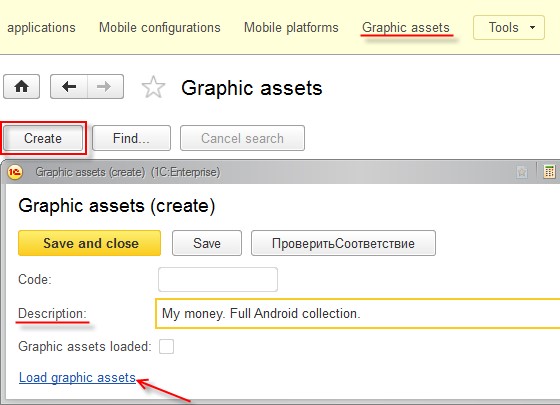
Figure 19-30. Loading graphic assets
Select the mobile\_mobile_icoms.zip file and check whether the assets have been loaded (Graphic assets loaded is selected). Click Save and close.
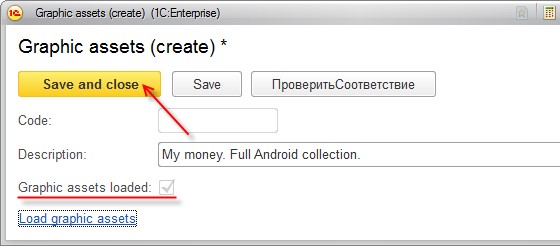
Figure 19-31. Graphic assets are loaded
The mobile platform is a .zip archive that contains a distribution package of the mobile platform on which the application will be run. You can find the mobile platform distribution package in the mobile\_mobile.zip file.
Click Mobile platform and then click Create.
Type the mobile platform version. If you use the platform included in the tutorial, the version is 8.3.4.17. Once you type the version and press Tab or Enter, the description is filled automatically.
Click Load the platform (in the Mobile application builder version 1.0.3.2 and later the link is named Import platform).
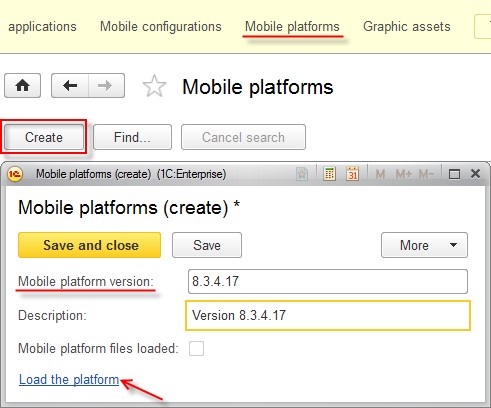
Figure 19-32. Loading the mobile platform
Select the mobile\_mobile.zip file and then check whether the platform has been loaded (the Mobile platform files loaded check box is selected). Click Save and close.

Figure 19-33. Mobile platform are loaded
Now, the most important step: adding the configuration of the mobile application.
Start the My money application in Designer mode and save the configuration to a file.
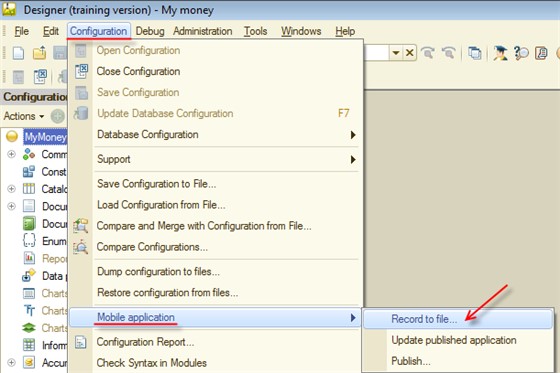
Figure 19-34. Saving the configuration to a file
Set the destination to C:\mobile.1c and the file name to 1cema.xml.
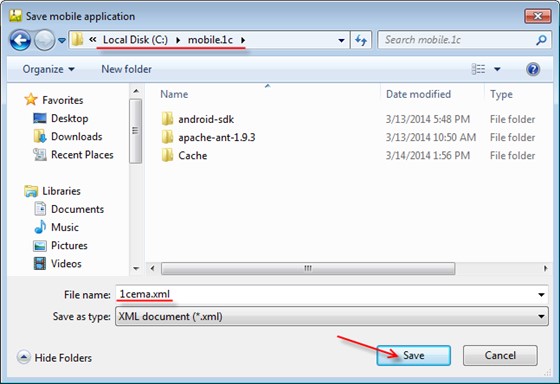
Figure 19-35. Saving the mobile application to a file
When the mobile application is saved to the file, you can close Designer.
In the Mobile application builder, click Mobile configurations and then click Create group. Name the configuration group, it is intended for storing all mobile application versions.
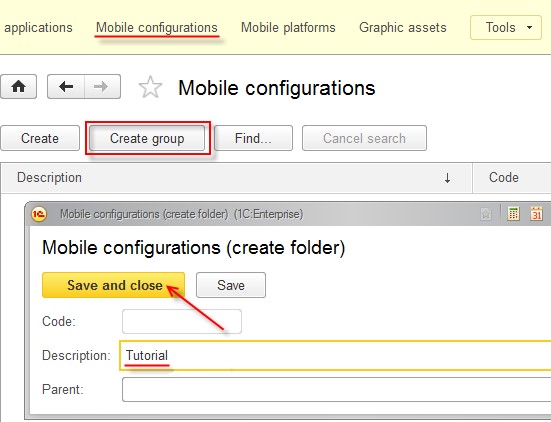
Figure 19-36. Mobile configuration group
Now add the file with the current mobile application version. Click Create and then click Load configuration (In the Mobile application builder version 1.0.3.2 and later the link is named Import configuration).
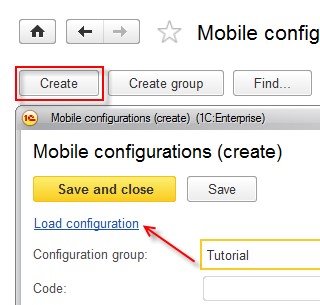
Figure 19-37. Mobile application version
Select the file you saved (C:\mobile.1c\1cema.xml). Once the application is loaded, Description, Configuration version, and Main configuration language are filled automatically based on the loaded configuration data. You can fill Comment. Click Save and close.
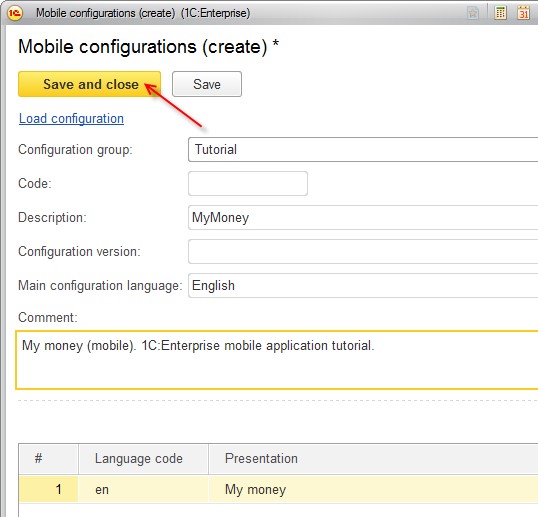
Figure 19-38. Mobile application version
Note. In the figure 19-38 Configuration version is not filled because this field is not filled in the configuration.
Building the application
All preparation stages are done, it is time to build the mobile application. Click Mobile applications and then click Create group.

Figure 19-39. Mobile application group
Type the description, for example My money. Select the vendor, mobile platform, and graphic assets.
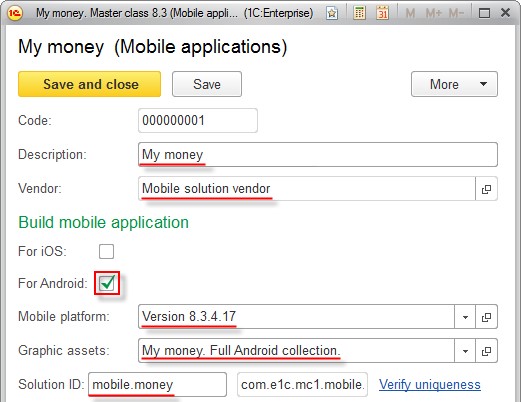
Figure 19-40. Distribution package building parameters
Type 1 in the Application version field. Do not change Building number, it incremented automatically every time you build the application. Click Add to add the mobile application to the tabular section.
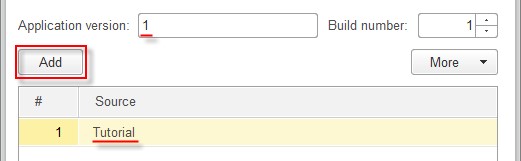
Figure 19-41. Distribution package building parameters
Click Save and close. Now you can proceed straight to building the application. Click the group you created (My money) and then click Create. All item parameters will be filled automatically, do not change them. Click Build application.
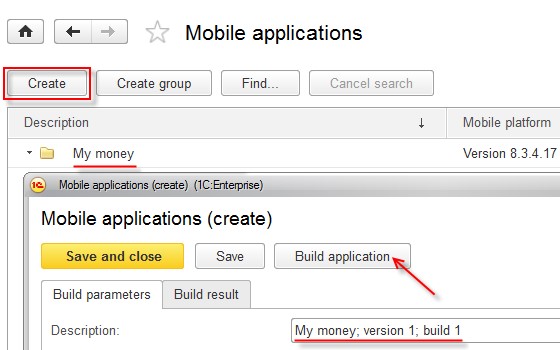
Figure 19-42. Building application
Once you click the button, the building process is started. During the installation process, Command Prompt windows are opened, do not close them! The process can take up to a few minutes, depending on performance of your computer. Once the building is done, you see a message that the building is complete, click OK. Then the application will show you the result.

Figure 19-43. Building is complete
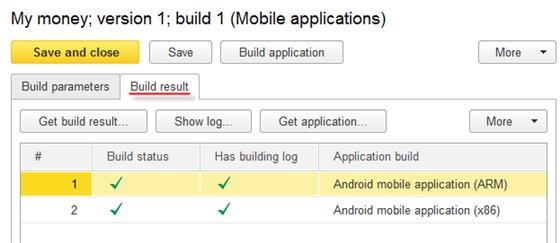
Figure 19-44. Build result
In case of errors, you can explore the build log of the package selected in the table package by clicking Show log.
The Get build result button is intended for opening and saving the archive with distribution packages.
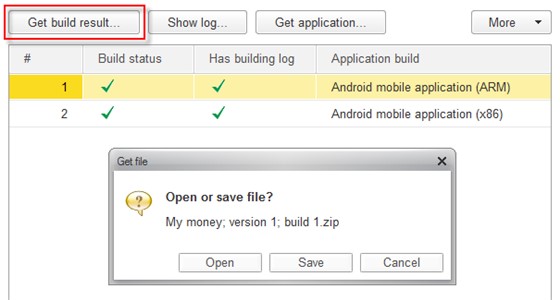
Figure 19-45. Geting build result
Save the results to C:\mobile.1c\Build\Android. The application suggests the name of the archive based on the mobile application description. Unpack the archive, it contains two directories: Android with distribution packages and Logs with distributive package building log.

Figure 19-46. Android distribution packages
In the figure 19-46, you can see two packages, for devices with ARM and x86 architecture.
Testing the application
To test the application, you have to pass the .apk file to a mobile device of the corresponding architecture and install it. It is important to select Unknown sources as the available installation sources.
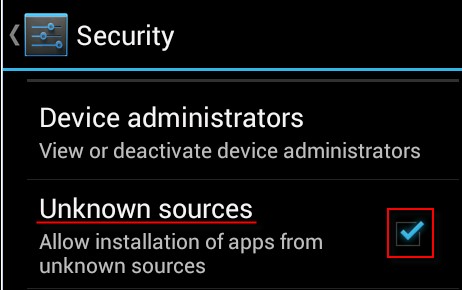
Figure 19-47. Allow installation of the apps from unknown sources
If you do not have a mobile device to test the application, you can do it on the emulator, which is included into the Android SDK package. Click Start, point to Android SDK Tools, and then click AVD Manager.

Figure 19-48. AVD Manager
In the AVD Manager window, click New to add a new Android virtual device and fill the parameters as in the figure 19-49. Click OK to save the device.
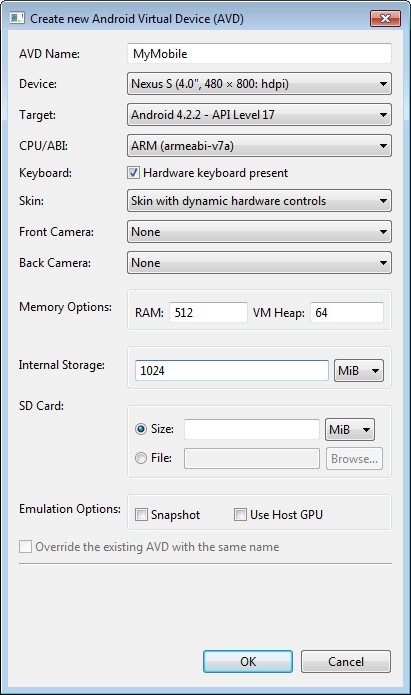
Figure 19-49. New device
To start the virtual device, click Start and then click Launch.
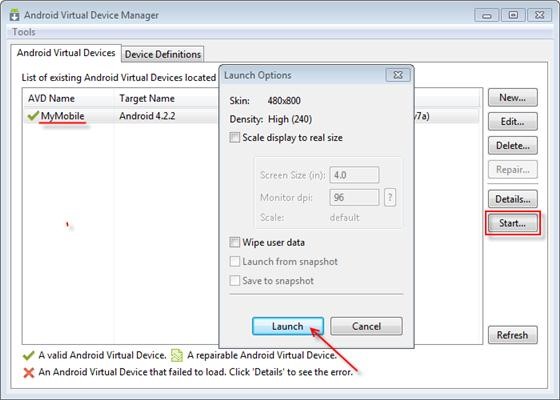
Figure 19-50. Starting the emulator
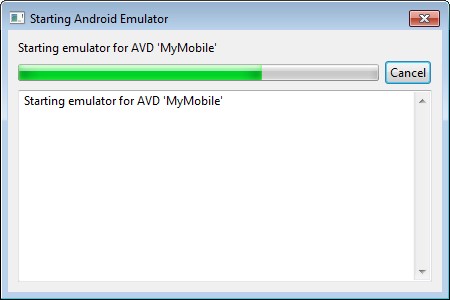
Figure 19-51. Starting the emulator
The emulator starting time depends on your computer performance.
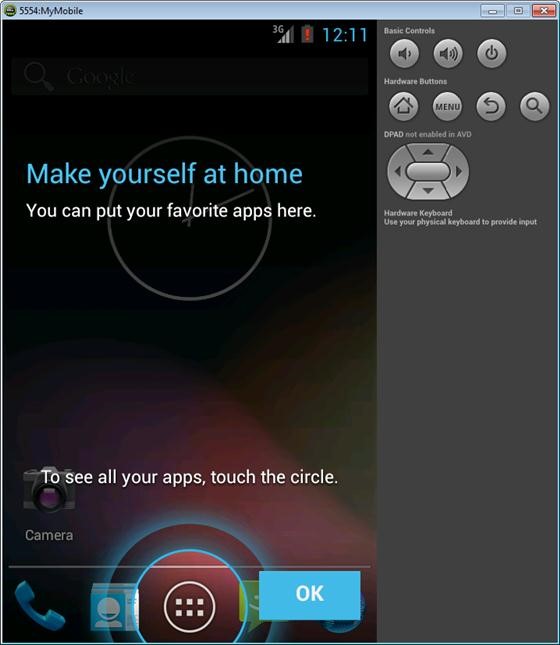
Figure 19-52. Starting the emulator
In the right upper corner, you can see the buttons matching to the real device buttons. To scroll lists, move the pointer while holding the left mouse button. In the security parameters, check whether Unknown sources is selected (see the figure 19-47).
If you want, you can also set the time zone, developer parameters, and all other options available on the device.
Now you can install the application to the virtual device.
Important. The emulator must be started before you install the application. Press Windows logo key+R to open the Run window, type cmd there, and press Enter. To open Command prompt window type the following command (quotation marks are necessary):
"C:\mobile.1c\android-sdk\platform-tools\adb.exe" install
"C:\mobile.1c\Build\Android\com.e1c.mc1.mobile.money-arm.apk"
Note. If you use other project and Android SDK directories, you must type them instead of these.
Press Enter and wait while the application is being installed.
Note. You can install the 1C:Enterprise mobile platform for developers to a virtual device in the same way. Use 1cem-arm.apk or 1cemx86.apk from the platform distribution package instead of com.e1c.mc1.mobile.money-arm.apk.
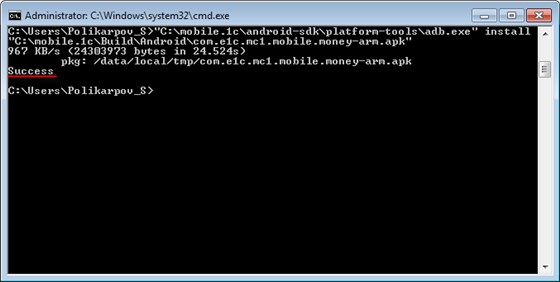
Figure 19-53. Installing the mobile application
Once the Success message is displayed, you can return to the emulator and find the application.
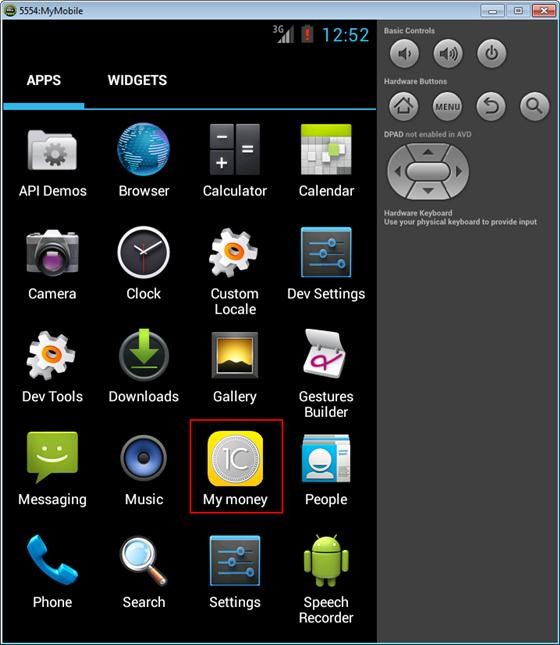
Figure 19-54. Mobile application
Start the application on the emulator to test it.
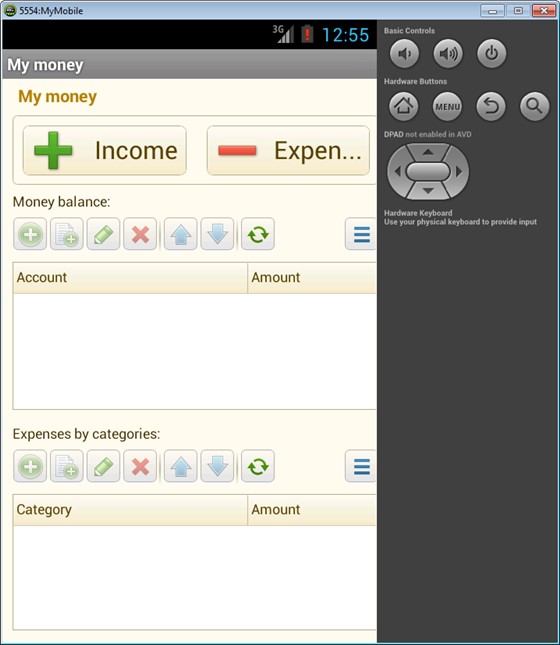
Figure 19-54. Mobile application
That is all, you built the application that you created and installed it to the mobile device emulator for testing.
Where and how to study 1C:Enterprise
The experience of many professionals proves that it is easy to successfully master 1C:Enterprise on your own. To help you with that, 1C Company publishes training versions of the platform, demo versions of applications, documentation, books, and tutorials. They are available free of charge at 1C:Developer Network.
1C:Enterprise 8 (training version)
1C:Enterprise 8 (training version) is a free solution for a wide range of users who want to get started with 1C:Enterprise 8. It allows you to learn development methods: create and edit the metadata structure, write script modules, configure forms and interfaces, and administer the application.
You can also use the training version, keeping in mind its limitations, to modify existing applied solutions. Applied solution configurations are the same for both training and commercial versions. There are no limitations on the configuration complexity in the training version. However, the training version cannot be used for keeping actual records, for this you need to purchase a commercial version of 1C:Enterprise platform.
Training version limitations:
• The volume of data is limited for documents, catalogs, registers, charts of accounts, and other object tables:
o Maximum number of records in account tables is 2000. o Maximum number of records in main object tables is 2000.
o Maximum number of records in tabular sections of objects is 1000.
o Maximum number of records in record sets is 2000.
o Maximum number of records from external data sources is 200.
• Client/server mode is not supported.
• Distributed infobases are not supported.
• COM connection is not supported.
• It is not possible to use passwords and operating system authentication.
• Printing and saving spreadsheet documents are only supported in Designer mode.
• Performance is lower compared to the commercial 1C:Enterprise 8 version.
• It is not possible to copy content of multiple cells of a spreadsheet document in 1C:Enterprise mode.
• Operations with the configuration repository are not supported.
Where and how to study 1C:Enterprise Configuration delivery features are not available.
• Only one concurrent infobase session in possible.
To get 1C:Enterprise (training version) support, use the public Studying 1C:Enterprise platform forum.
You can download updates for 1C:Enterprise (training version) free of charge at 1C:Developer Network.
1C:AccountingSuite demo
1C:AccountingSuite is a small business accounting and inventory software. The applied solution supports US GAAP and IFRS accounting and reporting standards. The software provides full visibility into purchasing and sales transactions, automates accounts receivable and accounts payable. 1C:AccountingSuite makes managing payments, receipts, and bank transactions a breeze, providing business owners with a real-time financial snapshot of operations.
The demo version lets you:
• emulate accounting of the live business;
• learn accounting and taxes calculation;
• learn how to adjust documents and reports;
• estimate economy on the manual labor cost;
• generate reports, including Balance sheet and Profit and loss statement;
• adjust and adopt the applied solution.
The demo version is not intended to be used in live business accounting according to limitations of 1C:Enterprise (training version).
The demo version includes:
• 1C:AccountingSuite applied solution;
• 1C:AccountingSuite user manual PDF book;
• 1C:Enterprise (training version); Installation instructions.
You can find the application description, download files and support in 1C:AccountingSuite section of 1C:Developer Network.
Business automation
1C Company has built a software development, distribution, and implementation business, which has enabled thousands of companies to start and grow profitable business. By automation of management and accounting fields 1C Company provided hundreds of thousands of companies and individuals with an access to the mission-critical information.
1C Company created a prestigious profession and even industry. Hundreds of thousands of competent professionals are helping companies and individuals to improve their efficiency by using the state-ofart 1C:Enterprise automation platform.
Most of employees of 1C Company and its partners graduated from universities and colleges. Therefore, one of 1C Company priorities, as the leading software developer, is to cooperate with students and educational institutions to give young people the opportunity to gain practical skills of working with 1C:Enterprise platform. As well as to assist in employment to the position that allows to utilize acquired skills.
1C:Enterprise 8
1C:Enterprise 8
1C:Enterprise 8 application collection is designed for the automation of management and accounting based on the state-of-art 1C:Enterprise platform. The platform provides extensive functionality, flexibility, and scalability starting from single user applications in file mode and until cloud applications with server clusters deployment. Features and architecture of 1C:Enterprise 8 platform is designed in anticipation of global trends in the business automation. Many of 1C:Enterprise solutions are unique and are beyond the competition.
1C Company and its partners using 1C:Enterprise 8 platform develop massmarket, industrial, and custom business solutions, including following:
• 1C:AccountingSuite
• 1C:Small Business
• 1C:Translator
1C:Enterprise 8 offers:
• To Director of Development: tools for analysis, planning, and flexible resource management, that gains its competitive advantages.
• To Department Director, managers, and employees who are directly involved with production, marketing, logistics, and other activities: tools to gain the efficiency of their daily work.
• To accounting department: tools for automated record keeping that is in full compliance with both the legal requirements and the corporate standards of the company.
• To IT professionals: tools and environment for the development, modification, deployment, administration, and maintenance of corporate information systems that meet latest standards.
Mass-market, industrial, and custom business solutions powered by 1C:Enterprise let you:
• Find the optimal automation strategy.
• Implement the application spending minimum time and resources.
• Quickly get real benefits from the implementation.
• Simplify the user training, maintenance, and administration of the application.
• Develop the system in accordance with the needs of the company without any downtime.
All of this ensures the high efficiency of 1C:Enterprise specialists and is a foundation of their success on the automation market.
1C partners
International experience shows that bulk sales of technically complex products can only be effectively managed through a well-organized and diversified dealer network.
1C partners are underlying distribution and technical support centers. Clients perceive 1C partners to be representatives of 1C Company that work side by side with them. If one of users finds it difficult to use a new application to prepare an urgently needed Balance sheet or P&L, for example, he would want to be able to obtain sound advice as soon as possible. The fastest way to get such advice is from a local partner.
1C Company always strives to understand and take account of the interests of its partners, not just focus on the benefits for itself. 1C Company has a direct interest in growing total sales through the partner network and consequently tries to provide its partners with the best terms and conditions for cooperation and provide all possible manner of support. This has enabled 1C Company to attract more than 10,000 regular partners in more than 800 cities in Eastern Europe.
1C partner program consists of several levels. 1C:Official Partner introductory status was established for partners who have not developed their own applied solutions powered by the 1C:Enterprise platform and need to acquire 1C:Enterprise licenses to implement projects for their clients. 1C:Solution partner status is intended for partners who have an applied solution, which has been certified by 1C Company. The 1C:Service provider status is established for those who are planning to organize and provide services based on products created on 1C:Enterprise platform. 1C:Regional partner status is intended for partners who have their own certified applied solutions and sell them through their own regional partner network.
More details on how you can become a 1C partner you can read in Partner program information section of 1C:Developer Network.
Useful online resources
Useful online resources
1C:Developer Network (http://1c-dn.com)
1C:Developer Network is the information resource for developers, creating business solutions on 1C:Enterprise platform. 1C:Developer network is a good choice for both novice and experienced developers. It is possible to learn from grounds and create a business solution by using 1C:Developer network documentation and support.
Everyone can create an account and use the materials provided on 1C:Developer Network without any fee. To obtain free of charge all needed tools for learning and beginning of development. Each user can ask a question or share his ideas and experience in 1C:Enterprise at the online forum on 1C:Developer Network.
On the website you can find up-to-date information on all aspects of 1C Company activities:
• Support
• List of 1C partners
• News for partners and users
• Information on training and certification
• Press information
• Price list
• Jobs
To help you continue learning 1C:Enterprise use following references:
• 1C:Enterprise platform documentation: user, administrator and developer guides.
• Learn section allows you to study 1C:Enterprise platform using samples and tutorials.
• 1C:Developer Network forums for developers, as well as users and partners.
• 1C:Enterprise platform overview and key features.
• Best practices section contains standards and best practices for 1C:Enterprise developers.
• Demo applications for studying specific features of 1C:Enterprise platform.
• Video section is a collection of training videos for quick and easy 1C:Enterprise learning.
• Applications section is a collection of advanced applications based on 1C:Enterprise platform.
• System requirements contain a list of supported OS and DBMS.