
Selecting data from a single table
Let us create a report named Services document register using the data composition system.
Using this report as an example, we will show how to select data from a single database table and output the data in a specific order. You will also get acquainted with the specifics of the drilldown feature.
This report displays the list of Services documents available in the database, sorted by their date and number (fig. 13.7).

Fig. 13.7 Resulting report
In Designer mode
Let us repeat the first steps of report generation that are described in lesson 7.
- Create a report configuration object.
- On the Main tab, set Name to ServicesDocumentRegister.
- Set Extended presentation to List of rendered services.
This report name will be displayed in the applied solution interface.
Now let us create the data composition system. - Click Open data composition schema.
-OR-
In the Main data composition schema field, click the Open button (fig. 13.8).
Fig. 13.8. Specifying main report properties - In the Template Wizard window, click Finish.
- In the data composition schema wizard, add Data set – query (fig. 13.9).

Fig. 13.9. Adding data set (query)
In 1C:Enterprise mode
Let us check the report.
- Start 1C:Enterprise in the debug mode.
You can see that the Services section now includes the Reports menu, which contains the command that generates the Services document register report. - Click the Services document register command (fig. 13.16).

Fig. 13.16. The command that generates the Services document register report
This opens an automatically generated report form.
Note that the form title is List of services rendered, it is defined by the Extended presentation property that you specified for the report. - Click Create (fig. 13.17).

Fig. 13.17. List of rendered services report
As you can see, the report lists the Services documents.
Double-clicking in the Document column opens the respective document.
Right-clicking a report cell opens a pop-up menu with commands that apply to the cell value: Open, Drill down, and so on.
In the report development exercise you learned how to use the data composition schema wizard and made yourself familiar with a few basic query language statements.
Query for a data set
Let us specify the query data set.
- Click the Query Builder button.
- Select the Services table as the data source.
It is the object (referential) table of the Services document. - Select the following fields from this table (fig. 13.10):
- Warehouse
- Technician
- Customer
- Ref

Fig. 13.10. Fields selected for the query
Note. You can move the selected items between the lists by dragging them or by double-clicking them. You can also use the  ,
,  ,
,  , and
, and  buttons.
Analyzing query text
Let us analyze the generated query text.
- Click OK and review the query generated by the query wizard (listing 13.1).
Listing 13.1. Query textSELECT Services.Warehouse, Services.Technician, Services.Customer, Services.Ref AS Document FROM Document.Services AS Services ORDER BY Document
Listing 13.2. Query description
SELECT
    Services.Warehouse,
    Services.Technician,
    Services.Customer,
    Services.Ref AS Document
FROM
    Document.Services AS Services
A query description always begins with the SELECT keyword followed by the list of selection fields. This list describes the fields that are included in the query result. The list can contain the fields themselves as well as certain expressions calculated based on the field values.
The data sources (the source query tables whose contents are processed in the query) are specified after the FROM keyword. In this case the data source is the Document.Services object (referential) table.
Aliases of the source data are specified after the AS keyword. In this case the alias is Services. Thereafter, the query text can reference that data source using the alias (listing 13.3).
Listing 13.3. Description of selection fields
SELECT
    Services.Warehouse,
    Services.Technician,
    Services.Customer,
    Services.Ref AS Document
FROM
    Document.Services AS Services
Selection fields can also have aliases that you can use to address these fields in the query text. In this case the alias of the Ref field is Document.
After the query description section, the query continues with the result ordering section (listing 13.4).
Listing 13.4. Ordering query results
ORDER BY
    Document
The ORDER BY clause is intended for sorting query result rows. It is followed by the ordering expression, which is generally a list of fields or expressions with their output order options.
In this case the result is ordered by the Document field (which is actually the Services.Ref field). The result is sorted in ascending order (if sorting order is not specified explicitly, the ascending order is applied).
Now let us proceed to specifying data composition schema settings.
Settings
Let us specify the default report view settings.
- Click the Settings tab.
A hierarchical report structure can include various combinations of three key items:- Grouping, used for displaying data as a regular linear report
- Table, used for displaying data as a table
- Chart, used for displaying data as a chart
- Right-click Report and then click New grouping.
-OR-
In the window command bar, click the Add button and then click New grouping.
-OR-
Click Report and then press Insert (fig. 13.13).
Fig. 13.13. Adding a grouping to a report - Do not enter the grouping field, simply click OK.
This specifies that the report includes detailed infobase records.
The Detailed records grouping is added to the report. - In the bottom pane, on the Selected fields tab, drag the following fields from the Available fields list to the Selected fields list:
- Document
- Warehouse
- Technician
- Customer
to the right of the list of selected fields. You can change the order of selected fields by dragging them or by using the Move up  and Move down
  buttons.
Now the report settings window should look as follows (fig. 13.14).
Fig. 13.14. Report settings window
This completes the report creation.
Finally, let us specify the subsystems where the report is available. - Close the data composition schema wizard and then, in the editor of the ServicesDocumentRegister report configuration object, click the Subsystems tab.
- Select the Services check box (fig. 13.15).
This adds the link that opens the report to the Reports menu in the command panel of this subsystem.
Fig. 13.15. Specifying the list of subsystems where the report is available
Field aliases
Let us set an alias for the Ref field.
- Click the Unions/Aliases tab.
- In the Field name column, change Ref to Document (fig. 13.11).

Fig. 13.11. Specifying query field aliases
Note. If you want to change a field name, we recommend that you do it in a query because field names are replicated to three data composition schema columns at once: Field, Path, and Title. This eliminates the need to change them in three locations.
Records order
Let us specify the order of report records.
- Click the Order tab and specify that the query result is ordered by the value of the Document field (fig. 13.12).
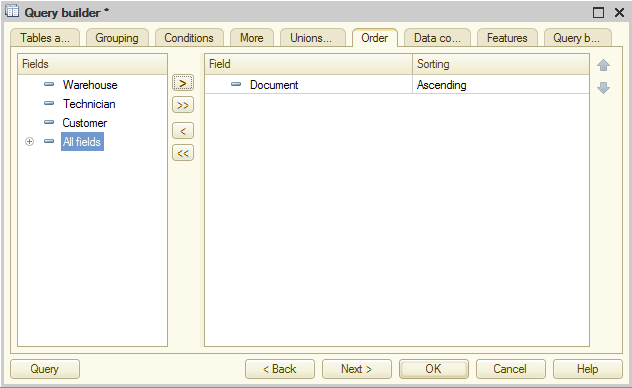
Fig. 13.12. Specifying the order of records in a query