Report with characteristics
To polish the result, let us create a report that shows the availability of materials with certain properties. To create the report, you will use the data composition system features that provide support for characteristics (fig. 15.47).

Fig. 15.47. Resulting report
Briefly, a data set for the data composition system it retrieved by a simple query to the BalanceOfMaterials register. The platform automatically includes the material option properties to the report based on the description that you created for the MaterialOptions catalog in section Description of material option characteristics.
Based on the description, the platform generates a straightforward and user-friendly interface for selecting characteristics. It also generates the required database queries based on the user-selected values.
In Designer mode
Let us proceed to report creation.
- Create a report configuration object named MaterialBalanceByProperty.
- Run the Data composition schema wizard.
- Add Data set – query and run the Query builder.
In 1C:Enterprise mode
Let us check the report.
- Start 1C:Enterprise in the debug mode.
- In the Inventory section, run the Material balance by property command (fig. 15.53).

Fig. 15.53. Report form
You can see that the Filter setting is available in the report form. You can use it to obtain the balance of materials based on their characteristics.
First, let us check the availability of materials with a cross-section of 2.5 sq mm. - In the Filter field, click the Select
 button (see fig. 15.53).
This opens the Edit filter dialog box. The list on the left contains all available report fields. - Expand the Property set item (fig. 15.54).
Note that the data composition system added all the characteristics defined for various property sets in the database (Manufacturer, Cross-section, and Color) to the standard attributes of the MaterialOptions catalog. So filtering the report by values of some characteristics is straightforward and intuitive. - Select the Cross-section, sq mm field and set the condition where its value is equal to 2.5.

Fig. 15.54. Creating a filter - Click OK.
- In the report window, click Create.
The report should look as shown in fig. 15.55.
Fig. 15.55. Resulting report
Now let us check which of the available materials are black. - In the Filter field, click the Select
 button, click the current filter condition, and click the Delete button.
- In the left pane, double-click the Color field.
- In the Value field, click the Select from list
 button and select Black from the list of available material properties (fig. 15.56).
Fig. 15.56. Creating a filter - Click OK.
- In the report window, click Create.
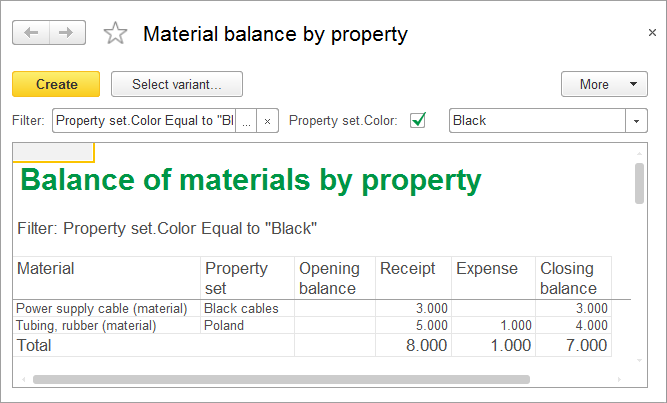
The report should look as shown in fig. 15.57.
Fig. 15.57. Resulting report
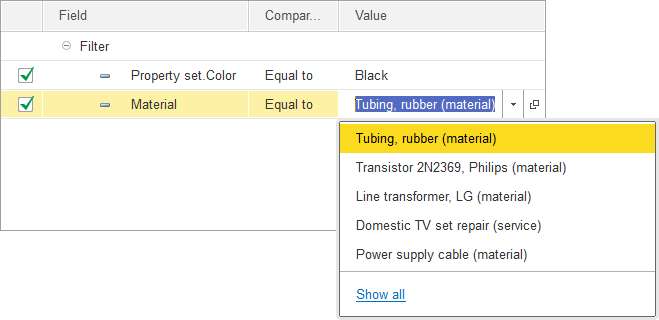
And finally, to ensure that the report functions properly, let us obtain the number of black rubber tubing units. - In the Filter field, click the Select
 button and then, in the list on the left, double-click the Material field.
This adds another filter condition. - In the Value field, click the Select from list
 button and select Tubing, rubber from the list (fig. 15.58).
Fig. 15.58. Creating a filter - Click OK.
- In the report window, click Create.
The report should look as shown in fig. 15.59.
Fig. 15.59. Resulting report
So you can be sure that, by using this logical design, you can perform material accounting based on any number of material properties and property values.
It is worth mentioning that the example we have covered in this chapter is not the final solution for this configuration. We have simply demonstrated the available options. In order for your configuration to fully use material properties, you have to make appropriate changes in the remaining registers, documents, and some reports.
Query for a data set
Let us specify the query data set.
- Select the BalanceOfMaterials.BalanceAndTurnovers virtual table as the data source.
- Select the following fields from this table (fig. 15.48):
- Material
- PropertySet
- QuantityOpeningBalance
- QuantityReceipt
- QuantityExpense
- QuantityClosingBalance

Fig. 15.48. Fields selected for the query - Click the Unions/Aliases tab and set the aliases for the numeric fields by removing Quantity from their names (fig. 15.49).

Fig. 15.49. Unions/aliases - Click OK.
This completes the query creation.
Resources
Let us add the resources.
- On the Resources tab, select all available resources (fig. 15.50).

Fig. 15.50. Data composition schema resources
Settings
Let us specify the report structure.
- On the Settings tab, add the <Detailed records> grouping.
- On the Selected fields tab, select the fields that you want displayed in the report (fig. 15.51):
- Material
- PropertySet
- OpeningBalance
- Receipt
- Expense
- Closing balance

Fig. 15.51. Report groupings and fields - On the Other settings tab, set the report title to Balance of materials by property.
To be able to test the report, let us include the Filter setting to the list of quick user settings. - Click the Custom settings item properties
 button in the command bar at the top of the window.
In the window that is opened you can edit the assortment of user settings for the report. - Select the check box next to Filter and, in the Edit mode list, keep the default Quick access value (fig. 15.52).

Fig. 15.52. Specifying user settings
Finally, let us specify the subsystems where the report is available. - Close the data composition schema wizard and then, in the editor of the MaterialBalanceByProperty report configuration object, click the Subsystems tab.
- Select the Accounting and Inventory check boxes.
This completes the report creation.
