
Adding a chart of accounts
In Designer mode
As we mentioned in the beginning of this lesson, the accounting in Jack of All Trades is greatly simplified. This is why the chart of accounts used by their accounting department only contains four accounts:
- Inventory
- AccountsPayable
- AccountsReceivable
- Equity
Let us create a chart of accounts for Jack of All Trades.
- Create a ChartOfAccounts object named Main.
- In the List presentation field, enter Main chart of accounts.
- On the Subsystems tab, include the chart of accounts in the Accounting subsystem.
- On the Data tab, click Accounting flags, then click the Add
 button to create an accounting flag named Quantitative (fig. 16.4).
Fig. 16.4. Creating a chart of accounts attribute in the Accounting flags group - On the Extra dimensions tab, specify that the extra dimension types for the chart of accounts are stored in the ExtraDimensionTypes chart of characteristic types.
- Set Maximum number of extra dimensions to 2.
- Create the Quantitative extra dimension accounting flag (fig. 16.5).
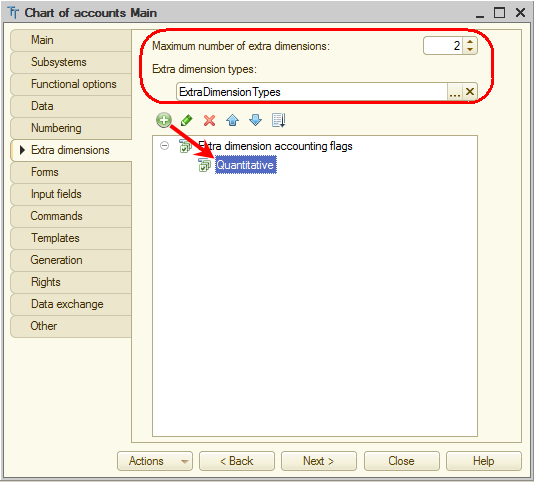
Fig. 16.5. Specifying extra dimension properties for a chart of accounts - On the Other tab, click Predefined data.
- Create the four predefined accounts (to create each account, click the root Accounts item and then click the Add button):
- Inventory. Code: 5000, type: Active, with quantitative accounting by material (fig. 16.6).

Fig. 16.6. Predefined account: Inventory - AccountsPayable. Code: 4000, type: Active/Passive (fig. 16.7).

Fig. 16.7. Predefined account: AccountsPayable - AccountsReceivable. Code 2000, Type: Active/Passive, with accounting by customers (fig. 16.8).
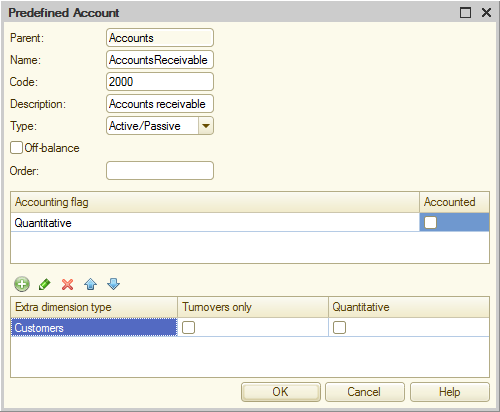
Fig. 16.8. Predefined account: AccountsReceivable - Income. Code: 9000, Type: Active/Passive (fig. 16.9).

Fig. 16.9. Predefined account: Income
- Inventory. Code: 5000, type: Active, with quantitative accounting by material (fig. 16.6).
This results in the following arrangement of the chart of accounts for Jack of All Trades (fig. 16.10):

Fig. 16.10. Main chart of accounts
Now you can move on to the last configuration object that you need to implement accounting operations: the Accounting register.
Learn more! You can set the Autoorder by code property for a chart of accounts. This property specifies that sorting by the Order field is always applied when a user or a developer selects sorting by code. We recommend that you use this property when you need to sort a chart of accounts by code with regard to the account code delimiter. For example, when sorting by account code is applied to the accounts 10.11 and 10.2, the accounts are arranged as follows:
10.11
10.2
This is correct from the perspective of row ordering, but this does not comply with the code assignment logic.
But if the values of the Order field are 10.11 and 10. 2 (there is a space before 2) and the Autoorder by code property is set, when a user selects ordering by code, they get an order that takes the delimiters into consideration:
10.2
10.11.
If the property is not set, the user has to select sorting by the Order field explicitly.