
Start “programming”
It is no accident that the word "programming" is used within quotation marks in the title. Programming itself in its common use, writing code, is an essential part of 1C:Enterprise, but not the number one.
Since 1C:Enterprise, as it was said in the Introduction, is a problemoriented platform, it hides from the developer many boring routine actions. All 1C:Enterprise applications are built using the same design methods, each application is put together from ready-to-use building blocks. The number of building blocks is limited, the platform has the implemented functions of all of them and how they interact with each other.
Therefore, a developer simply needs to add necessary building blocks to the infobase and it will work right away. The platform itself will ensure the proper functioning of building blocks.
Of course, the number of default functions is quite limited. In practice, everything is much more interesting and full of surprises. For this, there is a built-in script language, named 1C:Enterprise script, and a built-in query language, named 1C:Enterprise query language. With them, you can adjust the behavior of building blocks, define algorithms of interaction between building blocks, implement your own data processing algorithms, etc.
As it was said in the Introduction, this tutorial is about writing "Hello, world!" using 1C:Enterprise. Therefore, you are going to use little script and almost never use the query language. The use of script and query language in 1C:Enterprise is a complicated subject that requires a separate book.
The current task is to create a simple application from the building blocks. In other words, to demonstrate the basics of the development process. Adding bells and whistles, improvements, and modification can be done later, if you are interested and have time to do it. However, it is still important that even in such a skeleton form, the application will be fully functional with minimum efforts.
Note: To make sure, you can create an application with similar functions using any other universal IDE, and compare the necessary knowledge and time that you spent.
Now, let us get back to the building blocks. Since purposes of 1C:Enterprise applications are predefined, building blocks are not abstract, but problemoriented and related to practical entities. For example, there are building blocks of catalog and document classes, which businesses and individuals use in daily work.
In 1C:Enterprise, these building blocks are called configuration objects. All configuration objects are grouped into a tree. Thus, by looking at the Configuration object tree, you can observe the architecture of any application. You can quickly locate the object and learn its properties.
Now
the configuration is opened after you clicked Designer in the end of previous chapter. To see the Configuration object tree, you need to
click Open configuration  .
.

Figure 2-1. Opening a configuration objects tree
For now this tree is empty, it contains only top-level branches, which can be found in any 1C:Enterprise infobase.

Figure 2-2. Configuration object tree
The thing that you will to do next is adding configuration objects that are the basis of our application. Along the way you will notice how "bells and whistles" might be added, but without of going into much detail.
What configuration objects shall you add? It depends on the business processes that you want automated. Let us define it.
In this master class, you will create a simple accounting system. On the one hand, this system should take into account our income and expenses by Accounts and Categories. On the other hand, it should promptly provide us with information about balance of Accounts that you use and turnovers by Categories. You will design and create our application intended for mobile devices, so personal money accounting would be within easy reach.
At the same time, our application should be easy to use.
First, let us set up the basic parameters of our application.
Right-click the top node of the configuration tree to open menu and then click Properties. You can also open Properties by pressing Alt+Enter.

Figure 2-3. Configuration properties
In the property palette that is opened, type the configuration name MyMoney. Once you press Tab or Enter, Synonym is filled automatically.

Figure 2-4. Configuration name
In addition, specify that you are developing a mobile application. Select Mobile device in Use purposes.

Figure 2-5. Mobile device
Once you set Mobile device as a use purpose, 1C:Enterprise disables some configuration objects. It is ok for us.
Catalogs
By the project requirements, the applied solution must be capable of storing a list of accounts that you use and a list of income and expense categories. The content of the lists must be promptly editable according to actual events: the solution must feature deleting unused catalog items, adding new ones, and so on.
Account, as follows from the name, is a money storage. Our virtual accounts have real analogs. For example, a bank account or a wallet with cash.
Category helps us to classify a flow of funds: income and expenses. For example, you can consider salary as a separate category. You can also group categories, for example, Lunch and Dinner into Meals.
Thus, for meeting these requirements, create two catalogs:
• Accounts, with our money storage details;
• Categories, with income and expense classification.
There
is a common way to add configuration objects. Right-click the branch of the
configuration tree where you want to add the objects, and in the context menu
click  Add (Ins) command.
Catalogs are located in a tree branch named Catalogs. Add a new catalog.

Figure 3-1. Adding a catalog
When you add a catalog, a new configuration object window is opened. Catalog is a complex object to configure, therefore, the dialog window is intended to ease and speed up the configuration process.
Although
the same catalog properties can be specified in Properties on the right, it is more convenient to use this dialog
window. Following all the tabs of this dialogue window ensures that all the
necessary properties are filled in and nothing is missed.

Figure 3-2. Catalog properties window
Type the catalog name: Accounts. Once you type the name and press Enter or Tab, the system fills the Synonym field. There is nothing else to add here, so move on to the Data tab.

Figure 3-3. Catalog properties window
Increase the length of the Description attribute to 150 characters on the Data tab.

Figure 3-4. Description length
That is enough for storing accounts. You can now click Close to close the window.
Now create a catalog where the list of income and expense categories will be stored.
Similar to the first catalog, add the second one and name it Categories.

Figure 3-5. Adding the second catalog

Figure 3-6. The name of the second catalog
Before you proceed to the Data tab, set up one more parameter of the Categories catalog. You arrange to store both income and expense categories in a single catalog because the idea of separating by categories is common for both cases and it is logical to store them in a single catalog. In order not to prevent all in one heap, let users group categories. 1C:Enterprise features hierarchical catalogs. With this mechanism, you can easily group categories by type and separate out common categories that can be used for both income and expenses (Transfer or Debt, for example).
Proceed to the Hierarchy tab and select the Hierarchy catalog check box. Limit the number of hierarchy levels by two.

Figure 3-7. Hierarchy catalog
Proceed to the Data tab and set Description length to 150, similar to the previous catalog.

Figure 3-8. Description length
Now use one more platform feature and help the future users to start using our application. You will create some items in our new catalog. For this, you will use the Predefined data platform mechanism.
Proceed to the Other tab and click Predefined data.

Figure 3-9. Predefined data
In the
window that is opened, click Add group
 (Ctrl+F9).

Figure 3-10. Adding a group
Add a group for income categories. Type the name: Income. Once you press Enter or Tab, the Description field is filled automatically. Then click OK.

Figure 3-11. Income group
Similar to the first group, add the second one and name it Expenses.

Figure 3-12. Expenses group
Finally, add a predefined item, which will be useful lately: Transfer. You will use it to perform fund transfers between accounts.
Click Add (Ins).

Figure 3-13. Adding a catalog item
Type the name: Transfer. Ensure that the item is located in the root of the catalog, at the same level where the previously created groups are located. (Parent must contain Elements).

Figure 3-14. Transfer item
Our
catalog is ready. Before we proceed to the next step, we should save our
progress. Click Update Database
Configuration  (F7).
(F7).

Figure 3-15. Update Database Configuration
The platform informs us about the changes that we made, accept them.

Figure 4-16. Design Changes
Excellent! The Accounts catalog can store account details and the Categories catalog can store details of income and expense categories.
Registers
Now, add building blocks that may not be obvious from the first sight: Accounts and Expenses accumulation registers.
Questions "What is a register? What is its purpose?" immediately arise.
Below you will find a simple explanation.
According to project requirements, the application must not only store lists of accounts and categories, but also should be capable of keeping records of financial transactions. At least, it should keep records of cash flow and provide simple financial reports.
Registration of various events related to money income and expense will be implemented by using configuration objects named Documents. Later you will add a couple of documents to the configuration.
Together with registering money incomes and expenses, it is required to create some reports that show the flow of money. At least, you need to know balances of our accounts and turnovers by categories.
These reports can be created using data that is contained in user-created documents. These documents reflect actual receipts and expenditures of money. However, imagine that in a month (or a year), for example, you decide to supplement your financial records with new documents or functionally expand existing ones. Or there will be so many documents that it would waste a lot of time to get required data.
Making configuration changes, as you have already seen, is a simple task. Algorithms of calculating are changed easily. But the number of the tasks would snowball through time. You will have to take into account all those changes redoing the algorithms again and again. The chance of making errors would also increase.
To avoid this work, 1C:Enterprise uses the following development methodology.
To store data regarding activity of accounting subjects (for example, finances), configuration objects named Registers are used. Documents, which reflect business activities, record data to these registers. Required data is retrieved from the registers.
As a result, you have a separated structure. On the one hand, once there is a complete set of registers, it is easy to create required reports that will show data contained in these registers. On the other hand, when a new type of document appears in the applied solution, you only need to write the correct algorithm to store data to registers. This methodology guarantees that previously created reports will not require any alterations and will display correct data.

Figure 4-1. Documents-Registers-Reports diagram
So, for meeting project requirements it is enough to create two accumulation registers, name them Accounts and Expenses.
Point of Accounts is to store balance of accounts, so that you could quickly find out how much money is available now.
Expenses would help you analyze turnovers by categories. In other words, the register shows expenditure level per category, for example, you can use this information to find the biggest expense category.
Accumulation registers are located in the Accumulation registers branch of the configuration objects tree. Add a new accumulation register.

Figure 4-2. Adding an accumulation register
Name our new register Accounts. Set the register type to Balances. Then, proceed to the Data tab.

Figure 4-3. Accounts accumulation register
Now add dimensions, resources, and attributes of our register.

Figure 4-4. Accumulation register data
Dimensions refer to slices of information that is required to be obtained from the register. It is unlikely that you will be interested only in an overall balance. That is why you need the Account dimension.
Resources are the data that you are going to obtain from the register. In our case, you want to know the amount on our accounts. Hence, only one resource of Number type named Amount is required.
Attributes keep additional information that accompanies each entry in the register. In our case, you will keep here category of income or expense that made a record. You will add the Category attribute.
Let us add the dimension, resources, and attributes. To add them, use the context menu of the Dimensions, Resources, and Attributes groups of the register.
Add a dimension.

Figure 4-5. Adding a dimension
In the Properties window, define that a new dimension name is Account, and it has CatalogRef.Accounts type.

Figure 4-6. Account dimension properties
Now add the Amount resource. Accept the default Type and Length, and adjust only Precision, increase it from 0 to 2.

Figure 4-7. Amount resource properties
In the end, add the Category attribute and specify its type: CatalogRef.Categories.

Figure 4-8. Category attribute properties
As a result, the Accounts accumulation register will look as follows:

Figure 4-9. Accounts register
Similarly, add the Expenses register to the configuration. Unlike the Accounts register of the Balances type, new register will have the Turnovers type.

Figure 4-10. Expenses accumulation register
The register is intended for keeping information that is used to analyze turnovers by categories, so add Category to the dimensions. Resource is identical to the Amount resource of the Accounts register. Dimension must contain Account. Proceed to the Data tab.
Add a dimension. In the property palette, type the name: Category, and set the CatalogRef.Categories type.

Figure 4-11. Category dimension properties
Now add the Amount resource. Leave default Type and Length. Increase Precision to 2.

Figure 4-12. Amount resource properties
One thing left to do, add the Account attribute. In the property palette set the type: CatalogRef.Accounts.

Figure 4-13. Accounts attribute properties
As a result, the Accounts accumulation register will looks as shown in the figure 4-14.

Figure 4-14. Accounts register
Documents
Now proceed to adding documents that record money incomes and expenses. The first document you will add is Income.
Documents are located in the Documents branch of the configuration object tree. Add a new document.

Figure 5-1. Adding a new document
Name it Income and then proceed to the Data tab.

Figure 5-2. Creating Income document
Each document has two default attributes, Number and Date, they indicate the sequential number of the document and the date when it was created. However, in addition to these attributes, it is usually required to have other information regarding specific business activity in the document. For example, in this master class users would like to see what was the reason of money receipt, as well as its account and category.
In order to be able to track events by accounts, you need to create two attributes: Account and Category. To track the amount of transactions, create the Amount attribute. You may also need to comment each income. Add the Memo attribute:
• Account of the CatalogRef.Accounts type.
• Category of the CatalogRef.Categories type.
• Amount of the Number type. Length is 10, Precision is 2, and selected the Non-negative check box.
• Memo of the String type. Length is 1024.
After of these actions, the Data tab of the document will look as follows:

Figure 5-3. Filling the document with fields

Figure 5-4. Account attribute

Figure 5-5. Category attribute

Figure 5-6. Amount attribute

Figure 5-7. Memo attribute
And the final, but the most important step: proceed to the Posting tab.
As it is said above, documents write data to registers, and than you receive data, handy for future processing, from registers. If you just save document data without posting, no register data is changed. To make changes in registers, you have to post the document.
Document register records are records that documents make in registers; in our case, Income document records will be made in the Accounts register.
Expand the Accumulation registers node and select the Accounts accumulation register check box. Then click Register records wizard and the platform will assist you in creating the data-writing algorithm for registers.

Figure 5-8. Defining document register records
A window of Register Records Wizard will be opened. Leave Register Record Type unchanged, equal to Receipt, since this document is a receipt of money. Then click Fill Expressions.
In the table at the bottom of the window you can see that the platform automatically found the correspondence between the accumulation register attributes and the document attributes. The value of the Account attribute of the document will be placed into the Account register dimension. The value of Amount attribute will be placed into the Amount register resource. The value of Category attribute of the document will be placed into the Category register attribute.
After filling out and verifying the correspondence table, click OK.

Figure 5-9. Register Records Wizard
The wizard will generate the procedure for writing document register records, in other words, for posting the document, and then display it on the screen.

Figure 5-10. Procedure for posting the document
As you can see, the procedure is quite simple: a new record is added to the register and then register data is filled with the data of the corresponding document fields.
You could write this algorithm yourself but to minimize the amount of work it is better to utilize Register Records Wizard. The wizard generated this code automatically, which is mentioned in comments at the beginning and at the end of the procedure.
We are done with Income. However, users also need to track expenses. It seems obvious, that it is necessary to create the Expense document. You could easily create it manually in the same way as you did already with the existing Income document because the structure of these two documents is identical. Another option, however, is to use the 1C:Enterprise 8 feature allowing you to create new configuration objects based on existing ones by simply copying them.
To do
this, click the existing Income document
in the list of metadata objects and click Add
by cloning  (F9).
(F9).

Figure 5-11. Add by cloning
Once you click this button, a new Income1 document appears. It is going to be an exact copy of Income.

Figure 5-12. A copy of the Income document
The only thing left to do is to rename the document and edit some of its properties. Do it.
First,
open the properties editor window and change the name of the document to Expense. Then proceed to the Data
tab.

Figure 5-13. Expense document
On the Data tab, using Properties, change the name from Category to the Purpose.

Figure 5-14. Renaming Category to Purpose
A little explanation, users can reflect two operation kinds with the Expense document:
• Transferring funds between accounts
• Spending money
That is the Expense document could register either transferring money between accounts or expensing money by a category.
To implement our idea, select Composite data type:
CatalogRef.Accounts and CatalogRef.Categories.

Figure 5-15. Purpose attribute
If the purpose is an account, the document a reflects transfer because both the source (Account) and the target (Purpose) are accounts. If Purpose contains a category, the document reflects an expense.
Keep the remaining attributes unchanged as they meet the project requirements.
Proceed to the Posting tab. Here we will change the document posting. For now the posting algorithm is copied from the Income document. That document spores income but the newly created document is designed to store expenses.
Select both Accounts and Expenses registers. Then click Register records wizard. The platform will prompt you to confirm that the existing script is to be replaced. Confirm it.

Figure 5-16. Register records wizard
For the Accounts register (it will be selected automatically), fill all fields as in the previous document. Just change the record type to Expense and click Fill Expressions.

Figure 5-17. Register records wizard
Pay attention to the Category register field, which is left empty. The point is that the wizard compares document attributes and register fields by names. But we have no Category attribute in the Expense document. Help the wizard, click the row with the Category field and then double-click the Purpose attribute in the Document attributes area.

Figure 5-18. Filling the Category field
That is not all we have to do. The Income document adds records only to the Accounts register, but the Expense document has to add records to the Accounts and Expenses registers, that is why, without closing the Register Records Wizard window, you have to add the Category register to the Registers list.

Figure 5-19. Adding the Expenses register
Click AccumulationRegister.Expenses and then click Fill Expressions.

Figure 5-20. Filling the Expenses register records
As in the previous case, the Category field is not filled. Fill it with the Purpose attribute as you did it with the Accounts register field.

Figure 5-21. Filling the Category register field
Now everything is ready to generate register records. Click OK.

Figure 5-22. Posting procedure generated by a wizard
You can see that concerning the Accounts register there are minimum differences between two documents. In the Expense document, the record type is Expense. In addition, the Posting procedure contains a script that adds records to the Expenses register. Nothing complicated here.
The only thing requiring explanation is that the current Posting procedure implements only one branch of the document behavior: money spending. As we told before, the document must also support transferring money between accounts.
Here, first time in our master class, we have to customize the script manually.
It is easy to determine the document kind: we can find it out with the Purpose attribute. For this, add a classical If-Then-Else condition.
If the Purpose attribute value type is CatalogRef.Categories, then the document reflects an expense and we already have the posting script (see figure 5-22).
If the Purpose attribute value type is CatalogRef.Accounts, then the document must add transfer records to the Accounts register. One record must decrease the amount of money on one account and another one must add the same amount to the other account. In this case, no record is added to the Expense register.
Once all of the changes are made, the module looks as in figure 5-23.

Figure 5-23. Customized Posting procedure
You can find the module text in the Expense document module.txt file in the \demo\ext directory.
Before you
proceed to the next step, save you progress. Click Update Database Configuration (F7).

Figure 5-24. Update Database Configuration
The platform shows changes in the configuration, click Accept.

Figure 5-25. Update Database Configuration
Now your configuration has catalogs to store account details and categories of incomes and expenses. It has registers for prompt retrieving of required data, and has documents to reflect incomes and expenses.
So,
the backbone of your applied solution is ready. It matches the required goals.
But would it be easy-to-use? To check it out, start the application in
1C:Enterprise mode by clicking Start
Debugging  (F5).
(F5).

Figure 6-26. Start Debugging
Desktop
So far, you have created the backbone of the application. Now it can register financial operations. At this point, the application is simple but not user-friendly.
Look at the main application window.

Figure 6-1. Desktop
The desktop is empty. To add a new document or catalog item, a user has to guess where to click. Of course, a user would not feel comfortable using this application. In this chapter, you are going to improve the workspace.
First, create a user workspace, which will be the starting point for user work with the application: the desktop form. Note, that before this time the platform generated all screen forms "on-the-fly" based on content and specifics of catalogs, documents, and registers we created.
According to the master class specification, the application should provide fast recording of incomes and expenses and efficient balance and turnover control. That are the features that should be within the reach of user's hand, they should be placed on the desktop.
Return
to the Designer, expand the Common metadata tree branch, rightclick
Common forms, and then click Add (Ins).

Figure 6-2. Adding a new common form
Click Generic form, type the name Desktop, type the synonym My money. Then click Finish.
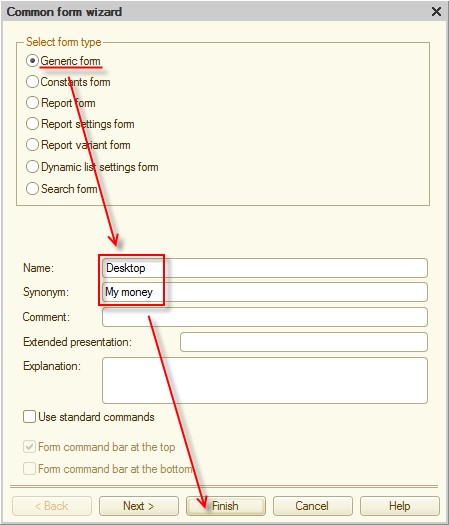
Figure 6-3. Common form parameters
Continue setting up the form in the form editor that is opened.

Figure 6-4. My money common form
By the project requirements, a user should see account balances and turnovers by categories. For this, add two tables with required rates to the form .
First,
the table with account balances. Add a new form item: Balance. Click Add attribute
 (Ins).

Figure 6-5. New form attrimute
In the form property palette, type the Balance name and select the ValueTable type.

Figure 6-6. Balance form attribute
Then add
two columns to the Balance attribute.
To add a column, click Add attribute
column  .
.

Figure 6-7. New attribute column
Name the first column Account. In the property palette, select CatalogRef.Accounts.

Figure 6-8. Account attribute column
Name the second column Amount. Type is Number, length is 10,
Precision is 2.

Figure 6-9. Amount attribute column
It is time to place the created attribute (the Balance table) to the form. Drag it to the form or to the Elements pane.

Figure 6-10. Placing the attribute on the form
The platform prompts you to add the table columns. Click Yes.

Figure 6-11. Balance table on the form
Now you can see the table on the form in the the preview area in the lower part of the form editor (see figure 6-12).

Figure 6-12. Form preview
Now add the second table, which will show turnovers by categories.
Add a new attribute and name it Expenses. The type is ValueTable.

Figure 6-13. New attribute

Figure 6-14. Expenses attribute
Add two columns: Category of the CatalogRef.Categories type and Amount of the Number type, Length is 10, Precission is 2. You can copy(Ctrl+C, Ctrl+V) the Amount column from the Balance table.

Figure 6-15. Category attribute column

Figure 6-16. Amount attribute column
Now
place the created attribute (the Expenses
table) on the form. Drag it to the form, confirm to add columns, and check
whether the Expenses table is placed
under the Balance table. You can
move form items by clicking Move up  (Ctrl+Shift+Up Arrow) and Move down
  (Ctrl+Shift+Down Arrow), or by moving them in the preview pane.

Figure 6-17. Placing the Expenses table

Figure 6-18. Moving buttons
As a result, the desktop form contains two tables (Balance and Expenses), one under another.

Figure 6-19. Desktop form
It is time to declare our form as a desktop form. In the property palette, find the Start page working area and open it for editing.

Figure 6-20. Start page open area
In the Starting page template list select One column.

Figure 6-21. Starting page template
To
add the Desktop common form, click Add (Ins), expand the Common node,
then expand the Common forms node,
click Desktop, and click OK.

Figure 6-22. Adding the common form to the desktop
Run the application in 1C:Enterprise mode, confirm the changes. Take a look at the result.

Figure 6-23. Desktop in 1C:Enterprise mode
The desktop became more useful, the user can control the flow of funds and account balance, and rapidly get catalog and document data to register financial activities.
Note. The desktop content looks pretty poor. It is striking on the personal computer when you develop the application. However, remember that you are developing a cross-platform mobile application. You do not know on which device a user will run your application, would it be a tablet with a big screen or a smartphone with a small one. That is why in the current application you should expect the worst, develop the desktop for a mobile device with a small screen.
Try to register some activities. It will help you check whether the application is easy-to-use.
There is a list on the left:
• Accounts
• Categories
• Expense
• Income

Figure 6-24. Navigation panel list
First, register a money receipt. On the navigation panel click Income, and then click Create (Ins) in the empty list of incomes.

Figure 6-25. Creating a new Income document
Register, for example, a part-time job salary of 100 received on a bank account. In the window of the new document fill the Amount field. Proceed to Account.

Figure 6-26. Amount is filled, proceeding to Account
Catalogs are empty for now and do not contain any data, it is necessary to fill them. In the 1C:Enterprise platform there are a lot of easy-to-use ways to do it:
• On the navigation panel, click Accounts. In the list of accounts create a new item (click Create, see figure 6-27). Then select the created catalog item in the document.
•
In
the document window, click Select  button of the Account field and then click Select (figure 6-28).
• Select the Account field and then press F8 (figure 6-29).
• Select the Account field and start typing a name. If the platform cannot find an item with this name in the catalog, it suggests you to create a new one (figure 6-30).

Figure 6-27. Creating a new Accounts catalog item in the separate list

Figure 6-28. Creating a new Accounts catalog item with the Select button

Figure 6-29. Creating a new Accounts catalog item with F8

Figure 6-30. Creating a new Accounts catalog item by typing an item name
Try the last way. This way is the most comfortable because you do not know whether a user remember, is there the item or it is a new one. The platform attempts to find the item by the typed characters, and if it doesn't, it suggests to create it.
Type Bank account in the Account field.

Figure 6-31. Creating a new Accounts catalog item
The 1C:Enterprise platform didn't find the requred item in the catalog and suggests to create it. Do it.

Figure 6-32. New Accounts catalog item
You can see that Desctiption of the item we are creating is filled automatically. Click Save and close and check out whether the Account document field is filled with the created item.

Figure 6-33. Selected account
Proceed to Category. The platform has the similar behavior as in the Account field.

Figure 6-34. Selecting a category from a catalog
Create the Part-time job catalog item. Use any method you like. However, check that it is in the Income group. You can select a group of the item in the Parent field.

Figure 6-35. New item of the Categories catalog
You can always change item parameters, just open it by clicking the
Open  button in the document window. Also you can
find the item in the catalog list and double-click it.
button in the document window. Also you can
find the item in the catalog list and double-click it.

Figure 6-36. Opening the catalog item
Your first document is almost filled. If you want, type a memo. Then click Post and close to save the document and make changes in the registers.

Figure 6-37. Saving and posting the document
Once the window is closed, you can check out lists of the catalogs and documents to see whether all data we provided is on its place.
Record one more financial event: withdrawing cash from an ATM. In fact, it is a transfer from one account to another.
In your application, transfer is recorded with the Expense document. Create one. Let the amount be 30. The source account is Bank account and the target account is Cash.
Click Expense and then click Create.

Figure 6-38. Creating the Expense document
Type 30 in the Amount field and proceed to Account.

Figure 6-39. Amount is typed, proceeding to Account
In the Account field, select Bank account, whish is already exist. You can start typing it and then click the found item in the list of matching values.

Figure 6-40. Selecting the account
In the Purpose field the platform prompts you to select the value type: Accounts or Categories. Select Accounts to record a transfer.

Figure 6-41. Selecting the target type
Add a new item: Cash. Save it and select it.

Figure 6-42. Target account
If you want, type a memo, then click Post and close to save the document and make changes in the registers.

Figure 6-43. Saving and posting the document
Check that all provided data is saved (the Expense document and Account catalog item). Now you can return to the desktop and check whether data is in the tables that must show financial indicators.

Figure 6-44. Desktop state after the documents have been posted
The tables are empty. Maybe the registers have been filled wrong? Check it out. Now it is not easy to get register records. The 1C:Enterprise platform normally hides these lists because they are not really useful for users. However, at the debugging stage, this data is useful for you.
Click Main Menu  and then click All functions.

Figure 6-45. All functions
Expand the Accumulation Registers branch of the metadata tree and then click Accounts. The Expenses register is not interesting for you now because you have not made any expense records yet.

Figure 6-46. Accounts register

Figure 6-47. List of Accounts register records
You can see that the documents made their records correctly. The first document (Income) created one register record, which contains information about a receipt of 100 to Bank account. The second document (Expense) created two register records, which contain information about an expense of 30 from Bank account and a receipt of 30 to Cash. The predefined category Transfer was used, as we designed.
What is the matter? Why are the desktop tables empty? The point is that the desktop tables know nothing about register records. For filling the desktop tables, you have to program logic of their filling in the 1C:Enterprise script.
Improving desktop functionality
Return to Designer and open the Desktop common form.

Figure 6-48. Desktop common form
Click the Module tab. For now, the form module is empty.

Figure 6-49. Desktop Module tab
For each table (you have two) create a fill procedure. Start with the Balance table. According to project requirements, the table must show actual balance. Name the procedure FillBalance(). In the procedure, you need to get the actual balance from the Accounts register. Not to put too fine a point upon it (register methods and 1C:Enterprise script syntax), you can solve the task as follows:

Figure 6-50. FillBalance() procedure
The AccumulationRegisters.Accounts.Balance() method calls the Accounts accumulation register and retrieve the actual balance.
Balance.Load() method puts retrieved data into the Balance table.
To find out more about the methods you use, see the Syntax assistant, which is built into the 1C:Enterprise platform. Point to a method and press Ctrl+F1.
Type a similar script for the second table. Here you need to get turnovers from the Expenses register. Name it FillExpenses() as on the figure 6-51.

Figure 6-51. FillExpenses() procedire
Here the AccumulationRegisters.Expenses.Turnovers() method calls the Expenses accumulation register and retrieves turnovers by categories.
The Expenses.Load() method puts retrieved data into the Expenses table.
Only one
step left to go: initiate execution of the procedures you have created. For
this, use the predefined procedure that is executed when you open a form: OnOpen(). You do not need to type it,
use a built-in mechanism instead. Click Procedures
and functions  (Ctrl+Alt+P).

Figure 6-52. Procedures and functions
By the way, this mechanism helps you find your custom procedures and functions too. On the figure 6-52, you can see two your procedures on the top.
In the opened list, find <OnOpen> and double-click it, or click it and than Go To.

Figure 6-53. Selecting <OnOpen>
In the procedure creation dialog, click Create on client and then click OK.

Figure 6-54. Variants of procedure creating
As a result, you have a new procedure that is executed when a user opens the form.

Figure 6-55. OnOpen() procedure
The only thing left to do is to add calls of the procedures that update the tables. You can just copy their names and do not forget to add semicolons (;) at the end of the lines.
You can also use another built-in mechanism. Start typing the name of the procedure and then press Ctrl+Space. In the list, move the cursor to the procedure or function and press Enter.
As a result, OnOpen() should contain calls of the update procedures, as on figure 6-56.

Figure 6-56. OnOpen() procedure
Start the application in 1C:Enterprise mode, confirm all changes, and check whether the procedures are executed correctly.

Figure 6-57. Filling the tables
Once you start the application, the balance table is filled. The turnover table is empty. Record one expense, for example, a dinner that cost you 3.
Create a new Expense document.

Figure 6-58. Creating a new Expense document
In the opened document fill Amount and proceed to Account.

Figure 6-59. Amount is filled, proceeding to Account
Consider
that you paid in cash. Select Cash as
an account. You can type it or click Select
.

Figure 6-60. Selecting Account
When you
click the Select button of the Purpose field,
the application asks you to select the data type: Accounts or Categories.
You are going to record an expense, so select Categories.

Figure 6-61. Selecting data type
Add a new item to the Expenses group. Name it Dinner. Then select it as a purpose in your document.

Figure 6-62. Purpose
If you want, fill Memo. Then click Post and close to make changes in the registers.

Figure 6-63. Posting the document
When you will return to the desktop, you will see that the turnover table is still empty.

Figure 6-64. Desktop
If you check the Expenses register (you can get to it through All functions), you see that it contains the record.

Figure 6-65. Expenses register
Is it a mistake? No. The point is that table updating is related to the OnOpen event, the tables are updated only when the desktop is opened. You did not reopen the form, you just returned to the opened form.
To activate table updating, you can restart the application in 1C:Enterprise mode, as well as close the desktop and open it again.

Figure 6-66. Closing the desktop

Figure 6-67. Opening the desktop
Now all data in the tables is actual. It may be considered that the tutorial task is completed.
However, asking a user to restart the application every time he or she want to see actual financial indicators is too much. In addition, the application has only the most primitive features and register tables are available only through the system menu. The usability is awful. On the mobile device it makes even more inconveniences.
Spend a little more time to make your application user-friendly.
Next part