
Lesson 24. Data Exchange
Estimated duration of the lesson is 6 hours 10 minutes.
CONTENT:
- General Information on Data Exchange.
Universal Data Exchange Mechanism.
- Creating a Constant for Data Exchange.
Updating Configuration Objects Involved in the Exchanges.
Adding an Exchange Plan.
Creating Data Exchange Procedures.
Testing Data Exchange Operation.
- Overview of Distributed Infobases.
The Task at Hand.
Example of Interactive Exchange in a Distributed Infobase.
During this lesson we will learn the data exchange tools available in the 1C:Enterprise 8, and will update our configuration by adding the ability to exchange data with remotely located branches and departments.
General Information on Data Exchange
Data exchange mechanisms in 1C:Enterprise 8 are intended to exchange information from the database with other computer systems.
These can be other 1C:Enterprise 8 infobases (regardless of whether they are identically configured) as well as non - 1C:Enterprise 8 systems.
Such a flexibility in data exchange is possible because data exchange tools available in 1C:Enterprise 8 can be used in various combinations. Besides, data exchange format is based on the XML language that is currently a generally accepted means of data representation.
The mechanisms for data exchange include:
- Exchange plans;
- XML Serialization;
- Tools of reading and writing XML documents.
Generally speaking, the interaction between these three components can be visualized as follows (fig. 24.1):
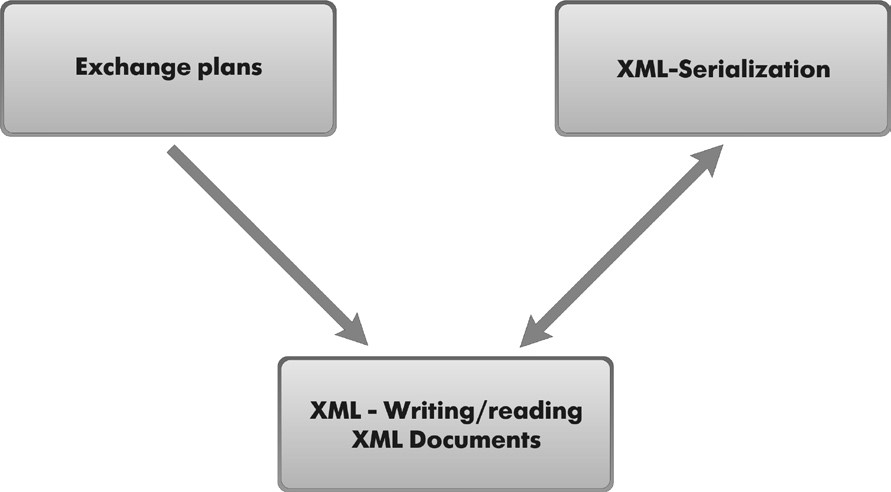
Fig. 24.1. Interaction between data exchange tools
Using exchange plans, we can get information regarding which data items have been changed and which data exchange node they need to be sent to.
This is possible because exchange plans contain a tool that records changes. Information about data changes is transferred using messages, and the exchange plans also support this messaging infrastructure.
XML serialization enables conversion of a 1C:Enterprise 8 object into an XML formatted data sequence. Additionally, XML serialization performs reconversion: converts an XML formatted data sequence into a 1C:Enterprise 8 object, provided that it corresponds to one of the object types in 1C:Enterprise 8.
Reading and writing XML documents is performed using the XML read/ write functions in the 1C:Enterprise script.
When implementing a data exchange algorithm, these mechanisms can be used either all together or in various combinations. In each specific instance, the developer decides which approach to use.
In the example discussed in the book we will use all the three mechanisms. So before we get down to writing a code, we will first take a closer look at each of them.
Understanding the Exchange Plan Concept
To support exchange of any data with anyone, you need to somehow identify those you will exchange data with, and then define an exchange list. An Exchange Plan configuration object lets you accomplish both tasks.
Much like catalog data items are catalog items, data exchange plan items are represented by exchange plan nodes.
Each node identifies an exchange participant for this exchange plan. Besides, each exchange plan always contains one predefined node which identifies this infobase.
There can be multiple exchange plans within a single configuration. Each exchange plan defines a set of data that will be exchanged within the context of that plan, as well as the exchange mechanism itself.
Multiple exchange plans may be needed when various nodes exchange different assortments of data, or when exchange arrangement for some nodes does not match the arrangement for other nodes.
LEARN MORE!
For details on the structure of the 1C:Enterprise script objects intended to work with the exchange plans, see "Developer's Quick Reference. Exchange Plans".
The following data exchange participants are possible:
- Database objects: catalog items, documents, etc.;
- Intangible data: record sets of registers, sequences, constants;
- Special 1C:Enterprise script entity ObjectDeletion.
For ease of presentation, we will subsequently refer to these items of the information structure as exchange objects.
A developer can determine the content of each exchange plan by specifying the configuration objects that will have their data participating in data exchange under this plan.
When you define the structure of an exchange plan's data, you can check AutoRecord for each object type. This checkbox indicates how the exchange plan will track data changes.
The ability to track data changes is accomplished within an exchange plan by the change registration mechanism.
The operation of this mechanism is based on the fact that each of the exchange objects has a DataExchange property, which lets us indicate the nodes for which changes to that object will need to be recorded. All changes of an exchange object ultimately boil down to writing or deleting an exchange object. The change registration mechanism analyzes the writing and deletion of exchange objects and generates a change registration record based on the data exchange parameters contained within each exchange object. We should point out that the DataExchange property is not stored in the database, but is used only while a data exchange object is being written.
Thus, the AutoRecord checkbox that is checked when you define the contents of an exchange plan's data lets you which data exchange parameters the change registration mechanism will generate each time, based on the information contained in the exchange plan.
After the exchange parameters are automatically filled in, the developer can still modify those parameters. This is done using the BeforeWrite and BeforeDelete event handlers of the objects that participate in exchanges, where you can modify the list of recipient nodes (those nodes for which changes are recorded).
It is also possible to disable automatic recording of changes so that data exchange parameters will need to be generated from scratch using 1C:Enterprise script tools. This could theoretically be done in any code segment, but to make the configuration easier to understand, it is better to consistently use the BeforeWrite and BeforeDelete event handlers for this purpose. In this manner the code to generate data exchange parameters will be concentrated in straightforward locations instead of scattered throughout the configuration.
So, we now know that when exchange objects are written or deleted, an exchange plan generates change registration records. These records are stored in change registration tables, where a separate table is maintained for each exchange object.
When an exchange object is modified, the number of records created in the change registration table is equal to the number of recipient nodes indicated in the exchange object's data exchange parameters. Each record created will contain a link to its recipient node. Change registration tables are created only if the corresponding metadata object has been specified within at least one of the exchange plans.
Besides a link to the exchange node for which changes are recorded, each record in the change registration table will also contain the number of the message where the change was initially passed to that node. Until the message is passed initially, the field will be set to Null.
From the exchange plan's perspective, a message is a basic unit of information exchange. Therefore, one of the most important components of an exchange plan (aside from the change registration services) is the message infrastructure.
Since exchange plan messages are transferred from one node to another within an exchange plan, each message is explicitly associated with an exchange plan and has a unique number, a single sender, and a single recipient. Message infrastructure is in charge of message numbering. This makes it possible for change registration records to also contain the numbers of the messages that initially transferred such changes.
The message infrastructure also makes it possible to get a confirmation of message delivery from the recipient node. This confirmation consists of the number of the last received message and is contained within each message arriving at the recipient node.
Subsequently, by analyzing the number of the last message received and the numbers of the messages stored in the change registration records, the developer can delete change registration records when delivery confirmation is received.
XML Serialization
The term XML serialization describes a mechanism that enables us to represent a 1C:Enterprise object as an XML formatted data sequence. Besides, XML serialization also makes it possible to do the reverse and represent an XML formatted data sequence as a 1C:Enterprise 8 object provided that an appropriate data type exists.
The thing to understand is that exchange objects, which exist as single entities within 1C:Enterprise 8, are actually comprised of various types of interconnected data.
For example, in addition to its code and description, a catalog item may contain a certain number of attributes of different types and a certain number of tabular sections, which in turn contain a certain number of attributes of various types.
Through XML serialization the entire body of data is represented as a corresponding XML formatted data sequence.
Through reconversion, the object is reassembled, provided that an appropriate data type exists in the 1C:Enterprise 8.
Writing and Reading XML Documents
In contrast to XML serialization, the mechanism for writing and reading XML documents allows us to work with XML data on a basic level without reference to 1C:Enterpise 8 objects.
Specifically, they allow us to open XML files for reading, to read data from files, to create new XML files and write data to such files.
Universal Data Exchange Mechanism
So the Jack of All Trades establishes a branch in N, and installed an identical configuration to manage the branch's operations.
So we now need to establish an exchange of data between these two databases so that each database reflects full information about materials and services, while accounting and payroll would be managed independently in each database.
To do so, we will create an exchange plan, specify what data needs to be included in the exchange, and create a number of procedures that will enable us to generate exchange files on the hard drive and likewise load received exchange files from the drive.
To simplify our example, we will not plan for any automatic file exchange between the two databases, and will launch the exchange procedure manually.
Before we get right into programming the exchange algorithm, we should discuss some enhancements that we will need to make in our database right up front.
These enhancements deal with the fact that, up to this point, we have only worked with one database, and have relied on uniqueness of catalog code numbers and document numbers.
Now, new catalog items and new documents will be created independently in two databases at the same time, and we still need to ensure uniqueness of catalog item code numbers and document numbers, but this time it's within the "space" of two databases.
If we don't do that, there can be a situation when both databases will create new documents with identical numbers and a conflict will happen upon data exchange since the system will attempt to write a document to the database using a number that is already used by another document.
To prevent such situations, we will add a unique prefix to document numbers and catalog codes in each database that will unambiguously identify the database.
Hence even if the numbers of new documents in the two databases match, they will still have different prefixes and no conflict will occur.
Configuration object referred to as a Constant is used to store a number prefix.
Creating a Constant for Data Exchange
In the Designer Mode
CAUTION
Since during the previous lesson we created a list of users in the configuration, now that you attempt to enter the Designer you will be prompted for a user name. Enter Administrator as the user name because this user has full access to all the configuration objects. There is no need to enter a password because we have not created one.
A Constant configuration object is intended to create database tables that will store information that either does not change overtime or only changes rarely.
Each Constant configuration object defines a table that stores one value.
Now proceed to creating a constant that will store the value of a number prefix.
Open the Designer and add a new Constant configuration object named NumberingPrefix.
Define the constant's data type as String, with a fixed length of 2 characters.
Updating Configuration Objects Involved in the Exchanges
In the Designer Mode
The first thing you need to do now is modify the modules of all the objects that are involved in exchanges (in our case such objects include documents, catalogs, and chart of characteristic types).
The result of the changes is that now when document numbers and codes for a catalog or a chart of characteristic types are generated, we will use the value of the NumberingPrefix constant to ensure that such numbers and codes are unique.
The function that generates the number prefix will be located in a common module, since it is possible that the algorithm used to generate document prefixes may need to be changed in the future.
Add a common module named Exchange.
Populate the module with the following function (listing 24.1).
Listing 24.1. A function to generate a number prefix
Function GetNumberingPrefix() Export
	Return Constants.NumberingPrefix.Get()
EndFunction
As you can see, this function merely returns the value of the NumberingPrefix constant.
Now update the Clients catalog.
Highlight this object in the configuration object tree and open the object module using its context menu.
Then add in an event handler OnSetNewCode (listing 24.2):
Listing 24.2. OnSetNewCode event handler
Procedure OnSetNewCode(StandardProcessing, Prefix)
 Prefix = ExchangeData.GetNumberingPrefix();
EndProcedure
The OnSetNewCode event occurs when a new code is set for a catalog item. Note that this code is created in the object module instead of the form module because this event occurs for the object in general instead of some particular form.
Prefix is the second parameter passed in the handler call. A prefix is populated in this procedure and is used by the system for code generation.
In the event handler we call for a function of a common module. Since the module is not global, we address it using the module name and the function name Exchange.GetNumberPrefix. In this procedure we set the prefix equal to the value of the NumberingPrefix constant.
Similar handlers will need to be added to all the catalogs and chart of characteristic types that are involved in exchanges.
In our case:
- Catalogs:
- Employees,
- Warehouses,
- Products,
- ProductTypes,
- AdditionalProductProperties.
- Chart of Characteristic Types: ProductProperties.
Next you will need to increase code length to 11 characters for all these objects and for the Clients catalog (in the properties palette of each configuration object).
Now we will update the documents.
In the module of the ReceiptOfGoods document add the OnSetNewNumber event handler as follows (listing 24.3).
Listing 24.3. OnSetNewNumber event handler
Procedure OnSetNewNumber(StandardProcessing, Prefix)
	Prefix = ExchangeData.GetNumberingPrefix();
EndProcedure
Similar handlers will need to be added to all the documents that are involved in exchanges.
In our case, it is only the ServicesRendered document.
Next for both documents you will need to increase number length to 11 characters (in the properties palette of the configuration object).
This wraps up the preparatory work on the existing configuration objects, and we can move on to creating the data exchange procedures.
Adding an Exchange Plan
In the Designer Mode
Now we will set up the mechanism that serves as the hub of any data exchange schema, upon which everything else will depend - the exchange plan.
Expand the Common branch of the configuration object tree, add a new ExchangePlan configuration object named Branches and enter Branch for object presentation.
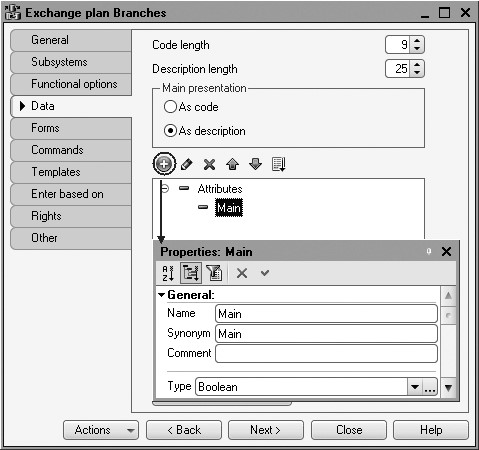
On the Data tab create an exchange plan attribute named Main of the Boolean type (fig. 24.2).
We will need this attribute to resolve collisions during data exchanges. A collision is a situation where one data exchange object is simultaneously modified in two nodes.
In this case we will look into the value of the Main attribute and confirm the changes only if they are made in the main node. In the event of a collision, we will reject the changes made anywhere but in the main node.
Now we will define the assortment of objects that participate in exchanges. To do so, on the Main tab click Contents.
Includes all the objects not related to accounting and payroll into the exchange.
Note that the NumberingPrefix constant is not included in the exchange, since its value needs to be unique for each database that takes part in the exchange.
The content of the data exchange should look as follows (fig. 24.3).
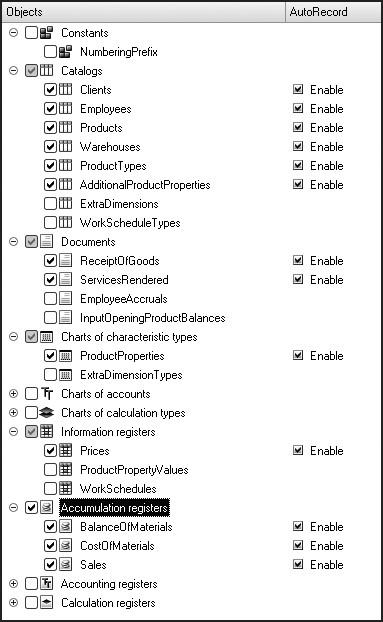
Fig. 24.3. Content of data exchanges
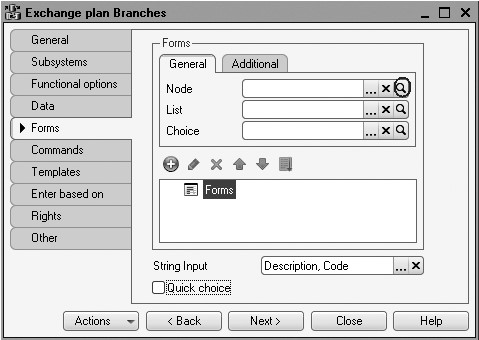
Fig. 24.4. Creating a form of data exchange node
Now on the Forms tab of the configuration object editor click the opening button and create the default node form using the wizard (fig. 24.4).
In the form controls window select the root item Form, open its context menu and create an event handler OnCreateAtServer.
We will need this handler to forbid setup of the Main attribute for a predefined node that corresponds to this infobase (listing 24.4).
Listing 24.4. OnCreateAtServer form event handler
&AtServer
Procedure OnCreateAtServer(Cancel, StandardProcessing)
	If Object.Ref = ExchangePlans.Branches.ThisNode() Then
		Items.Main.Enabled = False;
	EndIf;
EndProcedure
In this procedure we use the exchange plan manager's ThisNode() method, which returns a reference to the exchange plan node that corresponds to this infobase.
Next create the default form of the exchange plan list to define some actions involved in registering a new exchange node in this form.
The main thing these actions will accomplish is to ensure that when a new exchange node is created, we will need to generate all the change registration records the node will need for all the configuration objects included in this exchange plan. This will basically serve to initially synchronize the exchange node with all the exchange data.
To do so, on the Commands tab create a command RecordChanges.
In the properties palette that opens click the opening button in the Action row.
Populate the template of the event handler executing this command as follows (listing 24.5).
Listing 24.5. The RecordChanges command event handler
&AtClient
Procedure RecordChanges(Command)
	RecordChangesAtServer(Items.List.CurrentRow);
EndProcedure
In this event handler we call for the procedure RecordChangesAtServer() that we will soon create. It will be executed on the server.
The parameter Items.List.CurRow transfers a reference to the object ExchangePlan.Branches to this procedure using the CurRow property for the List table (a dynamic list of data exchange nodes Branches serves as a data source for this table).
The procedure RecordChangesAtServer() itself is preceded by the compilation directive &AtServerNoContext because the procedure will operate faster when context of the entire form is not transferred when it is called for (listing 24.6).
Listing 24.6. RecordChangesAtServer procedure
&AtServerNoContext
Procedure RecordChangesAtServer(Node)
	// Record all data changes for a node
	ExchangePlans.RecordChanges(Node);
EndProcedure
In this procedure we turn to the change registration mechanism, calling for the exchange plan manager method - RecordChanges().
A reference to the current exchange plan node Branches is transferred to this method.
This procedure results in infobase having change registration records created for all the exchange objects listed in the exchange plan's content, to be transmitted to the node created.
Finally, switch to the Form tab and drag the command RecordChanges from the commands window to the form controls window where it should be located in the form command bar.
This will result in the following appearance of the list form (fig. 24.5).
Note that the RecordChanges button should only be available if the current node is not a predefined node for this infobase because otherwise it is impossible to record changes.
To ensure that the button will behave as required, create a function in the list form module that will run on the server and will be true if the node transferred to the function is a predefined one (listing 24.7).

Listing 24.7. PredefinedNode() function
&AtServerNoContext
Function PredefinedNode(Node)
	Return Node = ExchangePlans.Branches.ThisNode();
EndFunction
Next in the form controls window highlight the List item, open its properties palette and create an event handler named OnActivateRow.
Populate the event handler as follows (listing 24.8).
Listing 24.8. OnActivateRow() event handler of the list form item
&AtClient
Procedure ListOnActivateRow(Item)
	If PredefinedNode(Item.CurrentRow) Then
		Items.RecordChanges.Enabled = False;
	Else
		Items.RecordChanges.Enables = True;
	EndIf;
EndProcedure
This procedure identifies if the RecordChanges button should be available based on the value of the PredefinedNode() function that receives a reference to the current node (Item.CurRow).
This concludes creation of our exchange plan so we can move right along to creating the data exchange procedures themselves.
Creating Data Exchange Procedures
In the Designer Mode
We will use a data processor to initiate data exchange.
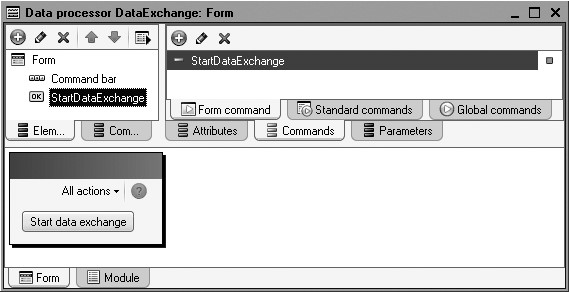
Add a new Data Processor configuration object named DataExchange.
On the Forms tab create the default data processor form.
In the form editor on the Commands tab create a form command StartDataExchange.
In the Action tab click the opening button and create an event handler for this command - call for the procedure ExchangeWithBranches() (listing 24.9).
Listing 24.9. StartDataExchange event handler
&AtClient
Procedure StartDataExchange(Command)
	ExchangeWithBranches();
EndProcedure
Next in the form module create a procedure named ExchangeWithBranches to be executed on the server (listing 24.10).
Listing 24.10. Creating the ExchangeWithBranches procedure
&tServerNoContext
Procedure ExchangeWithBranches() Export

	NodeSelection = ExchangePlans.Branches.Select();

	While NodeSelection.Next() Do
		// Exchange data with all nodes,
		// except for the current node (ThisNode)
		If NodeSelection.Ref <> ExchangePlans.Branches.ThisNode() Then
			NodeObject = NodeSelection.GetObject();
			// Receive message
			NodeObject.ReadMessageWithChanges();
			// Generate message
			NodeObject.WriteMessageWithChanges();
		EndIf;
	EndDo;
EndProcedure
The algorithm of this procedure is as follows: in the loop we select nodes contained in the Branches exchange plan and for all the nodes but the local node itself we first read the messages received from other exchange nodes (the procedure ReadMessagesWithChanges will be created later).
Next we generate the messages to be transferred that contain the modified data for this node (the procedure WriteMessageWithChanges will also be created later).
Finally, drag the StartDataExchange command from the command window to the form controls window. The resulting data processor form will look as follows (fig. 24.6).
Data Writing Procedure
We will place the procedures that will write and read exchange data inside the object module for the Branches exchange plan.
In the editor of this configuration object navigate to the Other tab and open its module.
First create a procedure named WriteMessageWithChanges that will be used in data exchanges.
It will be created in a few steps.
First we will generate a file name that will contain the data to be exchanged and will inform a user when dumping data to the node begins and ends (listing 24.11).
Listing 24.11. Generating a file name in the data writing procedure
Procedure WriteMessageWithChanges() Export

	Message = New UserMessage;
	Message.Text = "-------- Download to node " + String(ThisObject) + " --------";
	Message.Message();

	Directory = TempFilesDir();

	// Generate the name of temporary file
	FileName = Directory + ?(Right(Directory,1)= "\", "", "\") + "Message" + TrimAll(ExchangePlans.Branches.ThisNode().Code) + "_" +TrimAll(Ref.Code) + ".xml";

	Message = New UserMessage;
	Message.Text = "-------- Download complete --------";
	Message.Message();

EndProcedure
To simplify the example, we will exchange messages via a temporary files directory. The message names are standardized and follow the pattern MessageSendingNodeCode_RecipientNodeCode.xml.
Next turn your attention to the mechanisms for writing/reading XML documents and will create a new object named XMLWriter. This object is intended to open a new XML file for writing and to write an XML declaration into this file. In the end of the procedure XML writing is completed and the file is closed (listing 24.12).
Listing 24.12. Creating XML writer object in the data writing procedure
Procedure WriteMessageWithChanges() Export

	Message = New UserMessage;
	Message.Text = "-------- Download to node " + String(ThisObject) + " --------";
	Message.Message();

	Directory = TempFilesDir();
	// Generate the name of temporary file
	FileName = Directory + ?(Right(Directory,1)= "\", "", "\") + "Message" + TrimAll(ExchangePlans.Branches.ThisNode().Code) + "_" + TrimAll(Ref.Code) + ".xml";

	// Create write XML object
	// *** write XML-documents
	XMLWriter = New XMLWriter;
	XMLWriter.OpenFile(FileName);
	XMLWriter.WriteXMLDeclaration();
	XMLWriter.Close();

	Message = New UserMessage;
	Message.Text = "-------- Download complete --------";
	Message.Message();

EndProcedure
Now turn to the messages infrastructure and create a new object named ExchangeMessageWriter. This object includes a method BeginWrite() that enables us among other things to create the next message number and write the message header in XML. At the end of the procedure writing the message is completed again (listing 24.13).
Listing 24.13. Creating message sequence number and writing message header in XML
Procedure WriteMessageWithChanges() Export

	Message = New UserMessage;
	Message.Text = "-------- Download to node " + String(ThisObject) + " --------";
	Message.Message();

	Directory = TempFilesDir();
	// Generate the name of temporary file
	FileName = Directory + ?(Right(Directory,1)= "\", "", "\") + "Message" + TrimAll(ExchangePlans.Branches.ThisNode().Code) + "_" + TrimAll(Ref.Code) + ".xml";

	// Create write XML object
	// *** write XML-documents
	XMLWriter = New XMLWriter;
	XMLWriter.OpenFile(FileName);
	XMLWriter.WriteXMLDeclaration();

	//*** message infrastructure
	ExchangeMessageWriter = ExchangePlans.CreateMessageWriter();
	ExchangeMessageWriter.BeginWrite(XMLWriter, Ref);

	Message = New UserMessage;
	Message.Text = "Message number: " + ExchangeMessageWriter.MessageNo);
	Message.Message();

	ExchangeMessageWriter.EndWrite();
	XMLWriter.Close();

	Message = New UserMessage;
	Message.Text = "-------- Download complete --------";
	Message.Message();

EndProcedure
Since we are currently in the object module, we use the default Ref attribute as a reference to the object Branches Exchange Plan.
After that, in order to get the data we need to save to this file, we will use the change registration mechanism to get a selection of change registration records, intended for this node. When generating the selection, we will pass the message number in the second parameter (listing 24.14).
Listing 24.14. Obtaining a selection of change registration records intended for this node
Procedure WriteMessageWithChanges() Export

	Message = New UserMessage;
	Message.Text = "-------- Download to node " + String(ThisObject) + " --------";
	Message.Message();

	Directory = TempFilesDir();
	// Generate the name of temporary file
	FileName = Directory + ?(Right(Directory,1)= "\", "", "\") + "Message" + TrimAll(ExchangePlans.Branches.ThisNode().Code) + "_" + TrimAll(Ref.Code) + ".xml";

	// Create write XML object
	// *** write XML-documents
	XMLWriter = New XMLWriter;
	XMLWriter.OpenFile(FileName);
	XMLWriter.WriteXMLDeclaration();

	// *** message infrastructure
	ExchangeMessageWriter = ExchangePlans.CreateMessageWriter();
	ExchangeMessageWriter.BeginWrite(XMLWriter, Ref);
	Message = New UserMessage;
	Message.Text = "Message number: " + ExchangeMessageWriter.MessageNo);
	Message.Message();

	// Get selection of changed data
	//*** change recording mechanism
	SelectionOfChanges = ExchangePlans.SelectChanges(ExchangeMessageWriter.Recipient, ExchangeMessageWriter.MessageNo);
	ExchangeMessageWriter.EndWrite();
	XMLWriter.Close();

	Message = New UserMessage;
	Message.Text = "-------- Download complete --------";
	Message.Message();

EndProcedure
Now all that remains to do is use a loop to select records and serialize them to the open XML file (listing 24.15).
Listing 24.15. Search in records selection and serialization into the Open XML file
Procedure WriteMessageWithChanges() Export

	Message = New UserMessage;
	Message.Text = "-------- Download to node " + String(ThisObject) + " --------";
	Message.Message();

	Directory = TempFilesDir();
	// Generate the name of temporary file
	FileName = Directory + ?(Right(Directory,1)= "\", "", "\") + "Message" + TrimAll(ExchangePlans.Branches.ThisNode().Code) + "_" + TrimAll(Ref.Code) + ".xml";

	// Create write XML object
	// *** write XML-documents
	XMLWriter = New XMLWriter;
	XMLWriter.OpenFile(FileName);
	XMLWriter.WriteXMLDeclaration();

	//*** message infrastructure
	ExchangeMessageWriter = ExchangePlans.CreateMessageWriter();
	ExchangeMessageWriter.BeginWrite(XMLWriter, Ref);
	Message = New UserMessage;
	Message.Text = "Message number: " + ExchangeMessageWriter.MessageNo);
	Message.Message();

	// Get selection of changed data
	//*** change recording mechanism
	SelectionOfChanges = ExchangePlans.SelectChanges(ExchangeMessageWriter.Recipient, ExchangeMessageWriter.MessageNo);

	While SelectionOfChanges.Next() Do
		// Write data to the message
		// ***XML Serialization
		WriteXML(XMLWriter, SelectionOfChanges.Get());
	EndDo;

	ExchangeMessageWriter.EndWrite();
	XMLWriter.Close();

	Message = New UserMessage;
	Message.Text = "-------- Download complete --------";
	Message.Message();

EndProcedure
That finishes the procedure for writing exchange data.
Data Reading Procedure
The steps involved in creating the procedure to read exchange data will be the same as before: first we'll generate the name of the file that will contain the exchange data (listing 24.16).
Listing 24.16. Generating exchange data file name
Procedure WriteMessageWithChanges() Export

	Directory = TempFilesDir();
	// Generate the file name
	FileName = Directory + ?(Right(Directory,1)= "\", "", "\") + "Message" + TrimAll(ExchangePlans.Branches.ThisNode().Code) + "_" + TrimAll(Ref.Code) + ".xml";

	File = New File(FileName);
	If Not File.Exist() Then
		Return;
	EndIf;

	DeleteFiles(FileName);

	Message = New UserMessage;
	Message.Text = "-------- Download complete --------";
	Message.Message();

EndProcedure
Here we generate the name of the file we expect to find in the directory and then create a new File object with that name and check whether it exists. If there is no such file, the procedure terminates. If such a file is located, we will delete it once all the data it contains are processed.
Now we will add a command to read the identified exchange data file (listing 24.17).
Listing 24.17. Adding the reading of the identified exchange data file
Procedure ReadMessageWithChanges() Export

	Directory = TempFilesDir();
	// Generate the file name
	FileName = Directory + ?(Right(Directory,1)= "\", "", "\") + "Message" + TrimAll(ExchangePlans.Branches.ThisNode().Code) + "_" + TrimAll(Ref.Code) + ".xml";

	File = New File(FileName);
	If Not File.Exist() Then
		Return;
	EndIf;

	//*** Read XML documents
	// Try to open the file
	XMLReader = New XMLReader;
	Try
		XMLReader.OpenFile(FileName);
	Except
		Message = New UserMessage;
		Message.Text = "Exchange file could not be opened.";
		Message.Message();
		Return;
	EndTry;

	Message = New UserMessage;
	Message.Text = "-------- Upload from " + String(ThisObject) + "---------";
	Message.Message();

	Message = New UserMessage;
	Message.Text = "– Reading from " + FileName;
	Message.Message();

	XMLReader.Close();
	DeleteFiles(FileName);

	Message = New UserMessage;
	Message.Text = "-------- Download complete --------";
	Message.Message();

EndProcedure
At this very moment we call for the mechanisms to read/write XML documents that operate with such documents on the basic level.
To do so, we create a new object named XMLReader that will open the identified file for reading. If successful, a message is displayed informing the user that data restoration from the file begins. In the end of the procedure we also complete reading of XML data from the file using the Close() method.
The data received in this manner should be some sort of data exchange message. To present such data in message terms, the following code should be added to the procedure (listing 24.18).
Listing 24.18. Adding the reading of XML message header
Procedure ReadMessageWithChanges() Export

	Directory = TempFilesDir();
	// Generate the file name
	FileName = Directory + ?(Right(Directory,1)= "\", "", "\") + "Message" + TrimAll(ExchangePlans.Branches.ThisNode().Code) + "_" + TrimAll(Ref.Code) + ".xml";

	File = New File(FileName);
	If Not File.Exist() Then
		Return;
	EndIf;

	//*** Read XML documents
	// Try to open the file
	XMLReader = New XMLReader;
	Try
		XMLReader.OpenFile(FileName);
	Except
		Message = New UserMessage;
		Message.Text = "Exchange file could not be opened.";
		Message.Message();
		Return;
	EndTry;

	Message = New UserMessage;
	Message.Text = "-------- Upload from " + String(ThisObject) + "---------";
	Message.Message();

	Message = New UserMessage;
	Message.Text = "- Reading from " + FileName;

	// Upload from the found file
	//***Message infrastructure
	ExchangeMessageReader = ExchangePlans.CreateMessageReader();
	// read the XML data exchange message header from the XML file
	ExchangeMessageReader.BeginRead(XMLReader);
	ExchangeMessageReader.EndRead();
	Message.Message();

	XMLReader.Close();
	DeleteFiles(FileName);

	Message = New UserMessage;
	Message.Text = "-------- Download complete --------";
	Message.Message();

EndProcedure
Here we use message infrastructure of the exchange plans and create an object named ExchangeMessageReader. Using the BeginRead() object of this method we read the XML message header which contains information about the message sender among other data. Reading is stopped as soon as the entire message is processed.
Now that exchange data is presented as a message and the header is received, one more check is possible before actual data processing begins (listing 24.19).
Listing 24.19. Adding message verification
Procedure ReadMessageWithChanges() Export

	Directory = TempFilesDir();
	// Generate the file name
	FileName = Directory + ?(Right(Directory,1)= "\", "", "\") + "Message" + TrimAll(ExchangePlans.Branches.ThisNode().Code) + "_" + TrimAll(Ref.Code) + ".xml";

	File = New File(FileName);
	If Not File.Exist() Then
		Return;
	EndIf;

	//*** Read XML documents
	// Try to open the file
	XMLReader = New XMLReader;
	Try
		XMLReader.OpenFile(FileName);
	Except
		Message = New UserMessage;
		Message.Text = "Exchange file could not be opened.";
		Message.Message();
		Return;
	EndTry;

	Message = New UserMessage;
	Message.Text = "-------- Upload from " + String(ThisObject) + "---------";
	Message.Message();

	Message = New UserMessage;
	Message.Text = "– Reading from " + FileName;

	// Upload from the found file
	//***Message infrastructure
	ExchangeMessageReader = ExchangePlans.CreateMessageReader();
	// read the XML data exchange message header from the XML file
	ExchangeMessageReader.BeginRead(XMLReader);
	// Message is not for this node
	If ExchangeMessageReader.Sender <> Ref Then
		Raise "Incorrect node";
	EndIf;
	ExchangeMessageReader.EndRead();
	Message.Message();

	XMLReader.Close();
	DeleteFiles(FileName);

	Message = New UserMessage;
	Message.Text = "-------- Download complete --------";
	Message.Message();

EndProcedure
Here we verify that the message sender is exactly the node that we perform data exchange for in the current call for the procedure.
If everything is correct, before actual data reading begins, you should delete all the change registration records made for this node that correspond to message numbers not higher than the one specified in the processed message for the received message number. The idea is prevent repeated data already sent to the node and processed by the node (listing 24.20).
Listing 24.20. Deleting change registration records for sending node
Procedure ReadMessageWithChanges() Export

	Directory = TempFilesDir();
	// Generate the file name
	FileName = Directory + ?(Right(Directory,1)= "\", "", "\") + "Message" + TrimAll(ExchangePlans.Branches.ThisNode().Code) + "_" + TrimAll(Ref.Code) + ".xml";

	File = New File(FileName);
	If Not File.Exist() Then
		Return;
	EndIf;

	//*** Read XML documents
	// Try to open the file
	XMLReader = New XMLReader;
	Try
		XMLReader.OpenFile(FileName);
	Except
		Message = New UserMessage;
		Message.Text = "Exchange file could not be opened.";
		Message.Message();
		Return;
	EndTry;

	Message = New UserMessage;
	Message.Text = "-------- Upload from " + String(ThisObject) + "---------";
	Message.Message();

	Message = New UserMessage;
	Message.Text = "– Reading from " + FileName;

	// Upload from the found file
	//***Message infrastructure
	ExchangeMessageReader = ExchangePlans.CreateMessageReader();
	// read the XML data exchange message header from the XML file
	ExchangeMessageReader.BeginRead(XMLReader);
	// Message is not for this node
	If ExchangeMessageReader.Sender <> Ref Then
		Raise "Incorrect node";
	EndIf;

	// Delete change records for the message sending node
	// *** change registration service
	ExchangePlans.DeleteChangeRecords(ExchangeMessageReader.Sender,
	ExchangeMessageReader.ReceivedNo);
	ExchangeMessageReader.EndRead();
	Message.Message();

	XMLReader.Close();
	DeleteFiles(FileName);

	Message = New UserMessage;
	Message.Text = "-------- Download complete --------";
	Message.Message();

EndProcedure
Note that here we call for the change registration service and use the method DeleteChangeRecords() to execute such actions.
So now you can proceed to actually reading the data contained in the message (listing 24.21).
Listing 24.21. Reading the message data
Procedure ReadMessageWithChanges() Export

	Directory = TempFilesDir();
	// Generate the file name
	FileName = Directory + ?(Right(Directory,1)= "\", "", "\") + "Message" + TrimAll(ExchangePlans.Branches.ThisNode().Code) + "_" + TrimAll(Ref.Code) + ".xml";

	File = New File(FileName);
	If Not File.Exist() Then
		Return;
	EndIf;

	//*** Read XML documents
	// Try to open the file
	XMLReader = New XMLReader;
	Try
		XMLReader.OpenFile(FileName);
	Except
		Message = New UserMessage;
		Message.Text = "Exchange file could not be opened.";
		Message.Message();
		Return;
	EndTry;

	Message = New UserMessage;
	Message.Text = "-------- Upload from " + String(ThisObject) + "---------";
	Message.Message();

	Message = New UserMessage;
	Message.Text = "– Reading from " + FileName;

	// Upload from the found file
	//***Message infrastructure
	ExchangeMessageReader = ExchangePlans.CreateMessageReader();
	// read the XML data exchange message header from the XML file
	ExchangeMessageReader.BeginRead(XMLReader);
	// Message is not for this node
	If ExchangeMessageReader.Sender <> Ref Then
		Raise "Incorrect node";
	EndIf;

	// Delete change records for the message sending node
	// *** change registration service
	ExchangePlans.DeleteChangeRecords(ExchangeMessageReader.Sender,
	ExchangeMessageReader.ReceivedNo);

	// Read data from the message
	//*** XML serialization
	While CanReadXML(XMLReader) Do
	EndDo;
	ExchangeMessageReader.EndRead();
	Message.Message();

	XMLReader.Close();
	DeleteFiles(FileName);

	Message = New UserMessage;
	Message.Text = "-------- Download complete --------";
	Message.Message();

EndProcedure
Data reading is executed in the loop and we again use XML serialization and global context methods CanReadXML() to obtain the next XML data type from the XMLReader and define if a corresponding 1C:Enterprise object type exists. If yes, loop execution continues.
The first thing to do is represent the XML data as a value that has some type in 1C:Enterprise. To do so, global context method ReadXML() is used (listing 24.22).
Listing 24.22. Presenting XML data as a value with some type
Procedure ReadMessageWithChanges() Export

	Directory = TempFilesDir();
	// Generate the file name
	FileName = Directory + ?(Right(Directory,1)= "\", "", "\") + "Message" + TrimAll(ExchangePlans.Branches.ThisNode().Code) + "_" + TrimAll(Ref.Code) + ".xml";

	File = New File(FileName);
	If Not File.Exist() Then
		Return;
	EndIf;

	//*** Read XML documents
	// Try to open the file
	XMLReader = New XMLReader;
	Try
		XMLReader.OpenFile(FileName);
	Except
		Message = New UserMessage;
		Message.Text = "Exchange file could not be opened.";
		Message.Message();
		Return;
	EndTry;

	Message = New UserMessage;
	Message.Text = "-------- Upload from " + String(ThisObject) + "---------";
	Message.Message();

	Message = New UserMessage;
	Message.Text = "– Reading from " + FileName;

	// Upload from the found file
	//***Message infrastructure
	ExchangeMessageReader = ExchangePlans.CreateMessageReader();
	// read the XML data exchange message header from the XML file
	ExchangeMessageReader.BeginRead(XMLReader);
	// Message is not for this node
	If ExchangeMessageReader.Sender  Ref Then
		Raise "Incorrect node";
	EndIf;

	// Delete change records for the message sending node
	// *** change registration service
	ExchangePlans.DeleteChangeRecords(ExchangeMessageReader.Sender,
	ExchangeMessageReader.ReceivedNo);
	// Read data from the message
	//*** XML serialization
	While CanReadXML(XMLReader) Do
		// Read next value
		Data = ReadXML(XMLReader);
	EndDo;

	ExchangeMessageReader.EndRead();
	Message.Message();

	XMLReader.Close();
	DeleteFiles(FileName);

	Message = New UserMessage;
	Message.Text = "-------- Download complete --------";
	Message.Message();

EndProcedure
When this method is executed, the Data variable will contain a 1C:Enterprise object that corresponds to the XML data.
Once 1C:Enterprise object is obtained, potential collision should be solved (listing 24.23).
Listing 24.23. Resolution of potential collisions
Procedure ReadMessageWithChanges() Export

	Directory = TempFilesDir();
	// Generate the file name
	FileName = Directory + ?(Right(Directory,1)= "\", "", "\") + "Message" + TrimAll(ExchangePlans.Branches.ThisNode().Code) + "_" + TrimAll(Ref.Code) + ".xml";

	File = New File(FileName);
	If Not File.Exist() Then
		Return;
	EndIf;

	//*** Read XML documents
	// Try to open the file
	XMLReader = New XMLReader;
	Try
		XMLReader.OpenFile(FileName);
	Except
		Message = New UserMessage;
		Message.Text = "Exchange file could not be opened.";
		Message.Message();
		Return;
	EndTry;

	Message = New UserMessage;
	Message.Text = "-------- Upload from " + String(ThisObject) + "---------";
	Message.Message();

	Message = New UserMessage;
	Message.Text = "- Reading from " + FileName;

	// Upload from the found file
	//***Message infrastructure
	ExchangeMessageReader = ExchangePlans.CreateMessageReader();
	// read the XML data exchange message header from the XML file
	ExchangeMessageReader.BeginRead(XMLReader);
	// Message is not for this node
	If ExchangeMessageReader.Sender <> Ref Then
		Raise "Incorrect node";
	EndIf;

	// Delete change records for the message sending node
	// *** change registration service
	ExchangePlans.DeleteChangeRecords(ExchangeMessageReader.Sender,
	ExchangeMessageReader.ReceivedNo);
	// Read data from the message
	//*** XML serialization
	While CanReadXML(XMLReader) Do
		// Read next value
		Data = ReadXML(XMLReader);
		// Do not make the received change to main item
		// from one that is not main if changes have been recorded
		If Not ExchangeMessageReader.Sender.Main And ExchangePlans.IsChangeRecorded(ExchangeMessageReader.Sender, Data) Then
			Message = New UserMessage;
			Message.Text = "- Changes ignored";
			Message.Message();
			Continue;
		EndIf;
	EndDo;

	ExchangeMessageReader.EndRead();
	Message.Message();

	XMLReader.Close();
	DeleteFiles(FileName);

	Message = New UserMessage;
	Message.Text = "-------- Download complete --------";
	Message.Message();

EndProcedure
The potential collision is resolved as follows: we check whether the sending node is a main node and if there are some records regarding changes of this object for the node in our database. If the object has been changed in the database and the sender is not a main node, the record of the received object is rejected. Otherwise the changes of the received object are accepted.
Now everything we still need to do is write the received data (listing 24.24).
Listing 24.24. Writing received data
Procedure ReadMessageWithChanges() Export

	Directory = TempFilesDir();
	// Generate the file name
	FileName = Directory + ?(Right(Directory,1)= "\", "", "\") + "Message" + TrimAll(Ref.Code) + "_" + TrimAll(ExchangePlans.Branches.ThisNode().Code) + ".xml";

	File = New File(FileName);
	If Not File.Exist() Then
		Return;
	EndIf;

	//*** Read XML documents
	// Try to open the file
	XMLReader = New XMLReader;
	Try
		XMLReader.OpenFile(FileName);
	Except
		Message = New UserMessage;
		Message.Text = "Exchange file could not be opened.";
		Message.Message();
		Return;
	EndTry;

	Message = New UserMessage;
	Message.Text = "-------- Upload from " + String(ThisObject) + "---------";
	Message.Message();

	Message = New UserMessage;
	Message.Text = "- Reading from " + FileName;

	// Upload from the found file
	//***Message infrastructure
	ExchangeMessageReader = ExchangePlans.CreateMessageReader();
	// read the XML data exchange message header from the XML file
	ExchangeMessageReader.BeginRead(XMLReader);
	// Message is not for this node
	If ExchangeMessageReader.Sender <> Ref Then
		Raise "Incorrect node";
	EndIf;

	// Delete change records for the message sending node
	// *** change registration service
	ExchangePlans.DeleteChangeRecords(ExchangeMessageReader.Sender,
	ExchangeMessageReader.ReceivedNo);
	// Read data from the message
	//*** XML serialization
	While CanReadXML(XMLReader) Do
		// Read next value
		Data = ReadXML(XMLReader);
		// Do not make the received change to main item
		// from one that is not main if changes have been recorded
		If Not ExchangeMessageReader.Sender.Main And ExchangePlans.IsChangeRecorded(ExchangeMessageReader.Sender, Data) Then
			Message = New UserMessage;
			Message.Text = "- Changes ignored";
			Message.Message();
			Continue;
		EndIf;
		// Write received data
		Data.DataExchange.Sender = ExchangeMessageReader.Sender;
		Data.DataExchange.Load = True;
		Data.Write();
	EndDo;

	ExchangeMessageReader.EndRead();
	Message.Message();

	XMLReader.Close();
	DeleteFiles(FileName);

	Message = New UserMessage;
	Message.Text = "-------- Download complete --------";
	Message.Message();

EndProcedure
Before writing the received object we identify the sending node for this object in the data exchange parameters so that when this object is written to the database, no change registration record is generated for this object for the node we have just received it from.
Besides, in the data exchange parameters we enable the Download property that demonstrates that object writing will happen as update of the data received in the result of such an exchange. This identification simplifies the object writing procedure for the system because it can avoid some standard checks and prevent modifications of connected data that should happen for normal writing.
This step finishes the procedure for receiving and processing exchange data.
Testing Data Exchange Operation
In the Designer Mode
To be able to edit the NumberingPrefix constant, expand the Common branch of the configuration object tree, highlight the Common Forms branch and use the form wizard to create a constant form named GeneralSettings.
Open the properties window Advanced for this form (context menu- Advanced) and specify that the form is owned by the Enterprise subsystem (fig. 24.7).
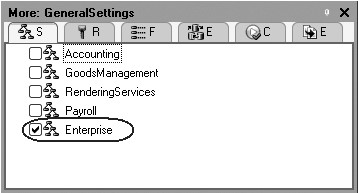
Fig. 24.7. Advanced window of the GeneralSettings Constant Form
In the configuration object editor for the Branches Exchange Plan and for the DataExchange data processor on the Subsystems tab also specify that they are owned by the Enterprise subsystem.
So only an Administrator will be able to access the commands to open the exchange plan, the data processor, and the constant form because the Enterprise subsystem will only be available for the Administrator role.
Also in the command interface editor of the subsystems All Subsystems enable visibility for the command Branch: New in the New group of the action panel of the Enterprise subsystem. Select the following order for the commands in the Tools group of the action panel:
- Search data,
- General Settings,
- Data Exchange,
- Job Scheduler.
Finally, we will create a new directory to host the infobase of the branch.
Update database configuration (F7). Now save the configuration into the created directory using Configuration > Save Configuration to File... from the main menu.
In the 1C:Enterprise Mode
Run 1C:Enterprise in the debugging mode and enter required values in the central infobase.
First, enter CI as a value for the Numbering Prefix.
To do so, select General Settings in the action panel of the Enterprise section (fig. 24.8).

Fig. 24.8. Value of the Numbering Prefix constant
Click Save and Close.
Next open the Branches exchange plan and specify default node parameters, i.e. the parameters of our database.
To do so, select Branches in the navigation panel of the Enterprise section. One record is already available in the list of exchange plans. Open and edit this record.
Enter CI for the infobase code and Central Database for its description.
Remember that it is the code that identifies exchange nodes in various databases so in the branch infobase we will create nodes with the same codes (fog. 24.9).
Click Save and Close.
Next click New or select Branch from the action panel.
Create a new node that will correspond to the branch infobase and enter Br for the code and Branch for the description (fig. 24.10).
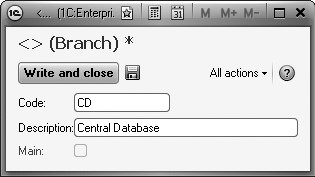
Fig. 24.9. Creating an exchange plan node
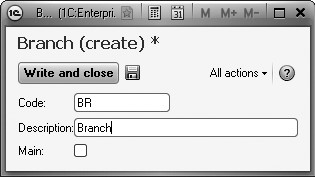
Fig. 24.10. Creating an exchange plan node
Note that the predefined infobase node (Central Database) is marked in the list of exchange nodes with a special icon. The Record Changes button is not available for the node.
Highlight the new node Branch in the list and click Record Changes.
Now call for the DataExchange data processor and click Start Data Exchange.
The following text will be displayed in the message window (fig. 24.11).
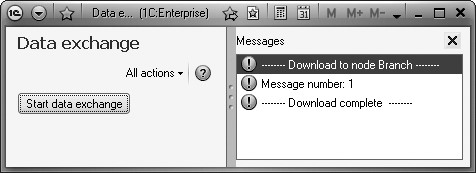
Fig. 24.11. Service message window
So as a result of such a data exchange the central infobase has generated an exchange file containing changes of all the data it exchanges with the branch.
Launching a Branch Infobase
Now it is time to proceed to the infobase of the branch.
Run 1C:Enterprise and add a new infobase to the list with an empty configuration. This infobase should be located in the branch infobase directory we have created. To do so, in the 1C:Enterprise startup window click Add and select Create a new infobase. Click Next.
In the next window select Create an infobase without configuration to ... restore a previously dumped infobase.
Click Next and enter a description for the infobase, e.g. Branch Infobase.
Click Next and specify the infobase directory where the saved configuration is located, e.g. D:\1C_8.2\branch. Click Next and then Finish.
In the Designer Mode
Open the Branch Infobase configuration we have created in the Designer mode. Select Configuration > Open Configuration from the main menu. You see that the list of configuration objects is empty.
Now restore a configuration from file (Configuration > Restore Configuration from File...).
In the browsing window select the directory and file name of the saved configuration, e.g. D:\1C_8.2\branch\1Cv8.cf. When prompted to confirm configuration update, answer Yes and in the configuration structure modification window click Accept.
All the configuration objects are now transferred from the central infobase.
Select Administration > Users from the main menu and create one user in the configuration of the branch: Administrator with Administrator role. The reason for the actions is that you need to create users from scratch in every infobase.
In the 1C:Enterprise Mode
Run 1C:Enterprise in the debugging mode.
First enter BR as a value for the NumberingPrefix constant (fig. 24.12).
Now open the Branch exchange plan and describe a predefined node (node of the current infobase).
To do so, select Branches in the navigation panel of the Enterprise section.
One record is already available in the list of exchange plans. Open and edit this record.
Enter Brn as a code and Branch as a description (fig. 24.13).

Fig. 24.12. Editing a constant

Fig. 24.13. Creating an exchange plan node
Next create a new data exchange node with the code CD, Central Database as its description and Main checked (fig. 24.14).

Fig. 24.14. Creating an exchange plan node
Highlight the new node Central Branch in the list of exchange nodes and click Record Changes.
Now to better understand the process open the list of Clients catalog.
Currently it has no items.
Call for the DataExchange data processor and click Start Data Exchange.
The catalog will be filled with items and the message window will display the following text (fig. 24.15).

Now we will test how exchange is processed on the other side.
In the Clients catalog create a new customer with an arbitrary name.
Note that code numbering for the new client starts from one and has BR as its prefix.
Now click Start Data Exchange again in the opened form of the DataExchange data processor.
Next navigate to the central infobase, carry out data exchange as well and make sure that the client created in the branch infobase has been transferred to the central one.
Distributed Infobases Mechanism
The mechanism for managing distributed infobases is a form of universal data exchange.
CAUTION
If you use the training version of the 1C:Enterprise 8.2 platform, you will be unable to reproduce this example because distributed infobases are not supported by the training version.
It implements a distributed infobase model that was available in the previous versions of 1C:Enterprise, which involves maintaining identical configurations at all nodes, has a tree structure and enables exchange of data changes as well as changes to the configuration.
The distributed infobase mechanism employs exchange plans. To make it possible, Exchange Plan configuration objects have Distributed Infobase property.
If the property is checked, it activates the distributed infobase mechanism for this exchange plan, and the developer can then create a distributed infobase using solely interactive means, without writing any code.
However, this feature does not prevent you from managing exchange using software tools as it is also available for operations on distributed infobases.
In the process of working on our example, we will discuss both options of arranging for exchange in distributed infobases.
Overview of Distributed Infobases
As we have already mentioned above, a distributed infobase needs to have a clearly defined tree structure. The count of levels in that structure is unlimited. An important thing is that there must always be an explicit master-subordinate relationship between each pair of linked nodes (fig. 24.16).

Fig. 24.16. Distributed infobase structure
Thus, each node in that structure can have an unlimited number of subordinate nodes (or none at all). Additionally, every node except one needs to have a master node, and the root node is the only one with no master. This rigidly defined node structure is essential for specifying the migration pattern for data and configuration modifications.
A configuration can only be changed in a node that has no master node (i.e. in the root node). Data changes can be made in any node.
Configuration changes will be passed down from master node to subordinate ones. Data changes can be passed between any linked nodes.
Collision resolution will be performed on the basis master-subordinate relationships as well. If changes are made simultaneously in a master node and in a subordinate one, only the changes to the master node will be accepted and changes to the subordinate node will be discarded.
For any subordinate node an initial image can be created - an infobase created on the basis of the configuration and data of the master node in compliance with the rules specified in the exchange plan. The procedure for creating an initial node image can be performed repeatedly. Every time it is performed, it deletes all the subordinate node's change records that are held in the main node's infobase. A node is ready to exchange data with the master node immediately after its initial image is created.
Creating an initial image is the recommended means of creating a subordinate node in a distributed infobase.
The Task at Hand
As an example of how distributed infobases work, we will create several departments for Jack of All Trades.
Unlike branches that are located in different cities and act as independent entities with relative independence in how they manage their books, the departments of our company are located in the same city and have no independent legal status, and keep their books in strict compliances with practices of the headquarters.
Therefore, they all use exactly the same configuration as the one used in the headquarters, and if the headquarters make any changes to the configuration, all of those changes will need to be rapidly disseminated to the configurations of the departments.
To implement such an arrangement, a distributed infobase is a perfect fit. First we will arrange for data exchange with departments using exclusively interactive means.
Example of Interactive Exchange in a Distributed Infobase
In the Designer Mode
To set up a distributed infobase, we will need to create another Exchange Plan configuration object. Enter Departments for its name and Department for object presentation.
Select Distributed Infobase property for this exchange plan (fig. 24.17).
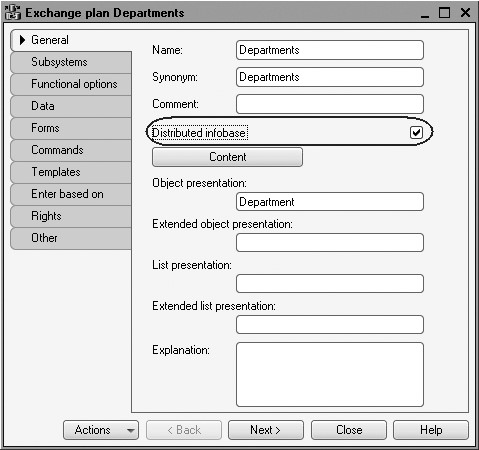
Fig. 24.17. Selecting distributed infobase property
On the Forms tab check Quick Choice to be able to select exchange plan nodes from a drop-down list.
Next we will define the assortment of objects that participate in exchanges.
On the General tab click Contents and specify the same data exchange content as the one used in the Branches exchange plan. Basically you should include all the objects that are not related to accounting and payroll into the exchange.
The resulting content of the data exchange should look as follows (fig. 24.18).

On the Subsystems tab specify that the exchange plan is owned by the Enterprise subsystem. In this manner the command to open the Departments exchange plan will only be available for the Administrator role.
Also in the command interface editor of the subsystems All Subsystems enable visibility for the command Department: New in the group Action Panel.New of the Enterprise subsystem. In the 1C:Enterprise Mode
Run 1C:Enterprise in the debugging mode.
Open the Departments exchange plan and specify the central node parameters (predefined exchange plan item).
To do so, select Departments in the navigation panel of the Enterprise section.
One record is already available in the list of exchange plans. This is a predefined node of our infobase. Open and edit this record. Enter CI as the code and Central Infobase as the description.
Next create a new node with Dep as its code and Department as its description.
The created node now has three buttons available in the command bar of the exchange plan form: Write Changes, Read Changes, and Create Initial
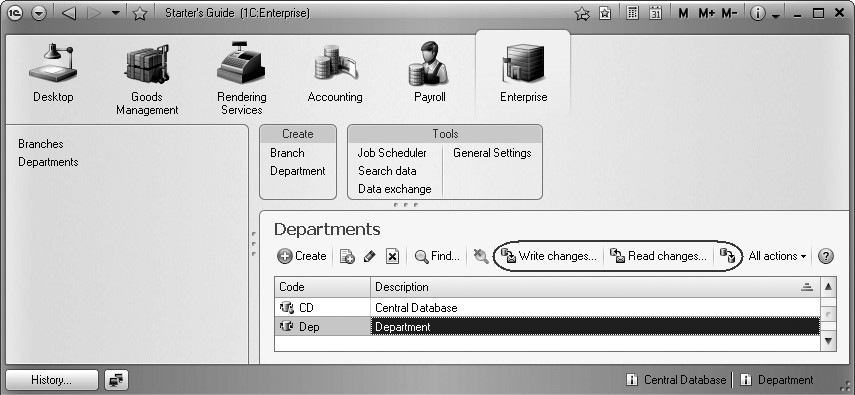
Fig. 24.19. Commands to work with a distributed infobase
Without delay, we will click one of the buttons to create an initial infobase image for our department.
To do so, we will first need to create a new directory on the hard drive to store the department infobase.
Next highlight the Department node in the list of data exchange nodes, select Create Initial Image and specify that the infobase will be located on this computer (fig. 24.20).
Click Create Initial Image.
At the next step specify the directory for the infobase and click Finish.
The initial image for the department's infobase will be created in the specified directory.
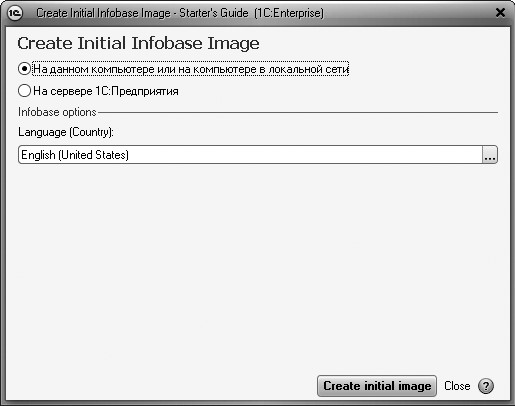
Fig. 24.20. Creating an initial infobase image
Launching a Department Infobase
Now proceed to the department infobase.
Run 1C:Enterprise and add the created infobase into the list. It is located in the directory where you hosted the initial infobase image for the department.
To do so, in the 1C:Enterprise startup window click Add and select Add an Existing Infobase.
Click Next and enter a description for the infobase, e.g. Department Infobase.
Click Next, specify the directory for the infobase, e.g. D:\1C_8.2\Department and click Finish.
In the Designer Mode
Open the Department Infobase configuration we have created in the Designer mode.
Select Configuration > Open Configuration from the main menu. You can see that the department configuration is now protected from modifications via distributed infobase management tools (fig. 24.21).

Fig. 24.21. Subordinate node configuration protected from modifications via distributed infobase management tools
Select Administration > Users from the main menu and create one user in the configuration of the branch: Administrator with Administrator role.
In the 1C:Enterprise Mode
Launch the department's infobase in the debugging mode and open the Departments exchange plan (fig. 24.22).
Note that in the subordinate node's infobase the subordinate node itself is a predefined exchange plan node, while the central infobase node is marked by a red icon, indicating that it is master of the department infobase. Additionally, for the central infobase the only available commands are Write Changes and Read Changes.
Now test how data exchange operates.
Open the constant list and enter Dep as the value for the NumberingPrefix constant.
Now open the clients catalog and add a new client.
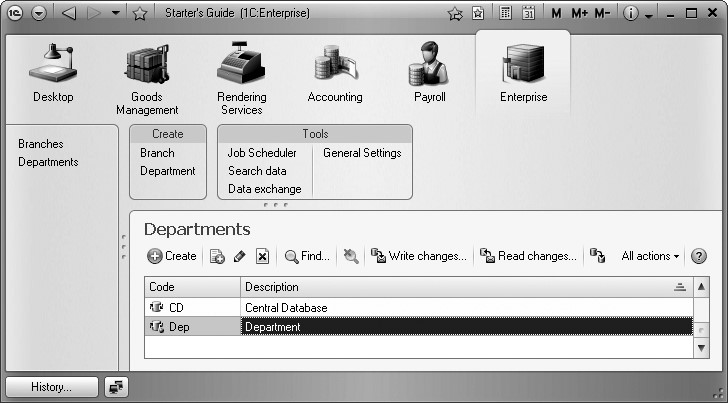
Fig. 24.22. Nodes of the Departments exchange plan
Then we will write changes for the central infobase (by specifying the message file name).
Navigate to the central infobase and read changes for the central infobase (by selecting the message file name).
Make sure that the new client created in the department infobase now exists in the central infobase as well.
Next review how configuration changes are transferred between the master node and subordinate ones.
In the Designer of the central infobase create a new constant named NewConstant.
Update the database configuration and launch 1C:Enterprise in the debugging mode.
Open the Departments exchange plan and write the changes for the subordinate node named Department.
Next close the Designer of the department infobase, run it in the 1C:Enterprise mode and read the changes in the subordinate node infobase.
After reading, the following message will be displayed (fig. 24.23).
Open the department infobase Designer and verify that the NewConstant constant has shown up in the main configuration. In other words, the changes made to the central infobase configuration have been automatically sent to the configuration of the subordinate node.
Now everything you need to do is update the infobase configuration in the subordinate node.
We should probably say a few words concerning the order in which changes are accepted, when a single message contains changes to both the configuration and the data.
In this case, the main configuration will be changed first, and then a message is displayed prompting you to save the database configuration. After synching the configurations, we will need to reread the data, at which time all of the data changes contained in the message will be accepted. This order for accepting changes remains the same regardless of whether the changed data refer to an existing configuration object or a new one.
Finally, delete the NewConstant object from the object tree of our configuration.
Software-based Exchange in a Distributed Infobase
All the steps above related to data exchange in a distributed infobase can be programmed as well.
We will create a data processor that is programmed to perform all of the steps we looked at in the preceding section for a selected node.
In the Designer Mode
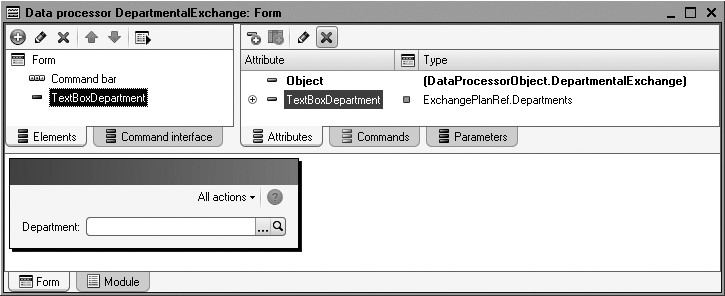
In the Designer of the central infobase create a new Data Processor configuration object named DepartmentalExchange.
On the Forms tab create the default data processor form.
In the form editor on the Attributes tab add a form attribute named TextBoxDepartment of the type ExchangePlan.Departments and drag it to the form controls window.
In the properties palette of the field that opens enter a title for the field as Department. The text box available for the field type by default should remain unchanged (fig. 24.24).
Next on the Commands tab create the commands CreateInitialImage, WriteChanges, and ReadChanges one after another.
Click the opening button in the Action row for every command.
Do not populate the templates for the event handlers and instead navigate to the Form tab and drag these commands to the form controls window one after another.
This will result in the following appearance of the data processor form (fig. 24.25).
Open properties palette for the CreateInitialImage and clear Availability property.
So when a data processor is opened, this button will not be available until you select a data exchange node in the TextBoxDepartment. This button will not be available either if you select a predefined node of the infobase. This means that it will be impossible to create an initial image if the selected node is a predefined one.
To ensure that the button will behave as required, create a function in the data processor form module that will run on the server and will be true if the node transferred to the function is a predefined one (listing 24.25).

Listing 24.25. PredefinedNode() function
&AtServerNoContext
Function PredefinedNode(Node)

	Return ExchangePlans.Departments.ThisNode();

EndFunction
Next in the form controls window highlight the TextBoxDepartment item, open its properties palette and create an event handler named ChoiceProcessing.
Populate the event handler as follows (listing 24.26).
Listing 24.26. TextBoxDepartmentChoiceProcessing() procedure
&AtClient
Procedure TextBoxDepartmentChoiceProcessing(Item, SelectedValue, StandardProcessing)
	If PredefinedNode(SelectedValue) Then
		Items.CreateInitialImage.Enabled = False;
	Else
		Items.CreateInitialImage.Enabled = True;
	EndIf;
EndProcedure
This procedure identifies if the CreateInitialImage button should be available based on the value of the PredefinedNode() function that receives a reference to the selected node (ValueSelected).
Now populate the event handler for the CreateInitialImage command as follows (listing 24.27).
Listing 24.27. Create Initial Image event handler
&AtClient
Procedure CreateInitialImage(Command)

	Dialog = New FileDialog(FileDialogMode.ChooseDirectory);
	Dialog.Title = "Specify infobase directory:";
	If Dialog.Choose() Then
		CreateInitialImageAtServer(TextBoxDepartment, "File =" + Dialog.Directory);
		DoMessageBox("Initial Image Created.");
	EndIf;

EndProcedure
In the beginning of the procedure we call up a dialog to select the directory where the infobase image should be located. Then we execute the procedure CreateInitialImageOnServer() that is executed on the server.
The procedure in turn calls for the CreateInitialImage() method of the ExchangePlansManager object.
It is this method that lets us create the image for a subordinate node in a distributed infobase. The first parameter of the method passes a reference to the node (TextBoxDepartment form attribute) the initial image should be created for, while the second parameter provides a connection string that specifies the infobase (listing 24.28).
Listing 24.28. CreateInitialImageAtServer procedure
&AtServerNoContext
Procedure CreateInitialImageAtServer(Node, ConnectionDirectory)

	ExchangePlans.CreateInitialImage(Node, "File =" + ConnectionDirectory);

EndProcedure
Now create an event handler for the Write Changes command.
The event handler code will look as follows (listing 24.29).
Listing 24.29. Write Changes event handler
&AtClient
Procedure WriteChanges(Command)
	Dialog = New FileDialog(FileDialogMode.Save);
	Dialog.Title = "Specify the exchange file:";
	If Dialog.Choose() Then
		WriteChangesAtServer(TextBoxDepartment, Dialog.FullFileName);
		DoMessageBox("Changes Write Completed.");
	EndIf;
EndProcedure
In the beginning of the procedure we call for the dialog to enter a name of the file the changes will be saved to. Then we call for the procedure WriteChangesAtServer() that is executed on the server. The first parameter of the method transfers a reference to the node (TextBoxDepartment form attribute) the changes should be written for.
In this procedure we create an XMLWriter object to work with that file.
Next we create an ExchangeMessageWriter object that will be used to create an exchange message. In the second parameter of the BeginWrite() method we indicate which exchange node this message will be created for. After that we will execute the WriteChanges() method from the ExchangePlansManager object, which saves changes that are to be sent to the selected node in the specified exchange message.
In the end we finalize the exchange message writing and close the file (listing 24.30).
Listing 24.30. WriteChangesAtServer procedure
&AtServerNoContext
Procedure WriteChangesAtServer(Node, FileName)

	// Create and initialize XMLWriter object
	XMLWriter = New XMLWriter;
	XMLWriter.OpenFile(FileName);

	// Create ExchangeMessageWriter object and start writing message
	ExchangeMessageWriter = ExchangePlans.CreateMessageWriter();
	ExchangeMessageWriter.BeginWrite(XMLWriter, Node);

	// Write message body content for the
	// exchange of distributed infobase data
	ExchangePlans.WriteChanges(ExchangeMessageWriter);

	// Terminate message and XML writing
	ExchangeMessageWriter.EndWrite();
	XMLWriter.Close();

EndProcedure
LEARN MORE!
It is worth noting that the WriteChanges method lets us specify a number of data items up to the maximum number contained in a message within a single database transaction. By default, all the data is stored in a message as a single transaction.
This is the recommended mode, since it assures consistency of the data contained within the message.
However, when creating messages in multi-user mode, lock conflicts may occur between the transactions containing data from messages and transactions performed by other users. To reduce the probability of such conflicts, we can set the value of the parameter to something other than the default value. The lesser the parameter value, the lesser the locking conflict probability, but the higher the probability of inconsistent data being placed in the message.
Considering all of the above, the ideal solution is to perform data exchanges in exclusive mode. However, this option is not always possible given the way a specific infobase may be set up.
And finally, we will create a handler for the Read Changes command.
The event handler code will look as follows (listing 24.31).
Listing 24.31. Read Changes event handler
&AtClient
Procedure ReadChanges(Command)
	Dialog = New FileDialog(FileDialogMode.Open);
	Dialog.Title = "Specify the exchange file:";
	If Dialog.Choose() Then
		ReadChangesAtServer(Dialog.FullFileName);
		DoMessageBox("Changes have been read.");
	EndIf;
EndProcedure
Again in the beginning of the procedure we call for the dialog to enter a name of the file that should be read. Then we call for the procedure ReadChangesAtServer() that is executed on the server.
In this procedure we create an XMLReader object to work with that file. After that we create an ExchangeMessageReader object to read the message contained in the specified file.
Then we use the ReadChanges() method from the ExchangePlansManager object to read the received message.
At the end of the procedure, we terminate reading of the exchange message and close the file (listing 24.32).
Listing 24.32. ReadChangesAtServer procedure
&AtServerNoContext
Procedure ReadChangesAtServer(FileName)

	// Create and initialize XMLReader object
	XMLReader = New XMLReader;
	XMLReader.OpenFile(FileName);

	// Create ExchangeMessageReader object and start reading message
	ExchangeMessageReader = ExchangePlans.CreateMessageReader();
	ExchangeMessageReader.BeginRead(XMLReader);

	// Read message body content
	ExchangePlans.ReadChanges(ExchangeMessageReader);

	// Terminate message and XML reading
	ExchangeMessageReader.EndRead();
	XMLReader.Close();

EndProcedure
Finally, on the Subsystems tab specify that the DepartmentalExchange data processor is owned by the Enterprise subsystem.
Also in the command interface editor of this subsystem (All Subsystems) arrange the commands in the action panel of the Tools group in the following order:
- Search Data,
- General Setup,
- Data Exchange,
- Departmental Exchange,
- Job Scheduler.
You can verify that our data processor operates properly using an example similar to the one provided in the universal data exchange section.
For now we only need to make a few final observations.
When using distributed infobases, four events become available from the ExchangePlanObject.<name> object which allow us to manage sending and receipt of data down to the level of individual data items.
- OnSendDataToMaster();
- OnSendDataToSlave();
- OnReceiveDataFromMaster();
- OnReceiveDataFromSlave().
These events will be called for each item of data included in the message.
You can watch these events in action by adding the following code to the module of the Departments Exchange Plan object (listing 24.33).
Listing 24.33. Viewing operation of the ExchangePlanObject object events
Procedure OnSendDataToMaster(DataItem, ItemSend)
	Message = New UserMessage;
	Message.Text = "OnSendDataToMaster " + DataItem;
	Message.Message();
EndProcedure

Procedure OnSendDataToSlave(DataItem, ItemSend, InitialImageCreating)
	Message = New UserMessage;
	Message.Text = "OnSendDataToSlave " + DataItem;
	Message.Message();
EndProcedure

Procedure OnReceiveDataFromMaster(DataItem, ItemReceive, SendBack)
	Message = New UserMessage;
	Message.Text = "OnReceiveDataFromMaster " + DataItem;
	Message.Message();
EndProcedure

Procedure OnReceiveDataFromSlave(DataItem, ItemReceive, SendBack)
	Message = New UserMessage;
	Message.Text = "OnReceiveDataFromSlave " + DataItem;
	Message.Message();
EndProcedure
The first parameter in all of these events is the data item for which the event was called.
The ItemSend parameter allows us to control the type of information that will be included in the message. It can have one of the three values:
- Auto - the default value. Indicates that a data item will be included in the message;
01
- Delete - a value will be placed in the message to delete this data item;
- Ignore - nothing will be included in the message in regard to this data item.
The ItemReceive parameter lets you indicate whether the read data item will be recorded in the database. The parameter can have one of the three values as well:
- Auto - the default value. If the data item is received from the master node, it will always be saved. If the data item is received from a subordinate node, it will be saved only if no change is registered against that data item;
- Accept - a received data item will always be saved;
- Ignore - ignore the received data item and don't save anything.
Data receipt events also have a third Boolean type parameter - SendBack.
This parameter enables forced recording of changes to the received item in the receiving infobase.
This feature could be required, for example, where an inconsistency is detected in the data received from the sending node (such as when an error has been made when changing data at the sending node).
In that case we can ignore the received change and check SendBack to force recording of changes against the received data items on our end, which will then be sent back to the sender.
After the subsequent exchange, the state of that data item at the sending node will be set exactly as it is in our infobase.
Changing the Node Structure of the Distributed Infobase
In conclusion, we need to point out that the mechanism of distributed infobases includes software tools to reconfigure the node structure of a distributed infobase.
Use the SetMasterNode() method of the ExchangePlansManager() object.
As a parameter for this method we pass a reference to the exchange plan node within the distributed infobase that becomes the master for the current infobase. We can also pass an Undefined value which means that the current infobase will have no master node.
Suppose we need to move one of the subordinate nodes to root (fig. 24.26).
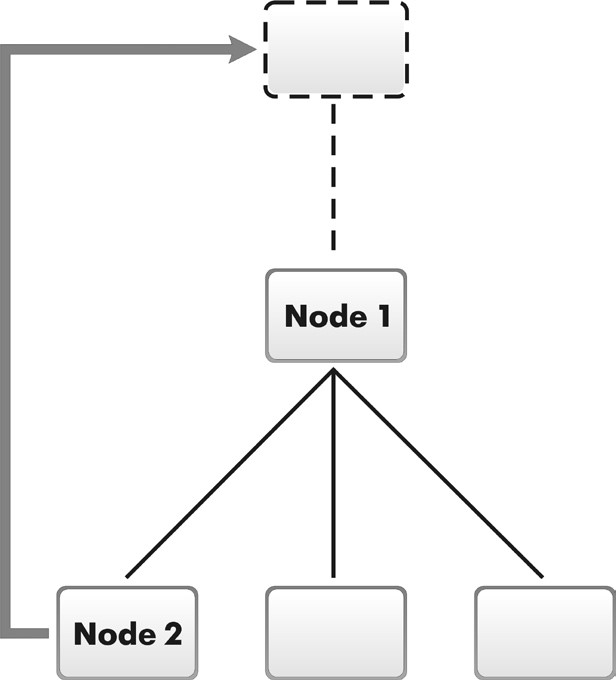
Fig. 24.26. Reconfiguring node structure
To do so (listing 24.34):
Listing 24.34. Moving Node2 to the tree root
// In the Node2 infobase
ExchangePlansManager.SetMasterNode(Undefined);

// In the Node1 infobase
ExchangePlansManager.SetMasterNode(Node2);
This code deletes all the Node1's configuration change registration records concerning Node2, so that we will only be able to disseminate configuration changes from Node2 to Node1. Data change records will not be deleted, since it will still be possible to execute data changes between these nodes.
In a similar manner you can use an Undefined value of the method parameter to detach an individual infobase or a sub-tree from the tree structure (fig. 24.27, listing 24.35).
Listing 24.35. Moving Node2 to the tree root
// In the Node1 infobase
ExchangePlansManager.SetMasterNode(Undefined);
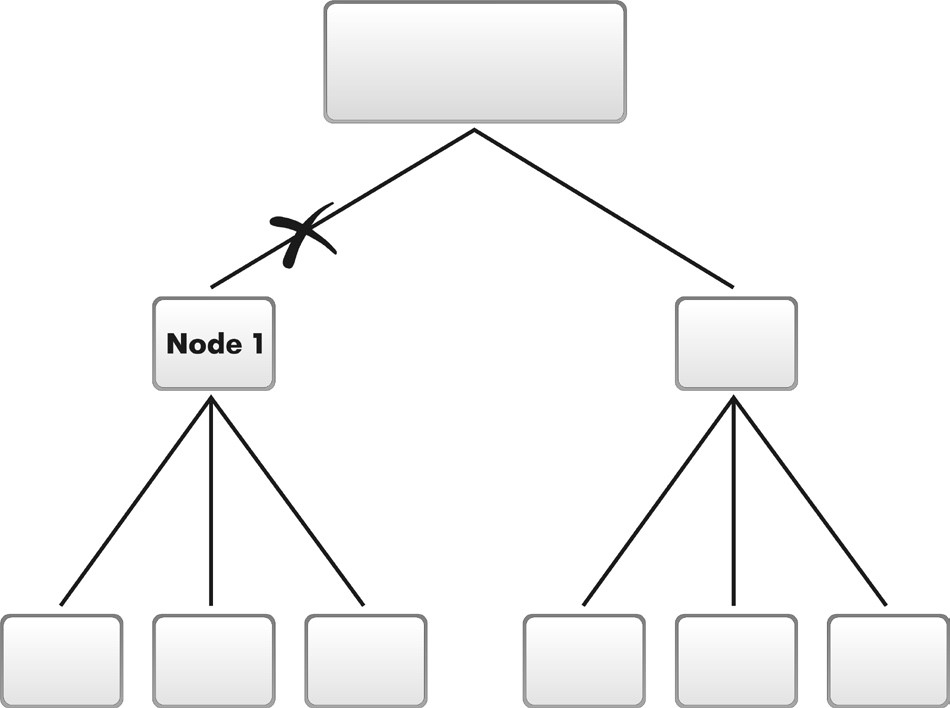
Fig. 24.27. Detaching a sub-tree from a distributed infobase
In addition, we can create a distributed infobase from individual infobases with identical configurations (fig. 24.28, listing 24.36).
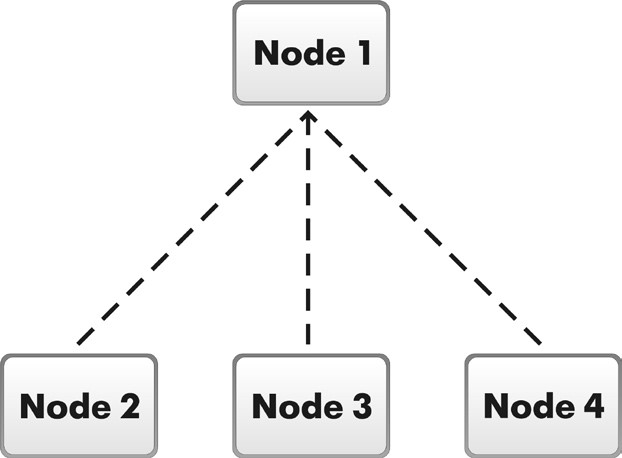
Fig. 24.28. Infobase Made up of Individual Infobases with Identical Configurations
Listing 24.36. Creating a Distributed Infobase from Infobases with Identical Configurations
// In the infobases of Node2, Node3 and Node4
ExchangePlansManager.SetMasterNode(Node1);
Quiz
- What does the universal exchange mechanism consist of?
- What is the purpose of the Exchange Plan configuration object?
- What are the main components of an exchange plan?
- What are the exchange plan nodes?
- What is the content of an exchange plan?
- What data items support data exchange?
- What is AutoRecord?
- What is change registration intended for?
- How does message infrastructure work?
- What is XML serialization intended for?
- What is writing and reading of XML documents used for?
- How does one create an exchange plan?
- How does one set configuration up for data exchange?
- How does one implement data exchanges in the general case?
- How does one implement data exchanges in a distributed infobase?
- How does one use software tools to manage data exchanges in a distributed infobase?
- How does one change the tree structure of a distributed infobase?