
Lesson 25. Functional Options
Estimated duration of the lesson is 30 minutes.
CONTENT:
So now we have created a small-sized application that will let us automate operations at the Jack of All Trades maintenance company. Now here comes the change-up pitch.
The thing is that the staff at Jack of All Trades liked our application so much that they told their neighbors at the Beauty Queen makeup studio about it. The staff at the studio saw how our application works and then asked us to automate their operations as well.
Naturally, we were delighted to accept, for one simple reason: what we have created is a universal configuration, which is suitable for automation of almost any kind of service activities.
All that we now need to do for our configuration to operate in a makeup studio is simply create a new infobase with our configuration and populate it with new data, including employees, new products, etc. All the accounting tools we have created are not linked to any specific features of a company so they can easily be used in any other company involved in similar activities.
So, even if the makeup studio management wants to have some additional functionality, all we will need to do is update a few of our configuration's modules. This will be much more efficient that recreating an application from scratch for this specific company.
But at the same time a makeup studio may not need some of the features that are already available in our configuration.
So what does one do? Does one delete unneeded configuration objects and code?
This may take a lot of time and efforts. Real-life configurations may include a large number of configuration objects. And they may have complex interconnections.
This is why 1C:Enterprise 8 supports the mechanism of functional options that makes it possible to enable or disable entire functional blocks without changing the configuration itself in the process of implementation.
Functional options enable a developer to separate some functionality of an application that can be enabled or disabled in real time in the process of deploying and/or during operation.
The Accounting and the Payroll Options
Suppose that for some reason the makeup studio does not have accounting and payroll. To disable these features, we will now create functional options named Accounting and Payroll, assign these options to appropriate configuration objects and disable them in the 1C:Enterprise mode.
So even in an absolutely the same configuration, the application of the makeup studio will have all the actions related to payroll and accounting invisible as if they don't exist at all.
In the Designer Mode
Since values of functional options should necessarily be stored somewhere, we will first add constants named Accounting and Payroll of the Boolean type where the functional option values will be stored (fig. 25.1).
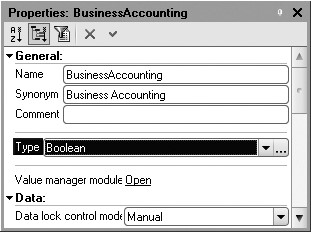
If the constant value is True, the functional option is enabled. If the value is False, the functional option is disabled.
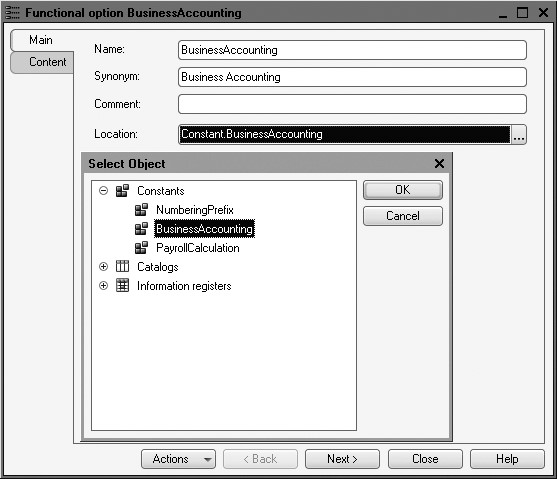
Now expand the Common branch, highlight the Functional Options branch and create functional options named Accounting and Payroll with their respective constants specified in the Location property (fig. 25.2).
Now you need to connect configuration objects to functional options.
The following objects are related to accounting in our configuration:
- ExtraDimension catalog,
- InputOpeningProductBalances document,
- TrialBalance report,
- ExtraDimensionTypes chart of characteristic types,
- Main chart of accounts,
- Management accounting register.
On the Content tab check these objects for the Accounting functional option (fig. 25.3).

Fig. 25.3. Content of the Accounting functional option
The following objects are related to payroll in our configuration:
- WorkScheduleTypes catalog,
- EmployeeAccruals document,
- EmployeeAccruals report,
- Recalculation report,
- AccrualsChart report,
- MainAccruals chart of calculation types,
- WorkSchedules information register,
- Accruals calculation register.
On the Content tab check these objects for the Payroll functional option.
Now if you open configuration object editor for the ExtraDimension catalog or any other configuration object that is part of the Accounting functional option, this option will be enabled on the Functional Options tab of the object's editor (fig. 25.4).
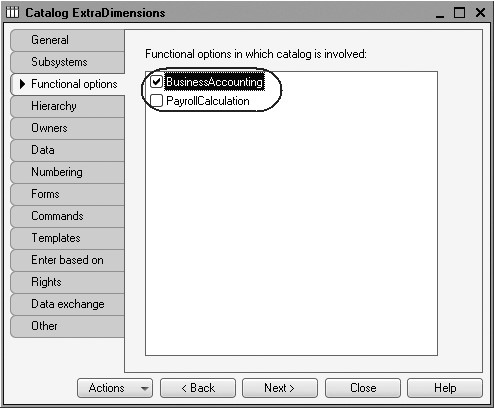
Fig. 25.4. Value of functional options for accounting objects
So display of configuration objects in the application interface depends on if their respective functional options are enabled (their appropriate constants are True).
For the objects related to payroll you will see the Payroll functional option enabled on the Functional Options tab of the object editors.
For the rest of the configuration objects the Functional Options tab has nothing selected. If a functional option is disabled for an object, this object does not depend on the value of this functional option and is always displayed (fig. 25.5).

Fig. 25.5. Assigning a functional option for independent objects
NOTE
If you include some subsystem into a functional option, you will not see the respective section in the 1C:Enterprise at all if this functional option is disabled.
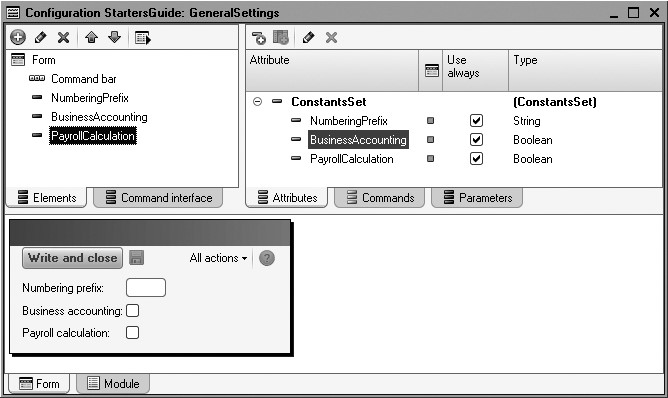
Now expand the Common Forms branch and open a common form of constants. We have already created this form with GeneralSetup as a name on the previous lesson and it already contains a constant NumberingPrefix.
Now we need to add new constants to this form to be able to later open the constant forms in the user mode and change the values of functional options.
On the Attributes tab of this form expand the default attribute ConstantsSet and drag the constants named Accounting and Payroll to the form controls window (fig. 25.6).
In the 1C:Enterprise Mode
Launch 1C:Enterprise in the debugging mode and test operation of the functional options.
In the action panel of the Enterprise section click General Setup.
In the constants form that opens you see that both constants are False (fig. 25.7).

It means that respective functional options are disabled.
True, in the Accounting and Payroll sections we don't see commands involved in accounting and payroll (fig. 25.8).
So if after a while the management of the makeup studio decides to start using payroll, their administrator will simply enable respective Payroll option for everything to work. (fig. 25.9).
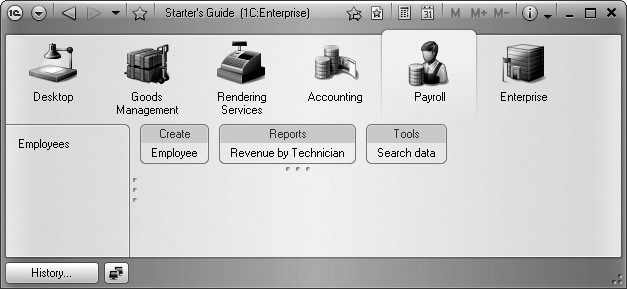
Fig. 25.8. Interface of the Payroll section
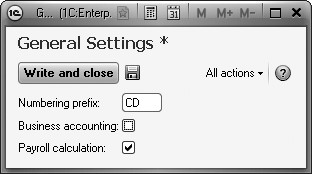
Fig. 25.9. Changing functional option value for Payroll
The only actions involved are saving the changed value of the constants and restart 1C:Enterprise for the platform to apply a new interface.
This will result in the following appearance of the Payroll section (fig. 25.10).

Fig. 25.10. Interface of the Payroll section
And if we enable the Accounting functional option as well, the initially developed for the Jack of All Trades application interface will be restored.
This is how an application can be quickly and easily customized in compliance with the customer requirements.
The Client Accounting Option
Note that functional options may influence the appearance of the application forms in addition to the application command interface. Besides, functionality can be enabled/disabled without restarting client application. If you also keep in mind that you can work with functional options in the 1C:Enterprise script, you will understand that functional options may make deployment and customization processes simple and straightforward even for an inexperienced user.
Now we will discuss another example.
It does not always make sense to record customers with their names when rendering services. Often only the fact that a service is rendered matters while the personality of a customer does not.
So we will provide a feature in our configuration to disable maintenance of a customer list to prevent users from having to specify the client every time a service is rendered.
We will also update existing functional options by including the subsystems Accounting and Payroll in these options. This is needed for the solution to actually be complete: if accounting is not needed, it should not be present anywhere.
In the Designer Mode
Open the content of the Accounting functional option and add the Accounting subsystem here.
In a similar manner add the Payroll subsystem to the Payroll functional option (fig. 25.11).
Now we will proceed to creating a new functional option.
Add a new constant named ClientAccounting to store this option.
It will have Boolean type (fig. 25.12).

Fig. 25.11. Contents of Payroll and Accounting functional options

Fig. 25.12. ClientAccounting constant
Add a functional option named ClientAccounting and specify that its value will be located in the ClientAccounting constant (fig. 25.13).

Fig. 25.13. ClientAccounting functional option
Now on the Content tab specify the objects that will be included in this functional option.
First of all it is the Clients catalog.
Also it is Client attribute of the ServicesRendered document.
Finally, it is Client dimension of the Sales accumulation register (fig. 25.14).
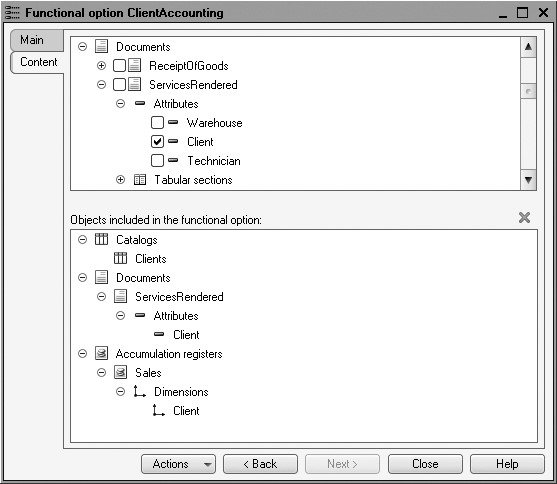
Fig. 25.14. Content of ClientAccounting functional option
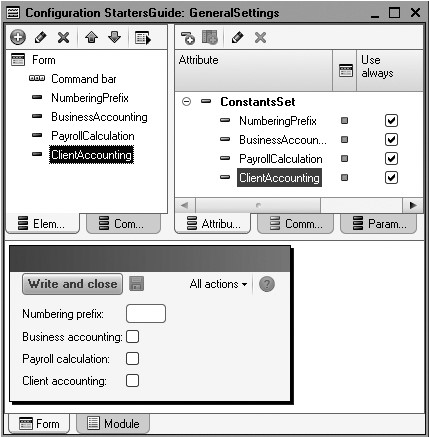
Now we will update the GeneralSettings common form that is used to specify values for functional options.
First of all, drag the new ClientAccounting constant into the form controls (fig. 25.15).
Next ensure that the application interface will be updated after new values of functional options are applied.
To do so, in the form controls tree select its root (Form), locate the AfterWrite event of the form and click Open in the text box of this event.
In the form module that opens in the handler for After Write event of the form enter a single line (listing 25.1).
Listing 25.1. AfterWrite form event handler
&AtClient
Procedure AfterWrite(WriteParameters)
	RefreshInterface();
EndProcedure
RefreshInterface() is a global context method that updates command interface, desktop and opened forms in compliance with current values of functional options and their parameters.
To make it as easy and simple as possible to test how functional options operate, we will make it so that opening this common form does not lock main software window.
Now if you open the GeneralSettings form in the 1C:Enterprise mode, you will be unable to toggle anything in the main software window because it is locked while the form is opened.
This happens because by default the form wizard selected Block Owner Window for the property WindowOpeningMode.
So navigate to the Form tab, highlight the root item in the form controls tree, in the properties palette find WindowOpeningMode and select Independent for its value (fig. 25.16).

Fig. 25.16. WindowOpeningMode property
In the 1C:Enterprise Mode
Launch software in the 1C:Enterprise mode.
In the Enterprise section click General Setup.
In the main window navigate to the Rendering Services section and click Services Rendered.
Open any Services Rendered document, e.g. No. 3 (fig. 25.17).
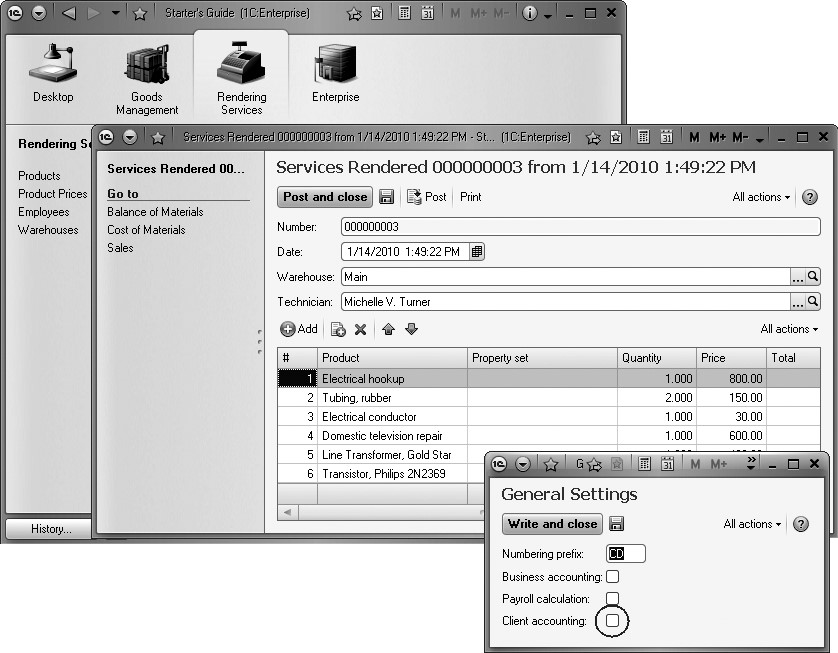
Fig. 25.17. ClientAccounting functional option disabled
The Client Accounting functional option is disabled.
So the document does not have the Client field, navigation panel of the Rendering Services section has no Clients command while its action panel has no command Client to create a new client.
In the General Setup form select Client Accounting and click the Save icon (next to the Save and Close button).
The application interface changes (fig. 25.18).
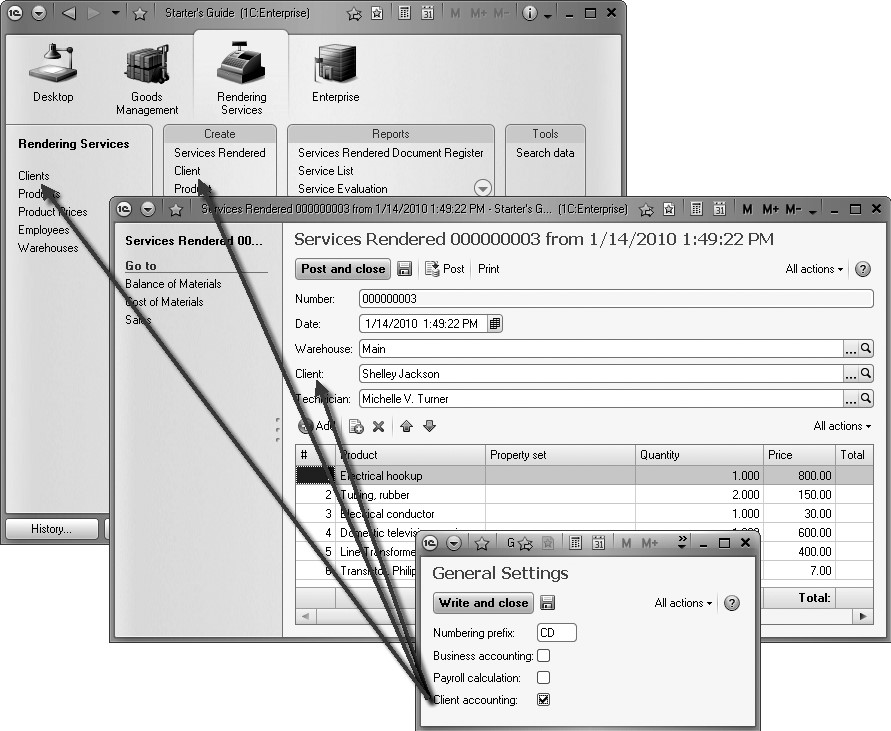
Fig. 25.18. ClientAccounting functional option enabled
The Client Accounting functional option is enabled.
The document has the Client field, the navigation panel and action panel of the Rendering Services section now have commands to work with the Clients catalog.
In a similar manner you can toggle various functional options yourself and note how application interface changes.
So we have actually completed the development of our configuration.
The next two lessons are devoted to individual development methods that are frequently used in the 1C:Enterprise 8.
Some examples will have multiple versions so it is up to you to decide which of the versions you will use in the existing configuration.
Quiz
- What is a functional option? What is a functional option intended for?
- How does one modify application interface using functional options?