Tutorial: designing configuration structure
At the stage of configuration structure design, you are going to implement as many features as you can using the standard platform mechanisms. This requires almost no programming. You will have to start programming later, when you need to process data or customize interface features.
You will perform the development in managed application mode. Therefore, before you start, you have to set up Designer and the configuration itself.
1. Configure Designer for the development of managed applications.

2. Define rules for object creation in a managed application.

The tutorial parts that describe creation of configuration objects will only cover topics related to data storage structure.
Using common applied objects
The first step towards development success is the correct choice of configuration objects. We will discuss other steps later.
There are lots of subject entities that you can use in different areas of accounting and document flow at the same time. We will talk of configuration objects for storing these entities as of common applied objects.
Constants
Constants are application objects storing data values that do not change in time, or change rarely, while legacy values are no longer required in the infobase. Each constant provides storage for a single value.

Task 3
Create a constant in the configuration to store the value of the Company name parameter. The parameter will be entered as plain text, up to 1024 characters. The parameter value is ALPHA.
Solution
1. Right-click the Constants item in the configuration tree, and then click Add.

2. Specify the name, synonym, length, and type.

3. Run the application in the 1C:Enterprise mode, enter the value "ALPHA", and write it.

Task 4
Create a constant in the configuration to store the value of the Connection limit parameter. It is a number in the range between 0 to 5. The parameter value is 3.
Solution
1. Right-click the Constants item in the configuration tree, and then click Add.

2. In the General property group, specify the name, synonym, and type.

3. Specify the numeric value range in the Presentation group of properties.

4. Run the application in the 1C:Enterprise mode, enter the value "3", and write it.

If you attempt to enter a value that is out of the specified range, the following warning will appear:

 Task 5
Time: 20 minutes
Create the following constants:
|
# |
DESCRIPTION |
DATA TYPE |
VALUE |
|
1 |
ActivityBeginDate |
Date (composite date) |
01.01.1980 |
|
2 |
MaintainInventoryAccounting |
Boolean |
True |
|
3 |
CompanyLogo |
ValueStorage |
|
|
4 |
TechnologyServicesDayOfWeek |
String (10) |
|
|
5 |
DataExchangeInterval |
String (10) |
|
|
6 |
ParentOrganization |
String (10) |
|
Enumerations
Enumeration is an auxiliary data type that is not used separately, but often used together with other data types.
Enumeration objects store value sets that should not be changed at run time.
You can create as many enumerations in your application as you want.

To simplify viewing of enumeration data, the platform supports two kinds of enumeration forms: list form and selection form. The list form gives you advanced view of the enumeration values, while the selection form presents enumeration values in a format that makes selecting one of them easier (unless the list is too long). You can select an enumeration from a form, or by using the quick selection feature.
You can use enumerations to eliminate possible errors (the human factor) when all possible values are known.

You can specify enumeration values only by entering them in Designer. You cannot create, modify, or delete enumeration values at run time. Names of values are unique, and you can use synonyms to present values in various locales. If a synonym is not set, the presentation is created automatically based on the value name (consider this when developing multilanguage applications).
If you cannot determine a complete set of possible values in advance, do not use enumerations because otherwise your users will not have the option to add their own values at run time.
Task 6
Redefine the method for setting the MaintenanceDayOfWeek constant from specifying a string value to selecting from a set of possible values.
Solution
1. Create an enumeration called DaysOfWeek.

2. Specify that the values for the MaintenanceDayOfWeek constant should be chosen from the enumeration you have created.

3. On the Data tab, add the enumeration value as shown on the following figure:

 Task 7
Time: 3 minutes
Add the following data as values of the enumeration DaysOfWeek:
|
NAME |
SYNONYM |
|
Day2 |
Tuesday |
|
Day3 |
Wednesday |
|
Day4 |
Thursday |
|
Day5 |
Friday |
|
Day6 |
Saturday |
|
Day7 |
Sunday |
Create another enumeration named Gender with the following values:
|
NAME |
SYNONYM |
|
M |
Male |
|
F |
Female |
Catalogs
Catalogs are used mostly to store lists of relatively constant data. For example, value sets that allow adding data, such as lists of goods and materials, employees, contractors, and so on.

Catalogs can have hierarchical structure. The number of hierarchy levels can be unlimited, or you can use platform tools (with no programming) to limit the number of levels up to 10:

A hierarchical catalog can have a group or an item as its parent:

A catalog can be subordinate to another catalog, chart of characteristic types, chart of calculation types, or chart of accounts, or to several objects at the same time:

Groups inside a parent catalog can have subordinate items in other catalogs:

The length of the standard catalog attribute Code is limited by 50 characters for string values and 38 characters for numeric values. The length of a catalog description must not exceed 150 characters. If the code length or catalog description length is set to 0, these attributes are disabled.

You can use the properties palette to set an additional parameter Allowed Length for a string code.

Catalog items can be presented at run time (for example, in selection fields) only as codes or descriptions:

You can use the standard platform feature Check uniqueness to ensure that catalog codes are unique.

Depending on the catalog settings,
some standard (system) attributes are enabled or disabled. You can view and customize these attributes in the
list of standard attributes in Designer:

Names of standard attributes are predefined and cannot be changed. However, you can specify their synonyms.
Besides the standard attributes, you can also define attributes and tabular sections to implement the business logic of the application. Tabular sections of a catalog are responsible for storing data that is related to specific catalog items but does not need to be referenced from other objects.
A catalog can have any number of attributes and tabular sections.

An attribute is a property of an item with a single value.
A tabular section is a property of an item with multiple values.
You can define how an attribute or a tabular section should be used.

In some cases you might need to enable attribute indexing:

Catalog attributes can have the following data types: primitive, reference, composite, ValueStorage, and UUID:

When you define an attribute, you can set the default attribute value for new items.
For primitive types:

For reference types using predefined items:

1C:Enterprise 8 catalogs may contain predefined items and groups of items (for hierarchical catalogs):

They can be used, for example, to directly reference a specific catalog item (by its name) in Designer, or to set some items explicitly at the development stage.
Predefined items cannot be deleted by users working in 1C:Enterprise mode.

When a predefined item is deleted in Designer, the item is not deleted physically. Instead, it is transformed from a predefined item into a common one marked for deletion. A common item marked for deletion can be deleted physically later (only at run time).
Only basic properties (name, code, and description) can be specified for predefined items in Designer.

You can use the item name in script expressions.

Values of other attributes of a predefined item are specified in 1C:Enterprise mode.

The icons of predefined items in 1C:Enterprise mode look different from the icons of user-created items.

The Designer operates with configuration objects, while 1C:Enterprise (runtime) mode operates with catalog items.

You can delete an item using the platform user interface:

or using the script:

The platform supports interactive object deletion (by pressing Shift+Del). However, this feature is disabled in standard solutions by user right settings. It can be very useful if enhanced with custom algorithms.
Do not confuse marking for deletion with the actual deletion of an object. If an item (or a group) is marked for deletion, it will remain in the catalog but will be shown with a special mark.

Items with deletion marks are included in the search and, in most cases, are visible to users. To delete the catalog item completely, in the All functions list, under Standard, click Delete Marked Objects.

Task 8
In this exercise you will optimize setting the value of the DataExchangePeriod constant by selecting values instead of entering a string. You will let users to select values from the options defined at the development stage (in Designer) and implement a feature to let users extend the list of available options in 1C:Enterprise mode. In this case enumerations will not do anymore, so we are going to use a catalog. However, from the users' point of view it looks the same as when we used the MaintenanceDayOfWeek constant.
Complete the previous examples before proceeding with this one.
Solution
1. Create a catalog named TypesOfExchangePeriodicity.

2. Change the constant type to CatalogRef.TypesOfExchangePeriodicity.

Next, let us customize the TypesOfExchangePeriodicity catalog to set up user interaction pattern similar to working with enumerations.
3. Turn on the standard platform feature Check uniqueness to ensure that catalog codes are unique. Select to use the standard attribute Code as a string and disable the standard attribute Description. Set the default presentation to As code.

4. Change the code synonym (its name as it is displayed to users) and enable the system fill check for your code.

5. Turn off code autogeneration for new catalog items.

6. Enable quick selection of this catalog upon all calls and disable input by string by description.

7. Create a predefined item (which is similar to enumeration value).

8. Check the result in the 1C:Enterprise mode.
You can see the Value column in the list, and the Value field in the item form. If a user attempts to create an item with the existing value (code), the platform displays a warning:

Let us add a new value Once An Hour to the catalog at run time.
You can select values while editing a constant in the same way as you did with enumerations:

Task 9
To learn catalogs a little deeper, optimize setting the value of the ParentOrganization constant and create the Contractors catalog. Select data for the constant from the Contractors catalog, but only from items that represent branches of your organization (for which the Branch property is TRUE). Use the quick selection mode for the ParentOrganization constant. In other catalog calls the selection mode can be different.
Solution
1. Create the Contractors catalog.

2. Change the value editing method for the ParentOrganization constant to using the Contractors catalog.

3. Create an attribute named Branch with the Boolean type.

4. Limit value selection options for the ParentOrganization constant.

As a result, you will have the following setting:

5. In the Quick choice list, select Use to enforce quick selection of values without opening a selection form when editing the constant value.

6. Switch to the 1C:Enterprise mode and create the following items in the catalog:

While filling the constant values, you only see the items marked as branches:

Now you will learn how to work with hierarchical catalogs. Let us optimize the way of storing data in the Contractors catalog. Define this catalog as a hierarchical one with a limit of 2 hierarchical levels and two predefined groups, Businesses and Individuals.
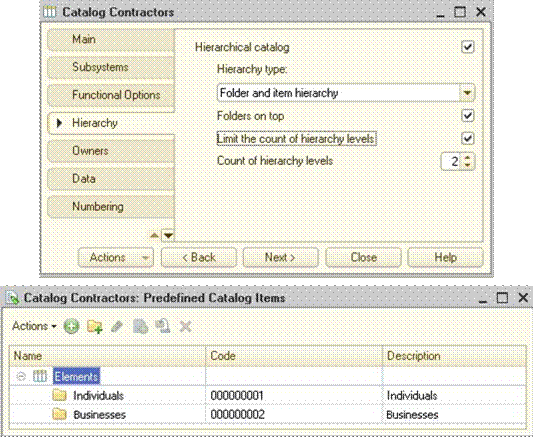
Enable the use of hierarchical data storage structure:

If you attempt to update the configuration, you will see the following warning:

In 1C:Enterprise mode, move the elements to the Businesses group:

Next, create an item named Smith in the Individuals group:

Disable creation of new groups and creation of new items in the catalog root by turning on the fill check for the Parent field:

Now hierarchy limitations will prohibit users from creating new groups within the existing groups. Creating a new group in the root folder is also impossible, since there is no way to fill the Parent field of this group.
For user convenience, set the synonym Included in the group for the Parent field:

Task 10
Enable the quick selection of contractors by their TIN (in the form for editing the value of the Parent Organization constant).
Solution
1. Add an attribute named TIN:

2. Customize the attribute type (String, 9 characters, fixed length). Enable indexing; you will need it for quick input. Customize the value input by setting a mask (digits only):

3. Add TIN to the Input by String box, and remove Code from this box.

4. To check the result at run time:
Fill in TIN for our items.

Navigate to Parent Organization constant and enter 90 in the box.

Due care should be taken when creating catalogs, since incorrect design of catalog types and their properties may result in the need for excessive programming and limited business logic of your applied solution. Let us review a similar situation with the Contractors catalog that you created earlier.
We can see that this catalog is intended for storing data about our accounting objects (contractors, in this case). However, these objects may be presented with different object entities in the system.

On the other hand, data duplication in the Contractors catalog may cause accounting problems, while duplication is strictly necessary for customer and vendor bases. As far as the timeframe is concerned, the customer and vendor may start cooperating with the company before the contractor, which makes use of the subordination mechanism impossible.
Let us create the following catalogs to deal with this task: Customers and Vendors.
Add the Contractor attribute to catalogs Customers and Vendors.

Task 11. Creating and Using Catalogs
1. Create attribute AllowReserve for the Customers catalog and set the value for new items to TRUE.
2. Create the Items and UnitsOfMeasurement catalogs with the following data:
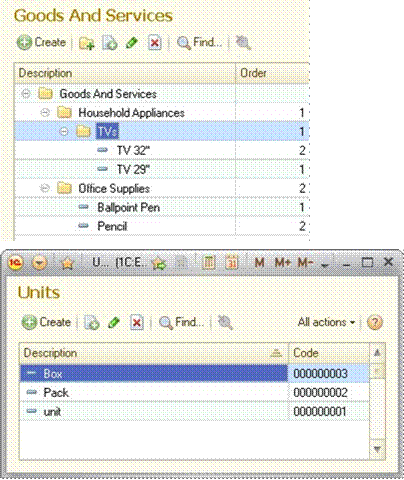
3. Create catalog Contacts and make it subordinate to catalogs Customers and Vendors. A contact may be assigned for a group of customers. Contacts are numbered individually (for each owner) and checked for uniqueness, and the numbering is generated automatically by the platform.
Input the following data:

4. Create a hierarchical catalog Positions that contains a predefined group Managers, and enable creation of groups at the root level only.
Input the following data:

5. Create catalog Agreements and make it subordinate to catalogs Customers and Vendors. An agreement can be assigned to a catalog item only. Disable using the code, and set the maximum allowed description length. Use the following structure of attributes and tabular sections:
|
TABULAR SECTION |
ATTRIBUTE |
TYPE |
|
|
StartOfActivity |
Date |
|
|
EndOfActivity |
Date |
|
|
Manager |
CatalogRef.Positions |
|
|
CustomerRepresentative |
CatalogRef.Contacts |
|
Details |
StartDate |
Date |
|
Details |
EndDate |
Date |
|
Details |
Item |
CatalogRef.Items |
|
Details |
Amount |
Number (10, 3, nonnegative) |
|
Details |
Total |
Number (10, 2, nonnegative) |
For the Manager attribute, enable quick selection of items from the Managers group.
For the CustomerRepresentative attribute, restrict the selection to contacts that are related to the owner of the agreement.
Input the following data:


6. Create catalog DocumentTemplates to store the following information:

7. Create the Accounts catalog to store data on contractor bank accounts.

8. Create the Contracts catalog to store the following information:
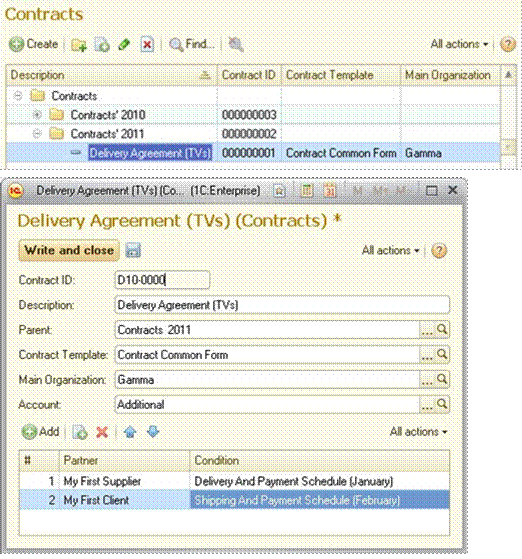
Contract number prefix D10- cannot be changed by end users.
A quick selection is used to populate the Condition column, with only the agreements related to the selected Partner shown.
Contract template is an item from the DocumentTemplates catalog. Templates are selected from group Document templates only.
Bank accounts are selected from the drop-down list of accounts that belong to the specified legal entity.
9. To add the capability to store retail store data to the groups of the Items catalog:
add the following data to the RetailStores catalog;

add the following data to the Items catalog (for groups in the RetailStores tabular section).

Information registers
An information register is an applied object for storing information that can vary depending on some conditions or time. For instance, you can create an information register to store inventory prices from the client’s perspective:
|
PRODUCT |
CLIENT |
PRICE |
|
Ballpoint pen |
Johns |
10 USD |
|
PRODUCT |
CLIENT |
PRICE |
|
Ballpoint pen |
Smith |
12 USD |
In all previous examples with constants, catalog attributes, and tabular section attributes you used unconditional values.
You know that catalogs can include tabular sections for storing multiple pieces of data based on any conditions. For instance:
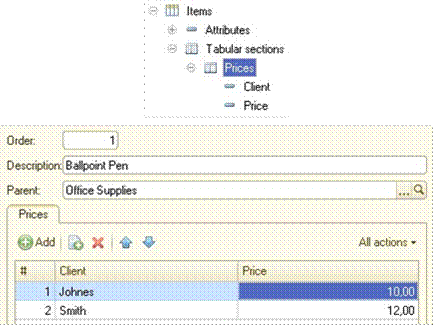
So why you might need information registers?
First, an information register ensures that the values for a certain combination of conditions are unique (this is done by the platform, with no programming), which is not available for tabular sections. Nothing stops you from creating one more entry for a client named Johns with a price of 15 in the tabular section of the catalog.

As a result, the system will not be able to determine which value is the correct one.
But what do you get from the system that uses an information register if you try to enter one more value for the same combination of conditions?

As you can see, adding another price value for the existing entry in the information register is prohibited.

Second, you can edit information register entries without changing the object itself. However, the object must be stored in the base (which is not necessary with tabular sections):

If you try to fill an information register without having your object stored in the base, you will see the notification telling that doing so is prohibited, and you will be prompted to record your data into the base to continue working with the information register.

However, if an object is stored in the base, you can fill the information register independently:

This feature provides the way to edit object properties without editing the object itself.
Third, you can bind the mere existence of the value with some conditions.
In a tabular section, the presence of a price value only depends on the presence a product card. If there is no product, there is no price.

However, nothing can stop you from omitting the Client or deleting the client's card from the base (unless you do not handle this issue programmatically):

You can avoid this by simply customizing the structure of an information register. It shortens the development time significantly and makes the logic of the applied solution more clear:

If these options are set, an information register entry related to a product or client is automatically deleted when the product or client is deleted. Specifying the product and client in a new entry is mandatory.
Finally, it is often required not only to store the current information in the database, but to remember the history of changes and be able to get the value from a given moment in time.
If you use a tabular section, you can add, of course, another tabular section attribute called On Date:

But what if you need to retrieve a value for a specific product and client for an intermediate date (e.g., January 10, 2011)? There is no value for this date in the tabular section. Therefore, you will have to develop an algorithm to get this value. Probably it would have to retrieve the value from the Price column of the nearest entry in the past that has the specified Product and Client values. To make it easier, the platform developers have provided you with such a feature in information registers.
Periodic registers are designed to deal with it.

The platform automatically adds the system dimension Period (of Date type) to the periodic information register. As a result, you can obtain both current object data and data from a specific moment in time.
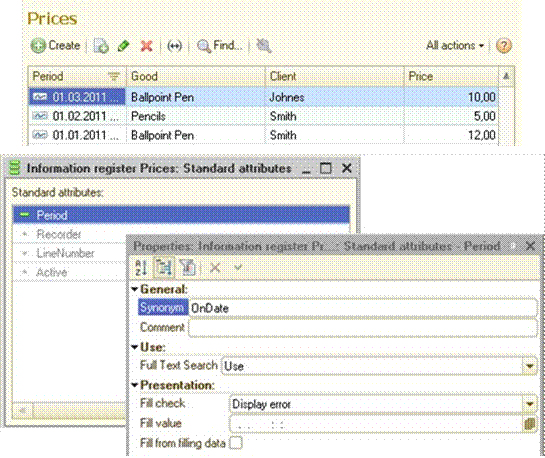
When you fill a periodic information register, entering a value in the Period box is mandatory. The following options are available:
• The user gets an error message about the empty value and is prompted to enter the mandatory data:

• The system fills the Period box with default data from the Fill value property:

When you enter data into an information register, the Period value is automatically set to the beginning of the specified calendar period.
For obtaining data from a specific point in time, you can select a special table during form development:

You can also use the script methods provided:

We will discuss these capabilities later in chapter "Creating a user-system interaction model" in part 2 of this tutorial, when talking about topics like platform interface features, scripts, and the query language.
Now you know about the main purpose and applications of information registers. Let us explore information register structure.
You can define the structure of an information register using the Data tab in the window for editing the configuration object, or using the metadata tree. The structure is defined by three types of subordinate configuration objects: dimensions, resources, and attributes.

Dimensions
Dimensions are used to define conditions for data stored in the information register. The order of information register dimensions is important. Place dimensions that you want to access quickly on the top of the list.
For dimensions, the following data types are supported:

It is recommended that you use the Master option for reference types in dimensions.

If a user deletes data from register dimensions with the Master option enabled, the entries are deleted from the register automatically, which preserves the reference integrity of the base.
If a dimension value is mandatory and you need persistent filling control (during both programmatic and interactive entry creation), you need to prohibit specifying empty values.

If you do not always need to prohibit empty values, but you still need this in some scenarios, use the following dimension option:

Resources
Resources are used for storing data. Information register resources can store the following types of data:

The type of data stored in a resource can also be determined by parameters of a chart of characteristic types (for more information about this, see section "Charts of characteristic types" on page 172).

Use this option to control how the resource value is filled:

Attributes
In addition to dimensions and resources, you can define attributes when you create an information register. Attributes contain service information for each register entry. Attributes can have the same data types as resources can have.
Attributes store additional service information, which helps users to understand the meaning of an entry quickly, or can be used by some of the algorithms of the applied solution.
Specifying attribute options is similar to specifying information register options.
However, to retrieve values using the script methods, the system uses dimensions and resources.
Attribute usage is discussed in more detail in the practical part of this section.
Creating information register records
The platform provides two methods for recording data to information registers:

Select Independent if you do not need to track why the entries appear in the information register.
Subordinate to recorder connects an entry with the document that registers the entry. In other words, the recorder is the reason why an entry appears in the information register. When this mode is selected, the following standard attributes become available:

This mode lets you use an additional periodicity option By recorder position. It allows recording even more detail than the Within a second option.

Now let us have some practice to reinforce your knowledge.
Task 12
Implement storage for the parameter that contains the current shareholder list. Shareholders are taken from the Contractors list, and the parameter values should be unique. No empty values are allowed, too.
Solution
To solve this task, you need an information register and the Contractors catalog that you have created before.
1. Create the Shareholders information register.

2. To ensure that the parameter values are unique, use the integrated feature for the uniqueness control in the information register dimensions. Create a dimension of reference type called Shareholder. Set the No Empty Values option to prohibit empty strings.

Then check how it works.
If you try to enter an empty register entry value, you will see the following warning:

You will also receive a warning if you try to enter a value that is not unique:

Then enter the correct data:

You have finished this task.
Task 13
Next, you have to register the offices of your company. Note that there are both headquarters and industry-specific branches. But for now, you are only interested in actual addresses of the offices. At run time, users should be able to add branches and link office addresses to them.
Solution
1. First of all, you need a nonhierarchical, nonsubordinate catalog to store the types of industries and to control the uniqueness of their names (use Code with the Name synonym).

2. Create a nonperiodic information register OfficesOfCompany with an independent record mode and the following structure:

To check how it works, enter the following data:

Task 14
Create an information register for storing the current additional settings of infobase users:
• workday start time;
• workday end time;
• company (to specify in documents and use as a separator for settings);
• person responsible (to specify in documents);
• greeting line (to enhance authorization);
• response line (to enhance authorization);
• program header;
• unique database user ID.
Solution
• Define the following structure for the UserSettings information register.
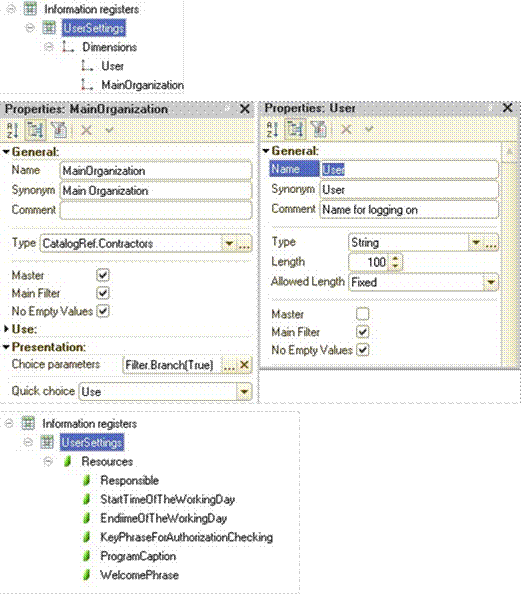
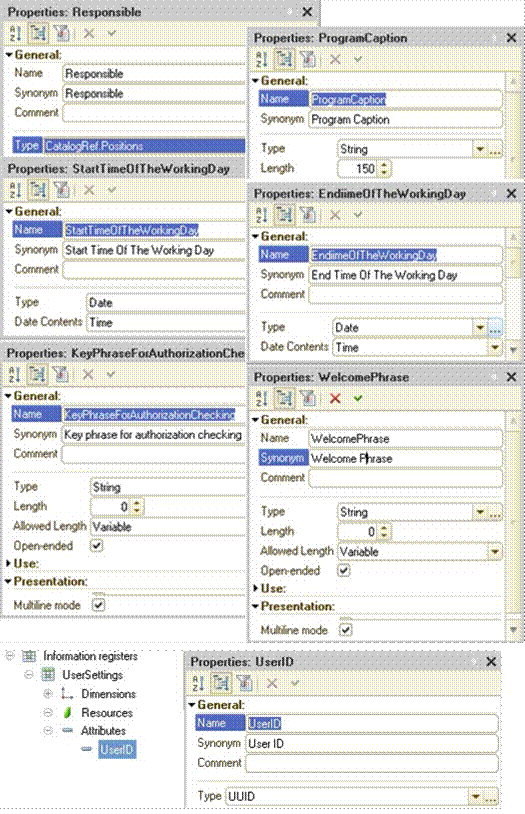
You will learn about customizing forms and determining user IDs later in this course.
Task 15
Creating and using information registers
1. Develop the Exchange Rates information register to store the history of exchange rates. An exchange rate changes once a day or less frequently. An exchange rate is a 7-digit number value with 4 digits after the decimal separator.
Add the following data:

2. Create an information register to store the lists of shareholders (shareholders are taken from the Contractors catalog). The list is updated annually.
Add the following data:

3. Create a register to store the information on the product range available at the stores. The data changes once a day or less frequently.
Add the following data:

4. Create a mechanism to store the following parameters of an enterprise: postal address, legal address, phone number. The history of changes (once a year) should be stored in the system.
Add the following data:

