Runtime tools
Comfortable user experience is a major target of a business application. A clumsy user interface might negate all your efforts on creating an optimized data storage structure and internal application streamlining.
Comfortable user experience includes the following:
• Quick and easy learning
The user is not afraid to use the new software, and the learning curve should be gentle. The software provides hints on actions that the user attempts to perform.
• Quick interface customization
Whatever forms we may create, users still have their individual habits, and a customizable interface eases adapting the software to their needs. Users feel more comfortable when they are given tools for customizing forms and the application interface.
(This may be compared to a driver adjusting the seat and rearview mirrors for him or herself).
• Quick data entry and search
Tasks such as customer service requests should be processed swiftly, especially when support is provided by phone.
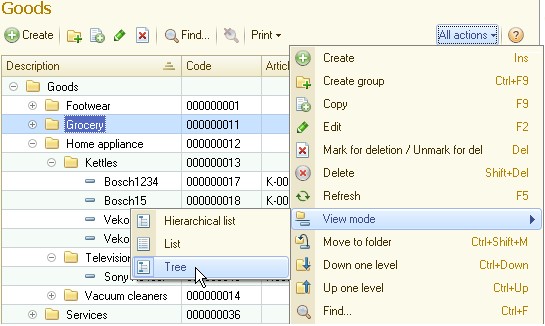
• Visually compelling data view
Users should be able to quickly find the information they need in a list. Therefore, the information should be presented in accordance with certain rules, hierarchically if needed, or filtered, or highlighted.
• Access restriction system
Commands whose execution would result in "access denied" messages should be hidden from the user.
1C:Enterprise 8 contains a number of tools and features that help you solve the abovementioned interface-related issues.
Window interface
The graphical tools available in 1C:Enterprise 8 ensure the highest level of efficiency for the following data presentation methods:
• MDI (multiple document interface) where windows reside under a single parent window.
The main application window is the window that is opened when the application is started in 1C:Enterprise mode.
• SDI (single document interface) where individual windows are handled separately.
Auxiliary windows include those that are opened by running commands that perform data input or object editing, as well as by running reports and data processors.
Task-oriented interface
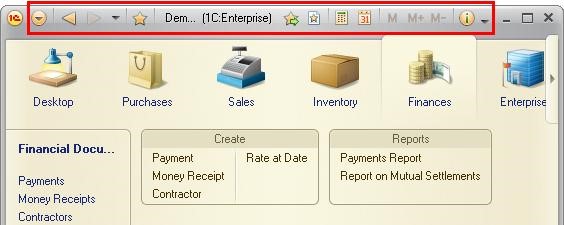
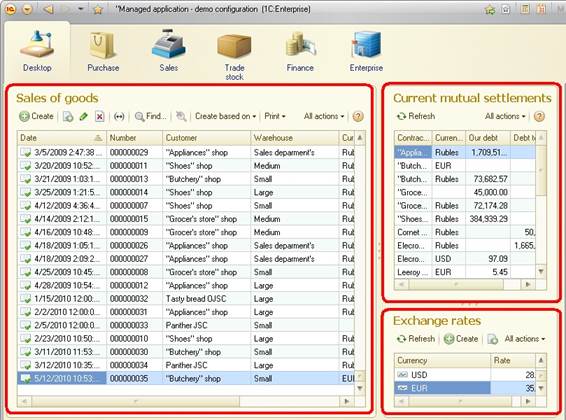
Users start their work from the main window. It contains a high-level view of the application structure (the Sections panel) and the Desktop:
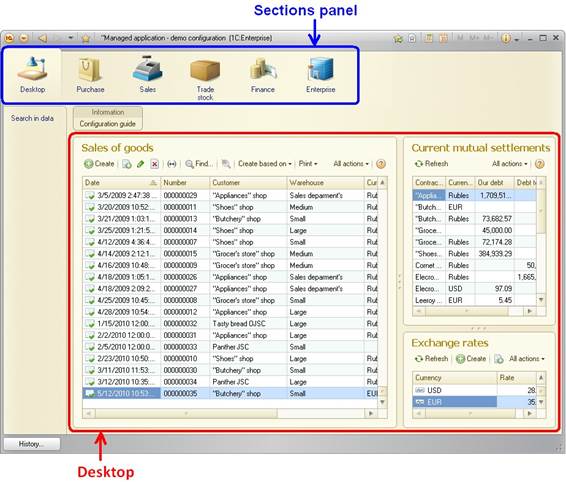
The Desktop is a standard application section that contains frequently used documents, reports, catalogs, and so on. This is a sort of user's assistant. Each working day starts with some type of interaction with the Desktop. The Desktop informs the user of what’s going on and answers the user’s questions, such as:
• What needs to be done today?
• What’s new?
• What requires attention?
The Sections panel shows the largest functionality areas of the applied solution. It is located in the upper part of the main window, and it contains the subsystems included in the configuration. It allows switching between the sections of the applied solution.
When you select a section, the entire functionality of the subsystem, including the embedded subsystems, is displayed as a set of commands grouped on two panels:
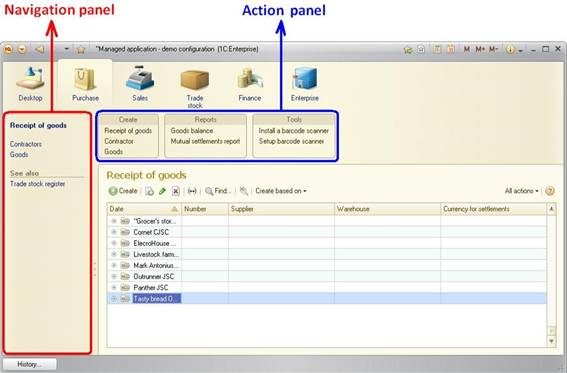
The Navigation panel can be referred to as the "contents" of a section. It contains commands that allow you to navigate to any part of the section. Navigation commands usually open lists. When you run a navigation command, the program displays the list in the workspace of the current section, replacing its previous content.
The Action panel contains the most frequently used commands for quick creation of new objects, performing standard data processing and building common reports. Such commands are called action commands because running them opens a new window and switches you to another task.
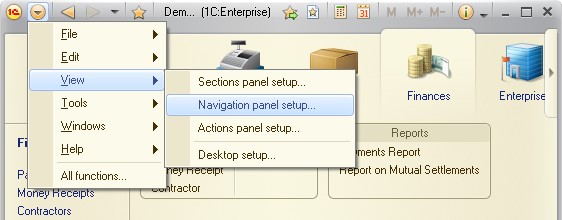
System commands
Buttons that run system commands are located in the title bar of the main window:
One of these buttons opens the main menu:
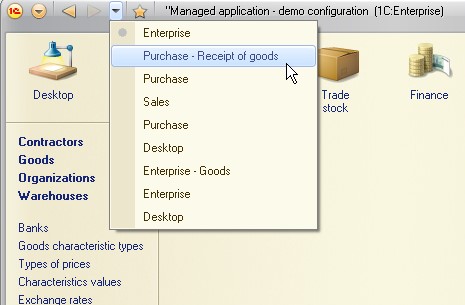
All your navigation choices are automatically saved in the history section of the main window, and you can move across them just like you do with the web pages in your browser history. You can use the drop-down list to view the entire list of navigation places and go to any of them:
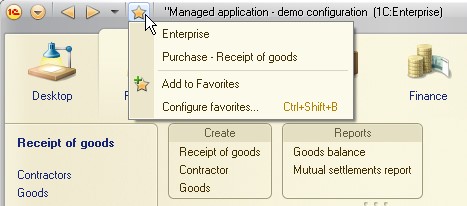
You can add any section, list, database object, report, or data processor to the Favorites menu, so that you can go back to them later:
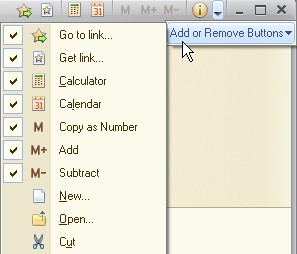
The right part of the title bar contains general commands that are not related to any particular application:
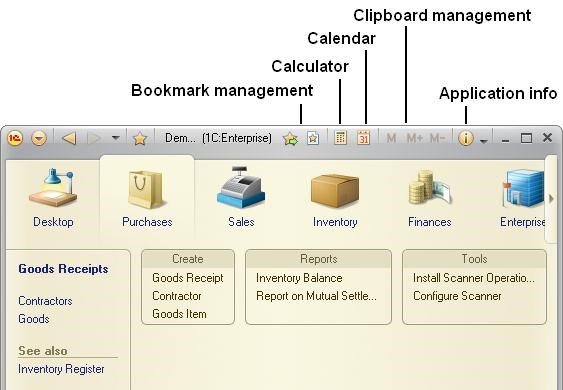
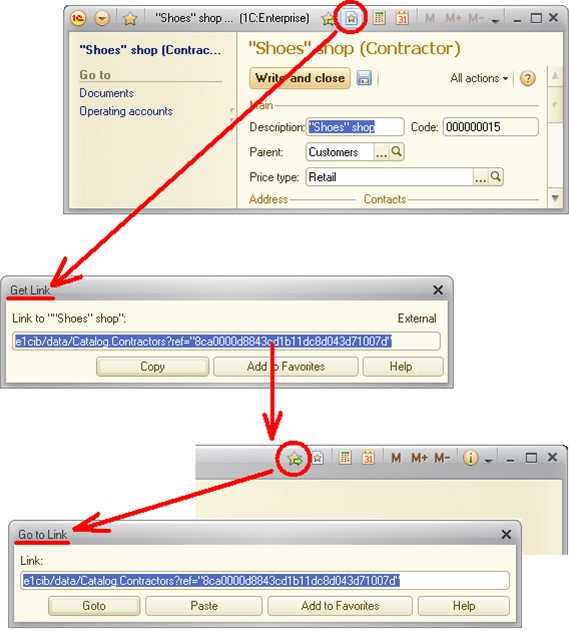
You can obtain a link to any section, list, database object, report, or data processor. You can send this link to your colleagues to let them quickly open the same data and make their changes.
You have the option to add other commands to the title bar.
Additional features
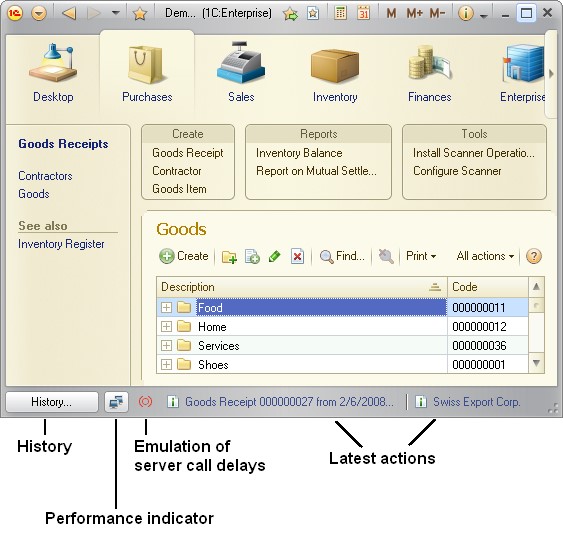
The Information panel is displayed in the bottom of the main window:
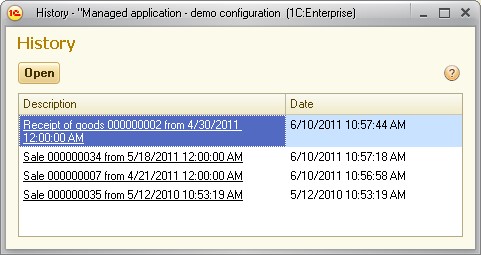
History is a common interface feature. It is provided by the platform and is available to users of any application. History contains the list of all user actions related to adding or editing data, including operations with catalog items, documents, and so on. You can always open the list of changes and navigate to any object listed there. It can be useful, for example, if you want to make sure that the data have been modified correctly:
Performance indicators are a development tool. They let the developer see the number and duration of server calls and the amount of data sent and received in real time, in 1C:Enterprise mode.

Server call delay emulation mode allows you to estimate actual performance of your application from the user’s side.
This mode does not require Internet connection. All you have to do is turn this mode on, and the platform (even in the file mode on a local computer) will start operating with the delays similar to delays of a real communication channel.
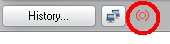
You can turn the server call delay simulation mode on or off while the client application is running. The session running in this mode is marked with an icon in the information panel.
Recent notifications is a feature designed for quick access to recently entered data. If the last action includes data modification, clicking the notification opens the form containing these data (for example, the form of a posted document):

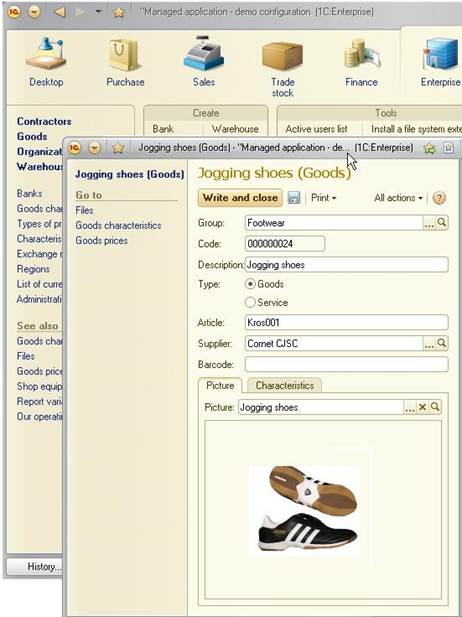
Managed forms
Managed forms are the essential feature for displaying data in 1C:Enterprise 8.2.
Managed forms can display information in the desktop area of the main window:
You can add or remove forms. However, you cannot add arbitrary forms. You only can add forms from the list created by the developer (the Available forms list).
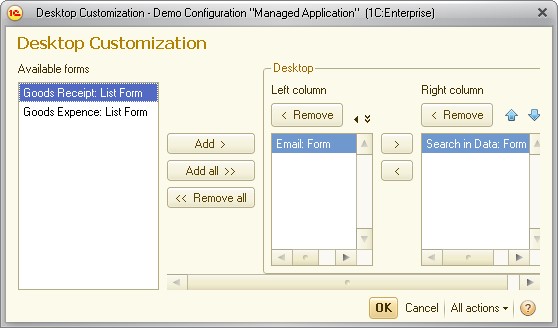
You can change the order of forms, or move them from one column to another (if your desktop has two columns). You cannot change the number of columns on the desktop.
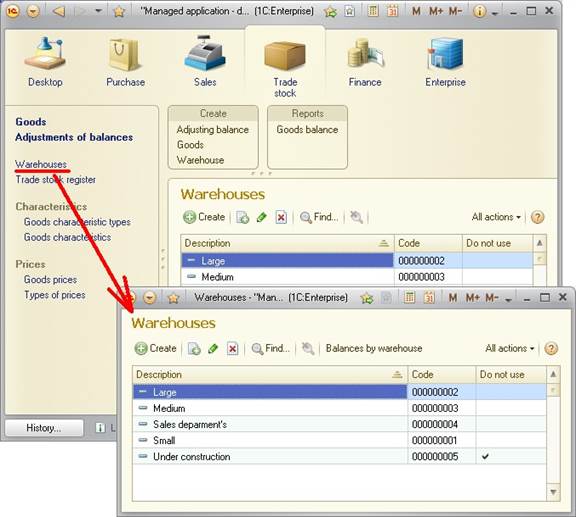
In a section, running a navigation panel command opens the associated list in the workspace area, replacing any previous contents of this area.
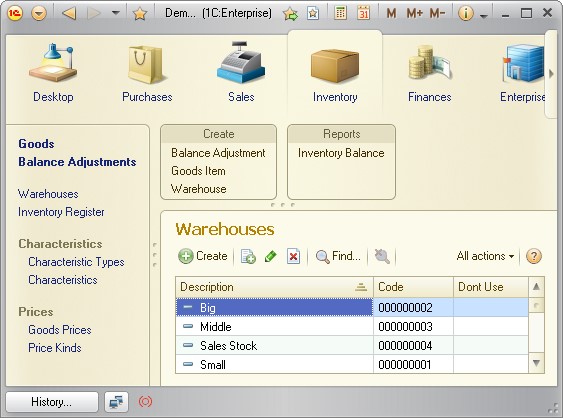
But you have the option to open lists in new windows:
The application dynamically creates managed forms. Users can customize the appearance of managed forms by using the Change form command.

However, this option only allows you to add or remove form elements that were defined by the application developer, or by form autogeneration rules:
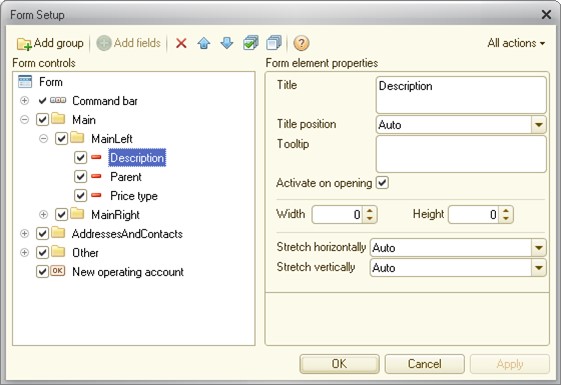
Therefore, if you want to add some elements to display new data, you have to create and use your own managed form:
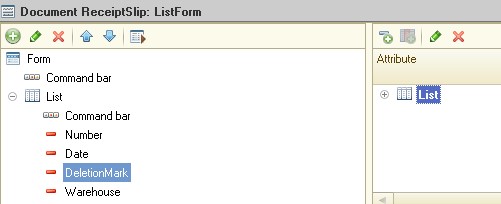
The added elements are displayed in the list of form elements that you can add or remove.
You may want to use a calculation formula to perform some actions in the form, like calculating the total price based on the number of items and their price.
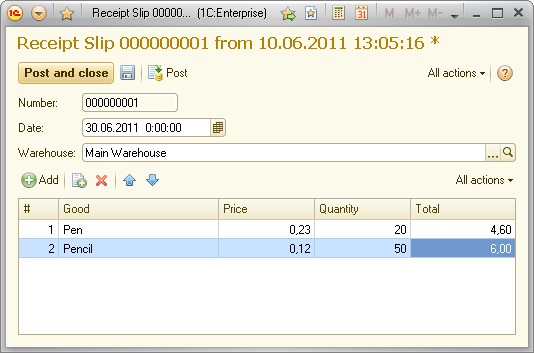
The platform itself does not know how the total amount should be calculated (information from the contract or the customer card may be needed, for instance). To deal with it, you will need a form created by the application developer with a calculation algorithm included:
&AtClient
Procedure SpecificationNumberOnChange(Element)
LineBeingChanged = Elements.Specification.CurrentData;
LineBeingChanged.Sum = LineBeingChanged.Count * LineBeingChanged.Cost;
EndProcedure
In addition to that, you have the option to customize the view of list items. You can change not only the column set, but also how lines are displayed.

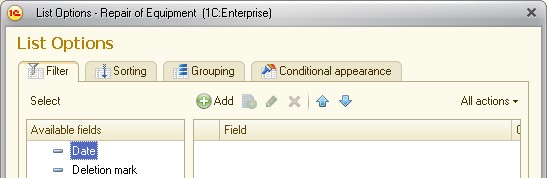
You have the following customization options:
• Filter (setting data display filters)

• Sorting (setting data sorting rules)
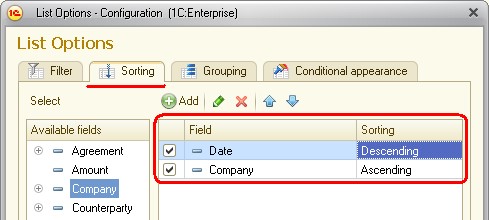
• Grouping (displaying data using hierarchies)
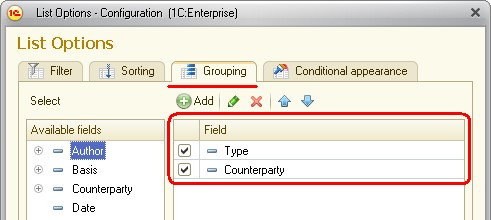
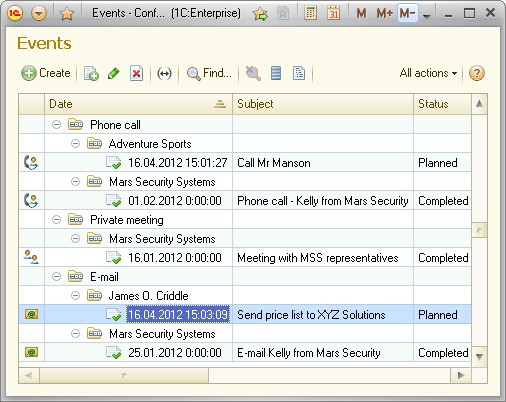
Any list can be shown hierarchically. Your data might look like this:
• Conditional appearance (modifying data display rules and choosing to show additional data)
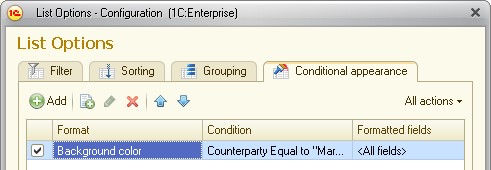
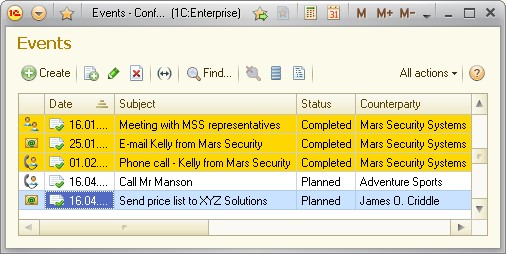
Your list might look like this:
Any of these settings can be defined both in development mode and individually for each user at run time.
You can also change the view of any list based on hierarchical data storage structure.