
Improving interface
Main section command interface
At the moment, only four commands and two tables are on the desktop. What if you want more? What to do if you want all application functionality to be at hand? You do not need to program anything for this, just set up the main section command interface.
In Designer, open Properties of the root node in the Configuration tree and click the Open link of the Main section command interface property.
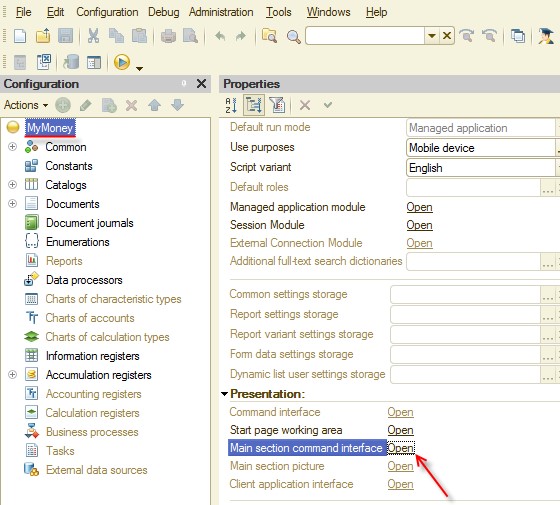
Figure 7-1. Main section command interface
You can
place configuration objects to Main
section command interface by
selecting check boxes of the Visibility column.
You can move objects up and down with the Move
up  (Ctrl+Shift+Up Arrow) and Move down
  (Ctrl+Shift+Down Arrow) buttons.
Place objects as it is shown in figure 7-2.

Figure 7-2. Adjusting main section command interface
See how Desktop looks now. Start the application in 1C:Enterprise mode.
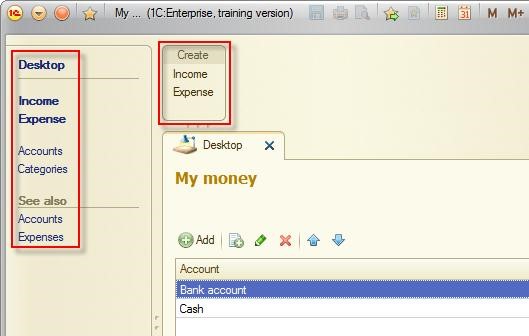
Figure 7-3. Main section command interface
Excellent! Now everything is at fingertips of users. By the way, using window separators, users can adjust the interface to move frequently used items up, which is very convenient.

Figure 7-4. Changing the form interface
Managed forms
If you analyze more precisely, many users start recording incomes or expenses with an amount and only then specify account and category.
On the mobile device, interface is even more important. If you take a look at all the forms that the platform generates automatically, you can see that not all items are interesting for users. For example, Number is not really important for users of your application.
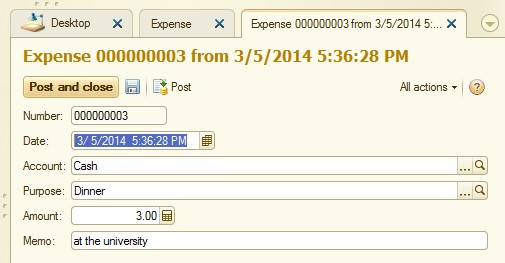
Figure 8-1. Automatically generated form
Now, when you run the application on the computer, the interface includes commands for quick document creation. On the mobile device, the command interface becomes the application main menu. That means these commands are unavailable on the desktop. Of course, a user can open the menu to get them, but it is not really comfortable. Therefore, it would be logical to supply the user with rapid document creation functionality.
It is time to solve both tasks using fine-tuning of the forms.
Adjusting document forms
Return to Designer. Start with the Income document. Up to now, all configuration object forms were generated automatically when a user required them. The only exception is Desktop, which you describes in Designer. To simplify financial activity registration, create and set up a form of the document.
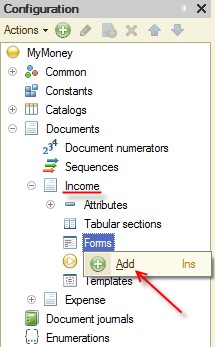
Figure 9-1. Adding a new document form
You already know how to add a new form. Once you click Add, the Document Form Wizard is opened. In our case, select Document form and then click Finish.

Figure 9-2. Creating a new form
Document Form Wizard generates the default form, similar to the one automatically generated in 1C:Enterprise mode (see figure 6-26).
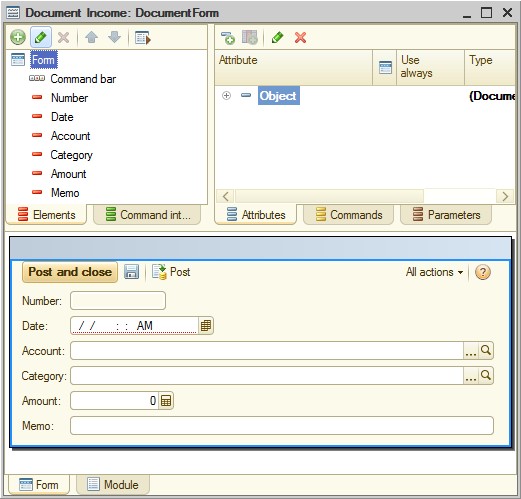
Figure 9-3. Adjusting a managed form
Customize the form to make the data input more comfortable.
Start with
removing the item that users do not need: Number.
To do it, click the Number item of
the form item list (the left upper pane) and click Delete current item  (Del).

Figure 9-4 Deleting a managed form item
Note. Deleting the form item does not delete the object attribute. In our case, you removed the presentation of a document number, but the document still has a number. You can easily check it, just expand the Object attribute branch of the document attribute list (the right upper pane) and you will see it. Even if the presentation is removed, you still can interact with the attribute, for example, through the script. You can always return the presentation to the form.
Once you delete a form item, the platform redraws the managed form. In our case, the form will look as follows:
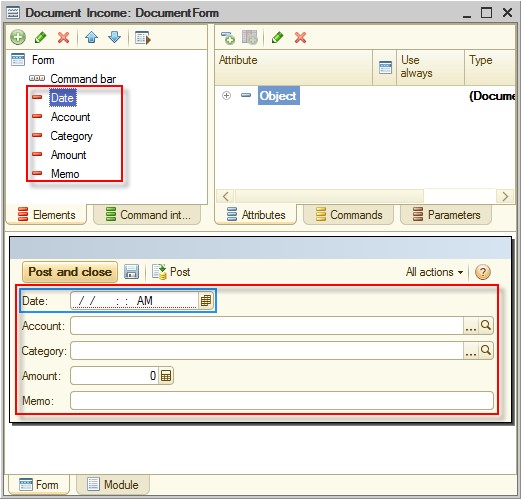
Figure 9-5. Adjusting a managed form
Besides removing unnecessary items, make presentations of other items more clear.
Move Amount to the top of the list.

Figure 9-6. Moving Amount to the top
Let us increase the font size of Amount to 14 and make this item activate by default. To set these parameters, open Properties.
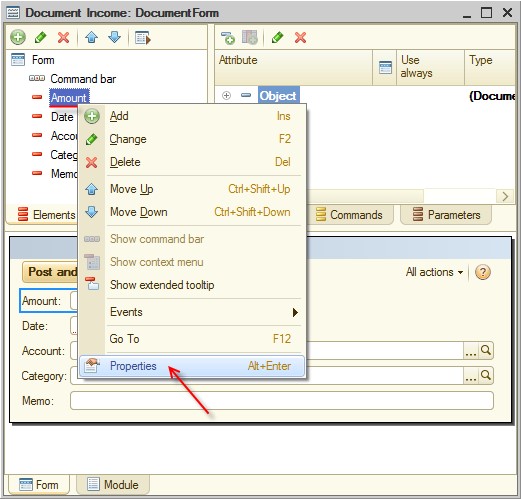
Figure 9-7 Form item properties
To set the
font, click the Select  button of the Font field.
Note. If you see property names (for example, DefaultItem) instead of property presentations (for example, Activate by default) in the property palette, right-click the property palette and then clear the Display property names check box.

Figure 9-8. Form item font
Clear the From style check box of the font size.
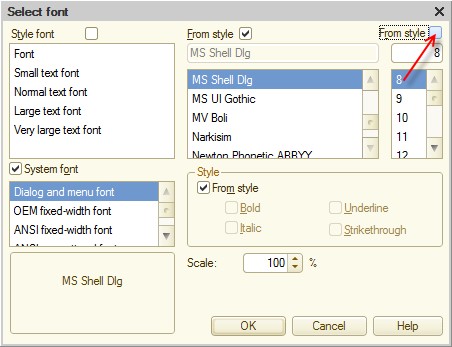
Figure 9-9. Clearing From style
Set the font size to 14, then click Close. Pay attention to the Document Form Wizard. Once you change a font parameter, you can see changes on the form.
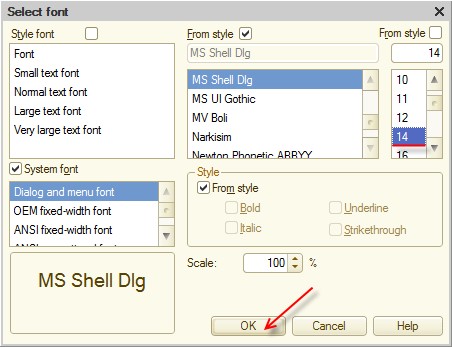
Figure 9-10. Setting the font size
Select the Activate by default check box.
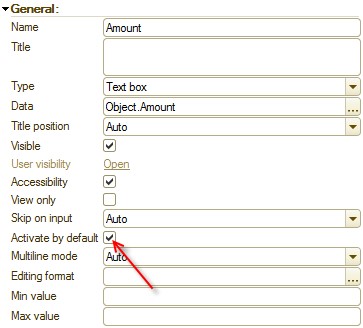
Figure 9-11. The Activate by default check box
Move the Date field, which is filled automatically, to the bottom.
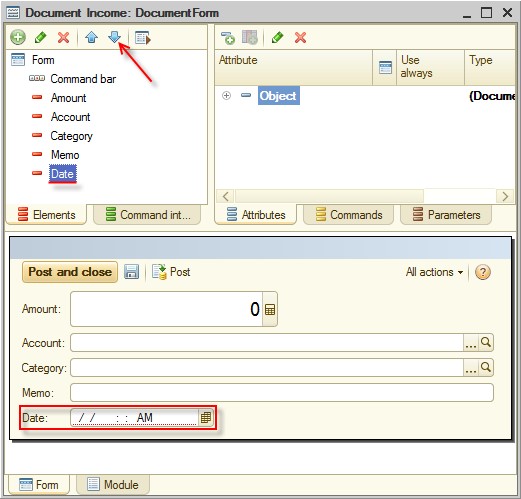
Figure 9-12. Moving Date to the bottom
In the property palette of the Date field, set Skip on input to Yes.
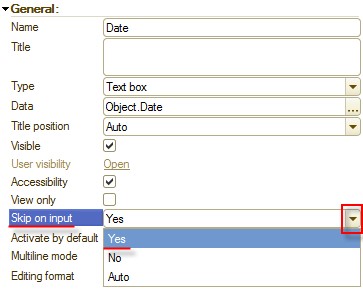
Figure 9-13. Skip on input
Probably the number of user accounts would not be large. Let us block opening a separate window for selecting an account. If Quick choice is set to Use, the 1C:Enterprise platform suggests the user to make a choice from a drop-down list. To make selection with a drop-down list a default way of selection, set Quick choice to Use for the Income document attribute but not for the form item.
Expand Income attributes in the metadata tree.
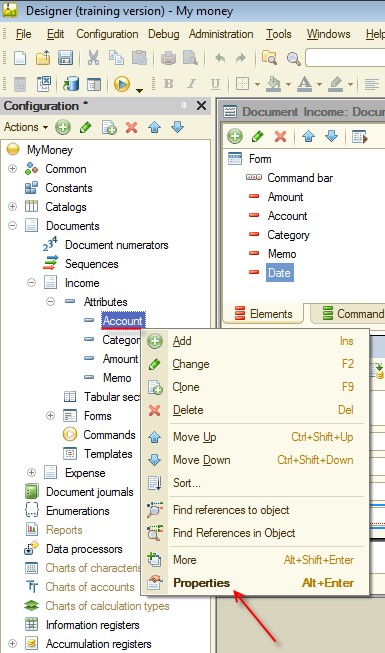
Figure 9-14. Document attributes
Right-click Account and open its property palette.
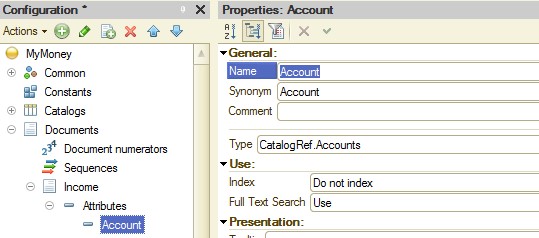
Figure 9-15. Account attribute property
Set Quick choice to Use.
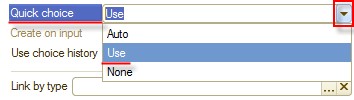
Figure 9-16. Setting whether a quick choice is used
Now set Multiline mode for Memo, it is also set in the property palette.
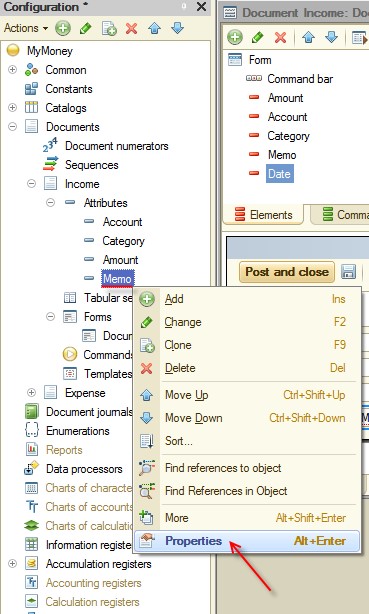
Figure 9-17. Memo attribute properties
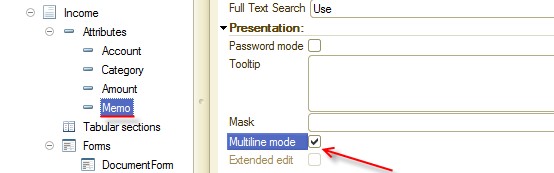
Figure 9-18. Selecting Multiline mode
Look at the preview and note how the Memo field changed.
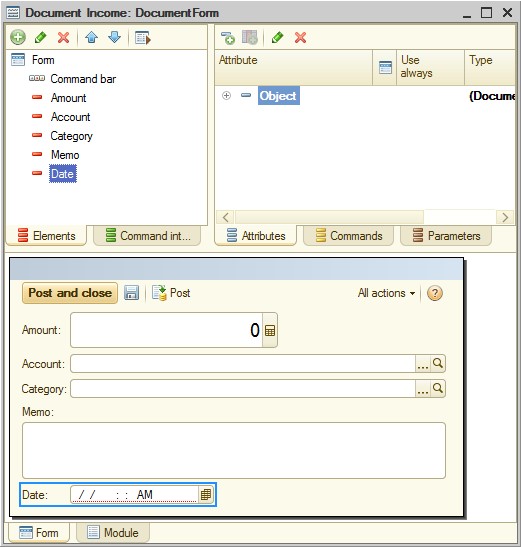
Figure 9-19. Income document preview
Now let us adjust the Expense document form in a similar way.
Create the form.
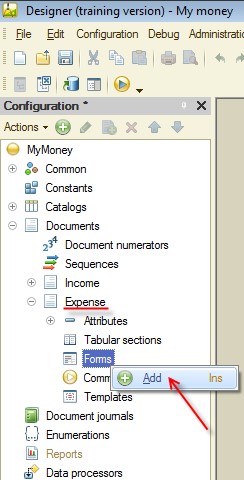
Figure 9-20. Adding the document form
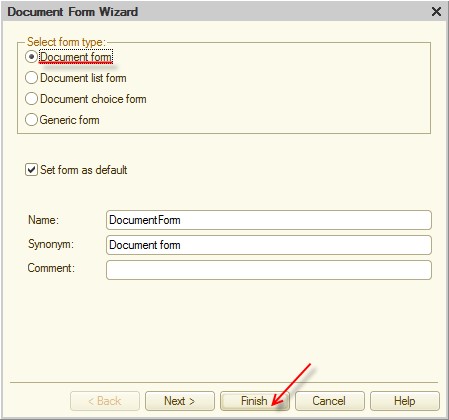
Figure 9-21. The document form
Remove Number.
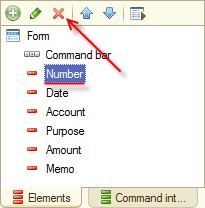
Figure 9-22. Removing the form item
Move Amount to the top of the list. Increase the font size to 14.
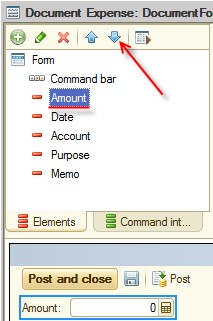
Figure 9-23. Moving Amount
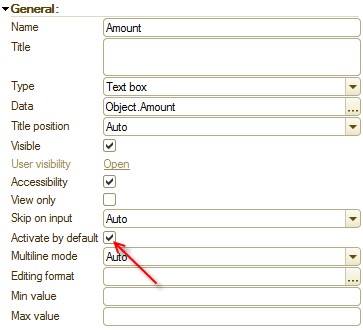
Figure 9-24. The Activate by default check box
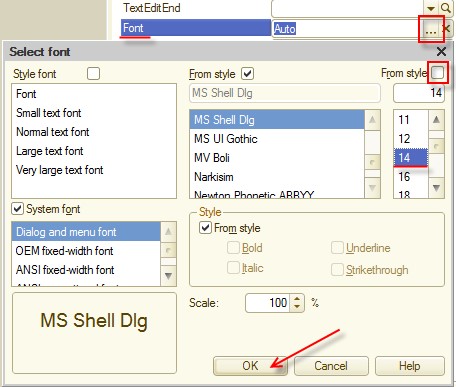
Figure 9-25. Setting a font
Move Date to the bottom and set Skip on input to Yes.
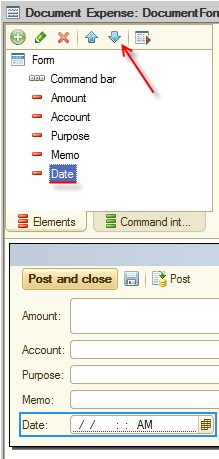
Figure 9-26. Moving Date to the bottom
Set Quick choice of Account to Use.
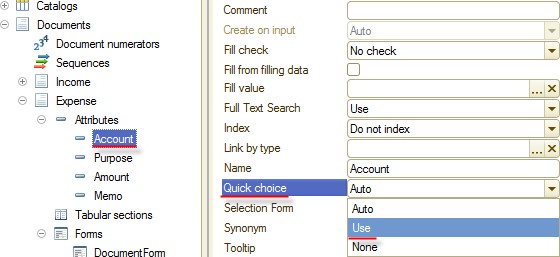
Figure 9-27. Account quick choice
Select Multiline mode for Memo.

Figure 9-28. Multiline mode
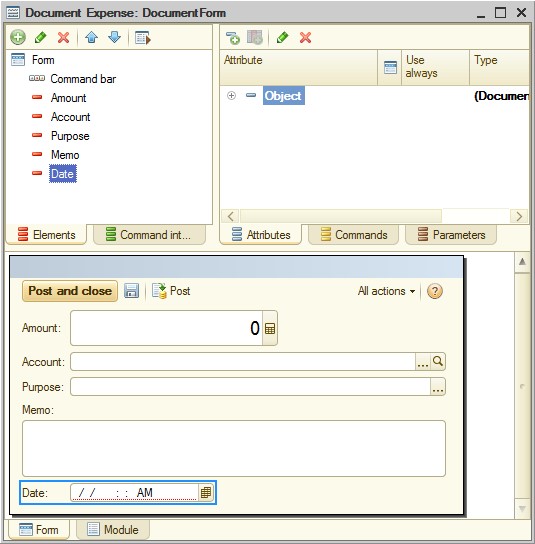
Figure 9-29. Expense preview
When you
are done with the form customization, you can start the application in 1C:Enterprise
mode and check the result. You can also use a built-in mechanism of Document Form Wizard. In Designer, in Document Form Wizard, click Test  (Ctrl+R).
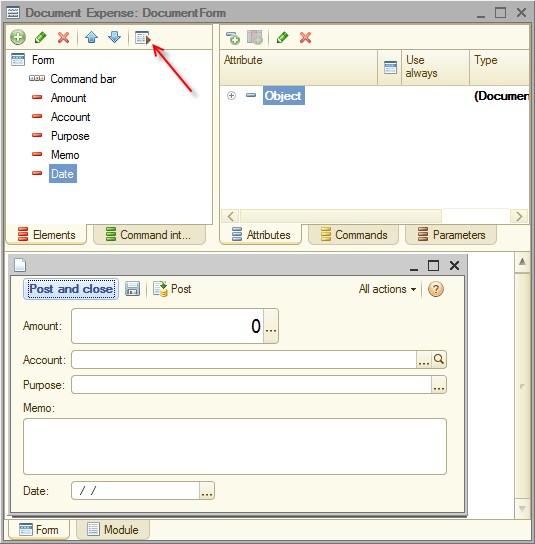
Figure 9-30. Testing the form
Adding desktop buttons
The second issue you have to solve is quick access to the activity recording on the desktop. In other words, you need to place two buttons on the desktop to be used for creating the Income and Expense documents.
In
Designer, open the Desktop common
form wizard. Click Form in the form
item list and then click Add  (Ins). Then click Group - Regular
group (no visual presentation) and then click OK.
(Ins). Then click Group - Regular
group (no visual presentation) and then click OK.
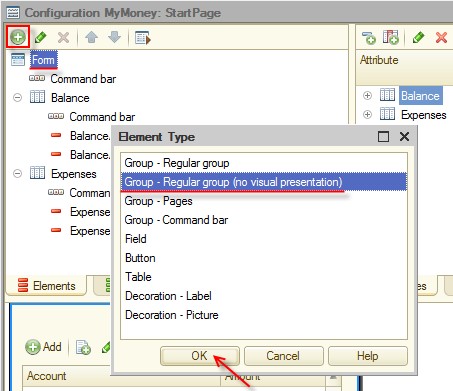
Figure 10-1. Group - Regular group (no visual presentation)
The Group type item is required for arranging buttons horizontally. Move the group to the top of the form and open Properties. Name the group ButtonGroup.

Figure 10-2. Group name
Set Display to Strong marking.
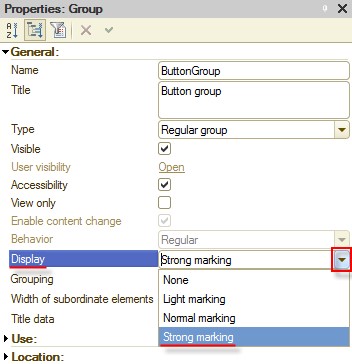
Figure 10-3. Group display
Set Grouping to Horizontal.
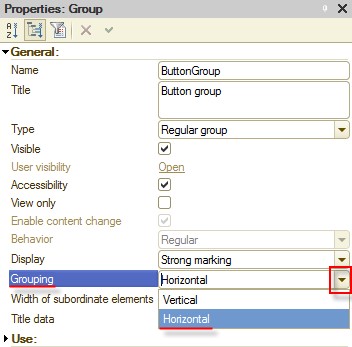
Figure 10-4. Grouping
Set Width of subordinate elements to Equal.
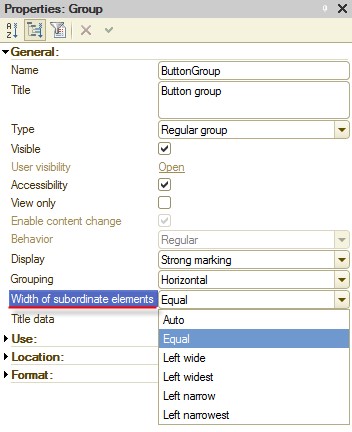
Figure 10-5. Width of subordinate elements
Add two buttons. Place them inside the group. Start with the Income button.
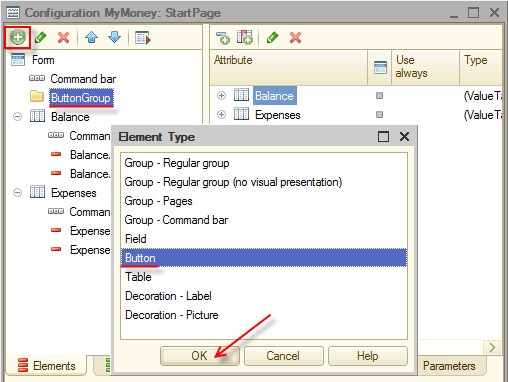
Figure 10-6. New button inside the group
Name it IncomeButton.
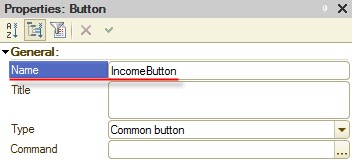
Figure 10-7. IncomeButton
Add the Expense button.
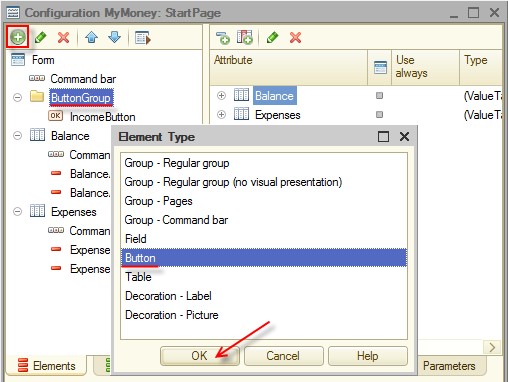
Figure 10-8. New button inside the group
Name it ExpenseButton.
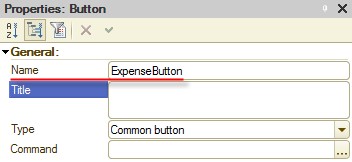
Figure 10-9. ExpenseButton
Now you need to specify the actions that will be perform when users click the buttons: creation of the Income and Expense documents.
Click the Select button of the Command field.
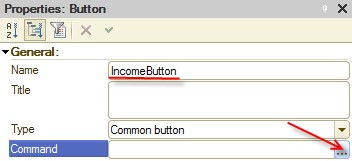
Figure 10-10. Clicking the Select button
On the Global commands tab, click Income: create, and then click OK.
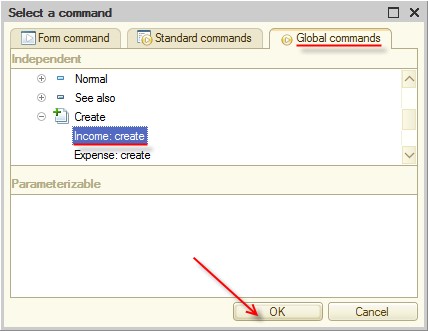
Figure 10-11. Selecting the command
For ExpenseButton, set the Expense: create global command.
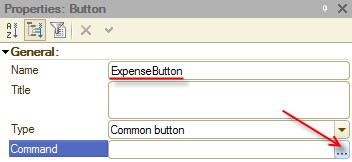
Figure 10-12. Command button property
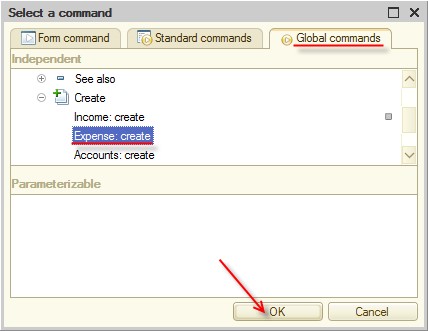
Figure 10-13. Selecting the command
Once you select the commands, the buttons on the form become visible. Now, make them bigger and add pictures to them.
Also, increase the font size to 14.

Figure 10-14. Button font
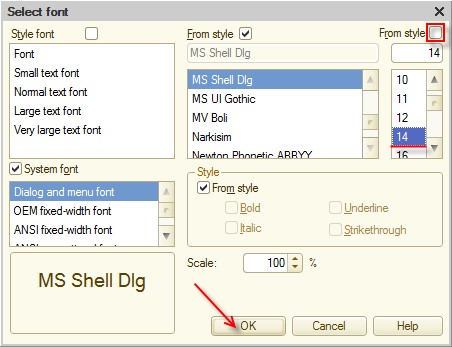
Figure 10-15. Button font size
The result is immediately displayed in the preview pane.
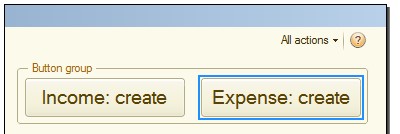
Figure 10-16. Form preview
To set a
button picture, in the button properties, click the Select button of the Picture field.
Start with the IncomeButton.
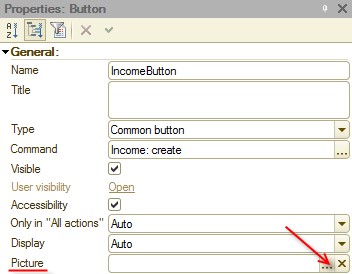
Figure 10-17. Picture property
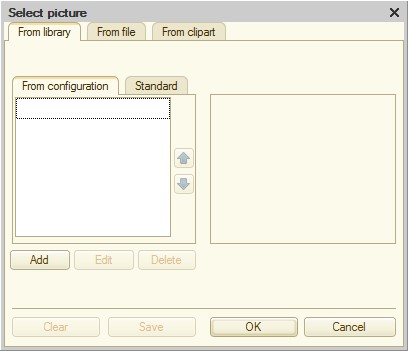
Figure 10-18. Selecting a picture
There are no pictures in the configuration, therefore you have to load them from files. The tutorial includes the Income.png file. To load a picture, click Add.
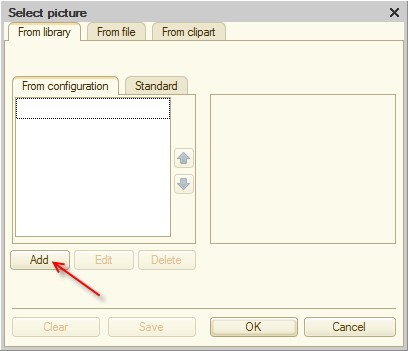
Figure 10-19. Adding a picture
Click Select from file.
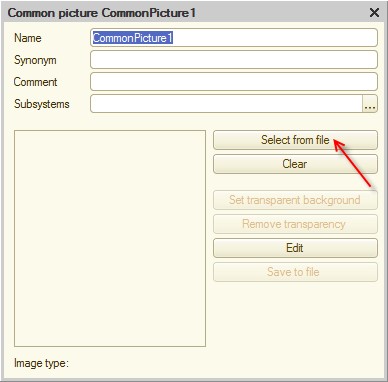
Figure 10-20. Adding a new picture
Click the picture file and then click Open.
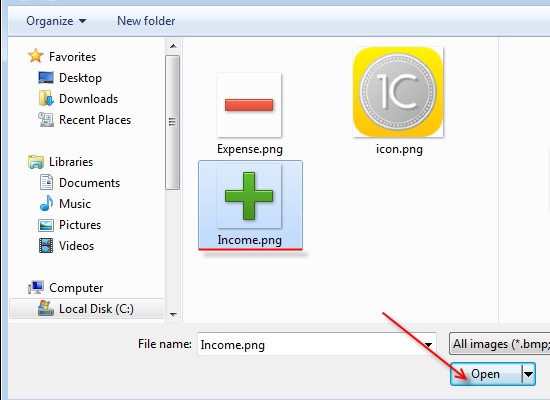
Figure 10-21. Selecting a picture file
Name it Income.
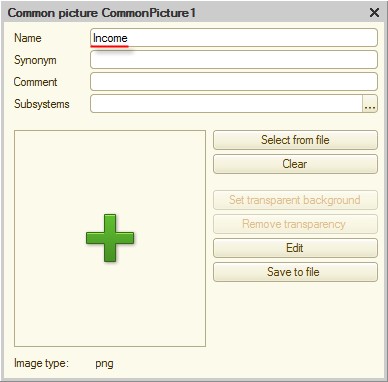
Figure 10-22. Common picture name
Now, you can close the common picture window and select the loaded picture in the Select picture window. Click the picture and then click OK.
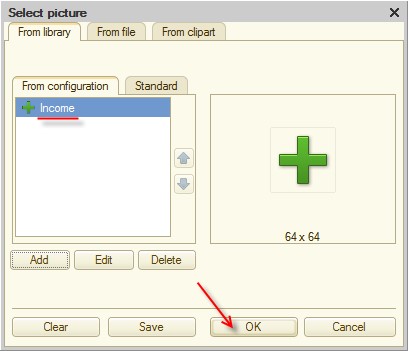
Figure 10-23. Selecting a common picture
The button now has a picture. To make it visible, set Display to Picture and text.
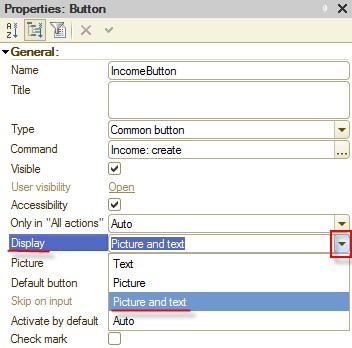
Figure 10-24. Setting the Display mode
Similarly, specify the picture for the second button. You can find Expense.png in the tutorial directory. As a result, the preview is looks as follows:
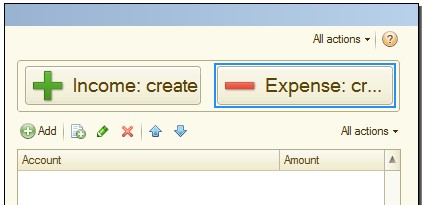
Figure 10-25. Buttons with pictures
As you can see in the preview pane, the Expense: create text is too long for the button. This automatically generated name is also redundant. Change it to Expense and change Income: create to Income. For this, open the property palette and type the new titles in the Title field.

Figure 10-26. Button title
You can see that the platform attempted to calculate the width of the buttons based on titles, but pictures have not been taken into account.
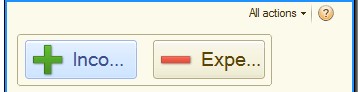
Figure 10-27. Button width
Set the button width manually in Properties, increase Width to 16.
By the way, to set equal attribute values for objects, hold down Shift while clicking the objects, whose attributes you want to set. Then press Alt+Enter and customize the properties that are common for the selected objects.
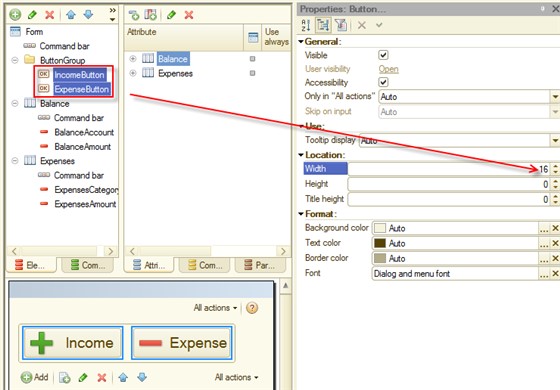
Figure 10-28. Button width
In the preview pane you can see that now the texts fit the buttons. You can start the application in 1C:Enterprise mode and see that the buttons are represented correctly and perform the required actions: once you click one of them, new document of the corresponding type is created.
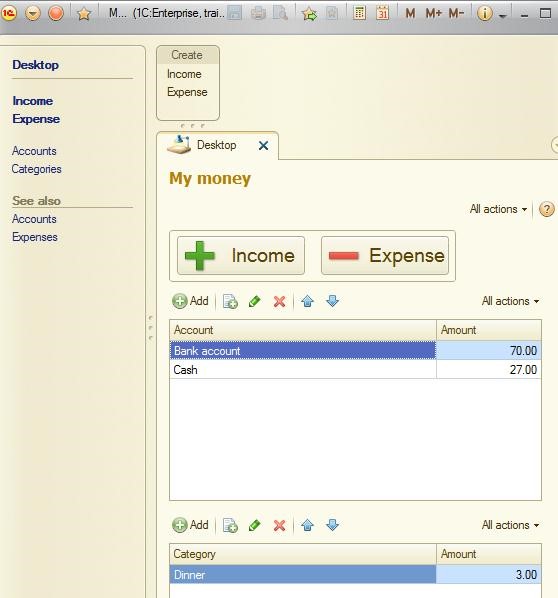
Figure 10-29. Buttons on the desktop

Figure 10-30. Creating new documents
Record another expense. Let it be a fare of 3, paid in cash.
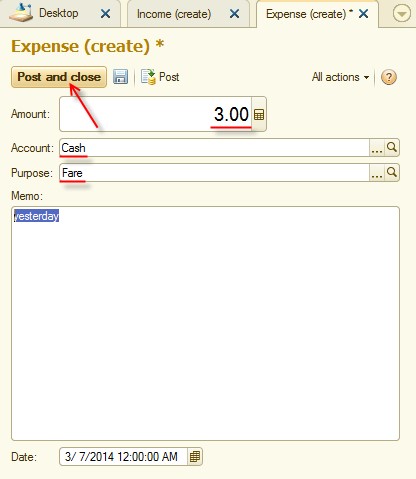
Figure 10-31. Paying the fare
Updating desktop tables
It is easy to see that tables are not updated when you post a document. We have already explained the reason why it occurs. Naturally, application restart is not the answer. It is time to improve the situation. There are many ways to do it. In the tutorial you will implement the one. Give users a tool to update the tables any time they want. In other words, supply the tables with update buttons.
Return to Designer and open the editor of the Desktop common form. If you look at the preview pane, you can see an automatically generated command bar above each table.
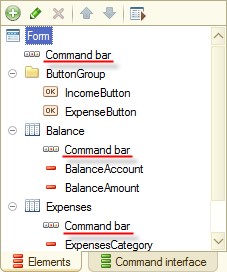
Figure 11-1. Command bars above the tables
If you check properties of the command bars, you see that Autofill is selected. It means that the bar content is automatically filled based on the item type. This algorithm is convenient for both developers and users because the platform automatically update the bar content once the item type is changed.
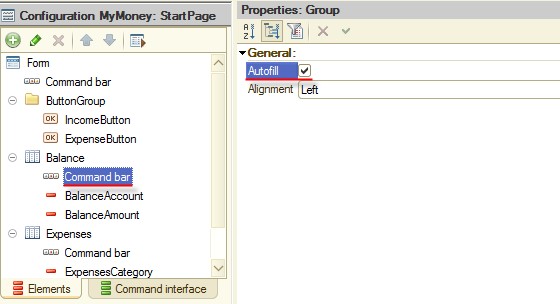
Figure 11-2. Command bar properties
Autofill is ok for you now but you need to add a button to the command bar of each table. Start with the Balance table.
Click Command bar of the Balance table and then click Add
(Ins). Select the Button
element type.

Figure 11-3. Adding a button to the command bar
For the created button (which is placed in the Command bar branch), type a name: BalanceRefresh.

Figure 11-4. New command bar button
Now it is time to create a command to be executed when the button is clicked. Here you will see that the way you attach the command to the button is different from the way you did it with IncomeButton and ExpenseButton.
There you used existing commands
that create documents, that is why they were available in the Global commands tab. In the case of the
BalanceRefresh button, there is no
such command, you have to create it. It is easy to do. Click Commands and then click Add (Ins).
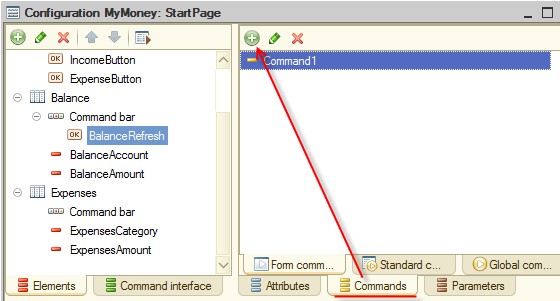
Figure 11-5. Adding a command
Type BalanceRefresh in the Name field in Properties.
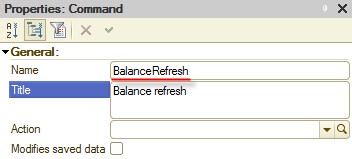
Figure 11-6. Name of the command
After
that, select the on-click action for the button. There is no action specified,
so click Open  (Ctrl+Shift+F4) to add a new one.
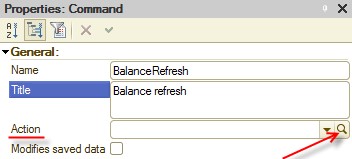
Figure 11-7. Action of the command
The platform prompts you to select where the command handler must be created. Select Create on client and then click OK.
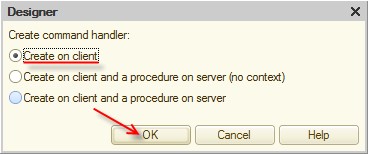
Figure 11-8. Creating a handler
Once you click OK, the form module with the BalanceRefresh() handler is opened.
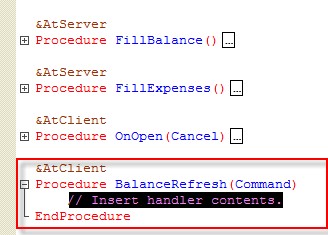
Figure 11-9. New handler in the form module
This is the handler to be executed when a user clicks the button. It has to implement a simple procedure: updating the table data. Use the existing FillBalance() procedure. Type it name in the BalanceRefresh() handler and do not forget to close the line with a semicolon (;).
As a result, the procedure looks as on the figure 11-10.

Figure 11-10. BalanceRefresh() procedure script.
Now, set the BalanceRefresh command for the BalanceRefresh form button. In the form editor, right-click the button and then click
Properties. Click the Select button of the Command field,
then on the Form command tab click BalanceRefresh, and then click OK.
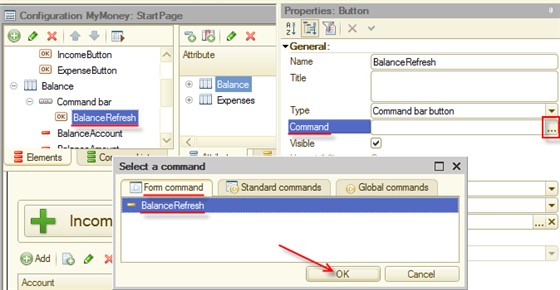
Figure 11-11. Specifying the button command
As a finishing stroke, set the button picture. There is a standard picture for update buttons, use it.
In Properties, click the Select button of the Picture
field.
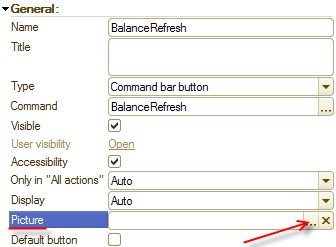
Figure 11-12. Selecting a picture
In the Select picture window, click Standard, find the Refresh picture (you can start typing it name), click it, and then click OK.
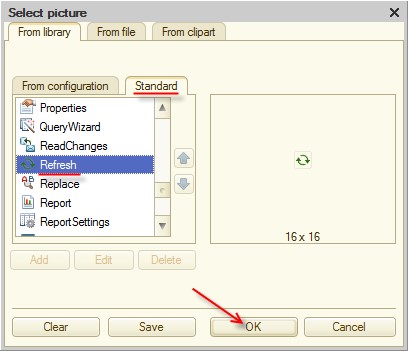
Figure 11-13. Selecting the standard picture
Let us take a look at the new button
in 1C:Enterprise mode. Create the Expense
document that records a transfer of 10 from Bank account to Cash.
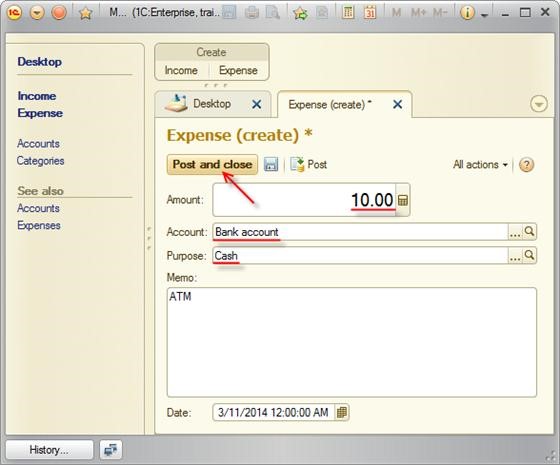
Figure 11-14. Posting a transfer
Close the
document and click BalanceRefresh  . The balance has been updated.

Figure 11-15. Actual balance
Now create a similar button for the Expenses table.
Return to the form editor in Designer. Add a button to the Expenses table command bar.

Figure 11-16. Adding a button
Name it ExpensesRefresh.
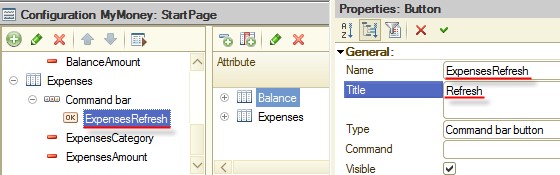
Figure 11-17. Button properties
Create the ExpensesRefresh form command on client.
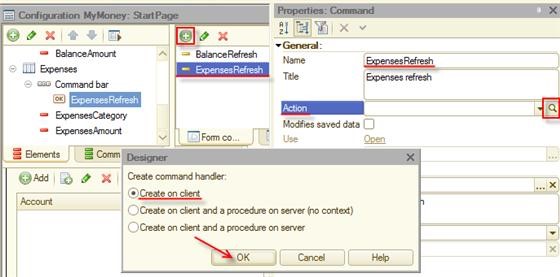
Figure 11-18. New form command
Type the FillExpenses(); call in the command handler as shown in figure 11-19.
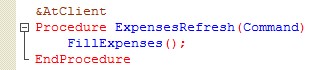
Figure 11-19. ExpensesRefresh() script
Associate ExpensesButton and the ExpensesRefresh command.
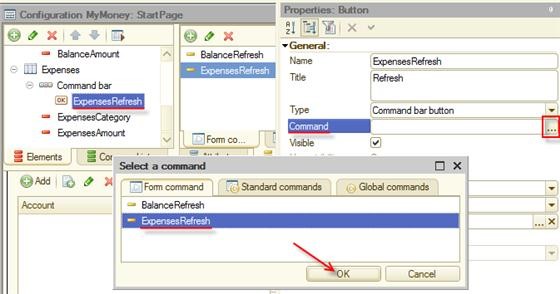
Figure 11-20. Associating the button and the command
Set the standard refresh picture.
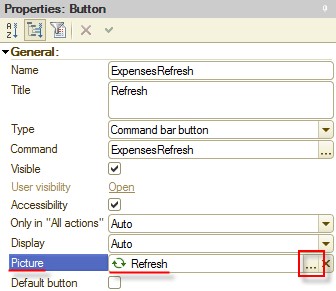
Figure 11-21. Selecting the standard picture
Note. You can find the Desktop form module in the Desktop form module.txt file.
Let us check the button in 1C:Enterprise mode. Create the Expense document that records the expense of 1.50 for Dinner.
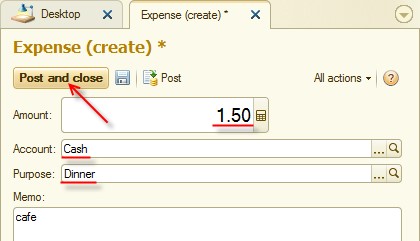
Figure 11-22. Recording the expense
Close the
document and click ExpensesRefresh . The table data is updated.
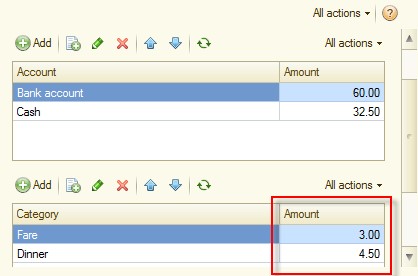
Figure 11-23. Updated expense
So, you improved the application usability. Users have two buttons that help to record their activities quickly. In addition, they can see actual balance and expenses.
In whole, the application became handier, especially on mobile devices.
Final interface tuning
There are a few strokes left to add to exclude the things that users do not need and emphasize the most important ones.
First, set the view only mode for the both desktop tables. This mode does not affect automatic table filling, but prevents changing and deleting table data by user.
For each table on the form in the property palette select View only.
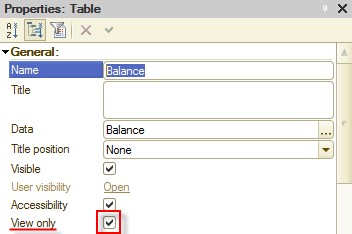
Figure 12-1. Selecting View only
Start the application in 1C:Enterprise mode and check the result. All the command bar buttons that are associated with data changing are disabled, but the update buttons are still enabled and function as required.
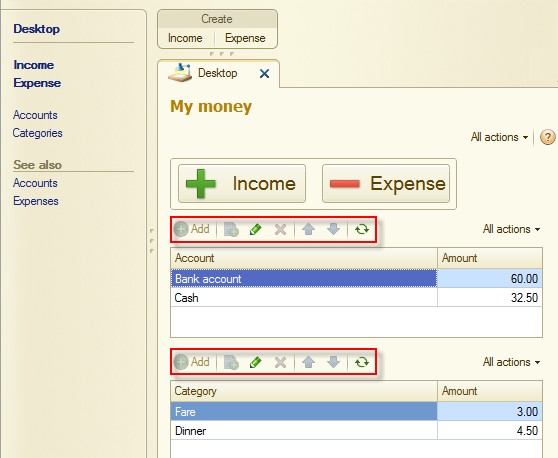
Figure 12-2. Disabled buttons
Return to Designer. Add the table names to the desktop, to make users could what is in the tables without tooltips. Also, set the height of the tables equal to 5 so that users can see both tables on the screen without using a scroll bar.
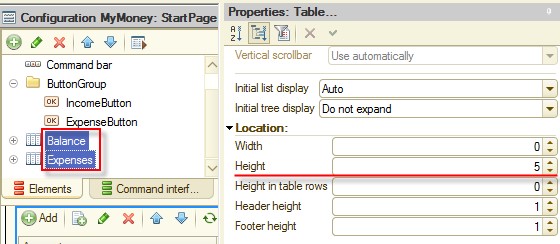
Figure 12-3. Table height
For the Balance table, in the property palette, type the Title: Money balance. Set Title position to Top.
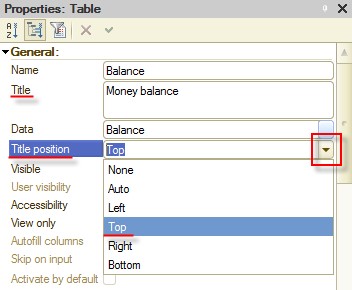
Figure 12-4. Balance table properties
For the Expenses table, in the property palette, type the Title: Expenses by categories. Set Title position to Top.
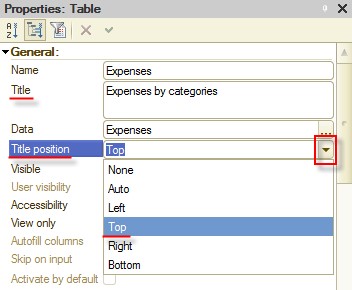
Figure 12-5. Expenses table properties
Now, set up the table fields. You want them to be easily readable on mobile device screens.
In the property palette of the BalanceAccount field of the Balance table, type Account in the Title field. Set Width to 10.
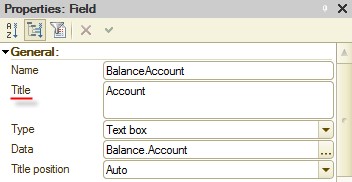
Figure 12-6. BalanceAccount field properties

Figure 12-7. BalanceAccount field properties
For the BalanceAmount, type Amount as a Title. Set Horizontal
Position to Left.

Figure 12-8. BalanceAmount field properties
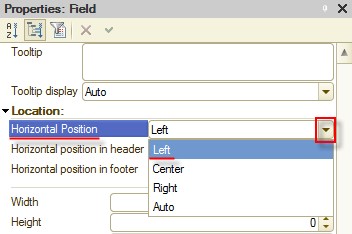
Figure 12-9. BalanceAmount field properties
In the property palette of the ExpensesCategory field of the Expenses table, type Category in the Title field. Set Width to 10.
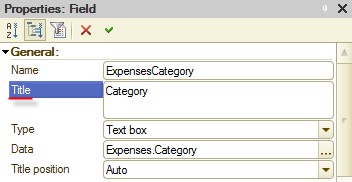
Figure 12-10. ExpensesCategory field properties
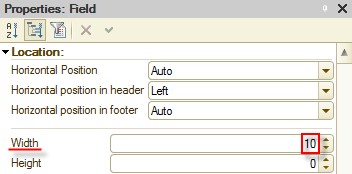
Figure 12-11. ExpensesCategory field properties
For ExpensesAmount, type Amount as a Title. Set Horizontal Position to Left.

Figure 12-12. ExpensesAmount field properties
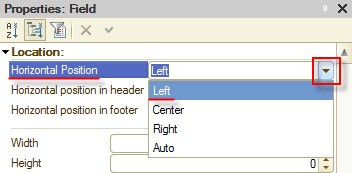
Figure 12-13. ExpensesAmount field properties
Start the application in 1C:Enterprise mode. Check that the items you have just set up are displayed correctly. The tables have titles, column names match their content, and the form is easily readable even on a small screen.
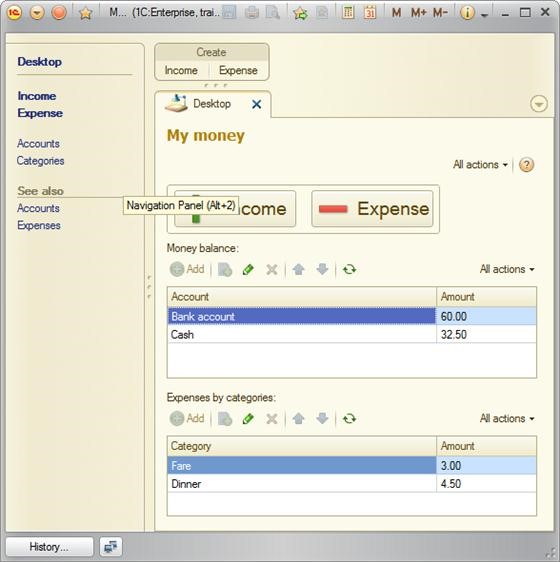
Figure 12-14. Final application appearance
You can record a few more documents and check whether the application responds exactly as you expected.
That is all. Your application is ready. Of course it is far from a real cash flow recording application, but the tutorial goal is achieved. You can improve your application functionality. In the Homework section of the tutorial, you will find three examples of the application improvement.
Cross-platform design
Now it is time to explain on which operating systems and devices you can run your application.
Linux
You can use the application that you have developed in this tutorial without any modification both on computers that run Microsoft Windows and Linux operating systems.
The 1C:Enterprise 8.3 platform introduces the following analogs of client applications previously available only for Microsoft Windows:
The Thin client allows users to run applications in the 1C:Enterprise mode;
The Thick client allows users to run applications in 1C:Enterprise and Designer modes.
Client applications support both file and client/server modes. They are available for both x86 and x86-64 architectures.
This means that now not only the 1C:Enterprise mode users can work on Linux, but also developers and administrators.
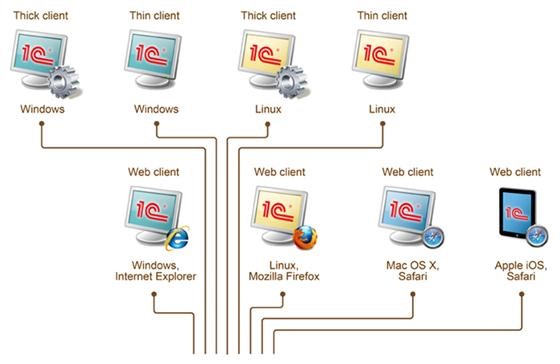
Figure 13-1. Cross-platform design
You can find the full list of supported operating systems in the system requirements.
On Linux, the application will have the same look and feel as it does on Microsoft Windows.
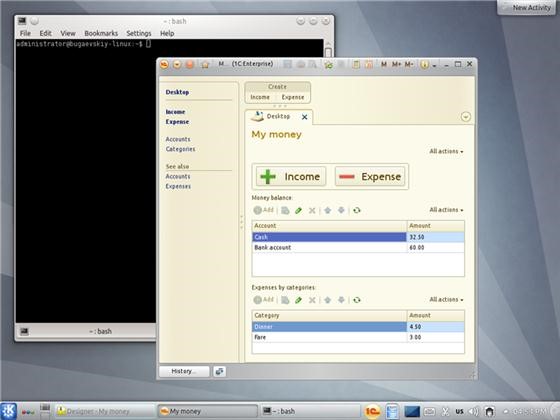
Figure 13-2. 1C:Enterprise on Linux
Web client
It is a common situation when you are not at your workplace but you need some data urgently. In this case Internet access using a web browser might save you.
It is no doubt that you can develop a web interface for any system. To do this you need to develop, debug and deploy it as well as maintain compatibility with different web browsers. 1C:Enterprise platform allows developers to save efforts on the development of the web interface.
The platform allows you to publish the entire application that you have developed in this tutorial on a web server in a few clicks. After that, users will be able to access the application using regular web browsers. At the time of writing this book there are four supported web browsers, which are: Internet Explorer, Firefox, Chrome, and Safari.
This means that users do not need to install any of 1C:Enterprise applications or licenses, the only requirements are the connection to the Internet and any of the supported web browsers. At the same time, you need to have a server where 1C:Enterprise platform and a web server are installed. At the time of writing this book there are two supported web servers: IIS and Apache.
To install the web server, click Start, then click Control panel, and then click Uninstall a program. Click Turn Windows features on or off. In Windows Features, select Internet Information Services. The default set of features will do. Click OK to set up and close this window.
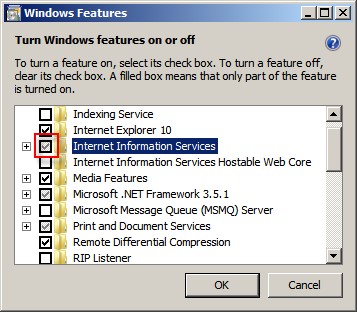
Figure 14-1. Installing the Internet Information Services web server
To publish a web client, you need to have the Web server extension modules component of 1C:Enterprise platform installed. To install the component, click Start, then click Control panel, then click Uninstall a program, in the list of applications find 1C:Enterprise 8 (training version) (<version number>) and select it. The version must match the version that you use for publishing the application. Then click Change at the top of the list. In the installation wizard, select the Modify option and click Next.
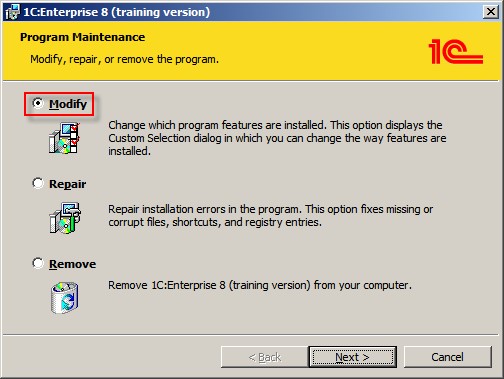
Figure 14-2. Modifying the 1C:Enterprise installation
On the next page select This feature, and all subfeatures, will be installed on local hard drive for Web server extension modules. After that, follow the wizard without changing the default settings.

Figure 14-3. Installing the Web server extension modules component
Enabling access to the application through the Internet is simple. Open the application in Designer mode. On the Administration menu click Publishing on web-server.
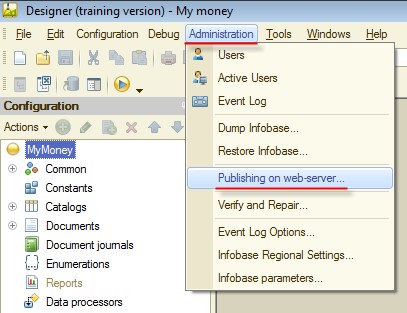
Figure 14-4. Opening the Publish on web-server wizard
In the Publish on web-server wizard, in the Name field, enter money, and in Directory field, ensure that the last folder is changed to money. Then click Publish.
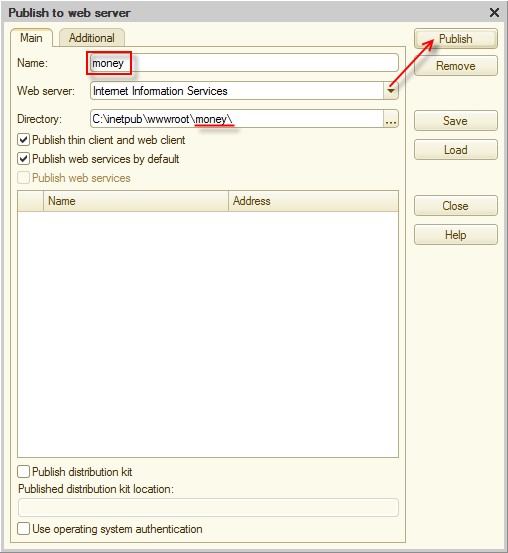
Figure 11-5. Publishing the application on the web server
The platform will ask for confirmations during publishing. Click Yes when needed.
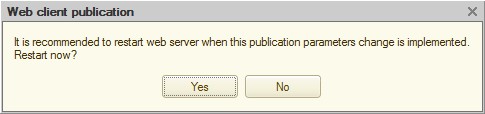
Figure 11-6. An example of the publication confirmation dialog
After the application is published, you can access it from any place around the world. To connect to the application you will need to know only its URL.
Note. Details of configuring web servers are skipped in this book. In short, you will need to grant the IIS_IUSRS user on the server access to 1C:Enterprise installation bin folder, to the folder that you have specified in the Directory field of the Publish to web server wizard, and to the folder where your infobase is placed. Then you need to enable Anonymous Authentication in the Authentication settings of the money IIS application, and for 64-bit Windows you need Enable 32-Bit Applications to be set to True in advanced settings of the DefaultAppPool application pool.
In the tutorial you run it on your local computer, thus the URL will be local only. To log on, type http://localhost/money in the address bar of your web browser and you will see the 1C:Enterprise interface, with which you are already familiar.
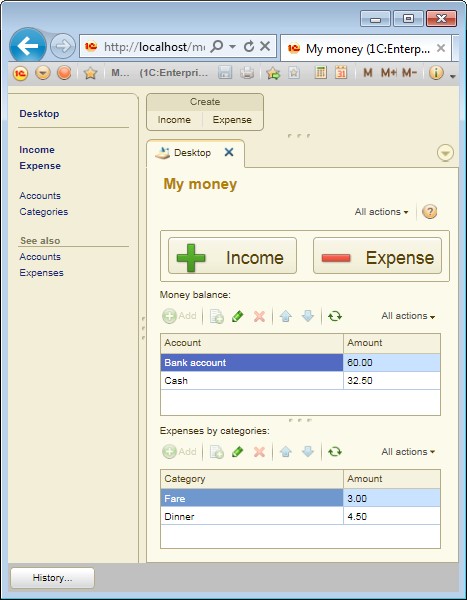
Figure 11-7. Web client in Microsoft Internet Explorer
As it is said above, you can use your favorite web browser to work with your application.
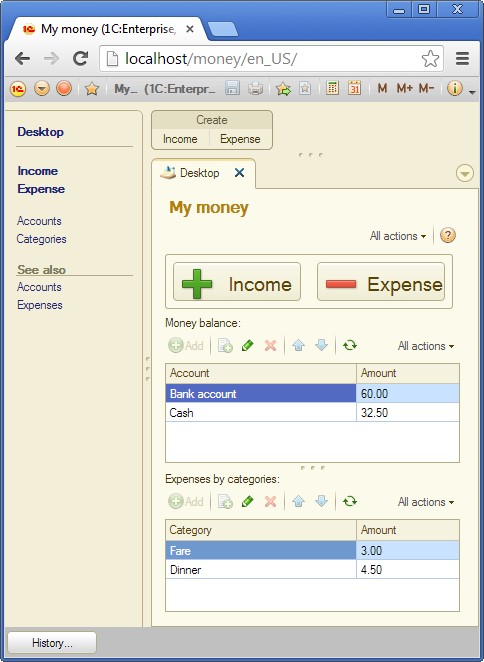
Figure 11-8. Web client in Chrome
Note: 1C:Enterprise training version has a set of limitations, thus you cannot protect it with the password because this feature is disabled for the training version. In addition, to log on using the web client you need to exit Designer mode first as there can be only one concurrent user in the training version. The limitations that have effect at the time of writing this book limitations are listed in 1C:Enterprise 8 (training version) chapter.
You can see live demo on 1C:Developer Network in Applications section.
Mobile platform
One more interesting thing is that the application that you have developed with almost no efforts can be started on iOS or Android mobile devices. This feature is provided by the mobile platform, which is a part of 1C:Enterprise 8.3 platform.
The look and feel of applications for Android and iOS devices can be slightly different.
Note: In this chapter you are going to run your application in the mobile platform for developers on iPad. Full example of building the application ready to be published and building the application for Android-based devices is given in the Mobile application building example chapter.
You can also find information about features of applications based on 1C:Enterprise platform for mobile devices in Chapter 25. Developing solutions for the mobile platform of 1C:Enterprise 8.3. Developer Guide.
To install and start the application on iOS devices in the developer mode, the need an iOS developer account. Moreover, you will need a Mac computer with Xcode developer environment.
For Android-based devices, you only need to install 1C:Enterprise mobile platform for developers using packages that are available in the distribution kit of 1C:Enterprise mobile platform.
1C:Enterprise 8 mobile platform is a set of tools that let you to create applications that work on Android or iOS mobile devices. Those devices are mostly smartphones and tablet computers.
The 1C:Enterprise mobile application that you install on the mobile device is a combination of the mobile platform and the infobase. The mobile infobase is similar to the file infobase. It consists of a database that stores data in a file and a mobile applied solution that is a program, which can be started on a mobile device and manage data in the database.
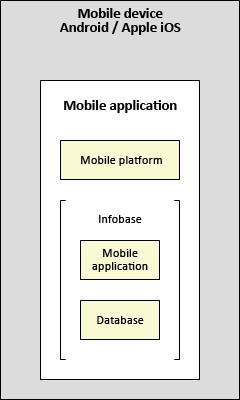
Figure 15-1. 1C:Enterprise 8 mobile platform
Thanks to the mobile platform you can right now, without using any thirdparty IDE, install and start your application and see how it works on the mobile device. As an example, you will do this for an iOS-based device.
To install the 1C:Enterprise mobile platform, perform the following steps:
• Plug the mobile device to the Mac computer.
• Unpack prjios.zip on your Mac.
• Open the project with mobile platform for developers in Xcode. For this, double-click the 1cem.xcodeproj file or start Xcode, click File, then click Open, and select the project file.
• In Xcode, click Window and then click Organizer to open the Organizer tool.
• In the pane on the left, select your iPad.
• The device you have selected must be marked with the green. If it is not, click Use for Development.
• Organizer will automatically request certificates and provisioning profile from the Apple website and prompt you for iOS developer password.
• In the Product menu, point to Edit and then click Edit Scheme to open the scheme settings window. In the scheme settings window:
o Select 1cem as Scheme. o Select your iPad as Destination. o Set Build configuration equals to Release.
o Click OK.
• In the Product menu, click Run, to start the project.
• The mobile platform will be installed and started on your mobile device. You will see 1C:Enterprise icon among other application icons.
• Now you can unplug the mobile device and start the application using its icon. If the 1C:Enterprise mobile platform is started by Xcode, it is spoped during the unplugging.

Figure 15-2. Use for Development button

Figure 15-3. Scheme settings window
The last step is to upload and start this application on the mobile device. You will use the tool that is similar to publishing on the web server that was described in the Web client chapter.
The web server will store the application as a single XML file. The mobile platform for developers connects to this web server, downloads that XML file, and install it on the mobile device. After that, the application can be started on the mobile device.
In Designer mode, on the Configuration menu click Mobile application, and then click Publish.
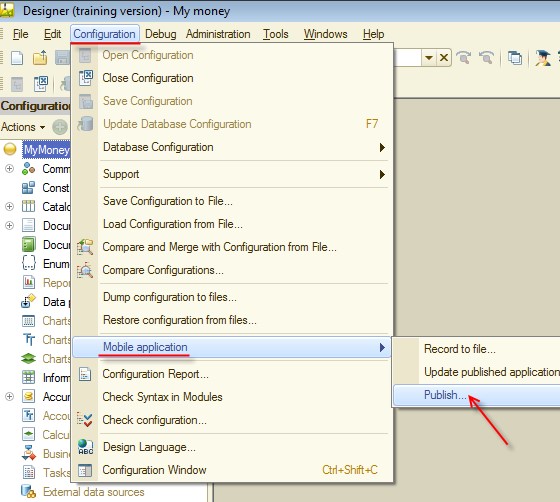
Figure 15-4. Publishing the mobile application
Select the Create virtual directory on web server and Update mobile application when a database configuration is updated check boxes, and type mm in Name. Note that the last folder in Directory is also changed to mm. Then click Publish.
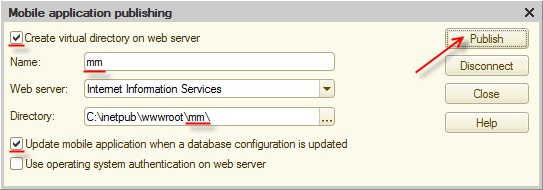
Figure 15-5. Publishing the mobile application
Confirm all actions that the platform will request confirmation for, and your application will be published.
All
actions involving the computer are done. Start the 1C:Enterperise platform on
the mobile device. And click  to add the application.
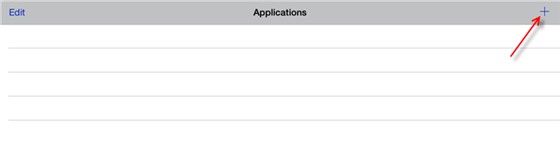
Figure 15-6. Adding a new application
In Address, type http://<your computer IP>/mm. Instead of <your computer IP>, type the IP address of the computer where you run the web server with the published mobile application.
Note: To find out the computer IP, see its network connection properties. The mobile device and the server must be located in the same network. The easiest way of doing that is using a Wi-Fi router. Both the computer with the web server and the mobile device should be connected to it.
Then tap Download.
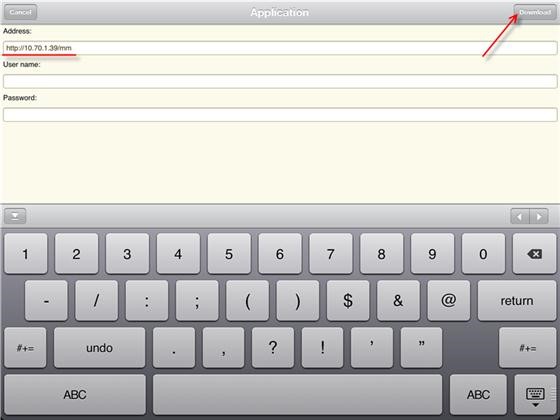
Figure 15-7. Downloading the application
The mobile platform will download the application. Then it will suggest you to adjust some properties. Leave Application name as it is and select the Restart from designer check box. Then tap Done.

Figure 15-8. Downloading the application details
Set Restart from designer to On.

Figure 15-9. Application details
You will see the application in the list of applications. To start it, tap the application name.
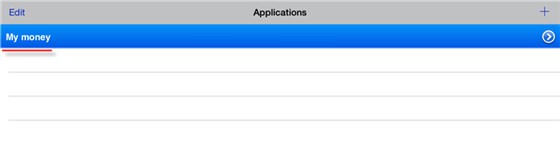
Figure 15-10. List of applications

Figure 15-11. Starting the application
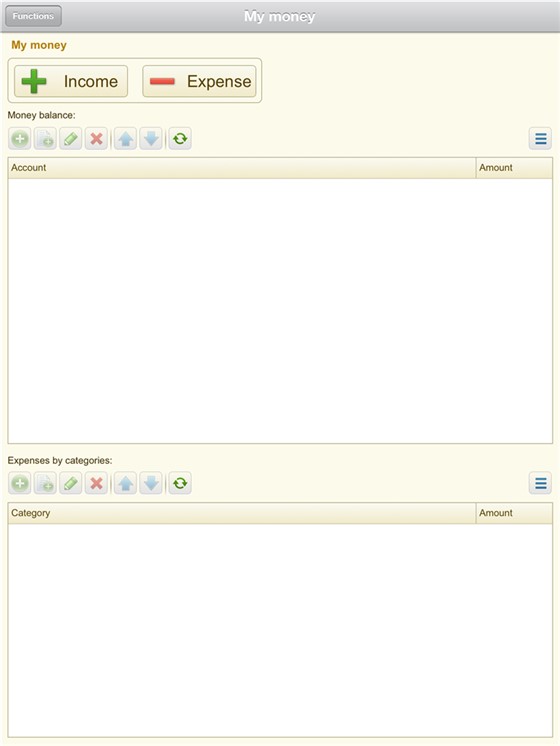
Figure 15-12. Mobile application desktop
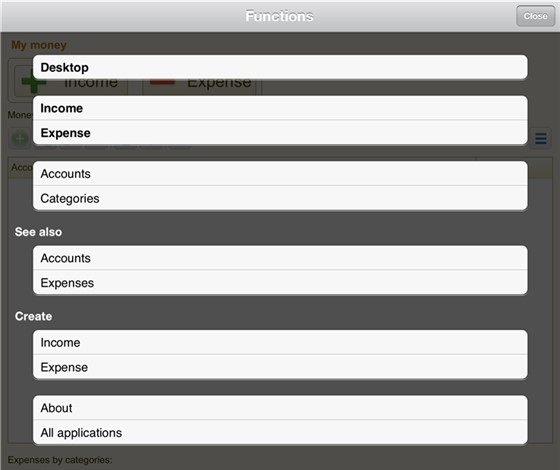
Figure 15-13. Application menu
If you tap the menu button of your mobile device, you will see the application menu. Note that the command interface of the Main section is displayed in the application menu on the mobile platform (we discuss this in the Improving interface chapter). The buttons on the desktop have become even more useful.
Important. The application that you developed and filled with data, when it is opened on the mobile device, contains no data except the predefined items. This is not an error. The data synchronization between several applications is an interesting but separate topic. The 1C:Enterprise platform can solve these problems with ease. For example, see Homework 3.
In this chapter you developed a mobile version of your application, which is compatible with Android and iOS mobile devices.
To distribute your application for end users you need to create a package containing the mobile platform, the applied solution, and the database. For this, 1C:Enterprise platform has packing tools. You can read more about it in the Mobile application building example chapter. The packed application can be published in Play Store and App Store.
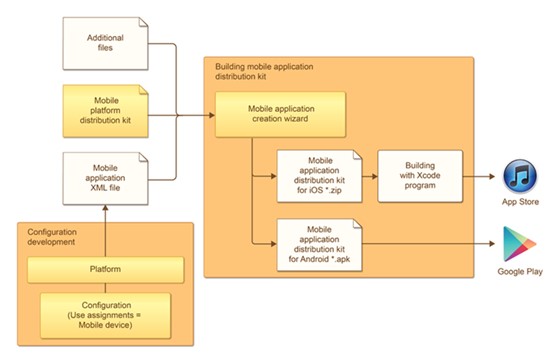
Figure 15-14. Publishing the mobile application
Next part