
Modifying the GoodsReceipt document
So what comes next?
First you will update both your documents (GoodsReceipt and Services) to provide data not only for the accumulation registers, but also for the accounting register.
Then you will create a Trial balance accounting report, which shows the inventory amounts at Jack of All Trades based on the accounting register data.
During the document posting the following accounting postings (records in the accounting register) should be created (table 16.1).
Table 16.1. Postings created by documents
| Documents | Postings | ||||
| Debit | Credit | Sum | |||
| Goods receipt | 5000 | Inventory | 4000 | Accounts payable | Cost |
| Services | 2000 | Accounts receivable | 9000 | Income | Total |
| 9000 | Income | 5000 | Inventory | Cost | |
Let us implement the postings to the accounting register.
You have to modify the posting procedure for the GoodsReceipt document and then repost all GoodsReceipt documents in 1C:Enterprise in order to execute the modified posting algorithm.
In Designer mode
Let us modify the posting procedure.
- In Designer, open the editor of the GoodsReceipt document configuration object.
- On the Posting tab, specify that the document creates records in the Primary accounting register.
- On the Other tab, open the object module.
- Open the Posting event handler procedure, and at the end of the loop before the EndDo line add the script that generates Primary register records (listing 16.1).
Listing 16.1. Register records of the GoodsReceipt document (fragment)// register Primary Record = RegisterRecords.Primary.Add(); Record.AccountDr = ChartsOfAccounts.Main.Inventory; Record.AccountCr = ChartsOfAccounts.Main.AccountsPayable; Record.Period = Date; Record.Sum = CurRowMaterials.Total; Record.QuantityDr = CurRowMaterials.Quantity; Record.ExtDimensionsDr[ChartsOfCharacteristicTypes.ExtraDimensionTypes.Materials] = CurRowMaterials.Material; - Before the beginning of the loop, set the Write property of the Primary register record set to True.
This writes the register changes to the database.
The resulting Posting procedure should look as shown in listing 16.2.
Listing 16.2. Register records of the GoodsReceipt documentProcedure Posting(Cancel, Mode) RegisterRecords.BalanceOfMaterials.Write = True; RegisterRecords.CostOfMaterials.Write = True; RegisterRecords.Primary.Write = True; For Each CurRowMaterials In Materials Do // register BalanceOfMaterials Receipt Record = RegisterRecords.BalanceOfMaterials.Add(); Record.RecordType = AccumulationRecordType.Receipt; Record.Period = Date; Record.Material = CurRowMaterials.Material; Record.PropertySet = CurRowMaterials.PropertySet; Record.Warehouse = Warehouse; Record.Quantity = CurRowMaterials.Quantity; // register CostOfMaterials Receipt Record = RegisterRecords.CostOfMaterials.Add(); Record.RecordType = AccumulationRecordType.Receipt; Record.Period = Date; Record.Material = CurRowMaterials.Material; Record.Cost = CurRowMaterials.Total; // register Primary Record = RegisterRecords.Primary.Add(); Record.AccountDr = ChartsOfAccounts.Main.Inventory; Record.AccountCr = ChartsOfAccounts.Main.AccountsPayable; Record.Period = Date; Record.Sum = CurRowMaterials.Total; Record.QuantityDr = CurRowMaterials.Quantity; Record.ExtDimensionsDr[ChartsOfCharacteristicTypes.ExtraDimensionTypes.Materials] = CurRowMaterials.Material; EndDo; EndProcedure
Now let us examine this script.
As you can see, accounting register records are generated in the same manner as accumulation register records.
But during the creation of the data storage table the platform added a number of attribute fields that originate from using the Main chart of accounts.
First of all, these are the AccountDr and AccountCr fields. These fields store accounts that have their debit and credit values affected by this posting.
Besides, for each register dimension or attribute that is linked to an accounting flag the platform creates a pair of fields to store resource values separately for posting debits and credits: QuantityDt and QuantityCr. And for the accounts that have extra dimensions the platform creates the ExtDimensionDr and ExtDimensionCr collections.
If you take a look at the table 16.1, you will see that when a goods receipt is posted, the Inventory (5000) account serves as a debit account while AccountsPayable (4000) serves as a credit account.
You access an account using the ChartsOfAccounts global context property. This property provides access to all the charts of accounts available in the configuration. Then you specify the name of the required chart of accounts (Main), separated by a dot. And then you specify the name of a predefined account from this chart of accounts (Inventory) after another dot. It is one of the four predefined accounts that you created earlier.
Since quantitative accounting is only available for the Inventory (5000) account, the QuantityDr register field is filled with the quantity of material units from the document tabular section. The QuantityCr register field is not filled because quantitative accounting is not applied to the credit account of the posting (AccountsPayable).
Now look at the last line of the loop where a value is assigned to the debit extra dimension.
For each posting, the number of extra dimensions on the debit account is not equal to the number of extra dimensions on the credit account. These numbers are taken from the account definitions in the chart of accounts. Therefore, for each accounting register record, the platform stores two value collections: a collection of debit extra dimensions and a collection of credit extra dimensions. Each of them contains a number of elements equal to the number of extra dimension types defined for the respective account (debit or credit) in the chart of accounts.
You can access a collection element by specifying the respective extra dimension type (ChartsOfCharacteristicTypes.ExtraDimensionTypes.Materials) in square brackets.
Another way to access a collection element is specifying the name of a predefined extra dimension type separated by a dot from the debit extra dimension collection.
In other words, the statement Record.ExtDimensionsDr[ChartsOfCharacteristicTypes.ExtraDimensionTypes.Materials] gives the same result as the statement Record.ExtDimensionDr.Materials.
The ExtDimensionCr register collection is not filled because accounting by extra dimensions is not applied to the credit account of the posting (AccountsPayable).
Finally, let us edit the command interface of the document form to add the command that opens the list of the Primary register records related to that document to the form navigation panel.
- Open the GoodsReceipt document form.
- In the upper left pane, click the Command interface tab.
- In the Navigation panel branch, expand the Go to node and select the Visible check box for the Primary command.
In 1C:Enterprise mode
Let us test the changes.
- Start 1C:Enterprise in the debug mode.
The platform displays a warning stating that the Primary accounting register and the ExtraDimensions catalog are not included in any subsystems. Ignore the warning. - Open the GoodsReceipt document #1 and click Post.
- Click Primary to open the accounting register records generated by the document (fig. 16.13, 16.14, and 16.15).

Fig. 16.13. Goods receipt #1 register records in the Primary accounting register
Fig. 16.14. Goods receipt #1 register records in the Primary accounting register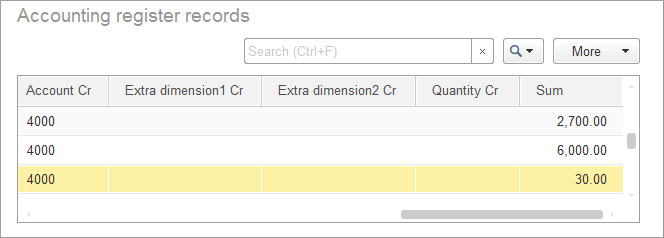
Fig. 16.15. Goods receipt #1 register records in the Primary accounting register
Note: since there is no analytical accounting for account 4000 (AccountsPayable) and all you track is a sum total, there are no records in the register for Extra dimension1 Cr, Extra dimension2 Cr, and Quantity Cr. - Repost the GoodsReceipt document #2 and ensure that it also generates correct records in the Primary accounting register.
Now let us proceed to a more complex task: adding records of the Services document to the Primary register.