
Creating roles
In Designer mode
When creating roles, one generally starts out by deciding what kind of data access various user groups need. To do so, let us assign roles by subsystems, which will make the task a lot easier.
Administrator
First, let us create the Administrator role. This role should include full rights for operations with infobase data.
- Expand the Common branch of the configuration object tree, click Roles, and add a new Role configuration object named Administrator (fig. 22.1).

Fig. 22.1. Creating a role
This opens the rights editor for the role (fig. 22.2).
Fig. 22.2. Rights editor window for the Administrator role
The left pane contains the list of configuration objects, grouped by type. The right pane contains the list of rights available for the selected object or object type.
An administrator should have rights for all the objects and all the object types. - On the Actions menu, click Grant All Rights.
This selects all rights for all objects.
You can grant or deny all rights for a specific configuration object using the Mark all elements and Remove marks from all elements
  buttons above the list of rights.
The only thing you have to do is deny the interactive deletion right for all the objects. This is required to prevent an administrator from accidental deletion of database objects. - Scroll through all the configuration object types (Catalogs, Documents, and so on) and clear the Interactive delete check box for each object. Note that this also clears the Interactive deletion of predefined objects check box (see fig. 22.2).
- Select the Set rights for new objects check box (see fig. 22.2).
This grants the administrator full access rights for the objects that you create after setting the rights.
You are done with the creation of the Administrator role.
CEO
Next, let us create the CEO role.
- Create a new Role configuration object named CEO.
It is fine with us that the new role does not have access rights for all the objects except for the configuration object types that do not have any objects created. For such configuration objects, full rights remain in effect. - Ensure that the Output right is set for the root configuration object.
- Scroll through all the configuration object types and grant the View right for each object.
This also automatically sets the Read and Use rights. - Expand the Common branch and then, in the Subsystems branch, grant the View right for all the subsystems.
This grants CEO the right to view all infobase data. Later you will use the command visibility by role settings to hide all the actions that are not related to the configuration applied logic from CEO's interface (fig. 22.3).
Fig. 22.3. Rights editor window for the CEO role
This completes the creation of the second role.
Technician
Next, let us create the Technician role.
- Create a new Role configuration object named Technician.
- On the Actions menu, click Grant Rights By Subsystems, select the Inventory and Services subsystems, and click Set.
This grants all the rights for configuration objects that belong to these subsystems. - Filter the list of objects by the Inventory and Services subsystems (fig. 22.4).
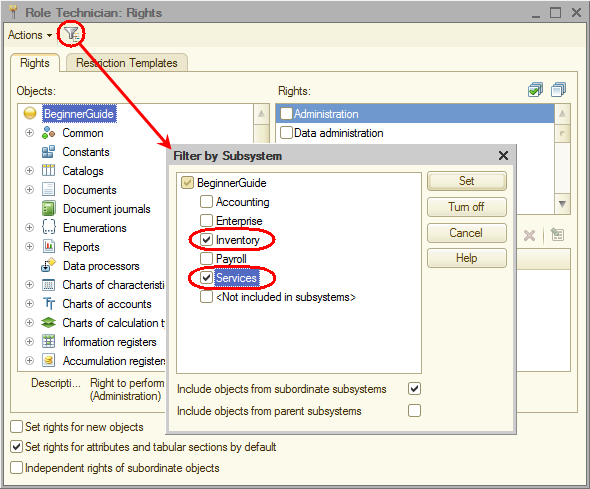
Fig. 22.4. Filtering by subsystem
This helps you to fine tune the rights for objects belonging to these subsystems. - For the Employees catalog, deny the Insert, Edit, and Delete rights.
Note that denying the Insert right removes the check mark from the Interactive insert right because it is a subset of the Insert right. In the same manner, subsets of rights are denied when you deny the Edit and Delete rights. - Scroll through all the configuration object types and clear the Interactive delete check box for each object.
- Remove the filter and grant all the rights except Interactive delete for the following configuration objects:
- MaterialOptions catalog
- AdditionalMaterialProperties catalog
- MaterialProperties chart of characteristic types
- MaterialPropertyValues information register
- Expand the Common branch, expand the Subsystems branch, click Enterprise, and grant the View right.
This grants access to reference data stored in this subsystem. Later you will hide the functionality that technicians do not need using command visibility by roles.
This completes the creation of the Technician role.
Payroll accountant
All you have left to do is create two roles: Accountant and Payroll accountant.
We are going to divide the rights for payroll calculation and for accounting. There is an accountant at Jack of All Trades, and an assistant accountant as well. The assistant usually performs payroll calculation, but sometimes the chief accountant does that. Therefore the chief accountant needs to have both roles, while the assistant only needs the Payroll accountant role.
- Create a new Role configuration object named PayrollAccountant.
- In the rights editor, grant the right for the Payroll subsystem (and remember to deny Interactive delete).
- For the Sales accumulation register and for the Customers catalog, grant the View right.
- For the Enterprise subsystem, grant the View right.
This completes the creation of the Payroll accountant role.
Accountant
Finally, let us create the Accountant role.
- Create a Role configuration object named Accountant.
- In the rights editor, grant the right for the Accounting subsystem.
- Filter the list of objects by that subsystem and deny the Insert, Edit, and Delete rights for the MaterialsAndServices catalog.
- Deny the Interactive delete right for all objects.
- Remove the filter and grant all the rights except Interactive delete for the ExtraDimensions catalog.
- Grant the View right for the following configuration objects:
- Warehouses catalog
- MaterialOptions catalog
- AdditionalMaterialProperties catalog
- MaterialProperties chart of characteristic types
- MaterialPropertyValues information register
- Grant the View right for the Enterprise subsystem.
Rights to run client applications
Finally, grant the rights to run client applications (the thin client and the web client) for each role.
For this task you will use another tool that better suits your goal: the All Roles editor.
- In the configuration object tree, right-click the Roles branch and click All roles.
You can see that the Thin client and Web client rights are granted to all roles (fig. 22.5).
Fig. 22.5. All Roles editor
Administrators also have the right to connect to the infobase using other client application types.
To view the list of rights for each role
- On the Actions menu, click Output list (fig. 22.6).
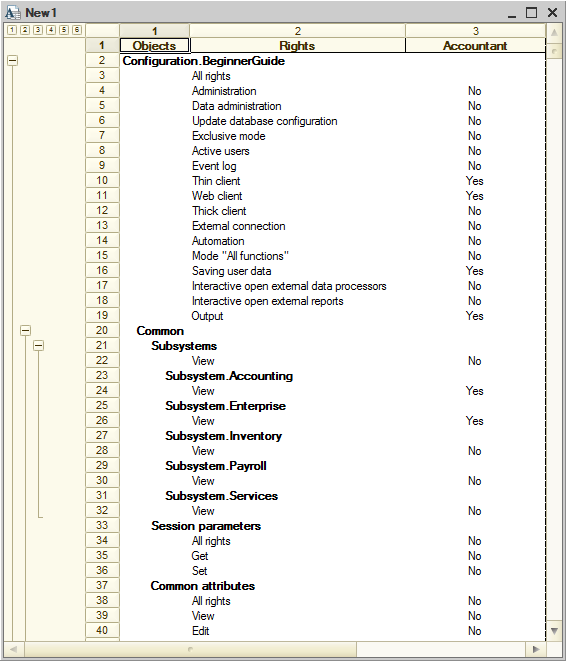
Fig. 22.6. List of rights for the Accountant role
You can also view the list of rights for all available roles in the All Roles editor.