
Calculated columns in lists
You might want to display custom data in list columns. For example, you might want to add a column with a calculated value.
We will explain this feature using the following example: displaying effective prices in the MaterialsAndServices catalog list.
You can get this data from the Prices.SliceLast information register table. So the Price field of the table should be added to the List dynamic list, which is the main attribute of the materials and services list form and serves as a data source for the list table.
In Designer mode
Let us add the prices to the list of materials and services.
- In Designer, open the list form of the MaterialsAndServices catalog.
- Open the property palette of the main List attribute.
Up to this point the Main table property of the dynamic list was set to Catalog.MaterialsAndServices (see fig. 27.10) and the list was generated using a query to the table.
Now you also need the related data from the Prices.SliceLast information register table. - Select the CustomQuery check box and then, in the List setup field, click Open (fig. 27.16).

Fig. 27.16. Opening dynamic list settings
This opens the dynamic list settings window. On the Query tab you can see the query that selects all the fields from the Catalog.MaterialsAndServices table. Let us modify it. - Click the Query Builder button (fig. 27.17).
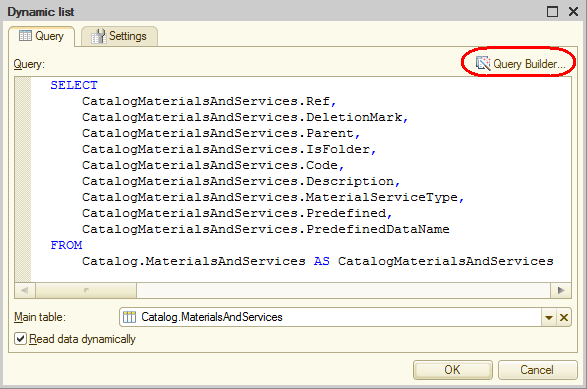
Fig. 27.17. Creating a custom query for a dynamic list - Add Prices.SliceLast to the list of tables and select the Price field from this table (fig. 27.18).
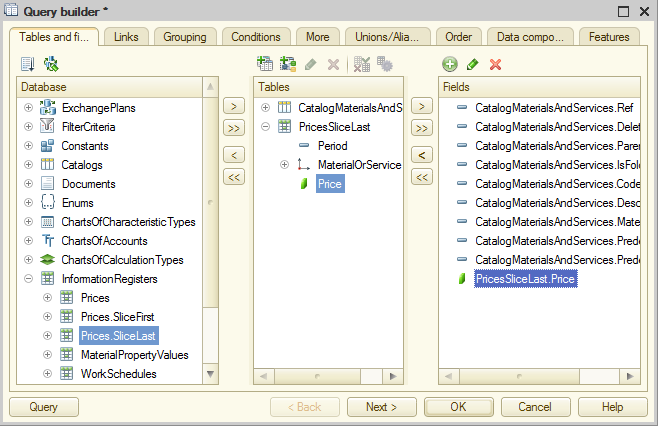
Fig. 27.18. Adding a second table
Let us edit the automatically generated relation between the tables. - On the Links tab, select the All check box for the Catalog.MaterialsAndServices table and clear the All check box for the Prices.SliceLast table (fig. 27.19).

Fig. 27.19. Specifying the relation between the tables
This is how you specify that the list of materials and services displays all the items, including those that have no prices assigned. You performed similar steps in lesson 13 "Reports" for the Service list report.
This completes the query creation. - Click OK.
You are already familiar with the query script so we will not discuss it here.
So you added the option to display the Price column, which contains the current prices, in the list of materials and services, but the column is not yet added to the list form.
Now let us specify the conditional appearance of the Price column by highlighting low prices with a color. - In the dynamic list settings window, click the Settings tab.
- Click the Conditional appearance tab.
This tab contains the conditional appearance of the list rows that you created earlier in this lesson. - Click the Add
 button.
First, let us specify the formatting for highlighting fields. - In the Format field, click the selection
 button and select blue text color.
Then let us specify the condition for the appearance to be applied (when the text in the Price column should be blue). - In the Condition field, click the selection button .
- In the window that is opened, click the Add
 button and then click New item.
- In the Left value column, select Price.
- In the Comparison type column, select Less than.
- In the Right value column, enter 500 (fig. 27.20).
Finally, let us specify the fields where the formatting is applied. - In the Formatted fields column, click the selection button .
- Click Add and select Price (fig. 27.20).
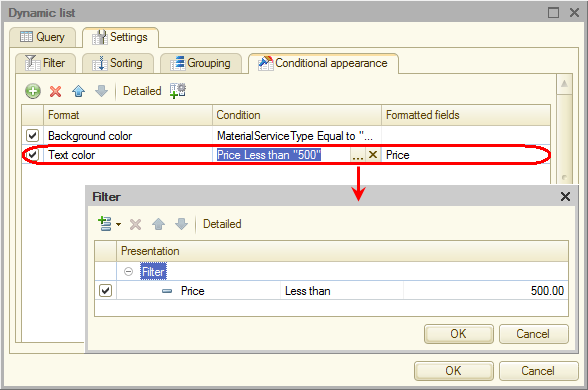
Fig. 27.20. Dynamic list conditional formatting settings - Click OK.
- Drag the Price field from the attributes pane to the controls pane (fig. 27.21).
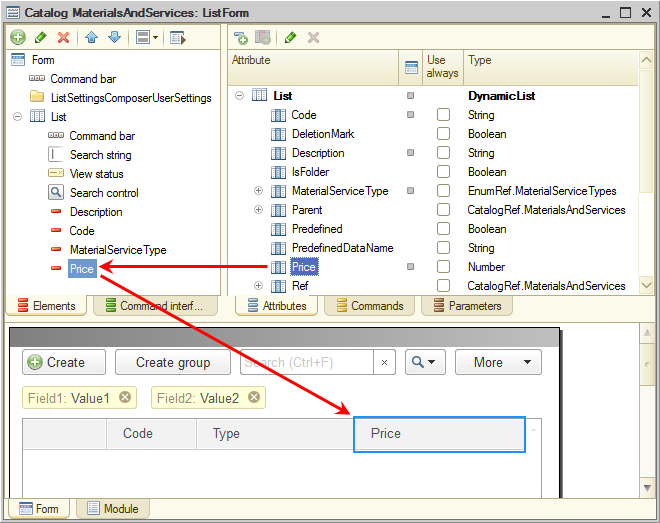
Fig. 27.21. Adding a column to the list form
Now let us specify individual properties for each conditional appearance settings item. - In the dynamic list settings window, on the Settings tab, click the first settings item and then click the Custom settings item properties
 button.
- Select the Include in custom settings check box, set Presentation to Services, and in the Edit mode field, leave the Quick access value.
- Click OK.
- For the second settings item, select the Include in custom settings check box, set Presentation to Low price, and in the Edit mode field, leave the Quick access value.
- At the bottom of the tab, set the general Editing mode property to Normal (fig. 27.22).

Fig. 27.22. Conditional appearance settings item properties
In 1C:Enterprise mode
Let us test the changes.
- Start 1C:Enterprise in the debug mode and open the list of materials and services.
You can see that materials and services are accompanied by their current prices, prices under 500 are displayed in blue color, and rows that represent services have lavender background.
Both conditional appearance settings are displayed above the list of materials and services, they have human-readable names, and you can easily enable or disable them (provided that you remove the general setting that adds the backgound color, if it is still present in the user settings), fig. 27.3.
Fig. 27.23. List of materials and services with the specified formatting
Finally, note the Auto save user settings property of a dynamic list (see fig. 27.16). It is enabled by default.
This is why, once a user closes the form, its list settings are saved to a system storage, and once this user opens this form again, the settings are loaded from the storage. In addition to that, users can save list settings manually with custom names by clicking Save settings or Select settings on the More menu. You can use this feature to store multiple settings options for a single list.
You can also revert to the list settings specified by a developer in Designer by clicking Set default settings on the More menu.