
Catalogs with predefined items
Finally, you will create the Warehouses catalog, which will store warehouses used by Jack of All Trades.
This catalog will contain a predefined item: the Main warehouse where all the materials are delivered.
In Designer mode
Let us create the catalog.
- Open Designer and create a Catalog configuration object named Warehouses.
The platform fills the synonym automatically based on the name. - In the Object presentation field, type Warehouse.
You do not have to fill the List presentation property because the platform will use the Warehouses synonym (fig. 3.65).
Fig. 3.65. Specifying main catalog properties - Click the Subsystems tab.
The configuration logic suggests that the list of warehouses should be available in the Services and Inventory sections since deliveries of materials and rendering of services are normally recorded for warehouses. - Select the Inventory and Services check boxes (fig. 3.66).

Fig. 3.66. Specifying subsystems where the catalog is available
In 1C:Enterprise mode
In the 1C:Enterprise window you can see that the Create menu of the Inventory section contains the Warehouse command that creates warehouses (fig. 3.72).

Fig. 3.72. The Inventory section
The command name is defined by the Object presentation property that you specified for this catalog.
Also, the Warehouses command that opens the list of warehouses is added to the Services and Inventory sections (see fig. 3.72). The command name is defined by the configuration object synonym because you have not specified the List presentation for the catalog.
- In the Inventory section, run the Warehouses command.
This opens the warehouse list form. The list of warehouses contains the Main item. This is the predefined item that you created in Designer. - On the Create menu, run the Warehouse command and create another item named Retail (fig. 3.73).
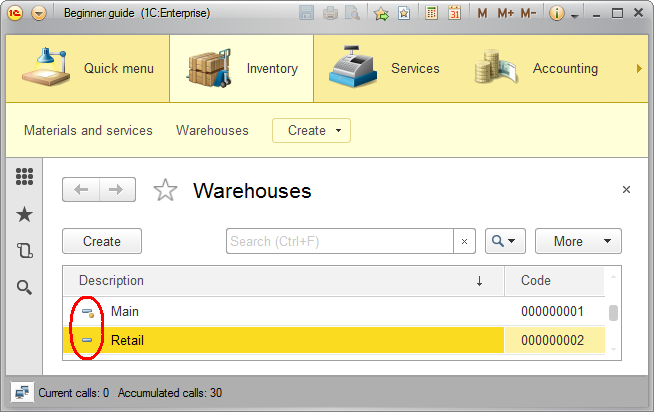
Fig. 3.73. Items of the Warehouses catalog
With that we will wrap up the preliminary work of creating catalogs, and will discuss some theory to explain the predefined items and the prompts that you see on the screen when you start or continue debugging.
Quick choice property
Let us fill another Warehouses catalog property: Quick choice.
- Click the Input fields tab and select the Quick choice check box (fig. 3.67).

Fig. 3.67. Specifying the Quick choice property
By default, this check box is not selected and clicking a selection button in the field that references to a catalog item opens the catalog item choice form. It might not be user-friendly, especially when the catalog is not hierarchical and is known to include only a small number of items.
The Quick choice property allows selecting items from a small drop-down list filled with items of this catalog instead of using a dedicated form (fig. 3.68).
Fig. 3.68. Selecting a warehouse from a drop-down list
This option is handy for the list of warehouses because this list will likely contain just a few items.
You have not set the Quick choice property for the other catalogs. This is because Materials and services is a hierarchical catalog and quick selection does not make sense for this catalog. The list of employees and especially the list of customers can be very large and the drop-down list might require too much scrolling, which is inconvenient.
Predefined items
- Click the Other tab and then click the Predefined data button.
This opens the list of predefined catalog items. At this point the list is empty. - Click the Add button
 and create a predefined item named Main (fig. 3.69).
Fig. 3.69. Creating a predefined catalog item
Note that in addition to the description the predefined catalog item has a name.
In the future, when you start learning 1C:Enterprise script, you will be able to refer to this catalog item using the name that you assigned in Designer. While a predefined catalog item description can be edited by users, the name is not visible to users and therefore they cannot edit it.
Before you start 1C:Enterprise, let us configure the applied solution interface to streamline catalog item creation (make the standard warehouse creation command visible in the Inventory section). - In the configuration object tree, double-click the Inventory subsystem and then click the Command interface button.
This opens the Command interface window, which lists all of the subsystem commands. - In the Actions panel.Create group, enable visibility for the Warehouse: create command.
You can also see that the Navigation panel.Normal group contains the Warehouses command, which opens the list of warehouses. The command is visible by default (fig. 3.70).
Fig. 3.70. Subsystem command interface settings window - Close the Warehouses catalog editor and start 1C:Enterprise in the debug mode.
- Confirm that you want to update the configuration.
The platform displays the window that lists the changes in the configuration structure (the new Warehouses catalog). - Click Accept (fig. 3.71).

Fig. 3.71. List of changes in the configuration structure