
Catalogs with tabular sections
Now you can proceed to creating the second catalog: Employees.
This catalog will be more complex than the Customers catalog. It will store not only the full employee name, but also their past employment data.
This data is uniform in structure (company, start and end dates, and job title), but the number of previous jobs varies. You will use a tabular section for storing this kind of data.
In Designer mode
Let us add the Employees catalog.
- In the configuration object tree, right-click the Catalogs branch and then click Add
 .
.
- In the Name field, type Employees.
The synonym is filled automatically based on the name. - In the Object presentation field, type Employee.
- In the Extended list presentation field, type Employee list.
Note that you do not have to fill the List presentation field (fig. 3.37).
Fig. 3.37. Specifying main catalog properties - Click Next.
This opens the Subsystems tab.
The configuration logic suggests that the list of employees should be available in the Services and Payroll sections. Indeed, when a service is provided you need to specify the employee in charge. This information is used for calculating employee wages. - Select the Services and Payroll check boxes (fig. 3.38).

Fig. 3.38. Specifying subsystems where the catalog is available - Click the Data tab.
- Leave the default values for the code length and type unchanged, and in the Description length field, type 50.
Let us change the synonym of the Description standard attribute, just like you did for the Customers catalog. - Click the Standard attributes button.
- Double-click the Description attribute and then, in the property palette, in the Synonym field, type Full name (fig. 3.39).

Fig. 3.39. Specifying synonym for the Description standard attribute
In 1C:Enterprise mode
In the 1C:Enterprise window you can see that the Employees command is now available in the command panels of the Services and Payroll sections. This command opens the list of employees (fig. 3.46).
Fig. 3.46. Payroll section
The command name is determined by the object synonym because you have not defined the List presentation for this catalog.
Also the actions panel of the Payroll section now has the Employee command that creates employees (see fig. 3.46). The command name is determined by the Object presentation property that you defined for this catalog.
Now let us use this command to create catalog items without opening the list of employees.
Tabular sections
Let us add the PastEmployment tabular section.
- Click the Add tabular section button
 (fig. 3.40).
Fig. 3.40. Adding a tabular section - In the Name field, type PastEmployment (fig. 3.41).

Fig. 3.41. Adding a tabular section
Then let us create the tabular section attributes. - Click the Add attribute button
 (fig. 3.42)
Fig. 3.42. Adding a tabular section attribute - Add the following attributes:
- Company. Type: String, length: 100
- StartDate. Type: Date, date contents: Date
- EndDate. Type: Date, date contents: Date
- JobTitle. Type: String, length: 100.
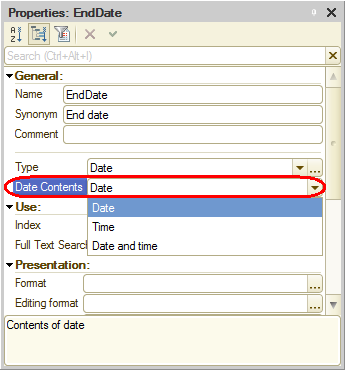
Fig. 3.43. Tabular section attribute properties
Finally, let us edit the command interface of the Payroll section to simplify creation of catalog items (make the standard employee creation command visible). - Open the editor of the Payroll subsystem configuration object and click the Command interface button.
This opens the Command interface window that lists all of the subsystem commands. - In the Action panel.Create group, enable visibility for the Employee: create command.
You can also see that the Navigation panel.Normal group contains the Employees command. It is visible by default (fig. 3.44).
Fig. 3.44. Subsystem command interface settings window
You do not have to add any commands to the actions panel of the Services subsystem because adding employees in this section is not a typical scenario.
You completed the creation of the Employees catalog. - Close the Employees catalog editor and start 1C:Enterprise in the debug mode.
- Confirm that you want to update the configuration.
The platform displays the window that lists the changes in the configuration structure (the new Employees catalog). - Click Accept (fig. 3.45).

Fig. 3.45. List of changes in the configuration structure
Filling tabular sections
Let us fill the tabular section.
- Run the Employee command.
This opens the catalog item creation form. The form title is defined by the Object presentation property. This form includes a tabular section with the attributes that you defined in Designer. - Create the following employees (fig. 3.47, 3.48, 3.49):
- Alexander D. Johnson
- Past employment:
- Company: NTI Company
- Start date: 2/1/2000
- End date: 4/16/2003
- Job title: Senior technician
- Past employment:
- John A. Walkman
- Past employment 1:
- Company: Global Automation Solutions, LLC
- Start date: 01/22/2006
- End date: 12/31/2012
- Job Title: Engineer
- Past employment 2:
- Company: QDA Telecommunications Group
- Start date: 06/20/1996
- End date: 01/21/2006
- Job title: Production manager
- Past employment 1:
- Michelle V. Turner
- Past employment:
- Company: Wilson and Beane Construction
- Start date: 2/6/2001
- End date: 4/3/2004
- Job title: Master builder
- Past employment:

Fig. 3.47. Filling an Employees catalog item
Fig. 3.48. Filling an Employees catalog item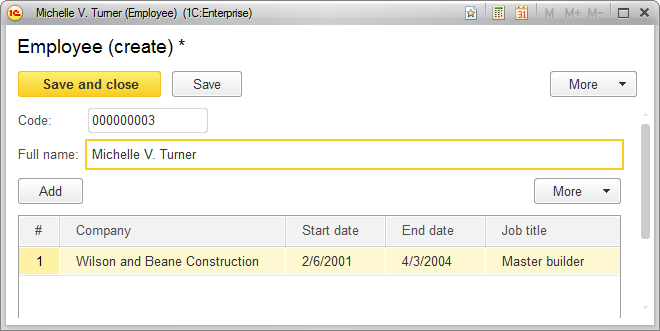
Fig. 3.49. Filling an Employees catalog item - Alexander D. Johnson
- Run the Employees command.
It opens the employee list form where you can view the list of added employees. Note that the form title is determined by the Extended list presentation property that you defined for this catalog (fig. 3.50).
Fig. 3.50. Employee list
Now you can proceed to creating the next catalog: MaterialsAndServices.