
Simple catalogs
Now that you are somewhat familiar with the features of Catalog configuration objects, you will create several objects of this type. They will describe the catalogs available in your database.
Since your company, Jack of All Trades, provides household appliance services, you obviously need to create a certain number of lists for keeping the records.
First of all, you need a list of company employees who provide the services.
You also need a list of customers.
Then, you need a list of services provided by your company, and a list of materials that can be consumed while providing the services. Finally, you need a list of warehouses where Jack of All Trades stores materials.
Let us start with the simplest things: the employee list and the customer list. The first goal is the customer list.
In Designer mode
Let us create the list of customers.
- In Designer, open your configuration.
- In the configuration object tree, click the Catalogs branch.
- In the configuration window command bar, click the Add
 button (fig. 3.16).
Fig. 3.16. Creating a Catalog configuration object - In the configuration object editor, in the Name field, enter Customers.
Based on the name, the platform generates the Customers synonym. As a reminder, the Synonym property defines the object presentation in the applied solution interface.
You can also specify additional properties that define various object presentations. These properties are optional. If they are not defined, the synonym of the Catalog configuration object is used to represent this object in the 1C:Enterprise interface. But this is not always the best option as you will see further.
In 1C:Enterprise mode
Configuration object presentations
An object can have multiple presentations.
- Object presentation determines the object name in the singular and is used in the standard commands. For example, it is used in the command that creates objects of this type: Customer: create.
The object presentation is required when the object synonym is defined in the plural or when it describes multiple objects because commands that open the catalog list and create a catalog item are automatically generated in the interface.
If a synonym is defined in the plural, it is absolutely suitable for the command that opens the Customers list (the list of all customers). But it is not a good option for the command that creates a catalog item (a single customer). This command requires a presentation in the singular: Customer. The object presentation describes the name of the command that adds a customer in the user interface. It is also shown in the title of the customer form (unless extended object presentation is available) and in the presentation of a reference to a customer. - Extended object presentation defines the title of the object form (for example, a catalog item creation form). If this property is omitted, the Presentation property of the object is used instead.
- List presentation defines the name of a list of objects, and it is also used in the names of standard commands (for example, the Customers command that opens the list of objects). List presentation is required when the synonym is defined in the singular.
This is often needed for documents (such as Goods receipt). In this case the list presentation must include the configuration object name in the plural (Goods receipts). - Extended list presentation defines the title of the list form, such as the catalog list form. If this property is omitted, the List presentation property is used instead.
Now let us define some of these properties.
- In the Object presentation field, type Customer.
- In the List presentation field, type Customers.
You can omit setting this property because the catalog synonym matches the List presentation property (fig. 3.17).
The list presentation seems to suggest List of customers as a name but in the application interface the lines List of employees, List of customers, and List of warehouses following each other will not look good.

Fig. 3.17. Specifying main catalog settings
Object affiliation with subsystems
Now let us include the object in subsystems.
- Click Next.
This opens the Subsystems tab of the Catalog configuration object editor. Here you can define the subsystems where this catalog is available.
The subsystem list includes the subsystems that you created earlier in the process of defining the application structure. Based on the business logic, the list of customers should be available in the Services section because each service is related to a specific customer. Accounting records generated in the Accounting section can also be filtered by customers. - Select the Accounting and Services check boxes (fig. 3.18).
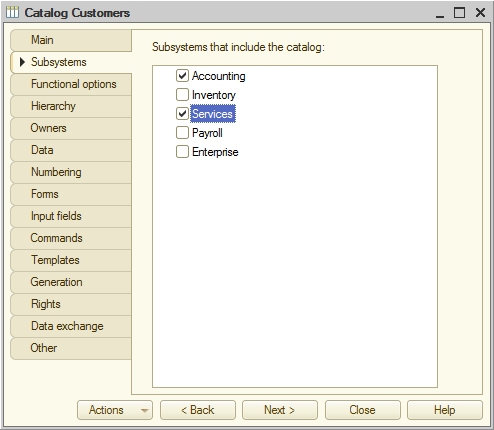
Fig. 3.18. Specifying subsystems where the catalog is available - Open the editor for one of these subsystems (for example, Accounting) and click the Content tab.
You can see that the objects of this subsystem now include the new configuration object: the Customers catalog (fig. 3.19).
Note that on the Content tab you can also modify the list of objects included in the subsystem.
Fig. 3.19. Objects included in a subsystem
Catalog code and description
In this section you will specify the catalog code and description settings.
- Return to the Catalog configuration object editor and click the Data tab.
Note the Code length and Description length fields.
The code length is an important catalog property. As a rule, the catalog code is used to identify a catalog item, and it contains a unique value for each catalog item. The platform can check the codes for uniqueness and perform automatic numbering of catalog items. So the code length defines the total number of items that can be stored in a catalog.
The maximum code length is 9 characters. This means that codes between 1 and 999999999 are available, which is okay for the small company Jack of All Trades.
Now let us look at the description length. 25 characters would clearly be too few. - In the Description length field, type 50 (fig. 3.20).

Fig. 3.20. Specifying catalog code length and description length
You also need a better name for the Description standard attribute, which will be displayed in the user interface. The word "description" is suitable for inanimate objects but our customers are people.
Since the user interface displays object synonyms, let us change the Synonym property of the Description catalog attribute. - At the bottom of the window, click the Standard attributes button.
- Right-click the Description attribute and then click Properties (fig. 3.21).

Fig. 3.21. List of standard catalog attributes - In the property palette of the Description standard attribute, in the Synonym field, type Full name (fig. 3.22).

Fig. 3.22. Property palette of the Description standard attribute
Note that you changed the synonym of the configuration object attribute instead of changing the synonym of the form attribute. Actually, in this case the platform automatically generates the item form for the Customers catalog.
So this attribute will have its synonym set in all types of forms, unless you decide to change it during the development of a custom form.
Also note that the default value of the Fill check property is Display error. It means that leaving the Description attribute blank will generate an error message (see fig. 3.29).
Item creation command
Before you start the applied solution in 1C:Enterprise mode, let us configure the application interface to simplify creation of catalog items.
1C:Enterprise features a common algorithm for arranging standard commands that open lists and create configuration objects. You will learn this algorithm using catalogs as an example, but it also applies to documents, chart of accounts, and so on.
The command that opens a catalog list and the command that creates catalog items are added to the interface of the sections (subsystems) that include the catalog. But the command that creates items is hidden from the application interface by default.
This is because viewing catalog lists is a frequent operation, while creation of catalog items is less frequent. So the item creation command should only be enabled for Catalog configuration objects in sections where item creation is the major user activity.
Let us make the standard customer creation command available on the actions panel of the Services section.
- Open the editor window of the Services subsystem and click Command interface.

Fig. 3.23. Opening subsystem command interface settings
This opens the Command interface window, which lists all of the subsystem commands.
When you have created the Customers catalog, the Customers command (used to open the catalog list) was automatically added to the Navigation panel.Normal group and made visible by default. Also, the Customer: create command was added to the Actions panel.Create group and made hidden by default. - Select the Visibility check box for the Customer: create command (fig. 3.24).

Fig. 3.24. Subsystem command interface settings window
You do not have to add any item creation commands to the Accounting subsystem because the business logic does not imply item creation in this section.
We assume that everyday operations with customers are mostly executed by the manager responsible for provision of services. These operations include creation of customers in the database when needed. And the accounting department simply processes the data in the database to obtain the reports they need.
This is why the customer creation command is added to the Services subsystem where the manager works. And the command is hidden from the accountants because we do not expect them to add customers.
But an accountant still has the option to create a customer using the list of customers (by opening the list and adding an item). The availability of the item creation command without the need to open the list of items is a matter of user convenience, it is not related to access restrictions. This is why we provide this handy feature to the manager instead of the accountant. - Close the Customers catalog editor and start the applied solution in the debug mode.
- Confirm that you want to update the configuration.
The platform displays the window that lists the changes in the configuration structure (the new Customers catalog). - Click Accept (fig. 3.25).

Fig. 3.25. List of changes in the configuration structure
Current section commands panel
Let us look at the applied solution window in 1C:Enterprise mode. If you click the Services or Accounting section, you will see the current section commands panel below the sections panel (fig. 3.26).

Fig. 3.26. The 1C:Enterprise window
The current section commands panel contains commands that belong to the selected section. First commands that open lists, then commands that create items, and finally commands that generate reports or run data processors.
In the command interface settings window for the Services subsystem (see fig. 3.24), in the Navigation panel.Normal group, you kept the default visibility of the command that opens the Customers catalog. This command is also visible by default in the Accounting subsystem. Therefore, both sections contain the Customers command that opens your first list.
Note that the Customers command name is taken from the List presentation catalog property. If the property value is not specified, the synonym of the Catalog configuration object is used instead.
Section commands that perform actions other than opening lists are combined into groups that are represented by menus in the user interface: Create, Reports, Tools, and custom developer-created groups. The Create menu contains commands that create database objects, such as documents or catalog items.
Note that the Services section, in addition to the Customers command, contains the Create menu (see fig. 3.26). This menu contains the command that creates items in your first catalog, you made the command visible in the section interface (in the Actions panel.Create section, see fig. 3.24). Now you can use this command to create catalog items without opening the list of customers.
Note that the default item creation command name is defined by the Object presentation property that you specified for this catalog. If you had not specified this property, the command name would be based on the synonym of the Customers catalog (Customers). This is both inconvenient because it is identical to the command that opens the list and not exactly correct because when you create catalog item, you create a single customer.
Note that the other applied solution sections have empty commands panels because you did not make the Customers catalog visible in these subsystems.
Creating catalog items
For now your catalog is empty, let us populate it with some items.
- In the Services subsystem, in the commands panel, on the Create menu, click Customer.
This opens the catalog item creation form (fig. 3.27). - In the Full name field, type Michael Johnson.
You do not have to type the code because it is generated automatically. - Click Save and close.

Fig. 3.27. Creating a catalog item
A message is displayed in the lower right corner informing you that an item is created or modified. This is handy because you do not have to open the list to ensure that the item is created. - Add another customer named Peter Smith.
And now let us add the last customer Shelley Jackson using the customer list form. - In the Services section, click the Customers command.
This opens the customer list form (see fig. 3.28).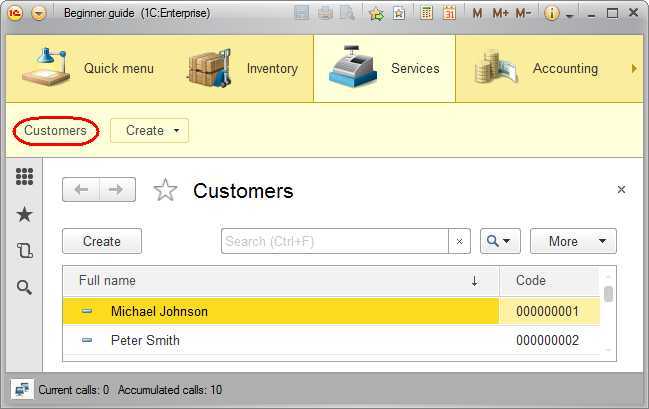
Fig. 3.28. Default customer list form
You can add a catalog item by clicking the Create button in the form command bar or by pressing the Insert key. - Click the Create button.
Note that the Full name field is marked by a red dotted line. This means that the platform performs the automatic fill check for this field. If you attempt to save a customer with an empty full name, you get an error message (fig. 3.29).
Fig. 3.29. Error message during catalog item creation
The error message is displayed because the platform performs automatic fill checks for some standard object attributes (for example, for the catalog description, provided that the default catalog presentation is set to As description). - In the Full name field, type Shelley Jackson.
Once you have added the items, the catalog looks as follows (fig. 3.30).
Fig. 3.30. The list of customers
You can open a catalog item for editing by double-clicking it.
For quick access to recently opened, created, or modified database objects (documents, catalog items, and so on) you can use the built-in history of user actions. The icon that opens the history is located on the tools panel (fig. 3.31).

Fig. 3.31. History of user actions
Using the history panel, you can open a recently created database object (for example, a catalog item) or run an applied solution command. If the history is long, you can use the search field at the top of the history panel. Novice developers often prefer to keep the history panel open at all times.