
1C:Enterprise 8.3. Administrator Guide. Contents
INFOBASE LIST MANAGEMENT
The controls located in the 1C:Enterprise startup window are intended to manage the infobase list: add new infobase and infobase folders, move infobase from one folder to another, edit properties of the existing infobase and delete unneeded infobase from the list.
The infobase list is displayed as a list (by default) or as a tree. A mode is selected in the startup customization dialog.
Fig. 20. 1C:Enterprise Startup
5.1. ADDING AN INFOBASE
5.1.1. Adding a New Infobase
In order to add a new infobase to the list, click the Add… button. A dialog will be displayed to select the mode for adding an infobase to the list:
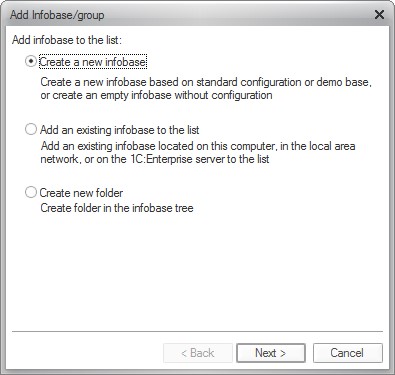
Fig. 21. Selecting Mode of Adding an Infobase to the List
If Create a new infobase mode is selected, 1C:Enterprise makes it possible to create an infobase based on a template infobase or to create an empty infobase.
When you click Next >, a selection dialog is displayed:

Fig. 22. Select Configuration Added
If you choose to create an infobase based on a template, select a source template from the template list.
In the next step you will be prompted to enter a name for the infobase and select infobase location type.
An infobase name is an arbitrary string of characters. The infobase name is limited to 255 characters, so you can assign meaningful names to infobase. An infobase name should be unique for the entire infobase list.
NOTE
Multiple infobases can be created with the same database connection string. This can be useful when you want to be able to access a single infobase using various clients without changing the infobase properties.
For description of creating a file infobase, see the next chapter. For description of creating an infobase located on the 1C:Enterprise server, see page 77.
5.1.1.1. Creating File Infobase
To create a file infobase, select the infobase location type as shown in fig. 23.

Fig. 23. Adding file infobase
Select an infobase location directory. If you specify a nonexistent directory, it will be created automatically when 1C:Enterprise is started.
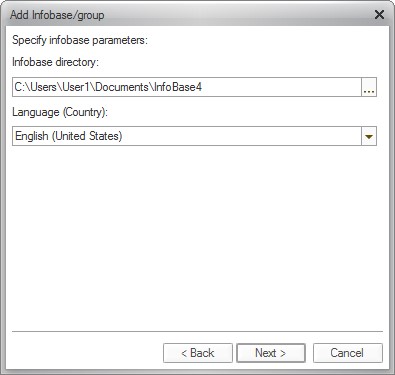
Fig. 24. Select Location Directory and Language for the Infobase
Clicking the selection button will open a standard dialog to browse to an existing directory.
NOTE
The name of the directory containing the infobase must comply with the RFC 2396 requirements, section 2.4.3 Excluded US-ASCII Characters (http://www.faqs.org/rfcs/rfc2396.html). The following characters cannot be used in the directory name: "<", ">", "#", "%", """, "{", "}", "[", "]", "|", "\", "^", "`", and characters with codes from 0 to 31 and 127.
If you select empty infobase creation mode, you can use the Language field to select the language that should be applied to data storage and sorting in the infobase. If you select a template, the language selection field may not be displayed.
When you click Next >, a window will be opened to specify startup options (see page 87).
If an empty infobase was created and the specified directory contains no configuration files, the infobase creation mode selection window will also be displayed when choosing 1C:Enterprise operation mode. If template-based mode is chosen, the infobase will be created basing on this template.
5.1.1.2. Creating Client/Server Infobase
To create a client/server infobase, select the infobase location type as shown in fig. 25.
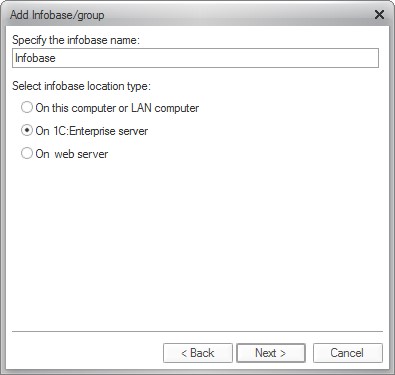 Fig. 25. Adding an Infobase on the Server
A client/server infobase is identified by two parameters:
The 1C:Enterprise server cluster address; The infobase name.
As mentioned above, the 1C:Enterprise server cluster address consists of the central server name and the number of the network port used by the cluster manager (e.g., Test_Server:1541). If the cluster manager uses the default network port (1541), server name is sufficient. The infobase name is unique within the 1C:Enterprise server cluster.
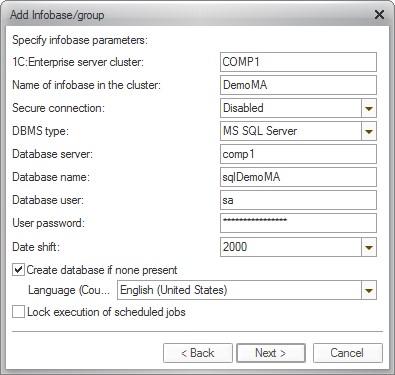 Fig. 26. Creating a New Infobase
NOTE 1
If cluster backup is used (see "1C:Enterprise 8.3. Client/Server Version. Administrator Guide"), the backup list may be specified directly in the 1C:Enterprise server cluster field as follows: Server1, Server2:Port, Server3. This format facilitates use of the list, for example to create a common infobase list.
NOTE 2
The name of the DBMS database must comply with the RFC 2396 requirements, section 2.4.3 Excluded US-ASCII Characters (http://www.faqs.org/rfcs/rfc2396.html). The following characters cannot be used in the database name: "<", ">", "#", "%", """, "{", "}", "[", "]", "|", "\", "^", "`", and characters with codes from 0 to 31 and 127. Each DBMS may have its own requirements as well.
The information entered in this window and required to create an infobase depends on the database management system (DBMS) used. You will find the information for the specific systems below. Microsoft SQL Server
DBMS type: Microsoft SQL Server.
Database server: server name. It can be specified as a computer name (if a single server instance is installed on the computer) or as the name of a specific instance (if multiple instances are installed). For example, Server/instance.
If the 1C:Enterprise server and Microsoft SQL Server are located on the same computer and Native Client is installed for Microsoft SQL Server, the SHARED MEMORY protocol can be used to establish a connection between these servers. To do so, specify the lpc: prefix before the Microsoft SQL Server name. In this case the name of the server database management system will be lpc:Server/instance.
Database name: a database name must begin with a Latin alphabet letter or an underscore ("_"). This first character can be followed by alphanumeric characters (Latin alphabet only) and symbols "_" and "$". The maximum length of a name is 63 characters. No spaces can be used in a name. A reserved word of the database server query language cannot be used as a name.
Database user: the name of the database server user that will access the database. It is important that this user is either the database server administrator (sa) or the database owner (if the database already exists) in order to be able to modify the structure of the selected database in the future. In the latter case, this user should have read access to the master database and full access to the tempdb database. Besides the abovementioned, the specified user must be a member of processadmin or sysadmin fixed server role.
User password: password of the user that will access the database.
Date shift (available values are 0 and 2000). This parameter determines the number of years that will be added to the dates when they are stored in the Microsoft SQL Server database or subtracted upon extraction. This parameter is needed because of the specific features of date storage in the Microsoft SQL Server. The DATETIME type used in the Microsoft SQL Server makes it possible to store dates from January 1, 1753 to December 31, 9999. If in the process of working with the infobase it may be necessary to store dates below the lower limit of this range, 2000 should be selected as the value for this parameter. If no such dates will be needed, zero date offset can be selected. After an infobase is created, the value of this parameter cannot be modified.
IMPORTANT!
If the application uses accumulation registers or accounting registers, the Date shift field should be set to 2000. If 0 was specified in this field when creating a database, dump the infobase into a file (see page 110), create a new database specifying 2000 in the Date shift field and load the infobase (see page 111).
PostgreSQL
DBMS type: PostrgeSQL.
Database server: server instance name.
Database name: a database name must begin with a Unicode 3.2 letter or a symbol "_", "@", and "#". This first character can be followed by Unicode 3.2 standard letters and symbols "_", "@", "$", "#". The maximum length of a name is 128 characters. No spaces can be used in a name. A reserved word of the database server query language cannot be used as a name.
Database user: the name of the database server user that will access the database. This user must have CREATEDB or SUPERUSER privileges, or be the database owner (if it already exists).
IBM DB2
DBMS type: IBM DB2.
Database server: server instance name. If there are database server instances different from the default instance on the computer, you should also specify the name of the installed IBM DB2 instance selected during its installation (separated by a slash). For example, computer/db2name.
Database name: database name should be unique within the location the databases are included in the directory. In Linux DB2 database manager implementation this location is a directory, while in Windows it is a logical drive. Database name can only begin with a Latin alphabet letter followed (optionally) by alphanumeric Latin characters. The maximum length of a name is 8 characters.
Database user: the name of the database server user that will access the database. This user must have CREATEDB or SUPERUSER privileges, or be the database owner (if it already exists). Maximum length for a database user name is 8 characters. Oracle Database
DBMS type: Oracle Database.
Database server: server instance name. When an infobase is created, a TNSname is used for the database server name. This means that when an infobase is created, you should enter a string formatted as //database_server_name/ service_name for the database server name (other formats are possible for a TNS-name).
Database name: a database in 1C:Enterprise corresponds to a database schema in Oracle Database. When an infobase is created in 1C:Enterprise, a user and their database schema are created in Oracle Database. A database schema name can only contain alphanumeric characters (Latin alphabet) and an underscore ("_"). Database name can only begin with a Latin alphabet letter. The maximum length of a name is 30 characters.
Database user: when creating an infobase in 1C:Enterprise, specify the user to call the database. Specify the user with DBA rights (e.g. SYSTEM) if the data scheme is being created by the system, and any other user if the scheme has been already created by the Oracle Database administrator. This can be a user whose data scheme is used for 1C:Enterprise, i.e. you can specify the same name in the Database Name and Database User properties.
Clarification with regard to rights required
When an existing data scheme is being used, the account under which the database is called will sometimes not have DBA rights. In this case the following access rights should be granted to the account:
CREATE SESSION
CREATE PROCEDURE
CREATE TRIGGER
CREATE SEQUENCE
CREATE TABLE
Instead of specifying particular rights, you can set rights to perform the following roles:
CONNECT
RESOURCE
The account should also be provided with quotas for table spaces V81C_DATA, V81C_INDEX, V81C_LOB, V81C_INDEX_BIG (if this exists).
You can refer to the example below to set access rights.
create  user <username> identified "<password>";
grant  create session to <username>;
grant  create table to <username>;
grant  create trigger to <username>;
grant  create sequence to <username>;
grant  create procedure to <username>;

alter  user <username> quota UNLIMITED on v81c_data;
alter  user <username> quota UNLIMITED on v81c_index;
alter  user <username> quota UNLIMITED on v81c_lob;
Clarification with regard to the password term
If the defaults of Oracle Database 11 are used, the password is valid for 180 days. Upon expiration of this period, an error may occur: Database server not found. DBMS error: ORA-28002: the password will expire within 7 days. In this case, you will have to change the password using the DBMS tools:
run the SQL*Plus utility;
connect to the database;
execute the ALTER USER <UserName> IDENTIFIED BY <Password> command.
The password then changes to the one specified in the query. It should be noted that the 1C:Enterprise server will store the password in the settings file and try to log on with the old password. So it is easier to specify the old password when executing the ALTER USER command without changing the password.
To disable the password expiration period, see the documentation on
Oracle Database 11 (http://docs.oracle.com/cd/B28359_01/network.111/b28531/ authentication.htm#i1007339).
General Options
User password: password of the user that will access the database.
If Create database if none present is checked, the database will only be created if the specified database server does not contain a database with this name. If this option is not checked, the database will not be created;
The Language (Country) parameter is selected from the list and defines the national settings that will be used in operations with the infobase. This parameter can be changed later using the Designer. If a new infobase is created based on a template containing infobase dump file (*.dt), the Language option is not displayed because the infobase dump file already contains language information.
If Lock execution of scheduled jobs is checked, performing scheduled jobs in the newly created infobase will not be allowed. If the option is unchecked, the existing scheduled jobs will be launched as soon as the infobase is connected to the server.
Database Creation
If all the options are correct, the following actions will be carried out:
An attempt to connect to the database on the specified database server using the selected user parameters;
If the database is not available and the Create database if none present is checked, an attempt to create the required database will be made. When an infobase is created, a user with the password matching the user name will be created in the Oracle Database. The user account is locked for the period of user creation. In the process of connecting to the Oracle Database 1C:Enterprise server uses the user name and password specified when creating the infobase;
If the specified database finds an existing 1C:Enterprise infobase, this infobase will be connected to. If an infobase is not found, a new infobase will be initialized. If the user specifies a template for creating a new infobase, this template will be used for initialization.
IMPORTANT!
Only one 1C:Enterprise server cluster can connect to the infobase stored on the database server.
For description of the infobase startup options page, see page 87. Concurrent Use of One Database by Several Infobases
The platform does not prohibit specifying one database in several infobases when creating an infobase on the 1C:Enterprise server. However, the organization of the cluster service data implies that one database corresponds to one service data structure. Concurrent use of several service data instances with one database breaks their logical integrity.
If several infobases use one database at the same time, the following will not work:
the infobase lock mechanism (for example, launching two designers may destroy the configuration)
the object locks mechanism
the managed locks manager
retrieval of the real-time timestamp
other mechanisms that use shared data stored by the cluster manager
Parallel data modification in this case may cause their irreversible destruction.
Reading from the database may also provide unreliable results.
Therefore, concurrent use of one database by several infobases is not recommended in standard scenarios.
At the same time, concurrent connection of several infobases to one database may be useful for debugging configurations and troubleshooting configurations and platforms. This is why concurrent connection of several infobases to one database is not prohibited programmatically in the 1C:Enterprise system. You can only use this option in exceptional cases, taking all the necessary precautions:
Parallel data modification in one database by several infobases may cause their irreversible destruction.
If the data being used by one infobase is concurrently read by another infobase, both infobases may provide unreliable results if at least one of the infobases has modified the data or used any locks.
5.1.2. Adding an Existing Infobase
If you select adding an existing infobase, you can add an infobase residing on the local workstation, on the local network or on the 1C:Enterprise server (only for the thin and web clients, see page 86).

Fig. 27. Adding an Existing Infobase
When you click Next >, a dialog is displayed where you will need to enter a name and select location type for the infobase.
An infobase name is an arbitrary string of characters. The infobase name is limited to 255 characters, so you can assign meaningful names to infobase.
For explanation of how to add an existing file infobase, see the next section.
For details on adding an existing infobase to the 1C:Enterprise server, see page 79.
5.1.2.1. File mode
For the file mode you should select a directory where the infobase will reside. If you specify a nonexistent directory, it will be created automatically when 1C:Enterprise is started.
Clicking the selection button will open a standard dialog where you will be able to browse to an existing directory containing an infobase.
NOTE
The name of the directory containing the infobase must comply with the RFC 2396 requirements, section 2.4.3 Excluded US-ASCII Characters (http://www.faqs.org/rfcs/rfc2396.html). The following characters cannot be used in the directory name: "<", ">", "#", "%", """, "{", "}", "[", "]", "|", "\", "^", "`", and characters with codes from 0 to 31 and 127.
For description of the infobase startup options page, see page 87.
5.1.2.2. Client/Server Mode
If an existing infobase is added to the list, the Add Infobase/group window will be displayed.
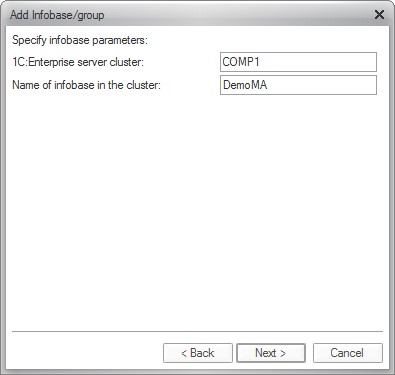
Fig. 28. Adding an Existing Infobase
The following should be specified in the fields:
The 1C:Enterprise server cluster address. The cluster address is the address of the central server in the cluster plus the number of the cluster manager process network port (1541 by default); The infobase name.
NOTE 1
If a dot notation IP address is specified as the 1C:Enterprise central server address, it is not required in DNS (hosts).
NOTE 2
If cluster backup is used (see "1C:Enterprise 8.3. Client/Server Administrator Guide"), the backup list may be specified directly in the 1C:Enterprise server cluster field as follows: Server1, Server2:Port, Server3. This format facilitates use of the list, for example to create a common infobase list.
NOTE 3
The name of the DBMS database must comply with the RFC 2396 requirements, section 2.4.3 Excluded US-ASCII Characters (http://www.faqs.org/rfcs/rfc2396.html). The following characters cannot be used in the database name: "<", ">", "#", "%", """, "{", "}", "[", "]", "|", "\", "^", "`", and characters with codes from 0 to 31 and 127. Each DBMS may have its own requirements as well.
At that the system does not check whether an infobase with the specified parameters exists.
If the Designer is unable to find an infobase with the specified parameters, it will display a message prompting the user to create a new infobase. If the user agrees to create a new infobase, the Create Infobase/group form is displayed by the Designer.
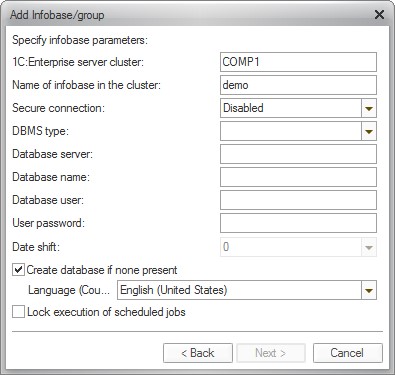
Fig. 29. Infobase Parameters
The fields in this form should be populated with the parameters required to create a new infobase.
For description of the infobase startup options page, see page 87.
5.1.2.3. Infobase Located on a Web Server
In order to add a new infobase that is located on the web server, start 1C:Enterprise thin client (1Cv8c).
In the infobase adding dialog you will need to select On web server for the infobase location type.
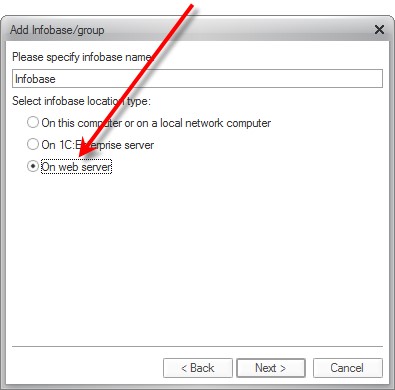
Fig. 30. Adding an Infobase on the Web Server
The next page prompts you to specify web server connection options (connection string, connection speed, etc.).
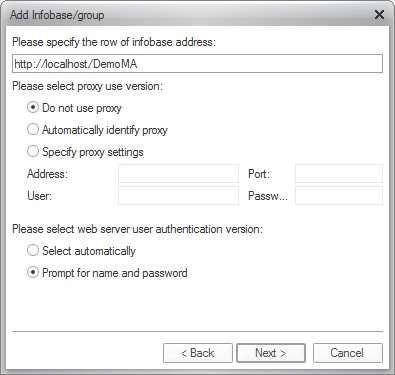
Fig. 31. Web Server Connection Options
The Please select web server user authentication version parameter is intended to select the authentication method:
Select automatically – in this case web server authentication using operating system tools is attempted. If this attempt fails, the user is specifically prompted for login/password.
Prompt for name and password – the user will always be prompted to enter the login/password for web server authentication.
For description of the infobase startup options page, see page 87.
5.1.3. Infobase Startup Options
This page specifies infobase startup options.
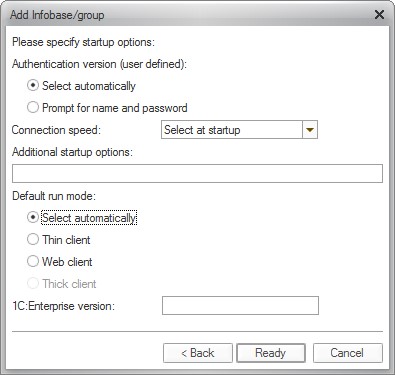
Fig. 32. Infobase Startup Options
The Authentication version (user defined) option may have the following values:
Select automatically – in this case authentication using operating system tools is attempted initially while if this attempt fails, the user will be prompted to enter login/password to access the infobase.
Prompt for name and password – in this case login and password entry window will always be used for authentication.
The Connection speed option is intended to define the speed of connection with the infobase or 1C:Enterprise server. The following values are possible for the option:
Normal – regular speed. No specific issues regarding system operation.
Low – slow connection. In this mode there are some specific issues in 1C:Enterprise behavior that are described in the "1C:Enterprise 8.3. Developer Guide".
Select at startup – in this mode every time an infobase is launched, it will be possible to select the connection speed. The Slow connection checkbox at the bottom of the 1C:Enterprise startup window makes it possible. If a specific value (Normal or Low) is set in the infobase properties, the Slow connection checkbox in the 1C:Enterprise Startup dialog cannot be toggled and matches the value selected in the infobase properties.
The Slow connection checkbox in the 1C:Enterprise startup dialog for the thin client will only be available to toggle if the infobase list contains at least one infobase with the required 1C:Enterprise version 8.3 or later and with the Connection speed option set to Select at startup. Otherwise the checkbox cannot be toggled and matches the connection speed specified in the infobase properties.
The Additional startup options field is intended to specify various command line options that will be transferred to the executable file. For details on the command line options, see the built-in help (1C:Enterprise 8 Startup and startup parameters). The L and VL parameters specified in that field will only apply if the infobase is launched with the help of an interactive launcher (see page 59).
The Default run mode option determines the client that will be used to access the infobase:
Select automatically – in this mode the client application type will be determined based on the Default run mode configuration property and the Run mode user property.
Thin client – thin client will be used to run the infobase.
Web client – web client will be used to run the infobase. This client is only available when the infobase is accessed via a web server.
Thick client – thick client will be used to run the infobase. This client will not be available when the infobase is accessed via a web server.
1C:Enterprise version This field is intended to specify a specific version number that should be used to access this infobase. Besides, 8.1, 8.0 can be entered as values for this field. In this case 1C:Enterprise 8.0 or 1C:Enterprise 8.1 version installed on this computer will be used to access the infobase. With this arrangement it is not reasonable to enter a specific version number.
5.1.4. Certificate setup parameters
If infobase creation on a web server is selected (see page 86) and the HTTPS protocol is specified in the Please specify the row of infobase address field (for instance, https://localhost/DemoMA is specified instead of http://localhost/DemoMA), you can access the page specifying certificate setup parameters.
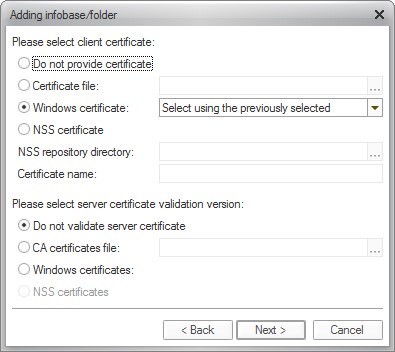
Fig. 33. Certificate setup parameters
This page allows you to define where the client certificate should be selected from and how the server certificate should be verified. A detailed description of parameter groups is provided below.
Please select client certificate is used to select the location of the client certificate.
○ Do not provide certificate defines that only web servers that do not require a client certificate can be connected to.
○ Certificate file allows you to select the file that stores a client certificate and its private key. If the file is password-protected, the user will be prompted to enter the password when attempting to connect.
○ Windows certificate indicates that the client certificate will be selected from the Windows OS certificate store. If the system can provide several client certificates appropriate for the given connection, you can define any further steps to be taken by the system.
□ Select using the previously selected allows the user to select a certificate being used through the Certificate Selection dialogue. The certificate selected will automatically be used from then on.
□ Select always allows the user to select a certificate being used through the Certificate Selection dialogue irrespective of whether any certificate has been selected before. The certificate selected may automatically be used with the Select using previously selected parameter from then on.
□ Select automatically indicates that the system uses an arbitrary certificate appropriate for the connection being established. The certificate selection dialogue is not displayed.
○ NSS certificate – the client certificate is provided from the NSS certificate store. In this case you should specify the following additional settings:
□ NSS repository directory – the directory with NSS certificate store files should be selected. If the store is password-protected, the user will be asked to enter the password when attempting to connect.
□ Certificate name – the name of a specific client certificate in the NSS certificate store selected. If the name is not specified, the certificate will be selected automatically. When the Mozilla Firefox store is used to store certificates, it is not recommended to specify the value for this property, as the certificate name depends on the web browser and can be unreadable.
Please select server certificate validation version indicates the way certificates presented by the web server should be verified:
○ Do not validate server certificate means that the web server certificate will not be verified and, therefore, certificates of Certification Authorities (CA) will not be used.
○ CA certificate file allows you to select a file that stores the certificates of certification authorities. If the file is password-protected, the user will be prompted to enter the password when attempting to connect.
The parameter is not available when the NSS certificate is selected as a client certificate.
○ Windows certificates indicates that certification authority certificates should be provided from the Windows system certificate store.
The parameter is not available when the NSS certificate is selected as a client certificate.
○ NSS certificates indicates that Certification Authorities’ certificates should be provided from an NSS system certificate store specified in the client certificate settings.
The parameter is available only when the NSS certificate is selected as a client certificate.
5.2. EDITING AN INFOBASE
To edit the name or directory of any infobase in the list, select the infobase name from the list and click the Change button. In order to change infobase properties a dialog is used that is similar to the dialog that is used to add an existing infobase (see page 83).
5.3. DELETING AN INFOBASE FROM THE LIST
To delete an infobase from the list, select its name in the list and click the Remove button. The selected infobase will be deleted from the list.
NOTE
This operation only deletes the infobase from the list, but does not delete the infobase directory from the computer hard drive or the infobase located on the 1C:Enterprise server. This should be done manually.
5.4. INFOBASES ORDER IN THE LIST
If sorting by name is not selected in the startup dialog settings (see the section below), you can rearrange the infobase in the list using your mouse or context menu commands.
To move an infobase line in the list, select the desired line, left-click and hold it and drag the mouse pointer in the desired direction. During dragging, the anticipated destination is outlined.
Drag the mouse pointer to the desired position and release the mouse button.
The infobase list lines can also be rearranged using the context menu items Move Up (Ctrl + Shift + Up Arrow) and Move Down (Ctrl + Shift + Down Arrow). The commands function in a "loop", that is, when the first or the last position is reached and the command is repeated, the line will be moved to the end or to the beginning of the list.
Sort Ascending and Sort Descending commands are available as well: they are intended to rearrange the infobase list accordingly.
If tree view is selected in the startup dialog settings (see page 94), you should note the following specific features applicable to dragging and dropping a line containing an infobase:
If an outline points to a folder, the line being dragged will be moved to the end of the list in the specified folder.
To move an infobase or a folder to a specific position within a folder, expand the folder first.
5.5. MAINTAINING A HIERARCHICAL INFOBASE LIST
This section describes the actions required to create and rearrange an infobase list in the tree view.
5.5.1. Adding an Infobase Folder
Infobase folders are worth creating if you work with multiple similar infobase on your workstation or if the number of infobases is fairly large and it takes some time to find the one required.
Folder creation mode is available if the Display as tree mode was set in the startup dialog settings.
If the mode is enabled, the infobase list is displayed as a tree where the Infobases root folder already exists. You cannot change or delete this folder.
To add an infobase folder, select the folder where you want to create a new subfolder (point to the folder line or to any line containing an infobase belonging to this folder) and click Add. The addition mode selection dialog will be displayed.
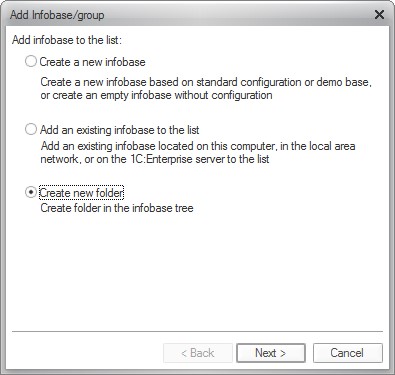 Fig. 34. Creating a New Folder
Select the Create new folder option and click the Next > button.
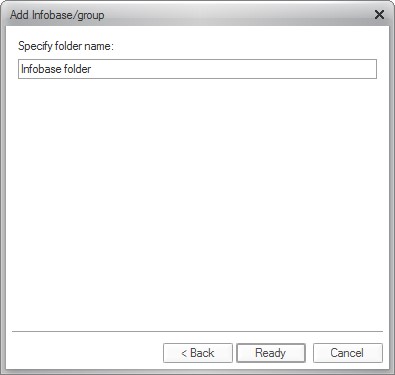 Fig. 35. New Folder Name
Enter the name of the folder (no slash ["/"] symbols are allowed) and press Ready.
The created folder is placed in the specified infobase folder (at the end of the specified folder unless sorting by name is enabled).
5.5.2. Editing an Infobase Folder
To modify an infobase folder name, select the line in the list containing the folder and click Change. The Editing folder window will be displayed containing the name of the selected infobase folder.
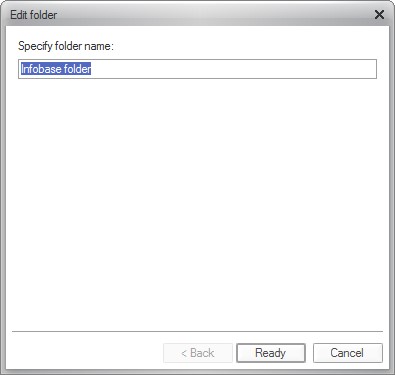
Fig. 36. Editing a Folder
Enter the new name and click Ready.
5.5.3. Deleting an Infobase Folder
To delete an infobase folder from the list, select its name in the list and click Remove. The selected infobase folder is deleted from the list.
IMPORTANT!
All the infobases belonging to the folder will also be deleted from the list.
5.6. STARTUP WINDOW CUSTOMIZATION
Click the Settings button in the startup dialog. The startup customization dialog is displayed.
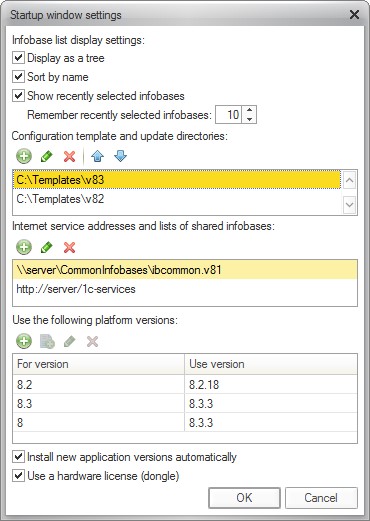
Fig. 37. Startup Dialog Customization
This dialog is only displayed if customization is carried out from the interactive launcher. When thick client (1ñv8) is used to initiate customization, the settings window will lack the Use the following platform versions field while if the process is initiated in the thin client (1ñv8c), the Configuration template and update directories field will not be available either.
If Display as tree is checked, the infobase list is displayed as a tree.
If Sort by name is checked, the list is sorted by name within each folder.
If Show recently selected infobases is checked, the number of infobases used recently is shown in the Remember recently selected infobases field.
The list of the recently selected infobases is shown at the top of the general list. Infobase names are in bold. This list is displayed in the order of selection: the most recently selected infobase is at the very top of the list. The settings applied to list sorting do not influence the infobase order in the list of the recently selected infobases. Only selection is allowed in this list. Editing and deleting of infobase are available if you select an infobase in the general infobase list.
The Configuration template and update directories field specifies the list of the directories containing the templates for configuration and update. For example, this list may contain the company's shared template directory and a template directory used for local tasks.
NOTE
The Configuration template and update directories field is not available for thin client customization window.
The Lists of common infobases field is intended to edit the assortment of the common infobase lists. When 1C:Enterprise is launched, the infobases contained in the common infobase lists will be added to the major infobase list. If the local configuration file contains the CommonCfgLocation parameter, the infobases that are specified in the CommonInfoBases parameters (if any) in the shared configuration file (1CESCmn.cfg, for details see page 240) will also be added to the major infobase list. In addition, infobases received through internet services will be added to the infobase list. For a description of the internet services used to obtain lists of common infobases, see page 319.
The paths to the templates directory or a list of shared infobases are displayed in the customization windows, but only if these paths are set with the help of the appropriate parameters of the local configuration file – 1CEStart.cfg (see the description on page 241). If these paths are specified in the shared configuration file (1CEScmn.cfg, see the description on page 240), they will not be displayed in the customization dialog.
The Use the following platform versions field contains a list of specifications of the version numbers used by the system. This list is used when some infobases need a version that does not match the highest version already installed on the computer. For example, if you specify the comparison string 8.3 = 8.3.3.657, when infobase properties specify version 8.3, version 8.3.3.657 will be used to run this infobase instead of the version with the highest available number.
The Use hardware license (dongle) parameter is responsible for the dongle search when you are launching the client application. The parameter change is applied when the next session is launched and changes the value of the UseHwLicenses parameter in the 1CEStart.cfg file (see page 241).
NOTE
When the launch dialog is customized, the CommonInfoBases, ConfigurationTemplatesLocation, DefaultVersion and UseHwLicenses parameters are only changed in the local configuration file of the account under which the launch dialog is customized.
The Install Nnew Version application versions aAutomatically parameter controls the automatic installation option for a new version. The option button defines the value of the AppAutoInstallLastVersion parameter in the 1CEScestart.cfg file (see page 241).
5.7. THE LISTS OF COMMON INFOBASES
The lists of common infobases are files with v8i extension that contain references to the common infobases.
The location of the common infobase list is defined in the CommonInfoBases option in the configuration files (for details on 1CEStart.cfg see page 241, for details on 1CEScmn.cfg see page 240). The common infobase lists are formatted similarly to the major infobase list (see page 235).
The common infobase list can be generated manually or you can save the existing references to infobase to a file. To do so, you should use the Save reference into file command of the infobase list context menu.
The common infobase list can be directly used to launch 1C:Enterprise. When the file with v8i extension is run, 1C:Enterprise will be launched and the startup dialog will only contain the references that are available in this common infobase list.
TIP
We recommend specifying Normal for connection speed (unless remote users exist or the infobase is located on a remote server). This will prevent Slow connection checkbox from displaying.
You can also specify the internet service that will provide a list of common infobases in situations when the common infobase list from a local network cannot be used. For instance, when the infobase is used via the internet (using a connection through a web server). For details on internet services used to get a list of common infobases, see page 319.