
Lesson 1-1
Before we start
1C:Enterprise:
- Rapid development tool focused on business applications
- Run-time environment to run the apps
The course
This course is designed to help you learn the ropes of 1C:Enterprise platform (The Platform) and to start developing business applications using it. This course doesn’t cover all the Platform’s features and programming techniques but gives you all the essentials.
The course uses a sample application included into “Practical developer guide 8.3” but it doesn’t follow the Guide itself. Instead it provides you with:
- a step-by-step instruction on building this app;
- videos showing some of these steps;
- detailed explanations of concepts and techniques for every decision we make during the development process.
The course does not give a theory in theme-structured manner. Instead, it follows the natural flow of the development process and introduces a correspondent topic when you come to a point of a specific functionality implementation.
We recommend you to create a new empty infobase and follow all the steps of the course lessons. Otherwise, you could miss important details or lose sight of the big picture.
At the end of every lesson, you will be prompted to pass self-test quiz on the subjects covered by the lesson.
At the end of the course you will be able to take the final online test and get your “1C:Enterprise Professional” certificate if you pass it.
The task
Automate the operations of a service provider (home appliances repair).
Installation and the first run
To start the course, you need to download the latest version of the free training Platform from here.
The course is built on the full version of the Platform, so screenshots and videos presented in the course might differ from what you will see if you use the training version.
The installation procedure is perfectly straightforward. You can just leave all the setting by default, and the Platform will be all set and ready to go. After the installation is completed, you will see something like this in your Start menu:

Let’s run 1C:Enterprise and here is the first thing that we will see.
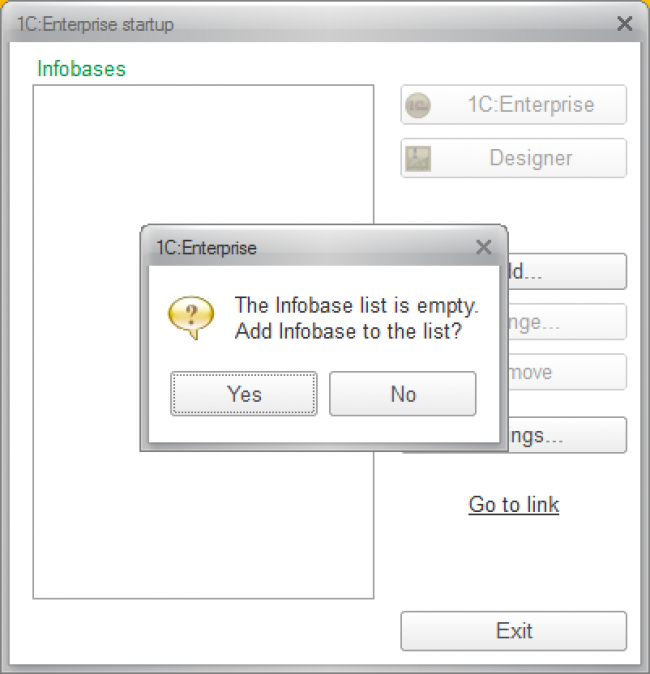
The Platform tells us that there are no infobases to work with, so first we need to create an infobase.
Infobase
To start with let’s learn what the infobase is. An infobase is a relational database of specific structure that contains:
- application
- system settings
- data
The application (also known as the Configuration) includes everything described in a Designer mode. It contains a data structure description, source code, forms and more. When you distribute your app, this part of the infobase is all you need to provide your client with.
System settings consist of a users list, regional settings and some other internal data necessary for the system operation.
User data is everything that users input into infobase using the features the application provides them with. It might be, for instance, the list of all services our company provides, all invoices and receipts we registered and so on.
As specified above the infobase has a specific structure, meaning that you cannot use 1C:Enterprise to work with any database because the Platform expects it to contain certain tables with certain fields and relations. You can create an infobase only with the Platform.
It also means that you are not supposed to work with the infobase using anything but 1C:Enterprise (although, technically you can get access to some data using third-party tools).
The definition above also implies that user data along with an application to manipulate the data are stored in a same database (unlike other database management system). Therefore, when you make a copy of your infobase (using backup and restore, for instance) you are transferring all you need to work (well, except the Platform).
OK, let’s move on with the infobase creation by answering “Yes” to the question above.

Here we have two options and whereas “Creating an infobase” makes a perfect sense (there are no infobases yet, so we need to create one to start with), the second option raises a question: is it possible for infobase to exist without being shown in the list? In other words: what do we see in the list? Is it a complete inventory of all existent infobases?
The answer is “no”.
There can exist numerous infobases (on this computer, in the local network or even on the Internet) you can technically work with. What you see here is just a list of “shortcuts” created locally to remember the infobases you use. Moreover, this list is user-related. Every user will see his or her list in this form.
So, the options we were presented with can be described as following:
- “Creating an infobase” - create a new infobase and create its shortcut in the list.
- “Adding an existing infobase to the list” - create only a shortcut the infobase that is already created.
Note that we can create an infobase using this form, but the only thing we can delete here is a shortcut. When you press “Remove” in this form, the infobase stays intact but its shortcut gets deleted from your list.
Creating a new infobase
Let’s select “Creating an infobase” option. Here is what we are to see next:
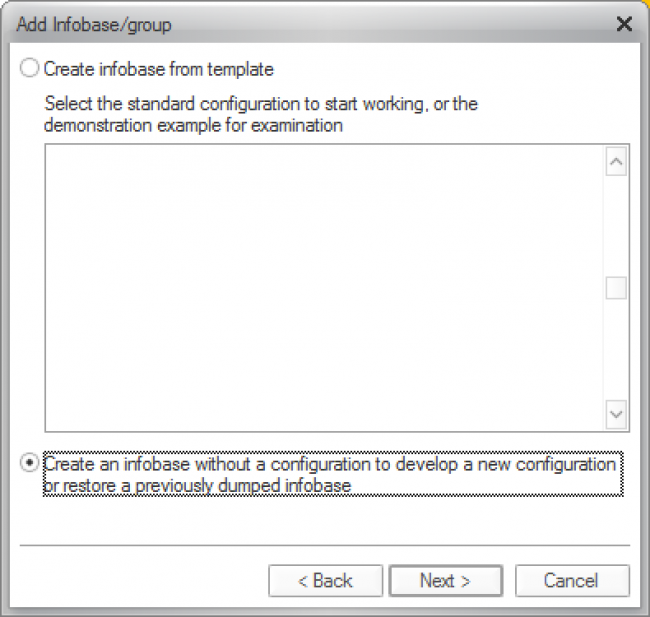
The real difference between these two options is about application part of the infobase. You can download application somebody else has developed (from 1c-dn, for example) and install it on your computer by running “setup.exe”. Next time you add a new infobase you will see the application in the list above and will be able to create an infobase using this application. It will have no user or system data, but the application will be already there.
When you choose the second option, you get an entirely empty infobase - no data, no application, no nothing. Given that we are to build our application from the ground up, we have to select the second option here.
Note also that nothing will prevent you from loading any application into your infobase any time later if you need so.
On the next step, you will see the following:
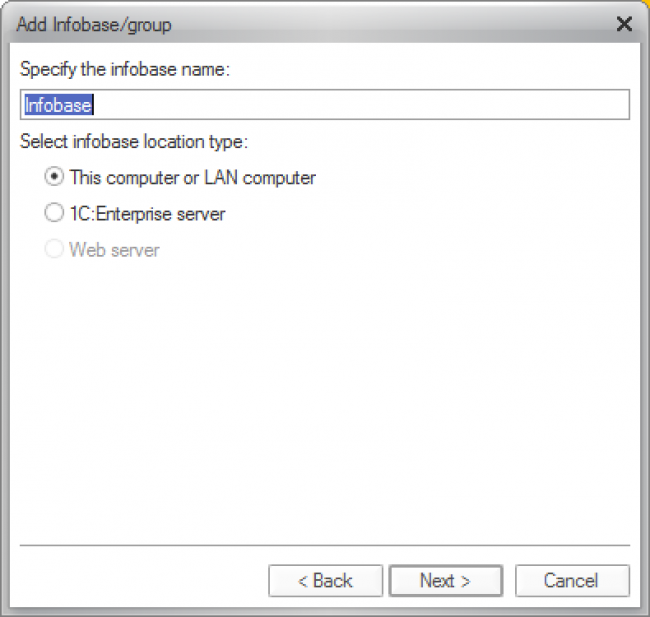
Here we need to give a name to the infobase we are creating. It can be anything we want, so we can name it after our imaginary company - let’s say “Handy guys”.
To choose a correct “infobase location type” option we need to decide where we want our infobase to be stored and what operation mode we want 1C:Enterprise to work in. Putting aside the “Web server” option (which is disabled anyway) we need to choose from these two possibilities:
| 1C:Enterprise operation mode | File mode | Client/server mode |
| Need to use third party software | No. 1C:Enterprise client works with an infobase directly. | Yes. You must use one of the following DBMS: MS SQL Server IBM DB2 PostgreSQL Oracle database |
| Infobase file format | 1C proprietary DBF-based | DBMS specific file format |
| Need to use 1C:Enterprise server (requires server license) | No | Yes |
| Scalability limit due to the Platform constraints | Yes. Approx 5-10 active concurrent users | No. Any number of concurrent users |
You can transfer infobase from one format to another any time you need. It means that we don’t need to think about scalability limits right now. Therefore, file mode looks like a preferable option (we don’t need to bother about running 1C:Enterprise server, installing DBMS and so on). That said, you can use client/server mode for development if you have all necessary preparations done, but for this course purposes we will use the file mode only.
Let’s select “This computer or LAN computer” option and move on.
On the next step, you will be prompted for the folder to store the infobase. Select any folder on your computer or any local network folder you have access to.
On the next step leave all settings by default and press “Finish”.
Congratulations! You have just created a new infobase.
First run
Now we have the infobase created and ready to open it with 1C:Enterprise. Except there are two options (again): 1C:Enterprise and Designer.
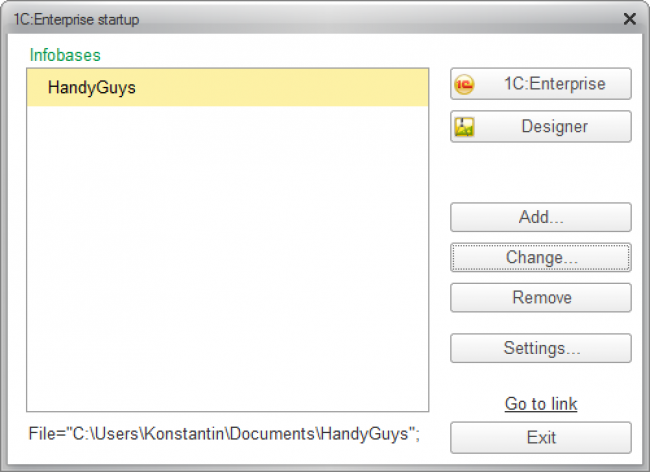
As it was said earlier, 1C:Enterprise can work as an app development tool and as a run-time environment capable of running the apps. So, you can open the infobase to build an app, or to run the app you’ve built.
This is what this choice about - who you are (developer or user) and what you want to do now (develop an app or use it to work with its data)? Being a developer (and, hopefully, a future 1C:Professional) you want to use the Designer mode to build the app. But you also want to use 1C:Enterprise mode to check out how does your app work (i.e. test and debug it).
Running the Designer and renaming the app