
Lesson 1-5
Reading data using queries
The most important thing you need to remember about object technique is that this is the only way to write data. But it’s not the case when it comes to reading.
There is one more way to read data in 1C:Enterprise - queries. Unlike the object technique you can read only attributes you need (no excessive reading) and read as many objects as you need at once (no cycles).
On the other hand you cannot write data with queries. One more downside of queries is that they take much more code to start working.
This is how you work with queries in 1C:Enterprise:
Here is the code automatically generated by the Query Wizard:
Query = New Query;
	Query.Text =
		"SELECT
		|	Warehouses.Ref
		|FROM
		|	Catalog.Warehouses AS Warehouses
		|WHERE
		|	Warehouses.Description = &Description";

	Query.SetParameter("Description", Description);

    QueryResult = Query.Execute();
	SelectionDetailRecords = QueryResult.Select();

	While SelectionDetailRecords.Next() Do
		// Insert selection processing SelectionDetailRecords
	EndDo;
Let’s run through these lines and see what do they do.
Variables declaration and assignment
Query = New Query;
This code line declares the variable named “Query” and assigns it to a new object of Query type.
“Query” in the left part of the assignment operator is an arbitrary name you can choose for your convenience. It can be virtually anything: “MyQuery”, “GetMainWarehouseQuery” - whatever you want. Here is what Developer Guide has to say on the subject:
“Variable names may consist of any sequence of letters, digits and underscore characters beginning with a letter or an underscore character. New names cannot be the same as reserved words or names of properties that are directly available in the current context. Variable, procedure and function names are not case sensitive”.
Here are a few more things you should know about variable declaration and assignment:
- You can declare variables explicitly using “Var” operator;
- You don’t have to do it. Variable will be created by the Platform when you assign a value to it.
- Every time you assign a value to a variable it is recreated (and can get a new data type).
You can assign a primitive data type value to the variable (MyName = “Konstantin”;) or you can create a new object of a complex type with “New” operator and assign the object to the variable (to those of you who is familiar with an object-oriented programming concept: using “New” operator you basically run the class constructor). This is exactly what happens in this line. There is complex type (i.e. class) “Query” predefined in the Platform. Performing “New Query” operation, you create an object of this class.
1C Query text
“Query.Text” is a String property containing the text of the query.
1C:Enterprise query language syntax is based on SQL ( Structured Query Language) standard. Unlike SQL, 1C query language doesn’t support DML, DDL or DCL subsets of SQL standard. The only SQL operation implemented in 1C is “SELECT” statement. It means that you cannot use 1C query to:
- Change the infobase data (you should use object technique instead)
- Change the infobase data structure (you should use the Designer metadata object instead)
- Manage users’ access rights to the infobase data (you should use Roles and Users instead).
What you can do with 1C query language is retrieving data using all features of standard SQL “SELECT” statement: search conditions, joins, grouping, ordering and so on. Additionally 1C queries implement some 1C specific features that will be discussed later.
Our query text is pretty straightforward: get “Ref” attribute values of all elements of “Warehouses” catalog having “Description” attribute equal to “&Description”. Symbol “&” in 1C query language designates that the following is a name of a parameter you will assign later using this method:
Query.SetParameter("Description", Description);
One more thing I need to draw your attention to is a difference between names and aliases:
Query.Text =
		"SELECT
		|	Warehouses.Ref
		|FROM
		|	Catalog.Warehouses AS Warehouses
		|WHERE
		|	Warehouses.Description = &Description";
Note that “FROM Catalog.Warehouses” refers to a name of the catalog as it was defined in Designer, whereas “AS Warehouses” defines an alias that can be anything you want. “Official” catalog name is mentioned ones (in “FROM” clause), the alias name is used for all the rest - to address the attributes in the “SELECT” or “WHERE” clauses. To stress the difference let’s rewrite the query like this:
Query.Text =
		"SELECT
		|	W.Ref
		|FROM
		|	Catalog.Warehouses AS W
		|WHERE
		|	W.Description = &Description";
Setting query parameters
There are more than one way to specify the condition in our query.
We could hard-code “Main” into the query like this:
Query.Text = "SELECT
	| Warehouses.Ref
	|FROM
	| Catalog.Warehouses AS Warehouses
	|WHERE
	| Warehouses.Description = ""Main""";
Note that we use double quotation marks to set off the “Name” string literal. This is a common rule for using strings inside strings in 1C source code.
Another way is using a parameter. In 1C, query parameters are designated by the symbol &. After the query text is set you can assign values to parameters by using SetParameter method:
Query.SetParameter(“Description”, Description);
Note that this code won’t pass syntax check for the second parameter of the method is a variable that haven’t been declared yet. So, we can write something like this:
Query.Text =
	"SELECT
	| Warehouses.Ref
	|FROM
	| Catalog.Warehouses AS Warehouses
	|WHERE
	| Warehouses.Description = &Description";

	Query.SetParameter("Description", "Main");
Execution of the query
QueryResult = Query.Execute();
This line runs the query in DBMS but doesn’t return a resulting recordset. At this point, you can check if your query returns any rows at all (to avoid excessive server calls while trying to read nonexistent data). Use IsEmpty() method to check it if necessary.
SelectionDetailRecords = QueryResult.Select();
This code makes the resulting data accessible for 1C server code, so after this you can use
SelectionDetailRecords.Next()
to fetch the next row of the resulting recordset into 1C server memory. This function also tells you if the raw was successfully fetched or there is no more rows to fetch. If the function returns TRUE you can access the fields of the resulting recordset and the next video shows you how.
Looks like it works but let me show you one more problem. User can rename or even remove the “Main” element in the Warehouse catalog and the code we have written will stop working.
Predefined catalog elements
The problem was that we based our code on the infobase data that can be (accidentally or deliberately) altered by the users. In other words we included knowledge about data into the application source code, which is bad. If we want to use something in the code this “something” must be declared in the application.
First solution that comes to mind is to prevent users from changing the data our code depends on by applying access restrictions - complicated but theoretically implementable. But what happens when we distribute our app? The app contains no data, only the configuration, so our code won’t work in this case too.
A good decision is called “Predefined data”.
Every catalog can contain any number of predefined elements that have dual nature: on the one hand they are the part of the application, so we can use them in the code and be sure they are here. On the other hand they are catalog elements that will be shown in all interfaces along with other (user defined) elements.
You can consider predefined data as elements that are automatically created by the Platform (if needed) when the infobase launches in 1C:Enterprise mode.
Let’s create a predefined “Main” warehouse and see how we can use it in the code.
The resulting code is:
&AtClient
Procedure OnOpen(Cancel)
	OnOpenAtServer(ThisForm.Object.Warehouse);
EndProcedure
&AtServerNoContext
Procedure OnOpenAtServer(Warehouse)
	Warehouse = Catalogs.Warehouses.Main;
EndProcedure
Server calls
Now I want to draw your attention to one more detail. There is a small bar in the left bottom of 1C:Enterprise window that shows the number of client/server calls in real time:
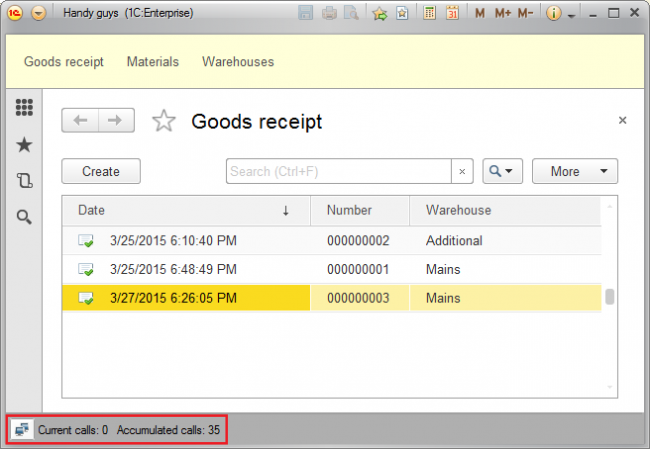
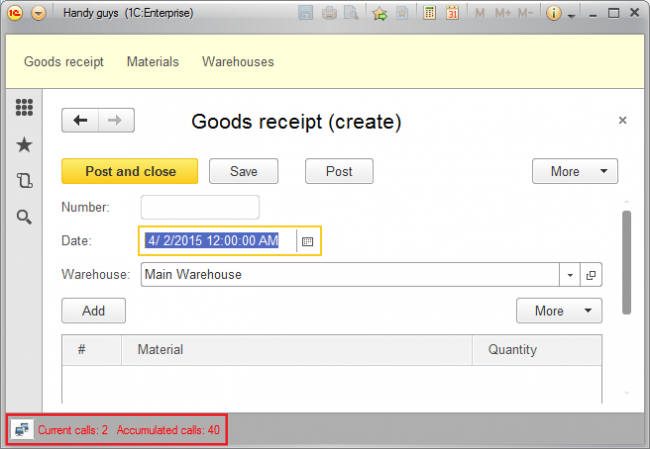
Let’s take a look at the number of server calls performed when a user presses “Create” button in this form. At the very first run this number is large, but it doesn’t count because client cache is empty so far. All consecutive runs will be giving us 2 server calls every time:
OK, but why we should even bother about it?
The thing is that in a real world the client and the server can be divided by thousands of miles of wires, hundreds of meters of wireless networks, numerous hubs, routers and other networking devices. It can take up to 0.5 sec or even more to travel through all of these for a simple ping. So if we are developing a real world software we must consider every server call as costing us 0.5 sec to perform. 2 calls give us 1 sec that is much more than any user would expect to wait before a simple form opens.
So, excessive server calls can drastically compromise your system performance and your users satisfaction. Therefore, your rule of thumb should be: one user action - one server call.
Let’s see where did these two calls come from.
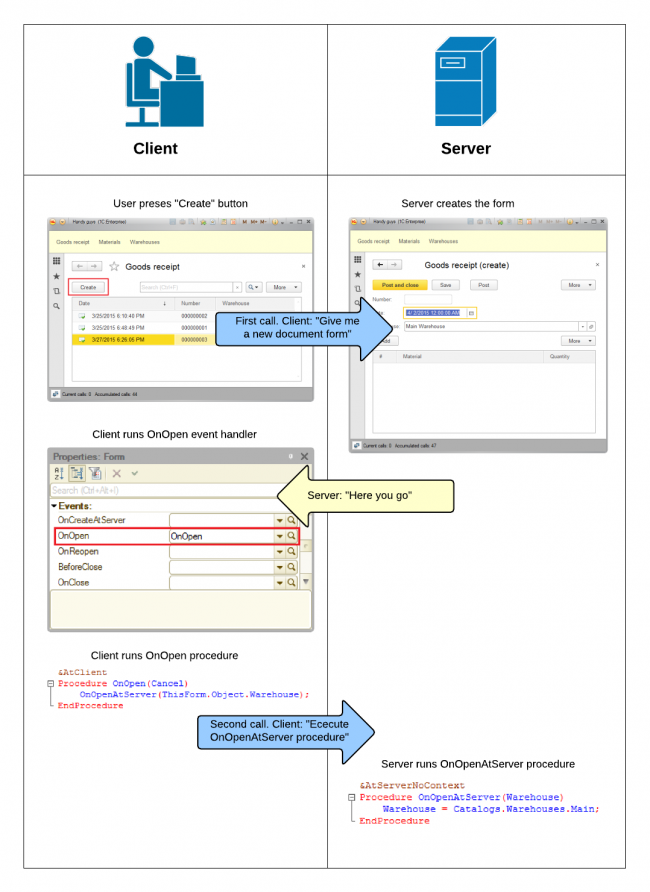
So, the first call occurs when user presses “Create” button and the second one - when client “OnOpen” event handler runs “OnOpenAtServer” server procedure.
How do we get rid of this additional call?
If you take a second look at the picture above you will see that the form is created on the server side. Could we fill out the Warehouse attribute with “Main” value during the form creation on the server side? Let’s see:
Initial field value
One more final thought for today. The task we just solved seems to be quite common. Is there any chance the Platform has some setting that allows to solve if without coding?
Well, yes it is:

Most metadata objects allow you to define the default value of their attributes in the Designer, so there is no need to implement this functional using the application source code.
Now we can remove all source code we build and set the default value by using “Fill value” property.
Lesson 1-4 | Course description| Lesson 2-1