Lesson 2-3
Choosing accumulation register dimensions
When we post a Services document, we need to check if there is enough material in the warehouse for each line of the document’s tabular section. To do so we need to execute a query getting the balance for each warehouse-material pair, i.e. we are going to use this two attributes in the query’s “WHERE” clause. This query will be executed fastest if there is the only row meeting the condition.
So, to get the best result, you need to have a dimension for every condition in your “WHERE” clause. Or (the same from another perspective) you need to use all dimensions in the query’s “WHERE” clause.
Let’s check the various dimensions’ sets against our task of getting the balance for given warehouse and material:
| # | Dimensions | Rows fit | |
| 1 | none | none | There is no Balance table row meeting the condition. The balance we are looking for is “hidden” inside the bigger balance. |
| 2 | Material | ||
| 3 | Warehouse | ||
| 4 | Material, Warehouse | 1 | Perfect fit. We are going to use all dimensions in the query “WHERE” clause |
| 5 | Material, Warehouse, Customer | more than 1 | There are more that one row that meet the condition. To get the balance for given Material and Warehouse, the Platform is going to sum up a few records (for different Customers but the same Warehouse and Material). |
Please note, that the Platform will correctly calculate the balance you need regardless of the dimensions set you have chosen, but the time it takes to get the result may vary drastically. When you use only some of the dimensions in the “WHERE” clause (row 5 in the table above) the Platform will sum up the records meeting the condition. But what does it do when there are no records meeting the condition at all (rows 1-3 in the table above)? In this case, the Platform will use another table that stores the exact copy of all tabular sections for all documents posting their tabular parts to the register.
This table is called Main table as distinct from a Balance table containing resources’ sums grouped by the register dimensions. When we add this new table to the picture, the posting process will look like this:
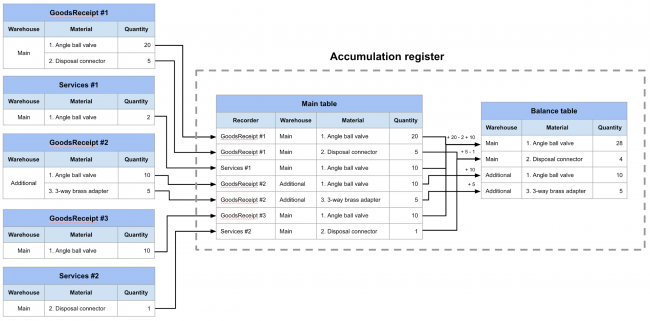
One more important difference between the Main and the Balance tables is that you can directly read and write a Main table, whereas a Balance table cannot be edited by any means (but it can be read, of course). Only the Platform can edit the Balance table directly. You can do it only indirectly - by changing the Main table content.
OK, let’s create our register.
Creating an accumulation register
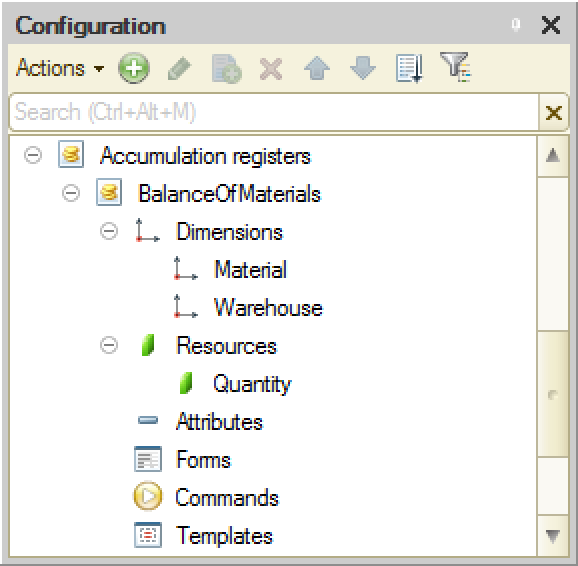
The process is pretty straightforward. Just make sure you choose the right types of the dimensions and the resource:
- Material: CatalogRef.MaterialsAndServices
- Warehouse: CatalogRef.Warehouses
- Quantity: Number (10, 2)
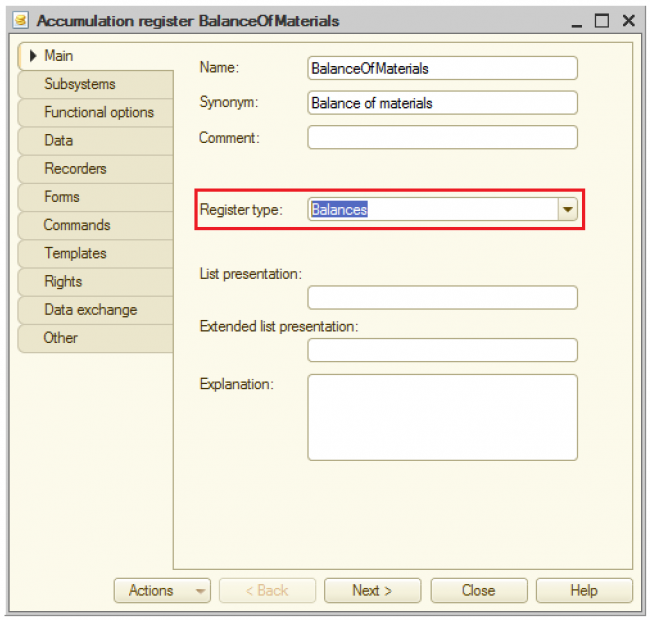
Note, that we have created the register of “Balances” type (default setting). There is one more register type called Turnovers. It works differently and will be considered later.
Accumulation Register’s attributes
As every Metadata object, an Accumulation Register can have any number of attributes. For example, I may want to store price of every Material in the same BalanceOfMaterials Accumulation Register.

This attribute will be available in AR Main table, but won’t be available in AR Balance table. The thing is that the Balance table stores dimensions and aggregated (summed up) resources, so attributes won’t make any sense there.
Let’s consider a simple example. Say, we are adding these two records to the AR:

In the Balance table they will be aggregated into one record with Quantity = 10 + 20 = 30. But what is the price of these 30 cords? We don’t know. Some of them cost $12, others - $10.5. In other words, the price for aggregated values is undefined.
Therefore, you won’t see aggregates in the list of available fields in the Query Builder and won’t be able to select them from the Balance virtual table.
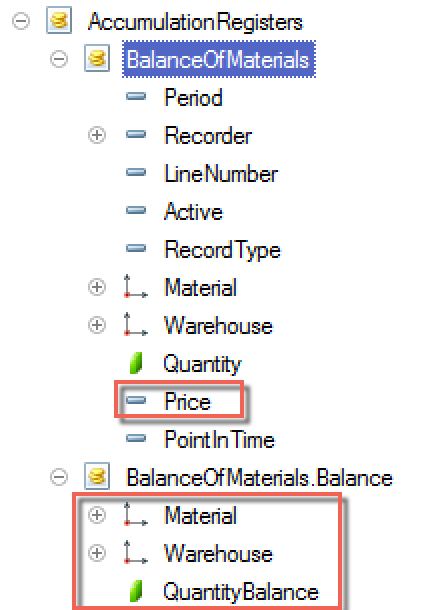
So, we use AR attributes in order to save some additional information for every AR Main table record. This information is not available in AR Balance table.
GoodsReceipt document posting
You might have noticed that there are a few lookalike buttons in the document form: “Save”, “Post” and “Post and close”:
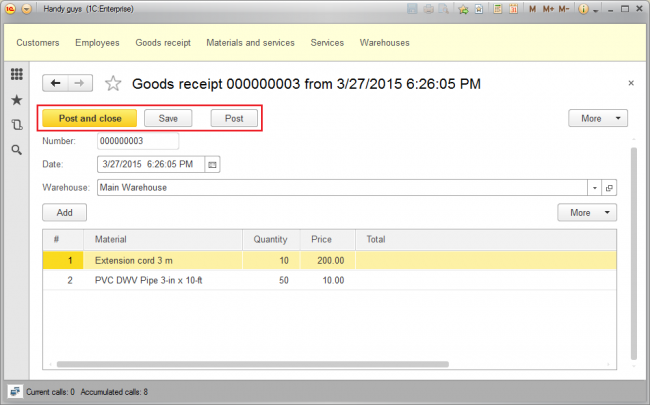
The Save button just writes the document into the infobase. The Post button does the same, plus runs the Posting event handler that is supposed to contain the code saving the documents tabular sections to registers. So “post” means - write the document and fill up the registers with this documents’ data.
So, a user clicks the Save button while filling out the document (just to preserve its current state) and clicks Post when the document is ready.
Please, note, that the document can be posted on any number of registers. For instance, the document might have few tabular sections and post each of them into its register. Or you might want to post one tabular section into several registers, every one of them having its own structure that fits the best for the specific task.
Let’s see, how the Platform posts the tabular section rows to a register.
Let’s take a closer look at the code generated by the Register Record Wizard.
Procedure Posting(Cancel, Mode)
	//{{__REGISTER_REGISTERRECORDS_WIZARD
	// This fragment was built by the wizard.
	// Warning! All manually made changes will be lost next time you use the wizard.
	// register BalanceOfMaterials Receipt
	RegisterRecords.BalanceOfMaterials.Write = True;
	For Each CurRowMaterials In Materials Do
		Record = RegisterRecords.BalanceOfMaterials.Add();
		Record.RecordType = AccumulationRecordType.Receipt;
		Record.Period = Date;
		Record.Material = CurRowMaterials.Material;
		Record.Warehouse = Warehouse;
		Record.Quantity = CurRowMaterials.Quantity;
	EndDo;
	//}}__REGISTER_REGISTERRECORDS_WIZARD
EndProcedure
Note that there is no explicit accumulation register writing command in the text. Instead, the code contains this line:
RegisterRecords.BalanceOfMaterials.Write = True;
The thing is that after we tell the Platform that the GoodsReceipt document writes records to the BalanceOfMaterials accumulation register (by selecting this checkbox),
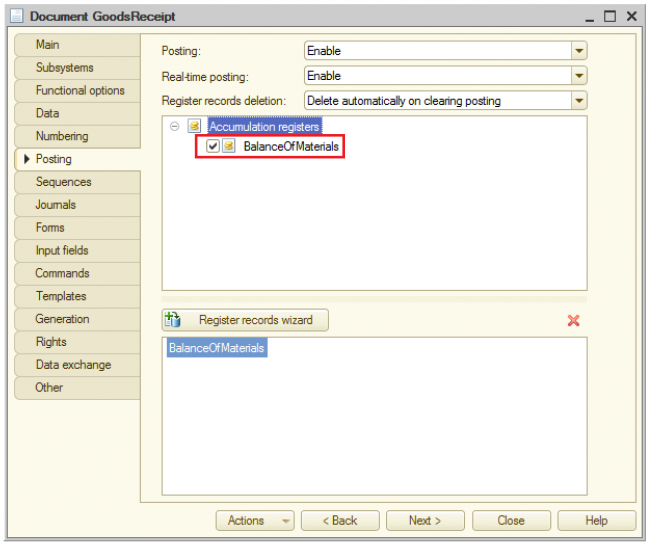
the Platform added this object to the document structure in memory
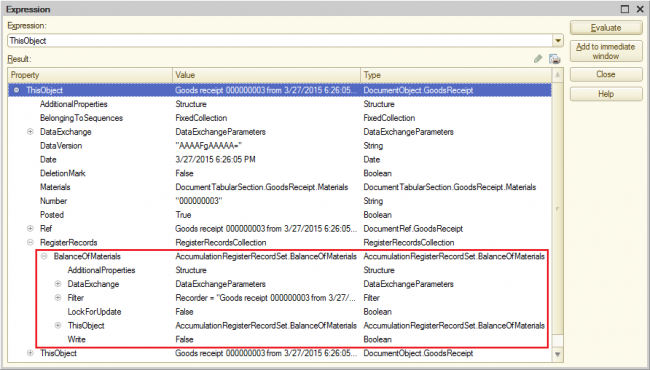
Everything that’s inside this recordset at the moment of document posting will be written into the BalanceOfMaterials accumulation register if the RegisterRecords.BalanceOfMaterials.Write is set to True. So we need to fill out the recordset with Materials tabular section data, but we don’t need to write it to the register explicitly (although we can do it) - the Platform will take care of it.
Then the code cycles through the lines of the Materials tabular section:
For Each CurRowMaterials In Materials Do
In this cycle, the code asks the BalanceOfMaterials accumulation register recordset (RegisterRecords.BalanceOfMaterials - “ThisObject” can be omitted as the code is inside this object module) to create a new record:
Record = RegisterRecords.BalanceOfMaterials.Add();
Then the record is filled out with the current tabular section row data, and RecordType is set to AccumulationRecordType.Receipt meaning that these quantities will be added to the balance.
Lesson 2-2| Course description| Lesson 2-4
