
1C:Enterprise 8.3. Developer Guide. Contents
CONFIGURATION DISTRIBUTION AND SUPPORT
Standard configurations are periodically modified. It may be caused by changes in legislation, addition of new features or modifications of the program. Therefore, the configuration support method is very important for users of standard configurations.
Distribution, support and distribution kit terms are used to describe support mechanisms.
Distribution. There are two types of distribution – full distribution and update distribution. Full distribution is a specially organized configuration file using the *.cf format. An update distribution is a file that contains only updates. It uses the *.cfu format.
Support. Configuration support means the capability of the Designer to update the configuration using distribution files. The support mechanism should provide protection of the logical integrity of a configuration. The description also uses the supported configuration term.
Distribution kit. A distribution kit contains the setup.exe installation program and distribution files in the 1cv8.efd archive. The distribution language is the same as the Designer language (localized distribution resources are located in a subdirectory named after a language in the distribution directory).
Developers of typical configurations may use the Designer to prepare distributions of new configuration versions and to enable support of these configurations considering modifications in user configurations.
30.1. DISTRIBUTE CONFIGURATION
30.1.1. Distribution Set Options
To configure a distribution you have to specify vendor rules for the configuration object modification by the developers that support the end user configurations.
Use the Configuration – Distribute Configuration – Distribution Options command to configure rights. The distribution setup dialog will open:

Fig. 473. Distribution Set Options
Only the first level objects are available in the hierarchical list of configuration objects.
You have to specify a modification rule for each object. To do it select an object and click the Edit button. To change the rules for a group of objects, select a group and click the Change Subordinate button.

Fig. 474. Vendor Rules Setup
You may make multiple selections in the object tree. In this case a new setting is applied to the selected objects.
The following rules can be specified:
Changes allowed – all user configuration changes are allowed.
Changes not recommended – user configuration changes are not recommended.
Changes not allowed – all changes are forbidden. This right makes it impossible to modify supported objects. It is impossible to disable support for an object with this rule. To modify such an object the user would need to disable support for the entire configuration.
Inclusion in configuration not recommended – when support is enabled by merging with a provider configuration or updating with a new provider configuration, the object with this rule is by default not prompted to be included in the user configuration.
By default the Designer uses the Changes allowed rule.
Check the Include source texts of object modules to distribution option if the distribution contains only the compiled module text. In this case the functionality will not change, but module text will not be available for viewing.
Uncheck the Include source texts of object modules to distribution option if the distribution contains only the compiled module text. In this case the functionality will not change, but module text will not be available for viewing. Exclusion of source texts is not supported for the following modules:
managed application module
form modules
command modules
modules containing preprocessor instructions
common client modules in the managed mode (thin client, web client and thick client's managed mode).
If the Include source texts of object modules to distribution checkbox is unchecked for the root configuration element, the normal application, external connection and session modules will be distributed without source texts.
Check the Distribution file can be used for updates option for a distribution file if it is intended for a regular configuration update. Uncheck this option if you plan to use this distribution file as an intermediary in cases when a sequence of updates is needed.
For example, if you change an attribute directly, this may cause data loss for some users. Therefore, it is often necessary to use an intermediate version where a new attribute is added without deleting the old attribute. Usually only the update file is prepared. Data conversion is performed by a special handler. Then another configuration update is applied where the name of a new attribute is changed to the name of the old attribute. The second version is used only as an intermediate procedure and it cannot be used as an independent update.
Click the Close button after specifying the relevant rights.
30.1.2. Creation of Distribution Files
Use the Configuration – Distribute Configuration – Create Distribution Package and Configuration Update File command to create distribution and update files.
The Vendor and Version properties in the Development category must be configured before you can create a distribution.
Vendor – name of the configuration vendor.
Version – configuration version (line).
TIP
The recommended structure of the version number is: <version>.<subversion>. <release>.<build>, where items of the structure are decimal numbers. This structure simplifies identification of the configuration version during sequential development and creation of distribution files (kits).
The lists of configuration templates and updates are sorted by configuration version number based on the number structure.
If a configuration or a database is modified, the Designer requires saving the configuration and refreshing the database configuration. The distribution creation window will open (see fig. 475).

Fig. 475. Distribution Creation
Click Distribution files directory to create a directory for creating new distribution directories. The version directory name is the same as the version number.
Check Create distribution file to create a distribution file. A default distribution file name will be suggested.
Check Create configuration update file to create an update file. A default update file name will be suggested.
If you check the Create configuration update file option, you have to include previous updates in this file. Use the Add from Previous Versions command and choose previous versions of distribution files to include previous updates to the new update.
Click Run to create the specified files.
A distribution kit generated in Windows OS is not fully functional in Linux OS, since the Windows file system does not support setting the Run (X) attribute for the setup file intended for Linux. This means that, to be able to launch the setup application, you need to set this attribute for the setup file either after you copy the installation kit to a computer running Linux or when you create a setup disk image. You should set the Run attribute in Linux. The installation program for Linux (setup) can be launched in both a 32-bit version and 64-bit version.
Text files of the distribution kit are to be encoded in UTF-8.
These files are passed to developers responsible for the end user configuration support.
30.1.3. Preparing Distribution Kits for Standard Configurations
To create a distribution kit you have to generate a kit description (stored in a file) and create a distribution kit based on this description.
30.1.3.1. Distribution Kit Description
Use the Configuration – Distribute Configuration – Distribution package command to create a distribution kit description. It will display a dialog box (see fig. 476).

Fig. 476. Distribution Package Description Selection
Select the description entry mode in this dialog box.
Check the Open distribution package description option if you want to edit an existing description. Enter the name of the description file into the text box.
Check the Create new distribution package description option to create a new description.
Creation of New Distribution Kit Description Description wizard window will open:
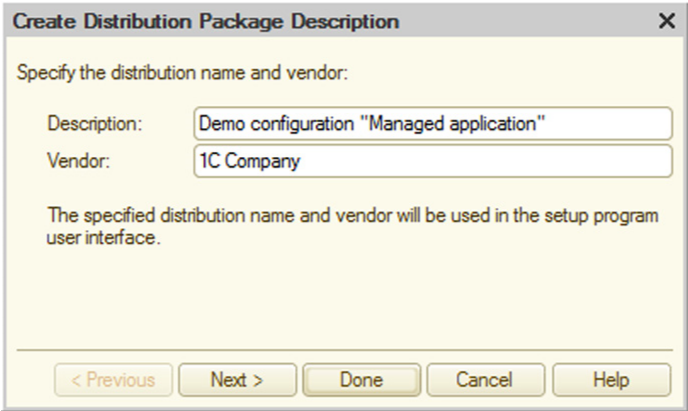
Fig. 477. istribution Kit Description Wizard
Specify the distribution kit name and vendor name. Click Next >.
Specify template parameters at the next step.

Fig. 478. Creation of Distribution Kit Description
By default (the Determine Options Based on Current Configuration box is checked) parameters are selected from the corresponding configuration properties. If this option is not checked, you may edit these parameters.
The Path parameter specifies a directory where a manifest file will be created.
Template parameters are recorded in the manifest file which is a part of the distribution kit. For information about manifest file structure see "1C:Enterprise 8.3. Administrator Guide".
Specify template parameters at the next step (see fig. 479).
Mark the template files that should be included in the distribution kit description. Specify a directory for additional files in the kit. All files in this directory and its subdirectories will be included in the distribution kit.

Fig. 479. Setting Template Parameters
Click Done to create the description. The distribution kit description editing window will open.
Editing Distribution Kit Description
The distribution kit description editing window is opened when you create a description (see above) or when you choose the edit mode (see page 2-1125).

Fig. 480. Distribution Kit Description Editor
The distribution kit description editing window is used for distribution creation purposes.
Description represents a tree that consists of four main branches:
configuration templates
distribution options
home directories
languages
You may add, modify or delete any data at any branch. Use the Actions menu to manage the description tree. Use the properties palette to edit properties.
Configuration Templates
Configuration templates are the main items of the distribution kit. Configuration templates consist of files and file groups.
Files may include arbitrary files (or file sets that are determined based on a mask) and configuration files or data dumping files obtained from the current infobase.
Each template is placed in the template directory. All files and file groups are also placed in the template directory based on the manifest file address (file groups are represented as subdirectories).
The manifest file contains only configuration files and data dumping files. The other files are placed in the configuration template directory.
Templates
To set up template properties choose a template and specify its properties.
Current configuration – when you check this option, the data (vendor, name and version) are picked from the current infobase. If this option is not checked, you may edit these properties.
Vendor – configuration vendor (the same as the Vendor configuration property).
Name – configuration name (the same as the Name configuration property).
Version – configuration version (the same as the Version configuration property).
Location of manifest – relative path to the template manifest file in the template directory.
Files and File Groups
To add a file pick a template and run the Actions – Add command. The file selection dialog will open.

Fig. 481. Add File to Template
Location of the template item to be added is specified in the dialog box.
The file can be located in the current configuration, in the current infobase, in a separate file or may be a set of files in a specified directory picked based on a mask (subdirectory files may be included).
To configure file properties select a file and specify its properties:
Description – file description.
Data – data source for a file (file, current configuration or current infobase).
Home Directory – home directory for file reference.
File/Directory – relative (for home directory) or absolute path to a file.
Place on support? – enable support for a configuration file or data dumping file.
Include in manifest – include configuration file or data dumping file in the manifest file.
Name in template – name in template directory. The name is localized to all languages supported by the installation kit.
Location – default directory for the infobase.
Name for updates – use name of the file in template directory as a source for naming updates.
To add a group of files select a template and run the Actions – New Folder command. Specify the group name in the properties palette.
If you select a group and use the Actions – Add command, a file will be added to this group. A group may contain an unlimited number of files.
You may create embedded groups of files.
Distribution Options
Distribution options contain different combinations of distribution files. Such a combination may be used for different distribution contents (e.g., full distribution vs. update distribution).
Description – name of distribution option.
Distribution files – set of distribution files. By default a full version containing all files is created. If you specify several options, you may specify a set of files for an option using the Edit link in the properties palette. Check the files that will be added to the selected distribution option.
Distribution description file – description that is shown to user when the product is installed.
Home Directory and Directory – these parameters specify location
of distribution kit or distribution files. If you specify these directories,
they are automatically added in the prompting dialog box for kit creation.
Fig. 482. Creation Option
Home Directories
Home directories are used to specify the distribution files that are moved between different computers.
You may specify an environment variable or directory name as the home directory. Then you may specify the distribution file name as a combination of the home directory and relative path from the home directory.
Description – name of the home directory.
Home – can have one of two values:
○ Environment variable; ○ Directory.
Environment variable/Directory – contains name of environment variable or an absolute path to a directory depending on the value of the Home property.
Languages
Languages are used to show localized names of template items.
To display the names correctly it is necessary to create languages in accordance with the directory names in the 1C:Enterprise platform containing the corresponding localized interfaces. One of the languages is considered a default language (a localized line in the default language shall be used if no line corresponding to the current platform language is available).
Name – language name.
Resource directory – language resource directory for this language.
30.1.3.2. Creation of Kit
Use the Actions – Create Package command to create a kit. A distribution kit for the selected distribution option will be created.
Use the Actions – Create package files command to create a kit of distribution files. Distribution files (unpacked) will be created for the selected distribution option without an installation program.
The Designer offers to save the kit description if it has not been saved yet.
If you specify more than one option, the option selection dialog box is opened. Select one option from this dialog box.
New update kit files have to be placed in the resource directory specified in the Update directory address property (see page 2-1136).
In addition to licensing with dongle protection where the total number of seats is limited and the configurations in use are not controlled, electronic licenses can be applied which are issued per seat and allow you to control the use of specific configurations listed in the license. Software licenses are available from 1C Company licensing center and are stored in the user's computer.
NOTE
To create a distribution kit for a configuration distributed via licensing per user seat, the -DigiSign option is implemented for CreateDistributionFiles and CreateDistributive command-line keys, allowing you to specify a file with licensing parameters. The creation and distribution of configurations supporting peruser-seat licensing can be enabled for a partner based on a separate agreement with 1C Company.
30.2. CONFIGURATION SUPPORT
You may obtain a new version of the configuration as a distribution file (a distribution file of the new configuration version and/or update).
User configurations that may be updated with received distribution files have to be supported.
You may change the object support mode if you disable full support first. The ability to set user rules (for object modification) depends on rules stipulated by the vendor and on current locks in the user configuration.
The following features are available for a supported configuration: comparison with distribution, comparison of a new distribution with an earlier one and comparison of the current configuration state with its initial one.
If the configuration is supported, objects in the Configuration window are marked with special icons located at the right side of the objects near the window border.

Fig. 483. Support Mode Icons
Icons for various support modes are shown on fig. 483.
30.2.1. Setting Configuration Support
When a standard configuration is installed, configuration support is automatically turned on for this configuration.
If the configuration is not supported, use the Configuration – Compare and Merge with Configuration from File command and select the distribution file as a file for comparison to turn on configuration support.
In this case the Designer offers to turn on the support for the configuration. A dialog box with the Possible merger with enrollment for support detected message is opened. This dialog box contains main parameters of the vendor configuration. The system asks the user whether support should be turned on.
If you click the Yes button, the configuration comparison and merging window will open.
Click Execute after specifying merge conditions and modes. Configurations are analyzed object-by-object to determine compliance of vendor rules with merging rules.
If vendor rules for any objects conflict with merging rules, a list of these objects is displayed in a separate window. Use the comparison window to adjust the settings to eliminate all conflicts and repeat merging.
If there are no rule conflicts, configurations are merged and support is turned on for the current configuration.
When vendor configuration change is enabled, enabling support and updating vendor configuration with enabled changing functionality, there is an ability to configure default support rules in the details for objects with different support rules.
If the current configuration is connected to the configuration repository, it is required that all configuration objects (which should all be taken from the vendor configuration) and the root configuration object are locked in the repository when a configuration is set for support.
30.2.2. Support Setting
Support setup consists of setting user rules for each configuration object.
Use the Configuration – Support – Support Options command for support setup. The support rules setting window will open (see fig. 484).
In the upper line of the window, the Designer displays the current support state for the current configuration.
Below is the configuration name, vendor and current configuration version.
The Object Support Rules Settings section contains the object tree, vendor support rules and user rules for each object.

Fig. 484. Support Setting
Vendor support rules cannot be changed. Only user rules can be changed (if the configuration is not under full support). You may make multiple selections in the settings window to configure the same support rules for selected objects. Use the context menu in the support rule columns to change the support rules.
A distribution file may contain information in several languages. Use the support language selection feature to specify the languages that are used in the current configuration. Click the Support Language button to open the language selection window.

Fig. 485. Selection of Configuration Support Languages
30.2.2.1. Full (Automated) Support
If you see This configuration is under support in the status bar of the support setting window, it means that all objects of this configuration are supported and may not be modified (edited). In this case you may refresh the configuration automatically.
To update the current configuration automatically:
Select Configuration – Support – Update Configuration.
Select a support file.
The update is performed automatically and the Compare and Merge window is not opened.
In this state it is impossible to change user rules for any configuration objects regardless of vendor rules.
30.2.2.2. Support with Updates
Often it is necessary to change the standard configuration to meet the requirements of a specific user. In such cases support of some objects has to be cancelled completely (the vendor object is not supported) or partially (the vendor object is editable with the possibility of support).
To access user support rules, click Enable modification in the support setting window.
After clicking this button, you will see the following warning: If you change the mode you will not be able to perform complete configuration update automatically. Continue? If you click Yes, you are prompted to select support rules for objects with different distribution rules.

Fig. 486. Support rules configuration
When you specify support rules and click OK, the configuration status is changed and it will be supported with the ability to make changes. In the result, all configuration objects will be locked from random changes regardless of the distribution rules set by the provider. Now, to change the object you need to explicitly enable an ability to change the object or its subordinate objects (see page 2-1135).
If you do not need to change the support mode (the actions were performed by mistake), close the configuration without saving.
After canceling full support, you can turn it on again for the entire configuration only as follows:
disable support for the configuration (select the root configuration object in the settings window and use the Actions – Cancel Support command); run the Configuration – Load Configuration from File command; select a distribution file.
Change of Object Support Rules
To change support rules you have to select an object in the object tree of the settings window and pick the Set Support Rule command from the context menu. Select the required user rule out of three available user rules:
vendor object is not editable;
vendor object is editable, support is enabled; vendor object is not supported.
Availability of these rules depends on the vendor support rules.
If the vendor support rule Changes allowed is turned on, you may use any vendor rules.
If the vendor support rule Changes not recommended is turned on, setup of any vendor rule is available, but if you modify this rule, a warning is displayed.
If the vendor support rule Changes not allowed is turned on, you may not set up any vendor rules.
IMPORTANT!
Please remember that when you turn on the Support cancelled for cendor object rule, you may not "return" to the Vendor object changes not allowed rule.
If the selected object contains several subordinate objects, check the Apply to all subordinate objects option to modify the support rules for these objects as well.
Completely disabling support. To disable support for all configuration objects, use the Actions – Cancel Support command. You will see the following warning:
Removal from support will make it impossible to obtain update from vendor. Continue? Click Yes to disable support. The configuration will no longer be supported. If this action has been performed by mistake, close the configuration without saving.
IMPORTANT!
You may update the configuration using the comparison and merging method even when support is disabled.
Compare and Merge with Vendor Configuration
The user can perform comparison and merging of the current configuration with the original (previous) distribution file in the support setting window. To do this, click the Compare, merge button. The comparison and merging window will open.

Fig. 487. Compare and Merge with Vendor Configuration
For more information about comparison and merging see page 2-1057.
Unlike the "standard" configuration comparison and merging mode, the comparison window contains a line for vendor and user rules and the Edit button for changing user rules.
When you compare the current configuration with the distribution file, the current configuration is always a descendant of the vendor configuration. Therefore, the configuration setup mode selection button is not available.
30.2.3. Configuration Update
Use the Configuration – Support – Update Configuration command to update a supported configuration. The update wizard will open.

Fig. 488. Update Wizard
At the first screen, the user may select a separate update file for the configuration update or search possible locations of update files.
If you select a separate update file, you have to choose it on the next step.

Fig. 489. Update File Selection
When you click Ready, a dialog box with main parameters of the current configuration and vendor configuration (see below) will open.
If you select the update search option, click Next > to specify possible update locations in the update wizard.

Fig. 490. Update Locations
Possible update locations include:
current template directory;
removable disks (the v8updates directory is added for CD-ROM disks); address specified as the update directory address in the configuration.
Selected directories are searched for updates as follows:
Specified local directories and subdirectories are searched for update files and template list files. Found template list files should describe the template directories and should be located at the root of these directories.
Specified remote directories are searched for template list files. Other directories (subdirectories) are not searched.
If the Update directory address configuration property contains an address that can be used to obtain the configuration update, clicking Next > invokes the user authentication procedure.

Fig. 491. Internet Resource Access Authentication
You have to enter the username and password to access the server with update set. You also have to enter the username and password for the proxy server if required.
At the third step, you will see updates for which templates have been found. Files that most probably can be used for configuration updates are marked in bold.

Fig. 492. Update Selection
If you pick an update in a remote directory, this update is copied to the current template directory (if it is local).
Click Finish to finish searching for update files.
A dialog box with main parameters of the current configuration and vendor configuration will open.

Fig. 493. Update Parameters
Click OK to continue.
The Designer compares the configurations and opens the Update Configuration window.
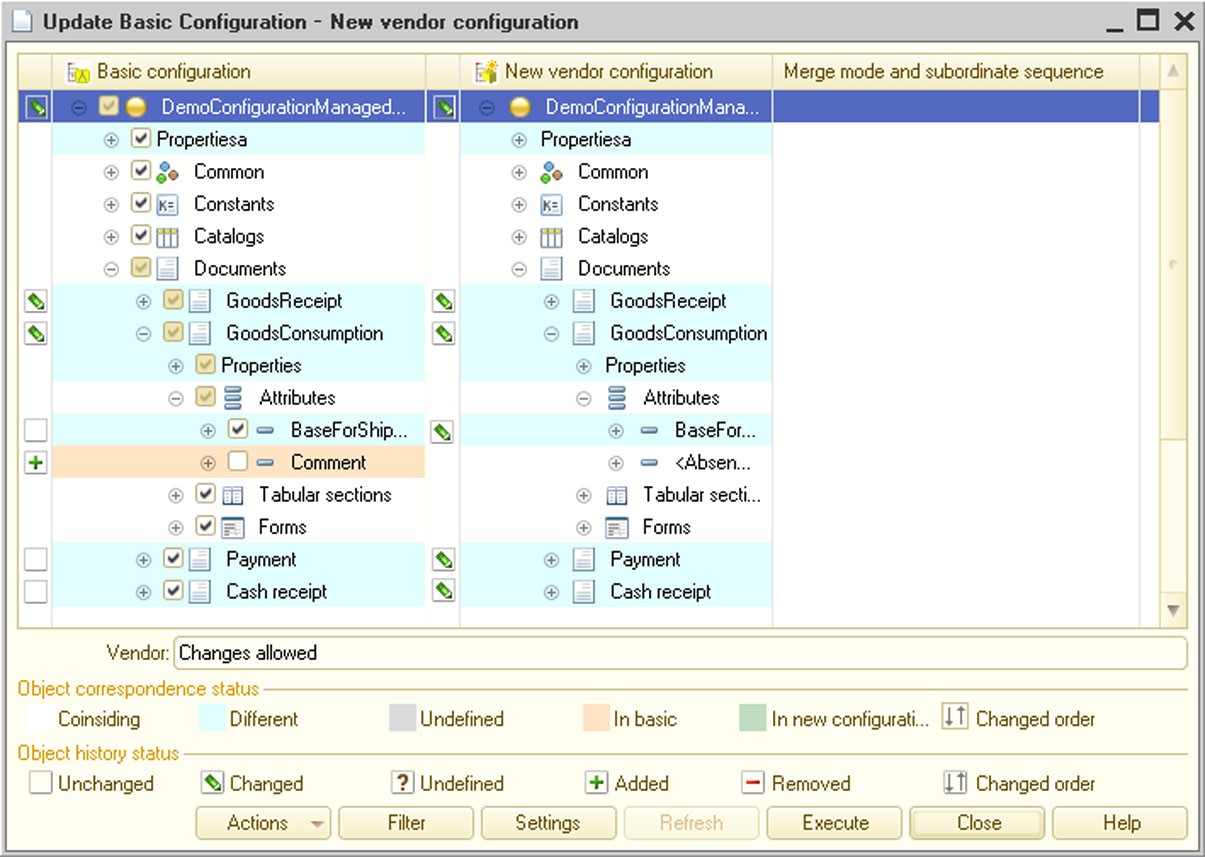
Fig. 494. Update Configuration
For more information about comparison and merging see page 2-1071.
In addition to standard fields for comparison and merging, this table box contains two more columns that show the object history status. The status icon drill down is provided in the lower part of the window. The icons can be used to easily find out what changes have been made and to determine the affected configuration.
For example, the figure demonstrates that the Address and Phone attributes have been added to the Competitors catalog in the main configuration, while attributes of the Nomenclature and Units of Measure catalogs have been changed in the vendor configuration. The Address and Phone attributes have also been added to the Competitors catalog, but their order differs from that in the main configuration.
Pick an object in the table box to view vendor rules. The rule is displayed in an attribute below the table box.
To analyze configuration changes it is convenient to use a special filter that can be called using the Filter button. The settings window will open:
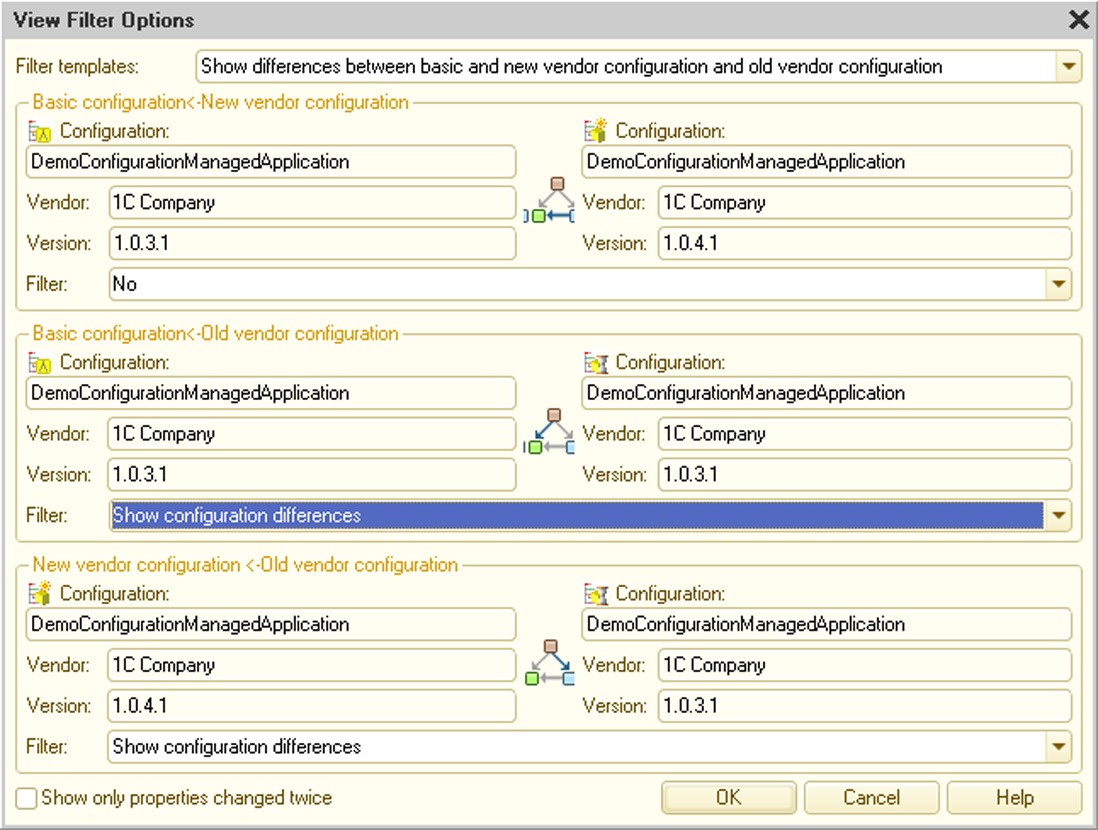
Fig. 495. View Filter Settings
You may use a filter to examine the configuration changes by selecting objects for comparison and specifying difference display modes.
The main (current) configuration, the new vendor configuration and the old vendor configuration may be used as comparison objects. Therefore, the filter setting window consists of three sections with similar attributes. Each section is used to configure the comparison mode for any pair of configurations.
You may use a filter to configure the differences display mode for all configurations.
You may use a filter template for more convenience. A template contains the most commonly used settings.
The user makes the decision regarding merging based on the information on changes and support rules.
30.2.4. Template Directory Description File
If configuration templates (updates included) are located at HTTP(S) or FTP resources, the user is required to specify a list of configurations for each resource. This can be done in the template directory description file, v8cscdsc.lst. This file is stored in the root template directory for configuration located at HTTP(S) or FTP resources.
It is used to determine whether updates are available at a resource when Configuration – Support – Update Configuration is selected.

Fig. 496. Creation of Template List File
Select Configuration – Support – Configuration and Update Templates to create and edit a template directory description file.
The Directories table lists template directories obtained from the file 1CEStart. cfg (for details on 1CEStart.cfg see "1C:Enterprise 8.3. Administrator Guide"). The Templates table lists templates from the selected template directory.
Editing configuration template directory involves deleting template items (or entire templates along with their items) and adding configuration templates from other directories.
Select Add in the command bar of the Templates table to add templates to the directory. A wizard for choosing a directory and template items will open.
Choose the source directory and items missing from the current directory.
Select Delete in the command bar of the Templates table to delete templates from the directory. The deletion dialog box will appear. Select the required deletion method (only specified items or entire templates that contain these items) and click OK.
To create template directory description file use the Create Template List File command in the command bar of the Templates table. You have to run this command to save changes in the template directory description.
After this move the template directory (and the directory description file) to the required external resource.
The following approach is generally applied to work with templates located at HTTP(S) or FTP resources:
1. A directory that will store templates published at external resources is created on the local drive.
2. All templates to be placed in external resources are added to this directory.
3. The Designer (Configuration template directories window, see above) adds the template directory created on step 1 to the Directories: list.
4. Template directory description file is created in the Configuration template directories window (Create Template List File button). To do this, place the cursor over the template directory added on step 3.
5. Then move the template directory (and the template directory description file) from the local directory to the HTTP(S) or FTP resource.