
1C:Enterprise 8.3. Developer Guide. Contents
DISTRIBUTED CONFIGURATION DEVELOPMENT
This chapter describes Designer features designed to enable distributed configuration development.
To undertake successful distributed configuration development developers can agree on conventions governing modification of configuration objects, make these changes and then integrate the results. However, this mode introduces a risk of accidental changes to various objects; it is therefore critical for participating developers to understand all modification processes and relationships between objects. In this case configuration merging should be completed by a senior specialist who can effectively steer the direction of development effort.
This chapter explains how to reduce probability of errors, increase performance and simplify the development process through distributed configuration development as described herein.
In a distributed environment workgroup, a development effort is conveyed through changes to a configuration object that can be made only by the developer who has previously locked the object.
A configuration repository is created for distributed development purposes. The Designer places the configuration into this repository. Developers are granted access to the configuration repository: either through the local network or using remote access through a Web server. After the repository is created, a Repository Administrator is appointed. This role is responsible for creating a list of users who can access the repository. Administrative permissions can be assigned to other users as well.
In the distributed development environment configuration is treated as a set of read-only objects. In order to make changes to an object the developer has to lock it first. An object can be locked only by one user at a time. A user may lock any number of objects that are not locked by other users.
Techniques for working with locked configuration objects are in no way different from the regular environment. The user can edit properties of the locked object as well as add and remove subordinate objects.
To add an object the user first has to lock the parent object. For example, to add a constant the user needs to lock the root configuration object. To add an attribute or object form the user needs to lock the object itself.
To delete an unlocked object the user needs to lock the object itself, its parent object and all of its subordinate objects.
When you are done working with the locked objects, the result of their modification can be stored in the configuration repository. On the other hand, if any of the unlocked objects have been changed, you can receive updated objects immediately after they are placed in the configuration repository by the author of the changes.
Configuration repository activities can be viewed in the configuration repository history. You can open configuration versions stored in the configuration repository to view and compare them with the current configuration, database configuration as well as different repository versions.
Configuration objects are closely interrelated. Therefore, the configuration repository ensures metadata integrity when objects are locked or stored in the repository.
In this way, the distributed development method ensures synchronization of configuration modifications by a group of developers.
29.1. CONFIGURATION REPOSITORY ADMINISTRATION
29.1.1. Creation of Configuration Repository
Configuration repository is created to provide shared access to configuration objects.
To create a configuration repository select Configuration – Configuration Repository – Create Repository. The following dialog box is displayed:

Fig. 435. Creation of Configuration Repository
In the Repository location (files directory or remote repository address) field, enter the directory where the configuration repository is to be created. This directory should not be registered as a storage place for another configuration repository. Click Next >.

Fig. 436. Selection of Configuration Repository Administrator
Enter name and password for the configuration repository administrator. The configuration repository administrator creates a list of users with access rights in the configuration repository.
When you click OK, the Designer analyzes the data, generates the structure of objects and records the data in the specified directory. This process can take some time (depending on the configuration size). When the configuration repository has been created, the Designer prompts the user to open the configuration repository.

Fig. 437. Open Configuration Repository?
If the specified directory is already holding a registered configuration repository, then the Designer displays a warning that it is unable to create a configuration repository in this directory.
29.1.2. Open Configuration Repository
To open the configuration repository select Configuration – Configuration Repository – Open Repository.
If the current configuration has not been connected to the configuration repository, then before connection the Designer reports that the current configuration will be replaced by a configuration from the repository and requests confirmation for connection.
IMPORTANT!
Configuration received from the repository replaces the current configuration and is saved to disk without additional warnings.
After confirmation the connection dialog box appears:

Fig. 438. Open Configuration Repository
Enter username and password, if any.
If this username is not registered in the configuration repository, the following warning appears: Configuration repository authentication error. Check whether the user name and password are entered correctly.
Each user can connect only one configuration to the repository. Therefore, the Designer must first perform a login credentials check for the user.
If the username is registered in the configuration repository and no infobase is connected to the configuration repository for this user, then login is performed and the link is established: information on the configuration and its location is recorded in the configuration repository for this user.
If user configuration has already been connected and the link has not changed, then the configuration window appears and the user can start working with the configuration objects.
If a connected configuration for this user is currently open, then the Designer displays an authentication warning.
If an infobase for the given user is not currently open, but the location information is different (e.g., the configuration is in a different directory or a connection is made from a different workstation), then the Designer displays the following message: Configuration bound to this configuration repository already exists for this user. Continue? Pressing the Yes button in this dialog box creates a new connection, the current configuration replaces the configuration from the repository and a new link is established between the current configuration and the repository for this user.
After logging in the Designer opens the Configuration window (see fig. 439).
The status of configuration objects is indicated by icons arranged along the right border of the Configuration window. Icons of the parent and child (subordinate) objects are of different sizes (child objects are smaller) and appearances (child objects have an image of a tree branch).
Possible object status are shown on fig. 440.

Fig. 439. Configuration Connected to Repository
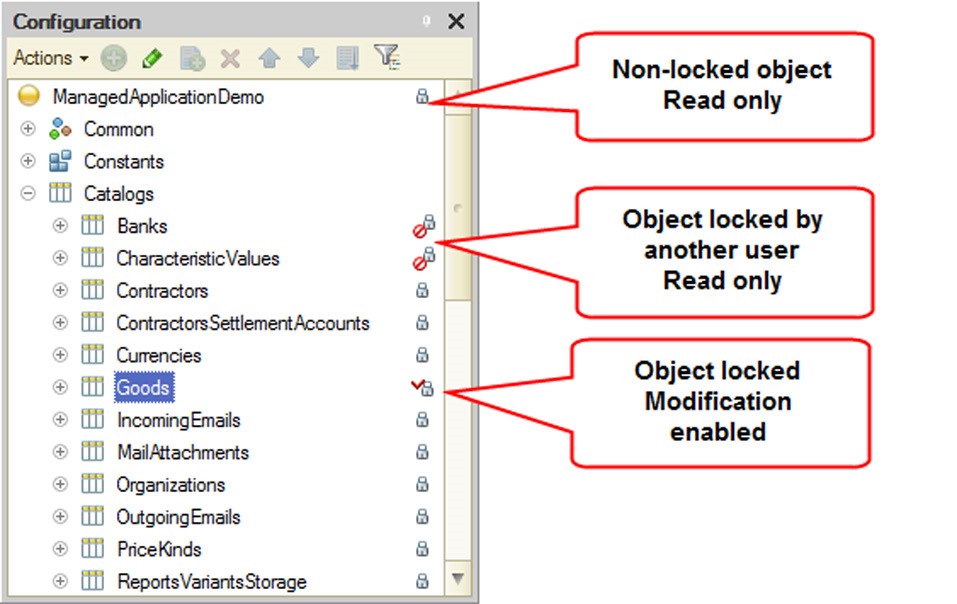
Fig. 440. Object Icons
If an object has been locked by another user (see fig. 440), it can be modified only by the user who has locked it. The metadata object tooltip that appears above the current object status icon in the configuration repository contains the name of the user who has locked the object, lock date, name of the computer used to connect the user to the configuration repository and location of the infobase.
Newly created objects that have not yet been checked in the configuration repository and objects that have been deleted from the repository but still exist in the local configuration are represented by an icon in the form of a red mark.
Upon the first login the Designer stores the connection parameters (the configuration repository directory and username) for the given infobase. The next time the user opens the configuration, the Designer requests to connect to the configuration repository before displaying the Configuration window.
If an incorrect username or password is entered when logging into the configuration repository or if a user with this name is already connected to the given repository at that moment, then the following message appears: Configuration repository authentication error. Check whether the user name and password are entered correctly.
If there is an attempt to bind a configuration not previously connected to the configuration repository by entering a username for which there is a registered connection (established link) to the repository, but for another infobase (which is not open at the moment), then the Designer displays the following message:
Configuration bound to this configuration repository already exists for this user. Continue? After an affirmative response the configuration is loaded from the configuration repository (the current configuration is completely replaced and saved to disk) and a new infobase and configuration repository link is established. In this case the former link is dropped (the infobase which was connected earlier to the configuration repository cannot be joined to this user without reconnecting).
If there is a login attempt to the configuration repository and the configuration is currently open, the Designer displays an error message showing the username for the attempt.
29.1.3. Maintaining the Configuration Repository Users List
To create a new configuration repository user select the Configuration – Configuration Repository – Repository Administration menu item and choose Actions – Add on the Users tab. A window for editing user information will appear. Use the General tab to enter username and password to access the configuration repository.

Fig. 441. Configuration Repository User Parameters
The Rights tab displays access rights for this user.

Fig. 442. Configuration Repository User Rights
Administrative tasks – user has privileges to create, delete and disconnect users, cancel locks, change the repository compatibility mode and run the optimization procedure.
Change version structure – the user has the right to roll back and delete old versions (for details see page 2-1102).
Lock objects – the user with this right can lock and make changes to the configuration of the configuration repository. If this right is not set, the configuration repository objects for this user are read-only.
29.1.4. Configuration Repository Administration
Configuration repository administration is done through the administration window which is available via the Configuration – Configuration Repository – Repository Administration menu item.
It displays a dialog box (see fig. 443).

Fig. 443. Configuration Repository Administration
The Users tab contains controls which manage the list of configuration developers (hereinafter referred to as "users" in this chapter). All users can change their own login credentials (username and password), but they cannot change their access rights. Names of users that are currently connected to the configuration repository are shown in bold. On fig. 443 it is Jones.
IMPORTANT!
Only users with administrative permissions can add, delete and change user rights.
The Connections tab lists users logged into the configuration repository.

Fig. 444. Connected Users
You can disconnect any user who is not currently working with the configuration repository from the repository by pressing the Disconnect button.
IMPORTANT!
The Disconnect button is accessible only to users with administrative permissions.
You can release object locks for a particular user by using the Release locks tab.

Fig. 445. Release of Object Locks
The user would be unable to store any changes he or she has already made to the locked objects in the configuration repository.
IMPORTANT!
This button is accessible only to users with administrative permissions.
The Other tab contains parameters that manage the repository operation.

Fig. 446. Configuration repository parameters
The Repository data optimization group can be used to perform optimization for a repository that is not compatible with version 8.3.2 (the compatibility mode is set to Do not use). Optimization results in higher repository performance. You should only perform optimization if the system prompts you to do so.
A user with administrative privileges can enable a prompt for optimization after performing each repository operation (adding objects, rolling back or merging versions). To do this, select the Prompt for optimization after performing repository operations checkbox on the Other tab of the repository administration dialog. If this option is selected, after a repository operation is complete, the following dialog may be displayed to the user:

Fig. 447. Prompt for repository optimization
If the user (repository administrator) chooses to skip optimization when the prompt is displayed, optimization can be run later. To do this, open the repository administration dialog, go to the Other tab and click the Optimize button. You should click the button if the optimization prompt is displayed to the right of the button. Repository optimization can take a long time (see fig. 448).
We recommend that you do not work with the repository during optimization.
You can also run optimization using the following Designer startup command-line option: /ConfigurationRepositoryOptimizeData.

Fig. 448. Optimization recommended
29.1.5. Repository Backup Configuration
The backup procedure depends on the compatibility mode selected for the repository.
CAUTION!
When you run configuration repository backup, no connections to the repository are allowed.
If the repository is in compatibility mode (the Compatibility mode property is set to Version 8.3.2), create a repository backup file by copying the 1Cv8ddb.1CD file.
If the repository does not use the compatibility mode (the Compatibility mode property is set to Do not use), create a repository backup file by copying the 1Cv8ddb.1CD file and the entire data directory located in the same directory as the 1Cv8ddb.1CD file.
29.2. WORKING WITH CONFIGURATION REPOSITORY
Locking, retrieving and storing objects in the configuration repository as well as other actions with repository objects can be done in the Configuration Repository window. To open it choose Configuration – Configuration Repository – Repository (see fig. 449).
The Configuration Repository window contains a toolbar and table box. The first column of the latter contains a hierarchical structure of configuration repository objects or a list of objects depending on the view mode (Type menu).
If deleted objects are set to be available for viewing (Type submenu), then deleted items are displayed in the list in a lighter font.

Fig. 449. Configuration Repository
In the second column, the status of locked objects is shown by icons. Objects locked by the current user are represented by an icon with a red checkmark. In the User column, the user who has locked the object is shown. In the Date column, the lock date (if the object is currently locked) or the date of the last update for this object is shown. In the Computer column, the name of the user's computer is shown and in the Infobase column, the name of the local infobase directory on the user's computer is shown.
IMPORTANT!
Newly created objects that are not yet stored in the configuration repository do not appear in the configuration repository window.
29.2.1. Configuration Repository Filter
To simplify working with the configuration, you can customize the objects view in the Object column of the Configuration Repository window. The filter is activated through the Actions – Filter menu. The following window is displayed:

Fig. 450. Filter Configuration Repository Objects
The meaning of the controls is self-explanatory.
29.2.2. Locking Configuration Repository Objects
The object lock is a way of acquiring the exclusive ownership of the modification of a configuration repository object. The locked object becomes inaccessible to other users to make changes (you can only view and retrieve a copy of the changed object for use).
To lock objects select the object (multiple selection is allowed) in the Configuration Repository window and click the Actions – Lock in Repository command.

Fig. 451. Lock Objects In Configuration Repository
If this object is linked to other objects, then these objects are also included in the list. In this case the selected object is displayed in bold. You can only lock selected objects when these objects are also retrieved from the configuration repository.
The list also includes objects that are not directly linked to the chosen object, but have an indirect link.
To retrieve these objects select the check box in the first column of the list. If you need to not only retrieve, but also lock these objects, select the check box in the Lock column. If not all objects required for the lock are marked for retrieval, the Designer displays the following message: This operation requires the following objects to be retrieved. The message is followed by a list of required objects. Locking in this case does not occur.
If the objects contain subordinates that need to be locked, select the Retrieve Recursively check box.
If you need to retrieve data of objects that are already locked, select the Allow to Retrieve Locked check box.
IMPORTANT!
If the Allow to Retrieve Locked check box is selected, changes made in locked objects are lost when re-retrieving occurs.
Locked objects are marked by a special icon.
Before you can add new objects to the configuration, you must lock the parent object. For example, to create a new catalog lock the root object of the configuration and to create a new form or attribute for the catalog lock the catalog object itself.
After the parent object has been locked, subordinate objects can be created. Then every new object, along with the locked parent object, should be placed in the repository.
29.2.3. Object Placement in Configuration Repository
The modified object can be stored in the configuration repository so that other users can refresh it in their configurations. This can be done with the Actions – Store in Repository command. The following dialog box is displayed:
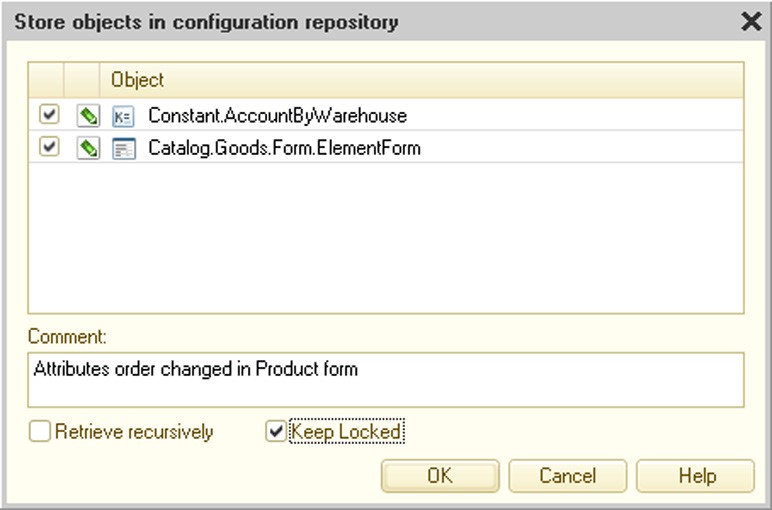
Fig. 452. Object Placement in Configuration Repository
Select the check boxes for objects to be stored in the configuration repository.
Changes made to the objects can be entered into the multiline Comment field. This text can be viewed in the configuration repository history.
If the objects contain subordinate objects that need to be stored in the configuration repository, select the Retrieve Recursively check box.
Select the Allow to Retrieve Locked check box if the specified objects should remain locked.
In the case when objects linked to other configuration objects are stored in the configuration repository, the entire list of these objects appears in the dialog box.
To store new objects in the configuration repository choose an object in the Configuration window and select Store in Repository from the context menu. The window for storing objects in the configuration repository appears.
Other objects linked to the given object can also be included in the list. In this case the selected object appears in bold in the object list. An object cannot be stored in the configuration repository without updating these objects as well.
29.2.4. Object Retrieval from Configuration Repository
To get objects changed by other users select the necessary objects in the list of configuration repository objects and choose the Actions – Retrieve from Repository command. The following dialog box is displayed:

Fig. 453. Object Retrieval from Configuration Repository
In the list of objects, select the check box for those objects that must be retrieved from the configuration repository.
If the objects contain subordinate objects that need to be retrieved, select the Retrieve Recursively check box.
If the selected object is already locked, then selecting the Allow to Retrieve Locked check box causes changes made to the object to be lost. In this case the object data are restored using data from the configuration repository.
29.2.5. Release of Object Locks
If it is not necessary to save the changes made to a configuration repository object or to render the given object to another user for modification, the object can be released. To do this, select the Actions – Undo Lock in Repository command.

Fig. 454. Release of Object Locks
In the second column of the list, the icon shows the difference between the configuration and the configuration repository objects. If the icon is not shown, then the objects are identical.
If objects contain subordinate objects that need to be released, select the Retrieve Recursively check box.
After the locks have been released, the objects are retrieved from the configuration repository.
29.2.6. Update of Configuration Repository Object Statuses
If you need to update information about objects in the configuration repository, choose the Update Status command. This command updates information about object locking and releasing as well as about any new objects in the configuration repository.
29.2.7. Comparison of Configuration Repository and Current Configuration
You can compare the current configuration with the configuration repository at any time. To do this, choose Configuration – Configuration Repository – Compare and Merge Configuration with Repository. It displays a comparison dialog box (see page 2-1073).
29.2.8. Comparison of Configuration Repository Objects and Current Configuration Objects
Sometimes it is necessary to compare a specific object in the configuration repository and the current configuration. To do this, choose the object in the Configuration Repository window and select the Actions – Compare with configuration object menu item.
The following question appears on the screen: Show configuration comparison results? If the answer is Yes, configuration comparison is carried out, the configuration comparison window appears, the line with the selected object is activated and the report setup dialog appears on the screen.
If the answer is negative, the configuration comparison window is not displayed and no comparison is performed.
If compatibility with version 8.3.2 is disabled for the repository (see page 2-1093), you can run a selective comparison of two configuration objects without needing to compare the entire configurations. However, selective comparison is only available for versions of objects placed in the repository using 1C:Enterprise 8.2.9 or earlier. To run selective comparison, choose the Perform selective comparison with the repository object or Perform selective comparison with the configuration object commands from the context menu, depending on where you run the comparison from: the configuration tree or repository history window. If you run a selective comparison from the configuration tree, the object is compared with the latest object version stored in the configuration repository. If selective comparison is unavailable, the platform informs the user of this through a diagnostic message.
You can run a selective comparison for the following configuration objects: module, template, image, WS reference, schedule, register aggregates, exchange plan contents, style, start page working area, flowchart, form, help content, predefined items, command interface fragment and role rights.
29.2.9. Save Configuration Repository as Configuration
The configuration repository can be saved as a configuration using the Configuration – Configuration Repository – Save Repository Configuration to File command.
29.2.10. Disconnection from Configuration Repository
To disconnect from the configuration repository choose the Configuration – Configuration Repository – Unbind from Repository command.
29.2.11. Configuration Repository History
The system of distributed configuration development supports a history of configuration object changes. The history logs the results of object placement.
You can view every object change, compare with the current state, compare configuration versions and retrieve the configuration of the given version from the configuration repository.
To open the configuration repository history window, select Configuration – Configuration Repository – Repository History.

Fig. 455. Configuration Repository History
A chronological list of configuration versions appears in the table box in the left part of the window.
Below the list of versions is a field to enter comments for the version.
A list of objects that have been changed, added or deleted in the chosen version appears in the table box located in the right section of the window.
Multiple selections are allowed in the version list. In this case comments on all chosen versions appear in the Comment field and a list of all objects in the given versions appears in the list of objects.
You can open each object from the list in the Repository History window to view the history of changes and compare it with the object of the current configuration. This is done using the context menu of the object list.
29.2.11.1. Working with Configuration Repository Version
Each version of the configuration repository can be opened for viewing, loaded in place of the current version, compared with the current version or saved to disk. You can also compare the version of the configuration repository with the configuration stored in the file. Version tracking operations are carried out using the Actions menu in the Repository History window.
There is a special report designed to collect information about the configuration repository history. To create this report select Actions –Repository History Report in the Repository History window. The window to enter report parameters appears.

Fig. 456. Parameters of Configuration Repository History Report
Select the type of information grouping in the report in the Report by group. In each group, information is arranged in alphabetical order.
To group information by version number select Repository versions. To group information by objects, select Objects. To group information by comments in the configuration repository history, select Repository versions comments.
Select the type of report layout (text or spreadsheet document) in the Create as group.
Additional report parameters can be specified in the Options group.
To exclude comment lines starting with "//", select the appropriate check box.
To specify objects to report on as well as a date range, click the Filter button. In the window that opens, set the filter criteria.
To start the report generation process click OK.
29.2.11.2. Rollback to Previous Versions
Should already published versions in the configuration repository become unnecessary, you can roll back to the version that you need. To do this, choose the version which you want to roll back to in the list of versions and select Actions – Rollback to Version. The following warning is displayed: Rollback will delete information about rolled-back versions without the possibility of recovery. Continue? Upon confirmation, a rollback is performed which literally means that all versions stored in the configuration repository after the selected one are deleted from the repository.
29.2.11.3. Deletion of Old Versions
Should early versions of the configuration repository become unnecessary, they can be deleted from the repository. To do this, choose the version up to which you want to delete the older ones in the list of versions and select Actions – Delete Old Versions. The system displays the following warning: This operation will permanently destroy information about previous versions. Continue? If the answer is Yes, all versions placed in the configuration repository before the selected version are deleted.
29.2.11.4. Merging Versions
The user can merge several consecutive configuration repository versions. To do this, select the versions to be merged in the Repository History window (as you select them, a summary statement combining all comments for the selected versions appears in the Comment section and all objects affected by any activity in these versions are displayed in the list of objects) and choose Actions – Merge Versions.
As a result a single version comprising all the changes combined from merged version is created in the configuration repository history.
29.2.11.5. Assign Version Labels
Each configuration version can be labeled in the Repository History window. To do this, select the version and choose Change in the context menu. The following dialog box is displayed (see fig. 457).
Enter the label value. As you type the first symbol, the Label ñomment field becomes accessible. You can enter the label description in this field. Labels primarily serve to mark completion of certain stages or activities (e.g., a new configuration version release, preparation for distribution, etc.).

Fig. 457. Configuration Repository Version
29.2.11.6. Filter
A filter dialog box for the Repository History list is different from the standard filter dialog box.

Fig. 458. Version Filter
Versions can be filtered within a time range, range of configuration repository versions (or combination of the above), by a list of configuration repository users who have placed versions in the repository, by configuration objects and by configuration versions. You can also specify whether or not to include versions with labels as well as only filter versions with labels.
The left section of the Repository History window contains a list of objects which have been added, modified or deleted for every selected version. This list is always complete for the given version (it does not depend on filter criteria). If specific configuration objects are selected in the filter criteria (not the entire configuration), then the objects in the list that meet the selection conditions are highlighted by a different background color.
29.2.11.7. Comparison of Configuration Repository Versions
In some cases the user might need to compare configuration repository configuration versions. To do this, select two versions to be compared in the Repository History window (hold down the Ctrl key) and choose Actions – Compare Configuration Versions or Actions – Perform selective comparison of object versions For more information on selective comparison see page 2-1101.
The selected configuration versions are compared and the configuration comparison window appears.
29.2.12. Object History
To view the history of object changes in the list of configuration repository objects or in the Configuration window, select the object and choose Object History in the context menu.
The Filter Object History dialog box appears.
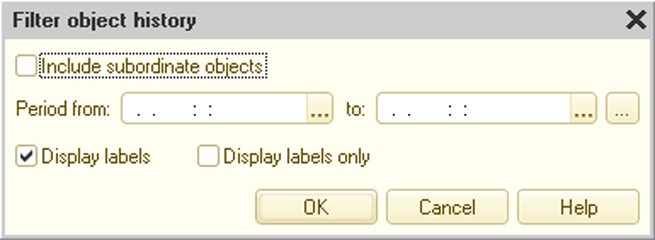
Fig. 459. Filter Object History
Select the necessary filter parameters and click OK.
The object history window appears.

Fig. 460. Object History
Each object change can be viewed, compared with the current object or compared between the versions (you need to select two versions in the list to do this).
For every object version, you can view comments and labels in the same way as for configuration versions (see above) as well as retrieve the configuration of the given version from the configuration repository.
You can filter the object version list. The filter is applied in the same manner as the configuration repository history filter described earlier in this chapter. The only difference is the selection and marking of the current object in the list of objects.
If you need to go to the configuration repository history window, choose Configuration Repository History from the Go To menu within the object history window. If you need to open the configuration repository history window and set a filter by the current object, select Configuration Repository History by Object.
29.2.13. Actions with Configuration Repository without Connection
Some actions can be performed without connection.
If the configuration is not connected to the repository, connection with the repository must be established first. To do this, select any item from the Configuration – Configuration Repository group. The connect-to-repository dialog box appears.
Fig. 461. Open Configuration Repository
Specify the connection credentials and click OK.
When the connection is established, the user is not prompted for login credentials again for any of the other menu items.
In the connection mode users can do anything within their rights, including viewing configuration storage data and comparing objects and configurations as well as full administration of the configuration storage (for users with administrative permissions). Actions related to retrieving objects from the repository are not available.
When the connection is active, users with administrative permissions can do all operations available with the configuration repository history.
29.3. REMOTE WORK WITH CONFIGURATION REPOSITORY
The mechanism for working remotely with the configuration repository enhances the distributed configuration development potential:
Configuration repository can be located on a PC under Windows or Linux.
Configuration repository can be accessed by both LAN users (tcp) and Internet users (http).
For application designers there is no difference between working remotely with the configuration repository and working with the configuration repository located at a shared network resource, except for some features covered by on page 2-1119.
NOTE
The mechanism of remote working with the configuration repository is mainly intended for high-bandwidth connections. It should also be taken into account that if remote access is used, operations with a significant data exchange volume, e.g., getting a full version of the configuration repository, may last considerably longer.
29.3.1. Architecture Overview
Working remotely with the configuration repository is supported by a special application – the configuration repository server. The PC where the configuration repository server application (crserver.exe for Windows or crserver for Linux) runs is also called the configuration repository server. Depending on the access protocol (TCP or HTTP), various patterns may be used for remote interaction between the client application and the configuration repository. At the same time concurrent work with configuration repository is supported, both remote and local – as with a shared file resource.

Fig. 462. Remote Configuration Repository
29.3.1.1. General Flowchart for Working with Configuration Repository
Generally, 1C:Enterprise supports concurrent work with the configuration repository by means of all access protocols: file access, TCP protocol and HTTP protocol.

Fig. 463. Interaction with Remote Configuration Repository
The same configuration repository server provides clients with the possibility of working with different configuration repositories. The only limitation is that all configuration repositories have to be located in the same root directory.

Fig. 464. Location of Various Repository Files
29.3.1.2. TCP Interaction
When TCP is used, the client application interacts with the configuration repository server, while the latter, in turn, interacts directly with the configuration repository.

Fig. 465. TCP Interaction
29.3.1.3. HTTP Interaction
When HTTP is used, chain interaction takes place: client application – web server – configuration repository server – configuration repository.

Fig. 466. HTTP Interaction
29.3.2. Configuration Repository Server Installation
Configuration repository server installation is described in detail in "1C:Enterprise 8.3. Administrator Guide".
After the configuration repository server is installed, the user on whose behalf the configuration repository server is operated must have write and read rights for the directory where the configuration repository is located (1Cv8DDB.1CD file and data directory).
29.3.3. Web Server Setup for Work with Configuration Repository
If remote interaction with configuration repository via HTTP is planned, then, in addition to setting the configuration repository server, the Web server also should be set up for interaction with the 1C:Enterprise system and the configuration repository server. The following actions must be taken to set up the web server:
record the web server extension modules
record the virtual application on the server
publish the configuration file for working with the configuration repository server
NOTE
The web server must have ISAPI extension support installed.
Publication of the configuration file for working with the configuration repository server implies placing the 1ccr file in the virtual directory of the web server. For instance, the name of such a configuration can be storage.1ccr (for a file description refer to "1C:Enterprise 8.3. Administrator Guide") and it can have the following content:
<?xml  version="1.0" encoding="UTF-8"?>
<storage  connectString="tcp://RepServ"/>
Administrator’s rights are required to set up the web server.
NOTE
The repository server is a 32-bit application, so when working through the server you should either use 32-bit operating systems and web servers or allow the Microsoft Internet Information Services web server to execute 32-bit modules.
29.3.3.1. For Microsoft Internet Information Services web server
This section describes the settings for different versions of the Microsoft Internet Information Services web server (hereinafter "IIS").
For IIS version 5.1, 6.0
You should create a virtual directory. To do this, use the virtual directory creation wizard from the Default Web Site context menu item (Internet Information
Services – <Name of computer that runs the web server> – Web Sites – Default Web Site). Select the New – Virtual directory context menu item.

Fig. 467. Defining the virtual directory name
The name specified in the Alias field will be used in generating URL access to the repository. Then specify the name of the folder with the files of the directory that you are creating.

Fig. 468. Specifying the directory
The next step is to specify which actions should be permitted with regard to working with the directory. You should allow Read and Execute (such as execution of ISAPI applications or CGI). Other rights should be disabled.

Fig. 469. Setting permissions
The next step is to click the Finish button. This completes the process of virtual directory creation. Then you should set up the directory created and record the web server extension for this directory. To do this, open the properties of the virtual directory created and click Setting in the dialog that opens.

Fig. 470. Recording web server extension
The IIS web server extension can be the wsisapi.dll dynamic library located in the bin directory of the specific 1C:Enterprise version.
TIP
To record the web server extension, use either a short path ("format 8.3") or install 1C:Enterprise in the directory that does not contain spaces or directory names exceeding 8 characters.
You can specify either a specific extension (.1ccr), or a mask of all files (*) as the extension (the Extension: field in the dialog in fig. 470).
The last step is to restart the web server.
For IIS version 7.0, 7.5
You should create a virtual application. To do this, use the virtual application creation wizard from the Default Web Site context menu item (<Name of computer with web server> – Sites – Default Web Site). Select the Add Application… context menu item.

Fig. 471. Creating the virtual application
The name specified in the Alias field will be used in generating URL access to the repository.
Then add the handler for .1ccr files. To do this, select <Name of computer that runs the web server> – Sites – Default Web Site – storage – Handler Mappings – Add Script Map.
The IIS web server extension can be the wsisapi.dll dynamic library located in the bin directory of the specific 1C:Enterprise version being used.
You can indicate either a specific extension (.1ccr) or a mask of all files (*) as the extension (the Request path: field in the dialog in fig. 472).
The last step is to restart the web server.

Fig. 472. Adding the handler
29.3.3.2. For Apache web servers
To setup the Apache web server to work with the configuration repository, take the following actions:
Include the loading of the web server extension module into the web server configuration file (httpd.conf). Names of extension modules vary depending on the web server version and the operating system used:
○ For Windows:
□ For Apache 2.0: wsapch2.dll
□ For Apache 2.2: wsap22.dll
○ For Linux
□ For Apache 2.0: wsapch2.so
□ For Apache 2.2: wsap22.so
The identifier of the web server extension module is _1cws_module.
To load the module, you must enter the following string of the LoadModule
_1cws_module <path to web server extension module> type in the configuration file.
Example for Windows:
LoadModule _1cws_module "C:\Program Files\1cv8\8.3.1.100\bin\wsap22.dll"
Example for Linux:
LoadModule _1cws_module /opt/1C/v8.2/i386/wsap22.so
Create a virtual directory on the web server to provide access to the configuration repository and record the file handler for the virtual application directory. The identifier of the handler being recorded is 1c-application.
Sample virtual directory for Windows:
Alias  "/repos" "C:\www\repos\"
<Directory  "C:\www\repos\">
AllowOverride None
Options None
Order allow,deny
Allow from all
SetHandler 1c-application
</Directory>
Sample virtual directory for Linux:
Alias  "/repos" "/var/1C/www/repos"
<Directory  "/var/1C/www/repos">
AllowOverride None
Options None
Order allow,deny
Allow from all
SetHandler 1c-application
</Directory>
Add the *.1ccr file to the folder with the virtual directory files and specify the address of the configuration repository server in this file (tcp scheme).
.1ccr sample file:
<?xml  version="1.0" encoding="UTF-8"?>
<repository  connectString="tcp://192.168.0.12"/>
Restart the web server
29.3.4. Launch of Configuration Repository Server
In the Windows environment, the configuration repository server can be launched as an application or installed as a service.
In the Linux environment, the configuration repository server can be launched as a process or a daemon.
29.3.4.1. Windows OS
The configuration repository server is launched via the command line:
crserver.exe  -instsrvc  | -rmsrvc -usr <user>  -pwd <password>
-  start | -stop
-port  <port> -d <directory>
If server storage is installed as a service, it is called 1C:Enterprise 8 Configuration Repository Server.
IMPORTANT!
The option name and its value should be separated by a space.
-start
Start server repository service.
-stop
Stop server repository service.
-instsrvc
Register server repository as a service.
-rmsrvc
It removes registration of the server as a service.
-usr
Name of the user registering the service. This user should be assigned the Log on as a service right. Additionally the user must have read access rights to the executable files directory in the relevant 1C:Enterprise version and full access rights to the configuration repository root directory (%APPDATA%\1C\1cv8\ by default or the directory indicated by the -d switch).
-pwd
Password of the user registering the service.
-port
Operation port of the configuration repository server. 1542 is used by default.
-d
Root directory for configuration repositories. %APPDATA%\1C\1cv8\ is used by default.
29.3.4.2. Linux OS
The configuration repository server is launched via the command line:
./crserver -daemon -port <port> -d<directory>
IMPORTANT!
Parameter name and value should be separated by a space.
-daemon
The server is launched as a daemon.
-port
Operation port of the configuration repository server. 1542 is used by default.
-d
Root directory for configuration repositories. /home/usr1cv8/.1cv8 or ~/.1cv8 is used by default.
29.3.5. Connection to Configuration Repository Server
Client connection to the configuration repository for remote work is similar to the connection procedure for working with the configuration repository located at a shared network resource. The only difference lies in the method of specification for the configuration repository directory. Depending on the protocol, a configuration repository directory can be specified in two ways:
For TCP protocol:
tcp://<configuration repository server name>/<relative path to configuration repository>
For HTTP protocol:
<Web service description file address>/<relative path to configuration repository>
Example:
tcp://RepServ/MyConfRep
Or:
http://www.MyCompany.ru/VirtualFolder/storage.1ccr/MyConfRep
RepServ – configuration repository server name;
http://www.MyCompany.ru – the Web server address where the Web service description file is published;
http://www.MyCompany.ru/VirtualFolder/storage.1ccr – full HTTP Web service description file address;
MyConfRep – relative path to the configuration repository.
The relative path starts from the default directory ((%APPDATA%\1C\1ñv8\) if the directory has not been specified explicitly or from the directory specified in the -d switch when launching the configuration repository server. If the relative path to the configuration repository is not specified, then connection to the default configuration repository is established (maincr directory).
If you work with a configuration repository server, the repository server and the Designer versions should match. The repository will be unavailable for work if the designer and configuration repository server versions mismatch.
29.3.6. Creation of Configuration Repository
The default directory for configuration repository placement is created during the first launch of the configuration repository server. The default directory name is maincr. If no -d switch has been used when launching the server, then the configuration repository is located in the default directory, i.e. %APPDATA%\1C\1ñv8\ maincr.
For a new configuration repository, create a configuration repository from the client application in the Designer mode and assign the required new directory as a configuration repository directory.
For maximum performance, the recommended placement for the configuration repository root directory is on the configuration repository server. The 1C:Enterprise system supports the placement of configuration repository directories at network resources accessed by the configuration repository server. However, using this option may lead to lower performance.
29.3.7. Remote Work with Configuration Repository
(Special Features)
No automatic object status update is performed in the configuration repository during remote work with the configuration repository. To update details for objects placed in the configuration repository run the Actions – Update Status command.
Active users working with the configuration repository remotely are not shown in bold in the configuration repository user list.
29.4. RECOMMENDATIONS ON HOW TO USE CONFIGURATION REPOSITORY
Distributed development is done best when developers leave comments on their work and maintain a list of changes so that other developers can understand the changes.
A simple way to leave comments on the changes is to create a text report describing the difference between the current working configuration and the repository configuration (only on objects placed in the repository) and store this report in an accessible place.
The configuration repository administrator should periodically back up the repository data and change the reports created by the developers (the timeframe depends on the development progress).
If a configuration comparison window is open, performing group operations with the repository (obtaining objects, placing objects, etc.) and disabling configuration support are not recommended.