
1C:Enterprise 8.3. Developer Guide. Contents
SERVICE FEATURES
1C:Enterprise has abundant service features and modes. They are described in this chapter.
31.1. WINDOW MANAGEMENT
31.1.1. State (Window Placement Mode)
31.1.1.1. Setting Window Placement Mode
Windows can be placed on the screen in various ways, including:
normal location in which a window is displayed only inside the working area of the program;
floating location in which a window can freely move around the screen (not only inside the work area of the program);
docked location in which a window is "pinned" to the borders of the work area of the program; auto-hide location.
To change the window placement mode select the desired mode from the context menu of the window header.
Floating windows are always displayed on top of windows in all other modes. If there are several windows in Floating mode, the active window is always displayed on top of other windows.
In the MDI and Floating modes, you can attach windows to each other. If a pair of windows in the same state have the Dockable property turned on (in the context menu of the window header), these windows can be attached to each other. To attach windows in the MDI state to each other, press the Shift key when moving the windows. You can also dock windows that are already docked to each other.
If the Dockable property is not turned on, you cannot select the Docked or Autohide modes.
For the Docked and Autohide modes, the Dockable property is always turned on and cannot be disabled.
The Docked mode requires special discussion. In this mode a window may be:
attached (docked) to one of the borders of the Designer window;
attached (docked) to any border of any other window with the Docked property turned on;
displayed above any other docked window (stacked windows).
If the Docked mode is turned on for a window, this window is attached to one of the borders of the work area or to another window in Docked mode.
To modify the size of a docked window, move the mouse cursor to a free border (turned to the work area) and drag the border with the mouse.
If the window is in Floating mode and you drag its border close to a work area border or another Docked window, the window borders may change abruptly. If you release the mouse button at this time, the window attaches to a new border and its status is changed to Docked.
You can change the status of docked windows by moving them with the mouse. To move a window left click and hold the window header and drag the window to another location. The window state is changed to Floating.
There are several ways to attach multiple docked windows to the Designer window or another window border. Windows can be arranged in layers when each window occupies the entire width of the work area of the Designer window or a different window. It is possible to place windows in sequence so that each window is located in one layer along the border of another window. If there are more than two windows docked, you can arrange some of them in layers and the others in sequence.
To arrange one docked window above another (create stacked windows), please do the following:
grab the window header with the mouse;
move the window so that its header fits over the header of another docked window. The dragged window should have a tab contour at the bottom; release the mouse button.
Now tabs will show up at the bottom of the docked window. The tab text will be the same as the window header text. The tabs contain stacked windows.
Click a tab to open the corresponding window.
The Close command can only close an active tab in this case.
To separate stacked windows grab the appropriate tab with the mouse and drag it away (you can control the contour of the window you move).
If the mouse pointer remains in the tab area, you can change the tab order in this way.
If some windows are docked to each other, you can attach more windows to them by dragging new windows to the tab area instead of the header. You can specify the tab order in this way.
You can also arrange windows in the Autohide mode. If the Autohide mode is selected, an additional line appears on one side of the work area. This line contains window tabs, including a tab for the current window attached to this side of the work area. Location of this line is determined by the window location in Docked mode. In this mode a window remains on the screen while it is active. Once a window is activated, the previous window becomes hidden. To open a window move the mouse cursor over the tab for this window (do not click). When the mouse is moved away from the window, the window is automatically hidden.
For docked windows you can also specify a mode other than stacked. For example, the Autohide mode is very convenient. In this case an additional line will contain only tab icons. Move the pointer over the tab icon to restore a hidden window and display its name in the additional line.
31.1.1.2. Restoring Window Position
You can change window position, size and status as described above. When a window is closed, the latest window display options are saved and when a window is re-opened, the most recent display options are used.
To restore the original position, size and status of a window, select the Restore Window Position command in the context menu of the window header (or window bar header). The saved display options are reset and the original parameters are restored. The window is closed and re-opened with the new display options.
31.1.1.3. Selection of Window Mode for Object Forms
You can specify the window state mode for object forms when they are first opened in the 1C:Enterprise mode. For this purpose you can use the Window properties category for each object form.
Window State specifies the window state when it is first opened. If the Normal option is selected, the window state cannot be modified for this window.
Dockable Window shows that it is possible to attach this window to other windows.
Window Location – if Auto is specified, the window position is determined based on the state and dimensions of the work area. If you specify the Center option, the window is placed in the center of the work area when it is first opened. If Dont Overlap Owner is selected, location of a subordinate window is determined so that it does not overlap the owner window or control (if the work area has free space). If there is no place to display it, the subordinate window attempts to expose the left part of the owner window provided that 50% of the owner width can be unclosed.
Window Dock Location defines position of a docked form window relative to the work area.
Change Size permits or forbids changing the size. The DontChange option does not affect the ability to change the size of a window in the Docked and Autohide modes.
31.1.2. Window Settings Dialog Box
This dialog box is used to work with the list of open windows. It can be used to switch to a selected open window, save changes, manage window location or close one, several or all open windows.
Use the Windows – Windows command to open this dialog box. It contains a list of currently open windows. Only windows with Normal status are included in the list.
If the contents of an open window have been modified, this window is marked with a "*" character appearing to the left of the window name.
All actions are performed with one or several windows in the list. You can select or deselect multiple lines in the standard way.
Actions that can be performed with one or several open windows are described in the table below.
|
Button |
Action |
Number of Selected Windows (Condition) |
|
Activate |
Makes selected window active |
One |
|
Save |
Saves all changes for certain document types (e.g., text and spreadsheet documents) that have this option |
Any |
|
Close windows |
Closes all selected windows |
Any |
|
Arrange |
Arranges selected windows on the screen. Horizontally – arranges selected windows from left to right. Vertically – arranges selected windows from top to bottom. Cascade – arranges selected windows in a cascade. |
More than one |
|
Combine |
Attaches two windows to each other |
Attachment permitted |
|
Separate |
Detaches combined windows |
|
|
OK |
Closes the Windows dialog box |
Any |
31.1.3. Use of New Window Mode
Use the Windows – New Window command to make a copy of any form editor, text editor or spreadsheet editor window. A new window instance, an exact copy of the current one, opens in the work area of the program. Its contents are the same as the contents of the source window. The window instance number is displayed in the header.
This mode is convenient for viewing, comparing and editing information in a window. Any changes in any window instance are displayed in all window instances.
It is recommended that this mode be used if the window is a configuration object form with items distributed across several pages and you need to view these pages at the same time or view the module and form dialog box simultaneously. Similarly, this mode makes it possible to edit long texts or templates. One window instance can be used to view one part of a text or template and the other window instance can be used to view another part.
31.1.4. Service Windows
When the user is working with the Designer, service windows are used to provide various support information to the user. These windows include:
message window
search results window
text template window
Syntax Assistant
The first two types of windows are automatically displayed on the screen if needed (the text template window and the Syntax Assistant window are displayed upon user request).
The purpose of each of these windows is described in the corresponding parts of this guide. This section describes general principles of working with such windows.
To manage windows you can use context menus from the window title bar and the inside of the window. The first option manages the window itself (for details see page 2-1143), while the second option operates the window contents.
The contents of the message window are not automatically cleared. To clear the window select the Clear command from the context menu.
31.1.5. Closing Windows
Any window can be closed with the mouse (by clicking the Close Window button) or with the keyboard using the Shift + Esc or Ctrl + F4 shortcuts.
31.1.6. Window Navigation History
The history of navigation between windows is stored only during a session. You can use this tool, for example, to return to the original window when moving to the place where variables, procedures and functions are defined.
To move back within the history, select the Windows – Move back item. To move forward within the history, select the Windows – Move forward item.
31.2. SETTING DESIGNER PARAMETERS
Use the Tools – Options menu command to specify various Designer parameters.
The Options window is organized as a card file. All possible parameters are combined in groups. To access controls of a specific group, click the appropriate window tab.
31.2.1. General
This tab contains a single parameter that defines operation mode and interface for Designer – Edit configuration for startup modes.
The parameter can have one of two values:
Managed application. In this case the system hides interface items used to edit properties and objects in the ordinary run mode.
Managed and ordinary application. In this case no interface items are hidden and the user can edit the configuration in both ordinary and managed mode at one time.

Fig. 497. General Options
This parameter is stored and can be set up for each particular infobase. By default the parameter is set to the managed mode; however, if the user loads a configuration with Default run mode property set to Ordinary application (or if this property can be changed interactively), the parameter is assigned the Managed and Ordinary Run Mode value.
The following Designer interface items are hidden when the parameter is set to the managed mode:
Styles metadata tree branch
Interfaces metadata tree branch
Default Interface configuration property
selection of default interface in the user's editing dialog box
Forms tab in the Designer parameters
Default run mode dropdown list on Modules – Check tab
Use managed forms in ordinary applications configuration property
Use ordinary forms in managed applications configuration property
Interfaces tab in metadata editing windows
Open ordinary application module configuration context menu item
flag of managed form creation in the form wizard
Report Generator commands
Client (ordinary application) common module property
Additional tab on the Forms tab of the configuration object editing window
Interactive Activation Data processor and Before Execute Interactively event handlers for a business process route point of the Activity type
31.2.2. Texts
Texts tab controls are used to configure the text document editor.
Drag and drop text. You can use the drag & drop mode to copy and move text blocks in the text editor.

Fig. 498. Text Editing Parameters
Allow cursor beyond end of lines. If the option is enabled, the cursor can be positioned after the line end. Otherwise the cursor position is limited to the line break symbol.
Show spaces and tabs. If enabled, space and tab symbols are displayed in the text. This option is used to verify text formatting. With the Show spaces and tabs enabled, the Space and Tab properties allow you to specify the display characters representing spaces and tabs:
Space – specifies the symbol used to display spaces; Tab – specifies the symbol used to display tabs.
Replace tabs with spaces when typing. If this option is turned on, tabulation symbols are replaced with the number of spaces specified in Tab width.
Tab width. It defines the number of characters that corresponds to a tab symbol during text input.
Autoindent. It sets or removes automatic indentation when the line break symbol (the Enter key) is entered.
Font. It specifies the font to be used for text input. It is recommended using a fixed-width font for module code (e.g., Courier New).
Autoreplace. If this option is turned on, the entered text that corresponds to the text in the Automatically replace string attribute of the template is automatically replaced with template text. If this option is set to Enable with Prompt, the template text is displayed after a short pause while the text to be replaced is being entered. If this option is set to Prompt Only, template text is shown after a short pause, but the text is not replaced.
To replace input text with template text, press Spacebar or Enter after typing the string.
31.2.3. Modules
The Modules tab controls are used to configure color highlighting of module code syntax, auto-indentation and tabulation step sizes for modules and to set up groups. Settings are combined in two sections, each located on a separate tab.
31.2.3.1. Setting Editing Parameters
Use the Edit tab to configure color syntax highlighting, auto-indentation and tabulation step size in the module code (see fig. 499).
Syntax highlighting. It is much easier to recognize module text if certain syntactic constructs (constants, names, operators, comments, etc.) are color-coded. Color coding is also used to check whether module text has been entered correctly. If an operator is entered incorrectly, it is not displayed in the required color. You can specify a different color for each construct (constant, name, operator, comment, etc.).

Fig. 499. Setting Module Text Editing
Disable color highlighting. If set, module text is displayed as ordinary text and the color highlighting setting is unavailable.
Autoreplacement. If this option is turned on, the entered text that corresponds to the text in the Automatically replace string attribute of the template is automatically replaced with template text. If this option is set to Enable and show tooltips, the template text is displayed after a short pause while the text to be replaced is being entered. If this option is set to Show tooltips only, tooltip text is shown after a short pause when you type the replaceable text.
To replace input text with template text, press Spacebar or Enter after typing the string. If the Autoreplacement option is set to Disable or Show tooltips only , these actions are not performed.
Use Autoreplacement in comments. If this option is set, template text is displayed when the user enters matching text into comments.
Replace tabs with spaces when typing. If this option is turned on, tabulation symbols are replaced with the number of spaces specified in Tab width.
Tab width. It specifies the number of Space characters equivalent to one tab character.
Autoindent. It sets or removes automatic indentation when the line break symbol (the Enter key) is entered. If the Use syntax rules value is selected, text entry proceeds taking the current syntactic construct into account.
Font. It specifies the font to be used for text input. It is recommended using a fixed-width font for module code (e.g., Courier New).
31.2.3.2. Setting Module Check Parameters
The Check tab can be used to set module check modes.

Fig. 500. Module Syntax Check Settings
Use the module check settings to select a suitable environment for compilation. Execution environment includes common modules with an appropriate flag and special modules used in a particular execution mode (managed application module, session module, etc.). If execution environment compilation is successful, the module that has initiated syntax check is verified. The number of check passes (including execution environment compilation) is defined by the number of check boxes selected in the dialog box. Modules that do not exist in the selected check mode are not verified; e.g., application modules are not checked if the Thin client check mode has been selected.
Availability of the Default run mode dropdown list in the form depends on the Edit configuration for startup modes parameter (see page 2-1148). If the parameter value is Managed application, the dropdown list is missing from the form; the Thick client (ordinary application) parameter is also hidden in this case. When the dialog box is opened, the parameter value always matches the Default run mode configuration property value.
If the Default run mode dropdown list is available in the form, the user can select check modes for each run mode. If the Ordinary application mode is selected, only the Thick client (ordinary application) check box is set by default; if Managed application is selected, Thin client and Server are checked. The user can specify a new set of check boxes for each run mode and click Apply or OK. When the Edit configuration for startup modes parameter changes value (see page 2-1148), the Designer restores the required set of check modes.
The selected run mode determines preprocessor instructions:
|
Check Mode |
Preprocessor Instruction |
|
Thick client (ordinary application) |
Client, AtClient, ThickClientOrdinaryApplication |
|
Thin client |
ThinClient, Client, AtClient |
|
Web client |
WebClient, Client, AtClient |
|
Server |
Server, AtServer |
|
External connection |
ExternalConnection |
If the Check automatically check box is selected, module text is automatically checked for syntax errors (when recording or closing). When the Perform extended check checkbox is selected, calls to object properties and methods via a period (".") are verified for a limited number of types. Also, the system checks whether the parameters specified by a string are correct for a limited number of methods. For more details on verification types, see page 2-1025.
31.2.3.3. Setting Group Parameters
The Grouping tab is used to specify modes for grouping and collapsing various syntactic constructs. The table below lists syntactic construct types by row.

Fig. 501. Group Settings
If the Group column is checked, this syntactic construct is automatically grouped. Please note that only syntactic constructs at the second level of nesting can be grouped.
If the Collapse column is checked, this syntactic construct is automatically collapsed when a module is opened.
31.2.3.4. Context Tip Settings
The Context help tab is used to launch context tip for module texts.

Fig. 502. Context Help Settings
If the Automatic hint when "." is typed option is checked, context tip is displayed automatically when the user types ..
If the Automatic hint when "=" is typed option is checked, context tip is displayed automatically for system enumeration value selection when the user types "=".
The Automatic hint when a quotation mark is typed checkbox enables context tips for the options of some methods, if an option is set by a string.
The Automatic hint when "(" or "," is typed checkbox enables context help for the parameters of system procedures and functions, including procedures and functions of the applied solution with comments using a special format (see page 2-951).
If the Include templates in the list of hints option is checked, templates with autoreplace strings defined are also listed.
If the include keywords in the list of hints option is checked, all keywords (e.g., If, Procedure, Do, Return, etc.) are included in the list.
31.2.4. 1C:Enterprise Startup
31.2.4.1. Main Parameters
Use this tab to specify application to be started up and user selection method for 1C:Enterprise startup (see fig. 503).
The Application group defines the client to be launched upon 1C:Enterprise mode startup in the Designer.

Fig. 503. 1C:Enterprise Launch Parameters
If it is set to Select automatically, the system selects the client type depending on the Default run mode configuration property value and Run mode property value for the user starting up 1C:Enterprise. If no particular value is specified in the configuration and user properties, the following criteria are applied:
If Default run mode is Ordinary application, the system runs thick client in the ordinary mode.
If Default run mode is Managed application, the system runs thin client.
If the user wants to pick a specific client to run when 1C:Enterprise is started up in the Designer, it has to be done manually (items below Select automatically). If the web client has been selected to run, the Web browser to be used can also be indicated:
Default
Microsoft Internet Explorer
Mozilla Firefox
Google Chrome
Safari
When the web client is launched from the Designer, the system checks version of the platform that has had an infobase previously published. If versions differ, the user is prompted to run publication again. Affirmative answer initiates an infobase publication dialog box (for details see "1C:Enterprise 8.3. Administrator Guide").
The User group determines the user on behalf of whom 1C:Enterprise is started when it is started in the Designer:
Current – from the user list.
Name – a specific user is designated (same as the /N command line option). There is the ability to select a user from the list. The "..." button in the right side of the field is used for this purpose.
Use operating system authentication – if this option is checked, user is selected using OS authentication (same as the /WA command line switch).
Data split – specifies separator values as they are specified for the -Z option (for more details see page 2-911). A string specified in this field should match the rule of specifying separator values, but it should not include quotes around values when they are specified in the /Z option. For example, when the following option is specified in the command line: /Z "-1,+4", in the Data split you should specify -1,+4. The system remembers different variants of separator values entered and allows you to switch between them.
Startup option – launch parameter (same as the /C command line switch) that can be edited via the LaunchParameter global context property.
Slow connection – enables or disables low speed connection mode when launching thin client. The check box status is saved for a specific infobase. If run mode with low connection speed is not set for an infobase in the infobase list, the check box is displayed as unset. If the check box is selected, 1C:Enterprise runs with low speed.
If run mode with low connection speed is set for an infobase in the infobase list, the check box is displayed as grey. If the check box is not selected, 1C:Enterprise runs with normal speed. The check box has the same function as the -O command line switch.
Emulate delay on server calls – this check box enables imitation of thin client operation with significant delays in interaction with the server. By default it is unchecked.
Call delay (seconds) – defines delay duration for each server call by the client application.
Data sending delay (seconds/Kb) – defines delay duration for data transfer to the server. The time value is indicated per 100 bytes of transferred data.
Data receiving delay (seconds/Kb) – defines delay duration for data retrieval from the server. The time value is indicated per 100 bytes of retrieved data.
NOTE
Default values allow emulating GPRS connection.
Server call delay mechanism can also be enabled using the command line: -EmulateServerCallDelay [-CallXXXX] [-SendYYYY] [-ReceiveZZZZ], where:
-EmulateServerCallDelay – command line switch that enables the delay imitation mechanism for server calls;
-Call – parameter indicating delay duration for a server call in milliseconds (if no value is specified, the delay is 100 ms);
-Send – parameter indicating delay duration for data transfer (if no value is specified, the delay is 100 ms);
-Receive – parameter indicating delay duration for data retrieval from server (if no value is specified, the delay is 100 ms).
31.2.4.2. Additional Parameters
This tab lists additional parameters that can help the user in application solution development (e.g., in debugging).
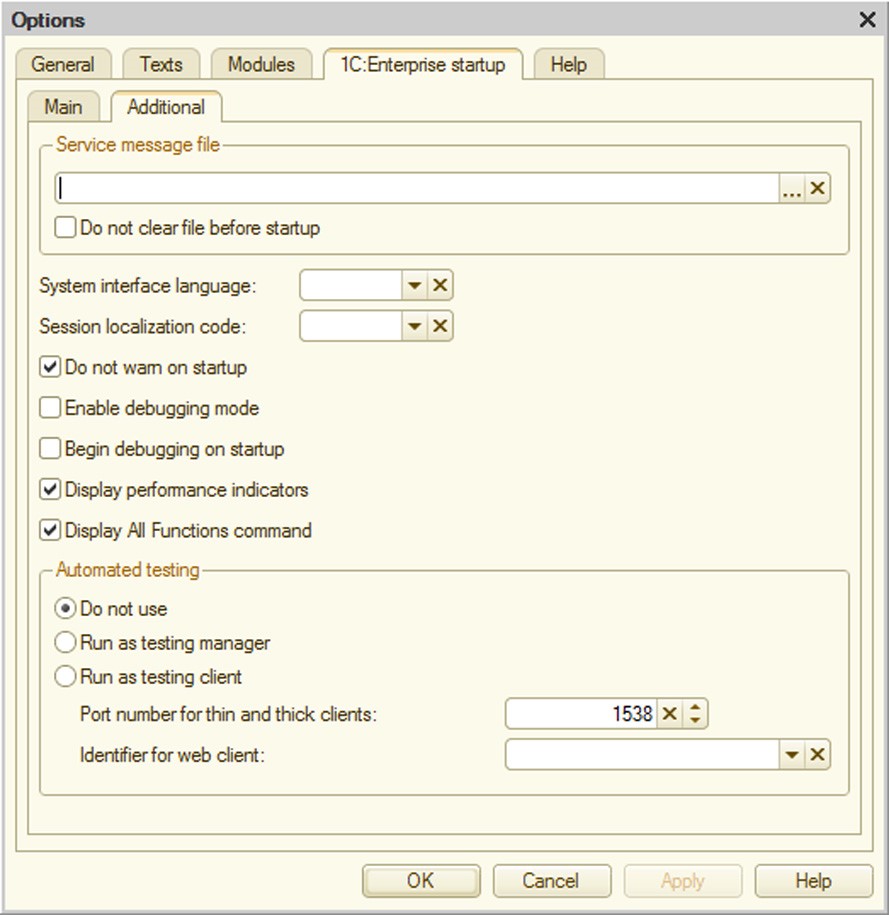
Fig. 504. Additional 1C:Enterprise Launch Parameters
Service messages file – if it is necessary to auto-save service messages to a file, specify its name in this parameter (same as the /OUT command line switch).
Do not clear file before startup – if the check box is set, at the next startup messages will be added to the file specified (same as the /OUT command line switch with the NoTruncate key).
System interface language – specifies the interface language (same as the /L command line switch).
Session localization code – specifies session locale code (same as the /VL command line switch).
Do not warn on startup – if this option is checked, the following launch warnings are suppressed:
Configuration being edited differs from database configuration. Continue?
Your computer's capabilities are inadequate to edit configuration help, you must install Microsoft Internet Explorer version 6.0 or higher.
Your computer's capabilities are inadequate to edit HTML documents, including help sections. To edit HTML documents, you must install Microsoft Internet Explorer version 6.0 or higher. HTML document editing will be unavailable during this session (same as parameter passed through the /DisableStartupMessages command line switch).
Enable debugging mode – if checked, debugging is enabled when launching the system in 1C:Enterprise mode (same as the /DEBUG command line switch).
Begin debugging on startup – if checked, connection is performed automatically when launching 1C:Enterprise.
NOTE
If 1C:Enterprise is launched from the Designer by pressing F5 (or using the Debug – Start Debugging menu item), the debugging mode is enabled automatically (regardless of Enable debugging mode and Begin debugging on startup check boxes).
Display performance indicators – if this check box is selected, 1C:Enterprise launch adds a special button to the Favorites and History panel. Clicking the button displays a window with current statistics on interaction with the 1C:Enterprise server (same as the /DisplauserverCalls command line switch).

Fig. 505. Show Server Calls
For a detailed description of the server call display mechanism see page 2-1057.
Display All Functions command – displays the Main Menu – All functions menu item (see fig. 506). Invocation of this command displays a form with a list of all application objects available to the user (used in managed mode of thick client as well as thin and web clients). By the default this menu item is disabled (it is the same as the /DisplayAllFunctions command line switch).

Fig. 506. Tools – All Functions Menu
NOTE
Forms opened from the All functions window always appear in an auxiliary application window.
The All functions window also provides access to Standard functions used for standard procedures: viewing the list of active users, deleting marked objects, etc. For a detailed description of standard functions see "1C:Enterprise 8.3. Administrator Guide".
The Automated testing group defines the role (in terms of automated testing; for details, see page 2-1060) for the client application launched from Designer:
Do not use – the launched client application is not included in automated testing;
Run as testing manager – the launched client application is used as the testing manager (the TestManager command-line parameter is used);
Run as testing client – the launched client application is used as the testing client (the TestClient command-line parameter is used); the port specified in the Port number for thin and thick clients parameter is used for communicating with the testing manager (TPort option for the TestClient command-line parameter). For the web client, the ID specified in the Identifier for web client option is used (TestClientID command-line parameter).
31.2.5. Help
Use this tab to configure the viewing mode of the Help content (see fig. 507).
Help content can be displayed in one window or split into several independent windows (Display in a single window/Display in multiple Windows parameters).
The Syntax Assistant window can be placed horizontally or vertically (Arrange horizontally/Arrange vertically parameters) and use two languages for terms (Use both languages parameter).

Fig. 507. Help Content Display Settings
The user can set up filtering by object availability for tree contents and Syntax Assistant index display for a particular 1C:Enterprise run mode. Thus, Syntax Assistant sections can be displayed only for objects available in the thin client.
This tab can also be accessed using a command bar button in the Syntax Assistant.
31.3. CALCULATOR
For help with calculator features see the "Calculator" section in the User Manual.
31.4. CALENDAR
For help with calendar features see the "Calendar" section in the User Manual.
31.5. TEXT TEMPLATES
The Designer can save frequently used text fragments for quick insertion into a text document or module code.
A template is a text fragment assigned to some character sequence serving as a short name to look up this text sequence when typing. If the automatic substitution mode is turned on, the named text fragment is automatically inserted into the editor when the template name is typed.
IMPORTANT!
Automatic substitution mode is turned on separately for modules and text on different tabs of the Designer parameters window.
31.5.1. Template List Maintenance
Templates are stored in template files. Templates can be classified as standard (i.e. shipped with 1C:Enterprise) and user (i.e. user-generated). Standard templates are stored in the bin directory of the installation directory for a particular 1C:Enterprise version. User templates can be stored at any location on the hard drive. The list of attached templates is saved and can be generated for individual versions of 1C:Enterprise script. Standard templates are provided for both versions of 1C:Enterprise script.
Templates can be configured in the Text Templates window using the Tools – Text Templates command.

Fig. 508. Text Templates
To manage templates select Actions – Template Setup in the Text Templates window. The Template settings window is displayed.

Fig. 509. Template Setting
Use the Use standard templates check box to add standard templates. Deselecting this check box disables standard templates altogether. Each 1C:Enterprise version uses its own set of standard templates. User templates can be attached in addition to standard templates. To do this, click the Add button on the toolbar of the Template Setting window and select the required template file.
TIP
It is recommended to store user templates in a directory different from the 1C:Enterprise installation directory. For example, templates might be saved in a special subdirectory of the My Documents directory.
Use the Move up and Move down buttons to rearrange files within the list.
To remove an unwanted template select it in the file list and click the Delete current item button.
31.5.2. Editing Templates
Select Actions – Change to edit an existing template file. The template editing window will be displayed.

Fig. 510. Template Editor
IMPORTANT!
Standard templates cannot be edited. They can only be viewed in the template editor.
The Name attribute shows the name of a template in the list of templates. Use the Automatically replace string attribute to specify the line sequence to be replaced with template text when typing. Replacement is initiated by hitting Spacebar or Enter key.
Additionally when the user types in a template name, a tooltip with template text is displayed on the screen as shown below.

Fig. 511. Use of Templates
The template editing window contains a toolbar that can be used to create template groups and separate templates, remove redundant templates and sort lists. The left part of the window contains a tree of templates. In the right part, you can edit names of template groups and the template itself.
Templates can be grouped into folders for convenience. Use the Add Folder command from the context menu or the appropriate toolbar button to create a group. Enter a group name in the Name attribute.
To create a template select the group where it is to be located and use the Add command from the context menu or the appropriate toolbar button. The Name attribute contains the template name (this name is used to select a template for inserting into edited text). Use the Automatically replace string field to specify the first part of the string that will be replaced with template text in a text document window (if automatic substitution is turned on). Automatic substitution occurs when the user presses Enter or Spacebar after entering a sequence of characters. Use Template text multi-line field to enter text to replace the Automatically replace string field value or to be inserted into a document when a template is selected.
To make a template available for interactive selection, check the Include in context menu option.
In this case a template to be inserted in text (module) can be selected from the list of templates in the context menu. Templates are placed in the list if the Include in context menu option is checked.
31.5.2.1. Template Control Directives
Custom Query
Description:
This is used for entering any text. When using this kind of template, a dialog on context-dependent template entry appears on the screen.
Syntax:
<?"Tooltip"> Parameters:
<Tooltip>
Explanatory label text. Cursor Positioning
Description:
This construct is used for placing the cursor to the indicated location after inserting text into the template.
Syntax:
<?> Special Query
Description:
This construct is used for entering configuration objects, predefined items and other data.
Syntax:
<?"Tooltip",<Keyword>[, <Parameter1>[,<Parameter2>…]] Parameters:
<Tooltip>
Explanatory text in the entry query.
<Keyword>
Type of query.
<Parameter1>…
Query parameters.
Special query descriptions are listed in the following table:
English
Variant
|
BusinessProcess Selecting a business process type VariantSelection <Tooltip 1>, When using this template a list of lines to choose from is shown <String to insert 1>, … on the screen , <Tooltip N>, <String to Each list line consists of a tooltip and insertion text. |
|
||
|
insert N> |
Example: "Tooltip 1" – parameter describing text of the first list line; "String to insert 1" – parameter or text that will be inserted by choosing the first line |
|
|
|
TypeSelection |
Selection of type |
|
|
|
Document |
Document type selection |
|
|
|
DocumentJournal |
Document journal type selection |
|
|
|
Task |
Task type selection |
|
|
|
EnumValue |
Enumeration value selection |
|
|
|
UserName |
User name entry |
|
|
|
TypeDescriptionConstructor |
Type description wizard |
|
|
|
UserFullName |
Full user name entry |
|
|
|
ConfigurationStorageUserName |
Entry of full configuration repository user name |
|
|
|
Constant |
Constant selection |
|
|
|
FilterCriterion |
Filter criterion selection |
|
|
|
DataProcessor |
Data processor selection |
|
|
|
Report |
Report selection |
|
|
|
Recalculation |
Recalculation selection |
|
|
|
Enum |
Enumeration selection |
|
|
|
ChartOfCalculationTypes |
Chart of calculation types selection |
|
|
|
ChartOfCharacteristicTypes |
Chart of characteristic types selection |
|
|
|
ExchangePlan |
Exchange plan selection |
|
|
|
ChartOfAccounts |
Chart of accounts selection |
|
|
|
ChartOfCalculationTypesPredefinedData |
Selection of predefined data for a chart of calculation types. First, a chart of calculation types is selected, then – predefined data value |
|
|
|
ChartOfCharacteristic- TypesPredefinedData |
Selection of predefined data for a chart of characteristic types. First, a chart of characteristic types is selected, then – predefined data value |
|
|
|
ChartOfAccountsPredefinedData |
Selection of predefined data for a chart of accounts. First, a chart of accounts is selected, then – predefined data value |
|
|
|
MDObjectsSubset |
Metadata object selection. When creating a template, a dialog box opens where you need to specify types of metadata objects. When selecting a template, a selection dialog box appears on the screen containing all metadata objects of the specified type. |
|
|
|
Seq |
Sequence selection |
|
|
|
AccountingRegister |
Accounting register selection |
|
|
|
AccumulationRegister |
Accumulation register selection |
|
|
|
CalculationRegister |
Calculation register selection |
|
|
|
InformationRegister |
Information register selection |
|
|
|
English Variant |
Description |
|||
|
Catalog |
Catalog selection |
|||
|
CatalogPredefinedData |
Selection of predefined data for a catalog. First, a catalog is selected, then – predefined data value |
|||
|
QueryText |
Query text entry using query wizard |
|||
|
DateTime, <Format string> |
Entry of current date in the format indicated in the <Format string> parameter |
|||
|
FormatString |
Format string text entry using format string wizard |
|||
31.5.2.2. Template Text Editor
Templates can contain a static (unchangeable) part and a dynamic part which is context-dependent and cannot be specified in advance. For example, the If operator of the 1C:Enterprise script has the following structure:
If  <?"Condition 1"> Then
ElseIf  <?"Condition 2"> Then
EndIf;
<?"Condition…">
These are context-dependent template parts.
To provide for universal use of a template, use the control directives insertion mode. Control directives (character sequences which initiate some actions when template text is inserted) are inserted into the template text. For example, a control directive can be used to request information from the user and to add this information to the text to be inserted.
Control directives can be inserted into templates manually or interactively through a special query.

Fig. 512. Insert Control Directive
Place the cursor in the template area that contains a variable part and click the <->Insert… button. The Insert Control Directive dialog box is displayed.
The Tooltip attribute is used to specify a line of text that will be entered as an explanation to an action that is performed when a context-dependent part of a template is requested. Since a template can contain several control directives that can be entered in a sequence, this text explains the required actions and the location of the variable part.
Click radio buttons to select the type of control directive for insertion.
Custom query is used to enter free-form text. In this case template text contains a control directive that looks like <?"Tooltip text">.
A Custom query control directive is used as follows. If the replacement text contains a <?"Tooltip text"> construct, a request with tooltip text and a text box is displayed before the replacement text is inserted. Specify the text for insertion in the text box in place of the <?"Tooltip text"> construct. There may be several Custom query constructs in a replacement text and some constructs may have the same tooltip text. A specific text request is provided for each construct when replacement text is inserted. There will be one common query for all identical constructs and the text in the query will replace all identical constructs.
Specific query is used to select configuration objects. To place a configuration object into the type selection control directive template using the Insert Control Directive window, enter the query name in the Tooltip field and select the directive from the list (selection of configuration object, predefined configuration object item or special directive), e.g., Catalog.

Fig. 513. Specific Query
When such a template is used, a list of possible configuration objects is displayed on the screen. The name of a selected object replaces the entered text. Position of the selected line is memorized and the list is positioned on this line when this template is selected again.
Other possible values for a specific query include a switch. When a template with this type of query is generated and you click OK, a window with possible values is displayed.

Fig. 514. Data for Selection
Use the Tooltip column to insert text to be placed in the selection list when this template is used. Use the String to insert column to enter text for insertion into text document.
The list can only be edited in the template text. When directive insertion is invoked again, a new directive is added.
When you press OK, a control directive is inserted into the template text.

Fig. 515. Template with Control Directive
Select this template in the template tree (or during automatic substitution).

Fig. 516. Context Menu
In this case a catalog type selection query is displayed.

Fig. 517. Enumeration Selection
The following text is generated as a result:
PredefinedValue("Enum.ProductTypes.Product")
Position cursor – is used for placing the cursor to the indicated location after inserting text into template. The <?> construct is inserted into replacement text of the template. This construct specifies where the cursor is moved to when replacement text is inserted. If there are several constructs of this type in the replacement text, the cursor is placed into the first <?> construct.
When writing template texts, multiple occurrences of control directives as well as use of existing templates is allowed.
31.6. SYNTAX ASSISTANT
Syntax Assistant is a tool that facilitates module development. The main purpose of the Syntax Assistant is to provide the 1C:Enterprise configuration developer with quick help on the 1C:Enterprise script.
Use the Help – Syntax Assistant command to invoke the Syntax Assistant.
The Syntax Assistant window is divided into two parts. Division can be vertical or horizontal.
A description of the selected 1C:Enterprise script section is displayed in the lower (right-hand) part. Contents of the upper (left-hand) part are defined by the selected tab.
This window contains three tabs: Content, Index and Search. The first tab contains a hierarchical list of 1C:Enterprise script items for the 1C:Enterprise operators, control directives, procedures and functions, system constants, etc. The second and third tabs are designed for searching using 1C:Enterprise script item names and for custom searching using description text, respectively.
If horizontal location has been selected for the Syntax Assistant, tabs are replaced by buttons with the same names on the command bar.

Fig. 518. Horizontal Location
The user can set up filtering by object availability for tree contents and Syntax Assistant index display for a particular 1C:Enterprise run mode.
31.6.1. Syntax Assistant Settings
For a description of Syntax Assistant settings see page 2-1159.
Command bar buttons of the Syntax Assistant are described on fig. 519.

Fig. 519. Description of Command Bar Buttons
31.6.2. Content Tab of Syntax Assistant
For the sake of convenience, all items of the 1C:Enterprise script are grouped under topics represented as a tree with branches which is displayed in the upper part of the Syntax Assistant window.
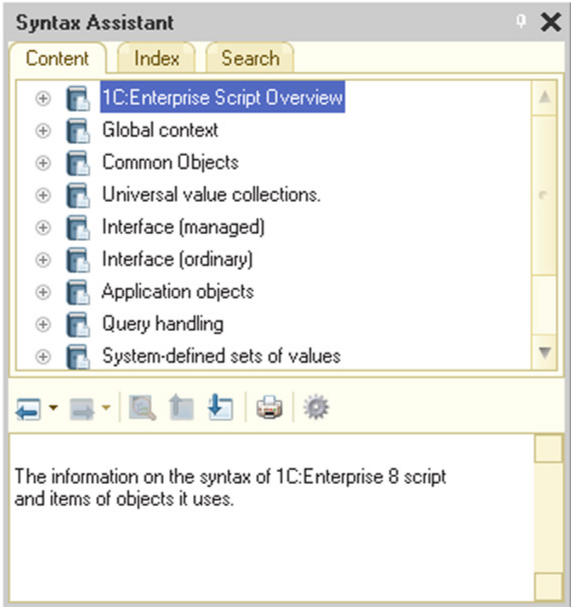
Fig. 520. Syntax Assistant Window
The Syntax Assistant window is a standard hierarchical data window with a tree and you can work with it in a standard way. To open a branch use the "+", "-" and "*" keys of the numeric keypad. The "+" key expands one level of a branch, the "-" key collapses a level and the "*" key expands all child branches of the current branch.
To get a description select the name of a 1C:Enterprise script item in the upper part of the Syntax Assistant window. The item description is displayed in the lower part of the window. This description may contain links to descriptions of referenced 1C:Enterprise script items.
The window contains a toolbar that can be used to view history of previously selected descriptions.
To display location of the item whose description is currently displayed in the lower part of the window in the structure of the 1C:Enterprise script items, click the Find current element in the tree button in the toolbar.
31.6.3. Copying 1C:Enterprise Script Items
The Syntax Assistant can copy selected 1C:Enterprise script items to the text editor.
To do this, select the desired item in the tree and use the clipboard. A 1C:Enterprise script item instance is inserted at the cursor position in the text editor window.
In addition to the clipboard, you can drag and drop instances of 1C:Enterprise script items: you simply need to use the mouse to drag the selected item from the Syntax Assistant window into the editor window.
31.6.4. Search in Syntax Assistant
The Syntax Assistant can perform searches by the 1C:Enterprise script item name and by arbitrary description text.
A search using the 1C:Enterprise script item name is performed in the Index tab of the Syntax Assistant window. The upper part contains a text box where the required 1C:Enterprise script item name has to be entered and a complete list of all item names.
When you enter a name, the program performs a special context search moving to the first name on the list that begins with the entered text based on each entered character.
To enable the context search mode select the Search in Syntax Assistant command from the context menu of the text editor. The Index tab of the Syntax Assistant window will open.

Fig. 521. Syntax Assistant Index
If the found item is used in several objects, the Select topic window will open. This window contains a list of entries for the selected item.

Fig. 522. Select Topic
Now, if you press the Show button, a description of the found 1C:Enterprise script item from the window of entries is shown in the Syntax Assistant window.
TIP
If the Select topic window contains a lot of lines (see fig. 523), press Ctrl+F and enter the name of the searched object in the search dialog box. Thus, search of the required topic can be accelerated.
You can search for a 1C:Enterprise script item description in the Syntax Assistant during module editing. To perform a search place the cursor over the item for which you need to find description or select a text block and press Ctrl + F1.
If the word on which the cursor is placed or the selected text block is a 1C:Enterprise script item described in the Syntax Assistant, the Syntax Assistant window will open immediately with this item description.
If a 1C:Enterprise script item is described in several sections of the Syntax Assistant, the Select topic window will open so that the required section can be selected.
If the selected word or text block is not a 1C:Enterprise script item, the context search window will open in the Syntax Assistant when you press Ctrl + F1.
Each search is memorized in a list that can be called in the Name text box.
To view a topic select it from the list and press Enter. Description of the selected topic is shown in the lower part of the window.
Searches using random description text are performed in the Search tab of the Syntax Assistant window. The upper part contains a box for entering the search string and a box with a list of 1C:Enterprise script item description topics found.
To begin the search start typing the text. While you are typing, the system searches for topics where the entered text is present. Search is not case-sensitive; only whole words of the text are matched (unless the "*" operator is used), with morphology taken into account. Search operators are allowed (see page 2-1207).
While you enter the text, the program displays a list of corresponding topics. If the entered text is not found anywhere, the program displays appropriate message below the text box.

Fig. 523. Search in Syntax Assistant
When you open a topic, the program shows the description in such a way that the first occurrence of the specified text is visible.
To view a topic select it from the list and press Enter. Description of the selected topic is shown in the lower part of the window.
When the chapter with the description of the 1C:Enterprise script item has been found and the Syntax Assistant window is open, use the Find current element in the tree button in the command bar to search for the chapter in the description tree.
If you select several pages for viewing, you can use the Go forward and Go back commands to return to previously viewed pages.
For a description of search expression syntax see page 2-1207.
31.7. FILE COMPARISON
In the file comparison mode, you can compare any two files. Use the File – Compare Files command to compare files. The file comparison dialog box will open.

Fig. 524. File Comparison
In the Compare and With fields, specify names of the files to be compared. File names can be entered manually or selected from the dropdown list or from the standard file opening dialog by clicking the selection button (…). You can specify any type of source file in the File Type field of the dialog box.
Use the As field to specify how the files are to be compared. You can compare text and spreadsheet documents as well as external data processors. You can also use binary comparison to compare files on the binary level. In this case the results will tell you whether or not the files are different from each other.
If files of different types are specified in the Compare and To fields, the selected files are cast to the type specified in the As field. Then the actual comparison is performed and comparison results are displayed.
Click OK to start the comparison process.
If you select Text document comparison type, the selected documents will be interpreted as text documents for comparison, although the Compare and With fields can contain non-text files (according to file extensions). If any of the specified files cannot be interpreted as a text file, binary comparison is performed.
31.7.1. Comparison of External Data Processors
If you compare external data processors, use the standard external data processor comparison procedure (for details see page 1-308).
Check the Match configurations by object names option to match objects first by names and then by internal IDs. If this option is not checked, objects are matched based on internal identifiers.
31.8. BUILT-IN SYSTEM FOR HELP CONTENT RETRIEVAL
Help content can be used to obtain information on 1C:Enterprise system tasks and specific objects and modes. You can invoke it any time by selecting Help or pressing the F1 key. It opens the help content section that corresponds to the current mode operated by the user.
The Contents menu item and Shift + F1 keys allow you to access the Help Table of Contents where you can obtain information on the Designer mode.

Fig. 525. Help Content
Help content contains a description of configuration sections, 1C:Enterprise script and additional information.
At the top of the help content window, you can see the toolbar used for navigation and search. The help contents are shown below the toolbar.