
1C:Enterprise 8.3. Developer Guide. Contents
COMMAND INTERFACE
Command Interface is the main tool that grants users access to the application functionality and ensures navigation between forms and various actions. A configuration developer does not create detailed descriptions of global interface commands or form command bars for every single user role available in the application (or for combinations of roles); instead, the developer describes the rules used by the command interface to automatically create a user-specific view.
The command interface representation depends on the user's rights (see page 1-180), functional options of the application (page 1-211) and, finally, user settings.
A declarative description of the command interface helps match the user-specific commands and the user's rights to perform certain actions; it also ensures the command interface of the application can be modified if some application functionalities are not implemented.
6.1. GENERAL STRUCTURE OF COMMAND INTERFACE
6.1.1. Sections and Subsections of Main Application Window
All global commands in the main application window are grouped into sections. You can use the sections panel to navigate between them. The set of these sections is unambiguously defined by the set of top-level subsystems marked as Include in the command interface.
Commands of the current section are displayed in the navigation panel and the actions panel of the main window.
When commands of a specific section are displayed in the navigation panel, subsections can also appear; these are groups of commands corresponding to a subordinate subsystem (also marked as Include in the command interface). For example, the Trade accounting partition could have Retail and Wholesale subsections as it owns identical subordinate subsystems.
6.1.2. Types of Commands
Commands in the command interface could be grouped as follows:
Independent global commands
Parameterized global commands
Local form commands
This section only deals with global commands (for a description of local form commands see page 1-388). On the other hand, commands can be divided into the following categories:
Standard commands (automatically added into the command interface by the system)
Navigation commands
Action commands
Commands created in the configuration
6.1.2.1. Standard Commands
Most configuration objects have system-provided standard commands that are added to the command interface automatically. Below is a list of these objects and the corresponding standard commands provided by the system.
Common form:
○ Open common form Constants:
○ Open constant editing form Catalogs:
○ Open list form
○ Open new item form
○ Open new group form
○ Generate
○ Go to list filtered by owner Documents:
○ Open list form
○ Open new item form
○ Generate
Document journals:
○ Open list form Reports:
○ Open main form Data processors:
○ Open main form
Chart of characteristic types: ○ Open list form
○ Open new item form
○ Open new group form
○ Generate
Charts of accounts: ○ Open list form
○ Open new item form
○ Generate
Charts of calculation types: ○ Open list form
○ Open new item form
○ Generate
Enumerations:
○ Open list form
Information registers: ○ Open list form
○ Open new item form ○ Go to list filtered by recorder Accumulation registers: ○ Open list form ○ Go to list filtered by recorder Accounting registers: ○ Open list form ○ Go to list filtered by recorder Calculation registers: ○ Open list form ○ Go to list filtered by recorder Business processes: ○ Open list form
○ Open new item form
○ Generate Tasks:
○ Open list form
○ Open new item form
○ Generate
Exchange plans:
○ Open list form
○ Open new item form
○ Generate
Filter criteria:
○ Open list form
Generation and Placement of Standard Commands
Standard commands that open a list form and create a new item are always added to the interface if the Include in the command interface property is enabled.
A standard report command is created if the default data composition schema or the default or auxiliary form is specified for the report.
A standard data processor command is created if the default or auxiliary form is specified for the data processor.
Standard generation commands are created by the system if you set the Base On property appropriately. For example, if Goods and Product Lots catalogs can be used as a basis to create Receipt and Invoice documents, the standard Generate command will be available for these catalogs.
Standard commands that open a list form filtered by owner are created if the Owners catalog property is set appropriately and the information register has one or more dimensions marked as Master.
A standard command that opens a list form filtered by recorder is created for registers subordinate to a recorder.
The following placement is applied to standard commands:
|
Panel |
Commands to be placed |
|
Navigation panel |
Commands that open lists |
|
Actions panel |
Command that opens constant editing forms Commands that open new item forms Commands that open report and data processor forms |
|
Form navigation panel |
Commands that open filtered list forms |
|
Form command bar |
"Generate" commands |
Parameterized Standard Commands
Some standard commands are parameterized, i.e. they can be executed in a form and receive a value as a parameter.
|
Command |
Parameter Type |
|
Generate |
Basis object reference |
|
Opening a list filtered by owner |
Owner object reference |
|
Opening a list filtered by recorder |
Reference to recorder document |
|
Opening a filter criteria list |
Reference to filter criterion value |
For a description of how to create a parameter type for standard parameterized commands see page 1-345.
Thus, if Goods and Product Lots catalogs can be used as a basis to create Receipt document, the parameter type for a Generate command will be composite: CatalogRef.Goods and CatalogRef.ProductLots. Therefore, the Receipt:generate standard command will be automatically added to the item forms of Goods and Product Lots catalogs.
6.1.2.2. Independent and Parameterized Global Commands
Use independent global commands to select a functionality throughout the entire application. You do not need additional information (parameters) to run this type of commands. The following commands are independent:
Opening a catalog list
Opening a document journal
Opening a report form
Opening a new catalog item form, etc.
Parameterized global commands are context-dependent; you cannot run them without additional information (parameters of command execution). The following commands are parameterized:
Opening a subordinate catalog list (use a reference to an owner catalog item as a parameter)
Opening a list of entries for a register subordinate to a recorder (use a reference to a recorder document as a parameter)
Input of an object based on another object (use a basis object as a parameter)
Parameterized commands can be displayed in the navigation panel of an auxiliary window or directly in the form's command bar.
Global commands are displayed in the form's command bar before the Help command. Please note that the Important command group is displayed in the command bar while other command groups (the standard Generate group and other groups in the form Command bar category) are displayed as submenus. Execution of global commands from the form's command bar opens a new auxiliary application window.
6.1.2.3. Navigation and Action Commands
Commands that allow a user to go to another application form without leaving the current (default or auxiliary) application window are referred to as navigation commands. They open a new form in the same application window where a user is currently working.
Navigation commands can include both independent commands of the global command interface and parameterized global commands. Navigation commands can be found in the navigation panel of the main or auxiliary application window.
Navigation commands of the main application window include Go to Catalog List or Document Journal commands. For example, the Currencies command opens a currencies list form in the same window and the Financial documents command opens a documents list form.
Navigation commands of an auxiliary application window include commands used to go to lists that are logically subordinate to the object edited in the current window. For example, an editing form for a currencies catalog item can contain a command used to go to an information register with an exchange rate history, while a document form can contain a command used to go to records in a specific register, etc.
NOTE
Cancelling the Open Form command does not interrupt the navigation command execution. However, it does open an empty form.
Commands that generally open a new auxiliary application window are referred to as action commands. These commands temporarily change the task performed by a user, thus modifying considerably the context of his/her activities. For example, a Create New Document command makes a switch from the application navigation task in the main application window to the new document entry task.
These commands are added to the actions panel of the main application window or to the form command bar displayed in the auxiliary application window.
6.1.2.4. Commands Created in Configuration
In addition to standard commands, a configuration developer can create custom commands, determine their location (a command group), describe the corresponding actions in the 1C:Enterprise script, etc.
For details on properties of the Command object see page 1-230 and page 1-266.
6.1.3. Command Groups
All global commands are divided into four categories by their location and nature:
|
Category |
Description |
|
Navigation panel |
Independent navigation commands |
|
Form navigation panel |
Parameterized navigation commands called from a form |
|
Actions panel |
Commands that open a new auxiliary application window |
|
Form command bar |
Parameterized form commands that open a new auxiliary application window |
The above list of categories is a list of application interface areas where global commands can be displayed.
The system provides standard command groups for global commands grouping.
|
Location |
Standard command groups |
|
|
Navigation panel |
■ |
Important |
|
|
■ |
Normal |
|
|
■ |
See also |
|
Actions panel |
■ |
Create |
|
|
■ |
Reports |
|
|
■ |
Tools |
|
Form navigation panel |
■ |
Important |
|
|
■ |
Go to |
|
|
■ |
See also |
|
Form command bar |
■ |
Important |
|
|
■ |
Generate |
Besides, at the configuration development stage the developer can create custom command groups (Common – Command groups configuration object, see page 1-230) that can be categorized into one of the categories listed above (Category property of a command group). These groups, along with predefined groups, can be used for displaying the developed custom commands.
6.2. CREATION OF GLOBAL COMMAND INTERFACE
This section describes configuration objects and their properties that affect creation of the configuration's global command interface.
6.2.1. Subsystems
The global command interface of the main application window is based on the configuration's structure of subsystems. Subsystems are used as a basis of the application functionality representation for users. The structure of subsystems describes the overall system functionality. Since the global command interface of the main application window depends on the structure of subsystems, the developer should exercise extra care when developing the configuration subsystems. The structure of subsystems is, in fact, the first thing a user will see when opening the application.
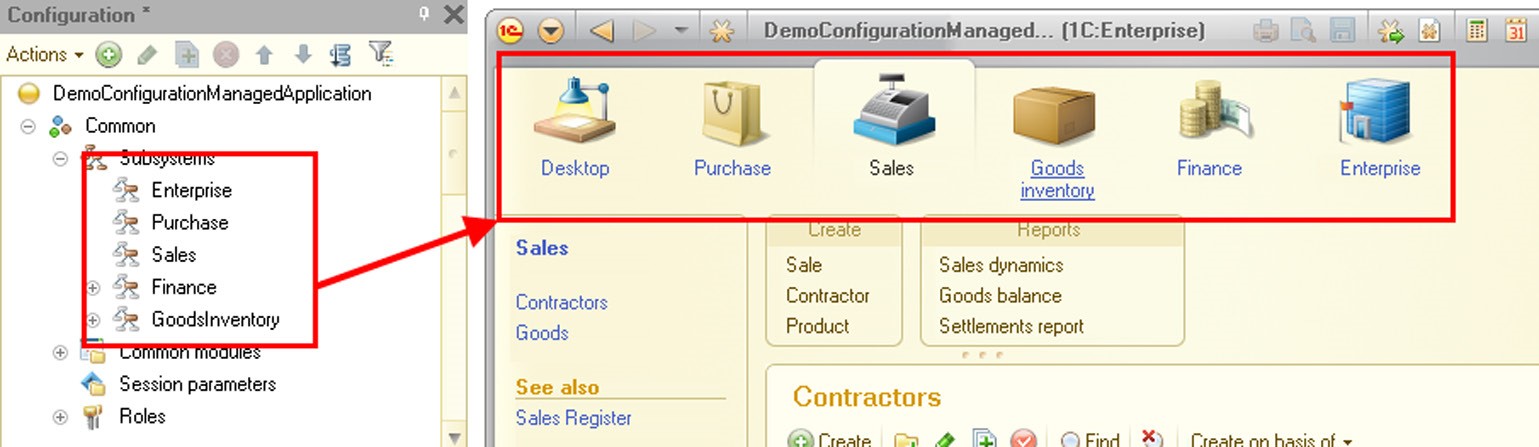
Fig. 140. Mapping Subsystems to Sections
The structure of the command interface is affected by the subsystems marked as Include in the command interface. However, this property is set for the subsystems by default; therefore, it is assumed that the subsystems are primarily created to describe the global command interface.
NOTE
If the configuration has no subsystems marked as Include in the command interface, the sections panel is not displayed on the desktop in the main application window.
Top-level subsystems create application sections, i.e. sets of global commands in a particular area. Sections are displayed in the sections panel of the main application window. Selecting a specific section modifies the commands in the navigation and actions panels.
Subsystems of lower levels create subsections in the navigation panel; these are used to consolidate commands of a particular subsystem.
If an object belongs to a particular set of subsystems, its commands are displayed in the corresponding areas of the configuration's command interface. However, by default new objects do not belong to any subsystem. It means their commands are not included in the command interface. Therefore, to add the object's standard and custom commands to the right areas of the command interface, you need to specify the subsystems owning the object.
An object can belong to multiple subsystems with no regard to their interdependency, i.e. it can belong to both a parent and a subordinate subsystem or to a subordinate subsystem only if it is more convenient for the purpose of creating the command interface.
NOTE
If the configuration has no subsystems marked as Include in the command interface, the desktop displays all commands that could be added there manually. In this case the command interface editor has a different appearance: it does not display a tree of commands and cannot remove commands from the desktop.
As soon as the first subsystem is included in the command interface, automatic placement of commands on the desktop is disabled and commands should be added to the desktop explicitly.
NOTE
The mode of automatic command placement on the desktop is disabled if the configuration run mode is Ordinary application.
6.2.2. Commands
As mentioned above, the system includes both standard commands and commands a developer creates in the configuration.
You can create a Command configuration object as subordinate to the following configuration objects:
catalogs
documents
document journal
reports
data processors
charts of characteristic types
enumerations
charts of accounts
charts of calculation types
information registers
accumulation registers
accounting registers
calculation registers
business processes
tasks
exchange plans
filter criteria
Additionally you can create common commands (Common – Common ñommands branch in the configuration tree; see page 1-230).
6.2.3. Command Parameterization
If a command can be parameterized, it is executed by receiving a value as a parameter. Values can only originate from form data.
IMPORTANT!
Setting a value type for a command parameter only makes sense if the corresponding command is placed in a form (is in the form Command bar or form Navigation panel categories).
The Command parameter type property defines a list of forms where this command can be executed. For example, if the command's parameter type is Cata- logRef.Goods, it can be executed in the following forms:
Form of Goods catalog item, where a reference to the edited object is used as a parameter;
Form of Goods catalog list, where a reference from the current list row is used as a parameter;
Form of a receipt, where a reference to a product from the current row of the document's tabular section is used as a parameter, etc.
The number of values passed as parameter values to the command is defined by the Parameter usage mode property. If this property is set to Single, the command only receives a single value of the selected type.
If the property is set to Multiple, an array of values is always passed as a parameter (even if a single value is selected). This mode makes sense when data for the command can originate from a table in the multiple selection mode. In this case the array's first item is the current row (regardless of the selection order of the table box rows). Thus, if a list of goods includes Mixer, Vacuum cleaner, Refrigerator, Kettle and Mixer, Refrigerator and Kettle are selected while the current row is Refrigerator, the command receives an array with the following items (the order of items is preserved): Refrigerator, Mixer, Kettle. The order of items after the first item is undefined, even though they are ordered in the example above.
NOTE
If the current row is not a part of the selection, the first array item cannot be identified unambiguously.
Areas of the forms' command interface are automatically created based on the type of the main attribute. When a form is edited, a form developer can add areas to the command interface. For example, if a form is used to edit goods, all commands with the CatalogRef.Goods parameter type are automatically included in it (e.g., Print product card, Go to product price list, etc.). If a product has the Manufacturer attribute, commands with the CatalogRef.Contractor parameter type can also be added to the form at the development stage (e.g., Contractor card, Contractor agreements, etc.), as the form allows users to obtain values for parameters of these commands. Although these commands (that do not belong to the main attribute) are not automatically included in the command interface, the developer can add them to the interface through the form editor.
Although a group of parameterized global commands is not automatically added to the command interface for a catalog group (Folder and item hierarchy hierarchy type) or a hierarchical chart of characteristic types, the developer can include these commands in the interface through the form editor.
6.2.4. Creation of Default Command Interface
Command placement is defined by the Command parameter type and Group properties and by the membership of the command (or its parent object) in a particular subsystem.
Independent (non-parameterized) commands are added to the global command interface areas corresponding to the subsystems that own the command (in case of common commands) or its owner object.
Parameterized commands are added to the global command interface areas corresponding to the objects with types included in the command's Type parameter.
In both cases a group of commands is a more accurate location of the command within an area. For example, command groups define a panel (navigation or actions panel) to include independent commands of a particular partition. In case of parameterized commands, a command group defines whether the command is placed in the form's navigation panel or command bar.
Therefore, independent commands (i.e. commands that do not require parameters, such as opening a list or a new object form) are rarely placed by default in categories different from the navigation or actions panel. On the other hand, placing parameterized commands in the navigation or actions panel makes no sense, as these commands cannot receive the required parameters in the main application window. Review the following table of command placement.
|
|
Independent commands |
Parameterized commands |
|
Navigation commands |
Navigation panel |
Form navigation panel |
|
Actions commands |
Actions panel |
Form command bar |
Please keep in mind that by default global commands are not included in the command interface for forms of hierarchical catalog groups and chart of characteristic types groups. To make a global command available in the command interface of this form, you need to place it there manually, through the form editor.
When you create a command interface, use text representations of configuration objects and commands. By default, the system generates representations based on the Synonym and Name properties. However, you can modify these representations. To do this, use object and list representations. For details see page 1-250.
6.2.5. Command Interface Property
Use the following properties to edit sets of global commands in the appropriate sections or sets of main section commands: Command interface (for subsystems), Command interface (for the configuration) and Main section command interface (for the configuration). You can edit these properties if you are dissatisfied with the auto-generated order of commands, groups of commands within sections and auto-defined default visibility.
Different sections can display the same command in different areas of the navigation or actions panel with varying visibility. For example, a command that opens a Goods catalog list in the Trade section is important and frequently used; therefore, a developer can add it to the Important group. In the Accounting section, however, it is not as important and the developer can categorize it as See also.
For details on the editor of command interface areas see page 2-967 and page 2-968.
6.2.6. Editing Sets of Commands
In addition to editing the subsystem's Command interface property in the property editor, you can also edit commands of all sections in the All Subsystems editor (see page 2-971).
Use the Command interface tab of the form editor to edit global commands displayed in the form (see page 2-937).
6.2.7. Role-Based Setup of Default Command Visibility
The following default visibility is used, when section commands and form commands are created automatically.
Visible by default:
commands that open lists of catalogs, documents, document journals, charts of characteristic types, charts of calculation types, charts of accounts, independent information registers, business processes, tasks and exchange plans;
commands that open report and data processor forms;
command that opens constant editing forms;
commands that navigate to subordinate catalog lists;
commands that navigate to lists of logically subordinate registers (i.e. registers with master dimensions);
commands that generate objects based on other objects;
custom commands created by the developer at the configuration stage.
Invisible by default:
commands that open lists of enumerations, information registers subordinate to a recorder, accumulation registers, accounting registers, calculation registers;
commands that open new object and new group forms;
commands that navigate to subordinate register lists; commands that navigate to filter criteria lists.
These visibility values auto-generated by the system can be modified for both parameterized and independent commands. Default visibility values can be based on roles used in the configuration. When commands are displayed in the 1C:Enterprise mode, a command is visible by default if at least one user roles has visibility set for this command.
When editing role-based visibility, please note that command visibility for a particular role is only enabled when the command is available for the role. Therefore, if you set up visibility for a role with a very limited set of rights, you almost never have to hide commands by clearing their default visibility check boxes (the total number of available commands in a section is limited in all cases).
Role-based editing of default visibility serves as a tool of initial setup of the global command interface content, primarily for users with a broad range of access rights.
6.3. SERVICE NAVIGATION FEATURES
6.3.1. Links
In 1C:Enterprise you can obtain a text link to any command interface section, report, data processor or infobase object (documents, catalog item, etc.).
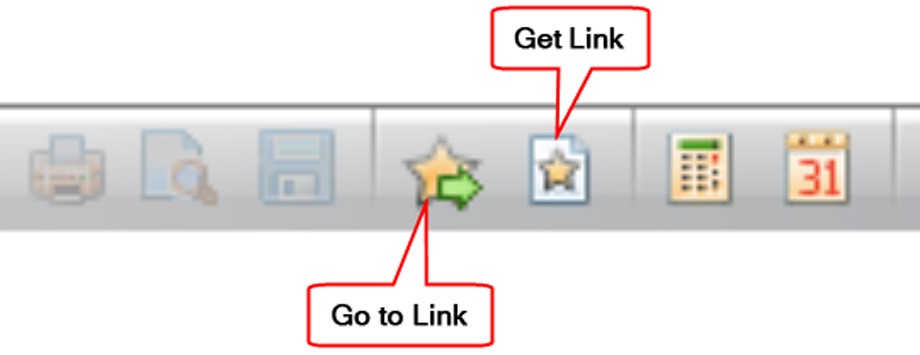
Fig. 141. Commands That Retrieve and Click Links
You can save the obtained link and use it subsequently to go to the required object. Since these links are text-based, you can send them to other users, e.g. by e-mail. For a description of link formats see page 2-1187. You cannot get links to tools included in standard functions.
You are allowed to launch the web client and follow a link concurrently. It requires an external link from the web or thin client connected to the infobase through a Web server.

Fig. 142. Retrieval of External Link
To obtain an external link, use the standard link retrieval command, ensuring, however, than the External button is selected in the link retrieval window (see fig. 142). The resulting link can be inserted into the browser address bar to load the application and follow the link (the example on fig. 142 opens the Sales Order list form).
NOTE
When Microsoft Internet Explorer is used, the application will not be launched with simultaneous navigation to a link if the link is related to the application already loaded in the current browser window. It is recommended to enter the link in the address bar of a new empty Web browser window.
6.3.2. User Notifications
Notifications are used to inform users of system actions. Notifications can be generated by the system or created by an application developer. The system generates notifications whenever an object is written or modified interactively; the developer can create notifications using the ShowUserNotification() method.
A notification is displayed in the window which is by default placed in the right lower corner of the screen working area. If the notification has an associated link, the explanation is also a hyperlink that opens the object indicated in the link. The explanation is also represented as a hyperlink if the notification is auto-generated by the system (when an object is written or modified interactively).
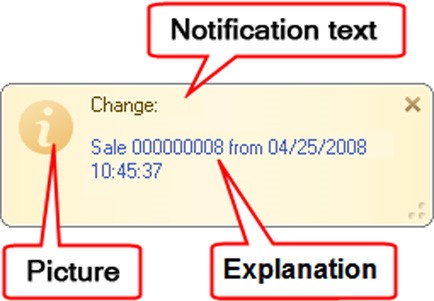
Fig. 143. User Notification
If a method call has no Explanation parameter, the URL becomes unavailable. For the user to be able to follow the hyperlink, both NavigationLink and Explanation parameters should be specified.
The notification window fades automatically after some time. However, if you move the mouse cursor over this window, it is displayed until you close it deliberately or move the cursor away from the notification window area.
If the notification display method is called multiple times, the user only see the last notification.
NOTE
The notification window is shown on top of all the windows of the current application apart from modal windows. Modal windows are displayed on top of a notification window.
When displayed in the favorites and history panel, the list of notifications is aligned to the right side of the panel. The latest notification is displayed to the right of the panel. If there are more than five notifications, only the last five messages are displayed.
NOTE
The list of notifications is only displayed during the session lifetime.
Notification windows displayed in the web client are docked to the currently active window.
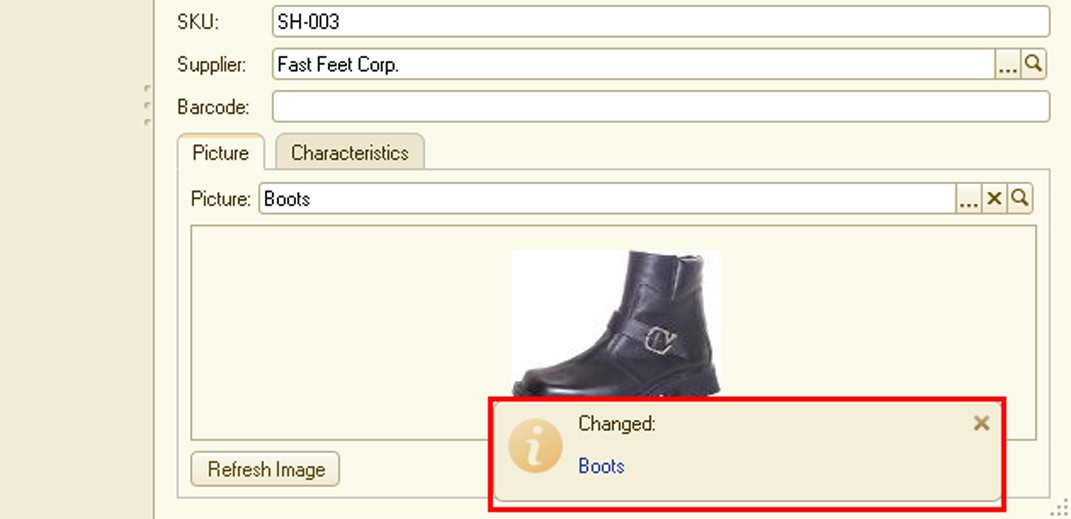
Fig. 144. User notification in web-client
When you close the window where the notification window appears, the latter is then displayed in the parent window, etc. until it reaches the main application window.
NOTE
You cannot move or re-size the notification window in the web client.
6.3.3. Display Status of Lengthy Processes
As you develop a configuration, you sometimes need to inform the system user of the status of lengthy processes (e.g., payroll calculation for a department). Use the status bar to do so.
To display the status bar, call the State() method; however, you cannot call it on the server side. If you need to display the status of a lengthy process at the client while the process runs on the server, you must implement this process to run by short chunks initiated by the client. In this case as soon as a new chunk runs on the server, you can display the status change of the process. A status panel is displayed in the window located by default in the right lower corner of the screen work area.
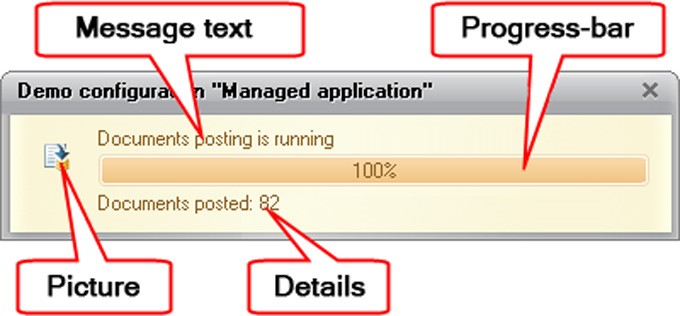
Fig. 145. Status Window
If you want to display the progress of the process in a progress bar (e.g., if you know the total number of employees in the calculation and want to show how many have been processed), use the same State() method and specify the third parameter that defines an absolute value of the progress bar. The minimum value of the progress bar is always 0 and its maximum value is 100.
State("Processing  data",
Counter*10,
"Processing  chunk: " + Counter,
PictureLib.SubsystemTradeInventory);
If the third parameter is not specified for the method, the progress bar is not displayed in the status bar. In this case the explanation text is placed below the text of the main description:
State("Posting  for" +
Format(PostingDate, "DLF=DD"),
,
"Posted" + PostedCount,
PictureLib.Post);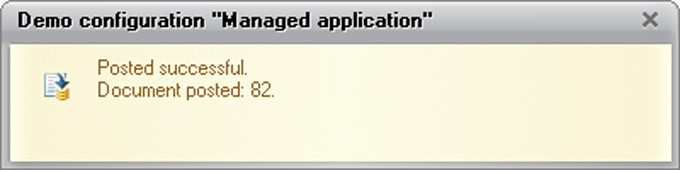
Fig. 146. Status Without Progress
The status bar automatically hides some time after a program fragment that displays the bar stops running. However, if you move the mouse cursor over this window, it is displayed until you close it deliberately or move the cursor away from the status bar area.
NOTE
The status bar is shown on top of all windows of the current application apart from modal windows. Modal windows are displayed on top of the status bar.
In the web client a status bar is displayed as a separate Web browser window. This window is updated in the following ways:
Microsoft Internet Explorer. The status is updated every time you call the State() method.
Mozilla Firefox. The state is updated upon each call to the server and after the program code in the 1C:Enterprise script is executed. Therefore, if no server methods are called during execution of the program code in the 1C:Enterprise script, the status bar is not updated.
Google Chrome and Safari. Status is updated only when built-in code execution is finished.
6.3.4. Messages
Most messages in an application are logically related to data. For example, if you post a document while certain items are missing at the warehouse, the programmer has to notify the user of this event.
Messages allow the developer to create notifications that specify object attributes causing the error. When displayed in a client application, a message can be automatically docked to a form element used to edit the attribute; in this case it is displayed next to the control.
Messages are displayed on the message panel in the lower part of the work area. The height of the message panel does not exceed 5 lines. If the panel contains multiple messages, a scroll bar appears, but the panel does not increase in height. Nor can the height be changed manually.
This mechanism is based on the UserMessage object of the platform.
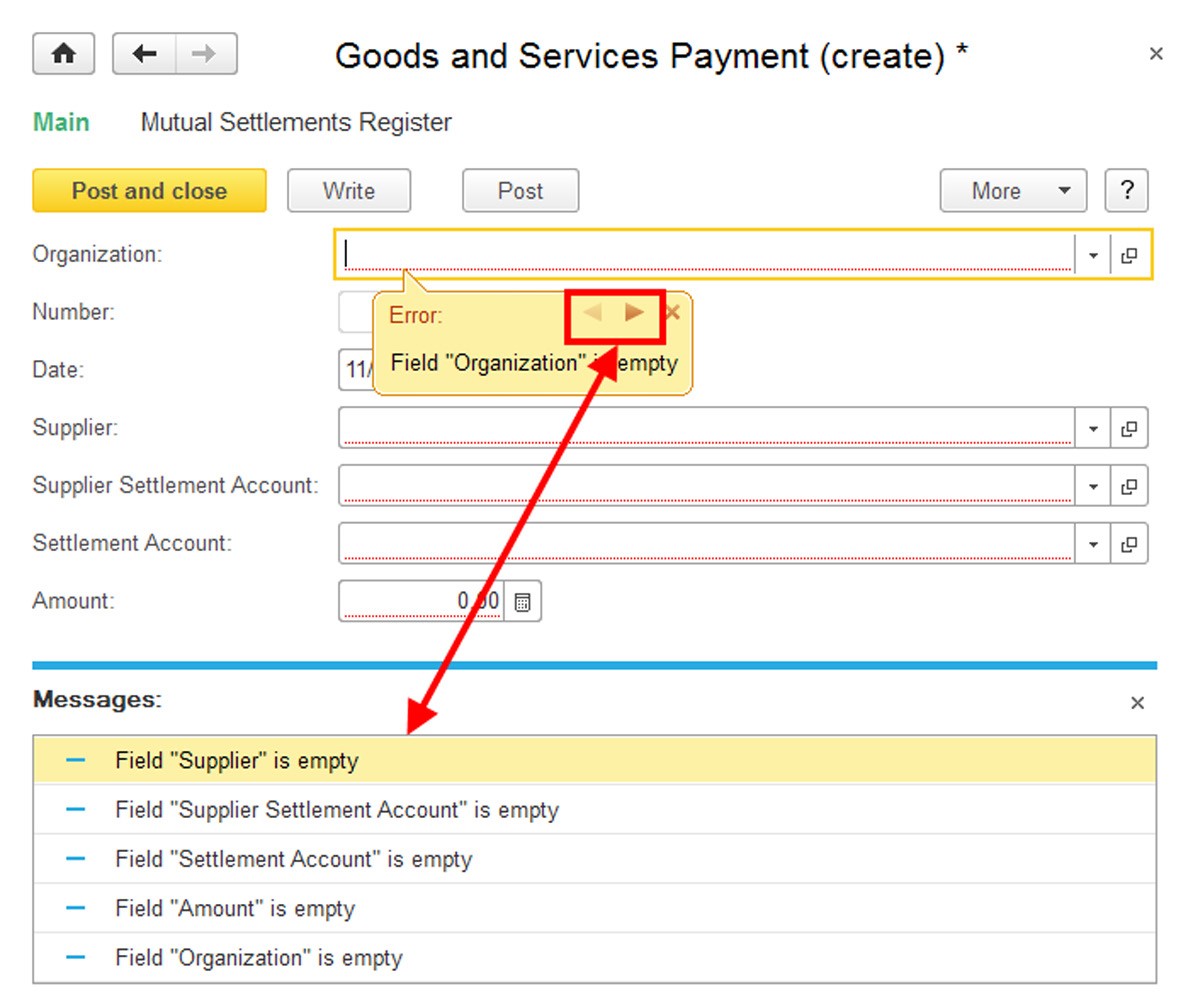
Fig. 147. Messages
Messages are used to notify a user that the requested action has failed (e.g., a document cannot be posted because the inventory balance is not available).
If a message is linked to a tabular section field, changing the tabular section row order will not affect message visualization.
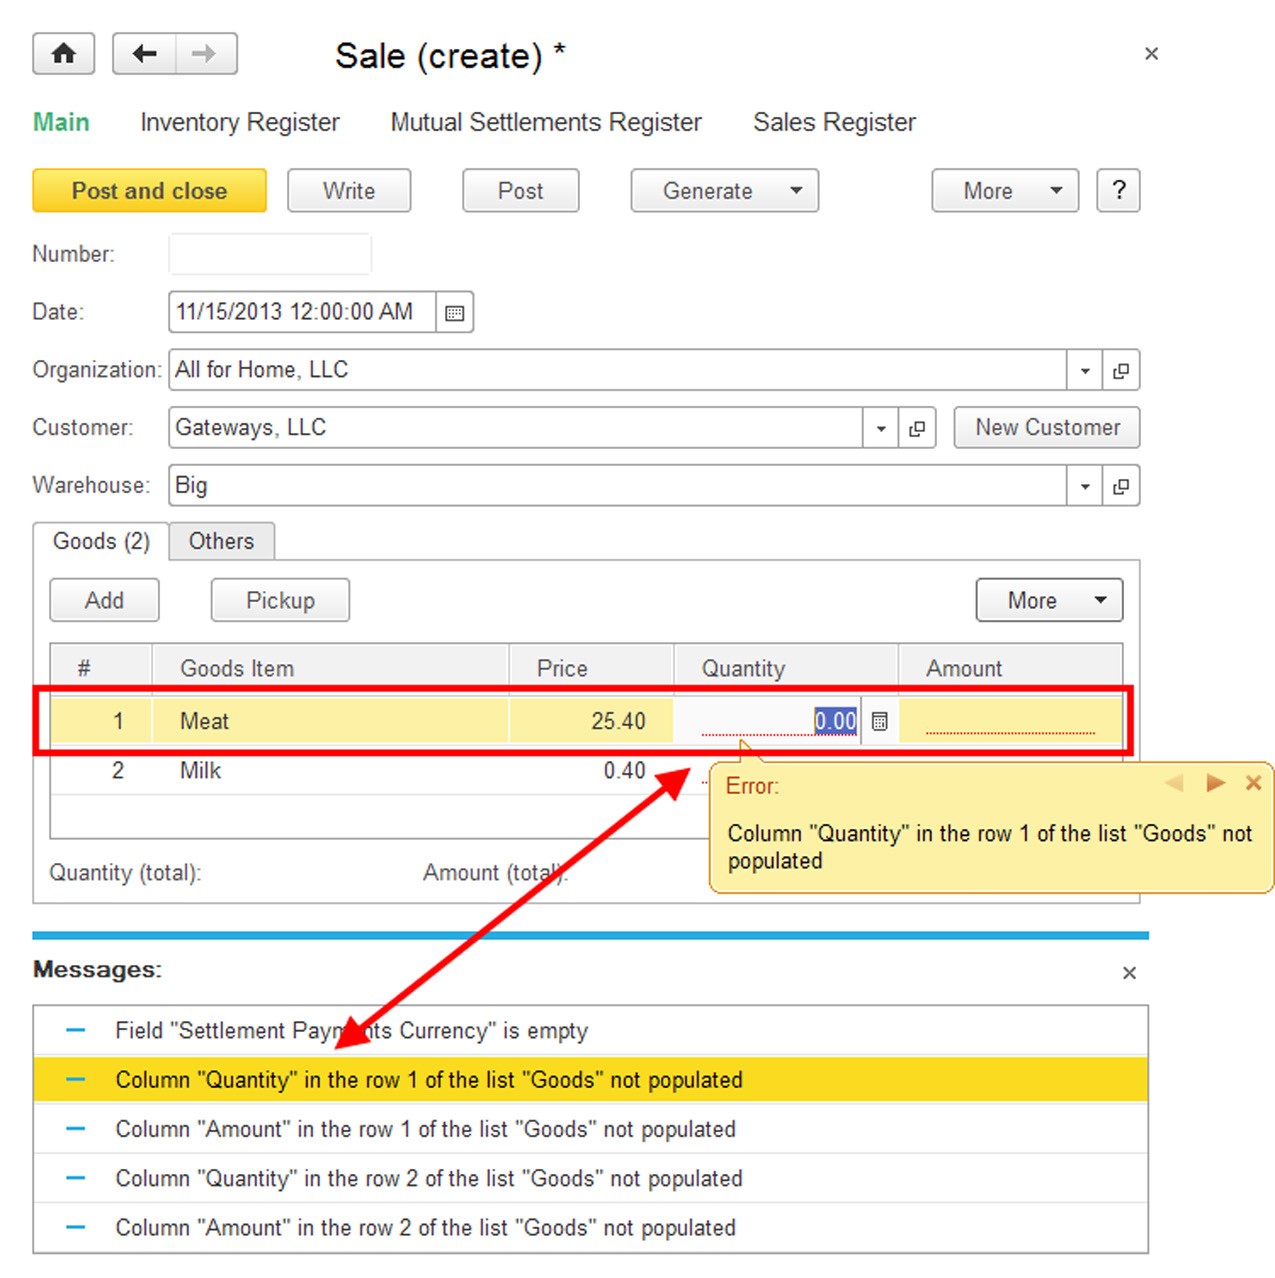
Fig. 148. Messages in the tabular section
If the row linked to the message is deleted, the message will be linked to a form element (see page 1-402) displaying the tabular section.
In case the message is linked to a table row linked to the FormDataCollectio, FormDataTree or FormDataStructureAndCollection type form attribute, the interactive search is performed by user (using a corresponding standard command) with the result of hiding the string, for which the message was created, then the search operation will be automatically aborted and the message will be shown as required. If a program filtering is set for the table (the RowFilter property), this filter will not be cancelled when the message is shown and the message is positioned for the whole table.
NOTE
You are recommended to display messages to notify a user the requested action cannot be completed, rather than to inform him/her of the actions in progress. In the latter case you can use the ShowUserNotification() method instead.
If you want to associate an error message with the correct form element, the system needs to know the following: the attribute, the owner infobase object and the form element used to display the attribute. Filling in the properties listed above helps you answer all of the questions:
Set the DataPath property to specify the form attribute that stores the infobase object data.
Set the Field property to specify the object's attribute for which the message will be displayed. Thus we can say that the message will indicate DataPath. Field data that are identified with the DataKey value. This allows the system to define the form element that displays the required information based on the form structure data. Later, this form element is used to display the message.
The Field property can contain a description of the data in the following format:
○ For attributes, the AttributeName type string, for example, Vendor, Vendor. Parent.
○ For tabular section attributes, TabularSectionName[RowIndex].AttributeName; e.g., Nomenclature[10].Count.
○ For recordset rows, [RowIndex].AttributeName; e.g., [10].Currency.
The AssignmentID property specifies which form a message is linked to. For example, if a message is generated in a form shown on the desktop, setting the AssignmentID property will show a message linked to the form where the messaged was generated.
If the DataKey property is filled in the message and does not match the key value of the current form main attribute (object reference or information register record key):
A new object form, corresponding to the DataKey value, opens;
If the DataPath property is not set in the message, it is filled in with the main attribute name of the open object form; The message is displayed in the new form.
Additionally all messages where the DataKey value matches the value of this property in the current message are moved from the current form to the new form. In this case the DataPath property is also filled in these messages if not set.
To fill in a data path, the system uses a special mechanism that saves information about form elements matching objects and then uses it when the SetData() method is called. Therefore, before object module procedures that create messages can be executed, form attributes should be mapped to objects, while the developer needs to call the SetData() method within the module.
When you perform standard actions with an object in a form, e.g., when you post a document, the form extension creates and maps the object. In this case the developer does not have to take any actions.
NOTE
If user messages were generated in a transaction when a new object was written (exchange plan, catalog, document, account chart element, characteristic types object element, calculation types list element, business process, job), when the transaction is cancelled in messages, references to the object are cleared (the DataKey property).
The following section describes how you can do the mapping if the object is created programmatically based on form data.
You can map an object to a form explicitly, using a method or implicitly.
If you want to use explicit mapping, call the SetObjectAndFormAttributeConformity() method. Information about the form where the object is displayed (the FormID property) and which attribute stores the data object (the Attribute property) is passed as a second parameter to the method to set the required mapping of messages and form elements:
Parameters  = New Structure;
Parameters.Insert("FormID",  UUID);
Parameters.Insert("Attribute",  "Object");
SetObjectAndFormConformity(Object,  Parameters);
The mapping will exist for as long as the object for which it is set exists.
This method maps form attributes to data objects which ensures messages are correctly mapped to the form elements. For a message to use data on mappings between an object and an attribute name, link the message to the data using the SetData() method of the UserMessage object.
ObjectCatalog  = CatalogRef.GetObject();
Parameters  = New Structure;
Parameters.Insert("FormID",  FormID);
Parameters.Insert("Attribute",  "Object");
SetObjectAndFormConformity(ObjectCatalog,  Parameters);
ObjectCatalog.FillCheck();
Please note that the SetObjectAndFormAttributeConformity() method must specify an attribute name for the form that will open by default and display an item of the catalog in use (ObjectCatalog in the example above). In this case messages generated in the fill check handler (ObjectCatalog.FillCheck()) will be correctly linked to the attributes of the new form. If the FormID property of the Parameters structure (see the example above) contains a unique identifier that does not match any form instance, a new form will be created and opened to display the message.
You can retrieve a mapping using the GetObjectAndFormAttributeConformity() method. You can only obtain the mapping until the object for which it is set exists.
AttributeName = GetObjectAndFormAttributeConformity(Object);
If a passed object has an attribute mapping, the attribute name is returned by the function. Additionally the mapping can be set by the form using the FormAttributeToValue() method. In most cases you are recommended to use this method.
//  Code in document module.
&AtServer
Procedure  Posting()
...
Message = New UserMessage();
Message.Text = "Row 10 of tabular section " + "Nomenclature lacks " + MissingNumber + " " + NomenclatureUOM;
Message.Field = "Nomenclature[10].Count";
Message.SetData(ThisObject);
Message.Message();

// The message is displayed in the form and docked to
// the control associated with the
// Count field in row 10 of the tabular section named
// Nomenclature.
...
EndProcedure;
If a user message is created (using the UserMessage object) in the course of a context or out-of-context server call from a form, common module or common command module, the message is not displayed. The generated messages are displayed to the user after control is transferred back to the client. To obtain a list of messages that have not been displayed, use the GetUserMessages() method.
6.3.5. How Keyboard Shortcuts Work
The following keyboard shortcuts are valid in an independent auxiliary window:
Navigation panel commands of the main window
Actions panel commands of the main window
Commands of the auxiliary window (both form commands and navigation panel commands)
Please note that keyboard shortcuts for the main window commands work, even if the command invoked by the shortcut is not visible, e.g., hidden by the user. Keyboard shortcuts for hidden navigation panel commands and hidden form elements do not work in auxiliary windows.
Blocking windows support internal keyboard shortcuts only; they do not support shortcuts for the main window commands.
6.4. COMMAND INTERFACE DEVELOPMENT PROCEDURE
Development of a command interface usually involves the following sequence of actions:
As you start to develop a configuration, you determine its structure within a specific subject area, i.e. create a tree of configuration subsystems;
You create a set of roles, i.e. define who will use the configuration;
Newly created configuration objects (catalogs, documents, etc.) are generally attributed to specific subsystems and assigned role-based access rights;
If the standard location and default visibility of commands does not meet your requirements, you can edit the Command interface property of the relevant subsystems and modify sets of commands in the forms where parameterized commands of the required objects (navigation to a subordinate list and input on basis) are automatically placed.
These minimal actions will display commands that open object list forms or can be used to input new objects in the relevant sections of the command interface (if the commands are visible in the editor of the command interface section). Additionally if indicated in the object's properties, commands for input on basis, navigation to a list filtered by recorder or owner and others will be added to forms of other configuration objects.
Review an example of creating a Shipment document. To create it, you need to do the following:
Indicate that the document belongs to Sales and Warehouse subsystems;
Grant rights to work with the document to Sales manager and Administrator roles;
Specify the document is based on Sales and Sales Order documents; Indicate it is a recorder for the Inventory register.
As a result, a Shipment command will appear in the navigation panel of the Sales section if a user is assigned the Sales manager role or has administrative permissions.
Moreover, forms of Sales and Sales Order documents will display a Generate submenu command that can be used to enter an invoice. Therefore, you do not need to edit interfaces for users with the specified roles or forms of Sales and Sales Order documents.
A standard presentation of the command that opens the list of goods issue documents (Shipment) might look ambiguous. You can override it by setting the List presentation property of the Shipment document to Shipments.
Please note that by default the command is added to the middle of the command list in the Sales section. Assume the command is important for the section. Go to the All Subsystems editor (or the command interface editor of the Sales subsystem) and move the command to the Important group. The Warehouse section is left unchanged, with the command at its default location.
Finally, review the default command visibility. The form of the Shipment document now contains a command used to navigate to a list of Inventory register records; however, by default the command is hidden. Assume this command is important to the system administrator and is irrelevant by default to a manager. To implement this, create a form of the Shipment document, start editing the command interface and make the command used to navigate to the register list visible for the Administrator role; do not change the settings for the manager role.
Since the system administrator is granted broad access rights, the number of commands is very big. Assume he/she will rarely use the command to go to a list of invoices. To lighten the command interface, start editing the commands in the All Subsystems editor and make the relevant command invisible for the Administrator role.
You can also display a command that adds a Shipment document in the actions panel for a sales manager, so that he/she could enter this document without opening the document list.
The user can also customize command visibility while working with the configuration.