
1C:Enterprise 8.3. Developer Guide. Contents
COMPARE AND MERGE CONFIGURATIONS
You can use the configuration comparing and merging mode to compare two configurations in detail and to merge them. Selective merging based on comparison results is also possible.
You can use the merging mode, for example, when one configuration is developed by several persons at the same time. Sometimes they need to merge the results of their work (or merge all results at the end of development).
The configuration comparing and merging mode can also be used to compare two configurations without merging.
And finally, in situations when you need to load changes to the source configuration, you should review and evaluate them using the configuration comparing and merging mode.
This mode compares both common properties of configuration objects such as catalogs, documents and journals and individual object and tabular section attributes. Object forms (modules, description texts and templates) are compared separately. You can view comparison results in detail as well.
28.1. CONFIGURATION COMPARISON CONDITIONS
When the comparison mode is activated, the program analyzes the configurations and maps objects.
Objects without a match can be either new or deleted objects or they may be objects from the same category but named differently in different configurations. You can specify interactive mapping for these objects (see page 2-1077).
When you set automatic mapping, the program analyzes configuration objects with the same names. For example, Catalog.Goods in one configuration and Catalog.Goods in another configuration are treated as one and the same catalog; they are considered a match and are compared.
Objects with different names are compared by internal IDs assigned by the Designer during their creation. Internal IDs are required to simplify mapping of configuration objects and make it automatic. For example, this situation occurs when the object name changes during configuration development. If object names are different while their internal IDs match, these objects are automatically mapped.
Form mapping is done in a special way. A form can contain several pages. First forms are analyzed by names; then pages with different names are analyzed by (nonempty) headers; and then pages with different headers are analyzed by pictures. If pages match, their controls are compared and merged. If pages do not match, they are considered different and the final form (after merging) contains all these pages.
Pages that have none of the three properties set (Internal ID, Header and Picture) are merged by pairs in accordance with the selected sequential order.
28.2. LAUNCH OF CONFIGURATION COMPARING AND MERGING MODE
As you will see below, although compared configurations are generally equal (i.e. you can set any of these configurations as a priority configuration), in some aspects the current configuration is considered as the master configuration as it is supplemented by all non-damaging changes from the loaded configuration. Therefore, it is recommended to select the master configuration. The selected configuration becomes the master configuration when 1C:Enterprise system is launched with it in the Designer mode.
Before comparing and merging the loaded configuration with the master configuration, you have to save it to a file first (see page 1-49).
To load the second configuration, use the Configuration – Compare and Merge with Configuration from File command. The standard Select a configuration file dialog box will open. Find and open the file of the loaded configuration (*.cf) in this dialog box.
If the master configuration is empty (the configuration process has not begun yet), the Designer asks the user to load the configuration completely. If the user confirms this operation, the specified configuration is loaded completely and the Configuration window opens. If the operation is cancelled, the configurations are compared.
The process of loading a configuration and comparing the loaded configuration with the current configuration is described by messages in the status bar of the Designer. These messages show configuration objects that are being currently compared. The status bar also shows a comparison progress indicator.
Loading and comparing can take a lot of time depending on the size of the compared configurations.
28.3. COMPARE CONFIGURATIONS
In addition to the master configuration comparing and merging mode described in the previous section (when one of the compared configurations is always selected as the master configuration), the Designer can be used to compare two arbitrary configurations (e.g., configuration files) or repository configuration (any version) and vendor configuration, etc.
Configurations to be compared can be selected in the Configuration – Compare Configurations menu.
The following dialog box is displayed:
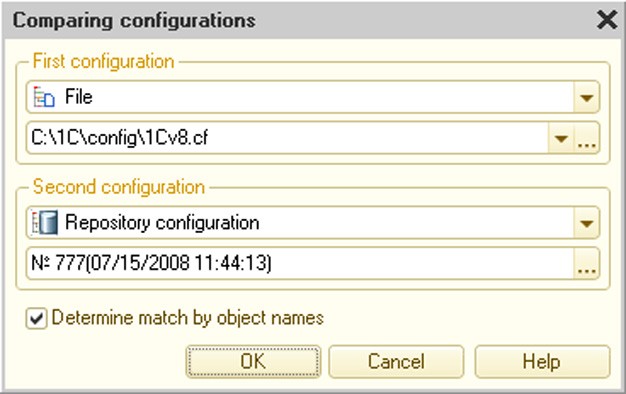
Fig. 426. Compare Configurations
This dialog box contains two sections used to select configurations for comparison. Techniques used in both sections are the same.
You can choose configurations from the master configuration, database configuration, configuration in a file, storage configuration and vendor configuration (if the current configuration is supported).
If a file or storage is selected, the file or storage version selection combo box is added to the corresponding section of the dialog box.
If the compared configurations are not descending from each other and it is impossible to match them by internal IDs, you should check the Determine Match By Object Names box. Click OK to start the comparison process. The Designer will compare the specified configurations and will display results in the Compare Configurations window. Techniques used in this window are the same as described in the Compare and Merge Configurations section. The only difference is that in the comparison mode you can only view the selected objects and obtain a report on differences.
28.4. COMPARE PREDEFINED DATA
When predefined data are compared, their items are mapped only by internal IDs.
A unique ID (within a metadata object) is assigned to a predefined item when it is created. This ID remains intact during any movement of the predefined data between configurations when the configurations are merged or copied. This way ID behavior is different from the behavior of the corresponding metadata object ID. Therefore, if you create predefined data items with the same name in two configurations, these items are considered different during comparison. The only way to obtain identical predefined data in two configurations is to use merging or copying.
When a database configuration is updated, predefined items are mapped with existing database objects. Internal ID consistence ensures a correct association between the predefined data item and its mapped database object when they are moved between configurations. Replacement of mapped objects is done in accordance with priority configuration selection.
Since mapping is based on internal IDs, predefined data for hierarchical structures can be merged even if they are located at different hierarchy levels. The merging result (the hierarchy level that will contain the merged item) depends on the configuration priority.
28.5. COMPARE AND MERGE CONFIGURATIONS WINDOW
The Compare and Merge Configurations window is opened when the comparison procedure has finished. This window can be used to do the following:
learn which objects in the two configurations are different
select objects that require a detailed review of differences
open specified objects for viewing and editing
select objects to be used for merging
map objects
specify configuration merging modes (for the entire configuration or for each specific object)
specify the order of subordinate objects (for the entire configuration or for each object)
generate a report on the configuration differences
initiate the configuration merging procedure
The window (see fig. 430) contains a table box that consists of three columns if the configurations are not linked with each other (for more information about linked configurations see page 2-1075). The first column contains information about the master configuration (the infobase that is opened in the Designer), the second column contains information about the loaded configuration and the third column is used to set the comparing mode and the order of subordinate objects.
The object mapping status is indicated with the row background color. Possible statuses are shown below the table box.
The Filter combo box is located below. You can use this box to enable the change view mode. When the Comparison window is opened, Show configuration differences filter is enabled. You can select other modes to examine configuration differences or matches.
Click the Actions button to open the context menu.
Use the Set Mode For All command to open merging mode setup dialog box (see page 2-1078) and order settings (see page 2-1082) for all objects.
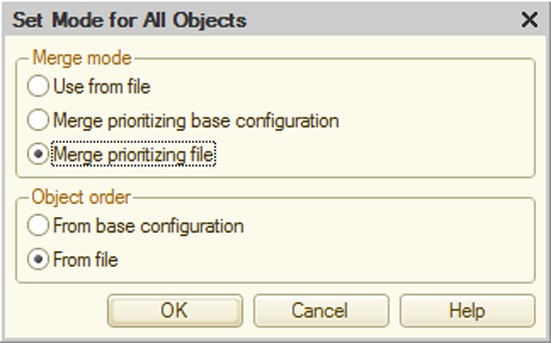
Fig. 427. Setting Modes for All Objects
Check against … subsystems item can be used to turn on filtering by subsystems.
Use the Configuration Comparison Report menu item to obtain a report on comparing two configurations with the required detail level.
28.6. CONFIGURATION COMPARISON SETTING
Click the Settings button to open the Setting the Configuration Comparison dialog.
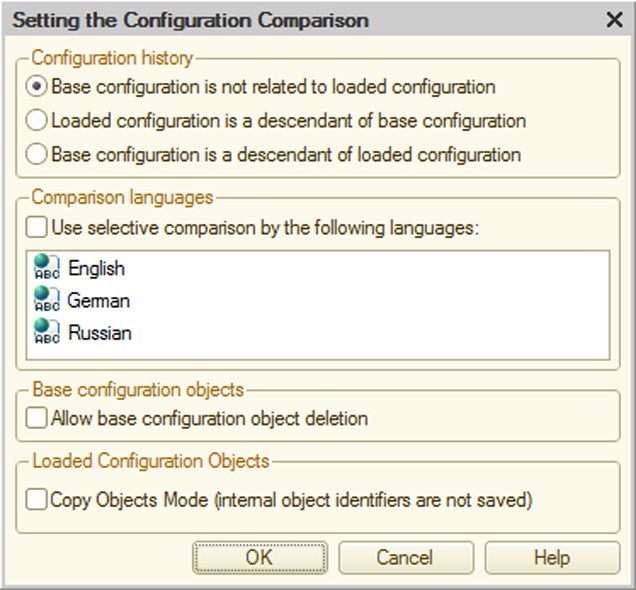
Fig. 428. Configuration Comparison Setting
You can select the configuration comparison mode in this dialog box. Mode for comparing different (non-linked) configurations is used by default.
If configurations are linked, please select the link type. When you close the setting dialog box (by clicking OK), a special column is added to the Compare and Merge window. The object changes history is shown in this column with special icons.
The special column is added to the File column if the loaded configuration is a descendant of the master configuration or to the Base configuration column if the master configuration is a descendant of the loaded configuration.
Help information for status drill down of the object history Statuses group is also added to the window.
If the configuration uses multiple languages, selective comparison by languages is available. To do this, set the Use selective comparison by the following languages option and specify one or more languages for comparison.
Master Configuration Objects Group
When configurations are merged, objects of the master configurations can be deleted. By default this feature is only enabled in the vendor configuration update mode. If it is required in other modes, set the Allow base configuration object deletion check box.
The following rules apply to setting deletion marks for vendor objects by default. If the user has modified a vendor object as compared to the previous version of vendor configuration, the object is not marked for deletion by default; if the object is identical to its previous version, it is marked for deletion. If an object has been marked for deletion (automatically or manually), clicking the Execute button results in reference integrity check. If unresolved references to a deleted object have been found, they are displayed in a separate window; however, unlike the case of unresolved references resulting from a cancelled copy operation for an object of vendor configuration (or any other configuration included in the merge operation), the user cannot continue merging (and delete the object).
Loaded Configuration Objects Group
When configurations are merged, by default objects missing in the master configuration are added together with IDs assigned to them in the loaded configuration.
Setting the Copy Objects Mode (internal object identifiers are not saved) check box means new objects can be added according to the rules from the previous platform versions: when objects missing in the master configuration are added, news IDs are always generated for them.
When you click OK, configurations are compared again according to the specified settings.
28.7. OBJECT EDITING
When the Merge Configurations window is opened in the standard mode (storage is not used and support is not provided), you can view and edit objects of the master configuration.
To edit object properties specify the required object in the column of the master configuration and correct the value in the properties palette. If the edited object is a form, template, interface or another complex object, it can be opened using the Open Form (Template/Interface) command of the context menu. Objects of the master configuration can also be selected for editing in the Configuration window.
Objects of the loaded configuration are available only for viewing. The procedure for accessing loaded configuration objects is similar to the procedure for accessing master configuration objects.
In case any changes have been made, the Execute button becomes unavailable and all objects are assigned the Undefined status (displayed in grey). Click the Refresh button to keep working in the Compare and Merge Configurations window. The Designer compares the configurations again (taking into consideration the changes made) and maps objects.
28.8. DISTRIBUTED DEVELOPMENT AND SUPPORT – EDITING
In the distributed development mode, you can only edit objects of the master configuration that are captured from the storage in the Compare and Merge Configurations window.
Read-only objects can only be viewed. You cannot merge these objects (no option to check).
A lock icon to the left of the object icon indicates that the object is read-only. In addition to that, object status is shown below the table box. The status contains a text message that indicates that the object is read-only.
The Compare and Merge Configurations window behaves similarly if the configuration is supported. If you set the vendor rule that forbids changes for a specific object, this object is available only for viewing. These objects can only be compared and cannot be merged.
28.9. OBJECT MAPPING
When configurations are compared, the program automatically maps objects of the two configurations. Since objects are mapped based on their names, object names can be identical in the configurations being compared. However, objects of the same name may in fact be different. On the other hand, objects with different names might be the same. In such cases you must define object mapping manually.
To cancel mapping select an object and choose the Clear Object Mapping command from the context menu. The status of these objects changes to Undefined.
Click Refresh when mapping is cancelled for all these objects. The Designer will again compare the configurations.

Fig. 429. Compare/Merge Configurations Main Window
Objects of the master configuration have a beige background (only in the master configuration), while objects of the loaded configuration will have a green background (only in the loaded configuration).
To enable mapping select an object and choose Find Objects Relationship from the context menu. The system displays a list of objects for which mapping is enabled. The list includes objects of the same type and objects which have not yet been mapped. Select an object and click OK.
28.10. MERGING MODE
You can enable the merging mode for each merged object. There are two types of merging:
Use from file (the merging mode name may vary depending on the loaded configuration);
Merge. In this case configuration priority is usually specified during merging.
If you choose Use from Loaded Configuration, then the configuration object is added (if it is new) or replaced (if it is modified). The entire object structure, modules, forms and descriptions are moved. The loaded configuration has maximum priority.
When you pick the Merge method, merging behavior depends on the specified priority.
If you need to take only new items from the loaded configuration and to preserve the old configuration as much as possible, choose the Merge Prioritizing Master Configuration option. Only new objects are added in this mode.
Texts are merged as follows:
|
Text |
Priority |
Result |
|
Deleted (exists in the master configuration, but doesn't exist in the loaded configuration) |
Master configura- tion priority |
Remains in the text |
|
New (exists in the loaded configuration, but doesn't exist in the master configuration) |
Added |
|
|
Modified |
Added as comments from the loaded configuration. Contents of the master configuration remain unchanged |
|
|
Deleted |
Loaded configura- tion priority |
Turns into comments |
|
New |
Added |
|
|
Modified |
Changes in the master configuration are turned into comments; changes in the loaded configuration are added |
Priority selection for a form module can be illustrated as follows.
Text in the master configuration module:
Procedure  SpecifyStatus(Item)
// Insert handler contents
Message("Message from the master configuration");
EndProcedure
Text in the loaded configuration module:
Procedure  SpecifyStatus(Item)
// Insert handler contents
Message("Message from the loaded configuration");
EndProcedure
Result of merging when the master configuration has the priority:
Procedure  SpecifyStatus(Item)
// Insert handler contents
//{{MRG[  <-> ]
Message("Message from the master configuration");
//{{MRG[  <-> ]
//{{MRG[  <-> ]
//  Message("Message from the loaded configuration");
//{{MRG[  <-> ]
EndProcedure
Result of merging when the loaded configuration has the priority:
Procedure  SpecifyStatus(Item)
// Insert handler contents
//{{MRG[  <-> ]
Message("Message from the loaded configuration");
//{{MRG[  <-> ]
//{{MRG[  <-> ]
//  Message("Message from the master configuration");
//{{MRG[  <-> ]
EndProcedure
The table below shows the dependence of merging results on the priority and value availability for objects that have property values specified in the properties palette (e.g., Synonym, Comment).
|
Value in Master Configuration |
Value in Loaded Configuration |
Configuration Priority |
Result (value is taken from…) |
|
Specified |
Specified |
Master configuration priority |
Master |
|
Specified |
Not set |
Master |
|
|
Not set |
Specified |
Loaded |
|
|
Specified |
Specified |
Loaded configuration priority |
Loaded |
|
Specified |
Not set |
Master |
|
|
Not set |
Specified |
Loaded |
If a property of an object can represent the result of a composite value of objects from the two configurations (e.g., Base On property), the result is determined by simple merging or selected from the loaded configuration.
If the configuration uses multiple languages and selective language comparison is enabled in the settings, such objects are compared and merged by the specified languages.
The following procedure is used for template merging: the resulting template consists of the template of the master configuration and the template of the loaded configuration separated by a row with yellow background. The priority configuration template is listed first in the resulting template and the other template follows after the separator. Final merging should be done manually after comparing.
NOTE
The Template Type property is not displayed in the Compare and Merge Configurations window. During merging this property is merged in the same way as the Template property.
When managed forms are merged, visualization of differences in the Compare and Merge Configurations window is not supported, but form comparison results can be displayed in the text format in a report on object comparison. Mapping is performed according to the following rules when forms are compared:
Module texts are compared by procedure names.
Form elements are compared by element type and name.
Form options are compared by name.
Commands are compared by name.
Attributes are compared by name.
For the command interface, comparison is performed by command type (automatic or custom) and command name.
Elements with the same names will be replaced in the master form (the properties, size and dimensions will be specified) if the loaded configuration has priority, but they will be left unchanged if the master form has priority. Some form element properties can be merged (e.g., a selection list, titles in different languages, etc.).
Form merging mode can be configured both for the whole form – for managed and ordinary forms, and for the form and the module form – for managed forms only, as shown in the fig. 430.
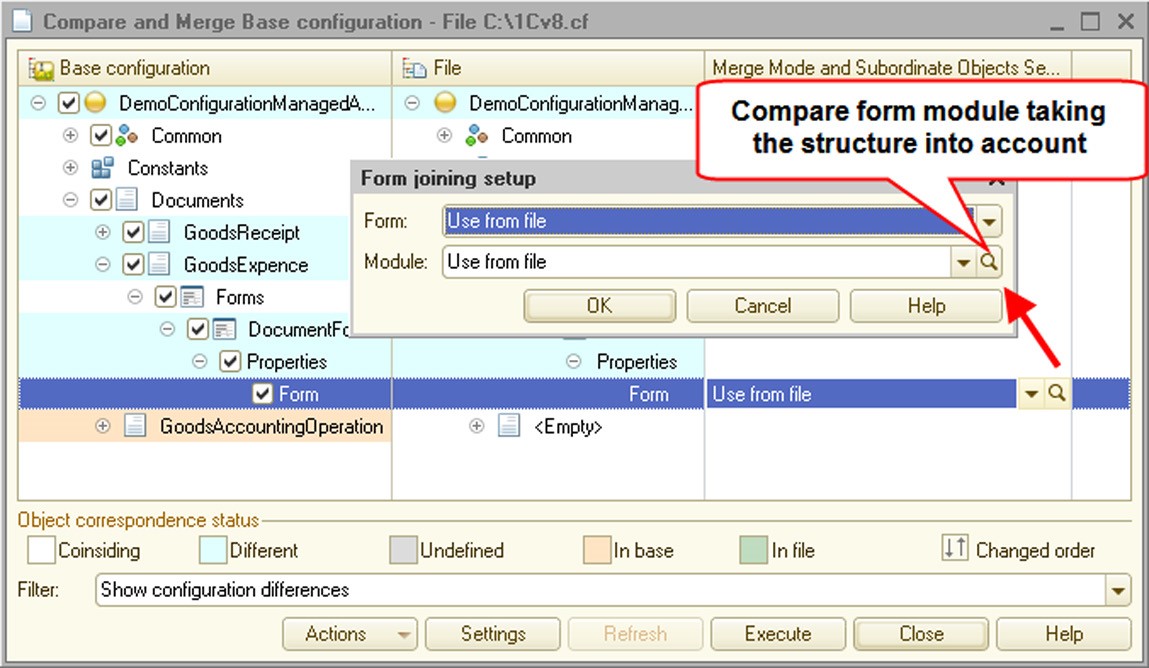
Fig. 430. Configuring module merging
From the Form joining setup window, you can also open the module comparison window (see page 2-1083) by clicking the button with the magnifying glass in the right side of the Module: field.
For some objects (object attributes) it may be impossible to pick the merging mode. Thus, for attributes with primitive type (e.g., Number), only the Use from file merging mode is available.
For some objects it may be impossible to select priority. For example, for Subsystems property you can select the Use from file and Merge merging modes. If you choose the Merge mode, then the specified subsystems of the two configurations are simply merged.
For rules of merging predefined data see page 2-1074.
28.11. SETTING ORDER OF SUBORDINATE OBJECTS
In some cases the order of objects in their group is important for objects that can have an unlimited number of subordinate objects (e.g., Attributes, Forms, Templates, Tabular sections and other subordinate objects of catalogs and documents).
If the Designer has mapped objects within a group while merging configurations, but has determined they are listed in a different order in different configurations, you can specify the required order in the Merge Mode and Subordinate Objects Sequence column.
To specify the order select any subordinate object and, in the third column, select the order setting option: Order from base configuration or Order from file.
The selected ordering method is applied to all subordinate objects of this type.
If subordinate objects for the selected object are changed and listed in a different order, you can only pick the order in the third column. You can specify the merging mode in the context menu for higher-level objects. For example, in both configurations there are several subordinate documents of the Forms type for Bill document. These forms and their order has been changed. To pick the merging mode select a higher-level object (Forms or Bill) and choose the required merging mode in the context menu.
28.12. VIEWING DIFFERENCES
You can view differences between configuration objects before merging.
To do this, you can use the properties palette. Open the properties palette and choose the required object of the master or loaded configuration. You can open forms or templates for viewing. If they are compared with a standard configuration file which is not a distribution file (see page 2-1121), you can make corrections to the loaded configuration data in addition to viewing. If corrections have been made, the Designer offers the user to save all changes made in the loaded configuration.
To view differences between modules choose Show Module Differences without Structure from the context menu.
When you pick this item, the Difference Between:… window is opened. If the compared texts are large, several seconds may pass before the window opens. For details on how to view differences see page 2-1175.
The Merge Modules mode (see below) is used for selective module comparison.
Choose Show Template Differences from the template context menu to view differences between templates.
The comparison window opens.

Fig. 431. Merge Templates
Spreadsheet documents are compared by cells. If cells differ (any properties except Details Parameter), the difference is shown in color. The color legend is shown at the bottom of the comparison window.
28.13. MODULE COMPARISON
During configuration merging you can configure merging of procedures and functions of any module (application module, common modules, object modules and form modules).
To do this, select the line that corresponds to the merged modules in the Merge Configurations window and activate the selected ordering type in the Merge Mode and Subordinate Objects Sequence column (click the cell). Ordering and merging selection buttons will be shown to the right of the cell. Click the magnifier button.
The Compare Modules window will open.
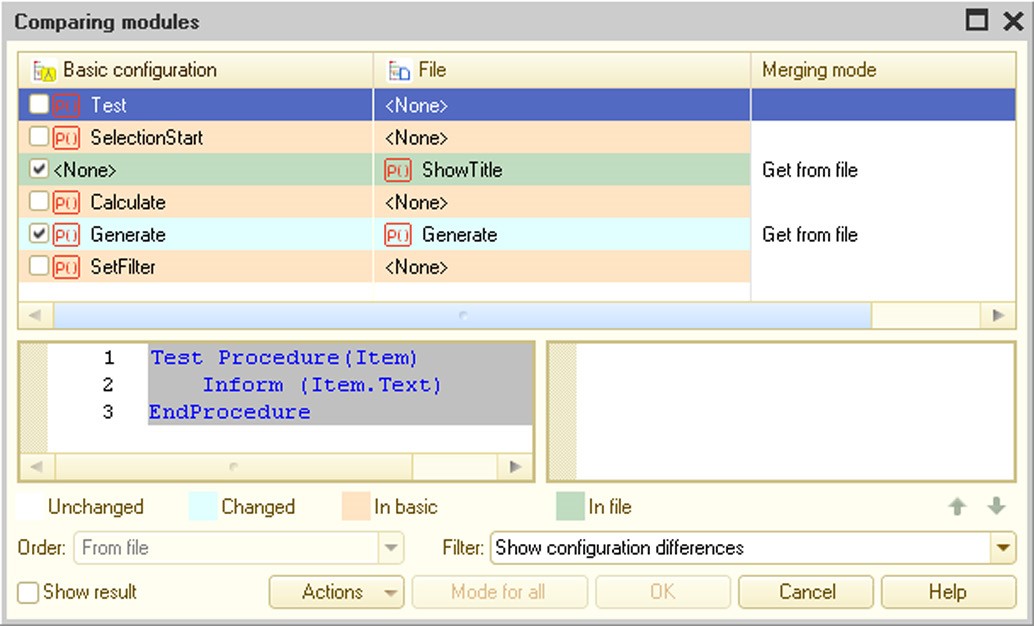
Fig. 432. Module Comparison
The top of the window contains a table box that corresponds to the table box from the Merge Configurations window. The only difference is that the column content is taken from the names of module parts: variable declaration area, procedures and functions section and main program area (henceforth, the objects). Any of these sections can be missing.
The contents of the table box are determined by the currently set filter (Filter attribute).
Select differing objects that need to be merged in the first column. You can customize the merge settings for the selected objects.
Comparison is done separately for each section. Only objects that are mapped are compared. Auto-mapping by name is performed as an initial step.
You can clear any mapping of procedures and functions. To cancel mapping select the line with the object from the list and choose the Clear Object Mapping command from the context menu.
If object names in the compared modules have changed, but objects still have the same contents and need to be compared, you have to map the objects manually. To map the objects choose any object for which the setting is to be made and choose Set Object Mapping from the context menu.
The Test() procedure of the main configuration on the figure above corresponds to the ShowHeader() procedure of the loaded configuration. The Merge Modules window shows differences between these objects after manual mapping (see below).
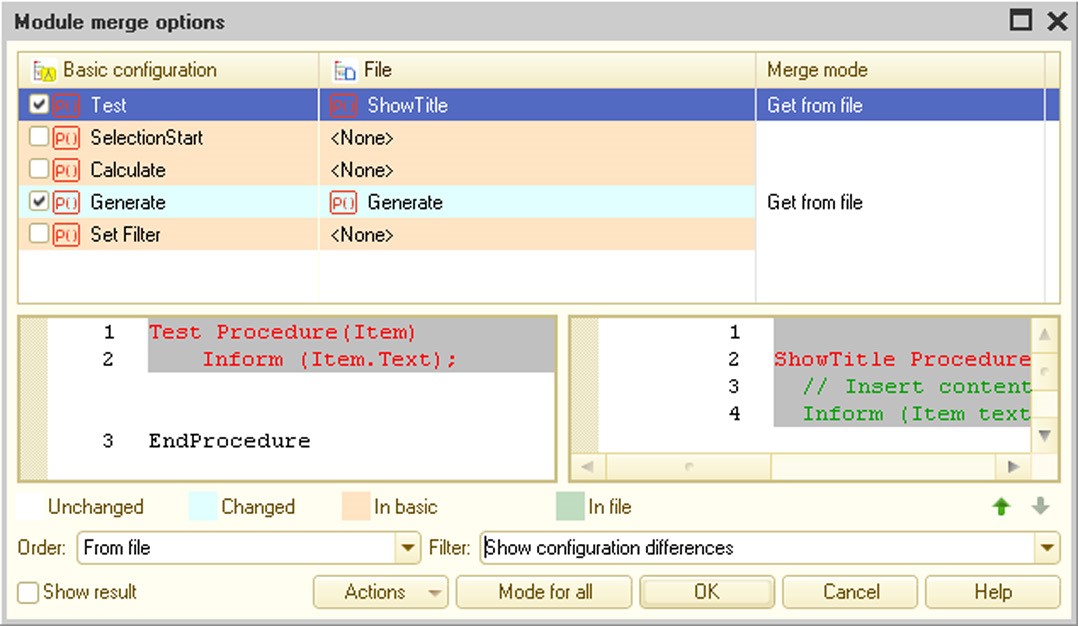
Fig. 433. Merge Modules
Differences between the objects are shown when the Display Result option is unchecked. If this option is checked, the merging result is shown with consideration for the merging mode.
Module object ordering is determined based on the Order attribute.
To view comparison results for modules without consideration for structure, click Actions – Show Module Differences without Structure. The Differences Between window will open. For details on how to view differences see page 2-1175. To view preliminary module merging results click Actions – Show Merge Results.
After mapping ordering and specifying the merging mode click OK to save the merging settings. Click Cancel to discard the changes.
When the module merging procedure completes, Custom Setting is displayed in the Merge Mode and Subordinate Objects Sequence column of the Merge Configurations window. If you select another mode from the list, the settings are lost. Modules are merged based on these settings only for the entire configuration.
28.14. FILTERING OBJECTS AND ACTIVATING MERGING
To generate a list of merged objects set the check boxes to the left of the master configuration object icons. Checking or unchecking higher-level objects checks or unchecks all subordinate objects. Check boxes indicate the selected objects of the two configurations will be merged.
Object check box is set to Undefined if some of its subordinate objects are checked and some are unchecked.
When you open the Merge Configurations window, the Designer adds all valid objects to the list of merged objects.
Click the Execute button for the Designer to analyze the checked configuration data. If there is nothing to prevent merging, configurations are merged. The merged configuration is automatically saved.
If you perform selective merging and select objects referencing other objects that are not checked for merging, the Designer displays a list of unresolved references. For example, if one of the attributes of a checked object is a reference to another object of the loaded configuration that is not checked for merging, this reference is considered unresolved (see fig. 434).
The window contains two table boxes. The upper table box contains a hierarchical list of all found objects that are linked with checked objects in the Merge Configurations window. The lower table box contains a hierarchical list of objects that use the object from the upper list.
This window can be used to examine links between the selected objects and to decide whether it is necessary to include these objects in the list of merged objects.
Use the Mark All for Merge button to check all objects that should be checked for adequate merging. When you click this button, the window closes and all required objects in the Merge Configurations window are checked.
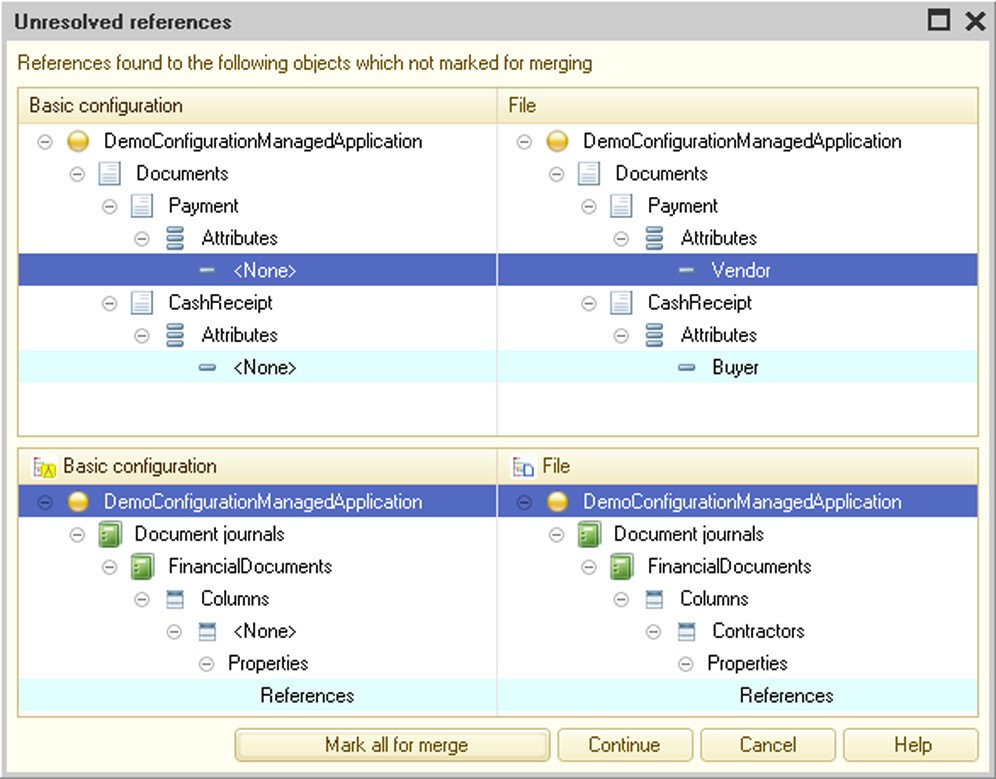
Fig. 434. Unresolved References
Use the Continue button to merge only the checked objects without consideration for unresolved references. In this case the specialist who performs merging is responsible for merging results.
28.15. LOADING CONFIGURATION FROM FILE
If the entire configuration needs to be replaced while running 1C:Enterprise, you need to load the new configuration from file.
Use the Configuration – Load Configuration from File command of the main menu to load changes.
Find and open a new configuration file (1Cv8.cf by default) in the standard open file dialog.
If the current configuration is not empty, the following message is displayed: Configuration is not empty. Loading the configuration will completely replace the current configuratuion with the new one, without comparison or merger. Continue? If you click Yes, differences between the old and the new configuration structures are analyzed and the required changes are made. The system asks you whether it is necessary to update the database configuration.
You can also load a configuration from file to create a new configuration based on the loaded configuration.