
1C:Enterprise 8.3. Developer Guide. Contents
WORK WITH CONFIGURATION
This chapter describes general techniques for working with configuration objects which are applicable to objects of all types. We will discuss specifics of creating and editing various types of configuration objects later, in the corresponding chapters of the guide.
This chapter mainly covers visual tools for configuration object management in the Designer. For a description of the 1C:Enterprise script see the 1C:Enterprise script help.
For information about saving and restoring infobases see "1C:Enterprise 8.3. Administrator Guide" or "1C:Enterprise 8.3. Client/Server. Administrator Guide".
The 1C:Enterprise infobase stores two configurations:
basic configuration (editable and referred to as "configuration")
database configuration
The database configuration determines the structure of database tables and the full set of functions accessed by users. The master configuration is only used to make changes. When operated by users, it allows changes to be entered and saved in the configuration. The database configuration cannot be changed when operated by users. For information on working with the database configuration see page 1-63.
2.1. OPENING CONFIGURATION
Use the Configuration window to work with configurations. To open a configuration, select Configuration – Open Configuration. The Configuration window will appear (see fig. 2).
To make more area available for working with various objects, you can temporarily close the Configuration window. Closing the Configuration window does not end your session with its individual components open for editing: you have not closed the configuration, just the Configuration window. To open the Configuration window, select Configuration – Configuration Window.
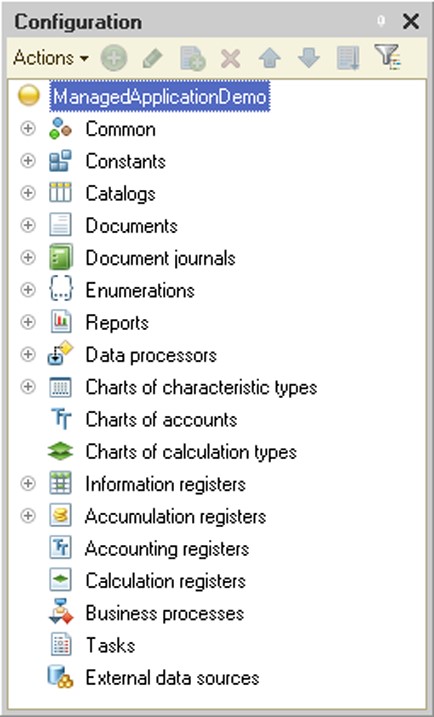
Fig. 2. Configuration
2.2. SAVING CONFIGURATION
While editing a configuration, you can create new objects, modify or delete the existing objects and subordinate objects (forms, attributes, etc). Any change of this kind results in a modified configuration. If the configuration has been modified, the * character appears in the Configuration window title.
To save the configuration (without ending your session), select Configuration – Save Configuration. This menu item is available if the configuration has been modified, while text, spreadsheet and HTML editors always display this item.
You can save a changed configuration at any time even if the 1C:Enterprise mode has been started or during debugging.
2.3. CLOSING CONFIGURATION
To close the configuration, select Configuration – Close Configuration. If the configuration has been modified (if you have made changes), the Designer will prompt you: Configuration has been changed. Save changes? To save your changes, click Yes.
You can close the configuration and save changes at any time even if the 1C:Enterprise mode has been started or during debugging.
2.4. SAVING CONFIGURATION TO FILE
To save a configuration to a file on disk, select Configuration – Save Configuration to File. The standard file selection dialog box will be displayed. Choose a directory and specify the file name to save the configuration.
You will need the saved configuration file if you want to compare or merge configurations (see page 2-1071).
NOTE
If the configuration is supported, the infobase always stores a vendor configuration.
2.5. LOADING CONFIGURATION FROM FILE
To completely replace the current configuration with one saved to a file, select Configuration – Load Configuration from File.
2.6. CONFIGURATION OBJECT TREE
The configuration is displayed as a tree structure where each branch describes a component of the configuration. Configuration objects on the configuration tree are represented by their names. For example, the Documents branch contains objects for all documents used in the configuration, the Invoice branch describes the Invoice document object, the Common – Roles branch describes all roles (information access rights) used for various user types, the SalesManager branch describes access rights for a the sales manager, etc.
The root branches of the tree consolidate general-purpose configuration objects that are logically interrelated.
For example, the Documents branch consolidates Sequence and Document numerator type objects as well as Document type objects. All these objects are designed for document entry into the 1C:Enterprise system.
When working in the Designer, use the keyboard for convenience. A list of keyboard shortcuts used in the Designer is available in the built-in help (see section Keyboard shortcuts (Designer)).
You can arrange configuration objects in whatever order you like within "their own" group of configuration objects. The same order is used to display the configuration objects in various lists.
To move a configuration object, select it in the Configuration window and use menu items Actions – Move Up or Actions – Move Down or else Actions – Sort.
To easily find an object you are currently editing in the configuration tree (an object editing window, form, template or module), use Edit – Find in Tree. First make the object editing window active. After you execute the command, the object you are currently editing is selected in the configuration tree.
You can search the metadata tree using one of two methods:
Start entering the object name (it searches the object in open tree branches only).
Use standard search functionality (press Ctrl + F to open the search window). This opens the Search results window where you can navigate to the required metadata object.
You can use the mouse to drag names of configuration objects and subordinate objects (attributes, tabular sections, forms, etc.) into modules and text documents.
2.7. METADATA TREE SORT SETTINGS
This mode is designed for sorting configuration objects. You can sort same-type configuration objects subordinate to one configuration object simultaneously.

Fig. 3. Sorting Metadata
For example, forms that belong to a specific catalog.
Sort by: Choose the property to be used as a sorting criterion:
○ Name. Configuration objects are sorted by name.
○ Synonym. Configuration objects are sorted by synonym.
○ Comment. Configuration objects are sorted by comments.
Sort direction: Select the sort direction:
○ Ascending. Results are presented in ascending order.
○ Descending. Results are presented in descending order.
2.8. CREATION AND DELETION OF CONFIGURATION OBJECTS
2.8.1. Create Configuration Objects
You can manage most configuration objects in the Configuration window. This section outlines common techniques for creating configuration objects which apply to all types of configuration objects.
To create a new configuration object, do the following:
In the configuration tree, select the name of the configuration object type or any existing configuration object of the type to be used for the new object.
In the Configuration window, select Actions – Add.
You can also create a new subordinate object as follows:
Open the object editing window (in the Configuration window, select Actions – Change).
Specify the desired type of subordinate object.
Click Add.
As a result, a new object appears on the current branch of the configuration tree, and its properties palette where you can edit the object properties is automatically displayed if not open yet (for more on how the properties palette works see page 1-53). Objects with a wide range of editable properties allow you to call up the editing window in addition to the properties palette (for more on how this window works see page 1-59).
The new configuration object is assigned a conventional name consisting of a word that corresponds to the type of object created and a number – the sequence number of the new configuration object. For example, a new catalog name begins with Catalog. The object properties palette contains default property values.
The Designer checks the object names before the database configuration is updated and the distribution is generated.
For objects that can have subordinate objects (for example, a catalog can have attributes, tabular sections, forms and templates), the desired number and content of subordinate objects are created. You can shape and setup them using various Designer tools.
To simplify creation of certain object components (queries, templates and print routines, register records and generation of objects based on other objects), the Designer has various wizards – auxiliary tools that facilitate the design process (for details see page 2-937).
For the object types that can have forms, the system has form wizards – auxiliary tools that facilitate development of object forms. The form wizard launches when you create a new form (for more on how the form wizard works see page 2-987).
You can use the form editor to edit forms (for more on how it works see page 2-937).
You can edit spreadsheet-based templates with the spreadsheet editor (see page 2-996). To generate templates, you can use the print wizard (see page 2-982) and the report generator (see page 2-979).
You can edit text-based templates with the text editor (see page 2-957).
You can edit programs in the 1C:Enterprise script located in modules with the text editor (see page 2-943).
You can create a new object by clicking and dragging. When you drag and drop an object (either within its branch or outside it), you create a new object. The possible use of the object original properties in the resulting object is checked.
If the resulting object supports the properties, they are copied. An example of a successful copy would be carrying attributes and catalog templates over into the document. When you copy the same catalog to a Style-type object, only its name, synonym and comments are carried over.
If the original object contains subordinate objects (attributes, forms, templates, etc.), then dragging it to a similar level (for example, dragging the Catalog.Currencies object to the Documents branch) copies its attributes, forms, templates and tabular sections. However, some properties of component parts may be changed (for example, a document may lack the Parent property).
2.8.2. Deletion of Configuration Objects
To delete a configuration object, select it in the configuration tree and use Actions – Delete in the Configuration window. If no other configuration objects reference this object, it is deleted.
If the object is referenced (i.e. is in use), the following message appears: Object cannot be deleted, because other objects contain links to it! The message window also displays a list of the object uses.
Fig. 4 below shows an example of the message window after an attempt to delete the GoodsReceipt document.
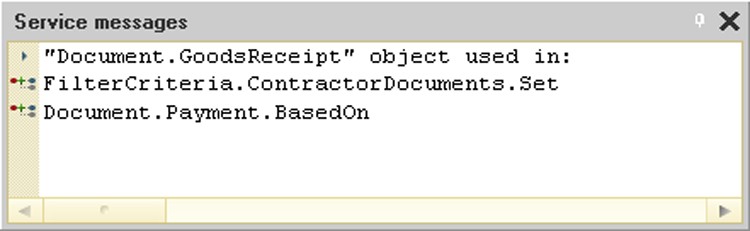
Fig. 4. Service Messages
To navigate to the object referencing the object you wish to delete, double-click its name in the message window.
2.8.3. References to Configuration Objects
From the standpoint of interconnection, configuration objects are divided into non-referenced objects (for example, the Purchase Price attribute with the Number type) and referenced objects (for example, the Unit of Measure attribute in the Nomenclature catalog which references the Units of Measure catalog).
It is often useful to know which configuration objects reference the object in question or which objects are associated with it. You can find it out by using commands
Actions – Find references to object and Actions – Find References in Object in the Configuration window.
It displays a dialog box.

Fig. 5. References to Object
You need to specify the search area (properties, subordinate objects) and click OK.
If references exist, they will be listed in the message window when you execute the command. If there are no references, one of the following warnings is displayed:
There are no references to this object.
Reference not found in object.
Use Actions – Find References in Object to display a list of all aggregate types used in the object.
To follow a link, double-click the corresponding line containing the name of the referenced object in the message window.
2.9. PROPERTIES PALETTE
The process of editing a configuration object consists of changing its properties in order to achieve the desired behavior when the object is used.
The properties palette is a window in the form of a set of properties that can be defined for the configuration object. The list of properties depends on the type of object being edited.
This section describes basic techniques for working with the properties palette.
To open the properties palette, point to the configuration object and select Edit – Properties.
Object properties are grouped in the properties palette by category. The number of categories and the properties included in each category depend on the type of object being viewed. For example, the properties palette for a document attribute only contains property categories General, Use and Presentation. The list of properties in a category also depends on the type of object. Even if you select identical object types, the list of properties is determined by the individual settings of the specific objects. For example, for a hierarchical catalog, the list of properties of a table box in the Use category includes additional properties: Tree, Hierarchical View and others.
Properties also depend on values chosen for other properties. For example, when you select the Number primitive type, properties that characterize the selected type are added to the Type property: Length, Precision and Non-negative.
The properties palette toolbar has five buttons (see fig. 6). The first three buttons manage how properties are displayed.

Fig. 6. Buttons in Properties Window
The toolbar buttons are described below:
Sort alphabetically. When selected, it lists object properties in alphabetical order. Categories are not displayed.
Sort by category. When selected, it lists object properties by category.
Show only important elements. When this button is selected, only important object properties are displayed; when it is not, all properties are shown.
Cancel edit. It discards changes to property text field.
Save. It writes changes to property text field.
Categories of properties can be arranged into tabs or lists. When properties are arranged in a list, they can be sorted by category or alphabetically (category names are not displayed).
To select a category display method (select the Sort by categories button to enable category display), open the context menu anywhere in the properties palette window and select the appropriate display method (Tabs or List). If Tabs is selected as the display method, the buttons Sort alphabetically and Sort by categories become unavailable.
If you want to navigate to another category with the Tabs display method selected, click the corresponding tab.
To display categories as a list again, select List in the context menu of the properties window.
If the selected display method is List, object properties are arranged by category or in alphabetical order. To select alphabetical order, click the Sort alphabetically button on the properties palette toolbar. All properties will be shown in alphabetical order.
To sort by category, select the Sort by categories button on the toolbar. All properties are grouped in categories and displayed as a list (one below another). Category names are displayed in bold. You can control display of properties within the category by using a button to the left of the category name. This button hides or displays a set of properties.
Double-clicking the name of a property category collapses all other categories and shows properties of the selected category.
If you select the Show only important elements button, only important (main) properties of the object are displayed (regardless of whether the display is set to list or tabs, categories or alphabetical order). To view all properties, press the Show only important elements button again.
Object properties are available or unavailable for editing depending on its type. For example, in a text document, object properties are designed only to show the number of lines and characters and the document status, but they are not available for editing.
Each property in the properties palette has a name and detailed explanation. The detailed description can be viewed using the Comment command of the context menu which can be displayed by clicking anywhere in the properties palette (outside text boxes). If this mode is set and you select a property, detailed explanation appears in the lower part of the properties palette. In addition to the explanation, the name of the property may be displayed for access to the value from the program module.
Properties accessible via the 1C:Enterprise script can be displayed either as descriptions or as property names, e.g. a property with the Value type description has the ValueType name. Display mode can be changed using the Display property names command in the context menu. Property names are displayed according to the selected option of the 1C:Enterprise script.
IMPORTANT!
Names of properties for metadata objects and the Configuration metadata object are not displayed.
The way you enter values in the properties palette depends on the type of property you are editing.
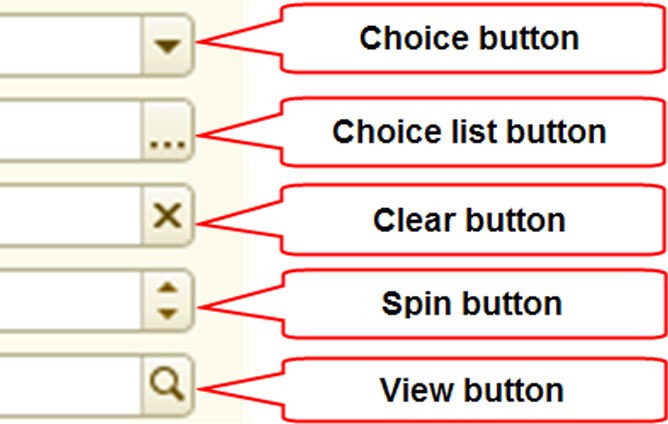
Fig. 7. Available Actions
You can enter text for text attributes in the usual way (using the clipboard) or select check boxes by clicking. For some properties, values are selected from lists. Fields of such properties have a selection list button (see fig. 7). If a property field has a selection button (see fig. 7), clicking it opens a window where you can select a value for the property (or view it if editing is not permitted, for example, for objects that are not locked in the configuration repository or for objects that are supported without possibility of change). Such properties include, for example, picture file selection, color definition and others.
The view button (see fig. 7) has various functions: for text data, it opens the window for editing strings in various languages; for events, it calls the form module procedure that handles a particular event; for properties from the Presentation category, it calls the existing data object form. The clear button (see fig. 7) clears the value of the specified property. The spin button (see fig. 7) increases or decreases a numeric value by 1.
Fields can also have combinations of buttons.
When you begin editing any text field in the properties palette, the properties palette toolbar buttons Cancel Editing (see fig. 6) and Save (see fig. 6) become available. Clicking the Cancel Editing button discards any changes you have made. Clicking the Save button saves the changes.
The properties palette may contain links that open various forms associated with the selected object. These may include, for example, displaying help content (description) for a configuration object, various forms or form module procedures. These links are underlined. Clicking the link opens the associated window.
If you view properties of an object that you cannot edit (for example, if the object is not locked in the configuration repository (see page 2-1088), you can open the type editing dialog box as read only.
2.10. MORE WINDOW
To make viewing and setting basic interface properties of a configuration object more convenient, you can use the More window. To open it, select Edit – More.
To view the properties, just select the desired object in the Configuration window. Its properties immediately appear in the More window.
Information in the window is organized on tabs.
You can include metadata objects into subsystems regardless of their mutual subordination. An object can belong to both a parent subsystem and its subordinates. Use the Subsystems tab to do this (see fig. 8).
The Rights tab shows a list of roles and the rights of each role relative to a particular object (see fig. 9).

Fig. 8. Subsystems tab

Fig. 9. Rights Tab
The Data Access Restrictions table box allows you to edit data access restrictions at the level of individual fields and records (for details see page 1-188).
The Functional options tab lists functional options existing in the system. You can select the functional options bound to a particular metadata object.

Fig. 10. Functional Options Tab
The Common attributes tab can be used to specify to which common attributes the current object belongs. The editing rules in this window are similar to those in the Content window of a general attribute property.

Fig. 11. Common Attributes Tab
The Exchange plans tab shows a list of exchange plans. The exchange plans where changes for a particular object are recorded are marked in the list.
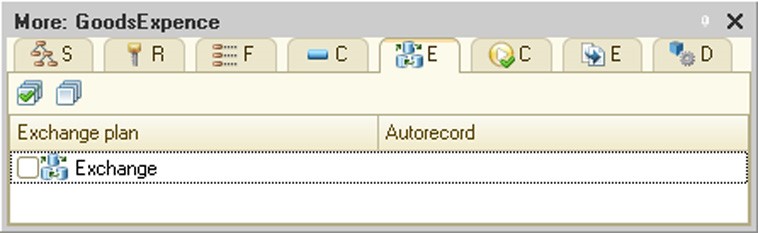
Fig. 12. Exchange Plans Tab
The Command interface tab can be used to edit visibility of standard and custom commands for the selected metadata object in various subsystems. Commands included in the desktop are grouped in the Desktop node.
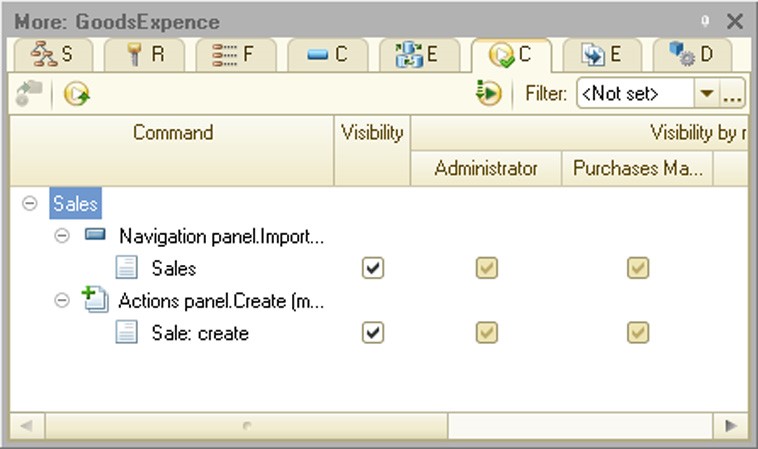
Fig. 13. Command Interface Tab
The Enter based on tab shows a list of objects used as a basis to create a particular object and a list of objects serving as a basis for exchange plans.

Fig. 14. Enter Based On Tab
The Only selected check box can be used to display selected objects only or all objects that can be input on a certain basis with selected objects marked by check boxes.
The Delivery settings tab can be used to select a distribution rule for the configuration object selected, similar to the special distribution configuration dialog (see page 2-1122).
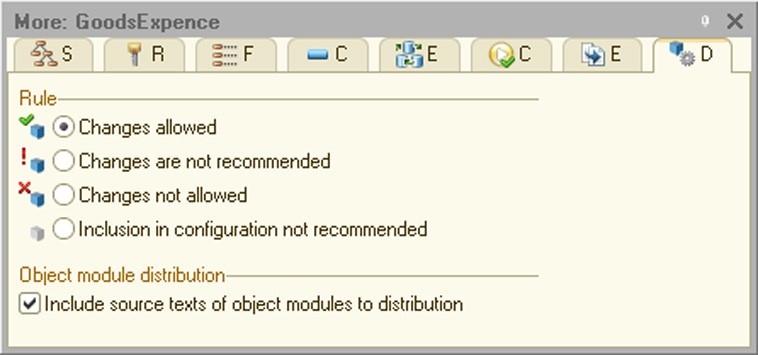
Fig. 15. Distribution Configuration Tab
2.11. OBJECT EDITING WINDOW
For basic configuration objects (catalogs, documents, document journals, etc.), it is easy to edit properties, add or delete subordinate objects and objects interaction setup using the object editing window.
In most cases you can open the object editing window by selecting Actions – Change in the Configuration window.
Editable properties are organized on several tabs. Each tab contains a set of attributes for customizing properties of a particular type of object. Thus, the Main tab allows you to enter Name, Synonym and Comment properties, while the Subsystems tab helps specify which subsystems use the object. You can navigate through the tabs using the Next > and < Back buttons. You can also select the desired tab with the mouse. This window contains the Actions button. Clicking it displays the object context menu. You can use this menu to open the desired form or object module (if any), call the desired wizard and perform other actions.
Available tabs and a set of controls on similar tabs can vary depending on the type of configuration object.
For example, for a Catalog object, the editing window looks like the following:

Fig. 16. Main Tab
The Main tab allows you to specify Name, Synonym and Comment properties. Additionally this tab is used to set properties that create an object presentation in the command interface (for details see page 1-250).
On the Subsystems tab, you can specify which subsystems use the object. You are allowed to include the object into subsystems regardless of their mutual subordination. The object can belong to both a parent subsystem and its subordinates. Object membership in subsystems defines where in the command interface commands for the edited object are displayed. For details on the command interface see page 1-83.
The Data tab can be used to create attributes, resources, dimensions, tabular sections and tabular section attributes as well as other subordinate objects (depending on the object type). This tab can also contain other controls for setting up properties that are characteristic of particular object types.
Thus, for a catalog, its description and code length, code type and default presentation of catalog items is defined (see fig. 17).
Use buttons on the toolbar located above the lists of subordinate objects to add, delete and sort these objects. Specify properties of subordinate objects in the properties palette.
If you open the editing window for an object that you cannot edit (for example, if the object is not locked in the configuration repository (see page 2-1088)), you can open the type editing dialog box as read-only.

Fig. 17. Data Tab
The Forms tab is used to manage object forms and to select default forms.
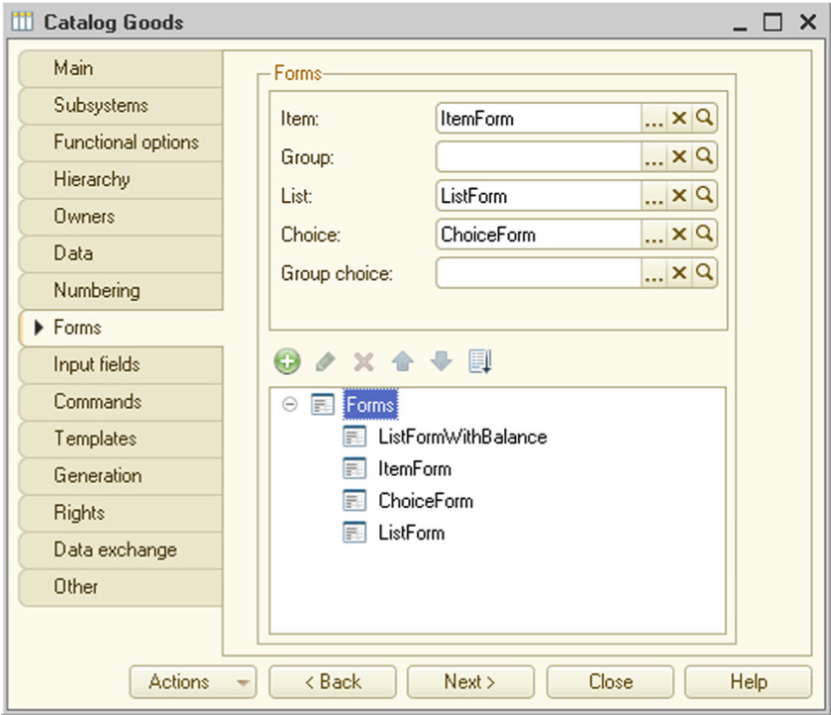
Fig. 18. Forms Tab
For details on default and additional forms see page 1-263.
The Input by string property group defines object attributes used in the system to search for information. For details on input by string see page 1-258.
The Quick choice property controls the default selection mode. For details on how this property works see page 1-274.
The Commands tab can be used to set custom commands associated with the object. For a description of command types see page 1-338.
Adding a new form launches the form wizard that can be used to select a form type, attributes placed in the form and the form structure. For details on how the form wizard works see page 2-987. For the main form editing methods see page 2-937.
The Templates tab is used to handle object templates.
Adding a new template launches the template wizard that helps create templates. For details on how the template wizard works see page 2-990.
Below the list of templates is the Wizards button. Clicking it opens a submenu where you can select the type of wizard (wizard availability depends on the object type).
Selecting Print Design Wizard launches the print wizard that is used to create a print template and routine. For details on how the print wizard works see page 2-982.
Selecting Output Form Wizard launches the output (report) form wizard.
On the Rights tab, define rights relative to a particular object for each role.
For application objects (catalogs, documents, charts of characteristic types, charts charts of accounts, charts charts of calculation types, registers, business processes and tasks), the Data exchange tab specifies a list of ExchangePlan objects. Mark the exchange plans that will record changes to the object you are editing.
The Other tab contains buttons that open an object module, manager module or help content and can also contain the Predefined button that opens a list of predefined object items (for catalogs, charts of characteristic types, charts of accounts and charts of calculation types). The tab can also contain lock control attributes (see page 1-516) and full text search settings (see page 2-835). These attributes are only displayed for the following application objects:
catalogs
documents
charts of characteristic types
charts of accounts
charts of calculation types
registers
business processes
tasks
Some objects may contain special tabs associated with this object type only.
Catalog type objects may have Hierarchy, Owners and Numbering tabs;
Document objects may have Numbering, Posting, Journals and Sequences tabs;
ChartOfCharacteristicTypes objects may have Hierarchy tab;
ChartOfCalculationTypes objects may have Calculation and Generation tabs;
ChartOfAccounts objects may have Extra dimensions tab;
CalculationRegister objects may have Recalculations tab;
Task objects may have Addressing tab;
all registers may have Recorders tab;
objects that can have their changes recorded in exchange plans may have Data exchange tab.
2.12. CREATE HELP CONTENT SECTION
Some configuration objects allow you to "pin" text explaining the object purpose and use. This text is called user description. When working in the 1C:Enterprise system, the user can display this description for viewing.
You can create and edit user descriptions in the built-in HTML editor which can be opened from the object properties palette via the Open link of the Help Content property. You can create and edit description text using HTML editor tools. To specify a name, create a top-level title in the topic text using the <H1> tag of the markup language.
Please note that the <STYLE> tag (and its contents) that can be specified when the reference information tag is edited manually outside of the <BODY> tag will be ignored if the reference text is displayed in 1C:Enterprise mode. Should any special formatting be used for the reference information page, it should be defined within the <BODY> tag.
If you set the Include in Help Contents property, object synonym is used as a help topic. Regardless of this property, the object synonym line is added to the index list (for help search purposes).
2.13. WORK WITH DATABASE CONFIGURATION
2.13.1. Database Configuration Object Tree
To view the tree structure of the database configuration, properties, forms, templates and other information about objects, you can open the database configuration window. To do so, select Configuration – Database Configuration – Open Database Configuration. It looks just like the Configuration window (see fig. 19).
You work with database configuration objects the same way as you do in the Configuration window, with one exception: all objects are read-only.
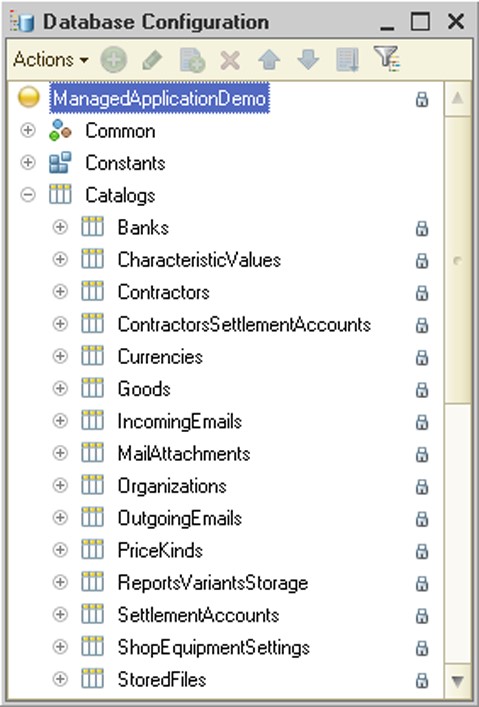
Fig. 19. Database Configuration
2.13.2. Update of Database Configuration
As you edit the configuration, you can create new objects, modify or delete the existing ones. The current structure of the database can differ from that of the configuration. Differences in the two configurations are represented by <!> characters in the title of the Configuration window.
NOTE
The configuration difference mark (<!>) appears only after you have saved changes to the master configuration. However, after saving the master configuration, you can continue making changes; in that case the title of the Configuration window will contain signs of modification of both configurations.
To align the configuration and the database configuration, you should update the database configuration. To do so, select Configuration – Update Database Configuration. If the master configuration has not yet been saved, the Designer first saves it and then updates the database configuration.
If the message window has opened in the database configuration update process, it is cleared.
IMPORTANT!
Updating the database configuration may require terminating all user sessions.
Before updating you can compare or merge configurations.
If debugging is run during the updating the database configuration, after saving the current configuration the system prompts: To update the database configuration you need to stop debugging. Do you want to continue? Select Yes to terminate debugging and update the database configuration. Select No to discard the update and continue debugging.
To update the database configuration, the Designer requires exclusive access to the infobase. Depending on whether there are users working with the database and what mode they use, the system may behave in different ways:
The Designer displays an exclusive lock error message in the following cases:
○ The file mode of the database is in use.
○ Some sessions are connected to the infobase without using the Web Server.
○ No sessions are connected through the Web Server.
○ Updating the configuration requires database restructuring.
The Designer prompts to terminate all sessions and re-try updating in the following cases:
○ Updating the configuration requires database restructuring.
○ The file mode version of the infobase is used by web clients and thin clients connected via the Web Server.
In all other cases the Designer prompts the user to perform a dynamic update.
NOTE 1
Troubleshooting messages contain characteristics of the sessions preventing the system from performing the requested action. If the number of these sessions does not exceed 5, a detailed list of sessions is displayed (with the machine name, application type, etc.); otherwise the total number of sessions is only displayed.
NOTE 2
Infobase operation in the exclusive mode does not switch the Microsoft SQL Server database to the single user mode.
NOTE 3
To speed up infobase restructuring, it is recommended to set the database recovery mode to the Simple or Bulk logged values when Microsoft SQL Server DBMS is used. The mode can be changed either before the restructuring operation or on an ongoing basis if it is not necessary to restore the database at an arbitrary point of time. Before changing the database recovery mode, back up the database.
Exclusive Access Error
If the system cannot gain exclusive access to the infobase, you can wait until all users disconnect from the infobase and retry the update operation.

Fig. 20. Exclusive Lock Error
Session Termination and Update Attempt
If updating the configuration requires terminating all sessions, the user will see the following message (see fig. 21).

Fig. 21. Session Termination for Update
If Close sessions and repeat is selected, the user is prompted to confirm the selection action (Closing sessions will result in abnormal termination of all infobase users’ work! Do you want to close sessions?). If the action is confirmed, the system attempts to terminate all infobase sessions. Then the system retries to save the database configuration.
Terminating all sessions shuts down all client applications.
In some situations sessions cannot be terminated. In this case you can either retry to update the database configuration later or terminate sessions by other methods (e.g., by reloading the working processes).
Dynamic Update
If dynamic update is allowed, the user will see a corresponding message (see fig. 22).
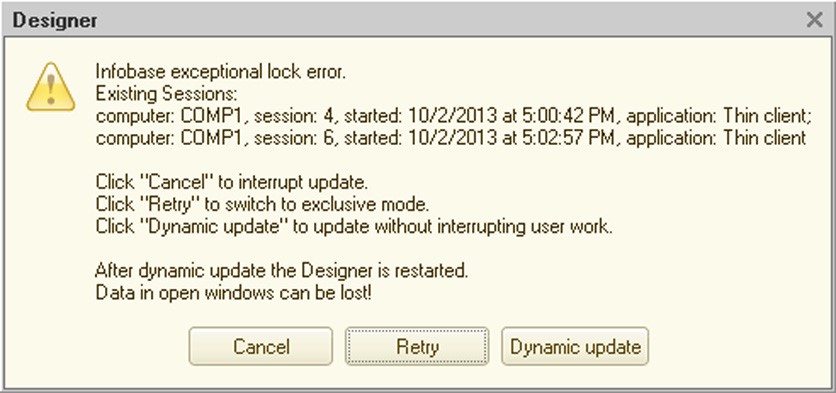
Fig. 22. Dynamic Update
Select the Dynamic update command to perform an update without interrupting user operations. In this case changes you make are saved dynamically as a version of configuration changes (the database configuration remains unchanged). Repeated changes to the master configuration are allowed. If during the next database configuration update you can enable the exclusive mode, the Designer will perform the database configuration update and include all the changes (both current and previous).
NOTE
If the client/server mode of the infobase is used, then the Designer is restarted after the update. All unsaved changes in text, spreadsheet and other documents will be lost.
In case of dynamic update active users continue to work with the previous configuration. To access the updated configuration, the user should restart the 1C:Enterprise system. For the purposes of control and user notification about dynamic changes, use the DataBaseConfigurationChangedDynamically() global context method.
NOTE
After the database configuration is updated all other versions created by dynamic updates are removed.
If changes requiring database restructuring are found, a dialog box with a list of these changes is displayed so that you can confirm that the update should go ahead.

Fig. 23. Reorganizing Information
Click Accept to save the changes or Cancel to discard.
2.13.3. Background Database Configuration Update
2.13.3.1. General information
It can take a long time to perform a database configuration update connected with database restructuring for large volume infobases. The infobase will be unavailable during the update.
To minimize the time spent on this operation, you can use a special mode that allows the background database configuration update. The background database configuration update incorporates the following features:
It is available only in the client/server mode of infobase.
It can be performed with Designer closed.
The greater part of the background database configuration update is performed without exclusive access to the database (including the period of database restructuring).
The background database configuration update makes the following operations unavailable:
○ Configuration editing;
○ Application debugging;
○ Database configuration update operations;
○ The SetAggregatesMode(), SetAggregatesUsing(), RebuildAggregatesUsing() methods are not allowed;
○ Changing a chart of accounts or chart of calculation types if the relevant accounting register or calculation register is involved in the background update. An attempt to change the content of the chart of accounts or chart of calculation types will lead to an error.
The background configuration update can be paused for up to 48 hours. If the pause exceeds 48 hours, the background configuration update will be cancelled.
The background update is not supported for configurations in the mode of compatibility with version 8.1 (see page 1-170).
The background database configuration update is not supported when IBM DB2 9.1 is run.
The background database configuration update consists of a number of phases:
Processing phase:
○ This phase takes long time.
○ The phase can be started by any of the following methods:
□ interactively from Designer;
□ from 1C:Enterprise script (using appropriate methods); □ from Designer startup batch mode.
○ Users can use the infobase during this phase.
○ The main volume of data is restructured for the following configuration objects:
□ Catalogs
□ Documents
□ Document journals
□ Information registers
□ Accumulation registers
□ Accounting registers
□ Calculation registers
□ Sequences
□ Charts of accounts
□ Business processes
□ Tasks
○ In the processing phase, the system records all data changes for the above objects by analogy with a data exchange mechanism.
Refreshing phase:
○ This starts automatically with a 1-minute interval after the processing phase finishes.
○ Users can work with the infobase during this phase.
○ The phase comprises automatically repeated iterations. Each iteration analyzes the changes accumulated since the previous iteration (or since the processing phase finished) and performs restructuring of the data.
○ Iterations are completed at the moment the next phase starts.
Change acceptance phase:
○ This phase requires exclusive access to the infobase.
○ Users cannot use the infobase in this phase.
○ The first step here is refreshing any data accumulated since the most recent iteration of the refreshing phase.
○ Then the system performs restructuring of data that were not involved in processing and refreshing operations during the respective phases. Changes to this data are not significant, thus their restructuring does not take very long.
○ The next step is acceptance of all changes made in the database.
○ The database configuration update process is then complete.
If the background update is run in such a way that it does not require database restructuring, the entire update process is executed at the change acceptance phase, which begins just after the background update is launched.
During the background update, the server operation can be stopped or the background update process can be paused.
After the server is stopped or the working process supporting the system’s background update job is aborted, the creation of the first session will require a bit more time than usual. This occurs due to background update recovery. However, the background update process itself is suspended. To proceed, you need to restart the background update execution. This behavior is implemented to prevent the system looping in the event that the abnormal end of the working process that supports the background update was caused by this background update itself.
After the server operation is recovered, the background database configuration update proceeds as follows:
If the operation has been terminated at the processing phase, the process resumes from the most recent configuration object whose processing has not been completed.
If the operation has been terminated at the refreshing phase, any iteration that has not been completed will resume.
TIP
We recommend canceling any background database configuration update process already started if you do not plan to complete the background database configuration update (e.g. if the process is put on an "infinite pause"). Following this recommendation will be positive for the system characteristics as no change registration will be performed to execute the refreshing phase.
When executing background restructuring, please note the following features of the system’s operation:
If the accumulation register or accounting register is part of a separator, then the register is processed during the change acceptance phase.
If the type of an independent separator has been changed (see page 2-895), all the objects included in this separator are processed during the change acceptance phase.
If the dimension type included in the main filter of an independent information register is changed, the register will be processed during the change acceptance phase.
2.13.3.2. Background database configuration update dialog
To call the background database configuration update operation, select the Configuration – Database Configuration – Background database configuration update menu item.
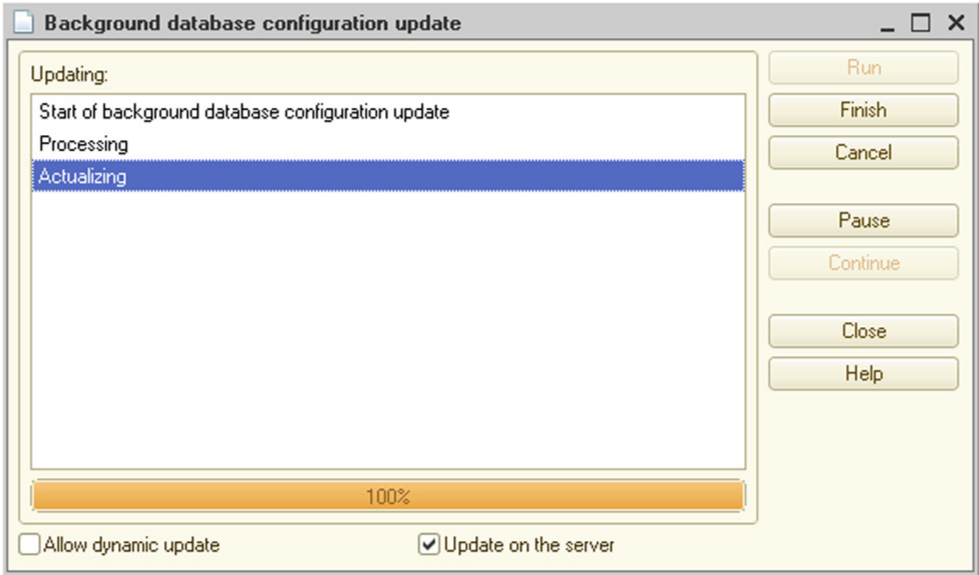
Fig. 24. Background Database Configuration Update
Clicking the Run button will launch the Processing Phase. When you do this, the service message window will display the following:
Background  database configuration update has started successfully.
The  configuration is not available for editing. Background database configuration  update is being executed.
After the background update has been started, the configuration becomes locked against changes. The background update operation can be paused at any phase by clicking the Pause button. Click the Continue button to go on with the background update process.
The processing phase is followed by the refreshing phase, during which you can move the system to the change acceptance phase by clicking Finish or choose not to update by clicking the Cancel button.
TIP
We recommend canceling the background database configuration update process already started if you do not plan to complete the background database configuration update (e.g. if the process is put on an "infinite pause"). Following this recommendation will be positive for the system characteristics as no change registration will be performed to execute the refreshing phase.
The Allow dynamic update check box is used to define whether the system should try to execute a dynamic update instead of starting the background database configuration update process after the Run button is clicked. If this option is checked, then once the Run button is clicked, the system will verify whether the dynamic configuration update can be performed. If the configuration allows this, the background database configuration update will be replaced with a dynamic update.
The Update on the server check box is used to define where the process will be launched, completed or canceled. The above commands will be executed in the client application if this option is unchecked, or on the 1C:Enterprise server side if checked. In addition, if the option is checked, the configuration can be updated even if you have only the DataBaseConfigurationUpdate right, setting the Administration right is not obligatory.
2.13.4. Saving Database Configuration to File
To save the database configuration to a file on disk, select Configuration – Database Configuration – Save Database Configuration to File. The standard file selection dialog box is displayed. Choose a directory and specify the file name to save the database configuration.
You will need the saved configuration file if you want to compare or merge configurations (see page 2-1071).
2.13.5. Comparison of Configuration and Database Configuration
If you are making changes to the configuration and want to create a report on how it is different from the database configuration, select Configuration – Database Configuration – Compare and Merge with Database Configuration.
If necessary, you can restore the changed objects.
2.13.6. Cancellation of Configuration Changes
To discard changes to the configuration, just select Configuration – Database Configuration – Return to Database Configuration.
NOTE
Even when the edited configuration is closed, Save Database Configuration to File … and Return to Database Configuration menu items are available. When the infobase is connected to the configuration repository, the Return to Database Configuration command remains inaccessible.
2.14. 1C:ENTERPRISE LAUNCH
You can run the 1C:Enterprise mode from the Designer. To do so, select Tools – 1C:Enterprise. You might frequently need to start 1C:Enterprise in debugging mode. Use the Debug – Start Debugging command to do so (for details on the debugger see page 2-1033).
If the configuration has been modified (if changes have been made), the Designer displays the following message: Configuration being edited differs from database configuration. Update database configuration? To save your changes, click Yes.
If you click No, the 1C:Enterprise mode is launched without saving the configuration.
If you refuse to save the configuration, the following prompt is displayed: Database configuration does not match stored configuration. Continue? If you click OK, the 1C:Enterprise mode is launched with the previous database configuration. If you click Cancel, the 1C:Enterprise mode is not launched.
2.15. DOWNLOAD/UPLOAD OF CONFIGURATION FILES
The mechanism of downloading/uploading configuration files allows you to download and upload selected properties of configuration objects (modules, templates and help content). To download properties, select Configuration – Dump configuration files.

Fig. 25. Downloading Configuration Files
In the window that appears, check configuration objects to be downloaded, specify the type of downloaded data and choose a directory to download into. To run this utility click the Execute button. Downloaded data are written into files with the same names as the downloaded properties. The file extensions depend on the data types.
htm – for help content and HTML document templates
txt – for modules and text document templates
mxl – for spreadsheet document templates
geo – for geographical schema templates
bin – for binary data templates
Pictures are downloaded in the format in which they are stored in the configuration. Pictures of all supported formats can be downloaded (see page 1-230).
To download/upload access rights you need to select the roles required (or all of them) and check the Rights item in the Process list. Access rights are downloaded in XML format. The files downloaded will include the access right itself, data access restrictions and access restriction templates.
When help files and HTML document templates are downloaded, a separate file is generated for every language, for which the layout is defined. The language code is included in the file name before the extension, for example Document. ConsumptionOfProduct.Help.en.htm is an English help file for the ConsumptionOfProduct document.
To download the properties, select Configuration – Load configuration files. The actions in this window are similar to data downloading actions.
When data are downloaded, an attempt to download help files and HTML document layouts is made for every language defined in the application. If only one file (without the language code in the file name) is found, it will be downloaded for the current configuration language.
To upload data, select Configuration – Load Configuration Files. Actions in this window are similar to data downloading actions.
2.16. CONFIGURATION DUMP AND RESTORATION
This feature allows you to dump all configuration objects into xml files and restore them. All the configuration objects are dumped into one or more files. The main file for the dump is Configuration.xml. It contains a description of the configuration properties.
The following is dumped into separate files:
Configuration objects, i.e. top level objects, as well as subordinate objects that are held separately in the configuration repository.
File name examples:
○ Document.GoodsSales.xml – a description of the Document.GoodsSales configuration object.
○ CommonPicture.SubsystemPurchasing.xml – a description of the CommonPicture.SubsystemPurchasing configuration object (but not the picture itself).
Individual properties – generally these are properties that have a large volume or a complex structure.
File name examples:
○ CommonPicture.SubsystemPurchasing.Picture.xml – a picture description (but not the picture itself).
○ DataProcessor.Guidebook.Template.HomePage.xml – a description of the template being processed (but not the template itself).
Individual property values that are files of known formats (other than XML). These include form modules, templates, and pictures.
File name examples:
○ CommonPicture.SubsystemPurchasing.Picture.Picture.png – a picture saved to common pictures with the SubsystemPurchasing name.
○ Catalog.Goods.Form.ItemForm.Form.Module.txt – a managed module of the Goods catalogue item form.
○ DataProcessor.AssistantOfDataExchangeCreation.Form.Form.Form. SecondInformationBasePicture.Picture.png – an absolute picture in the Picture property of the SecondInformationBasePicture item of the managed form.
Objects other than development objects are saved to parent object files, e.g. the
DataProcessor.PrintLabelsAndTags.Template.BarcodePrintingComponentLinux32. Template.bin file means the external component of label and tag printing that is located in the BarcodePrintingComponentLinux32 binary template.
The following items are dumped in a particular way:
Object module – it is dumped as a text file (if any) or in the binary form.
File name example:
○ DataProcessor.EventLog.ObjectModule.txt – the Processing.EventLog metadata object module.
HTML – it is dumped as a set of files: a property root file, HTML page files, picture files (if any). The root file contains a list of HTML pages included in the document. HTML files are pages included in the document. Each of these corresponds to a specific language defined in the configuration. Configuration Object Help represents a particular instance of HTML dump.
File name examples (for the Help property):
○ Catalog.Goods.Help.xml – a root file of the external help property of the Catalog.Goods metadata object.
○ Catalog.Goods.Help.ru.html, Catalog.Goods.Help.en.html – help pages for the Russian and English versions respectively.
○ Catalog.Goods.Help.Picture.png – a picture file in the HTML document with help.
Vendors' configurations – these are damped as a file with the information on vendors' configurations in an external format (other than XML) and configuration files (.cf) for each vendor's configuration.
File name examples:
○ Configuration.ParentConfigurations – a file with the information on vendors' configurations.
○ Configuration.ParentConfigurations.TradeManagement.cf – the vendor's configuration TradeManagement.
All references to metadata objects as well as references to fields, type identifiers, etc. are dumped as names (Catalog.Goods). All identifiers are dumped in English – a reference to the Goods catalog will appear as Catalog.Goods.
Should configuration objects contain references to absent configuration objects, such references are dumped as identifier text views and are restored in a reference to the absent configuration object at loading (to keep these two configurations identical). Internal identifiers are dumped for attributes and managed form elements. These identifiers are used to save and restore settings, among other things.
When roles are dumped, the system dumps only the values of those rights that are different from the default values at the moment of dumping. When default rights values are defined, the following role properties are used: Set rights for new objects and Set rights for attributes and tabular sections by default. The values of these options are default options for access rights to configuration objects and access rights to attributes and tabular sections, respectively.
NOTE
Ordinary forms and interfaces of ordinary applications are dumped in binary form.
If any errors are identified in files when they are being restored, the system will generate a window containing the list of errors. Where errors are not critical, you can click Accept. Selecting a line with an error will open the file with the error.
2.17. WORKING WITH A MOBILE APPLICATION
For information on working with a mobile application, see page 2-917.
2.18. CONFIGURATION REPORT
The Designer lets you output data on all configuration objects in text or spreadsheet form. To do this, select Configuration – Configuration Report.
It displays a dialog box in which you must select the type (text or spreadsheet) and name of the file where description of the configuration structure will be saved.

Fig. 26. Configuration Report
Creating descriptions of configuration objects for complex configurations can take a long time.
If you need a report on specific configuration objects, press the selection button in the Objects field and select the required check boxes in the object selection dialog box (see fig. 27).
You are allowed to select objects by subsystems.
After you have finished creating the configuration description, a window containing the description in the selected format (text or spreadsheet) will open.
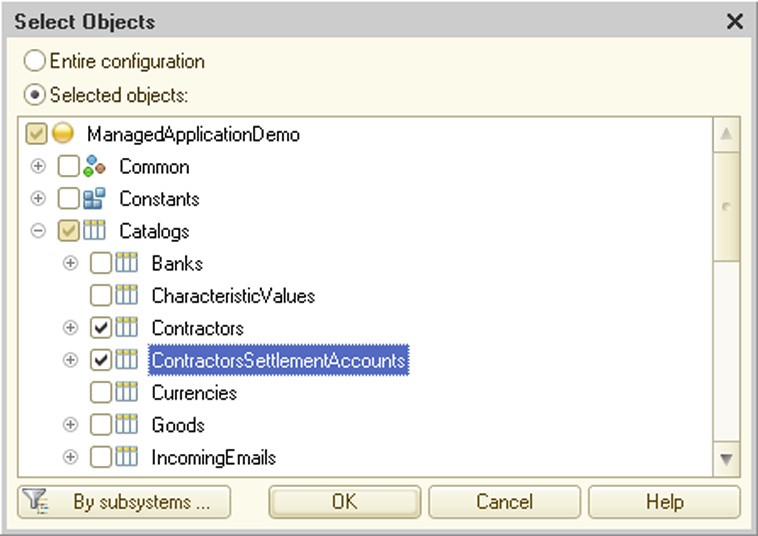
Fig. 27. Object Selection for Configuration Report
2.19. GLOBAL SEARCH AND REPLACEMENT
Global search and replace mode is used to find a specific string in all modules, dialog boxes, spreadsheets, configuration descriptions and external files (external reports, data processors and spreadsheets). Once found, the text can be replaced. This mode can be used, for example, to find all calls of a global procedure or references to an attribute in various modules.
You can invoke the search mode by selecting Edit – Global search and the replace mode by selecting Edit – Global replace.
Both modes use the same dialog box. If the search mode is selected, attributes of the replace mode become unavailable. To make the description shorter, we will examine the global replace procedure and then point out specifics of the search mode.
A dialog box appears for you to set search parameters.
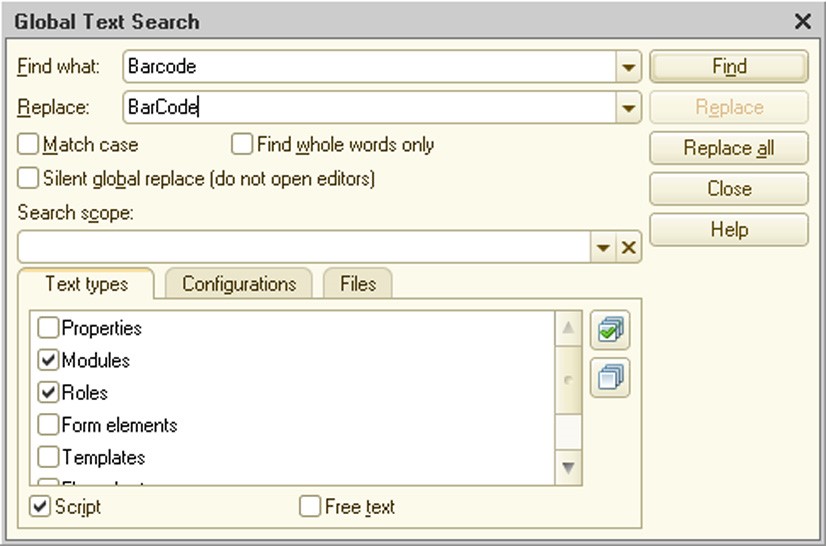
Fig. 28. Global Replace Window
In the Find what field of the dialog box, enter a search string or select one of the strings used in previous search operations.
In the Replace field, enter replacement text or select one of the strings used in previous replace operations.
To make the search case-sensitive, select the Match case check box. If you select Find whole words only, the system only finds whole words rather than their parts.
If you do not want to open editors in a global replace operation (using the Replace all button), select Silent global replace (do not open editors). The editor will open regardless of this check box setting if you click Find or Replace.
Below is a panel with tabs where you can specify objects where the string should be searched.
On the Text types tab, you can mark types of subordinate objects to be searched. If the configuration is editable for the Managed application run mode (see page 2-1148), user interfaces will be excluded from the object list.
On the Configurations tab, you can specify precisely, down to the object, configuration sections to be searched.

Fig. 29. Global Search
In addition to the master configuration, the list of configurations also includes the database configuration and the repository configuration. The repository configuration must be open before you start the search or replace mode.
To specify a set of objects, select the Selected objects toggle and check the objects to be searched. The first time you run the search, all objects in the list are checked by default. To clear the setting, uncheck the box for the line with the configuration name. Then you can specify particular objects to be searched.
On the Files tab, you can specify directory and file types to be searched. You can view the following types of viewable files: configurations in files (saved configurations and distribution files), external reports and data processors, text and spreadsheet documents. If no directory is specified (the Directories attribute is blank), the system does not search in files. You can also search open documents of the same types. To do so, check Search in open documents.
You can save the selected group of settings for further use. To do so, specify the setting name in the Search scope field. To use the previous setting, simply select the setting name from a dropdown list. The following settings are saved: settings on the Text types tab, the object structure for the main configuration on the Configurations tab, and the settings from the Files tab. If the search mode has been started, press the Find button to begin the search.
You can interrupt global search by pressing Ctrl + Break.
A list of matches found for the source text is displayed in the Search results window.
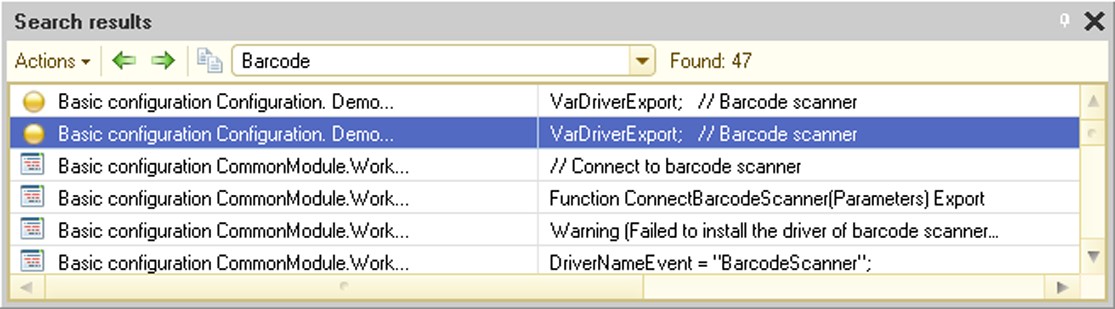
Fig. 30. Global Search Results
If a module has restricted access (see page 2-956), the system requests an access password before searching for the source text in that module. You must enter the correct password or refuse to enter the password. If you do not enter the password, this module is skipped.
You can view search results and go to each occurrence found by selecting the desired line in the search results and pressing Enter. To view the next or previous occurrence, you can use the following menu items: Actions – Next item and Actions – Previous item.
You can copy search results (the entire list) to the clipboard using the Copy command of the context menu or clicking the corresponding button on the toolbar of the search results window; you can also export the results to a text or spreadsheet document.
You can change the column width by using a standard method: dragging the column border while holding down the Ctrl key.
If the replace mode has been started, use the Replace box to enter the text string that will substitute the source text specified in the Find what box.
If you need to view the source text before replacement, click the Ignore button to begin the search. The first found occurrence of the source text will appear on the screen. If you click Ignore, the current text is skipped and the next occurrence of the source text is displayed in the current window or another window containing the source text.
If in case of global replace you do not need to open objects in which the source text is found, check Silent global replace (do not open editors).
IMPORTANT!
While viewing search results, you cannot change search criteria.
The selected search area (types of text, list of configuration objects, files and open documents) is saved and restored the next time you open the dialog box. If you need to save several areas, you need to give each a name in the Search scope attribute. When you reopen the search window, you just have to select the area you need from the list and perform your search.
2.20. CUSTOMIZATION OF DESIGNER WORK SPACE
To create and edit a configuration, you must simultaneously use various windows. For example, configuration objects are viewed, selected, added and deleted in the Configuration window, properties of objects and their components are edited in the properties palette, help on the 1C:Enterprise script is accessed in the Syntax Assistant window, and messages and search results are viewed in the message window. In addition, each configuration object can generally consist of various parts, each of which is edited in a separate window.
Simultaneously opening various service windows noticeably reduces the work space available for editing application objects (forms, modules and templates) and editing shared configuration objects (application module and common modules, templates, styles, interfaces, etc.).
To expand the work space and make your work more convenient, you can use several recommendations on customizing various panels of the Designer, on the display and behavior of various service windows and on the use of window display modes.
2.20.1. Panel Customization
The Designer is intended for maximum use of work space by automatically selecting the needed toolbars for each window type. Thus, when editing a spreadsheet the Designer offers a toolbar with spreadsheet editing commands, but when you switch to a window containing a form module, the Designer closes the spreadsheet toolbar and shows the text editor toolbar.
The user can customize the contents of toolbars and their placement on the screen. If non-default commands are included in the command bar during setup, the order of these commands on the command bar may change once Designer is restarted. In that event, a standard bar shall be hidden. Instead, we recommend that you create an additional command bar and place the required commands in the preferred order. The order of these commands will not change.
In addition to toolbars, the Designer has Window Bar and Status Bar at the bottom. Each of these occupies a separate line and cannot be moved. If any of the bars is not needed, it can be hidden using the context menu from anywhere in any bar. A bar is shown if the check box to the left of its name is selected and is hidden if the box is cleared. To change the bar display mode, just select the line with the bar name in the context menu.
If you do not want the window bar to always occupy a part of the program work space, you can set the Autohide mode. While you are working, the window bar is hidden. You can display it by placing the cursor over the bar location.
2.20.2. Configuration Window
You can open and close the Configuration window at any time. After selecting all the windows you need, you can close the Configuration window. Closing the window does not end your session with the configuration. You can open it at any time.
The initial state of the Configuration window is Docked. In this state it "overlaps" all windows in MDI state (most windows are displayed in this state). To use the area occupied by the Configuration window, you can change its status to MDI (in this case other windows are displayed above the Configuration window) or Autohide (if the window is not needed, it hides automatically and reappears if you put mouse over it).
2.20.3. Use of Window Display Modes
In MDI mode, a window can be placed (it is visible) only within the available work space of the Designer. Using other modes enables you to expand the work space or use it more efficiently. In addition, you can "send" a window outside the boundaries of the work space.
Every window in the Designer (except the Calculator) can be switched to Autohide mode. This mode allows you to select the desired window for viewing and editing simply by moving the cursor to the window title bar. When you are done viewing it, you can minimize the window simply by moving the cursor to any other window or to the title bar of an autohiding window. It's good to use this mode with windows you need briefly (Syntax Assistant, the Configuration window, message and search results window and windows of application objects, spreadsheet and text documents which you open mainly for viewing).
The Floating window state lets you place any window anywhere on the screen, regardless of the size and position of the program (Designer) window.
In the Docked mode, a window can be docked to another window in this state, to one of the sides of the Designer window or above another dockable window (stacked windows).
We recommend combining windows that you do not need to view simultaneously. For example, the properties palette window and the Syntax Assistant window or Immediate window and Call Stack during debugging.
For details on window display modes see page 2-1143.