
Lesson 14. Optimization of Posting the Services Rendered Document
Estimated duration of the lesson is 3 hours 20 minutes.
CONTENT:
- Theory. Specifics of Use of Referential Data.
Improving Posting Performance.
Automatic Cost Calculation.
Theory.
- How to View Query Results Quickly.
Real-Time and Regular Posting of Documents.
Point in Time Concept.
After studying the previous lesson, you have got a solid grasp of the query language, and we will finally get to one of the most important lessons in this book - to optimization of the ServicesRendered document. In particular, we are going to completely overhaul its Posting event handler.
You might ask why it should be done at all. There are three reasons.
First of all, the Posting event handler refers to the ProductType attribute of the Products catalog "by extension". Such a reference can bog down the procedure's execution when working with a large tabular section of a document.
Second is that the management at Jack of All Trades finally decided to wrap up the practice of manually entering the costs of consumables and now wants to switch over to a method of automatic calculation of "average costing" of consumables.
The third is that when ServicesRendered document is posted, we need to monitor balances of products in the warehouse. If the number of products is not sufficient, a warning should be displayed and the document should not be posted.
Therefore, the changes we will make to the ServicesRendered document will accomplish three purposes:
- improving the procedure's execution speed;
- determining the cost of consumables automatically when a document is posted;
- splitting the document posting procedure into real-time and regular modes and monitoring of balances for real-time posting.
Before we proceed to any real tasks, we should briefly discuss the unique features of referential data storage and use within 1C:Enterprise 8.
Theory. Specifics of Use of Referential Data
In this section we will discuss distinctive features of using referential data because access to this data via queries can significantly improve document posting speed and optimize the process.
We will use the term referential data to describe data that is stored in a database and accessed by means of 1C:Enterprise script entities of the Ref type: CatalogRef.<name>, DocumentRef.<name>, etc.
To make the explanation below easier to understand, we will use an example of getting a reference to a product type when posting a ServicesRendered document.
Not all the data stored in the database is referential. This is due to the fact that within the 1C:Enterprise 8 data structure there is a division between data that represents object-based (tangible) things (catalogs, charts of accounts, documents, etc.), and data that represents intangible things (information registers, accumulation registers, etc.).
From the platform's perspective, a certain body of object-based data is defined not only by the values of the fields but by the very fact of its existence as well. In other words, once we delete some body of objectbased data from the database, we will not be able to get the system to the condition it was in prior to such deletion. Even if we recreate the same body of object-based data with exactly the same field values, from the system's perspective, it will be a DIFFERENT body of object-based data.
Every such body of object-based data, which is uniquely recognized by the system, is referred to as a database object.
For the system to distinguish one database object from another, every database object (body of object-based data) has an embedded identifier. Different database objects will always have different identifiers. An identifier is stored along with the rest of the object's data in a special field named Ref.
Non-object data is stored as records, and from the system's perspective they are merely defined by the values of their fields. Therefore, if we delete a certain record, and then write a new one with exactly the same values in all the fields, the database will end up in the same state it was in before the deletion.
Therefore, since we can unambiguously point to each database object, we are able to store that pointer in fields within other database tables, select it in a text box, use it as a query parameter when searching by reference, etc. In all such situations we will use 1C:Enterprise script entity object of the Ref type. In fact, this object only stores an embedded identifier located in the Ref field.
If we use our ServicesRendered document as an example, the field that stores the Product attribute of the tabular section actually simply stores an embedded identifier that points to an item in the Products catalog (fig. 14.1).

Fig. 14.1. Reference to Products catalog item
When Posting event handler for the ServicesRendered document assigns a value of an attribute from Products tabular section to some variable, we actually deal with 1C:Enterprise script entity named DocumentObject.ServicesRendered.
This object contains all the values of all the document attributes and the attributes of its tabular sections.
So the following reference (listing 14.1) results in simple reading of data from RAM in this very 1C:Enterprise script entity (fig. 14.2).
Listing 14.1. Reference to an object attribute
RegisterRecord.Material = CurRowProductList.Product;

Fig. 14.2. Reading data from RAM
However, when we refer to a product type as an attribute of that catalog item that is referenced to in the document's tabular section (listing 14.2), the following happens (fig. 14.3).
Listing 14.2. Reference to a reference attribute
If CurRowProductList.Product.ProductType = Enums.ProductTypes.Material Then

Fig. 14.3. Use of object cache
Since DocumentObject.ServicesRendered object only contains a reference to an item of the Products catalog, and there is no additional information about this item, the platform uses the reference to search object cache for the data of the item corresponding to that reference.
If the object cache does not contain the required data, the system will call to the database to read all the data for the referenced object.
Once all the data stored in the attributes of the desired catalog item and in the attributes of its tabular sections will be read into the object cache, the object cache will return the requested reference stored in the ProductType attribute of the Products catalog.
It is obvious that such a request to the database will take far longer than simply reading from RAM. When filling in the documents interactively, such lags will go unnoticed, compared to the speed a user works with. However when making a large number of calculations (such as when posting large documents containing thousands of rows), the time difference may be noticeable enough.
From the above it follows that if the algorithm for posting documents uses only the data available in the document's attributes (and in its tabular sections), it will be totally sufficient to simply use the document register records wizard (as was the case with the ReceiptOfGoods document).
However, if posting algorithm needs to analyze additional object attributes that are referenced to in the document, and also requires use of totals calculated for registers, we will need to use queries to select data from the database faster.
The same is true for execution of any parts of the program for which performance is critical. The query mechanism better reads the infobase and can select only the required data in one pass. Therefore, for instance, in standard applications you will hardly ever see the 1C:Enterprise script entity named CatalogSelection.<name>. Instead database queries are used everywhere.
Improving Posting Performance
Our first task during this lesson is eliminating harmful statement CurRowProductList.Products.ProductType.
In the Designer Mode
Open the module of the ServicesRendered document.
Below you see the current procedure for posting this document (listing 14.3).
Listing 14.3. Procedure Posting
RegisterRecords.BalanceOfMaterials.Write = True;
RegisterRecords.CostOfMaterials.Write = True;
RegisterRecords.Sales.Write = True;

For Each CurRowProductList In ProductList Do
	If CurRowProductList.Product.ProductType = Enums.ProductTypes.Material Then
		// register BalanceOfMaterials Expense
		Record = RegisterRecords.BalanceOfMaterials.Add();
		Record.RecordType = AccumulationRecordType.Expense;
		Record.Period = Date;
		Record.Material = CurRowProductList.Product;
		Record.Warehouse = Warehouse;
		Record.Quantity = CurRowProductList.Quantity;
		// register CostOfMaterials Expense
		Record = RegisterRecords.CostOfMaterials.Add();
		Record.RecordType = AccumulationRecordType.Expense;
		Record.Period = Date;
		Record.Material = CurRowProductList.Product;
		Record.Cost = CurRowProductList.Quantity * CurRowProductList.Cost;
	EndIf;

	// Sales register
	Record = RegisterRecords.Sales.Add();
	Record.Period = Date;
	Record.Product = CurRowProductList.Product;
	Record.Client = Client;
	Record.Technician = Technician;
	Record.Quantity = CurRowProductList.Quantity;
	Record.Revenue = CurRowProductList.Total;
	Record.Cost = CurRowProductList.Cost * CurRowProductList.Quantity;
EndDo;
In other words, all the data needed to post the document is taken from the document itself. Only to define the nature of products (as products or services) we refer to the database and read the data of the entire Products object (listing 14.4).
Listing 14.4. Reference to products object
CurRowProductList.Product.ProductType
Leaping ahead, we will mention here that this is not all the data that we will need for correct posting of the document that is not contained in the document itself.
This is why we will do as follows: all the products related data contained in the tabular section of the document will be obtained using a database query. And the data related to the document itself (e.g. document data, warehouse) will still be obtained from the document. This approach will make it possible for us to read only the required data and reach the maximum speed for posting of the document.
A query will enable us to receive:
- Products;
- Quantity;
- Total;
- Cost.
The following data will be retrieved from the document:
- Date;
- Client;
- Technician;
- Warehouse.
Now, let us proceed to creating the query. Locate the cursor prior to the loop of searching in the document tabular section and select Query Wizard with Result Processing from the context menu (fig. 14.4).

Confirm that you want to create a new query.
In the query wizard navigate to the Tables and Fields tab and select the table named ServicesRenderedProductList which is the tabular section of the Services Rendered document.
In this table we need the following fields: Product, Products.ProductType, Quantity, Total, and Cost (fig. 14.5).

But we only need the records related to our document instead of all the records of this table.
So navigate to the Conditions tab and define a filter condition to select only the rows of the posted document from the document table.
To do so, drag the Ref field to the list of query criteria (listing 14.5).
Listing 14.5. Filter condition for document table
ServicesRenderedProductList.Ref = &Ref
A reference to this document will be transferred to the parameter of the Ref query (fig. 14.6).
Also note that the same product may have multiple occurrences in a document tabular section.
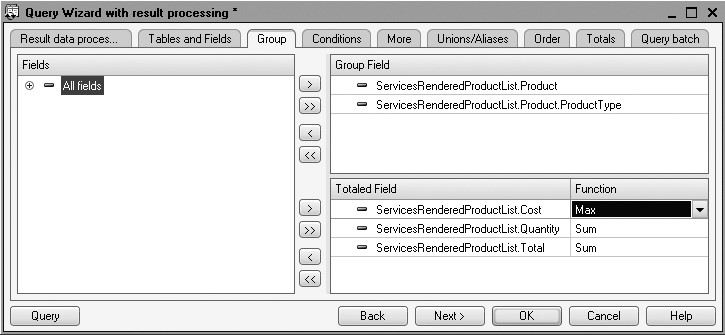
This is why on the Grouping tab we will group the records by the fields Product and ProductsProductType and will calculate the sum for the values in the fields Quantity and Total.

Fig. 14.6. Filter condition for document table
This arrangement makes it possible not to repeat products values with totals calculated by the fields Quantity and Total for every product if tabular section of the document includes multiple rows with the same product.
We will also include the field named Cost in the list of summable fields. This field will be used to calculate the Max function, for example.
We imply that multiple rows with the same products will have the same cost value so the Max function is only needed to obtain one of the available cost values (fig. 14.7).
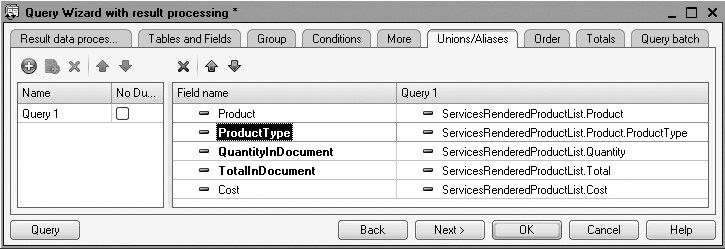
On the Unions/Aliases tab specify the aliases for the fields Quantity and Total as QuantityInDocument and TotalInDocument respectively. For the field ProductsProductType select ProductType as an alias simply to make the query easier to read (fig. 14.8).
Click OK and review the query text generated by the wizard (listing 14.6).
Listing 14.6. Query text
//{{QUERY_BUILDER_WITH_RESULT_PROCESSING
// This fragment was built by the wizard.
// Warning! All manually made changes will be lost next time you use the wizard.
Query = New Query;
Query.Text = "SELECT
	|	ServicesRenderedProductList.Product,
	|	ServicesRenderedProductList.Product.ProductType AS ProductType,
	|	SUM(ServicesRenderedProductList.Quantity) AS QuantityInDocument,
	|	SUM(ServicesRenderedProductList.Total) AS TotalInDocument,
	|	MAX(ServicesRenderedProductList.Cost) AS Cost
	|FROM
	|	Document.ServicesRendered.ProductList AS ServicesRenderedProductList
	|WHERE
	|	ServicesRenderedProductList.Ref = &Ref
	|GROUP BY
	|	ServicesRenderedProductList.Product,
	|	ServicesRenderedProductList.Product.ProductType";

Query.SetParameter("Ref", Ref);
Result = Query.Execute();

SelectionDetailRecords = Result.Choose();

While SelectionDetailRecords.Next() Do
	// Insert selection processing SelectionDetailRecords
EndDo;

//}}QUERY_BUILDER_WITH_RESULT_PROCESSING
You can delete the comments of query wizard in the beginning and at the end of the segment.
Since we used Query Wizard with Result Processing to generate the query, the wizard has also created the code to execute and search in the query records. Now we will discuss this code.
As you already know, working with queries involves use of the 1C:Enterprise script entity named Query. First a new Query object is created and located in the Query variable. Next query text is entered into the Text property of the Query object (Query.Text = ...).
Next the query parameter named &Ref receives a value that is a reference to the document the module we are currently located in belongs to (listing 14.7).
Listing 14.7. Query parameter setup
Query.SetParameter("Ref", Ref);
While SelectionDetailRecords.Next() Do
	// Insert processing of SelectionDetailRecords selection
EndDo;
Next the query is executed (Query.Execute()), the QueryResult object is obtained and its method Select() is executed that creates a selection of records from the query result.
So we receive an object QueryResultSelection that is moved to the variable SelectionDetailRecords.
Next we use the Next() method of this object (SelectionDetailRecords.Next()) we will search in the selection of query records within the loop.
When we execute the query selection method SelectionDetailRe- cords.Next(), on every loop step we position the pointer to the next selection record until the end of the selection is reached.
In order to get a value of some selection field from the query result, we will call for the query fields using a dot separating it from the SelectionDetailRecords variable that contains current row of the query selection. For example: SelectionDetailRecords.Products.
Now we only need to move the lines that earlier existed in the module and described register records so that they are located inside the loop that searches within the query results (listing 14.8).
Listing 14.8. Loop of searching within query records
First replace the comment "// Insert selection processing SelectionDetailRecords" with the check condition and the entire code that creates records for the registers BalanceOfMaterials and CostOfMaterials (listing 14.9).
Listing 14.9. Creating register records
While SelectionDetailRecords.Next() Do
	If CurRowProductList.Product.ProductType = Enums.ProductTypes.Material Then
		// register BalanceOfMaterials Expense
		Record = RegisterRecords.BalanceOfMaterials.Add();
		Record.RecordType = AccumulationRecordType.Expense;
		Record.Period = Date;
		Record.Material = CurRowProductList.Product;
		Record.Warehouse = Warehouse;
		Record.Quantity = CurRowProductList.Quantity;

		// register CostOfMaterials Expense
		Record = RegisterRecords.CostOfMaterials.Add();
		Record.RecordType = AccumulationRecordType.Expense;
		Record.Period = Date;
		Record.Material = CurRowProductList.Product;
		Record.Cost = CurRowProductList.Quantity * CurRowProductList.Cost;
	EndIf;
EndDo;
In the condition replace CurRowProductList.Products with SelectionDetailRecords because the product type is now obtained from the query.
In the register records also replace CurRowProductList with SelectionDetailRecords (listing 14.10).
Listing 14.10. Creating register records
While SelectionDetailRecords.Next() Do
	If SelectionDetailRecords.Product.ProductType = Enums.ProductTypes.Material Then
		// register BalanceOfMaterials Expense
		Record = RegisterRecords.BalanceOfMaterials.Add();
		Record.RecordType = AccumulationRecordType.Expense;
		Record.Period = Date;
		Record.Material = SelectionDetailRecords.Product;
		Record.Warehouse = Warehouse;
		Record.Quantity = SelectionDetailRecords.Quantity;

		// register CostOfMaterials Expense
		Record = RegisterRecords.CostOfMaterials.Add();
		Record.RecordType = AccumulationRecordType.Expense;
		Record.Period = Date;
		Record.Material = SelectionDetailRecords.Product;
		Record.Cost = SelectionDetailRecords.Quantity * SelectionDetailRecords.Cost;
	EndIf;
EndDo;
NOTE
To make it easier to understand, we use bold font for new texts in listings.
Keep in mind that for the Quantity we have created an alias in the query so we will replace it with QuantityInDocument (listing 14.11).
Listing 14.11. Creating register records
While SelectionDetailRecords.Next() Do
	If SelectionDetailRecords.Product.ProductType = Enums.ProductTypes.Material Then
		// register BalanceOfMaterials Expense
		Record = RegisterRecords.BalanceOfMaterials.Add();
		Record.RecordType = AccumulationRecordType.Expense;
		Record.Period = Date;
		Record.Material = SelectionDetailRecords.Product;
		Record.Warehouse = Warehouse;
		Record.Quantity = SelectionDetailRecords.QuantityInDocument;

		// register CostOfMaterials Expense
		Record = RegisterRecords.CostOfMaterials.Add();
		Record.RecordType = AccumulationRecordType.Expense;
		Record.Period = Date;
		Record.Material = SelectionDetailRecords.Product;
		Record.Cost = SelectionDetailRecords. QuantityInDocument * SelectionDetailRecords.Cost;
	EndIf;
EndDo;
Now we will transfer creating records for the Sales register (listing 14.12).
Listing 14.12. Creating register records
While SelectionDetailRecords.Next() Do
	If SelectionDetailRecords.Product.ProductType = Enums.ProductTypes.Material Then
		// register BalanceOfMaterials Expense
		Record = RegisterRecords.BalanceOfMaterials.Add();
		Record.RecordType = AccumulationRecordType.Expense;
		Record.Period = Date;
		Record.Material = SelectionDetailRecords.Product;
		Record.Warehouse = Warehouse;
		Record.Quantity = SelectionDetailRecords.QuantityInDocument;

		// register CostOfMaterials Expense
		Record = RegisterRecords.CostOfMaterials.Add();
		Record.RecordType = AccumulationRecordType.Expense;
		Record.Period = Date;
		Record.Material = SelectionDetailRecords.Product;
		Record.Cost = SelectionDetailRecords. QuantityInDocument * SelectionDetailRecords.Cost;
	EndIf;

	// register Sales
	Record = RegisterRecords.Sales.Add();
	Record.Period = Date;
	Record.Product = CurRowProductList.Product;
	Record.Client = Client;
	Record.Technician = Technician;
	Record.Quantity = CurRowProductList.Quantity;
	Record.Revenue = CurRowProductList.Total;
	Record.Cost = CurRowProductList.Cost * CurRowProductList.Quantity;
EndDo;
Here we will apply the same replacements. Replace CurRowProductList with SelectionDetailRecords (listing 14.13).
Listing 14.13. Creating register records
While SelectionDetailRecords.Next() Do
	If SelectionDetailRecords.Product.ProductType = Enums.ProductTypes.Material Then
		// register BalanceOfMaterials Expense
		Record = RegisterRecords.BalanceOfMaterials.Add();
		Record.RecordType = AccumulationRecordType.Expense;
		Record.Period = Date;
		Record.Material = SelectionDetailRecords.Product;
		Record.Warehouse = Warehouse;
		Record.Quantity = SelectionDetailRecords.QuantityInDocument;

		// register CostOfMaterials Expense
		Record = RegisterRecords.CostOfMaterials.Add();
		Record.RecordType = AccumulationRecordType.Expense;
		Record.Period = Date;
		Record.Material = SelectionDetailRecords.Product;
		Record.Cost = SelectionDetailRecords. QuantityInDocument * SelectionDetailRecords.Cost;
	EndIf;

	// register Sales
	Record = RegisterRecords.Sales.Add();
	Record.Period = Date;
	Record.Product = SelectionDetailRecords.Product;
	Record.Client = Client;
	Record.Technician = Technician;
	Record.Quantity = SelectionDetailRecords.Quantity;
	Record.Revenue = SelectionDetailRecords.Total;
	Record.Cost = SelectionDetailRecords.Cost * SelectionDetailRecords.Quantity;
EndDo;
The query fields Sum and Quantity should be replaced with TotalInDocument and QuantityInDocument respectively (listing 14.14).
Listing 14.14. Creating register records
While SelectionDetailRecords.Next() Do
	If SelectionDetailRecords.Product.ProductType = Enums.ProductTypes.Material Then
		// register BalanceOfMaterials Expense
		Record = RegisterRecords.BalanceOfMaterials.Add();
		Record.RecordType = AccumulationRecordType.Expense;
		Record.Period = Date;
		Record.Material = SelectionDetailRecords.Product;
		Record.Warehouse = Warehouse;
		Record.Quantity = SelectionDetailRecords.QuantityInDocument;

		// register CostOfMaterials Expense
		Record = RegisterRecords.CostOfMaterials.Add();
		Record.RecordType = AccumulationRecordType.Expense;
		Record.Period = Date;
		Record.Material = SelectionDetailRecords.Product;
		Record.Cost = SelectionDetailRecords.QuantityInDocument * SelectionDetailRecords.Cost;
	EndIf;

	// register Sales
	Record = RegisterRecords.Sales.Add();
	Record.Period = Date;
	Record.Product = SelectionDetailRecords.Product;
	Record.Client = Client;
	Record.Technician = Technician;
	Record.Quantity = SelectionDetailRecords.QuantityInDocument;
	Record.Revenue = SelectionDetailRecords.TotalInDocument;
	Record.Cost = SelectionDetailRecords.Cost * SelectionDetailRecords.QuantityInDocument;
EndDo;
The remaining part of the loop searching within the tabular section can be removed (listing 14.15).
Listing 14.15. Unneeded lines
For Each CurRowProductList In ProductList Do

EndDo;
This will result in the following appearance of the posting procedure (fig. 14.16).
Listing 14.16. Procedure posting
Procedure Posting(Cancel, Mode)

	RegisterRecords.BalanceOfMaterials.Write = True;
	RegisterRecords.CostOfMaterials.Write = True;
	RegisterRecords.Sales.Write = True;

	Query = New Query;
	Query.Text =
	"SELECT
	|	ServicesRenderedProductList.Product,
	|	ServicesRenderedProductList.Product.ProductType AS ProductType,
	|	ServicesRenderedProductList.PropertySet,
	|	SUM(ServicesRenderedProductList.Quantity) AS QuantityInDocument,
	|	SUM(ServicesRenderedProductList.Total) AS TotalInDocument,
	|	MAX(ServicesRenderedProductList.Cost) AS Cost)
	|FROM
	|	Document.ServicesRendered.ProductList AS ServicesRenderedProductList
	|WHERE
	|	ServicesRenderedProductList.Ref = &Ref
	|GROUP BY
	|	ServicesRenderedProductList.Product,
	|	ServicesRenderedProductList.Product.ProductType";

	Query.SetParameter("Ref", Ref);
	Result = Query.Execute();

	SelectionDetailRecords = Result.Choose();

	While SelectionDetailRecords.Next() Do
		If SelectionDetailRecords.Product.ProductType = Enums.ProductTypes.Material Then
			// register BalanceOfMaterials Expense
			Record = RegisterRecords.BalanceOfMaterials.Add();
			Record.RecordType = AccumulationRecordType.Expense;
			Record.Period = Date;
			Record.Material = SelectionDetailRecords.Product;
			Record.Warehouse = Warehouse;
			Record.Quantity = SelectionDetailRecords.QuantityInDocument;

			// register CostOfMaterials Expense
			Record = RegisterRecords.CostOfMaterials.Add();
			Record.RecordType = AccumulationRecordType.Expense;
			Record.Period = Date;
			Record.Material = SelectionDetailRecords.Product;
			Record.Cost = SelectionDetailRecords. QuantityInDocument * SelectionDetailRecords.Cost;
		EndIf;

		// register Sales
		Record = RegisterRecords.Sales.Add();
		Record.Period = Date;
		Record.Product = SelectionDetailRecords.Product;
		Record.Client = Client;
		Record.Technician = Technician;
		Record.Quantity = SelectionDetailRecords.QuantityInDocument;
		Record.Revenue = SelectionDetailRecords.TotalInDocument;
		Record.Cost = SelectionDetailRecords.Cost * SelectionDetailRecords.QuantityInDocument;
	EndDo;

EndProcedure
In the 1C:Enterprise Mode
Now run 1C:Enterprise in the debugging mode, repost the Services Rendered documents and make sure nothing has changed.
So we have accomplished the first step on our list: eliminated the necessity of reading all the data in the Products object and thus streamlined the posting procedure.
Automatic Cost Calculation
Now we will proceed to the second step on the plan.
Up to this point we entered the cost of consumed materials manually to the Services Rendered document when the document was created.
Now we will define the cost of products using average values: for every product its total summary cost is divided by the number of such products available in order to get an average cost of one unit of such products.
To execute such a calculation, we will need additional data that we do not have now.
For every product in the tabular section we will need:
- Its cost stored in the register CostOfMaterials.
- Total number of such products in all the warehouses that is sorted in the register BalanceOfMaterials.
Hence we will need to adjust our query so that it gets such data from the database as well.
We need the query to retrieve the following fields for every product in the document (fig. 14.9).

Fig. 14.9. Query fields definition
The first four fields can be obtained (in fact, they are already obtained) from the tabular section of the document itself, while the latter two fields will need to be obtained from other database tables:
- Cost - from the register CostOfMaterials,
- Balances in all the warehouses - from the register BalanceOfMaterials (fig. 14.10).

Fig. 14.10. Definition of query fields and tables
This means that our query should include two left joins of the document table with other tables:
- The first left join with the table named AccumulationRegister.CostOfMaterials.Balance,
- The second left join with the table named AccumulationRegister.BalanceOfMaterials.Balance.
Now it seems that everything is ready to generate the query.
But note one important aspect: in the suggested arrangement virtual tables will return costs and balances for all the products. And we only need this information for the products available in our document.
This might not be noticeable in a small database because the number of unique products in a catalog is similar to the number of unique products in a document.
But imagine a real-life database now. Suppose the Products catalog includes 15,000 items. And the document only includes 5 items. So as a result the virtual table will work heavily to calculate the cost (or balance) for all the 15,000 products and as a result we will only take 5 lines out of 15,000 lines of cost (or balance) after this table is connected using the left join with the document table. These will be the lines for those products that are specified in the document. The remaining 14,995 lines will simply be discarded so it was a waste of efforts to calculate them.
In real life such wastage is not acceptable and this query is far from optimal. So we should add a filter condition to all the virtual tables that will be used in order to only select the products contained in the tabular section of our document. In this situation cost and balance will only be calculated for the required products instead of all the products.
This will result in the following pattern of the query (fig. 14.11).
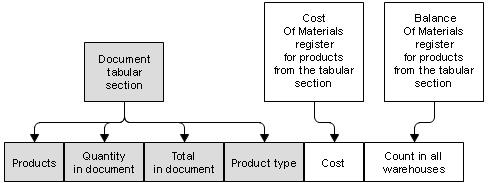
Fig. 14.11. Query pattern
Note that both virtual tables use the list of products from the document tabular section (data is calculated only for this list).
Besides, not all the data is taken from the document tables: instead, only the data related to our specific document is used. In order to avoid generating this list trice (once for the document and again for every virtual table), we can generate it in advance to later use in the relevant query conditions.
Temporary tables will help here.
A temporary table is a program object that can be created by a developer and populated with data for queries to use when needed. For example, they can be used to overlap some complex condition as you see in our situation.
This results in the following query pattern (fig. 14.12).

Fig. 14.12. Query pattern
So, let us proceed.
In the Designer Mode
The first thing to do is remove Cost attribute of the Services Rendered document because we will not need it anymore.
To do so, open the configuration object editor for the Services Rendered document, navigate to the Data tab, expand the list of document tabular section attributes, highlight Cost and click Delete in the command bar (fig. 14.13).
You should also delete the corresponding field from the ProductList table located in the form.
To do so, open the DocumentForm form for the Services Rendered document and in the items structure window highlight the table field ProductListCost and click Delete on the command bar (fig. 14.14).

Fig. 14.13. Removing a tabular section attribute

Fig. 14.14. Removing a tabular section field
Now we will deal with the query.
We will generate the temporary table using the query that we have already created.
Open the module of the ServicesRendered document.
In the Posting() procedure prior to query generation we will create a temporary table manager and specify that this query will use the manager (listing 14.17).
Listing 14.17. Using temporary tables manager
RegisterRecords.BalanceOfMaterials.Write = True;
RegisterRecords.CostOfMaterials.Write = True;
RegisterRecords.Sales.Write = True;

// Create temporary tables manager
TTManager = New TempTablesManager;

Query = New Query;
// Specify which temporary tables manager is used by this query
Query.TempTablesManager = TTManager;
Query.Text =
"SELECT
|	ServicesRenderedProductList.Product,
We will also modify the query so that it creates a temporary table to be stored in the temporary tables manager named TTManager.
For the query wizard to be able to open our query, we will need to remove the following line from it (as we do not have the Cost field any more) (listing 14.18):
Listing 14.18. Query modification
| MAX(ServicesRenderedProductList.Cost) AS Cost,
We will also delete a comma in the end of the previous line (listing 14.19):
Listing 14.19. Query modification
| SUM(ServicesRenderedProductList.Total) AS TotalInDocument,
Now locate the cursor inside the query text, e.g. on the word SELECT and use Query Wizard command from the context menu. The respective query text will be displayed in the form of query wizard (fig. 14.15).

To put query results into a temporary table, navigate to the Advanced tab and check Create temporary table.
Enter the name for the temporary table: DocumentProducts (fig. 14.16).

Fig. 14.16. Creating a temporary table
Click OK and review the text generated by the query wizard (listing 14.20).
Listing 14.20. Query text
"SELECT
|	ServicesRenderedProductList.Product,
|	ServicesRenderedProductList.Product.ProductType AS ProductType,
|	ServicesRenderedProductList.PropertySet,
|	SUM(ServicesRenderedProductList.Quantity) AS QuantityInDocument,
|	SUM(ServicesRenderedProductList.Total) AS TotalInDocument
|INTO DocumentProducts
|FROM
|	Document.ServicesRendered.ProductList AS ServicesRenderedProductList
|WHERE
|	ServicesRenderedProductList.Ref = &Ref
|GROUP BY
|	ServicesRenderedProductList.Product,
|	ServicesRenderedProductList.Product.ProductType";
There is only one new line here (listing 14.21):
Listing 14.21. Creating a temporary table
| INTO DocumentProducts
This line means that query results will be saved in the temporary table named DocumentProducts.
Now if we specify the same temporary tables manager named TTManager for another query, we will be able to refer to data of this temporary table in such a query.
So we are done with the first portion of the plan: created a query that copies data of the document tabular section to a temporary table (fig. 14.17).
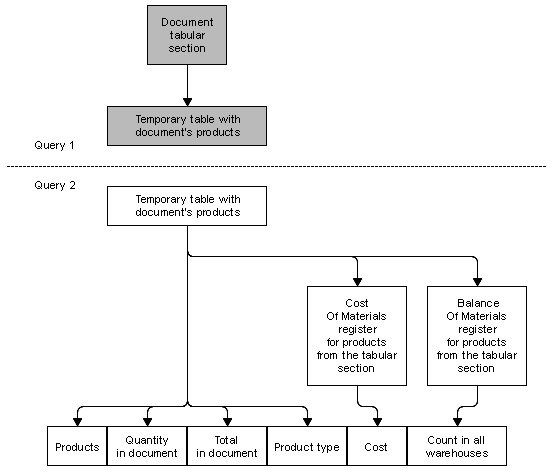
Fig. 14.17. Creating the first query
Now we will proceed to designing the second query.
Put the cursor into the line following the operator Result = Query.Execute();
(this is where a temporary table is created) and create a blank for our future query (listing 14.22).
Listing 14.22. Creating the second query
Query2 = New Query;
Query2.TempTablesManager = TTManager;
Query2.Text ="";
So you have created a new Query object and specified the same temporary tables manager for this query so that it could refer to the temporary table you have already created.
Now put the cursor inside the quotation marks and use Query Wizard from the context menu. Confirm your intention to create a new query.
Since the intention is to select the data from the existing temporary table, define this temporary table in the query. To do so, click Create Temporary Table Description over the list of Tables (fig. 14.18).

Fig. 14.18. Creating a temporary table description
In the window that opens enter a name for the temporary table: DocumentProducts, and add field definitions:
- Product, type CatalogRef.Products;
- ProductType, type EnumRef.ProductType;
- QuantityInDocument, type Number, 15, 3;
- TotalInDocument, type Number, 15, 2.
Click OK.
This results in the following definition of the temporary table (fig. 14.19).
Select all the fields from this table and click the Query button (fig. 14.20).

Fig. 14.19. Creating a temporary table description
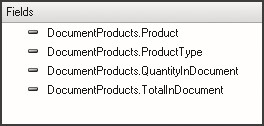
Fig. 14.20. Selected fields of temporary table
The query text will look as follows (listing 14.23):
Listing 14.23. Text of the second query
SELECT
	DocumentProducts.Product,
	DocumentProducts.ProductType,
	DocumentProducts.QuantityInDocument,
	DocumentProducts.TotalInDocument
FROM
	DocumentProducts AS DocumentProducts
So you have created the first portion of the second query: selected information from the temporary table (fig. 14.21).
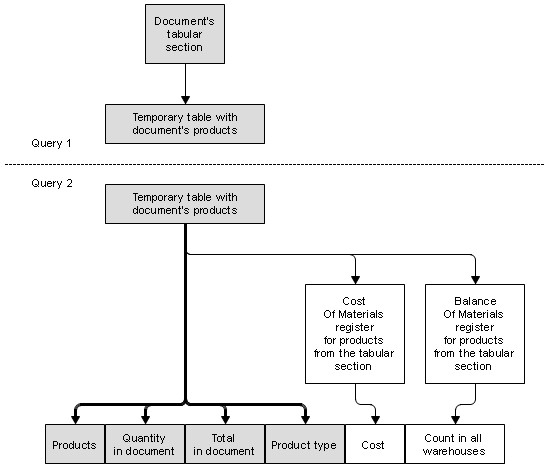
Fig. 14.21. Creating the second query
Now we will use left joins to connect this statement to tables of balances.
Start with Cost of Materials.
Add a virtual table named AccumulationRegister.CostOfMaterials.Balance to the list of query tables.
Select BalanceCost field from this table.
Go to the Links tab and define a connection between the tables.
We will select all the records from the temporary table and the field Product of the temporary table should match the field Material of the balances table (fig. 14.22).

It is important not to forget to introduce a limitation for the virtual table so that only the products from our temporary table are selected.
To do so, return to the Tables and Fields tab, highlight the table named CostOfMaterialsBalance and click Virtual Table Parameters under the list of tables.
Define Condition parameter as follows (listing 14.24):
Listing 14.24. Virtual Table Condition
Material IN (SELECT DocumentProducts.Product FROM DocumentProducts)
This means that material should be in the list of products selected from the temporary table.
LEARN MORE!
Be careful in how you use virtual query tables. Be particularly mindful of using parameters of such tables as much as possible.
For example, in our case, we could have avoided using the Condition parameter, and instead limited the selected fields in the query itself, by using the BY condition to set products from the document equal to materials from the balance table. Technically it would have provided us with exactly the same results, but it would be very different in performance from the method we use.
What happens in our option is that the virtual table will give us exactly the same number of records as the number of unique products in the posted document. If you set no conditions, the virtual table will provide us with records for all the products that are available in the accumulation register. Then within the query itself, we would need to select only those few records that we actually need from this enormous number of records.
Clearly, the second option would take longer to complete, and the execution time for such a query would depend less on the quantity of data contained in the document (the actual amount of data to be processed), but rather on the size of the accumulation register.
Aside from the fact that this option affects the configuration performance, it may happen that the two approaches produce different results. This could totally happen when using the virtual table of the SliceLast information register. For more details about this aspect, see the Information and Technical Support (ITS) disk, the article titled "Using Filters in Queries with Virtual Tables."
Click Query button and review the query text generated by the wizard (listing 14.25).
Listing 14.25. Query text
SELECT
	DocumentProducts.Product,
	DocumentProducts.ProductType,
	DocumentProducts.QuantityInDocument,
	DocumentProducts.TotalInDocument,
	CostOfMaterialsBalance.CostBalance
FROM
	DocumentProducts AS DocumentProducts
LEFT JOIN AccumulationRegister.CostOfMaterials.Balance(, Material IN
				(SELECT DocumentProducts.Product FROM DocumentProducts)) AS CostOfMaterialsBalance
	ON DocumentProducts.Product = CostOfMaterialsBalance.Material
So we have added product cost to the earlier selected fields (fig. 14.23).
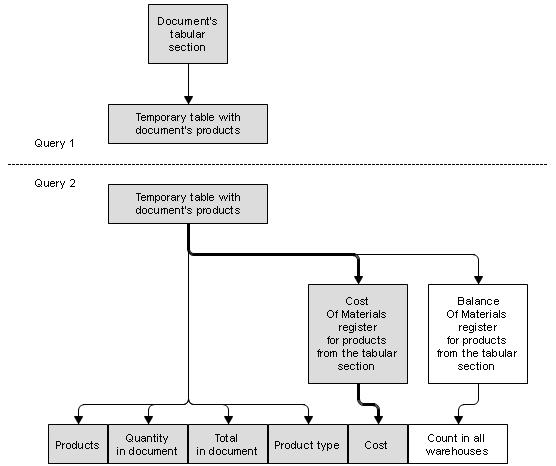
Fig. 14.23. Creating the second query
Now we will add a virtual table of balances for the register BalanceOfMaterials.Balance that we should use to select the field BalanceQuantity.
Go to the Links tab and define a connection between the tables.
We will select all the records from the temporary table and the field Product of the temporary table should match the field Material of the balances table (fig. 14.24).

Fig. 14.24. Relations between tables
We will also define parameters for the virtual table named BalanceOfMa- terialsBalance.
Populate the Condition parameter with the following code (listing 14.26).
Listing 14.26. Virtual table condition
Material IN (SELECT DocumentProducts.Product FROM DocumentProducts)
This results in the following query text (listing 14.27).
Listing 14.27. Query text
SELECT
	DocumentProducts.Product,
	DocumentProducts.ProductType,
	DocumentProducts.QuantityInDocument,
	DocumentProducts.TotalInDocument,
	CostOfMaterialsBalance.CostBalance,
	BalanceOfMaterialsBalance.QuantityBalance
FROM
	DocumentProducts AS DocumentProducts
	LEFT JOIN AccumulationRegister.BalanceOfMaterials.Balance(
							,
							Material IN
							(SELECT
								DocumentProducts.Product
							FROM
								DocumentProducts)) AS BalanceOfMaterialsBalance
		ON DocumentProducts.Product = BalanceOfMaterialsBalance.Material
	LEFT JOIN AccumulationRegister.CostOfMaterials.Balance(
							,
							Material IN
							(SELECT
								DocumentProducts.Product
							FROM
								DocumentProducts)) AS CostOfMaterialsBalance
		ON DocumentProducts.Product = CostOfMaterialsBalance.Material
So we have added balances of products in all the warehouses to the earlier selected fields (fig. 14.25).

Fig. 14.25. Creating the second query
Finally navigate to the Unions/Aliases tab and enter the field aliases as follows (fig. 14.26): BalanceCost - Cost; BalanceQuantity - Quantity.

Fig. 14.26. Field aliases
This results in the following query text (listing 14.28).
Listing 14.28. Query text
SELECT
	DocumentProducts.Product,
	DocumentProducts.ProductType,
	DocumentProducts.QuantityInDocument,
	DocumentProducts.TotalInDocument,
	CostOfMaterialsBalance.CostBalance AS Cost,
	BalanceOfMaterialsBalance.QuantityBalance AS Quantity
FROM
	DocumentProducts AS DocumentProducts
	LEFT JOIN AccumulationRegister.BalanceOfMaterials.Balance(
						,
						Material IN
						(SELECT
							DocumentProducts.Product
						FROM
							DocumentProducts)) AS BalanceOfMaterialsBalance
		ON DocumentProducts.Product = BalanceOfMaterialsBalance.Material
	LEFT JOIN AccumulationRegister.CostOfMaterials.Balance(
						,
						Material IN
						(SELECT
							DocumentProducts.Product
						FROM
							DocumentProducts)) AS CostOfMaterialsBalance
		ON DocumentProducts.Product = CostOfMaterialsBalance.Material
The final thing to do with our query is providing for the situation where a product is available in the catalog but without any balance or cost information. For example, this can happen when a product has already been added to the catalog but has not been delivered to the company yet.
In this situation left joins with virtual tables will return nothing. Using query language, it means that NULL values will be in the cost and quantity fields.
For convenience of working with query results, we will eliminate such values right in the query itself.
To do so, apply ISNULL() to the Cost and Quantity fields. If a value of a field is NULL, the function will return 0. In other situations the field value will be returned.
Navigate to the Tables and Fields tab, highlight the field CostOfMaterialsBalance.BalanceCost and click Change Current Item (fig. 14.27).

Fig. 14.27. Changing field value in a query
In the window that opens edit the field value as follows (listing 14.29) (fig. 14.28).
Listing 14.29. Expression for Field Calculation in a Query
ISNULL(CostOfMaterialsBalance.CostBalance, 0)

We will use the same steps for another field: BalanceOfMaterialsBalance.BalanceQuantity.
Click OK. The query text will now be inserted into the module (listing 14.30).
Listing 14.30. Query text
Query2.Text = "SELECT
|	DocumentProducts.Product,
|	DocumentProducts.ProductType,
|	DocumentProducts.PropertySet,
|	DocumentProducts.QuantityInDocument,
|	DocumentProducts.TotalInDocument,
|	ISNULL(CostOfMaterialsBalance.CostBalance, 0) AS Cost,
|	ISNULL(BalanceOfMaterialsBalance.QuantityBalance, 0) AS Quantity
|FROM
|	DocumentProducts AS DocumentProducts
|	LEFT JOIN AccumulationRegister.CostOfMaterials.Balance(,
|				Material IN
|				(SELECT
|					DocumentProducts.Product
|				FROM
|					DocumentProducts)) AS CostOfMaterialsBalance
|		ON DocumentProducts.Product = CostOfMaterialsBalance.Material
|	LEFT JOIN AccumulationRegister.BalanceOfMaterials.Balance(,
| 				Material IN
|				(SELECT
| 					DocumentProducts.Product
|				FROM
|					DocumentProducts)) AS BalanceOfMaterialsBalance
| 		ON DocumentProducts.Product = BalanceOfMaterialsBalance.Material";
The only thing you will need to do is add query execution statement after it (listing 14.31).
Listing 14.31. A fragment of the Posting() procedure
...
Query2 = New Query;
Query2.TempTablesManager = TTManager;
Query2.Text = "SELECT
| DocumentProducts.Product,
...
| ON DocumentProducts.Product = CostOfMaterialsBalance.Material";

Result = Query2.Execute ();

SelectionDetailRecords = Result.Choose();
...
Now we will deal with recording register records.
All the earlier created operators will operate without changes.
The only thing we will need to change is how cost is obtained. We used to take it directly from the document but now we will need to calculate it based on the value received using the query.
Cost of a material is calculated by dividing the total cost obtained with the query (Cost) by the total quantity of material available in all the warehouses (Quantity).
But we have already mentioned that a situation can occur where the Quantity field contains 0 and one cannot divide by 0. So right after the beginning of the loop searching in query results, we will calculate cost for the current product (listing 14.32).
Listing 14.32. A fragment of the Posting() procedure
While SelectionDetailRecords.Next() Do
	If SelectionDetailRecords.Quantity = 0 Then
		MaterialCost = 0;
	Else
		MaterialCost = SelectionDetailRecords.Cost / SelectionDetailRecords.Quantity;
	EndIf;
	If SelectionDetailRecords.ProductType = Enums.ProductTypes.Material Then
...
Now we will replace cost calculation in the records of the registers CostOfMaterials and Sales (listing 14.33).
Listing 14.33. A fragment of the Posting() Procedure
While SelectionDetailRecords.Next() Do
	If SelectionDetailRecords.Quantity = 0 Then
		MaterialCost = 0;
	Else
		MaterialCost = SelectionDetailRecords.Cost / SelectionDetailRecords.Quantity;
	EndIf;

	If SelectionDetailRecords.ProductType = Enums.ProductTypes.Material Then

		// register BalanceOfMaterials Expense
		Record = RegisterRecords.BalanceOfMaterials.Add();
		Record.RecordType = AccumulationRecordType.Expense;
		Record.Period = Date;
		Record.Material = SelectionDetailRecords.Product;
		Record.PropertySet = SelectionDetailRecords.PropertySet;
		Record.Warehouse = Warehouse;
		Record.Quantity = SelectionDetailRecords.QuantityInDocument;

		// register CostOfMaterials Expense
		Record = RegisterRecords.CostOfMaterials.Add();
		Record.RecordType = AccumulationRecordType.Expense;
		Record.Period = Date;
		Record.Material = SelectionDetailRecords.Product;
		Record.Cost = SelectionDetailRecords.QuantityInDocument * MaterialCost;
	EndIf;

	// register Sales
	Record = RegisterRecords.Sales.Add();
	Record.Period = Date;
	Record.Product = SelectionDetailRecords.Product;
	Record.Client = Client;
	Record.Technician = Technician;
	Record.Quantity = SelectionDetailRecords.QuantityInDocument;
	Record.Revenue = SelectionDetailRecords.TotalInDocument;
	Record.Cost = MaterialCost * SelectionDetailRecords.QuantityInDocument;
EndDo;
Now everything seems to be fine but there is still one important issue.
The result will be correct when a document is first posted.
But if an already posted document is reposted for some reason, the result will be wrong.
The thing is that when we are in the document posting event handler and the document has already been posted, the database contains register records from this document.
So if cost and the Balance Of Materials are read from the database, they will be retrieved in compliance with the register records applied by this very document earlier. And this is absolutely wrong.
In order to read database data in the document posting event handler without taking into account previous register records that could be applied by this document, we should add empty record sets to the register we intend to read from before actual reading procedure.
In our situation the registers are accumulation registers CostOfMaterials and BalanceOfMaterials.
So add two lines as follows prior to execution of the second query:
Listing 14.33a. A fragment of the Posting() procedure
...
|         ON DocumentProducts.Product = BalanceOfMaterialsBalance.Material";

// Write empty record sets to read balances  without data in the document.
RegisterRecords.CostOfMaterials.Write();
RegisterRecords.BalanceOfMaterials.Write();
Result = Query2.Execute ();
In the 1C:Enterprise Mode
Now run 1C:Enterprise in the debugging mode, repost all the Services Rendered documents and make sure data is recorded in the registers correctly.
Theory
How to View Query Results Quickly
In the process of modifying posting procedure for the ServicesRendered document, we have approached writing quite complex queries.
It may frequently be needed to make sure that some data read from the database with a query is correct and view such data in a table.
It can be easily accomplished in the Designer. We will discuss this feature using the query from our posting handler.
After a query is executed (Query2), we need query results to be dumped to a value table (VT) (listing 14.34).
Listing 14.34. A fragment of the Posting() procedure
...
Result = Query2.Execute ();
VT = Result.Unload();
SelectionDetailRecords = Result.Choose();
...
To do so, locate a breakpoint in the following statement (SelectionDe- tailRecords = Result.Select()).
Run 1C:Enterprise in the debugging mode and repost one of the Services Rendered documents. For example, it could be document No. 2.
When code execution is interrupted, double-click the word VT to highlight it and click Calculate expression (Shift + F9) on the Configuration Debugging toolbar.
This will open expressions preview window with the VT value table.
A value table is a collection so in order to view its content, highlight the row VT in the Result window and click Show Values in Separate Window (or press F2) over the results window (fig. 14.29).
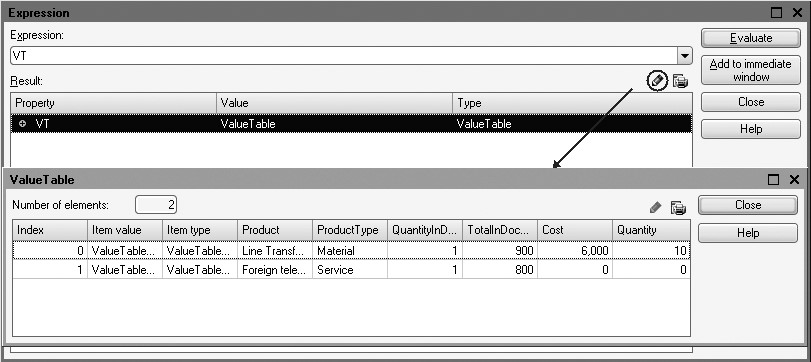
Fig. 14.29. Viewing values table with the query results
You will see the entire values table containing the results of query execution.
Using the button Output list, you can export this values table to a spreadsheet document if you want to analyze such data or save it for comparison.
When you preview the query results in such a manner, do not forget to remove the breakpoint in the document posting procedure and either comment (or remove) the added line that exports query results into a values table. We do not need it for normal performance of the document.
Real-Time and Regular Posting of Documents
Now we will discuss some special features that are related to the fact that in the posting event handler we will also monitor sufficient availability of materials in the warehouse when a document is posted.
We will not to do it all the time. This applies only to real-time posting of a document. But we will not do it for regular posting. So what are real-time and regular posting modes intended for? What is the arrangement of realtime posting mechanism?
In developing of configuration on the 1C:Enterprise 8 platform, we use the concept of real-time and regular document posting. This concept is used for real-time accounting purposes (e.g. for warehouse products accounting) and makes it possible to arrange for proper handling of documents in reallife conditions. But you can disable this feature (forbid real-time document posting) and implement your own algorithms, check documents relevancy on a timeline, etc.
This concept means that users can work in two fundamentally different modes.
Real time posting of documents by users is carried out in real time mode, i.e. it reflects changes and facts being performed on the spot. Real-time posting is particularly relevant in multi-user operations. Therefore, for this posting mode we need to apply the maximum number of checks to prevent errors when accepting user input.
For example, in real-time posting, we need to monitor the on-hand balances for listed products in order to prevent a single item from being sold simultaneously by multiple sales reps.
The mode document posting (real-time or regular) is defined by the document date. If the date of the posted document matches current date, such a document will be posted in real-time mode without any prompts. It is possible to understand it in the posting event handler to create a specific algorithm for document posting.
If the date of the posted document is before current date, such a document will be posted in regular mode. At that the user will see a message that such a document cannot be posted in real-time mode (in case of a user error). Regular posting will be executed when the user confirms their intention to execute regular posting with a date in the past.
Regular posting of documents means that the facts that took place in the past or are certain to happen in the future are reflected in the database. Therefore, regular document posting is intended to simply reflect data on completed operations in the infobase.
When regular document posting is used, a number of checks can be skipped, especially monitoring of balances. Naturally, if errors were made during regular document posting (such as issuing a number of products not available in the warehouse on the posting date), analysis of the resulting database state is a separate task, unrelated to regular posting and performed independently of that process. Instead, this process takes place when the database has sufficient data for analysis, i.e. when earlier receipt of goods documents are entered.
Hence real-time posting is intended to determine whether or not an operation is possible in real-time mode in a multi-user environment (and execute the operation if possible). By contrast, regular posting allows us to unconditionally record in the database the operations that are already completed or will certainly be completed.
Sometimes you may want to post a document with some date in the future in order to reflect some events that are certain to happen in the future. In this situation you will be prevented from posting a document with a date in the future if this document is allowed to use real-time posting. You will simply be warned that real-time posting is not available for this document without any other options to choose from. So you will either need to replace document date with current date (in this situation the document is posted in real time) or with a date in the past (for regular posting to be applied to the document upon additional user confirmation). So if the logics of accounting suggest that some document should be posted with a date in the future, real-time posting feature should be disabled for this document in the metadata (on the Register Records tab of the configuration object editor).
The concepts of real-time timestamp and point in time are connected to real-time document posting. We will not need this information right now but this is a good chance to discuss it now that we talk about real-time posting.
Point in Time Concept
A document attribute named Date is used to establish its place in time. A date includes time with one second precision. This makes it possible to manage the sequence of recording documents. However, when a large number of documents is created, there will probably be situations where multiple documents have identical dates (i.e. created in the same second). How does one determine the sequence of document creation in this situation?
The point in time concept has been introduced to deal with this very problem. A point in time is compiled based on the date, time and a reference to a database object. This concept lets us explicitly identify any reference type database object, but it generally only applies to documents. The point in time also makes it possible to identify non-object data, such as register records that are subordinate to a recorder.
The moment in time concept is implemented in the 1C:Enterprise script using the universal PointInTime object. This object has the properties Date and Ref, which let us get the "components" for the point in time, and a single method - Compare() which enables comparison of two points in time. Besides, a PointInTime object has a wizard and can be created explicitly for any reference type database object.
For some documents that have identical dates and times, their sequence in time is established by the system based on the references to these documents. It may not even match the sequence of how documents were created and it cannot be edited by the user. Hence it is impossible to influence how documents are arranged within one second in any way or calculate that one document was created before another.
The system generates a real-time timestamp for each instance of real-time document posting. Its value is generated based on the current time and the last real-time timestamp generated.
If the last real-time timestamp that was generated is less than the current time, the current time will be used as the new real-time timestamp.
If the last real-time timestamp was equal to or greater than the current time, the real-time timestamp will be set to a value one second greater than the old real-time timestamp.
So if a Document configuration object has real-time posting enabled (fig. 14.30), the following actions will be implemented by the system.

Fig. 14.30. Enabling real-time document posting
- When a new document is created, the system assigns it a current date and "null" time.
- When such a document is posted (with the current date), real-time timestamp is used as the document date automatically.
- If posting of the document is cancelled and then the document is reposted (without changing the date), an updated real-time timestamp will be assigned to the document.
- If you try to repost a document, you will be prompted to specify the type of posting to be used (real-time or regular):
- If real-time posting is selected, a new real-time timestamp will be assigned automatically.
- If regular posting is selected, the previous document time will be preserved.
- If you try to post (or repost) a document with real-time posting enabled using a date before the current date, a message will be displayed indicating that real-time posting is impossible and suggesting to use regular posting for the document (i.e. retaining existing time and date for the document).
Monitoring Balances
The general method of balance monitoring upon posting of documents is as follows: first you need to write register records generated by the document without any checks and then read balance values from the database.
If a negative balance value is returned, such a document cannot be posted. Instead a user should be warned about missing materials while document posting should be cancelled.
If no negative balance values emerge, a document can be posted without hesitation.
We are actually half-finished: we create document register records and write them. The only thing we still need to do is monitor the effects for real-time posting and cancel document posting if negative balance value is retrieved.
In the Designer Mode
Let us create a blank first. Add the following lines after the loop of searching in query results and before the procedure end (listing 14.35).
Listing 14.35. A fragment of the Posting() procedure
	...
	EndDo;
	RegisterRecords.Write();

	If Mode = DocumentPostingMode.RealTime Then
		// Check negative balance
	EndIf;
EndProcedure
First we write records in the registers.
Next we determine document posting mode. When Posting() procedure is executed, the second parameter (Mode) transfers document posting mode to this procedure and the value of the variable is compared to the value of system enumeration named DocumentPostingMode. For real-time posting balance monitoring will be applied.
Now we will create a blank for the query to check for negative balance.
Since once again we will only get balance values for the products available in the document, we will specify that this query will use the same temporary tables manager named TTManager (listing 14.36).
Listing 14.36. A fragment of the Posting() procedure
If Mode = DocumentPostingMode.RealTime Then
	// Check negative balance
	Query3 = New Query;
	Query3.TempTablesManager = TTManager;
	Query3.Text = "";
EndIf;
Locate cursor inside the quotation marks and open the query wizard. Confirm your intention to create a new query.
Select the table named BalanceOfMaterials.Balance and two fields from this table: Material and BalanceQuantity.
Define parameters for this table. Enter the following code to the Condition parameter (listing 14.37).
Listing 14.37. Virtual table condition
Material IN (SELECT DocumentProducts.Product FROM DocumentProducts) AND Warehouse = &Warehouse
This code means that we only get totals for the products available in the temporary table and only for the warehouse specified in the document.
Next on the Conditions tab move the field BalanceOfMaterialsBalance. QuantityBalance into the list of conditions, check Arbitrary and define that we only want to know about negative balance values (listing 14.38).
Listing 14.38. Query condition
BalanceOfMaterialsBalance.QuantityBalance < 0
Click OK. The query text will look as follows (listing 14.39):
Listing 14.39. Query text
// Check negative balance
Query3 = New Query;
Query3.TempTablesManager = TTManager;

Query3.Text = "SELECT
|	BalanceOfMaterialsBalance.Material,
|	BalanceOfMaterialsBalance.QuantityBalance
|FROM
|	AccumulationRegister.BalanceOfMaterials.Balance(,
|						Material IN
|						(SELECT
|							DocumentProducts.Product
|						FROM
|							DocumentProducts)
|						AND Warehouse = &Warehouse) AS BalanceOfMaterialsBalance
|WHERE
|	BalanceOfMaterialsBalance.QuantityBalance < 0";
Now we only need to define query parameter, search within query results and display messages regarding negative balance values (listing 14.40).
Listing 14.40. A fragment of the Posting() procedure
	Query3 = New Query;
	Query3.TempTablesManager = TTManager;
	Query3.Text = "SELECT
	|	BalanceOfMaterialsBalance.Material,
	 ...
	|WHERE
	|	BalanceOfMaterialsBalance.QuantityBalance < 0";

	Query3.SetParameter("Warehouse", Warehouse);

	Result = Query3.Execute();
	SelectionDetailRecords = Result.Choose();

	While SelectionDetailRecords.Next() Do
		Message = New UserMessage();
		Message.Text = "Yet " + String( - SelectionDetailRecords.QuantityBalance)  + " pieces of """ + SelectionDetailRecords.Material + """ required.";
		Message.Message();
		Cancel = True;
	EndDo;
EndIf;
Now we will briefly describe the added code.
During this check the warehouse specified in the document is transferred to the query in the Warehouse parameter.
Next the query is executed to obtain negative balance of products available in the temporary table and in the warehouse specified in the Warehouse parameter.
Next the selection of query records is searched within the loop and if such records are found, appropriate messages are displayed.
Note that Cancel parameter of the document posting procedure is assigned the value True, which means that the document is not posted, the transaction is cancelled and the state of data modified in the process of posting is returned to the initial state (existing prior to document posting attempt).
Locking of Data That are Read and Modified upon Posting
It may seem this is it. However, there is still a very important issue we have not taken care of.
Now the procedure has the following pattern:
1. We execute the first query named Query. This results in generation of a temporary table based on the list of products in the document.
2. We execute the second query named Query2. This results in reading cost and balance for products available in the tabular section of the document.
3. We write register records (RegisterRecords.Write()).
4. We execute the third query named Query3. This is how we check availability of negative balance values.
Note that from the beginning of the second query execution and down to the end of this procedure we need to ensure that product cost and balance values we are operating with will not change and will not even be available for other transactions to read. Obviously the system will lock this data from modification but such a lock will only be initiated when register records are written.
But the following situation is possible. When we execute the second query, we read that there are two pieces of some material. Another transaction (another user) that intends to spend materials, also reads availability of 2 pieces of this material. Next we write register records and the system locks the data. Another transaction waits for us to release the data. We post the document, withdraw 2 pieces of the material and release the data. Another transaction also attempts to withdraw 2 pieces of the material but the material is not available anymore!
A similar situation is also possible between steps 3 and steps 4. As a result, balance monitoring will perform improperly.
So to avoid such collisions, we need to lock balance values from reading by other transactions even before the second query is executed. So before reading any data that we intend to modify, we also need to prevent other transactions from reading the data until our modifications are completed (or until document posting is cancelled).
In the Designer Mode
How does one do it? This is definitely a good question. Let us review the configuration property named Data Lock Control Mode. This property currently has the Managedvalue (fig. 14.31).

Fig. 14.31. Data lock control mode in configuration properties
This means that we need to use managed locks that are defined using 1C:Enterprise script tools.
So we need to lock the data we intend to read and subsequently modify.
To do so, register record sets have a property named LockForUpdate that we will use here.
Insert this code before writing empty record sets (listing 14.41).
Listing 14.41. A fragment of the Posting() procedure
...
|         ON DocumentProducts.Product = BalanceOfMaterialsBalance.Material";

//Set the necessity to lock data in the CostOfMaterials and BalanceOfMaterials registers
RegisterRecords.CostOfMaterials.LockForUpdate = True;
RegisterRecords.BalanceOfMaterials.LockForUpdate = True;

// Write empty record sets to read balances without data in the document.
RegisterRecords.CostOfMaterials.Write();
RegisterRecords.BalanceOfMaterials.Write();

Result = Query2.Execute();
Managed lock will be applied at the moment of writing these record sets, i.e. immediately prior to execution of the second query. This is exactly what we wanted to achieve.
In the 1C:Enterprise Mode
Launch 1C:Enterprise in the debugging mode and test the new Posting event handler by reposting all the Services Rendered documents.
From the user's perspective, everything operates in exactly the same manner but document posting is arranged better and more efficiently from the data access perspective.
Theory. Understanding Cache
In the section "Distinctive Features of Referential Data" we have already mentioned that the platform has some cache that stores object data read from the database. Now we will discuss this feature in more details.
1C:Enterprise 8 uses a method for caching database objects that have been read from a database when using object techniques.
Hence when we call for the attributes of some object by reference, the call goes to the object cache located in RAM.
The object cache consists of two parts: transactional cache and standard cache. Which cache is used depends on whether the reference is made in the context of a transaction or not (fig. 14.32).

Fig. 14.32. Object cache
All the data in the cache is intended to be read only (ReadOnly). This means that all the data that is read by reference will be handled via object cache, while writing will be handled by the mechanism of software objects themselves.
Standard Cache
If after a call to standard cache the required data cannot be located, the object data will be read from the database and stored in the cache. In this case, a link to the database object will serve as the unique identifier for the cache. Therefore, the data for each read object can exist in the cache in one of two forms: either all the objects data, or an object presentation.
This means that if we go to the cache to get an object's presentation, and cache contains the information for our reference, that data will be taken from the cache (if the entire object is in the cache, the required presentation will be taken from the object's data).
If the cache does not contain information for our reference, only the fields required to create the object presentation will be read from the database.
If we go to the cache to get an object attribute, and the cache contains information for our reference, what comes next will depend on the contents of the cache.
If the cache contains the entire object, the attribute value will be read from the cache. If the cache contains object presentation, it will be deleted from the cache and all the object data will be read into the cache. If we go to the cache for an object attribute and the cache contains no information for our reference, all the object's fields will be read from the database.
The read data will remain in the cache until one of the following events occurs:
- The read data is forced out of the cache by data that is read for other objects (cache overflow);
- The next time we call to the cache, it turns out that the read data has been modified in the database;
- The 20-minute time out period expires.
All the read data is kept in a sequential queue and, since the size of the cache is limited, the oldest data will be replaced in the cache by the most recent data.
Upon subsequent calls for data that has already been read into the cache, the system will check the elapsed time since the data entered the cache.
If the call is within 20 seconds after the data arrived, the data is considered valid. If the elapsed time is longer than 20 seconds, the system will check that the version of the data stored in the cache matches the version in the database.
If the data versions do not match (if the data in the database has been changed), the data will be deleted from the cache and reread from the database. The next 20 second data validity period is counted from that point.
In addition to the above events, read data will be deleted from the cache 20 minutes after it was last read from the database.
So if we execute two operators in sequence (listing 14.42) where Product is a reference to a catalog item, execution of the second operator will take much less time because in the first case database query will be used while for the second operator data will be read from RAM (object cache).
Listing 14.42. Operator sequence
A = Product.Description;

B = Product.ProductType;
Transactional Cache
If a data call occurs in the context of a transaction, it will be redirected to the transactional cache. All the operations related to data modifications in the database are executed within transactions in 1C:Enterprise 8. For example, document posting event handler is executed within a transaction.
A transaction is an indivisible sequence of data manipulations that brings the database from one integral condition to a new one. So if for some reason one of the transaction actions cannot be accomplished, the database returns to the status it was in prior to the transaction (transaction rollback occurs - Rollback).
The transactional cache is essentially the same sequential queue as the standard cache. The difference is that all the data in the transactional cache is valid (definitely current).
When reading data into the transactional cache, the data in the database is locked, so there is no way it can be changed until the transaction is complete.
The transactional cache stores read data until it is replaced by subsequently read data or until the transaction is completed. Upon completion of a transaction, the cache will be cleared while the actions performed at the moment depend on the completion status of the transaction.
If the transaction was successfully completed (Commit), the data of all the objects in the transactional cache are moved over to the standard cache and the transactional cache is cleared (fig. 14.33).

Fig. 14.33. Successful completion of a transaction
If changes were canceled (Rollback), they will simply be cleared from the transactional cache (fig. 14.34).

Fig. 14.34. Clearing transactional cache upon rollback
Quiz
- How does 1C:Enterprise calls to referential data?
- How is object cache used?
- Why is it better to use queries to access large amounts of infobase data?
- What is a point in time?
- What is the difference between real-time document posting and regular posting?
- What is a real-time timestamp?
- How does one use a query to get the balances in an accumulation register?
- What should one pay particular attention to when defining the parameters for virtual query tables?
- Why is it not required to monitor balances when posting documents in regular mode?
- What are the meaning and purpose of temporary tables?
- What is a query manager?
- How can one use temporary tables in virtual table parameters?
- How is it accomplished?
- How does one apply software data locks?
- How does one preview query results in the debugger?