
Lesson 22. User List and Their Roles
Estimated duration of the lesson is 1 hour.
CONTENT:
- What a Role is.
Creating Roles.
- Administrator.
Director.
Technician.
Payroll Accountant.
Accountant.
Rights to Launch Client Applications.
Now that we have created all the major objects of the configuration, we can proceed to defining user roles. Administration of 1C:Enterprise user list and assigning roles in compliance with their job responsibilities is a very important issue in arranging the application interface in general and in distinguishing roles and actions of individual users. This is the topic of this lesson.
Until now we had full access to all the application sections and to all the configuration objects and commands used in the sections. However, when users work with the application in real life, one of the important tasks for the application is to restrict user access to some information stored in the infobase.
For example, managers will obviously need to have full access to all the information in the database, while stock clerks, by contrast, only need access to the information regarding receipts and expenses of products in the warehouses without being able to access accounting or human resources information.
Additionally, there needs to be a way to restrict the actions that users can perform on database objects. For example, stock clerks can create and modify receipts since it is their responsibility to account for materials within the company. Technicians may need to view the ReceiptOfGoods in order to know which products have been received and when. However, technicians do not need the ability to make any changes in those receipts.
What a Role is
A configuration object named Role is used to define such permissions. Using this object, a developer can describe a set of rights to execute some actions with every database object and the configuration as a whole.
As a rule, roles are created separately for each type of activity, and every user is assigned one or more roles.
When a user is assigned multiple roles, granting of access will be accomplished using the following algorithm:
- If any of the roles has the permission, access will be granted;
- If permission is denied in all the roles, no access will be granted.
Creating Roles
In the Designer Mode
When creating roles, we generally start out by deciding what kind of information access various groups of users will need. To do so, we will assign roles by subsystems, which will make our job a lot easier.
Administrator
The first role we will create will be that of an Administrator. This role should include full rights for operations with infobase data.
Expand the Common branch of the configuration object tree.
Highlight the Roles row and add a new Role configuration object.
Enter a name as Administrator (fig. 22.1).

This opens the rights editor for the role (fig. 22.2).
In the left pane the object list lists all the objects and types of configuration objects while the permission window lists available rights for the selected object and configuration object types.
An administrator should have rights for all the objects and all the object types. To do so, use the Actions4Grant All Rights in the command bar of the window.
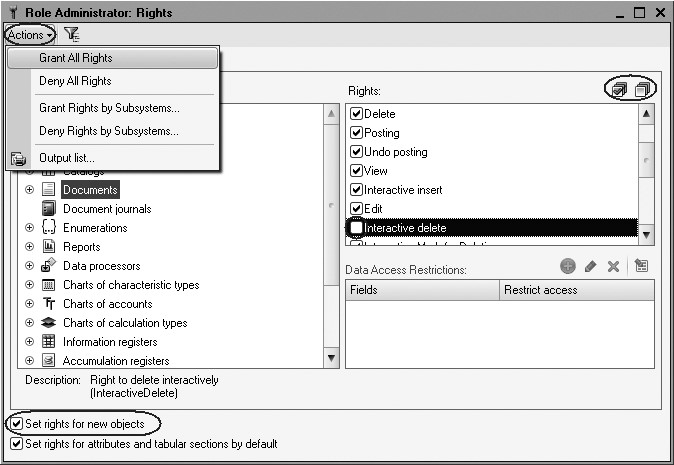
Fig. 22.2. Rights editor for the Administrator role
All the rights for all the objects will be checked.
But you can check or clear a specific configuration object using the Check All Items and Uncheck All Items buttons under the permission window.
The only thing we will do is remove the right for interactive deletion of all the objects. This is required to prevent an administrator from deleting some database object inadvertently.
To do so, scroll through all the configuration object types (Catalogs, Documents, etc.) and clear Interactive Delete (see fig. 22.2).
For the Administrator to be able to operate the objects created after assigning permissions, check Set rights for new objects parameter for this role (see fig. 22.2).
This completes creating the Administrator role.
Director
The next role we will create will be that of Director.
Create a new Role configuration object named Director.
It is fine with us that the new role does not have access rights for all the objects except for the configuration object types that do not have any objects created. For such configuration objects, full rights remain in effect. Enable the right Export for the entire configuration (fig. 22.3).

Now we only need to go through the configuration objects by type and enable View right (the Read and Use rights will be enabled automatically when we do so).
Now expand the Common branch, highlight the Subsystems branch and check the View right for all the subsystems but Enterprise. In doing so, we have granted the right to view all the infobase data to the director but excluded all the actions that do not relate to application part of the configuration as the configuration logics suggest.
The second role in our configuration is now complete.
Technician
The next role we will create will be that of Technician.
Add a new Role configuration object named Technician.
Use the command Actions 4 Grant Rights By Subsystems and select the subsystems named GoodsManagement and RenderingServices.
This will grant all the rights to configuration objects that belong to these subsystems.
If you now filter objects for the GoodsManagement and RenderingServices subsystems, you can make the following refinements in the rights settings (fig. 22.4).

In particular, for the Employees catalog, we will deny the rights Insert, Edit, and Delete.
Note that, when you prohibit the right to Insert, the right to Interactive Insert is cleared as well, since it is a subset of the right to Insert. In the same manner, subsets of rights are prohibited when the rights to edit and delete are revoked. Additionally, we will again clear Interactive Delete permission for all the database objects.
Now scroll through all the types of configuration objects and clear the Interactive Delete right for them all.
Now remove the filter and apply all the permissions but Interactive Delete for the following configuration objects:
- ProductTypes catalog,
- AdditionalProductProperties catalog,
- ProductProperties chart of characteristic types,
- ProductPropertyValues information register.
Do not link these objects to any subsystems but keep in mind that they will be needed to work with product characteristics.
The Technician role is ready now.
Payroll Accountant
Finally, all we have left to do is create two roles: Accountant and PayrollAccountant.
We will divide up permissions for calculating payroll and for accounting.
The thing is that there is an accountant and an assistant accountant at the Jack of All Trades. The assistant primarily works with calculating payroll, but sometimes the chief accountant works on that task as well.
Therefore the chief accountant will need to have both roles, while the assistant will only need the role of PayrollAccountant. Create a new Role configuration object named PayrollAccountant.
In the rights editor assign the permissions for the Payroll subsystem (and do not forget to deny Interactive Delete).
Also set the right to View for the configuration object Accumulation Register Sales.
The PayrollAccountant role is ready now.
Accountant
To wrap it up, we will create a Role configuration object named Accountant.
In the rights editor set the rights for the Accounting subsystem.
Next filter the list of objects by that subsystem and deny the rights to add, edit, and delete for the Products catalog.
Also deny the Interactive Delete right for all the objects.
Now remove the filter and apply all the permissions but Interactive Delete for the following configuration objects:
- ExtraDimension catalog,
- Management accounting register.
Also set the right to View for the following configuration objects:
- Warehouses catalog,
- ProductTypes catalog,
- AdditionalProductProperties catalog,
- ProductProperties chart of characteristic types,
- ProductPropertyValues information register.
Rights to Launch Client Applications
Finally, set the rights to launch a client application for every role.
To do so, we will use another tool that is more convenient for the purpose - the All Roles editor.
In the configuration object tree highlight the Roles branch and select All Roles from the context menu.
In the configuration object tree highlight the root and for all the roles set the Thin Client right (fig. 22.5).

Fig. 22.5. List of rights for the Accountant role
So you have now enabled all the users to connect to the infobase only using the thin client. An administrator can connect using other client applications as well. For example, an administrator may need it to create a job scheduler discussed in the "Job Scheduler" section.
You can get the list of rights for each role using Actions > Output List command in the rights editor (fig. 22.6).

Fig. 22.6. List of rights for the Accountant role
You can also get the same list for all the roles available in the configuration from the All Roles editor.
Adding New Users
To be able to tell one user from another when they work with the infobase, 1C:Enterprise offers a user list.
This list supports creating and deleting users, assigning roles to users, etc.
In the Designer Mode
Before
you proceed to creating users, you first need to update the database
configuration (Configuration > Update
Database Configuration (F7)  ) because a user can only be assigned the roles that exist in
the database configuration.
) because a user can only be assigned the roles that exist in
the database configuration.
After you complete the update, select Administration > Users command from the main menu.
This will open the list of users that exist in the system. This list is currently empty so add a new user (Actions > Add) or click Add in the command bar of the window (fig. 22.7).
User editor window is opened (fig. 22.8).

Fig. 22.7. User list
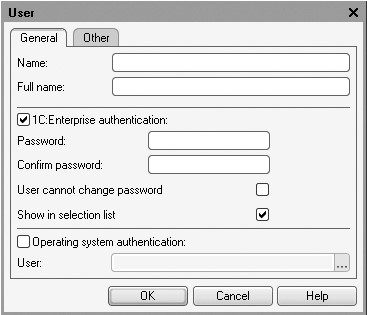
Fig. 22.8. User editor
CAUTION
If you use training version of the 1C:Enterprise 8.2 platform, you will be unable to specify user passwords or use OS authentication tools. These are the limitations of the training version.
User Name is an identifier that will appear in the user selection list when the system is launched in the 1C:Enterprise mode.
Full Name - a string that can be used within the configuration when outputting various reference information. It is generally recommended to fill in a full name using first name, middle name, and last name of a user (without abbreviations).
The next two panes of the window are used to manage user authentication.
1C:Enterprise Authentication Tools means that when the system starts up, users are prompted to select a user name and enter a password. If the password provided matches the one stored in the system for that user ID, the system launches with the rights that have been set for that user. After login the user will be able to modify their password unless User cannot change password is checked.
OS Authentication means that when the 1C:Enterprise 8 launches, no additional information is required from the user. 1C:Enterprise 8 determines the user account the operating system runs under and then goes to its own list of users. If a user that corresponds to the current operating system user is identified in the list, the infobase opens with the rights specified for that user.
Now proceed to creating users.
Enter a full name Administrator for the Administrator user name.
Move on to the Other tab.
Check the Administrator role and select English for the configuration language (fig. 22.9).

Click OK.
Next create the rest of the system users (fig. 22.10). For each user apply 1C:Enterprise authentication and English language.

NOTE
If some columns, e.g. Roles, are not visible in the user list, you can set the list up using Actions > List Options... and add the required columns.
Note that the chief accountant Estepan Delgado is assigned two roles: PayrollAccountant and Accountant, since in addition to accounting functions, he will need to be able to calculate payroll.
You can view the list of registered users using Actions > Output List... command.
Record- and Database Field-Level Data Access Restrictions
In the end of this lesson we will demonstrate how you can restrict data access with further precision. The precision can be determined by the data stored in the infobase.
To make it possible, 1C:Enterprise 8 offers data access restriction on the level of database records and fields. This tool makes it possible to specify more specific infobase data that the user will be able to access with the four major rights (read, insert, edit, and delete).
To do so, you can use a special language that is itself a subset of the query language.
Next we will use the Employee Accruals document to review a small example where technicians should be granted the opportunity to view their wages but are not allowed by the management to access the information on bonuses accrued.
In other words, technicians should be prevented from viewing the Employee Accruals documents that include records concerning bonuses.
In the Designer Mode
To achieve the goal, first grant the Technician role the View right for the EmployeeAccruals document.
Since the document belongs to the Payroll subsystem, also grant the right to view this subsystem.
Also grant the rights to view WorkScheduleTypes catalog and Main Accruals chart of calculation types because these objects are linked to by the EmployeeAccruals document.
Return to editing the Technician role.
As you can see, after you granted the View right, the Read right for the EmployeeAccruals documents has been assigned automatically.
Highlight it.
In the lower right portion of the screen you can see the Data Access
Restriction field.

Fig. 22.11. Adding access restriction for the Technician role
The idea is to forbid access to all the fields of the Employee Accruals document.
So you should not select the fields but should instead click the selection button in the Access Restriction field (fig. 22.12).

Fig. 22.12. Opening access restrictions editor
This opens the Access Restriction window where you can enter the code using a special language that is a subset of the query language.
To simplify the process, use the query wizard.
Click Query Wizard.
This opens the data access restrictions wizard. It is similar to query wizard (see fig. 22.13).
The EmployeeAccruals table is automatically included in the Tables and Fields tab and the wizard is opened on the Conditions tab.
Move the CalculationType field of the Accruals tabular section to the list of conditions, check Arbitrary and populate the right-hand part of the condition as shown in the listing 22.1 (fig. 22.13).
Listing 22.1. Data access restriction
	EmployeeAccruals
WHERE
	EmployeeAccruals.Accruals.CalculationType <> VALUE(ChartOfCalculationTypes.MainAccruals.Bonus)
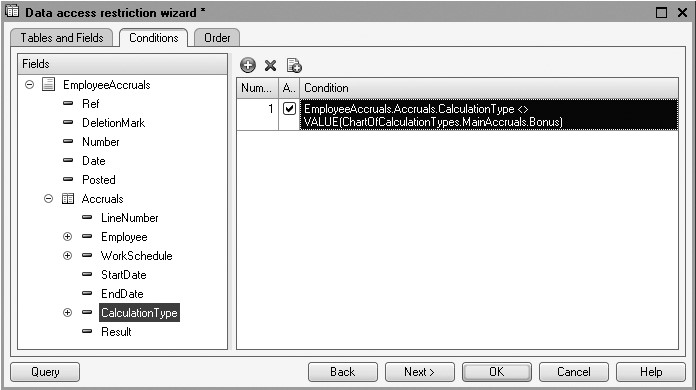

Fig. 22.14. Data access restriction code
Current user can only read or edit some database object if data access restriction grants such a right to this user. Hence the restriction condition should be true.
In our situation the user will be able to read the Employee Accruals document:
EmployeeAccruals WHERE...
Only if its tabular section named Accruals: ... WHERE EmployeeAccruals.Accruals ...
Are calculation types:
... WHERE EmployeeAccruals.Accruals.CalculationType ...
That is not a Bonus calculation type:
... <> VALUE(ChartOfCalculationTypes.MainAccruals.Bonus)
Click OK.
The data access restrictions window for the Technician role will look as follows (fig. 22.15).
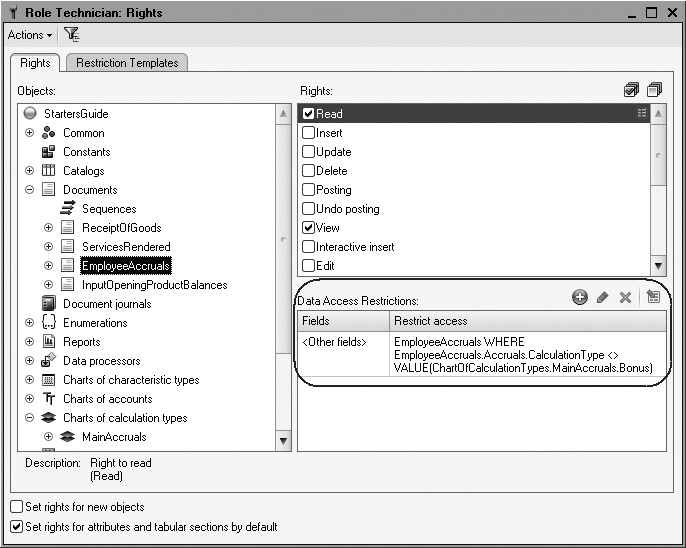
Fig. 22.15. Access restriction for the Technician role
In the 1C:Enterprise Mode
Update the infobase by pressing F7 and start 1C:Enterprise for a user with the Technician role, e.g. for the Alexander D. Johnson user name.
In the Payroll section open the list of EmployeeAccruals documents (fig. 22.16).
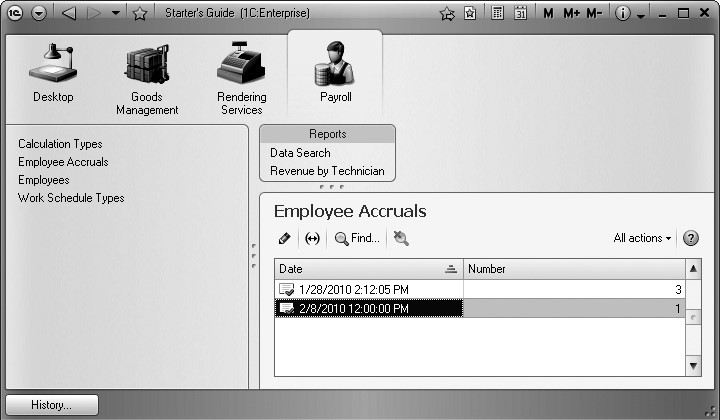
Fig. 22.16. List of Employee Accruals documents
As you can see, the list only includes the documents Nos. 1 and 3 because the document No. 2 accrues the bonuses.
Now we will complicate the task. We still do not want a technician to see the accrued bonuses but at the same time we do not want to hide the fact that such a document exists at all.
In other words, a technician should be able to see the document in the list of documents but should be unable to open it.
In the Designer Mode
Return to the Designer and review our restriction.
We have not specified any fields so the restriction applies to all the document fields (see fig. 22.15).
So now we will unconditionally allow to read those document fields that are required to display the document in the list.
This is how we will enable display of the document in the list. But since we will not remove the existing condition for other fields, the user will still be able to open the document only if its tabular section includes calculation types other than Bonus.
Add another condition to access restriction.
Select the following fields from the list of fields:
- Reference;
- DeletionMark;
- Number;
- Date;
- Posted;
In the access restriction enter WHERE TRUE (fig. 22.17).

Fig. 22.17. Specifying data access restrictions for the Technician role
Close the rights editor.
In the 1C:Enterprise Mode
Update the infobase by pressing F7 and start 1C:Enterprise for a user with the Technician role, e.g. for the Alexander D. Johnson user name.
In the Payroll section open the list of EmployeeAccruals documents (fig. 22.18).
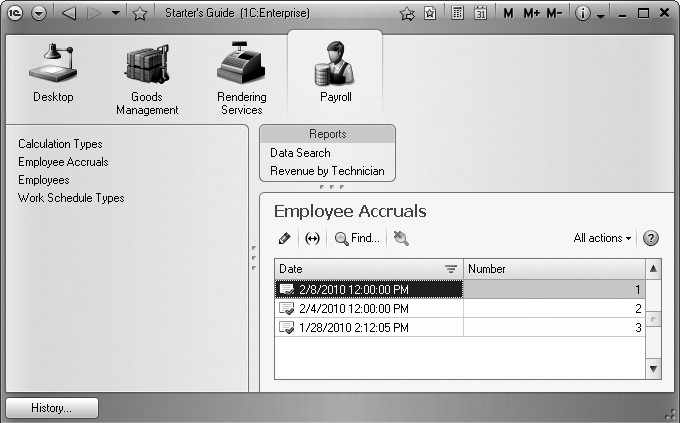
Fig. 22.18. Specifying data access restrictions for the Technician role
In the list of documents you will see all the documents related to accruals. You can also open and view the documents Nos. 1 and 3 but if you attempt to open the document No. 2, an access violation message will be displayed (fig. 22.19).
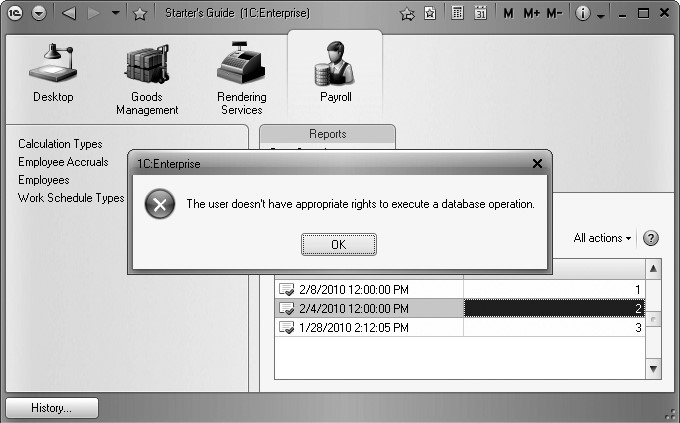
Fig. 22.19. Specifying data access restrictions for the Technician role
So we have reached our goal.
Now pay attention to the following issue.
Everything is fine while the document No. 2 only contains records related to bonus calculation. But remember the idea of our access restriction: a user will only be able to read the Employee Accruals document if its tabular section named Accruals includes calculation types other than Bonus.
This means that if such a document contains calculation types other than Bonus, a technician will be able to open and view this document.
Try this.
Run 1C:Enterprise under the Administrator user account.
In the Payroll section open the list of EmployeeAccruals documents.
Open the document No. 2 and copy any of its rows. In the new row replace calculation type with Salary. Post and close the document.
Terminate the session.
Now run 1C:Enterprise under the Alexander D. Johnson user name.
In the same manner in the Payroll section open the list of EmployeeAccruals documents.
Open the document No. 2. The document will be opened and you will see all its rows.
In the Designer Mode
Return to the Designer.
To prevent viewing of the document in such a situation, you will need to edit the existing data access restriction as well.
The new condition will be more complex so we will also demonstrate how templates are used in data restrictions.
Now open the Technician role and navigate to the Templates tab (fig. 22.20).

Fig. 22.20. Specifying data access restrictions for the Technician role
Here add a new template named ThereIsBonus.
The template code will look as follows:
Listing 22.2. Data access restriction
SELECT
	1
FROM
	Document.EmployeeAccruals.Accruals
WHERE
	Document.EmployeeAccruals.Accruals.CalculationType = VALUE (ChartOfCalculationTypes.MainAccruals.Bonus)
	AND Document.EmployeeAccruals.Accruals.Ref = #Parameter(1).Ref
By its nature the code is a query to the tabular section of the EmployeeAccruals document which will either retrieve nothing or will retrieve a single-field record that will contain 1 as its value.
This record will be retrieved if the document tabular section includes the Bonus calculation type.
The second condition in the query serves to specify the document that includes the tabular section we want to work with. In this condition we use the opportunity to specify parameters in the template:
Listing 22.3. Data access restriction
AND Document.EmployeeAccruals.Accruals.Ref = #Parameter(1).Ref
#Parameter(1) will be replaced with the line specified when this template is called for in the data access restriction.
Now return to the Rights tab.
In the existing access rights restriction replace the previous code with a new one (listing 22.4).
Listing 22.4. Data access restriction
DocAccruals WHERE NOT 1 IN(#ThereIsBonus("DocAccruals"))
Here the statement #ThereIsBonus("DocAccruals") calls for our template. The template code will simply be inserted into this location while the DocAccruals line will replace the first parameter of the template (#Parameter(1)).
As we have mentioned above, if a tabular section includes an accrual named Bonus, the query in the template will retrieve a single record with 1 as its value.
This is why this condition (see listing 22.4) will enable us to read the DocAccruals when the template query does not return 1: ... WHERE NOT 1 IN (#ThereIsBonus("DocAccruals"))
So it happens when the tabular section does not contain any Bonus accrual.
We could have actually coded this restriction condition directly without using templates.
But such a listing would have been more complicated (listing 22.5) and templates also enable us to separate some parts of restriction conditions that can be used in various conditions instead of repeating them everywhere.
Listing 22.5. Data access restriction
DocAccruals WHERE NOT 1 IN(
				SELECT
					1
				FROM
					Document.EmployeeAccruals.Accruals
				WHERE
					Document.EmployeeAccruals.Accruals.CalculationType = VALUE (ChartOfCalculationTypes.MainAccruals.Bonus)
			AND Document.EmployeeAccruals.Accruals.Ref = #Parameter(1).Ref)
Close the rights editor.
Now test how it works.
In the 1C:Enterprise Mode
Update the infobase by pressing F7 and run 1C:Enterprise under the Alexander D. Johnson user name.
In the Payroll section open the list of EmployeeAccruals documents.
As you remember, the document No. 2 includes rows both with the Bonus calculation type, and with the Salary calculation type. Until now you could open the document.
Try to open it now.
You will see an access violation message which is exactly what we intended to have (see fig. 22.19).
In the Designer Mode
Since this example involving access rights restriction on the level of database records and fields was more for demonstration, return to the initial state of the configuration.
Remove Read right for the EmployeeAccruals document for the Technician role.
Remove View right for the Payroll subsystem.
Remove Read right for the WorkScheduleTypes catalog and for the Main Accruals chart of calculation types.
Run 1C:Enterprise under the Administrator user account.
In the Payroll section open the list of EmployeeAccruals documents.
Open the document No. 2 and remove the last row (the one we added when working on the example). Post and close the document.
Quiz
- What is the Role configuration object intended for?
- How does one create a role using subsystems of a configuration?
- How does one create a user list and specify their rights?
- What is the difference between 1C:Enterprise authentication and operating system authentication?