
Lesson 20. Executing Jobs by a Schedule
Estimated duration of the lesson is 1 hour.
CONTENT:
CAUTION
If you use a training version of the 1C:Enterprise 8.2 platform, you will only be able to partially test the example discussed during this lesson. To fully test the example, you need to run two client sessions simultaneously: job scheduler and normal user session.
The training version only supports running of one user session. This is why you can only test their operations separately. First you can run the job scheduler and make sure that scheduled jobs are launched. Next close the scheduler session and open a normal user session to execute data search.
Any infobase of 1C:Enterprise 8 requires a specific set of scheduled operations to be executed periodically.
For example, when you modify existing data or add new data, you need to use backup. In this case if a failure results in an inoperable infobase, the majority of data could be restored from a backup copy. So the more frequently you use backup, the less data you will need to reenter if a failure occurs.
Another example: in order to be able to use full text search in a database, you need all the data to search in to be indexed. This means that full text index should be regularly updated. How frequently? It depends on how intensive the processes involving data modification and adding new data are. But it is obvious that some specific interval should be used.
To automate such operations, 1C:Enterprise 8 offers the jobs mechanism. It enables you to create jobs. Every job is a specific sequence of actions described using 1C:Enterprise script. You can create a schedule for every job and the job will be executed automatically in compliance with the schedule.
At this lesson we will see how jobs operate using two scheduled operations related to the full text search: full text indexing operations and indices merge operations.
We will now describe the operations using 1C:Enterprise script, will create schedules for automatic execution and will learn how to ensure automatic execution of the tasks in compliance with a schedule if file mode 1C:Enterprise 8 operation variant is used.
The Task at Hand
At the previous lesson you learned that to enable full text search, a full text index is required. A full text index is only created once and should be updated regularly.
In reality, a full text index includes two indices: main and supplementary. When full text search is carried out, both indices are searched in. The difference is as follows.
The main index is designed to ensure maximum search speed with large data volume. But the disadvantage is that data is added to the main index quite slowly.
The supplementary index is a direct opposite of the main index: data is added to the supplementary index fast but if the data volume in the supplementary index is significant, search itself will be carried out relatively slowly.
Availability of the main and supplementary indices suggests the following use strategy. The majority of data is located in the main index which enables quite a rapid search. New data (either modified or added) is added to the supplementary index right in the process of operation with a required periodicity (e.g. once an hour or every minute). Data is added rapidly and does not influence the system performance significantly. While the supplementary index does not contain a large volume of data, search in this index is also carried out rapidly.
In the periods of low user activity or when scheduled infobase operations are carried out (e.g. in the night), the main index is merged with the supplementary index (e.g. once a day). This operation may generate noticeable load or take a long time (depending on the data accumulated). As a result, new data is moved to the main index while the supplementary index is cleared and is prepared to host subsequent data quickly.
To enable the users to search in all the data without any slowing down of the system performance, the supplementary index should be updated quite frequently (e.g. once an hour or every minute). Besides, for search to be rapid enough, the supplementary index should contain as little data as possible, i.e. the main index should be merged with the supplementary index regularly (e.g. in the night during minimum user activity period).
So to automate full text indexing, we will need two jobs. The first job will perform indexing without merge and will be initiated every minute. The second job will merge indices and will be run once a day in the night.
Let us proceed to creating such jobs.
Understanding Scheduled Jobs
Scheduled Jobs are located in the configuration object tree in the Common branch. Every scheduled job includes two major properties: Method Name and Schedule.
The Method Name property connects the scheduled job to some procedure or function of the common module that will actually be executed. This procedure should host an algorithm written using the 1C:Enterprise script that describes all the operations to be executed.
The Schedule property enables you to define periodicity for the procedure execution.
In addition to the above properties, a scheduled job also has other properties, e.g. Restart Interval on Failure and Restart Count on Failure. So if a scheduled job fails for some reason, 1C:Enterprise can run this job automatically for the specified number of times during the specified time period.
Creating Scheduled Jobs
In the Designer Mode
First we will create the first scheduled job to update the index.
Expand the Common branch of the configuration object tree.
Highlight the Scheduled Jobs row and add a new Scheduled Job configuration object.
Enter a name as UpdateIndex (fig. 20.1).
Now create a procedure that will actually update the full text index of the infobase.
Any procedure or function of a non-global common module can serve as such a procedure provided that it can be called for on the server (the common module should have the Server property checked).
Add a common module to the configuration, enter ScheduledProcedured for its name and check Server Call to make its export procedures and functions visible (fig. 20.2).
Return to the properties of the UpdateIndex scheduled job.
Click the selection button of the text box Method Name.
Common module selection window will be opened (fig. 20.3).
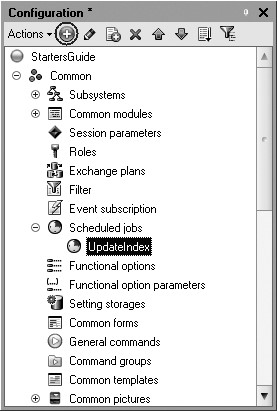
Fig. 20.1. Creating a scheduled job
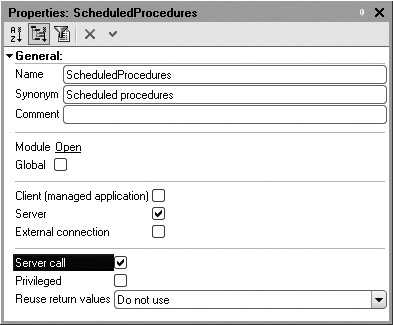
Fig. 20.2. Common module properties
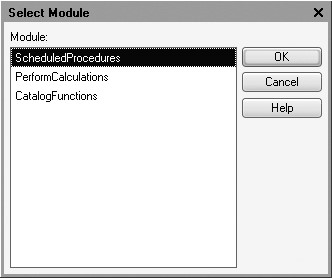
Fig. 20.3. Selecting an Event Handler
Select the module ScheduledProcedures.
In this module we will create a template for the procedure UpdateIndex().
Populate it as follows (listing 20.1).
Listing 20.1. Index update procedure
If FullTextSearch.GetFullTextMode() = FullTextMode.Enable Then
	If Not FullTextSearch.IndexTrue()Then
		FullTextSearch.UpdateIndex(,True);
	EndIf;
EndIf;
First this procedure verifies if full text search operations are possible (as they can be prohibited, e.g. interactively, see fig. 19.4).
If full text search operations are allowed, it verifies if full text index is current (if after the last indexing procedure the data to be included in the full text indexing has not been changed, the index stays current and no repeat indexing is required).
If indexing is required, the method UpdateIndex() of the full text search manager is called for.
The first parameter of the method determines if indices should be merged and is False by default. This means that indices will not be merged.
The second parameter defines the volume of data to be indexed: all the data to be indexed or some batches. Our goal is to carry out indexing as fast as possible so we specify that indexing will be carried out in batches (the value is True).
The size of one batch is fixed to 10 thousand objects. So if right now we need to index, say 15,000 objects, when this method is called for, only the first 10,000 objects (the first batch) will be indexed while the remaining objects will be indexed when this method is called for again (when we next run this scheduled job).
Now proceed to creating a schedule for the scheduled job execution.
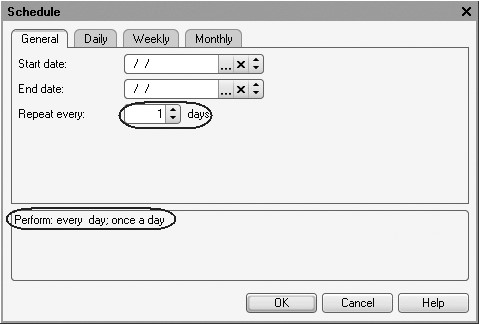
Click the Open link in the scheduled job properties (in the Schedule row) and the dialog to edit the schedule will be opened (fig. 20.4).

Fig. 20.4. Schedule editing dialog box
The dialog includes multiple tabs to define various types of schedules. The bottom of the dialog displays the final results of all the settings.
Our goal is to run the scheduled job daily, every minute.
This is why first we will specify on the General tab that the job should be repeated daily (Repeat every: 1 day) (fig. 20.5).
Now switch to the Daily tab and specify how the job should be executed during the day.
Select that the job should be repeated every 60 seconds (Repeat after: 60 s.) (fig. 20.6).
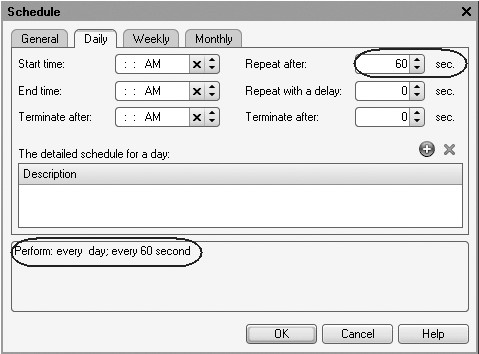
Fig. 20.6. Running a job every minute
The bottom of the dialog displays the created execution schedule: Perform: every day; every 60 s.
We seem to have obtained the result we needed: the scheduled job is launched daily, every minute.
But the Jack of All Trades does not work 24/7 so executing the job in the night will obviously be useless because database data is not modified. Also it is possible that some employees will stay late after their workday is over.
So we will modify the schedule as follows: enter Start time: 08:00 (fig. 20.7).

Fig. 20.7. Specifying starting time for execution
So the job will not be executed around the clock but only starting from 8 a.m. Since no end time is specified, execution of the job will be aborted when the current day is over. So the job will not be executed from 00:00 to 08:00.
Now we are done creating a schedule for a scheduled job. Click OK.
Finally, check Predefined in the scheduled job properties (fig. 20.8).
Checking this property means that when the system runs in the 1C:Enterprise mode, one predefined scheduled job is created. Otherwise we would have had to create such a job using 1C:Enterprise script tools.
This completes creation of the scheduled job Update Index.
Now we will use the same procedure to create the second scheduled job - MergeIndex.

In its properties palette click the selection button of the text box Method Name.
In the dialog that opens select the ScheduledProcedures module.
In this module we will create a template for the procedure MergeIndex(). Populate it as follows (listing 20.2).
Listing 20.2. MergeIndex procedure
If FullTextSearch.GetFullTextMode() = FullTextMode.Enable Then
	If Not FullTextSearch.IndexTrue()Then
		FullTextSearch.UpdateIndex(True);
	EndIf;
EndIf;
This procedure is similar to the one demonstrated in the listing 20.1 with the only exception being that when index is updated, indices are merged (the first parameter is True) and indexing is full, i.e. applied to all the data (the second parameter is False by default) since in this case indexing time is not vital.
In the job properties also check Predefined and proceed to editing the schedule. To do so, click the Open link in the scheduled job properties (in the Schedule row).
On the General tab specify that the job will be executed daily (Repeat every: 1 day), while on the Daily tab specify the beginning time for the job execution (Begin time: 01:00) (fig. 20.9).

Fig. 20.9. Schedule of the MergeIndex job
This results in the following schedule of the scheduled job execution: Perform: daily; from 1:00 once a day.
Now we are done creating a schedule for the MergeIndex scheduled job. Click OK.
Job Scheduler
As we have mentioned in the theoretical lesson in the beginning of the book, 1C:Enterprise 8 supports two operation modes: file mode and client-server.
File mode version is simple to install and requires virtually no administration. This is the version used by our demo infobase. But as you know, any simplicity means compromising something.
If our infobase operated in the client-server version, no other actions would have been needed to run and execute the created jobs automatically. We could have updated the database configuration and the 1C:Enterprise server cluster manager would have started to execute the jobs in compliance with the specified schedules on its own.
In our situation (file mode operation version) there is no such intermediary which could have taken responsibility for automatic execution of jobs as we only have the clients and the infobase.
This is why simplicity of file mode operation version means the following compromise: to execute jobs automatically, we need to always have one operating client connection to the infobase that will only deal with running jobs in compliance with the schedule. This connection is referred to as a job scheduler.
In our example we will create a simple data processor that will run jobs in compliance with a schedule. Next connect to the infobase in the 1C:Enterprise mode and run this data processor. The job scheduler is now ready.
The most important things now are not to close the data processor and not to close this 1C:Enterprise window because this window will be used to carry out scheduled jobs.
In the Designer Mode
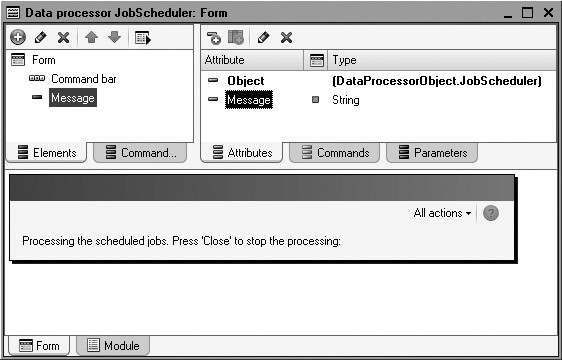
So highlight the Data Processors branch in the configuration object tree and add a new Data Processor configuration object named JobScheduler.
On the Forms tab create the default data processor form.
In the form editor on the Attributes tab add a form attribute named Message and drag it to the form controls window.
In the properties palette of the Message field that opens specify the field type as Label Field and enter a title Jobs are processed. Click Close to abort processing (fig. 20.10).

The resulting data processor form will look as follows (fig. 20.11).
Open the form events and click the opening button for the OnOpen event. Populate the handler for this event with the following code (listing 20.3).
Listing 20.3. OnOpen form event handler
#If ThickClientManagedApplication Then
	AttachIdleHandler("JobProcessing", 3);
#Else
	DoMessageBox("Data processor can be executed only on thick client!");
	Close();
#EndIf
Also copy the standby handler itself to the form module - the procedure JobsProcessing() (listing 20.4).
Listing 20.4. Standby handler
&AtClient
Procedure JobProcessing()
	#If ThickClientManagedApplication Then
		ProcessJobs();
	#EndIf
EndProcedure;
So when the form is opened, the procedure named JobProcessing() is connected as a standby handler.
This procedure will be called for every three seconds.
The procedure JobProcessing() in turn only executes a single action: calls for the method ProcessJobs(). This method verifies if the jobs to be executed in compliance with their schedules exist at all. If such jobs exist, it initiates their execution.
Both procedures use preprocessor instructions (after the # character) to specify that the code fragment will only be available if thick client is launched in the managed mode because the data processor JobScheduler will be launched in this mode.
To verify that jobs are actually run, add the following line in the beginning of the procedure UpdateIndex (common module ScheduledProcedures) (listing 20.5).
Listing 20.5. A running scheduled job message
Message = New UserMessage;
Message.Text = "Scheduled job UpdateIndex started " + CurrentDate();
Message.Message();
Finally, in the editor of the JobScheduler Data Processor configuration object use the Subsystems tab to check the Enterprise subsystem.
This means that the data processor will be available to the users with administrator rights and will be called for from the action panel (Tools group) of the Enterprise section.
In the 1C:Enterprise Mode
Now test operation of our scheduled jobs.
Update database configuration by clicking the Update Database
Configuration (F7)  in the toolbar and then
run the software in the mode 1C:Enterprise (thick client).
in the toolbar and then
run the software in the mode 1C:Enterprise (thick client).
To do so, you need to select the following menu items on your computer:
Start > All Programs > 1C Enterprise 8.2 > Advanced > <version number> > 1C Enterprise (thick client). In the run window open our infobase in the 1C:Enterprise mode.
In the Enterprise section open the data processor Job Scheduler and wait for a few minutes.
A text like the one displayed below will be displayed in the message window as a result (fig. 20.12).
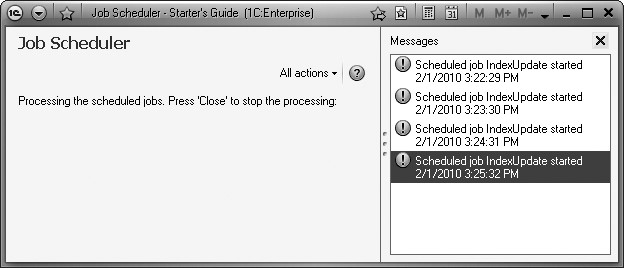
Fig. 20.12. Messages on scheduled jobs running
So you see that the job to update the index is run every 60 seconds as specified in the schedule.
LEARN MORE!
It is not recommended to use the connection busy executing scheduled jobs for any other tasks. So for regular operation of the infobase you will need to run the software in the 1C:Enterprise mode again and select our infobase. This is how you will create another connection where you will be able to operate the infobase as usually.
Quiz
- What is the purpose of scheduled jobs?
- How does one create a schedule to automatically execute jobs?
- How does one enable execution of jobs in compliance with a schedule in the file mode version ?