
Lesson 5. Theoretical Lesson
Estimated duration of the lesson is 2 hours.
CONTENT:
- The Default Form Mechanism.
Event Handlers.
Modules.
A Form as a Program Object.
Procedures - Event Handlers in the Form Module.
Understanding of the Form Module Content.
Understanding of 1C:Enterprise Script Operation.
Objects, Objects, Objects...
Server and Clients
Common Module Compilation
The Directives of the Compiler
Executing Code on the Client and on the Server.
Not to make things complicated with the large previous lesson covering Documents, we have decided to discuss all the theoretical issues here in an individual lesson.
Here we will pay attention to the issues we have omitted or only briefly covered earlier.
This theory is very important to understand exactly why we use the particular procedures we have used. This information is vital for those readers who are willing to develop configurations themselves in the future instead of only using this book as a step-by-step guide.
But if you are unable to understand this section right now, you can skip it and return here later. This will in no way damage the development of the training configuration that we discuss in this book. So let us begin.
The Default Form Mechanism
During the previous lesson we have created a form of the ReceiptOfGoods document and defined this form as a default one. What does it mean?
Every application object of a configuration has a certain number of default forms. These forms offer various ways of displaying the object's data.
If a developer does not set up their own default forms, the required object forms will be generated automatically when they are called for.
This mechanism enables a developer to save time that would otherwise be required to create forms for application testing and use the forms created automatically by the platform.
The creation of these forms is handled dynamically, while the system is operating. Forms are created at the moment they are called for. This happens regardless of whether the call is made interactively or from a program.
For example, the list form for the Clients catalog will be created both if a user selects All Functions > Catalogs > Clients interactively from the menu, and if the GetForm() global method is called for (listing 5.1).
Listing 5.1. Program Call of GetForm() Method
ListForm = GetForm("Catalog.Clients.ListForm");
Another point that is worth mentioning is the fact that assortment of default forms available for a configuration object may not match the list of forms that can be created for that object using the form wizard.
For example, for most registers you can create a default list form in the Designer. However, if you open the form wizard for a register, you will see that, in addition to a list form, you have the option of creating a register record set form, which is not available in the list of default forms.
The thing here is that the assortment of default forms is determined based on how the data may need to be displayed to users in interactive mode. Developers have the option of creating their own forms to present data and make them the default forms, or they can use the automatically created forms.
In contrast, the form wizard is based on the needs of developers. If a developer feels the need to use a record set form for some register rather than the usual list form, they can do so using the wizard and defining it as the default register form. But this will not make any real difference in how the system operates.
Event Handlers
During the previous lesson we have created OnChange event handler for some form controls. What is it?
When working with events in the 1C:Enterprise 8 platform, we need to distinguish between two types of events: events connected to a form and its controls and all the other events.
The difference is that the event handlers related to forms and its controls are assignable, whereas the handlers of all the other events are fixed.
A fixed event handler should have a name that matches the event name. This is the only way it can be called when the respective event occurs.
An assigned handler name can be arbitrary. Simply having a procedure name match the name of a form or its control is not enough to call the event handling procedure with that name. The handler procedure must be explicitly assigned to that event in the properties palette.
In this manner any procedure located in a form module can be assigned as the handler for any one or more events related to the form or to controls located within the form. In this situation procedure name is irrelevant. The only thing that matters is that it is assigned to handle some specific event.
Handlers can be assigned either interactively when you work with the form in the Designer, or by means of a program, using the SetAction() method for a form or control.
Modules
In the previous lesson we discussed the code of event handlers. We have learned that these procedures are located in the form module which is basically a repository for program code written using 1C:Enterprise script.
Now we will discuss the modules in further details and will get to know form module nature better.
Types of Modules
A configuration has various types of modules. They can belong to certain objects (such as forms), or they can exist independently (belonging to a configuration as a whole).
The platform will use the program code that is contained within the modules at predetermined points in the 1C:Enterprise operation. These points are referred to as events and we have discussed them earlier.
The following types of modules are available in the 1C:Enterprise 8.
The managed application module. The managed application module is executed when 1C:Enterprise is run in the thin client or web client modes.
You can declare and define procedures and functions in this module, and they will be available to all the configuration modules (except for the external connection module). They are also available for non-global common modules with the Client (managed application) property enabled. In the managed application module context, the exported procedures and functions of common modules are available.
In order to open a managed application module, highlight the root of the configuration object tree (the StartersGuide line) and select Open managed application module from the context menu (fig. 5.1)
Common modules. Common modules store the procedures and functions that are called from other system modules. A common module itself is not executed. Its individual procedures/functions are executed when they are called for from other modules.
In order to open a common module, expand the Common branch in the configuration object tree, then expand the Common modules branch and double-click the required module (fig. 5.2).

Fig. 5.1. Opening managed application module
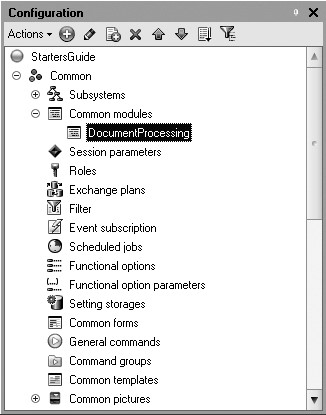
Fig. 5.2. Opening a common module
Object modules. Catalog item module or document module can be quoted as object modules.
These modules are called for when either this object is created by the program using 1C:Enterprise script tools, e.g. the CreateItem() methods of the catalog managers or CreateDocument() of the document managers or when a user creates new catalog item or document interactively.
When modified object data are recorded to the database, various event handlers are called for that are located in the object module.
For details on the procedure of recording configuration objects in the database, see "Developer's Quick Reference".
In order to open an object module, navigate to the Other tab of the configuration object editor and click Object module (fig. 5.3). Or highlight the required object in the configuration object tree and select Open object module from the context menu.

Form modules. Every form that is defined in a configuration has its own module. This module is executed when the ManagedForm entity of 1C:Enterprise script is created. This object is created by the system in the 1C:Enterprise mode when we open a form for some item either using program tools (GetForm() or OpenForm() methods) or interactively.
To open a form module, open the required configuration object Form and in the form editor navigate to the Module tab (fig. 5.4).
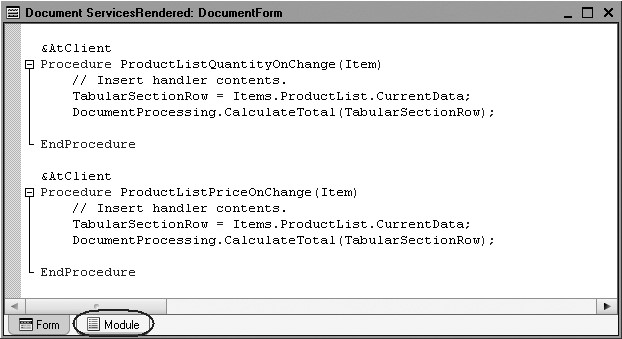
Fig. 5.4. Opening a form module
The session module. The session module runs automatically when the configuration is loaded upon 1C:Enterprise 8 startup. A session module is intended to initialize the session parameters and execute the session-related actions. It cannot contain exported procedures or functions. It can use procedures from the configuration's common modules.
In order to open a session module, highlight the root of the configuration object tree (the StartersGuide line) and select Open session module from the context menu (fig. 5.5).

External connection module is intended to host the code of functions and procedures that can be called for in the external connection session.
In order to open a session module, highlight the root of the configuration object tree (the StartersGuide line) and select Open external connection module from the context menu (fig. 5.5).
The manager module. Every application object has a manager that manages this object as a configuration object. Using this manager, you can create objects, work with forms and templates. A manager module allows you to extend the functionality of default managers by creating procedures and functions using 1C:Enterprise script.
In fact, this enables you to define your own methods for a configuration object (e.g. a catalog) that do not refer to a specific database object instance, but rather to the configuration object itself.
In order to open a manager module, navigate to the Other tab of the configuration object editor and click Manager module (fig. 5.6). Or highlight the required object in the configuration object tree and select Open manager module from the context menu.

Fig. 5.6. Opening a manager module

Fig. 5.7. Opening a command module of a configuration object
The command module. Same as the configuration itself, many application objects may have subordinate configuration objects referred to as Commands. Every command has a command module. This module can be used to create a predefined CommandProcessing() procedure to execute this command.
To open a command module subordinate to some configuration object, in the configuration object editor navigate to the Commands tab and doubleclick the required command (fig. 5.7). Or highlight the required command in the configuration object tree and select Open command module from the context menu.
Context of a Form Module
Every module is connected to the remaining part of the configuration. This relationship is referred to as module context.
Module context defines the assortment of objects, variables, procedures, and functions available when the module is executed.
Since further we will discuss the handler that we have coded in the form module, let us discuss in more details the content of form module context.
Context of a form module is composed of:
1) Local context of the form module itself.
2) Attributes of the form the module belongs to.
3) Properties and methods of the ManagedForm 1C:Enterprise script entity.
4) Properties and methods of form extension that is defined by the type of the object that stores the data in the main form attribute.
5) Global context including non-global common modules and exported functions and procedures of global common modules.
6) Exported variables, procedures, and functions of a managed application module.
Now let us discuss all the above components in details.
1. Local context of form module.
Local form module context consists of variables, procedures, and functions declared in this module.
For example, inside a form module you can directly address GetTotal() procedure that is declared in this very module using its name (listing 5.2):
Listing 5.2. Form Module
&AtClient
Procedure Command1()
	GetTotal();
EndProcedure

&AtServerNoContext
Procedure GetTotal()
	...
EndProcedure
For example, inside a form module you can directly address ServiceVariable variable that is declared in this very module using its name (listing 5.3):
Listing 5.3. Form Module
&AtClient
Var ServiceVariable;

&AtClient
Procedure Command1()
	ServiceVariable = 3;
EndProcedure
2. Attributes of the form the module belongs to.
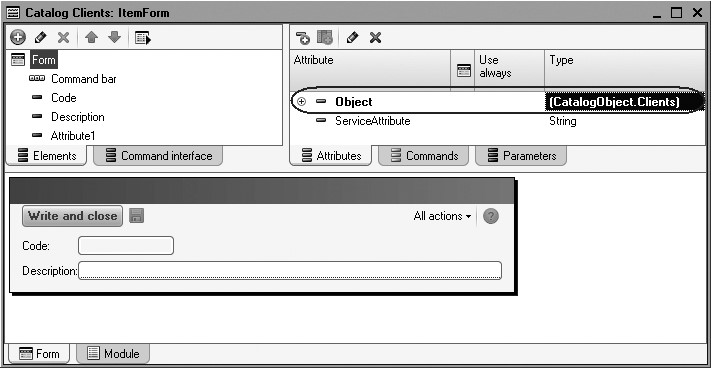
For example, if a form has ServiceAttribute attribute (fig. 5.8), you can directly address it using its name (listing 5.4):

Fig. 5.8. Form attribute - Service Attribute
Listing 5.4. Form Module
&AtClient
Procedure Command1()
	ServiceAttribute = 3;
EndProcedure
3. Properties and methods of ManagedForm object.
Properties and methods of the ManagedForm 1C:Enterprise script entity are described in the Syntax Assistant: Interface objects of managed application > ManagedForm (fig. 5.9).

Fig. 5.9. Properties of a managed form in Syntax Assistant
You can address them directly using their names. For example, you can define a form header (listing 5.5):
Listing 5.5. Form Module
&AtClient
Procedure Command1()
	Header = "New form header";
EndProcedure
Or you can close the form (listing 5.6):
Listing 5.6. Form Module
&AtClient
Procedure Command1()
	Close();
EndProcedure
4. Properties and methods of form extension that is defined by the type of the object that stores the data in the main form attribute.
One of the form attributes may be a default one. It is displayed in bold in the attribute list. Normally the default form attribute contains the data of the object displayed in the form. For example, if the form in question is a catalog form, the default attribute will store the data of the CatalogObject.<name> object (fig. 5.10).
And if it is a document form, the default attribute will store the data of the DocumentObject.<name> object (fig. 5.11).
Here we should clarify why the type of the default attribute is given in brackets in the list of attributes: (DocumentObject.Document1). The point is that this is not the real type of the form attribute. In this case the real type is FormDataStructure (fig. 5.12).

Fig. 5.11. Default form attribute
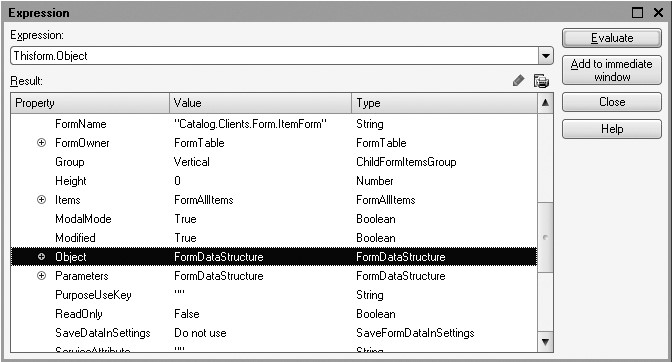
Fig. 5.12. Object type of a default form attribute
But FormDataStructure is a universal type that may host data of various application objects. So to better understand in the form editor what application object data this form displays, the Type column of the editor displays the type of the object that stores data in this attribute instead of the type of the form attribute (FormDataStructure). And this "unreal" type is displayed in the brackets.
The type of the object that stores the data in the default form attribute influences some special features of the form behavior.
For example, if the default form attribute contains data of a document, when such a form is closed the user will be prompted to confirm recording and posting of this document. While if the default form attribute stores data of a catalog, no such confirmation prompt will be displayed when the form is closed.
Depending on the type of the object that stores data in the default attribute, the context of the ManagedForm program object will have context of the respective extension added.
For example, if the default attribute is CatalogObject.<name>, form module will include the properties and methods of the Managed form extension for a catalog 1C:Enterprise script entity (Syntax Assistant - Interface (managed) > Managed Form > Catalog Extension) (fig. 5.13).

Fig. 5.13. Object description in Syntax Assistant
And if the default attribute is DynamicList (fig. 5.14), the form module will include the properties and methods of the Managed form extension for a dynamic list 1C:Enterprise script entity (Syntax Assistant - Interface (managed) > Managed Form > Dynamic List Extension) (fig. 5.13).
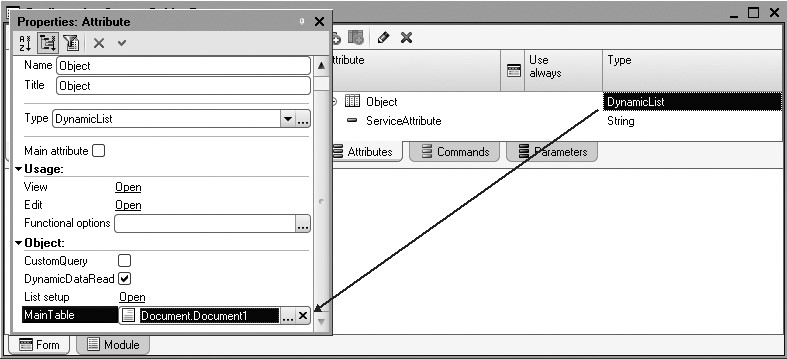
Fig. 5.14. The default form attribute

Fig. 5.15. Object description in Syntax Assistant
So in the form module where the default attribute stores data of a document (fig. 5.16), you can call for the managed form extension property for a document AutoTime (listing 5.7).
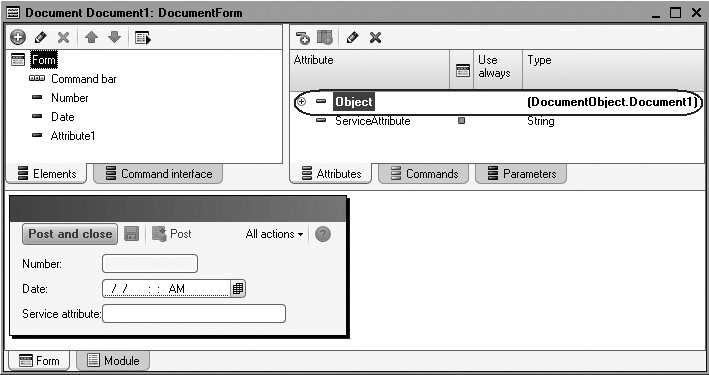
Fig. 5.16. The default form attribute
Listing 5.7. Form Module
&AtClient
Procedure Command1()
	AutoTime = AutoTimeMode.First;
EndProcedure
Or you can record the document using the Write() managed form extension method for a document (listing 5.8):
Listing 5.8. Form Module
&AtClient
Procedure Command1()
	Write(DocumentWriteMode.Posting);
EndProcedure
5. Global context, including non-global common modules and exported functions and procedures of global common modules.
In a form module you can get the system date by calling for the CurrentDate() built-in function (listing 5.9):
Listing 5.9. Form Module
&AtClient
Procedure Command1()
	Message(CurrentDate());
EndProcedure
Or you can get user operations history by calling for the UserWorkHistory property of the global context (listing 5.10):
Listing 5.10. Form Module
&AtClient
Procedure Command1()
	History = UserWorkHistory.Get();
EndProcedure
If a global common module (e.g., DataExchange) defines GetNumberPrefix() export procedure (listing 5.11):
Listing 5.11. Global Common Module
Function GetNumberPrefix() Export
	Return Constants.NumberPrefix.Get();
EndFunction
you can use its name to call for it in the form module (listing 5.12):
Listing 5.12. Form Module
&AtClient
Procedure Command1(Prefix)
	Prefix = GetNumberPrefix();
EndProcedure
If such a common module is non-global (e.g., DocumentProcessing), when you call for a procedure you should separate its name from the module name with a dot (listing 5.13):
Listing 5.13. Form Module
&AtClient
Procedure QuantityOnChange(Item)
	DocumentProcessing.CalculateTotal(TabularSectionRow);
EndProcedure
The latter method is better because non-global common modules are compiled when they are called for instead of upon system startup as is the case with global ones.
Naturally, it is important to ensure conformity of how a procedure is described in the form module (&AtClient, &AtServer, etc.) and what options are checked for the common module (client (managed application), server, etc.).
6. Exported variables, procedures and functions of the managed application module.
If an application module has the TestMessage() export procedure (listing 5.14):
Listing 5.14. Application Module
Procedure TestMessage() Export
	Message("Test message");
EndProcedure
You can use its name to call for it in the form module (listing 5.15):
Listing 5.15. Form Module
&AtClient
Procedure Command1()
	TestMessage();
EndProcedure
A Form as a Program Object
In addition to the fact that a form provides access to various parts of configuration inside its module, it can also be accessed from other parts of configuration as a program object itself.
At that in addition to standard properties and methods of the ManagedForm 1C:Enterprise script entity, it may have other developer-defined properties and methods.
For example, if the module of the DocumentForm form of the ReceiptOfGoods document describes MaterialsQuantity OnChange() exported procedure
(listing 5.16):
Listing 5.16. Form Module
&AtClient
Procedure MaterialsQuantity OnChange(Item)
	TabularSectionRow = Items.Materials.CurrentData;
	DocumentProcessing.CalculateTotal(TabularSectionRow);
EndProcedure
You can use the following to call this procedure (listing 5.17):
Listing 5.17. Form Module
Form = GetForm("Document.ReceiptOfGoodsOfGoods.Form.DocumentForm");
Form.MaterialsQuantity.OnChange();
Procedures - Event Handlers in the Form Module
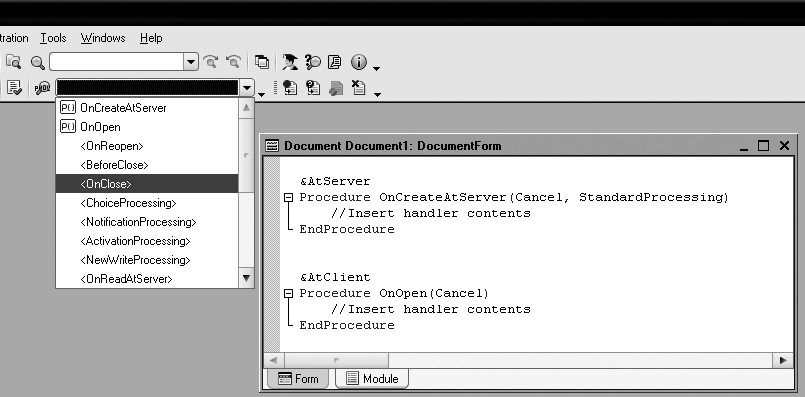
In addition to descriptions of variables and the main program, a form module may contain descriptions of the procedures that are handlers of the events related to the form. The events of opening and closing the form window are main events that may be handled in the form module (listing 5.18):
Listing 5.18. Form Module
&AtServer
Procedure OnCreateAtServer(Cancel, StandardProcessing)
	// Insert handler contents
EndProcedure

&AtClient
Procedure OnOpen(Cancel)
	//Insert handler contents
EndProcedure
An important aspect here is that the names of these procedures are not fixed so they may be arbitrary. So it is not sufficient, for example, to write procedure descriptions in the module named OnCreateAtServer or OnOpen. Additionally they must be linked in the Designer with respective events of the form (fig. 5.17).

Fig. 5.17. Form events

Fig. 5.18. Form events
Novice developers often forget about this aspect. Not to
face such situations it is better to use the opening buttons  marked with a
magnifying glass in the properties panel to automatically create such
procedures (fig. 5.18).
marked with a
magnifying glass in the properties panel to automatically create such
procedures (fig. 5.18).
Or you can select them from the drop-down list that is available when you are in the form module (fig. 5.19).
In this case the definitions of these procedures will be created automatically and linked to the respective form properties.
Understanding of the Form Module Content
Finally we will briefly describe the general algorithm that makes it possible to understand the code written in the form module. We will discuss it using the specific example of our MaterialsQuantityOnChange event handler. Suppose we see the following expression in the form module: TabularSectionRow = FormElements.Materials.CurrentData.
How does one understand the meaning of TabularSectionRow? We should now remember the content of a form context:
1) Local context of the form module itself.
2) Attributes of the form the module belongs to.
3) Properties and methods of the ManagedForm 1C:Enterprise script entity.
4) Properties and methods of form extension that is defined by the type of the object that stores the data in the main form attribute.
5) Global context, including non-global common modules and exported functions and procedures of global common modules.
6) Exported variables, procedures and functions of the managed application module.
And check these positions one by one:
1. Is the TabularSectionRow variable declared in the form module? No.
2. Does the form have the TabularSectionRow attribute? No.
3. Does the ManagedForm object have the TabularSectionRow property? No.
4. Does the form extension has the TabularSectionRow property? No.
5. Does the global context property named TabularSectionRow exist? No.
6. Does the managed application module contain exported variable TabularSectionRow? No.
This means that TabularSectionRow is a local variable that is defined directly in this assignment operator.
Understanding of 1C:Enterprise Script Operation
During the previous lesson we wrote code for a handler of the event MaterialsQuantityOnChange (listing 4.1) and briefly described the meaning of the code.
Now we will demonstrate two approaches to how you can understand clearly the large number of unknown properties and methods of configuration objects so that in the future you could review code fragments or create your own procedures using 1C:Enterprise script.
Syntax Assistant is a tool intended to help a developer. This tool hosts descriptions of all the program objects used by the system along with their methods, properties, events, etc.
To open the Syntax Assistant, click the respective button  on the toolbar of the
Designer or use Help > Syntax Assistant
command of the main menu (fig. 5.20).
on the toolbar of the
Designer or use Help > Syntax Assistant
command of the main menu (fig. 5.20).

Same as any other help system, Syntax Assistant is a tree-like structure containing chapters, sections, subsections, etc. The content of Syntax Assistant fully duplicates the seven-volume description of 1C:Enterprise script that is included in the 1C:Enterprise distribution kit. But using Syntax Assistant is more convenient because it is readily available and supports context-sensitive help (Ctrl + F1).
Using the Syntax Assistant to Analyze Code
The Syntax Assistant is convenient in the situations where you need to understand the already existing, but unfamiliar code. Using our Materials QuantityOnChange event handler we have created (see listing 4.1) we will demonstrate how one should understand the handler code using Syntax Assistant.
First Method
The first method - find the required section in the table of contents and follow down the tree while expanding the subsections, properties, references, etc. you need.
So take a look at the first line of our handler (listing 5.19).
Listing 5.19. MaterialsQuantityOnChange procedure (first line)
TabularSectionRow = Items.Materials.CurrentData;
To be able to understand this code, you should first understand the context it is used in. Program context depends on the module where the code is located. In this situation the handler procedure is located in the form module so we are in the form module context.
We will review our line in sequence from left to right. What is TabularSectionRow? Located to the left of the assignment operator (=), we see some property that is available directly in this context or a variable.
In compliance with the algorithm described in the previous section, we will now have to make the following checks:
Is the TabularSectionRow variable declared in the form module? Open the form module. Here we do not see the variable description line (Variable TabularSectionRow;) so this is not a form module variable.
Does the form have the TabularSectionRow attribute? Open the form of the ReceiptOfGoods document and navigate to the form attributes window located in the upper right part of the form editor (fig. 5.21).

Fig. 5.21. List of attributes of the ReceiptOfGoods document form
We see that this form has one default attribute (displayed in bold) named
Object. This means that the form does not have any attribute named TabularSectionRow.
n Does the ManagedForm object have the TabularSectionRow property? Now we will review the managed form properties in the Syntax Assistant. Open the Syntax Assistant and navigate to the Contents tab. A managed form is an interface object of a managed application so we will expand the section named Interface (managed) > Managed Form. Now expand the ManagedForm object and its Properties (fig. 5.22).

Fig. 5.22. List of properties of ManagedForm object in the Syntax Assistant
The properties are sorted alphabetically. We see that there is no TabularSectionRow property among them.
Does the form extension has the TabularSectionRow property? We know that the default form attribute stores data of the object DocumentObject.ReceiptOfGoods (see fig. 5.21). This means that the form module will have the properties and methods available for the 1C:Enterprise script entity Managed form extension for a document (Syntax Assistant - Interface (managed) > Managed Form > Document Extension). Now we will review them (fig. 5.23).
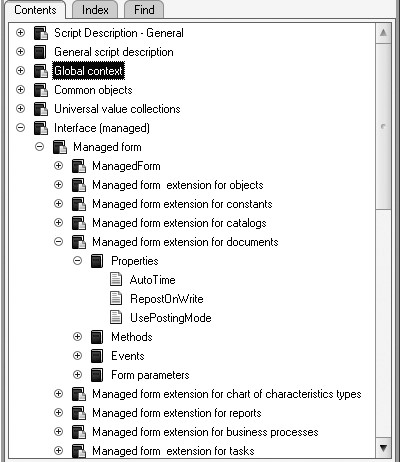
Fig. 5.23. List of properties of the managed form extension for a document in the Syntax Assistant
We see that there is no TabularSectionRow property among them.
Does the global context property named TabularSectionRow exist?
Open the global context properties in the Syntax Assistant (fig. 5.24)

Fig. 5.24. List of Global Context Properties in the Syntax Assistant
We see that there is no TabularSectionRow property among them. The expression TabularSectionRow also cannot be a name of a non-global common module because its procedures should be called for using separation with a dot (TabularSectionRow.). This expression cannot be an exported
procedure of a global common module either because in this situation we could have only called for the procedure as TabularSectionRow () instead of assigning anything to it.
Does the managed application module contain exported variable TabularSectionRow? Open the managed application module. Here we do not see the variables description line (Variable TabularSectionRow Export) so this is not a variable of a managed application module.
Now we understand that the expression TabularSectionRow is a local variable of the procedure MaterialsQuantityOnChange. In the process of program execution some value is assigned to this variable. The variables of the 1C:Enterprise script are not type-based so you can always assign a value of any type to the variable. If a variable is local, i.e. it is only used in the context of this particular procedure, no explicit update for the variable is required. A variable is declared when it is first used.
To the left of the assignment operator you see the expression Items. Materials.CurrentData. To better understand the meaning of Items, we will use again the same algorithm that we applied to the local variable TabularSectionRow.
- Is the Items variable declared in the form module? No.
- Does the form have the Items attribute? No.
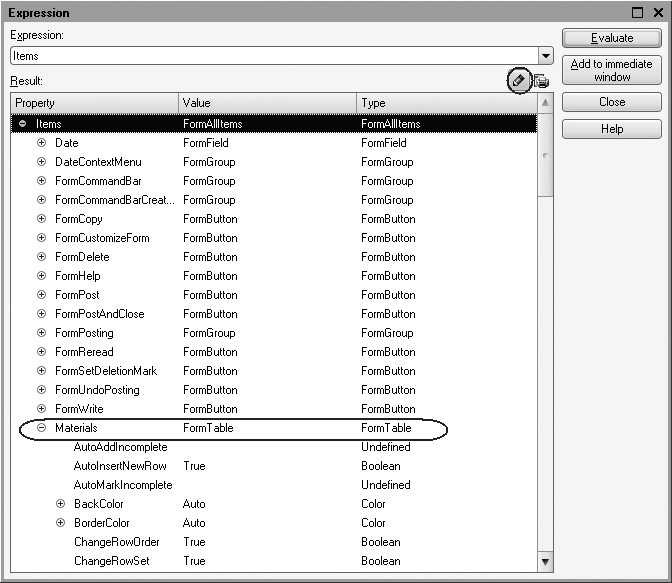
- Does the ManagedForm object have the Items property? Let us review again the list of properties of the ManagedForm object. Locate the line Items. Its availability means that this is one of the managed form properties. To understand its meaning, double-click this line (fig. 5.25).

Fig. 5.25. Description of Items property of ManagedForm object in the Syntax Assistant
The bottom of the Syntax Assistant window displays a description of the highlighted property. This description demonstrates that using the Items property we get the FormAllItems object that stores a collection of all form controls. To understand its meaning, click the respective link. The description of the collection FormAllItems is displayed (fig. 5.26).

Fig. 5.26. Description of FormAllItems collection in Syntax Assistant
NOTE
The Syntax Assistant tree above is
not changed. If you want to locate the tree branch that hosts the currently
opened description, click Find Current Item in the Tree  above the object
description window of the Syntax Assistant.
above the object
description window of the Syntax Assistant.
This collection contains the controls arranged in a managed form. You can access an item by its name.
So we now know what Items mean. This object is separated with a dot from the following code: Items.Materials. A collection has a property <Control Name> so Materials is a name of some form control. Look at the structure of form controls. Open the form of the ReceiptOfGoods document and navigate to the form controls window located in the upper left part of the form editor (fig. 5.27).

Fig. 5.27. Structure of Form Controls of ReceiptOfGoods Document

Fig. 5.28. Properties palette of a Table Form control
The form controls structure includes a table named Materials. If you open the properties palette of this table, the title will display Properties: Table (fig. 5.28).
It means that this form control is a table so we need an object of the FormTable collection. To understand its meaning, click the respective link (see fig. 5.26). We will see a list of properties of the FormTable object displayed. The properties are sorted alphabetically (fig. 5.29).
So we now know what Items.Materials mean. This object is separated with a dot from the following code: Items.Materials.CurrentData. Scroll through the list of managed form table properties for the CurrentData property to become visible. It means that this is one of the properties of the FormTable object. To understand its meaning, double-click this line (fig. 5.30).

Fig. 5.29. List of properties of FormTable object in the Syntax Assistant

Fig. 5.30. Description of the Current Data property of the FormTable object in the Syntax Assistant
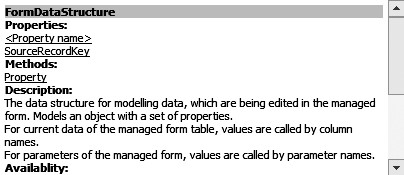
Fig. 5.31. Description of FormDataStructure object in Syntax Assistant
The bottom of the Syntax Assistant window displays a description of the highlighted property. This description means that using the CurrentData property we get the FormDataStructure object that contains the data located in the current row of the table.
So after the first line of the handler is executed (TabularSectionRow = Items.Materials.CurrentData;), the variable TabularSectionRow will contain an object of the FormDataStructure type.
Now we will review the next line of the handler (listing 5.20).
Listing 5.20. MaterialsQuantityOnChange procedure (second line)
TabularSectionRow.Total = TabularSectionRow.Quantity * TabularSectionRow.Price;
It is reasonable to suggest that Total, Quantity, and Price are some properties of the FormDataStructure object that is stored in the TabularSectionRow variable after the first line is executed. To understand its meaning, click the corresponding link (see fig. 5.30, 5.31).
The description of this entity makes it clear that using the FormDataStructure object we can refer to the data of a specific column of the tabular section using the column name as the entity property. So using the expression TabularSectionRow.Total we access the data located in the Total column of the current table row. And the data is basically the data in the Quantity column multiplied by the data in the Price column.
Second Method
The second method involves using context help in the Syntax Assistant. To do so, open the program module by locating the cursor on the required 1C:Enterprise script structure and press Control and F1 simultaneously. Open the form of the ReceiptOfGoods document, navigate to the Module tab and open the code of the MaterialsQuantityOnChange procedure.
Above we have already realized that the expression TabularSectionRow located to the left of the assignment operator is a local variable.
The expression Items.Materials.CurrentData is located to the left of the assignment operator. Locate the cursor to the Items expression and press Ctrl + F1. The Syntax Assistant will be opened on the Index tab and the Items expression will be entered to the search box (fig. 5.32). This expression will be searched for among 1C:Enterprise script structures sorted alphabetically.

Fig. 5.32. Opening Context Help in the Syntax Assistant
We see that this expression has been found because a new window is displayed listing the chapters where the expression is used. Every chapter in the list includes full path to the searched expression beginning with the structure root of the Syntax Assistant contents. Slash ("/") is used to separate levels of the structure from each other. So if you hover your mouse over some item in the list of chapters, you will be able to understand if this is the chapter we need.
But the list of chapters where the search expression is used is quite lengthy so it may be difficult to search for the required chapter manually. To find the Items property that is used in the managed form, press Ctrl + F in the list window and enter "ManagedForm" in the search window. Click Find. The required chapter will be highlighted in the list of chapters (fig. 5.33).
Click Show.
The description of the selected chapter will be opened on the Index tab in the
lower window of the Syntax Assistant (fig. 5.34). The Syntax Assistant tree
above is not changed. To locate the tree branch that hosts the currently opened
description, click Find
Current Item in the Tree above the object
description window of the Syntax Assistant.

Fig. 5.33. Search in the chapter list during context search

Fig. 5.34. Description of Items property of the ManagedForm object
The Contents tab of the Syntax Assistant will display the section corresponding to the current description. So in the tree of contents you can see that Items is a property of ManagedForm object. Next if you expand corresponding links as described for the first method of working with the Syntax Assistant, you will understand the content of the TabularSectionRow variable and how data in its columns can be called for. Etc, etc.
There is another useful feature of the Syntax Assistant. You can also restrict the assortment of objects that will be displayed. Since we are currently in a client and on a form, it is reasonable to only view the 1C:Enterprise script entities that are available in the Thin client and Web client modes. To do so, select Tools > Options from the main menu or click Open option setup mode  button located above the object description window of the Syntax Assistant. On the right-hand tab of the Options window you can check or clear the required run modes (fig. 5.35).

Fig. 5.35. Filtering objects displayed in the Syntax Assistant
CAUTION
When you write a procedure that will be executed, say, on the server and want to use the Syntax Assistant, do not forget to check the respective run mode to display 1C:Enterprise script entities.
Using Debugger to Analyze Code
The debugger tool is most convenient when you need to create some code of your own. The reason is that its major difference from the Syntax Assistant where you need to understand execution contexts, object structure and other parameters pretty well, is that when you use the debugger, you do not need to understand all these factors.
You can simply stop in any location of a program and review the available properties or the program objects that are used here.
The debugger is a support tool that facilitates program module development and debugging in 1C:Enterprise. The debugger provides the following capabilities:
- step-by-step module execution;
- setting breakpoints;
- interrupt and resume module execution;
- debugging multiple modules simultaneously;
- calculating expressions for variable status analysis;
- viewing procedure and function call stack;
- aborting upon error;
- editing a module during debugging.
For now we will not discuss all these features in detail but will instead discuss using the debugger in order to understand the event handler named MaterialsQuantityOnChange quoted in the listing 4.1.
If module code is edited in the Designer mode, the commands under Debug item of the main menu become available. These commands enable setting and removing breakpoints. Breakpoints make it possible to interrupt program execution in the locations of such breakpoints. After such interruption a developer can analyze the value and type of module expressions and variables at the point of interruption and continue execution up to the next breakpoint, etc.
Now open the form of the ReceiptOfGoods document, navigate to the Module tab and open the code of the MaterialsQuantityOnChange procedure. We see that the Debug main menu item and the Designer toolbar now include the commands to work with the breakpoints (fig. 5.36).

Fig. 5.36. Breakpoints toolbar
You can set a breakpoint by double-clicking in the utility area to the left of the required line. A breakpoint icon will be displayed in the utility area located along the left border.
NOTE
To define a breakpoint, you can also
locate the mouse pointer anywhere in the module code where you want
interruption to take place and select Debug > Breakpoint or click the respective button
 on the Breakpoints toolbar.
To remove a breakpoint, double-click this breakpoint in the utility area.
NOTE
To remove a breakpoint, you can also
locate the mouse pointer anywhere in the module code and select Debug > Remove Breakpoint or click the
respective button  on the Breakpoints toolbar.
To remove all the breakpoints, select Debug > Remove All Breakpoints or click the respective button on the Breakpoints toolbar.
Now double-click in the utility area to the left of the first line of the procedure MaterialsQuantityOnChange (fig. 5.37).

Fig. 5.37. Defining a breakpoint in the MaterialsQuantityOnChange procedure
To debug 1C:Enterprise script code, you should run the application that executes the code in the debug mode. To initiate debugging, select Debug > Begin Debugging or click the corresponding button on the Designer toolbar. The Designer will launch 1C:Enterprise in the debug mode. Actually this is exactly what we have done before but we have not set any breakpoints and the program was not interrupted.
Open the list of documents ReceiptOfGoods and open any of the two documents we have created. Edit the field Quantity in any row of the document. Program execution will be interrupted and the procedure MaterialsQuantityOnChange will be opened in the Designer in the breakpoint location. An arrow will be displayed near the breakpoint to demonstrate the currently executed module line (fig. 5.38).
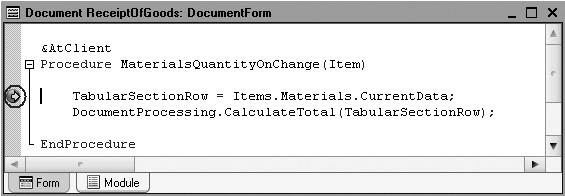
Fig. 5.38. Program interruption at the breakpoint location
We also see that the Debug main menu item and the Designer toolbar now include the commands to work with configuration in the process of debugging (fig. 5.39).

Fig. 5.39. Configuration debugging toolbar
Using these commands and buttons of the Configuration Debugging toolbar, you can execute the program (buttons Step Over, Step In, Step Out) or continue with debugging (using Continue Debugging button) up to the next breakpoint. Using the buttons Immediate Window and Calculate Expression, you can get the values of required expressions at every point of program interruption. You may use the Call Stack button to trace the sequence of procedures and functions.
But for now we have already stopped in the required line of the procedure MaterialsQuantityOnChange. Note that this line has not been executed yet so the values of variables are not filled in yet. To view them at the state after line execution, click Step Over.
So we now want to understand the meaning of the
expression Items. Materials.CurrentData and the
content of this object at the moment of program interruption. Double-click the
word Items and click Calculate Expression (Shift + F9)  on the Configuration Debugging
toolbar.
on the Configuration Debugging
toolbar.
The Expression field will be populated with the highlighted word Items. The respective columns will display the value and type of this object. We see that the Items object is a collection of values FormAllItems that hosts all the form controls. Expand this object branch (fig. 5.40).
Above the Result window you will see the button Show Values in Separate Window. If you click this button (or press F2), you will be able to view the content of collections.
Next we are interested in the expression Materials. Locate it in the list of form controls. We see that it is the object named FormTable. Expand this object and review its properties. The property we are interested in is CurrentData. Locate this object in the list and expand it. We will see the data of the current row in the tabular section, their values and types. Note that Quantity has the value we have just changed (fig. 5.41).
For now the value of the variable TabularSectionRow is not defined because we have stopped before execution of the line, i.e. before the object Items. Materials.CurrentData is assigned to the variable. Close the Expression window and click Step Over on the Configuration Debugging toolbar. The program will stop on the next line an arrow points to. Next click Step In on the same toolbar because we now want to go to the procedure of the DocumentProcessing common module where the value of the variable TabularSectionRow is calculated. The program will go to the CalculateTotal procedure of the DocumentProcessing common module. Double-click TabularSectionRow to highlight it and click Calculate Expression.
Expand the object TabularSectionRow (fig. 5.42).
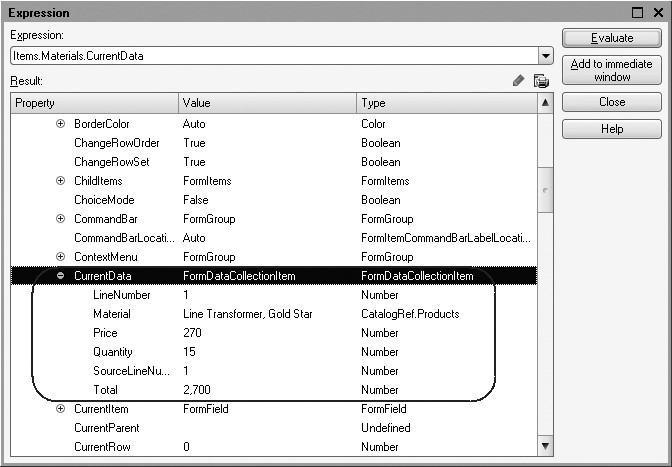
Fig. 5.41. Object Items.Materials.CurrentData

Now we see that the variable TabularSectionRow contains the FormDataCollectionItem object. But the values in the Total column have not be recalculated yet because the second line has not been executed yet.
Now close the Expression window and click Step Over button on the Configuration Debugging toolbar again. The program will execute the CalculateTotal procedure of the DocumentProcessing common module and stop in the end of the procedure. Now you can point your cursor to the Quantity or Total column and the current value will be displayed in the tooltip (fig. 5.43).

We see that the values in the Total column have been recalculated based on the specified algorithm so the object Items.Materials.CurrentData now contains new values.
So we can set a breakpoint to the loop body and view the values of variables in the process of execution, etc.
After you analyze the variables and expressions at the moment of interruption, you can continue with debugging using Continue Debugging button. If you want to abort debugging, use Debug > Stop command. You can edit the current configuration and save changes during debugging.
CAUTION
Although a debugged module may be edited, the Debugger does not compile the modified code, and debugging is continued for the database configuration code (that existed at the moment when the Debugger was launched or when the connection was opened). To debug changes made to the configuration, you should update the database configuration.
Finally, we will discuss some of the useful methods of working with the debugger.
When you are in a form module and you want to write some
handler, you can use ThisForm
property to view the context properties of this particular form along with the
extensions that exist, etc. To do so, after you stop at some breakpoint, click Calculate Expression (Shift
+ F9) on the Configuration Debugging
toolbar. In the Expression
field enter the word ThisForm
and click Evaluate
(fig. 5.44).

If you expand this object, you will see the type and properties of the 1C:Enterprise script entities that are used at the moment of interruption.
In a similar manner when you are in a module of an object or a record set, you can use ThisObject property to view the context properties of the module of the object or record set.
Objects, Objects, Objects...
What exactly is an object in 1C? This question often bewilders not just novice developers, but also people with a fair amount of experience developing for the 1C platform.
The hard part is to make sure that you clearly understand the context where the term is used.
As a rule the term object is used in one of the three contexts:
- Configuration;
- Database;
- 1C:Enterprise script.
When speaking about the configuration, we use the term configuration object to describe a certain set of data definitions and processes that manage the data. For example, a configuration may contain a Catalog object named Employees.
An information structure is created in the database on the basis of each configuration object. This structure is then used to store data.
So speaking about a database, what we mean by the term object is simply some item in that information structure. What defines such item is the fact that a reference points to it (as to a body of data), and that this reference might be a value in some field in another information structure.
For example, suppose a database contains a catalog named Employees, which includes an employee named Johnson. In this case, the catalog item that contains information about Johnson will be considered a database object. And if we have a ReceiptOfGoods document that includes the attribute ResponsibleParty, the value type for that attribute will be a reference to a database object, i.e. the catalog item containing Johnson's information.
However, if we start talking about the 1C:Enterprise script and about how we can use its commands to work with catalogs, what we will mean by the term object is a type of data that allows us to access data and possesses a set of properties and methods.
There are quite a number of 1C:Enterprise script entities that allow us to work with catalogs (CatalogsManager, CatalogManager.<name>, CatalogRef.<name>, etc). Among these there is one object that provides access to catalog objects in the database - CatalogObject.<name> (fig. 5.45).
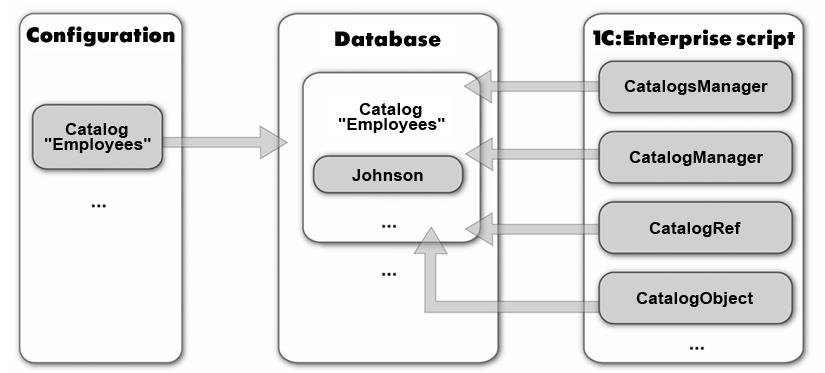
Fig. 5.45. Configuration Object, Database Object, 1C:Enterprise Script entities
Server and Clients
During the previous lesson we created one procedure to handle multiple events and located it in the common module named DocumentProcessing. We checked Client and Server in the properties of this common module. Now we will discuss in details why 1C:Enterprise has any clients and servers at all.
1C:Enterprise supports two run modes: file mode and client-server.
File mode version of infobase operation is intended for individual work of one user or work of a small number of users in a local network. When this version is used, all the infobase data (configuration, database, administrative information) are located in one file (fig. 5.46).

Fig. 5.46. File Mode operation
The main purpose of file mode is to install the system and begin using it quickly and easily. It may be needed to review something or work on some task at home or on a laptop. File mode allows for actual accounting operations but you need to understand that it does not offer the same level of opportunities in scalability and data protection as offered by the client-server version. So if you handle accounting on your own or have a small team and do not need secure data protection from unauthorized use by employees and you have a relatively small volume of data, you can certainly work in the file mode. In other cases you should use client-server version.
Client-server version is intended for use in work groups or at the entire enterprise level. This version is based on a three-level client-server architecture (fig. 5.47)
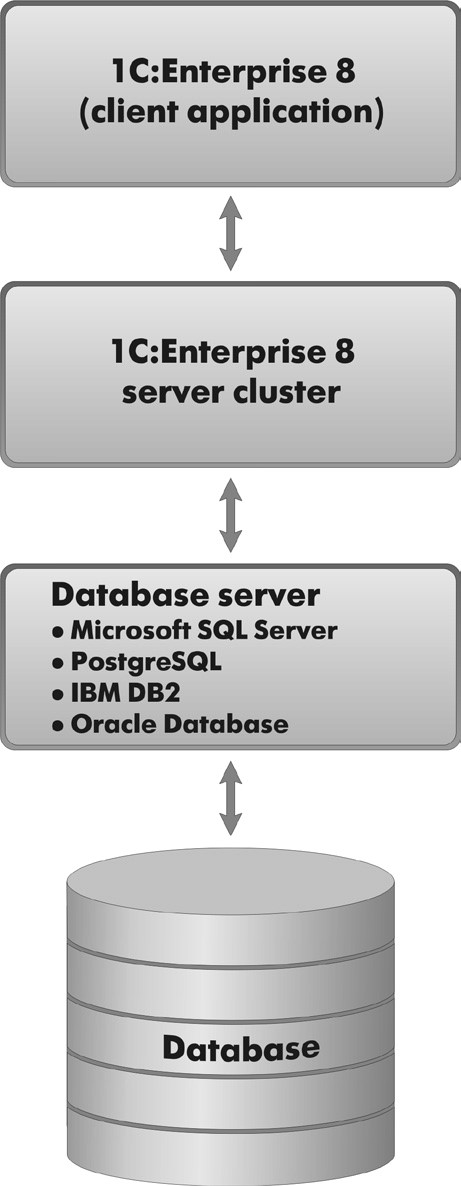
Fig. 5.47. Three-Level architecture of 1C:Enterprise
Client-server operation version is the main version for work in a multiuser environment with a large volume of data. It provides a complete range of features for scalability, administration, and data protection. But it also involves significant efforts in installation and administration.
Note that in physical sense the server and front end of 1C:Enterprise 8 may be located both on different computers and on the same one. The most important part is that a user does not have direct access to database server which provides for data security. And in the file mode the database should be located in some shared network location available to all the users. 1C:Enterprise is initially intended for client-server operation version. And while right now you develop your training configuration in the file mode, it will also work in the client-server version without any extra efforts.
Applications are developed only once and work in the same manner in both versions. So you do not need to modify the configuration to switch from one version to another.
This is possible because a configuration is always developed based on the client-server architecture. In 1C:Enterprise you simply cannot develop it otherwise. And if file mode is used, the system simply imitates availability of a server on a client computer when executing an application.
Client-server architecture splits the entire working system into three different parts that interact with each other in different manners: Client, 1C:Enterprise Server, and Database Server.
A client application is a program that is part of 1C:Enterprise. Its main purpose is arrangement of a user interface and display of data so that they could be modified. Besides, a client application may execute code written using 1C:Enterprise script (some algorithms created by the developer) but it only operates a very limited range of 1C:Enterprise script types. This approach makes it possible for a client application to be very lean, not resource-hungry, browse the internet and even operate in the web browser environment.
Client application interacts with 1C:Enterprise server. 1C:Enterprise server is also a program and a part of 1C:Enterprise.
One of the main goals of this program is delivery of requests from a client application to database server and returning results to the client.
Another goal of the server is execution of the vast majority of algorithms written using 1C:Enterprise script, preparation of data for display of forms, reports, etc. Hence, all the complicated calculations that involve direct operations with data are executed on the server. Note that almost the entire range of 1C:Enterprise script types is available on the server (the natural exception is specific interface types because the server has no interface part because it does not interact with users and only exchanges data with other programs: client application and database server).
A database server is a program as well. But this program is not a part of 1C:Enterprise. Instead it is a special third-party software. Its major goal is arrangement and maintenance of databases where a database is a structured and organized data set that describes characteristics of some physical or virtual systems.
Currently 1C:Enterprise supports the following database servers:
- Microsoft SQL Server;
- PostgreSQL;
- IBM DB2;
- Oracle Database.
Common Module Compilation
During the previous lesson we created one procedure to handle multiple events and located it in the common module named DocumentProcessing. Same as any common configuration module this module has a set of properties: Client (managed application), Server, and External Connection. The values of these properties (true/false) define where the instances of these modules will be compiled.
Let us discuss the events taking place where we check or clear some properties of a common module.
First you need to understand why compilation is needed. The thing is that everything that we have developed and coded in the configuration by now is nothing more than a "workpiece". When the platform is launched in the 1C:Enterprise mode, all of this is transformed into a program that can be executed on a computer. This process is referred to as compilation. Note that as we have mentioned above, different parts of the system exist where code is executed - a server and some client applications. So, for common modules we can and actually should specifically choose the end where such modules should be compiled: on the server or on the client.
In the DocumentProcessing common module we have checked the property Client (managed application) (see fig. 4.24). It means that instances of this module will be compiled only on the client end in the thin client context and in the web client context (fig. 5.48).
If a module only has the Server property checked, the module will only be compiled on the server end.
Two client applications exist: Thin client and Web client.
Thin client is the file named 1cv8c.exe. This is the file launched automatically when debugging is initiated.

Fig. 5.48. Common module compilation on the server side or front end
Web client does not exist as a file. It is not executed in the operating system environment and web browser environment is used instead. A user should only start their web browser, enter the address of the web server where a required infobase is published, and the web client is downloaded to the computer and runs.
The Directives of the Compiler
During the previous lesson we created handlers for OnChange events for some form controls. When declarations were created for the procedures containing the code of the handlers, they were preceded by the directives &AtClient. Here we will cover in details their meaning.
The thing is that a form exists simultaneously on the server and on the client. So for every procedure that exists in the form module, you should specifically enter its execution context, i.e. where it will be executed: on the server or on the client. Availability of the directives &AtClient or &AtServer or &AtServerNoContext is due to the fact that when 1C:Enterprise script is used in a form module, front end code should be precisely separated from the server code. So if you specify one of the directives, you expressly program server end or front end.
In a form module you can use procedures with different execution directives and transfer code execution from the client to the server. Also you can use a front end procedure of a form module to call for a common module procedure (exactly what we have in our example) that can be executed both on the front end and on the server end depending on the checked properties of the Thin client or Server module.
Executing Code on the Client and on the Server
During the previous lesson we created one procedure to handle multiple events and located it in the common module named DocumentProcessing. In doing so, we checked Client (managed application) and unchecked Server in its properties. This procedure was opened from the form module where the event handler also had a directive specified that defined the execution context for this handler - &AtClient. Now we will discuss in details how code is executed in this situation.
When an application is launched, code execution is always initiated on the front end. In the process of operation code execution can be transferred to the server by calling for a procedure of a common module compiled on the server.
The thing is that when a procedure or function is called for, it is first searched for on the client. If the compiled client context does not contain this procedure, search continues on the server end. If the procedure is found, code execution will be transferred to the server. When the procedure is ended, code execution will continue on the client.
For example, when you change the price in a receipt of goods form, the procedure of the form module named PriceOnChange() is called for. It is executed on the front end in the thin client mode. The second line of this handler call for the procedure CalculateTotal(). This procedure is located in the common module named DocumentProcessing that is also compiled on the client. It is executed in the thin client mode. After this procedure is executed, management is transferred again to the form module (fig. 5.49)
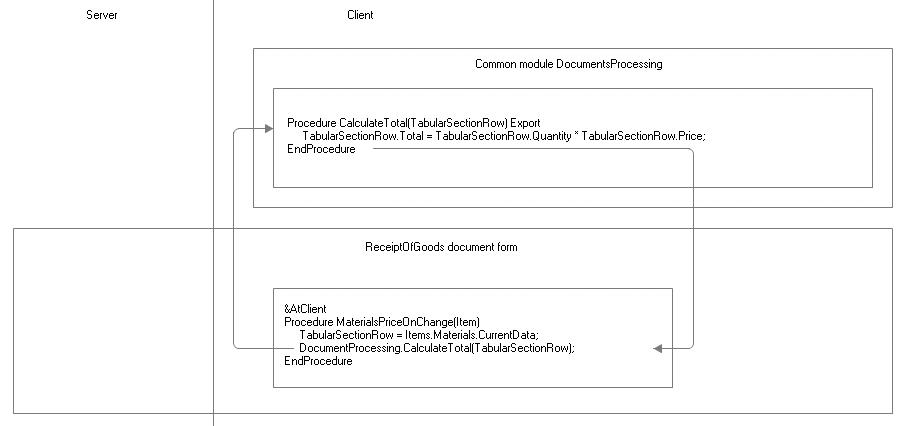
Fig. 5.49. Transfer of execution code between modules on the client