
Lesson 8. Templates. Editing Templates and Forms
Estimated duration of the lesson is 1 hour 10 minutes.
CONTENT:
During this lesson we will familiarize ourselves with a new configuration object named a Template. You will learn how it is used and will create a document template, which will be used to generate a print document form.
Understanding a Template
A Template configuration object is designed to store various data presentation forms and various data that may be required for certain configuration objects or for the application as a whole.
A template may include a spreadsheet or text document, binary data, HTML document or Active Document, graphical scheme (flowchart) or geographical map, data composition schema or appearance template for a data composition schema.
A template may exist independently (a common template), or it may be subordinate to some configuration object.
One of the uses of a template that is subordinate to a configuration object and contains a spreadsheet document is to generate a print form of this object. Creating a print form consists of laying out its component parts - the named areas that are used to assemble a ready print form.
The methods of populating the areas with data and outputting them into the final form are defined using the 1C:Enterprise script. A print form may include various graphic objects: images, OLE objects, charts, etc.
In addition to manual template creation, the Designer provides the developer with a special tool, the print wizard, which will perform the bulk of the routine steps in creating a template.
Adding a Print Form Template
In the Designer Mode
Our goal is to create a print form for the Services Rendered document.
In the Designer, open the configuration object editor for the ServicesRendered Document.
Go to the Templates tab and launch the print wizard (fig. 8.1):

In the print wizard window that opens specify that this will create the new command named Print to generate the document print form (fig. 8.2).
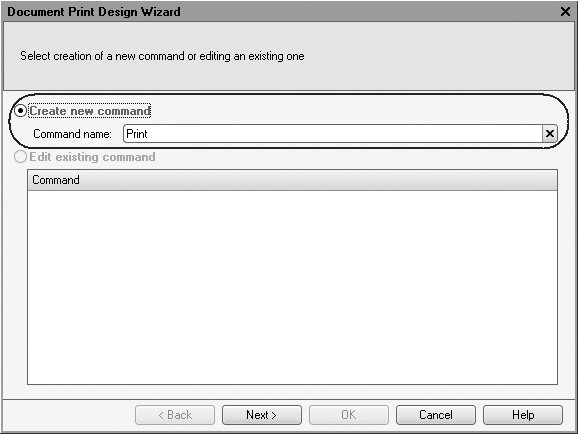
Click Next.
On the second step click the  button to indicate that all the document attributes will be displayed in the print form header (fig. 8.3).
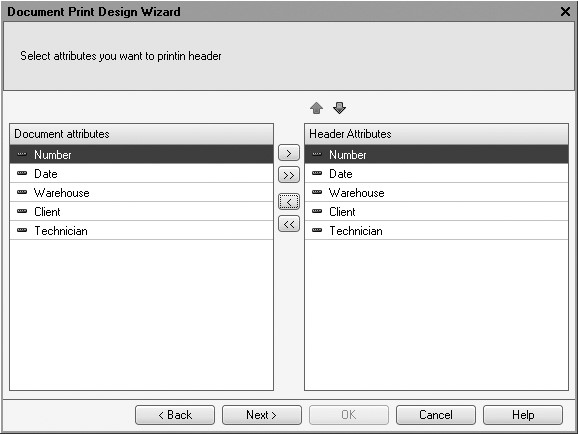
Fig. 8.3. The Print Wizard window. Step 2
Click Next.
On the third step use the same procedure to indicate that all the attributes of the document tabular section will be displayed in the print form (fig. 8.4).

Fig. 8.4. The Print Wizard window. Step 3
Click Next.
On the fourth step, the wizard will prompt you to generate a footer (bottom portion) of the print form. Skip this step (i.e. we will not use a footer), click Next and proceed to the fifth step (fig. 8.5).

Here we will not make any modifications. In doing so, we confirm that the command used to open the procedure of generating a print form will be included in the command bar of the form, Important section.
Click OK.
The Designer will open a command module of the Print command, module of the ServicesRendered document manager and the template for this document (fig. 8.6).

Fig. 8.6. Template of the Services Rendered document
Note that a developer can create a print form template from scratch and use a respective command and button in the document form to display it. But in this situation everything has been done by the print wizard:
- A print form template has been created for the ServicesRendered document named Print (see fig. 8.6).
- A command for the ServicesRendered document is created named Print. A module for this command includes a handler that calls for the document print procedure that is executed on the server. The print procedure itself is located in the module of the ServicesRendered document manager (fig. 8.7).

Fig. 8.7. Structure of the Services Rendered document in the configuration object tree
- The command bar of the ServicesRendered document now includes a command named Print to generate the document print form (fig. 8.8).

Fig. 8.8. Template of the Services Rendered document
Note that since the Print command relates to the entire ServicesRendered document instead of a specific form of this document, this command can be included into any form created for this document.
In the future we will create the procedures of command handlers manually and locate their respective buttons in the form but for now we will use the results of the print wizard and test this template.
In the 1C:Enterprise Mode
Launch 1C:Enterprise in the debugging mode and open the Services Rendered No. 1 document.
Note that the document command bar now has a new button named Print (fig. 8.9).
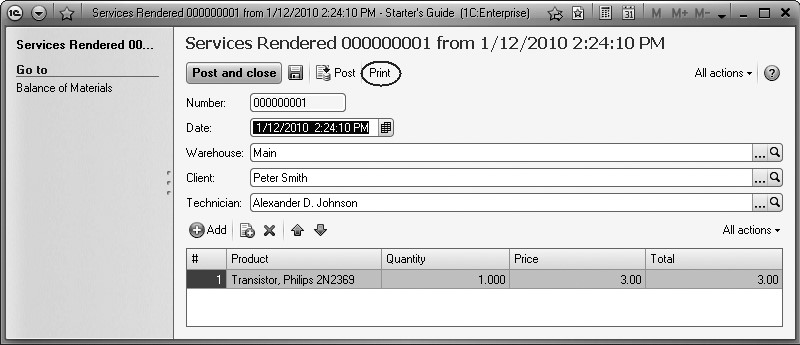
Fig. 8.9. Form of the Services Rendered Document with a new Print button
Click this button to view the print form of our document (fig. 8.10).

Fig. 8.10. Print Form of the Services Rendered Document
As you see, the wizard has generated a perfectly useable print form of our document. The only thing this form lacks is a summary total for the document.
In the next section we will use the example of adding a summary total for a document to see how templates and forms of configuration objects can be edited.
Editing a Template
In the Designer Mode
First of all, add the summary total to the print form of the ServicesRendered document.
Now open the Designer, expand the tree for Services Rendered document and double-click the Print template.
As you can see, the document template consists of named areas which are printed in a certain order.
The named areas we see in the left-hand pane have been generated with the wizard. But a developer can create or remove areas, rename them and perform various other actions.
We will now add a new area in order to output the document's summary total. Highlight two empty rows under the document tabular section and select Table > Names > Set Name... from the main menu (fig. 8.11).
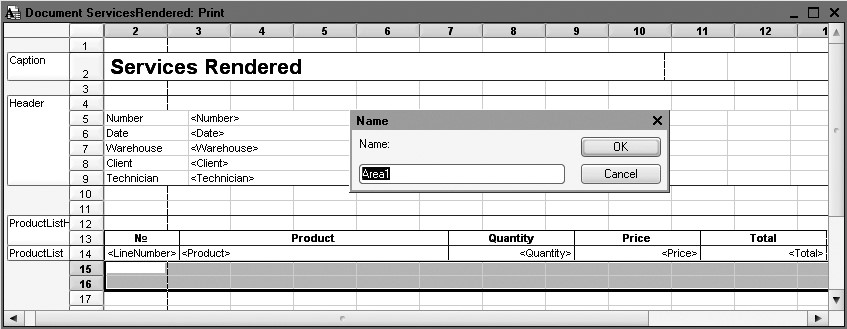
Fig. 8.11. Creating a Cells Area to Display the Summary Row
Enter Total for the name of the area and click OK.
For the format of the added rows to match the existing format of the document header and tabular section, resize the columns widths.
To do so, drag the right-hand border of the column 2 in the table header so that its width is equal to the width of column No. in the document header. Release the mouse button.
You will be prompted by the platform to create a new format for the highlighted rows. Confirm when prompted.
Use similar steps for columns 3, 4, 5, and 6.
Within the created area in the Price column, enter TOTAL, and then in the Total column enter DocumentTotal (fig. 8.12).

Now open the properties palette for the last cell we filled in (context menu - Properties) and in the FillType property indicate that the cell will contain a parameter rather than text (fig. 8.13).
Every cell of a spreadsheet document being edited may contain either text or some parameter or a template.
The text contained in the cell will be displayed on the screen.
A parameter will be replaced by a certain value that will be assigned to it by means of the 1C:Enterprise script. The text contained within the cell is the name of that parameter.
A template is a text string that can be used to insert parameter values at predefined locations.

Fig. 8.13. Properties of DocumentTotal Cell
Therefore, by setting the cell to be populated as a Parameter, we defined the parameter of the area named DocumentTotal, to which we will assign a value when generating the print form.
Open the module of the ServicesRendered document manager.
To do so, navigate to the Other tab in the configuration object editor for the ServicesRendered document and click Manager Module (fig. 8.14).

Fig. 8.14. Opening the manager module of the ServicesRendered document
Locate the procedure named Print and edit it as follows (new lines are displayed in bold) (listing 8.1).
Listing 8.1. Printing a Document Form (Segment)
...
AreaCaption = Template.GetArea("Caption");
Header = Template.GetArea("Header");
AreaProductListHeader = Template.GetArea("ProductListHeader");
AreaProductList = Template.GetArea("ProductList");
AreaTotal = Template.GetArea("Total");

Spreadsheet.Clear();

InsertPageBreak = False;

While Selection.Next() Do

	If InsertPageBreak Then
		Spreadsheet.PutHorizontalPageBreak();
	EndIf;

	Spreadsheet.Put(AreaCaption);
	Header.Parameters.Fill(Selection);
	Spreadsheet.Put(Header, Selection.Level());
	Spreadsheet.Put(AreaProductListHeader);

	SelectionProductList = Selection.ProductList.Choose();
	TotalSum = 0;

	While SelectionProductList.Next() Do

		AreaProductList.Parameters.Fill(SelectionProductList);
		Spreadsheet.Put(AreaProductList, SelectionProductList.Level());
		TotalSum = TotalSum + SelectionProductList.Total;

	EndDo;

	AreaTotal.Parameters.DocumentTotal = TotalSum;
	Spreadsheet.Put(AreaTotal);
	InsertPageBreak = True;

EndDo;
...
The meaning of the added segment is simple: We simply reference the template of the ServicesRendered document template using its name - Template.
Using the method GetArea() we obtain the Total area (the one we have added to the template) and save it in the AreaTotal variable.
In the loop of searching in the rows of the document tabular section obtained as a result of query execution, we accumulate the value of the document tabular section in the Total column in the TotalSum variable.
Next we address the DocumentTotal parameter (AreaTotal.Parameters.DocumentTotal) located in the Total area and assign the value of the TotalSum variable to this parameter.
Finally, we output the summary area in the resulting spreadsheet document that will be displayed on the screen and printed out by the user - Spreadsheet.Put(AreaTotal).
A spreadsheet document is displayed on the screen using the Print command handler in the front-end module of this command while the print procedure itself defined in the document manager module is executed on the server end.
In the 1C:Enterprise Mode
Run 1C:Enterprise in the debugging mode and test the results of our modifications (fig. 8.15).

Fig. 8.15. Print form of the Services Rendered document
A developer can create a print form designed as required in a similar manner by using named areas and template cells, their properties and by managing their print order with 1C:Enterprise script tools.
Now, in order to give our ServicesRendered document the finishing touch, we will add a document total to the screen form as well, so that the user will be able to see it while filling in the document's tabular section.
Editing a Form
In the Designer Mode
Once you output the summary total in the tabular section to a document print form, you will naturally want the same summary total to be displayed in the document form. This is convenient to know the summary total for the document while the document is created without printing it out.
To do so, we will slightly modify the ServicesRendered document form.
To edit a document form, open the Designer, expand the tree of the Services Rendered document and double-click the DocumentForm form.
Double-click ProductList form control in the form controls tree or open its properties palette by right-clicking it (Properties item of the context menu) (fig. 8.16).
Check the property Footer that defines availability of a footer in the form table (fig. 8.17).
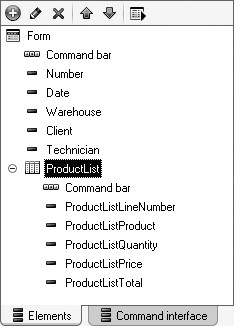
Fig. 8.16. Opening properties palette of a table box

Fig. 8.17. Enabling visibility for a tabular section footer
Next open the properties of the ProductListPrice form control and customize them as follows:
- Footer Text - Total: (fig. 8.18),
- Horizontal Alignment in Footer - Right (fig. 8.19), and in the Footer Font property apply Bold font (fig. 8.20).

Fig. 8.18. Defining table column properties in a footer

Fig. 8.19. Defining table column properties in a footer

Fig. 8.20. Defining table column properties in a footer
Now open the properties of the ProductListTotal control and customize them as follows:
- Horizontal Alignment in Footer - Right,
- and in the Footer Font we will also apply Bold font.
For the footer of Total column to display the totals for this column, click the selection field in the FooterDataPath field (fig. 8.21).
Expand the object attributes tree and select TotalTotal (fig. 8.22).

Fig. 8.21. Selecting data for a footer of the Total column

Fig. 8.22. Selecting data for a footer of the Total column
In the 1C:Enterprise Mode
Launch 1C:Enterprise in the debugging mode and check the appearance of the form for the document Services Rendered No. 1 (fig. 8.11):

Fig. 8.23. Form of the Services Rendered Document with the Total Row
We see that the summary total of the document is calculated in the Total column of the document tabular section.
This small modification applied to the form significantly improves user interface of the form and makes it more user-friendly. In a similar manner a developer can use the properties for form controls, enter their values and edit form command interface to create screen forms that will look and behave as required.
Quiz
- What are the uses of the Template configuration object? þ What is a print wizard?
- How does one create a template using the print wizard?
- How does one modify a spreadsheet document?
- What is the difference between populating cells of a spreadsheet document with text, parameters or templates?
- How does one use the 1C:Enterprise script to insert a new area into a spreadsheet document?
- How does one edit the appearance and behavior of a form control?
- How does one display totals for a table column?