
Lesson 23. Desktop and Command Interface Setup
Estimated duration of the lesson is 1 hour 10 minutes.
CONTENT:
During this lesson we will make our configuration more presentable by refining application command interface, setting up the desktop and visibility of commands by roles for the users created.
This will finalize the application interface to a certain extent and will make it more user-friendly which is most important.
The appearance and arrangement of the application interface heavily influence if the users will like the developed application.
Setup of Command Interface of Sections
Until now we have virtually ignored arrangement of command interface of sections (subsystems) because we dealt with issues that were most important from a developer's perspective.
Now it's time to deal with this aspect that is very important from a user's perspective so we will pay attention to sorting the commands and arranging them in groups based on priority and frequency of use .
In the Designer Mode
Start by entering Search data as a synonym for the DataSearch report.
This will be more straightforward for a user (fig. 23.1).

Fig. 23.1. Synonym of the DataSearch Report
Now open the command interface editor of subsystems All Subsystems (Common > Subsystems > All Subsystems) (see fig. 23.2).
Highlight the subsystem GoodsManagement in the list and in the Command Interface window apply the following changes:
- Drag the command Receipt of Goods from the Navigation Panel.Normal group to the Navigation Panel.Important group.
- Arrange the commands in the following order in the group Navigation Panel.Normal:
- Products,
- Product Prices,
- Warehouses.
- In the group Navigation Panel.See also disable visibility for the Sales command and define the following order for the commands:
- Balance of Materials,
- Cost of Materials.
- In the group Action Panel.New arrange visible commands in the following order (the arrangement of invisible commands is of no importance):
- Receipt of Goods: New,
- Product: New,
- Warehouse: New.
- Arrange the commands in the following order in the group Action Panel.Reports:
- Resources,
- Balance of Materials by Properties.
- Move the command Search data from the group Action Panel.Reports to the group Action Panel.Tools.
As a result of these actions the All Subsystems window will look as follows (fig. 23.2):
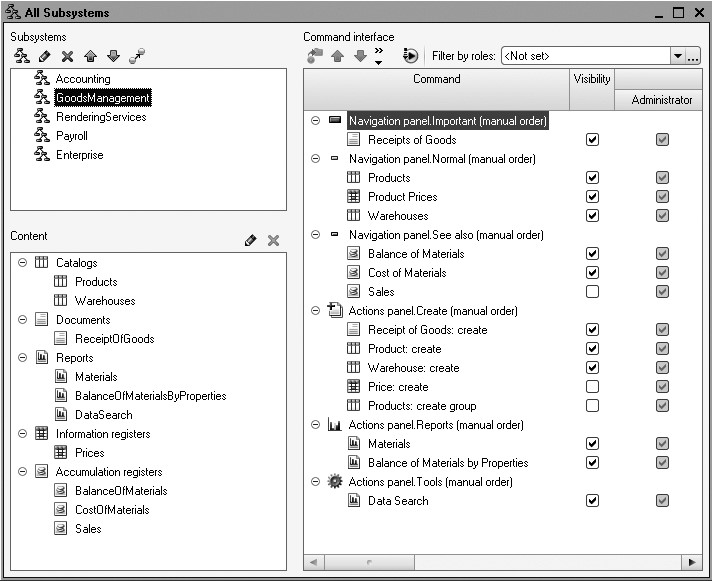
Fig. 23.2. Command interface of the GoodsManagement subsystem
We will now discuss these actions.
In the Goods Management section the user will most frequently need to create Receipt of goods and view the list of receipts. So we have put the command to view the list of receipts (Receipts of goods) to the group Important of the navigation panel while the command to create receipt (Receipt of Goods) has been arranged as the first one in the action panel of the Goods Management subsystem.
A user may quite frequently need to create new products and view the list of products. So we have put the command to view the list of products (Products) to the group Normal of the navigation panel while the command to create products (Product) has been arranged as the second one in the action panel of the Goods Management subsystem. The same is true for the catalog of warehouses but with somewhat lower priority.
The group See also of the section navigation panel contains the commands Balance of Materials and Cost of Materials that are intended to view the records of respective accumulation registers. The commands are arranged here in compliance with how frequently they are used. We have also removed the command to view the records of the Sales register because it will hardly be needed in the Goods Management section.
The reports in the section action panel are arranged in the order of priority. And the command to open Search data report has been moved from the group Reports to the group Tools of the action panel because data search is more of a service tool than an actual report.
Now use similar considerations to edit command interface of other subsystems.
The RenderingServices subsystem will have the command interface as follows (fig. 23.3):
- Navigation Panel.Important group:
- Rendering Services.
- Navigation Panel.Normal group:
- Clients,
- Products,
- Product Prices,
- Employees,
- Warehouses.
- Navigation Panel.See also group:
- Balance of Materials,
- Cost of Materials,
- Sales.
- Action Panel.New group (only visible commands):
- Services Rendered: New,
- Client: New,
- Product: New.
- Action Panel.Reports group:
- Services Rendered Documents Register,
- Services List,
- Service Evaluation,
- Client Evaluation,
- Revenue Per Technician,
- Resources,
- GeneralPurpose.
- Action Panel.Tools group:

Fig. 23.3. Command Interface of the RenderingServices Subsystem
The Accounting subsystem will have the command interface as follows:
- Navigation Panel.Important group:
- Receipt of Goods,
- Rendering Services.
- Navigation Panel.Normal group:
- Clients,
- Products,
- Product Prices.
- Navigation Panel.See also group:
- Balance Of Materials,
- Cost of Materials,
- Sales,
- Input Opening Product Balances,
- Main Chart of accounts,
- Extra Dimension Types.
- Action Panel.New group (only visible commands):
- Input Opening Product Balances: New
- Action Panel.Reports group:
- Trial Balance,
- Employee Accruals,
- Services List,
- Service Evaluation,
- Client Evaluation,
- Resources,
- Balance of Materials by Properties.
- Action Panel.Tools group:
- Search data
The Payroll subsystem will have the command interface as follows:
- Navigation Panel.Important group:
- Employee Accruals
- Navigation Panel.Normal group:
- Employees,
- Work Schedules.
- Navigation Panel.See also group:
- Accruals,
- Calculation Types,
- Work Schedule Types.
- Action Panel.New group (only visible commands):
- Employee Accruals: New,
- Employee: New.
- Action Panel.Reports group:
- Employee Accruals,
- Revenue Per Technician,
- Accruals Chart.
- Action Panel.Tools group:
- Search data
The Enterprise subsystem will have the command interface as follows:
- Action Panel.Tools group:
- Job Scheduler,
- Search data.
In the 1C:Enterprise Mode
Run 1C:Enterprise in the debugging mode.
Since we have created users for the configuration and assigned their roles, now before you run the application, you need to select a user.
Select Administrator user name. You do not need to enter a password for the users because we have not defined any passwords.
Now review the pleasant appearance of the application interface, e.g. in the sections Accounting and Payroll (fig. 23.4, 23.5).

Fig. 23.4. Command interface of the Accounting section
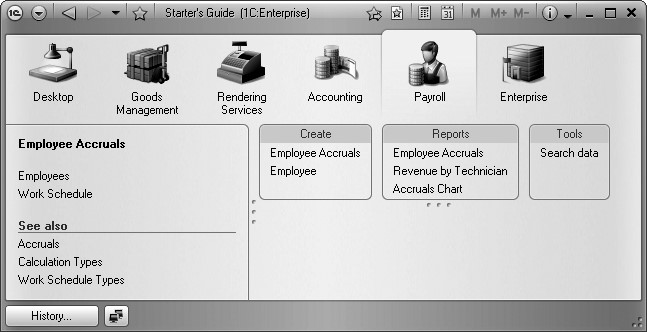
Fig. 23.5. Command interface of the Payroll section
As you can see, all the product groups are visually separated from each other while the most important commands are highlighted in bold in the navigation panels of the sections.
So we have set command interface of the sections up in compliance with our understanding of how the application will work.
But if a user has some other preferences, in the 1C:Enterprise mode they will be able to set command interface up as required using Tools > Interface Setup > ... of the main menu.
Desktop Setup
A desktop is intended to host the most frequently used documents, reports, catalogs, etc. So a user's desktop should include the forms of the documents, reports, etc. that they need to work with daily.
For example, a stock clerk will find it convenient to have easy access to the list of products and the list of receipts of goods while a manager will need the list of customers and documents recording services rendered.
When 1C:Enterprise is launched, the Desktop section is activated by default and the required forms are immediately opened in the work area of the application (fig. 23.6).
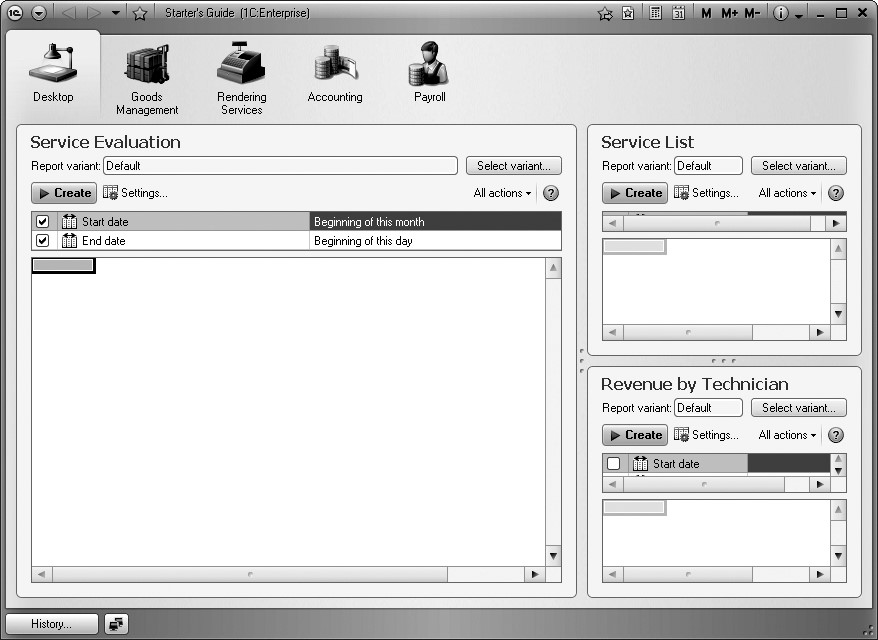
Fig. 23.6. Desktop for a user with a Director role
This prevents a user from navigating around various sections and using commands from action or navigation panels as they can immediately start working after simply turning the computer on and launching 1C:Enterprise 8.
But a desktop should not be overloaded with various forms because it may result in inconvenience to a user instead.
In the Designer Mode
So let us proceed to desktop setup.
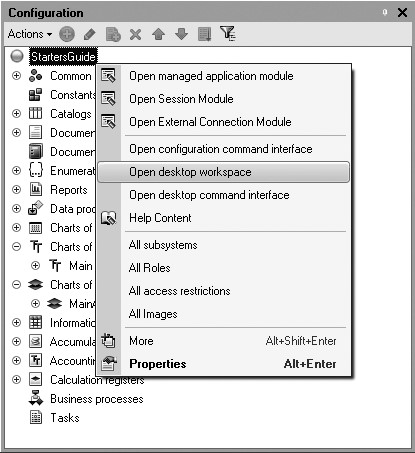
Highlight the root of the configuration object tree StartersGuide and select Open desktop workspace from its context menu (fig. 23.7).
This opens the desktop setup window (fig. 23.8). Start by selecting a desktop template in the top of the window as Two columns of different

Fig. 23.8. Desktop Setup Window
This means that forms on a desktop will be arranged in two columns and the left column will be twice as wide as the right one.
You can select another template where columns will have the same width or only one column will exist but the first option (2:1) is better because in this case a user will immediately see the forms of the highest priority that will be arranged in the left column.
In every column forms will be arranged one under another. An optimal arrangement is to have one or two forms at the most in the left-hand column while the right-hand column will host two or three forms per user.
Note that a desktop cannot host automatically generated forms. So before you add a form to the desktop, you will first need to explicitly create it in the configuration. Not to complicate things further, we will create the required forms right on the fly.
So let us proceed to desktop setup for the Technician role.
The Jack of All Trades is a service-oriented company and technicians are directly related to rendering services. So it is only logical if for a technician the left column of the desktop will contain the list of documents recording rendering services while the right column will display the list of receipts and the list of clients.
The following list forms are not available in the configuration so we will create list forms for the configuration objects:
- Clients catalog,
- ReceiptOfGoods document,
- ServicesRendered document.
Now navigate to the desktop setup window and click Add over the list of right-hand column forms.
Select the list form of the ServicesRendered document (fig. 23.9).

Fig. 23.9. Desktop setup for a user with a Technician role
In a similar manner add list forms for the ReceiptOfGoods document and Clients catalog to the right-hand column.
Now in each of the three forms click the links in the Visibility column and specify that these forms should only be visible for the Technician role (fig. 23.10).
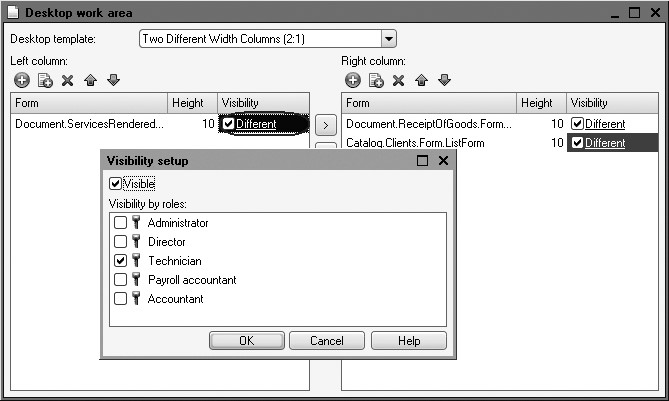
Fig. 23.10. Desktop setup for a user with a Technician role
These forms may be needed on desktops for users with other roles but for now we will only deal with the Technician not to complicate things.
Now we will set the desktop up for the Accountant role.
Suppose that an accountant will most frequently use the trial balance and the report regarding employee accruals. We will locate these reports in the left-hand column of the desktop while the right-hand column will be left empty.
Create the report form for the TrialBalance report (the form for the EmployeeAccruals report has already been created earlier when we designed our configuration).
Now switch to the desktop setup window and add these forms to the left-hand column. Enable visibility for these forms only for the role Accountant.
In a similar manner set the desktop up for the PayrollAccountant role.
The activities of a payroll manager suggest that they use the documents and reports related to employee accruals the most. So arrange the employee accruals report in the left-hand column of the desktop while the right-hand column should contain a list of accruals documents.
To do so, create a list form for the EmployeeAccruals document.
Now switch to the desktop setup window and add the list form to the right-hand column. Enable visibility for this form only for the role PayrollAccountant.
The EmployeeAccruals report has already been added to the left-hand column of the desktop when we customized the desktop for the Accountant role. So we only need to enable visibility for this report for the PayrollAccountant role as well (fig. 23.11).
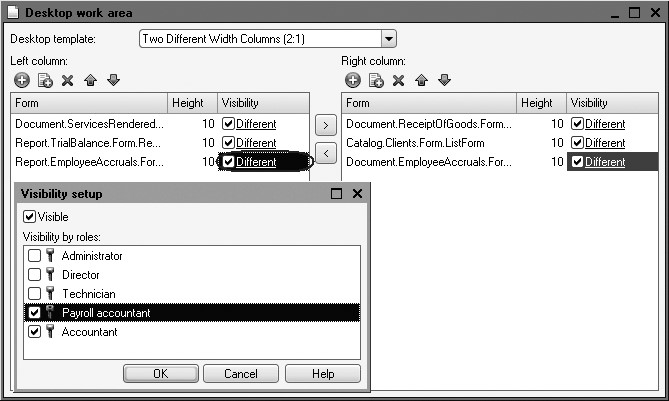
Fig. 23.11. Desktop setup for a user with a PayrollAccountant role
Next we will set the desktop up for the Director role.
The assumption here is that this role will be assigned to a user in charge of management functions. So this user will not need to enter any documents (and does not have respective permissions).
But the user will need to view operational reports from time to time to make various management decisions.
So the desktop for the user will be arranged as follows: left-hand column will include the Service Evaluation report while the right-hand column will host the reports Services List and Revenue Per Technician.
Now create report forms for these reports. Next switch to the desktop setup window and add these forms to the left-hand and right-hand columns. Enable visibility for these forms only for the role Director.
Finally, we will set the desktop up for the Administrator as well.
Administrator is in charge of 1C:Enterprise infobase condition and can access any configuration object. But it should not be complicated for an administrator to locate and execute any command in the configuration. So it is recommended to ask the administrator about what they actually want to have at the fingertips.
For example, for this user we will arrange the desktop so that the left-hand column contains the data search report while the right-hand column will be left empty.
We have already created the form for the DataSearch report earlier during configuration designing. Now switch to the desktop setup window and add the form to the left-hand column. Enable visibility for this form only for the role Administrator.
This should result in the following view of the desktop setup window (fig. 23.12).
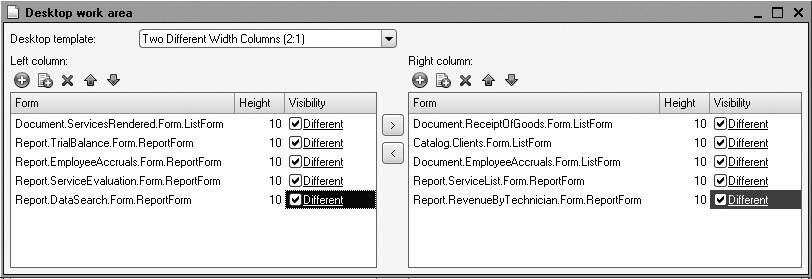
Fig. 23.12. Desktop Setup Window
In the 1C:Enterprise Mode
Now if you switch to the 1C:Enterprise mode and select the user name Delgado (who has the roles Accountant and PayrollAccountant), you will see the following desktop (fig. 23.13).

Fig. 23.13. Desktop for a user with the Accountant and PayrollAccountant roles
CAUTION
To be able to enter 1C:Enterprise mode under different users, you need to update the configuration and run 1C:Enterprise again by selecting 1C:Enterprise-thin client as a mode and the required user. If you run 1C:Enterprise in the debugging mode as we usually do here (i.e. from the Designer), the system will consider that you log in under the same user account that you use for the Designer, i.e. as an Administrator.
Note that the desktop also contains the list of documents recording employee accruals because the user Delgado has two roles: Accountant and PayrollAccountant. And this user has access to the sections Accounting and Payroll in compliance with the permissions specified for the roles during the previous lesson.
And for the user Alexander D. Johnson (who has Technician as its role), the desktop will look as follows (fig. 23.14).

Fig. 23.14. Desktop for a User with a Technician Role
This user has access to the sections Goods Management and Rendering Services in compliance with the permissions specified for the role during the previous lesson.
You can also set navigation panel and action panel of the desktop using the command Open desktop command interface (see fig. 24.7) but this is hardly necessary because all the required commands are already available in the action and navigation panels of the sections accessible by the user in compliance with their role.
Finally, in the process of 1C:Enterprise operation a user may set the desktop as required using Tools > Interface Setup > Desktop from the main menu.
But remember that users may only populate their desktops with the forms created by the developer in the configuration.
Setup of Command Visibility by Roles
In the Designer Mode
When we created new configuration objects, we saw that the default commands to operate these objects were added automatically (to open catalog lists, documents, to open reports, data processors, etc.). These commands were made available for all the users in the subsystems the object belonged to.
We have frequently edited command interface of subsystems using the command Common > Subsystems > All Subsystems. Such editing included reordering commands, enabling their visibility, etc. Now that we have added roles to the configuration, we can set visibility up for the commands by roles.
Role-based editing of default commands is a tool that enables you to customize how saturated the global command interface will initially be, in particular for the users with vast access rights.
So if a user cannot access the Accounting subsystem, they will not see any commands of this subsystem. And if a user is not allowed to create any documents, they will not see such commands either.
But for an administrator who possesses vast access rights the number of commands may turn out to be too large. Suppose that this user will very rarely use the command to open accumulation registers from the navigation panel of the sections.
To make the command interface leaner in this situation we will switch to editing global command interface again (Common > Subsystems > All Subsystems) and disable visibility for the Administrator role for the respective commands of every subsystem (fig. 23.15).
Also open the forms of the documents ServicesRendered and ReceiptOfGoods and on the Command Interface tab in the navigation panel clear visibility for the commands to switch to the Management accounting register for the Administrator role (fig. 23.16).

Fig. 23.15. Setup of command visibility in subsystems for the Administrator role in the subsystem interface
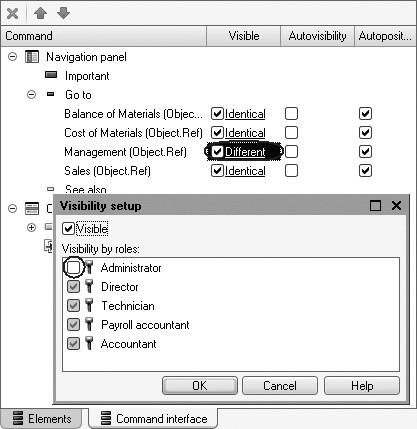
Fig. 23.16. Setup of command visibility in subsystems for the Administrator role in the document form
In the 1C:Enterprise Mode
Run 1C:Enterprise in the debugging mode and make sure that the commands to open accumulation registers are not visible to the administrator though this user has access to such commands. For example, via the main menu: All Functions - Accumulation Registers.
It is obvious that in a real-life configuration user roles and assortment of forms on their desktops will vary. These factors depend on the specifics of the company operations and on customer requirements.
During the last two lessons we have only demonstrated the basics of arranging an application interface by roles and restricting access to specific commands and sections in general based on user rights.
Quiz
- What is a desktop?
- How does one set desktops up for various users?
- How does one set command visibility up by roles?