
Lesson 16. Accounting
Estimated duration of the lesson is 1 hour 50 minutes.
CONTENT:
- Chart of Characteristic Types in Accounting.
Adding a Chart of Characteristic Types.
Understanding Chart of accounts.
Adding a Chart of Accounts.
Understanding Accounting Registers.
Adding an Accounting Register.
Updating the Receipt of Goods Document.
Updating the Services Rendered Document.
Trial Balance.
Quiz.
At this lesson we will demonstrate the accounting features of 1C:Enterprise. We will not explain or discuss the basics of accounting. So if you do not have required understanding of accounting, it will be better if you first read some popular manual on how accounting is arranged in your country in general.
To arrange for accounting, we will use the chart of characteristic types that we already know and two new configuration objects - the Chart of Accounts and the Accounting Register.
We are going to use the accounting register to accumulate data about completed business transactions.
Using the chart of accounts, we will define the accounts that are used for accounting, while the chart of characteristic types will serve to define the analytical accounting objects that will be used for accounting within the accounts.
We need to say up front that the chart of accounts we are going to use in our practice configuration is greatly simplified. It only contains a few provisional accounts, but that will be enough to help us understand the basics of accounting using 1C:Enterprise tools.
Chart of Characteristic Types in Accounting
We have discussed the configuration object named Chart of Characteristic Types in details during the previous lesson (see "Understanding a Chart of Characteristic Types") so right now we will only demonstrate how this object is used in accounting.
In general, accounting implies performing analytical accounting for most accounts. We will use the term extra dimension types to refer to sections of analytical accounting. It means that for every account multiple types of extra dimensions may exist and accounting can be executed based on such types.
We will use the term extra dimensions to refer to specific analytical accounting objects.
For example, on the account 41 (Goods) accounting is usually carried out based on Products and Warehouses that serve as extra dimension types. While a specific product named Chocolate Spread and a specific Main warehouse that are specified for some posting within the account 41 are both extra dimensions.
So one of the applications of chart of characteristic types is using it to describe extra dimension types. This means that all the analytical accounting sections are described in the respective chart of characteristic types and the types for the values available for some extra dimensions are defined there as well.
Adding a Chart of Characteristic Types
In the Designer Mode
We will start by creating a chart of characteristic types that will contain a description of analytical accounting sections - extra dimension types.
Open the Designer and add a new Chart of Characteristic Types configuration object.
Enter ExtraDimensionTypes for its name.
On the Subsystems tab specify that this chart of characteristic types will be displayed in the Accounting subsystem.
Since we are going to need some kind of auxiliary catalog where users will have "creative license" in setting up new analytical accounting objects, we will now create a Catalog configuration object named ExtraDimensions.
Then on the Owners tab indicate that this catalog will be subordinate to the ExtraDimensionTypes chart of characteristic types.
To do so, on the Owners tab click Add and select the chart of characteristic types named ExtraDimensionTypes as the catalog owner (fig. 16.1).
Now close the catalog editor and return to our chart of characteristic types.
On the Main tab specify the property Characteristics Value Type. Click the selection button and define a compound data type as follows (fig. 16.2):
- CatalogRef.Clients;
- CatalogRef.Products;
- CatalogRef.ExtraDimensions.
The accounting office at Jack of All Trades maintains records of monetary transactions only in terms of materials and clients, but it could be that, in the future, there will be a need for additional analysis (this is why we use the ExtraDimensions catalog).

Fig. 16.1. ExtDimensions catalog editor

Fig. 16.2. Selection value type of chart of characteristic types
Note that the catalog that will be used for the additional characteristic values must also be included in the compound data type as a characteristic value; otherwise the Designer will display an error.
Next indicate that the additional characteristic values will be contained in the catalog ExtraDimensions.
Then navigate to the Other tab and begin entering predefined values for the chart of characteristic types by clicking the Predefined button (fig. 16.3). These are the types of analytical accounting that accounting will be based on.

Click Add to create a predefined extra dimension type named Materials with 000000001 as its code and CatalogRef.Products as its type.
Next create an extra dimension type named Clients with 000000002 as its code and CatalogRef.Clients as its type.
With that, we are done creating extra dimension types so we can proceed to discussing the next configuration object we will use - the Chart of accounts.
Understanding Chart of accounts
A Chart of Accounts configuration object is intended to declare the structure that is used to store aggregate information from the control accounts a company uses to group information about its business activities.
Based on the Chart of Accounts configuration object, the platform creates database tables where information will be stored about the accounts used by the company and how such accounts will be used.
This could be a government-directed accounting system, a plan of management accounts or an arbitrary set of accounts, used in the analysis of various kinds of company activity.
In 1C:Enterprise a chart of accounts supports hierarchy of subaccounts: every top-level account may have multiple subaccounts with their own subaccounts, and so on.
Analytical accounting may be performed for any account or subaccount, in terms of the extra dimensions defined in the chart of characteristic types. A developer specifies the relation between the chart of accounts and the chart of characteristic types during configuration development.
To define the extra dimensions used, the system creates a dedicated tabular section named ExtraDimensionTypes within the chart of accounts, which is not visible in the Designer (but is accessible using the 1C:Enterprise script).
For each account we can specify multiple methods of accounting (for example, quantitative and currency). The method of accounting is defined by means of a subordinate configuration object named accounting flag.
We can also specify multiple accounting methods for an extra dimension (such as additive, currency or quantitative). The method of accounting for extra dimensions is defined by means of a subordinate configuration object named extra dimension accounting flag.
LEARN MORE!
For details on the structure of the 1C:Enterprise script objects intended to work with the chart of accounts, see "Developer's Quick Reference. Chart of Accounts".
In addition to the above, each account may have a set of properties that are defined as attributes for the Chart of Accounts configuration object. They allow us to define unique properties for plan of account items (such as the attribute DoNotUseInPostings).
Adding a Chart of Accounts
In the Designer Mode
Now we will proceed to creating a chart of accounts for Jack of All Trades.
As mentioned in the beginning of this lesson, the accounting in our company is very much simplified. This is why the chart of accounts used by the accounts department only contains four accounts:
- Goods,
- AccountsPayable,
- Capital,
- AccountsReceivable.
Add a new Chart of Accounts configuration object.
Enter Main for its name.
Enter Main Chart of accounts for List Presentation.
On the Subsystems tab specify that this chart of accounts will be displayed in the Accounting subsystem.
On the Data tab highlight the group of attributes named Accounting Flags and click the Add button to create an accounting flag named Quantitative (fig. 16.5).

Fig. 16.5. Creating a chart of accounts attribute in the Accounting Flags group
Go to the ExtraDimensions tab and indicate that the extra dimension types for this chart of accounts will be located in the Extra DimensionTypes chart of characteristic types.
Enter the maximum count of extra dimensions for this account as two.
Also create Quantitative accounting flag for the extra dimension (fig. 16.6).

Fig. 16.6. Defining extra dimension properties for a chart of accounts
Open the Other tab.
Click Predefined to create four predefined accounts (when you create every account, highlight the root of the accounts structure which is the Accounts row before actually clicking the Add button):
- Goods, code 41, active with quantitative accounting by materials (fig. 16.7).
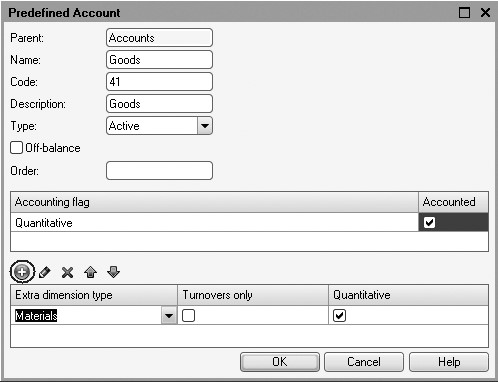
Fig. 16.7. Predefined account "Goods"
- AccountsPayable, code 60, active/passive (fig. 16.8).

Fig. 16.8. Predefined account "AccountsPayable"
- AccountsReceivable, code 62, active/passive with accounting by clients (fig. 16.9).

Fig. 16.9. Predefined account "AccountsReceivable"
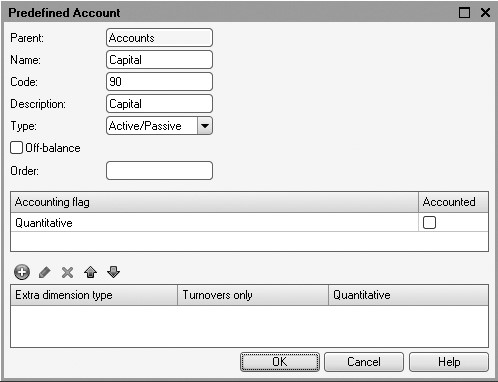
- Capital, code 90, active/passive (fig. 16.10).
This results in the following arrangement of the chart of accounts for Jack of All Trades (fig. 16.11):

Now we can move on to look at the last configuration object that we will need to set up accounting - the Accounting Register.
LEARN MORE!
For a chart of accounts the Autosort by Code property can be enabled. This property is used to inform the system that sorting by the Order field will always be applied where a user or a developer selects order by code. It should be used primarily where a user wants to have the chart of accounts sorted by code, with regard to the account code delimiter. For example, if sorting by account code is applied to the accounts 10.11 and 10.2, the accounts will be arranged as follows:
10.11
10.2
This is correct from the perspective of row ordering, but does not fit the codes' logic.
But if the values of the Order field were 10.11 and 10.2, and the Autoorder by Code property was checked, when selecting ordering by code, the user will basically get an order that takes the delimiters into consideration:
10.2
10.11.
If the property is cleared, the user would need to explicitly select ordering by the Order field.
Understanding Accounting Registers
The Accounting Register configuration object is intended to declare structures for accumulation of data that will be accounted for based on some chart of accounts. The platform uses the Accounting Register configuration object as a basis to create a database table that will accumulate data about business operations that are recorded in the accounts.
In its appearance an accounting register looks much like an accumulation register. It also has resources, and can have dimensions and attributes.
Dimensions allow us to break out our record keeping (for example, using the Company dimension, we can keep records based on multiple entities).
Attributes serve as flags that enable us to distinguish between various register records (for example, we could use a journal number as an attribute, which would allow us to select postings that go together).
The main difference between an accounting register and an accumulation register is that the former is tightly linked to the active chart of accounts. Therefore, each accounting register record contains additional fields that define the layout of that chart of accounts.
For example, a register records may contain additional fields to indicate corresponding accounts, amounts, analytical accounting objects (extra dimensions), quantities, types of currency, etc.
Another distinguishing feature of an accounting register is its ability to support double entry, where every register record has required fields to indicate the debit or credit account.
LEARN MORE!
For details on the structure of the 1C:Enterprise script objects intended to work with the accounting registers, see "Developer's Quick Reference. Accounting Registers".
Adding an Accounting Register
In the Designer Mode
We will now create a new Accounting Register configuration object.
The name will be Management.
Select Management Register Records for Extended list presentation.
Inform the system to link it with the Main chart of accounts.
Check Correspondence (fig. 16.12).
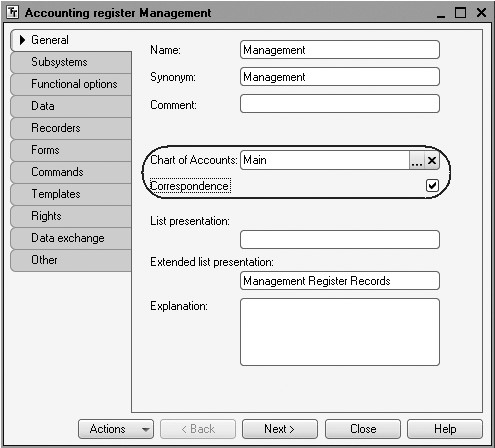
Fig. 16.12. Default properties of an accounting register
The Correspondence checkbox indicates that the created register supports correspondence. That means that every register record has debit and credit components which will allow us to get information not only about balances and turnover by account, but also about the correspondence between accounts.
Registers that do not support correspondence are used when we are not going to need to use the dual entry method that is called for accounting, or to use that approach to tracking the balance of business resources and their sources.
Now navigate to the Data tab and create two resources:
- Sum, length 15, 2 decimal places, Balance;
- Quantity, length 15, 3 decimal places, Off-Balance, accounting flag - Quantitative, extra dimension accounting flag - Quantitative (fig. 16.13).

Fig. 16.13. Properties of the Quantity resource of the accounting register
This completes creation of the accounting register.
Now we will proceed to discussion of how the Management accounting register we created is used.
Updating the Receipt of Goods Document
So what comes next?
First we will update both our documents - ReceiptOfGoods and
ServicesRendered - so that they will furnish data not only to the accumulation registers, but also to the accounting register.
Then we will create a Trial Balance accounting report, which will demonstrate the status of logistics at Jack of All Trades based on the data in the accounting register.
When our documents are posted, the following accounting postings (records in the accounting register) will be created (table 16.1).
Table 16.1. Postings Created by Documents
|
Documents |
postings |
||||
|
Debit |
Credit |
Sum |
|||
|
Receipt of Goods |
41 |
Goods |
60 |
Accounts payable |
Cost |
|
Services Rendered |
62 |
Accounts Receivable |
90 |
Capital |
Revenue |
|
90 |
Capital |
41 |
Goods |
Cost |
|
We will now add these postings when documents create records in the accounting register.
So, first of all we will modify the posting procedure for the ReceiptOfGoods document and then will repost all these documents in the 1C:Enterprise mode for the newly modified posting procedure to be executed for the Receipt Of Goods documents.
In the Designer Mode
In the configuration object editor of the ReceiptOfGoods document switch to the Register Records tab.
In the list of registers check that the document will now create records for the Management accounting register as well.
Go to the Other tab and open the object module.
Open the procedure for the Posting event handler.
In the very end of the loop before the EndDo add some lines of code to generate records in the Management register (listing 16.1).
Listing 16.1. Register records of the ReceiptOfGoods document (a fragment)
// register Management
Record = RegisterRecords.Management.Add();
Record.AccountDr = ChartOfAccounts.Main.Goods;
Record.AccountCr = ChartOfAccounts.Main.AccountsPayable;
Record.Period = Date;
Record.Sum = CurRowMaterials.Total;
Record.QuantityDr = CurRowMaterials.Quantity;
Record.ExtDimensionsDr[ChartOfCharacteristicTypes.ExtraDimensionTypes.Materials] = CurRowMaterials.Material;
Before the beginning of the loop select True for the Write property of the record set in the Management register to write the register changes into the database.
This results in the following appearance of the Posting procedure (listing 16.2):
Listing 16.2. Register records of the ReceiptOfGoods document
Procedure Posting(Cancel, Mode)

	RegisterRecords.BalanceOfMaterials.Write = True;
	RegisterRecords.CostOfMaterials.Write = True;
	RegisterRecords.Management.Write = True;

	For  Each CurRowMaterials In Materials Do

		// register BalanceOfMaterials ReceiptOfGoods
		Record = RegisterRecords.BalanceOfMaterials.Add();
		Record.RecordType = AccumulationRecordType.ReceiptOfGoods;
		Record.Period = Date;
		Record.Material = CurRowMaterials.Material;
		Record.Warehouse = Warehouse;
		Record.PropertySet = CurRowMaterials.PropertySet;
		Record.Quantity = CurRowMaterials.Quantity;

		// register CostOfMaterials ReceiptOfGoods
		Record = RegisterRecords.CostOfMaterials.Add();
		Record.RecordType = AccumulationRecordType.ReceiptOfGoods;
		Record.Period = Date;
		Record.Material	= CurRowMaterials.Material;
		Record.Cost = CurRowMaterials.Total;

		// register Management
		Record = RegisterRecords.Management.Add();
		Record.AccountDr = ChartOfAccounts.Main.Goods;
		Record.AccountCr = ChartOfAccounts.Main.AccountsPayable;
		Record.Period = Date;
		Record.Sum = CurRowMaterials.Total;
		Record.QuantityDr = CurRowMaterials.Quantity;
		Record.ExtDimensionsDr[ChartOfCharacteristicTypes.ExtraDimensionTypes.Materials] = CurRowMaterials.Material;

	EndDo;
EndProcedure
Let's discuss this code.
As you can see, records are generated for an accounting register in the same manner as they are for an accumulation register.
But the platform (when data storage table was created) rounded out the register attributes we have created by adding a number of fields that come from using the Main chart of accounts.
First of all, these are the fields named AccountDr and AccountCr.
These fields are intended to specify the accounts that have their debit and credit values influenced by this posting.
Besides, for the register dimensions and attributes that are linked to the accounting flags, the platform creates a pair of fields to store resource values separately for a posting's debits and credits - QuantityDt and QuantityCr.
Also for the accounts that are used for accounting by extra dimensions, the platform creates collections named ExtDimensionDr and ExtDimensionCr.
If you now take a look at the table 16.1, you will see that when a receipt of goods is posted, the Goods(41) account should serve as a debit account while AccountsPayable(60) should be a credit account.
A global context property named ChartOfAccounts is used to address an account. This property provides access to all the chart of accountscreated in the configuration.
Separated by a dot, specify the name of the required chart of accounts - Main. And then after another dot specify the name of a predefined account in this chart of accounts - Goods. We have created this account along with three other accounts in the Designer.
Since quantitative accounting is only applied to the account named Goods(41), the field QuantityDr of the register is filled in with the number of products from the document tabular section. The register field QuantityCt is not filled in because quantitative accounting is not applied to the credit account of the posting (AccountsPayable).
Now look at the last line of the loop where the value of debit extra dimension is assigned.
The thing is that the count of extra dimensions will vary on the debit account and on the credit account for every posting based on how accounts are defined in the active chart of accounts. Therefore, for each record of an accounting register, the platform will store two collections of values: a collection of debit extra dimensions and a collection of credit extra dimensions. Each of them contains a number of items equal to the number of extra dimension types indicated for use with the corresponding account (debit or credit) in the chart of accounts.
To call for an item of a collection, in the square brackets specify the respective extra dimension type (ChartOfCharacteristicTypes.ExtDimensionTypes.Materials).
Another method is to explicitly specify the name of a predefined extra dimension separated by a dot from the debit extra dimension collection.
In other words, this statement: Record.ExtDimensionDr[ChartOfCharacte- risticTypes.ExtDimensionTypes.Materials] is similar to the statement: Record.ExtDimensionDr.Materials.
The register collection ExtDimensionCr is not filled in because accounting by extra dimensions is not applied to the credit account of the posting (AccountsPayable).
Finally, we will edit the command interface of the document form so that the navigation panel made it possible to go to the list of Management register records related to the document.
To do so, open the form of the ReceiptOfGoods document.
In the upper left window navigate to the Command Interface tab.
In the Navigation Panel section expand Go To group and enable visibility for the command that opens the accounting register named Management. In the 1C:Enterprise Mode
Start 1C:Enterprise in the debugging mode.
A message will be displayed informing you that the Management accounting register and the ExtraDimensions catalog are not included in any subsystem.
Ignore this message.
Open the document Receipt of Goods No. 1 and click Post.
Use the command to navigate to the Management register and look at the records generated by the document in the accounting register (fig. 16.14, 16.15).

Fig. 16.14. Records of the Receipt of Goods No. 1 document in the Management accounting register

Fig. 16.15. Records of the Receipt of Goods No. 1 document in the Management accounting register
Please note: since there is no analysis for account 60 (AccountsPayable) and all we track is a sum total, there are no records in the register for ExtDimensionsCr1, ExtDimensionsCr2, and QuantityCr.
Next repost the document Receipt of Goods No. 2 and make sure that it also generates correct postings for the Management accounting register.
Now we will proceed to a more complex task: adding records for the Management register from the ServicesRendered document.
Updating the Services Rendered Document
First we will modify the posting procedure for the ServicesRendered document and then will repost all these documents in the 1C:Enterprise mode for the newly modified posting procedure to be executed for the Services Rendered documents.
In the Designer Mode
In contrast to the ReceiptOfGoods document which only generated a single accounting posting, the ServicesRendered document will generate two postings.
Remember that the accounting process at Jack of All Trades is not quite like real-life accounting, since to make the job easier we only account for materials receipts and expenses. The services provided by the company do not exist for the purposes of accounting.
Therefore, the ServicesRendered document should generate records for the accounting register only in the part that deals with expenses of materials.
In the configuration object editor of the ServicesRendered document switch to the Register Records tab.
In the list of registers check that the document will now create records for the Management register as well.
Go to the Other tab and open the object module.
Open the procedure for the Posting event handler.
Since we are only interested in the records related to materials, to make the necessary changes we need the IF ... clause where we have generated records for the BalanceOfMaterials and CostOfMaterials registers.
Add the records for the Management accounting register in the end of the condition prior to the EndIf line (listing 16.3).
Listing 16.3. Register Records of the ServicesRendered Document (segment)
...
If SelectionDetailRecords.ProductType = Enums.ProductTypes.Material Then

	// register BalanceOfMaterials Expense
	...
	// register CostOfMaterials Expense
	...
	// register Management

	// First posting: D 62(AccountReceived) - C 90 (Capital)
	// retail total
	Record = RegisterRecords.Management.Add();
	Record.AccountDr = ChartOfAccounts.Main.AccountsReceivable;
	Record.AccountCr = ChartOfAccounts.Main.Capital;
	Record.Period = Date;
	Record.Sum = SelectionDetailRecords.TotalInDocument;
	Record.ExtDimensionsDr[ChartOfCharacteristicTypes.ExtraDimensionTypes.Clients] = Client;

	// Second posting: D 90 (Capital) - C 41 (Goods)
	// cost
	Record = RegisterRecords.Management.Add();
	Record.AccountDr = ChartOfAccounts.Main.Capital;
	Record.AccountCr = ChartOfAccounts.Main.Goods;
	Record.Period = Date;
	Record.Sum = MaterialCost * SelectionDetailRecords.QuantityInDocument;
	Record.QuantityCr = SelectionDetailRecords.QuantityInDocument;
	Record.ExtDimensionsCr[ChartOfCharacteristicTypes.ExtraDimensionTypes.Materials] = SelectionDetailRecords.Product;

EndIf;
...
In the first posting, we specify the retail total for the materials from the document and from the extra dimension debit since we are keeping track of Accounts Receivable in terms of clients.
In the second posting, we specify the cost of materials, and the credit quantity and its extra dimension, since we apply quantitative accounting for Goods in terms of materials.
Now in the very beginning of the procedure select True for the Write property of the accounting register so that the changes in the registers are recorded in the database (listing 16.4).
Listing 16.4. Writing register records
Procedure Posting(Cancel, Mode)

	RegisterRecords.BalanceOfMaterials.Write = True;
	RegisterRecords.CostOfMaterials.Write = True;
	RegisterRecords.Sales.Write = True;
	RegisterRecords.Management.Write = True;
	...
Finally, we will edit the command interface of the document form so that the navigation panel made it possible to go to the list of Management register records related to the document.
To do so, open the form of the ServicesRendered document.
In the upper left window navigate to the Command Interface tab.
In the Navigation Panel section expand Go To group and enable visibility for the command that opens the accounting register named Management.
In the 1C:Enterprise Mode
Launch 1C:Enterprise in the debugging mode, open the Rendering Services No. 1 document and click Post.
Use the command to navigate to the Management register and look at the records generated by the document in the accounting register (fig. 16.16, 16.17).

Fig. 16.16. Records of the Rendering Services No. 1 document in the Management accounting register

Fig. 16.17. Records of the Rendering Services No. 1 document in the Management accounting register
After that, repost the remaining Services Rendered documents.
Trial Balance
Now all that is left for us to do is create a report for the accounts department at Jack of All Trades, and we will be done with learning use of an accounting register.
The only report the accounts department of our company uses is the Trial Balance report (fig. 16.18).
In the Designer Mode
In order to generate the report, open the Designer and add a new configuration Report object named TrialBalance.
Create a new data composition schema and add Data Set - Query.
Open the query wizard.
Query for a Data Set
The Trial Balance accounting report is a table with its rows listing all the accounts in the chart of accounts, and its columns displaying the opening balance, turnover, and the closing balance for the debits and credits of each account.
Therefore, to create this report we will need two source tables:
Object (referential) table of the Main chart of accounts;
Virtual table of the accounting register named Management.Balan- ceAndTurnovers (fig. 16.19).

Fig. 16.18. Report results
Fig. 16.19. Query tables
We will select the Code and Name fields from the Main table, and the following fields will be taken from the ManagementBalanceAndTurnover table (fig. 16.20):
- SumOpeningBalanceDr;
- SumOpeningBalanceCr;
- SumTurnoverDr;
- SumTurnoverCr;
- SumClosingBalanceDr;
- SumClosingBalanceCr.
Go to the Links tab and indicate that we want to select all the records from the Main table and only those that satisfy the link criteria from the register table (fig. 16.21).

Fig. 16.20. Selected fields

Fig. 16.21. Table link criterion
Then on the Unions/Aliases tab define aliases for the register's fields:
OpeningBalDr, OpeningBalCr, TurnoverDr, TurnoverCr, ClosingBalDr, and ClosingBalCr (fig. 16.22).

Next on the Order tab specify that the query results should be sorted by the Code field in ascending order.
Now we are done creating the report, click OK.
Roles of Balance Fields
Now for the data composition schema to be able to display totals for the fields of accounting balances, we will need to slightly modify the roles automatically defined for the balance fields of the accounting register (fig. 16.23).

Fig. 16.23. Roles of data composition fields
Accounting type has been defined for these fields: Debit and Credit.
So when totals are be calculated for these fields in the trial balance, 0 will be retrieved because the total for the accounts debits will match the total for the accounts credits but will have a reverse sign.
To avoid this situation, we will remove indication of accounting type from the roles of these fields and will change the names of group fields. In this case the data composition system will consider these fields as regular balance fields.
Enter edit mode for the Role field and click the selection button to open the editor of the field role (fig. 16.24).
For the fields OpeningBalDr and ClosingBalDr enter BalanceDr as the name.
For the fields OpeningBalCr and ClosingBalCr enter BalanceCr as the name.
For all the four fields select No as the value of Accounting Type (fig. 16.25).

Fig. 16.24. Field role edit dialog

Fig. 16.25. Roles of data composition fields
Resources
Navigate to the Resources tab and click Add all resources (>>) to select all the available resources.
Options
Normally accounting reports are generated for a specific period: month, quarter, year, etc. This is why we will use our report as an example to demonstrate use of a default period to specify report period.
On the Parameters tab add a parameter named Period of the type StandardPeriod. And for the parameters BeginOfPeriod and EndOfPeriod specify Expression for calculation and forbid user editing (listing 16.5).
Listing 16.5. Expression to Calculate BeginOfPeriod and EndOfPeriod Parameters
&Period.StartDate
&Period.EndDate
As a result of these actions data composition parameters will look as follows (fig. 16.26):
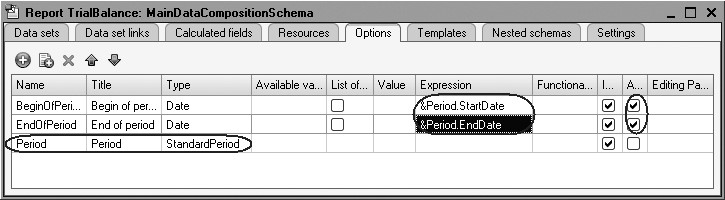
Fig. 16.26. Data composition schema parameters
Note that dates of the beginning and end of a default period include time as well. But here unlike the parameters BeginOfPeriod and EndOfPeriod the beginning date has the time at 00:00:00 while the end date's time is 23:59:59. Hence, the last day is included in the report and there is no need to use the EndOfPeriod() function.
Settings
Finally, navigate to the Settings tab and create a report structure.
Add a grouping that contains detailed records.
Next on the Selected fields select all the fields to be included in the report and arrange them as follows (fig. 16.27).

On the Other Settings tab enter a title for the report as Trial Balance.
For the Vertical arrangement of overalls parameter enter Start and End value.
Next on the Parameters tab select for the Period parameter a value from the list of default periods as This month (fig. 16.28).

Fig. 16.28. Creating quick settings of report period
This is how we ensure that current month will always be specified as a report period when the report form is opened. Remember that the beginning and end dates of the period will be changed dynamically based on the date of report execution.
Also click Properties of custom settings item to specify that Period will be included in the custom settings and this setting will be available directly in the report form (Quick Access edit mode).
Finally, we will define the subsystems where our report will be displayed.
Close the data composition schema wizard and in the editor of the TrialBalance Report configuration object navigate to the Subsystems tab.
Check Accounting subsystem in the configuration subsystem list.
In the 1C:Enterprise Mode
Launch 1C:Enterprise in the debugging mode and see how the report works.
In the Accounting section open the report and click Generate (fig. 16.29).

We see that the default standard report period is specified as This month. The default report period feature is very convenient when a user frequently needs to execute the report for a specific period of time. In this case you can pre-define a required period in the settings for the user not to have to define it before generating the report. But if required, in the 1C:Enterprise mode a user may select another period from the list of default periods.
Quiz
- How does one use the chart of characteristic types to ensure accounting?
- What is an extra dimension?
- What is the chart of accounts configuration object intended for?
- How does one create a chart of accounts?
- What is an accounting register intended for?
- How does one create an accounting register and specify accounting parameters?
- How does one create document register records against an accounting register using 1C:Enterprise script?
- How does one use a query to get data from an accounting register?
- How does one create a report based on the data of an accounting register using composition system?
- How does one assign roles and type of accounting balance to the fields in the data composition schema?
- How does one define a default period for report execution?