Lesson 15. Chart of Characteristic Types
Estimated duration of the lesson is 2 hours 50 minutes.
CONTENT:
- The Task at Hand.
Understanding a Chart of Characteristic Types.
Logical Relation between Objects.
Creating New Configuration Objects.
Modifying Configuration Objects.
Creating Product Characteristics.
Updating Accounting Mechanisms.
Product Receipt/Expense in Compliance with Characteristics.
A Report Using Characteristics.
Quiz.
During this lesson we will familiarize ourselves with a new configuration object - the Chart of Characteristic Types. We will also learn how this object can be used to expand functionality of our configuration.
The Task at Hand
Our immediate task will be to establish a means by which users can arbitrarily describe materials and, most importantly, can then perform accounting based on all such user-defined descriptions.
User-defined descriptions will work as follows: multiple (arbitrary) characteristics will be allowed for every material (to specify things like color, manufacturer, etc.). When materials arrive, users will be able to enter specific values for the relevant characteristics (for example, when electrical cables arrive, users will be able to indicate that such cables are white, with a cross-section of 2.5 sq. mm, and when rubber tubing is delivered, users will be able to enter that it is black and manufactured by Fagumit Sp. z o.o.).
In the future we will always be able to find out how many white-colored materials we have or how many black rubber tubing units we have used.
Since we do not know in advance exactly which characteristics users will want to describe for a material, we will need to provide them with a mechanism that permits them to create all types of characteristics, and then, most importantly, to indicated what value type should be used for those characteristics. Then, when entering values for a characteristic, the user will be able to pick a value that strictly complies with the assigned type.
This ability to define characteristics is provided for in the Chart of Characteristic Types that we will discuss now.
Understanding a Chart of Characteristic Types
Chart of Characteristic Types configuration object is intended to define information storage structures for user-defined characteristics. Based on the Chart of Characteristic Types, the platform creates a set of tables in the database that will store information on existing characteristic types and value types for every characteristic type.
In its nature the chart of characteristic types is very similar to a catalog but it has a more specific goal: it only contains the information regarding characteristic types that can be used to describe some database object.
A chart of characteristic types consists of characteristic types. Every characteristic type is defined by a name and value type.
A developer and, most importantly, a user can enter as many types of characteristics as they need (fig. 15.1).
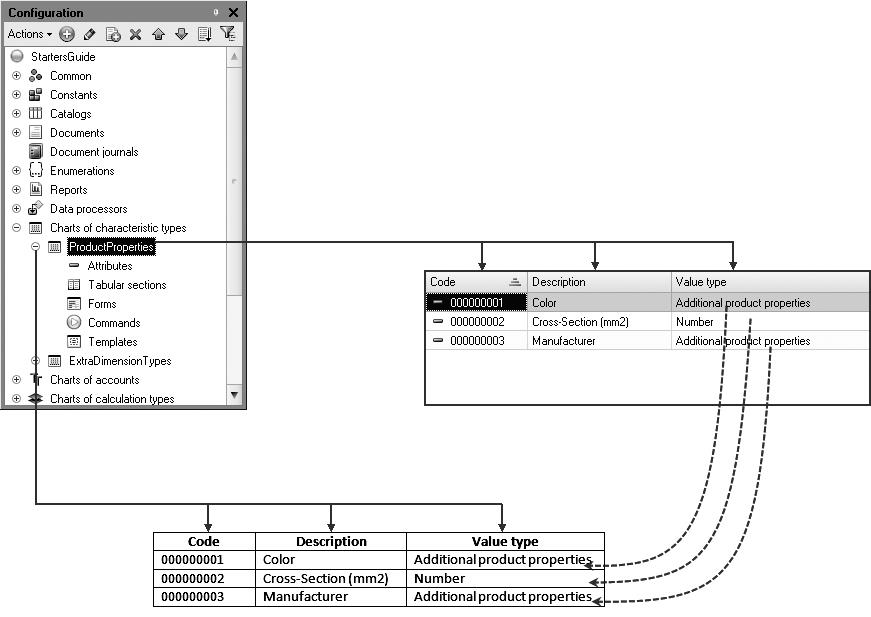
Fig. 15.1. Chart of characteristic types in the Designer, in the database and in the 1C:Enterprise Mode
For a developer to be able to define a certain set of value types that can be assigned to characteristics, the Chart of Characteristic Types configuration object has the Characteristic Value Type property.
This property type defines a compound data type, which contains all the types that may be used when specifying a characteristic's value type (fig. 15.2).
Besides, it may be possible that the data types existing in the configuration will not be sufficient for a user.

Fig. 15.2. Characteristics value type property
For example, a user may want to account for products based on their colors and the configuration does not have any catalog named Color.
In this situation they may use a dedicated auxiliary catalog created in advance by the developer and added as a property of the Chart of Characteristic Types configuration object - Additional Characteristic Values (fig. 15.3).
So a user will be able to create a new characteristic type named Color and define required values for the color in the catalog of additional characteristic values.
Note that this catalog is subordinate to the chart of characteristic types. So if in the future a user wants to create a characteristic type named Scent and define values for this characteristic, they will be created in the same catalog of additional characteristics but will not be mixed with the color values.
LEARN MORE!
For details on the structure of the 1C:Enterprise script objects intended to work with chart of characteristic types, see "Developer's Quick Reference. Chart of Characteristic Types".

Fig. 15.3. Additional characteristic values property
A chart of characteristic types has no internal predefined mechanisms for linking a characteristic type to the object that it describes. It merely enables and users to define a certain set of characteristics and assign their types.
Depending on the application at hand, developers decide for themselves how to maintain the correspondence between a specific characteristic type or characteristic value and a specific database object.
The example discussed below is not simple in terms of its implementation.
So we will first explain logical connection between the objects to be used in this example.
Logical Relation between Objects
To implement this example, we will need three new configuration objects.
The first object is Chart of Characteristic Types. It will store characteristic types that can generally be used to describe materials.
To do so, we will need a dedicated catalog subordinate to the Products catalog. The items in this catalog will identify batches of materials with some fixed set of characteristic values.
Our third object is an information register that stores the relationships between specific characteristic values and a certain type of material (see fig. 15.4).
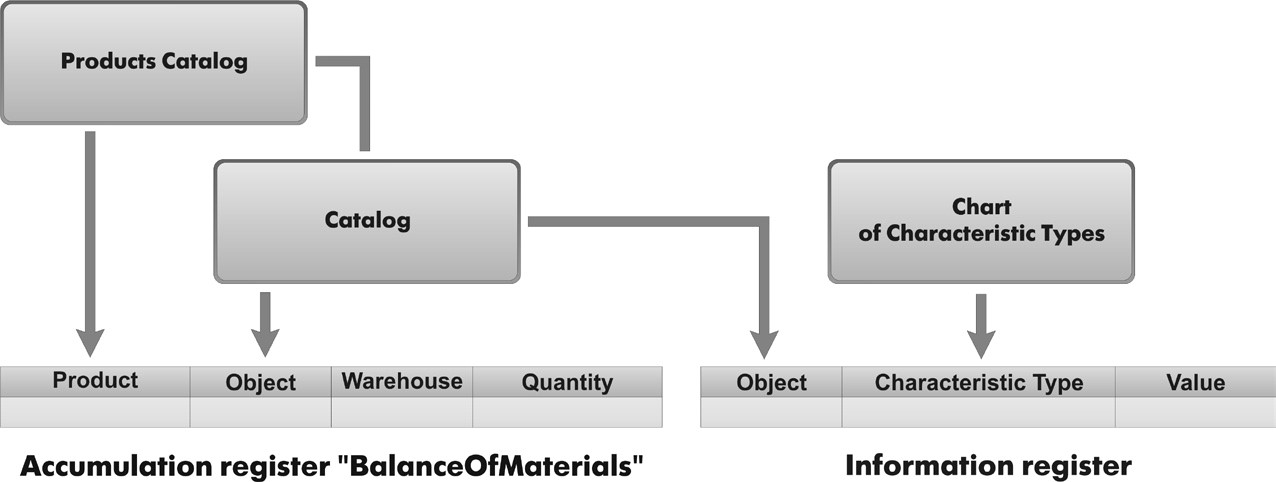
Fig. 15.4. Logical relation between objects
Using such a logical structure, we will be able to describe every batch of materials delivered using any number of characteristics, since this relationship will be stored in the information register.
Besides, by adding one more dimension to the accumulation registers to store links to items of the catalog that is subordinate to the Products catalog, we will be able to account for items based on their characteristics (fig. 15.4).
So to find out the Balance Of Materials that have some specific value of a certain characteristic, all we need to do is select from the information register all the items of the subordinate catalog that have this characteristic value, and then get the accumulation register balances for them and for their owners.
Creating New Configuration Objects
In the Designer Mode
As mentioned above, we will need to create some new configuration objects:
- ProductTypes catalog to describe batches of materials;
- AdditionalProductProperties catalog to define values for characteristic types that do not have appropriate types in the configuration;
- ProductProperties chart of characteristic types to create characteristic types;
- ProductPropertyValues information register to store values of characteristic types for various batches of materials.
First create a Catalog configuration object named ProductTypes and indicate that it will be subordinate to the Products catalog. To do so, on the Owners tab add the Products catalog to the list of owners for the ProductTypes catalog.
Next create another Catalog configuration object named AdditionalProductProperties.
Now create a chart of characteristic type configuration object named ProductProperties.
Select Characteristic value type property for it.
To do so, click the selection button  and define compound
data type as follows (fig. 15.5):
- Number, length 15,3 decimal points;
- String, length 25;
- Date;
- Boolean;
- CatalogRef.AdditionalProductProperties.
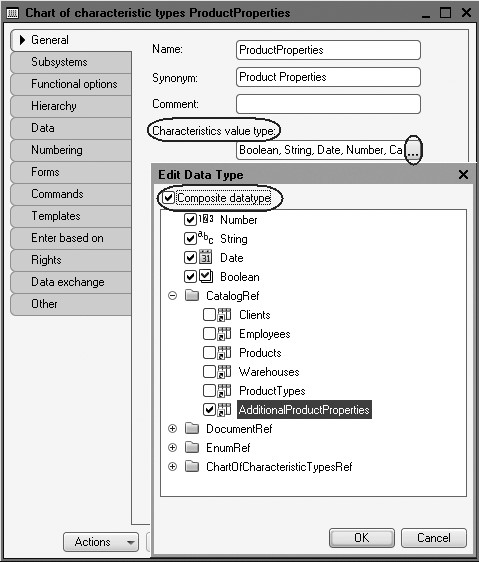
Fig. 15.5. Defining compound data type for characteristic value type of chart of characteristic types
Next select ProductProperties chart of characteristic types as the owner for the AdditionalProductProperties catalog (fig. 15.6).

Next specify that the additional characteristic values for the chart of characteristic types will be located in the catalog named AdditionalProductProperties (fig. 15.7).

Fig. 15.7. Editing window of chart of characteristic types
To wrap it up, will create an information register configuration object named ProductPropertyValues.
On the Data tab will create the register's dimensions:
- PropertySet, Main, type CatalogRef.ProductTypes;
- PropertyType, type ChartOfCharacteristicTypesObject.ProductProperties.
Now create register resource (fig. 15.8):
- Value, type Characteristic.ProductProperties.

Note that we can define a value type for a register's resource as Characteristic.<name>. Basically, this definition represents a compound data type because it is specified in the value type for the corresponding chart of characteristic types. In other words, a register resource can have a value of any type among those defined in the value type of the chart of characteristic types.
Besides, in the Link by Type property of this resource select register dimension PropertyType. A link by type ensures that the value types entered into this field will correspond to the characteristic type selected in the Properties Type field.
Also fill in another property named Choice Parameter Links.
To do so, click the selection button  for this property and
drag the register dimension named PropertyType from the list of available attributes to the
parameters list.
Defining the property named Choice Parameter Links will ensure that when values located in the Additional Product Properties are selected, only those values related to the selected characteristic will be suggested instead of all the values in the catalog (fig. 15.9)

Fig. 15.9. Property of the Information Register Value resource
Modifying Configuration Objects
So we have created new configuration objects and defined their basic properties required to implement our task.
But you will further see that we are not fully happy with some properties. In fact, you can never foresee everything in advance in the development process. Often some shortages only become obvious in the process of operation. So when you review some preliminary results in the 1C:Enterprise mode, it is important to be able to understand shortages and correct them on the fly.
This is why during this lesson we will demonstrate a backward development process. This is a valuable experience that we think will be very useful for you.
The Products Catalog
In the 1C:Enterprise Mode
So run 1C:Enterprise in the debugging mode and review interaction between logically connected configuration objects Products catalog, ProductTypes catalog, ProductProperties chart of characteristic types, and ProductPropertyValues information register.
Note that we have not defined any subsystems these objects relate to. The thing is that display of these objects outside of their logical connections to each other has no particular sense. Since we have defined catalog owners, main dimension of the information register, etc., the required objects will automatically be located in the navigation panels of their owners as subordinate information.
So ignore the system message regarding the absence of connections between the created objects and subsystems.
So the task is to create sets of properties and the characteristics they consist of for individual products. As we have mentioned above, such sets of properties will be stored in the catalog ProductTypes that is subordinate to Products catalog.
In the Goods Management section open the Products catalog and its item named Electrical conductor from the group Resources4Miscellaneous (fig. 15.10).

Fig. 15.10. Form of a Products catalog item
Since the Products catalog is the owner of ProductTypes catalog, in the navigation panel you can see a link to navigate to the subordinate list. It means that if you open this list, you will only see the property sets related to the edited item of the Products catalog.
This has been done automatically and is fine with us. But the name of the default attribute Parent is not quite clear. It would have been easier to understand and more natural to name it Products Group because a parent for an item is actually the group of products it belongs to.
Since application interface displays object synonyms, we need to edit the synonym of a default catalog attribute that by default matches its name, which is Parent.
In the Designer Mode
To do so, return to the Designer and open the editor for Products Catalog configuration object.
On the Data tab double-click the Standard Attributes button, double-click Parent attribute in the list of such attributes and in the properties palette that opens enter a Synonym as Products Group (fig. 15.11).

Fig. 15.11. Entering a synonym for a default attribute
Note that we have edited the synonym of configuration object attribute and not the form attribute. In this case the form of Products catalog item is in fact generated automatically.
Now in all the forms this attribute will carry the specified synonym unless the developer decides to change it when creating their own forms.
In the 1C:Enterprise Mode
Test the effect of the changes in the 1C:Enterprise mode.
Open the form of the same product and instead of the Parent name you will see Products Group (fig. 15.12).
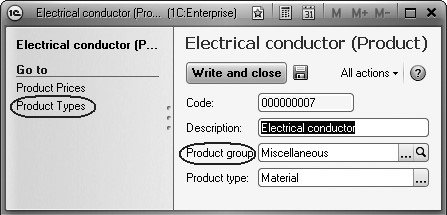
Fig. 15.12. Form of a Products catalog item
The Product Types Catalog
In the 1C:Enterprise Mode
Now we want to create a set of properties for a product named Electrical conductor.
To do so, use the command Product Types to navigate to the list that stores sets of properties for the products (fig. 15.13).

We are not quite happy with the form of product typees that opens because the columns Code and Owner are obviously not needed.
Code of a new product type is generated automatically and is meaningless for a user.
Owner of a product type is displayed in the upper left corner of the form navigation panel and is a nonsense in the list as well.
To hide these columns, we will need to create a form for the ProductTypes list form and decide where it is opened from in the process (you can understand it using the value in the Filter form parameter).
If filter by owner is enabled (the form is opened from the products list), we will hide the columns Code and Owner.
But if the form is opened otherwise, these columns may be needed so it would not be correct to simply remove them from the form.
Since the form is created on the server, you should do it in the event handler of the form OnCreateAtServer.
In the Designer Mode
Return to the
Designer and eliminate the shortages of the list form. To create the form, open
the configuration object editor for the ProductTypes catalog, navigate to the Forms tab, click the opening button  and create the default list form (fig. 15.14).

Fig. 15.14. Creating the Default List Form
Click Finish in the wizard window that opens.
Unlike an automatically generated form the form created by the wizard does not include the Owner field. So our task is getting even simpler as we will only need to hide one field - Code.
In the form editor you will see the form controls window in the upper left pane. Use it to highlight the Form control (because we need the form event in general) and double-click the properties palette for this control.
Scroll through the list of form properties to locate the event
named OnCreateAtServer and click the opening button  (fig. 15.15).
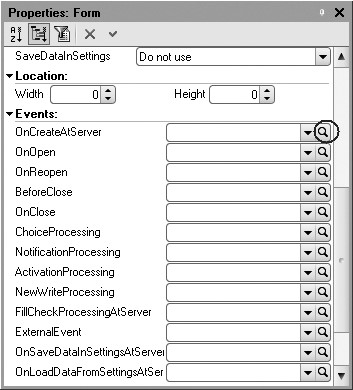
Fig. 15.15. Creating form event handler OnCreateAtServer
In the form module a form event handler OnCreateAtServer will be created that we will populate with the following code (listing 15.1).
Listing 15.1. Form Event Handler OnCreateAtServer()
If Parameters.Filter.Property("Owner") Then
	Items.Code.Visible = False;
EndIf;
Now we will discuss this code.
Parameters is a managed form property that owns the module we are located in.
Using this property, we get the object that contains a collection of form parameters.
The Filter item of this collection is referred to using its name.
Using Property method of the filter items structure we define if filter by the Owner field is applied.
If the filter is applied, we select False for the Code field visibility, i.e. hide this field. Here Items is a managed form property that enables us to access all the form items.
In the 1C:Enterprise Mode
Test the effect of the changes in the 1C:Enterprise mode.
The form of the product typees list will look as follows (fig. 15.16).

You see that we have achieved the goal: where in the figure 15.13 we had three columns, now we only have one column - Name.
Now click the New button to create a new set of properties for a product.
This will open the form of catalog item ProductTypes (fig. 15.17).

Fig. 15.17. Form of a Products Catalog Item Product Types
This form is generated automatically. But there are still some shortcomings:
- Form title should be in the singular.
- The fields Code and Owner are not needed.
- The command to navigate to subordinate information should be renamed into something better understandable.
Return to the Designer and correct such shortcomings.
In the Designer Mode
First we need to rename the form title so that it is clear that we are currently creating one product type.
To do so, in the configuration object editor of the ProductTypes catalog on the Main tab create Object presentation in the singular as Product Type (fig. 15.18).

This property will be used in the 1C:Enterprise interface as the title of the catalog item form.
Second, we need to remove the fields Code and Owner from the form.
To do so, in the configuration object editor of the ProductTypes catalog
navigate to the Forms
tab, click the opening button  and create the default
item form.
In the window of form controls structure highlight these items one by one and remove them from the form using the Delete button in the command bar (fig. 15.19).

This results in only one catalog attribute displayed in the item form - Name.
We will also slightly update its presentation.
On the Data tab in the configuration object editor of the ProductTypes catalog click Standard Attributes and double-click Name in the list of attributes. In the properties palette that opens enter a Synonym for the Name attribute.

Fig. 15.20. Defining list presentation for a register
First of all, the title of the form Product Type and its subordinate information Product Properties Values do not look good together (see fig. 15.17). These are the records of the register with the same name that can be navigated to from the item form.
So in the configuration object editor of the ProductPropertyValues information register on the Main tab enter List Presentation as Contents of Product Type (fig. 15.20).
This property will be used in the 1C:Enterprise interface as the title of the register list form.
In the 1C:Enterprise Mode
Test the effect of the changes in the 1C:Enterprise mode.
So, in the Goods Management section open the Products catalog and its item named Electrical conductor from the group Resources4Miscellaneous.
In the item form use the command Product Types to navigate to the list of property sets for this product. The list is currently empty.
Click New. Now we are happy with everything about the form of product type that opens.
The Product Property Values Register
In the 1C:Enterprise Mode
Create a product type named White Conductors (fig. 15.21).

Fig. 15.21. Form of a Products catalog item Product Type
Use the Contents of Product Type command to navigate to the contents of the edited product type. If the product type has not been recorded yet, you will be prompted to record the data. Confirm your intention (fig. 15.22).

This will open a list form of the register Product Properties Values that is also generated by default (fig. 15.23).

Fig. 15.23. List Form of the Contents of Product Type register
We are not happy with everything in the form either:
- The title of the PropertyType column should better be renamed.
- Unneeded column PropertySet.
Return to the Designer and eliminate the shortages of the list form.
In the Designer Mode
First of all, the name of the column Property Type should better be replaced with Property.
To do so, in the configuration object editor of the ProductPropertyValues information register on the Data tab open the properties palette for the PropertyType and enter Property as its Synonym (fig. 15.24).
Second, since the register has the main dimension PropertySet of the type CatalogRef.ProductTypes, the field Property Set is not needed because the owner of this property set is displayed in the upper left corner of the form navigation panel.

Fig. 15.24. Defining a synonym for register dimension
So we will now create an event handler named OnCreateAtServer of the register list form and make the column named PropertySet invisible if the form is opened with filter by this field applied (i.e. if the register list form is opened from the item form of the catalog Product Types).
To create this event handler, open the configuration object
editor for the ProductPropertyValues
information register, navigate to the Forms tab, click the opening button  and create the default
list form.
Next create for the form a form event handler named OnCreateAtServer and populate it with the following code (listing 15.2).
Listing 15.2. OnCreateAtServer() form event handler
If Parameters.Filter.Property("PropertySet") Then
	Items.PropertySet.Visible = False;
EndIf;
This code is similar to that provided in the listing 15.1 above so it does not require any further comments.
In the 1C:Enterprise Mode
Test the effect of the changes in the 1C:Enterprise mode.
This results in the list form of the register Contents of Product Type looking as follows (fig. 15.25).
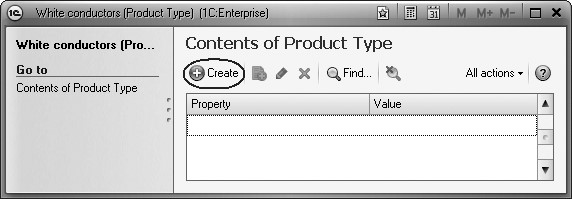
Fig. 15.25. List Form of the Contents of Product Type register
Now if you click the New button to add a new record into the content of a product type, a record form will be opened for the register ProductPropertyValues (fig. 15.26).
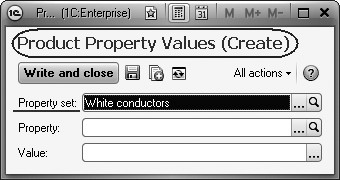
Fig. 15.26. Record form of the Product Property Values register
This form is generated automatically. But there are still some shortcomings:
- Form title should be in the singular.
- Unneeded column PropertySet.
Return to the Designer and correct such shortcomings.
In the Designer Mode
First we need to rename the form title so that it is clear that we are currently creating one property and its value within the contents of a product type.
To do so, in the configuration object editor of the ProductPropertyValues information register on the Main tab enter Record Presentation as Property and Value (fig. 15.27).

Fig. 15.27. Defining record presentation for a register
This property will be used in the 1C:Enterprise interface as the title of the register record form.
Second, we need to remove the field PropertySet from the form.
To do so, in the configuration object editor of the ProductPropertyValues
information register navigate to the Forms tab, click the opening button  and create the default
record form.
In the window of form controls structure highlight this control and click the Delete button in the command bar to remove this control from the form.
In the 1C:Enterprise Mode
Test the effect of the changes in the 1C:Enterprise mode. This results in the following look of the record form of the ProductPropertyValues register (fig. 15.28).
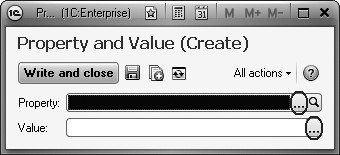
Fig. 15.28. Record Form of the Product Property Values register
Creating Product Characteristics
In the 1C:Enterprise Mode
Now create various product typees in the 1C:Enterprise mode.
So, in the Goods Management section open the Products catalog and its item named Electrical conductor from the group Resources > Miscellaneous.
In the product form use the command Product Types to navigate to the list of property sets for this product.
In the form of product typees list open the product set named White Conductors we earlier created.
In the form of product type use the command Contents of Product Type to navigate to the contents of the edited product type. The list is currently empty.
Click New. In the form that opens (see fig. 15.28) create a property named Color with the value White.
To do, click the selection button  in the Property field.
The dimension PropertyType(Property) of the register ProductPropertyValues has the type ChartOfCharacteristicTypesObject.ProductProperties. This is why you will see a form displayed to select this chart of characteristic types.
The list of characteristics is currently empty.
Click New. In the form of item of a chart of characteristic types enter the name for the characteristic as Color and leave the default characteristic Value Type as Additional Product Properties (fig. 15.29).
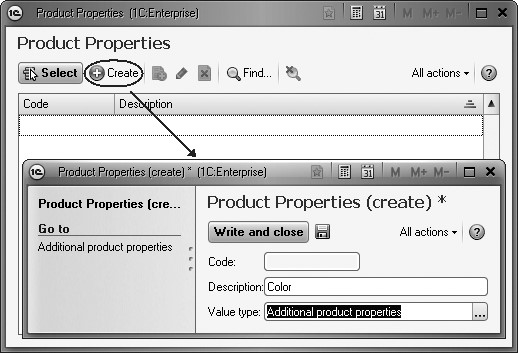
Fig. 15.29. Creating a characteristic in a Chart of Characteristic Types
Note that the form of a chart of characteristic types item (see fig. 15.29) and the form of additional product characteristics catalog item (see fig. 15.30) also have an unneeded field Code.
We have not adjusted these forms because we have already demonstrated similar actions. You can do it yourself using the same steps as used for the form of ProductTypes catalog item.
Click Save and Close.
The created characteristic will be displayed in the selection window of chart of characteristic types.
Click Select.
This returns you to the form of a record of product type contents titled Property and Value.
Click the selection button  in the Value field.
The resource Value of the register ProductPropertyValues has the type Characteristic.ProductProperties. This is a compound data type that is described in the property Characteristic Value Type of the chart of characteristic types ProductProperties.
Since for the Color characteristic we have selected CatalogRef.AdditionalProd uctProperties as the value type, you will see a selection form for this catalog displayed. The list of properties is currently empty.
Click New.
In the form window of additional product properties item enter White as the value type and leave the existing value in the Owner field as Color (fig. 15.30).

Fig. 15.30. Creating additional product properties
Click Save and Close.
In the selection window for additional product properties the created value will be displayed.
Click Select.
Now return to the form of product type contents record titled Property and Value to see the created property Color having White as its value (fig. 15.31).

Fig. 15.31. Property and value within a Product Type
Click Save and Close.
Return to the form of product type contents list.
Create another property named Cross-Section, sq.mm within the product type named White Conductors. To do so, repeat the previous steps.
Click the New button (fig. 15.32).
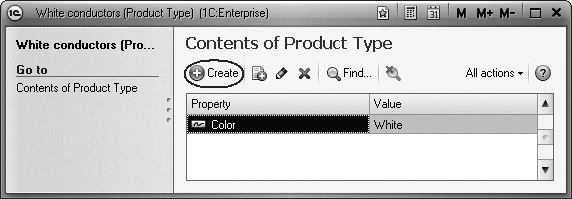
Fig. 15.32. Creating a New Property within a Product Type
In the form of product type contents record open the
selection button  in the Property field.
In the choice form of chart of characteristic types click New.
In the form window of chart of characteristic types item that opens enter a name for the characteristic as Cross-Section, sq.mm and select Value Type for this characteristic as Number, length as 15 and 3 decimal places (fig. 15.33).

Fig. 15.33. Creating a characteristic in a Chart of Characteristic Types
Click Save and Close.
The created characteristic will be displayed in the selection window of chart of characteristic types.
Click Select.
Now return to the form of a record of product type contents titled Property and Value.
Enter 2.5 to the field Value (fig. 15.34).

Fig. 15.34. Property and Value within a Product Type
Click Save and Close.
Return to the form of product type contents list.
So we see two properties and their values created for the product type White Conductors (fig. 15.35).
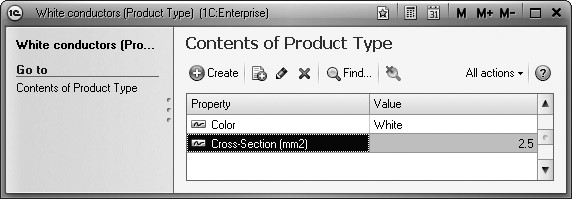
Fig. 15.35. Properties and Values within a Product Type
Now use the same steps to create a set of properties for Tubing, rubber from the Products catalog.
This set of properties will be named Poland (fig. 15.36) and will include the following properties (fig. 15.37):
- Color - Black;
- Manufacturer - Fagumit.
When you create the Color property, select it from the available properties in the chart of characteristic types.
The value of this characteristic is Black. First you will need to add it to the catalog of additional product properties and then select from this catalog.
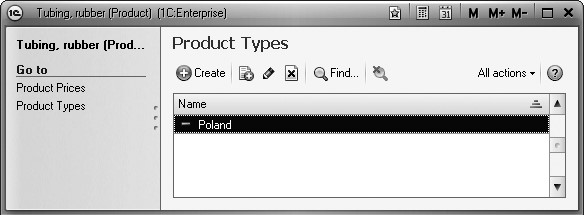
Fig. 15.36. Product type for a rubber tubing product
When you create the Manufacturer property of the value type Additional Product Properties, first add this property to the chart of characteristic types (value type is Additional Product Properties) and then select it from the chart.
The value of this characteristic is Fagumit. First you will need to add it to the catalog of additional product properties and then select from this catalog.

Fig. 15.37. Properties and values within the product type "Poland"
Now review everything we have created from a developer's perspective rather than from a user's perspective.
Navigate to the program main menu.
To do so, click the icon with a black triangle located in the title of the default program window near the 1C symbol.
Select All Functions from the main menu.
Open all the configuration objects that store information regarding product characteristics we have created one by one.
The Product Types catalog stores the sets of product properties we have created. Here every property set is subordinate to a specific product.
The chart of characteristic types named Product Properties stores product characteristics we have created:
- Color, value type: Additional Product Properties;
- Cross-Section, sq.mm, value type: Number;
- Manufacturer, value type: Additional Product Properties.
And the catalog named Additional Product Properties stores the values of such characteristics (except for the value of Cross-Section characteristic which is a Number).
The information register named ProductPropertyValues stores the relations between characteristics and their values for property sets.
Interactions between these configuration objects are demonstrated on the chart below (fig. 15.38):

Fig. 15.38. Configuration objects that store information regarding product characteristics
Updating Accounting Mechanisms
So we have made it possible to specify arbitrary characteristics for products and created some characteristic, i.e. product types.
But this is only part of the entire job. We would also want to account for products based on these characteristics. The goals we want to achieve are:
- Record product receipts with characteristics;
- Record product expenses with characteristics;
- Generate reports for products with specific characteristics instead of products in general.
To do so, you will need to adjust the existing registers and create a new report that will enable users to obtain data based on product properties.
The Balance Of Materials Register
In the Designer Mode
In order to record materials for accounting by their characteristic values, we need to edit the structure of accumulation register named BalanceOfMaterials so that it could store the data based on product property sets as well.

Fig. 15.39. New PropertySet dimension
To do so, open the configuration object editor for the BalanceOfMaterials accumulation register and on the Data tab add a new dimension PropertySet with the type CatalogRef.ProductTypes (fig. 15.39).
The Receipt Of Goods Document
In the Designer Mode
Now we will need to adjust the ReceiptOfGoods document. Our goal is to be able to specify a property set when material receipt are recorded and to record this property set in registers when a document is posted.
To do so, open the configuration object editor for the ReceiptOfGoods Document and on the Data tab add a new attribute named PropertySet to the document tabular section with the type CatalogRef.ProductTypes (fig. 15.40).

You need to fill in the property Choice Parameter Links for this attribute. This is needed to only select among property sets relevant for this product when a product is selected.
Locate Choice Parameter Links in the properties palette and click the
selection button  .
.
Drag the attribute named Materials.Material to the list of parameters from the list of available attributes (fig. 15.41).

So you have now defined that when a user attempts to select a value for the PropertySet field, the list of Product Types catalog items will be opened where product typees are subordinate to the material selected in the Material column.
Now place this attribute in the tabular section of a document form.
To do so, navigate to the Forms tab and double-click the DocumentForm row in the form list to open the document form.
Next in the upper right window of the form editor use the Attributes tab to expand the Object attribute of the form.
You can see that it includes all the attributes of the ReceiptOfGoods document.
Locate the PropertySet attribute in the tabular section and drag it to the form controls window located in the upper left pane of the form editor. It should end up in the Materials table.
The new control should be located in the form controls structure after the Material field (fig. 15.42).
Note that the properties palette of the PropertySet form control that opens contains the DataPath that already includes the tabular section attribute PropertySet because we dragged the attribute to the form so this property has been filled in automatically.
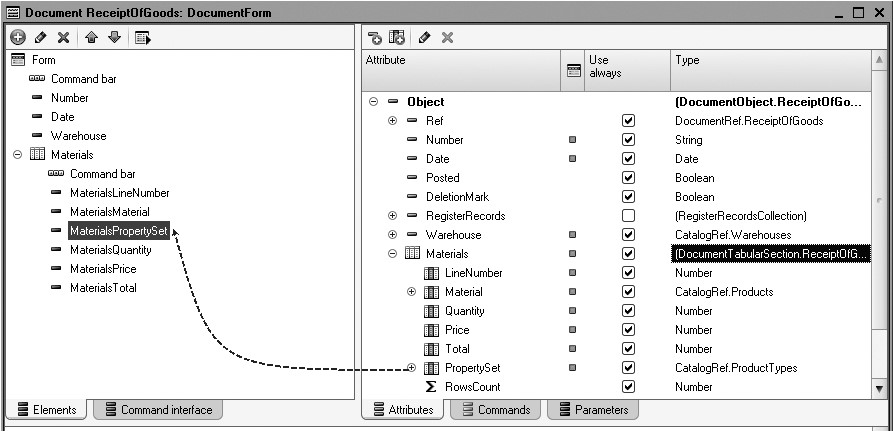
Fig. 15.42. Modification of ReceiptOfGoods document form
The DataPath property establishes a connection between form control and form attribute, i.e. the displayed data. This property must be filled because otherwise the form control will not be displayed!
NOTE
When a form control is added using the Add button, the property DataPath that establishes a connection of a form control with the form attribute, should be filled in manually.
Finally, in the configuration object editor for the ReceiptOfGoods Document navigate to the Other tab and open object module.
Open the procedure of Posting event handler, and in addition to the register records generated assign the PropertySet measurement of the BalanceOfMaterials register a value as follows (listing 15.3).
Listing 15.3. A fragment of the Posting() procedure
	...
	// register BalanceOfMaterials ReceiptOfGoods
	...
	Record.Material = CurRowMaterials.Material;
	Record.PropertySet = CurRowMaterials.PropertySet;
	Record.Warehouse = Warehouse;
	...
The Services Rendered Document
In the Designer Mode
Now we will adjust the ServicesRendered document in a similar manner.
For a user to be able to specify a set of property for every used material when recording material expenses, open the configuration object editor for the ServicesRendered document and on the Data tab add a new attribute to the document tabular section named PropertySet with the type CatalogRef.ProductTypes.
Fill in the property Choice Parameter Links for this attribute. Drag from the list of available attributes to the list of parameters an attribute named ProductList.Products. So you have now defined that when a user attempts to select a value for the PropertySet field, the list of Product Types catalog items will be opened where product typees are subordinate to the material selected in the Product column.
Now place this attribute in the tabular section of a document form. Open the document form and drag this attribute from the list of form controls to the window of form controls. The new control should be located in the form controls structure after the Product field.
Finally, in the configuration object editor for the ServicesRendered document navigate to the Other tab and open object module.
Open the procedure of Posting event handler, and in addition to the register records generated assign the PropertySet measurement of the BalanceOfMaterials register a value as follows (listing 15.4).
Listing 15.4. A fragment of the Posting() procedure
  ...
  // register BalanceOfMaterials Expense
  ...
  Record.Material = SelectionDetailRecords.Product;
  Record.PropertySet = SelectionDetailRecords.PropertySet;
  Record.Warehouse = Warehouse;
  ...
Since during the previous lesson we adjusted the document posting procedure and obtained all the document data using a query, add the following lines to the query text to obtain a new document attribute (listing 15.5).
Listing 15.5. A fragment of the Posting() procedure
Query = New Query;
// Specify which temporary tables manager is used by this query
Query.TempTablesManager = TTManager
Query.Text =
"SELECT
| ServicesRenderedProductList.Product,
| ServicesRenderedProductList.Product.ProductType AS ProductType,
| ServicesRenderedProductList.PropertySet,
| SUM(ServicesRenderedProductList.Quantity) AS QuantityInDocument,
| SUM(ServicesRenderedProductList.Total) AS TotalInDocument
|INTO DocumentProducts
|FROM
| Document.ServicesRendered.ProductList AS ServicesRenderedProductList
|WHERE
| ServicesRenderedProductList.Ref = &Ref
|GROUP BY
| ServicesRenderedProductList.Product,
| ServicesRenderedProductList.Product.ProductType,
| ServicesRenderedProductList.PropertySet";
...
Query2 = New Query;
Query2.TempTablesManager = TTManager;
Query2.Text = "SELECT
| DocumentProducts.Product,
| DocumentProducts.ProductType,
| DocumentProducts.PropertySet,
| DocumentProducts.QuantityInDocument,
| DocumentProducts.TotalInDocument,
| ISNULL(CostOfMaterialsBalance.CostBalance, 0) AS Cost,
| ISNULL(BalanceOfMaterialsBalance.QuantityBalance, 0) AS Quantity
|FROM
| DocumentProducts AS DocumentProducts
Product Receipt/Expense in Compliance with Characteristics
In the 1C:Enterprise Mode
Now launch 1C:Enterprise in the debugging mode and define property sets to be used when recording expenses of materials.
Open the document Receipt of goods No. 2 and indicate that we have purchased 2 white electrical conductors and Polish rubber tubing.
Then copy the first line of the document and indicate that we have also purchased 3 black electrical conductors. (In doing so, you will need to create another property set for electrical conductors: Black Conductors with Color - Black and Cross-Section - 2.5) (fig. 15.43).
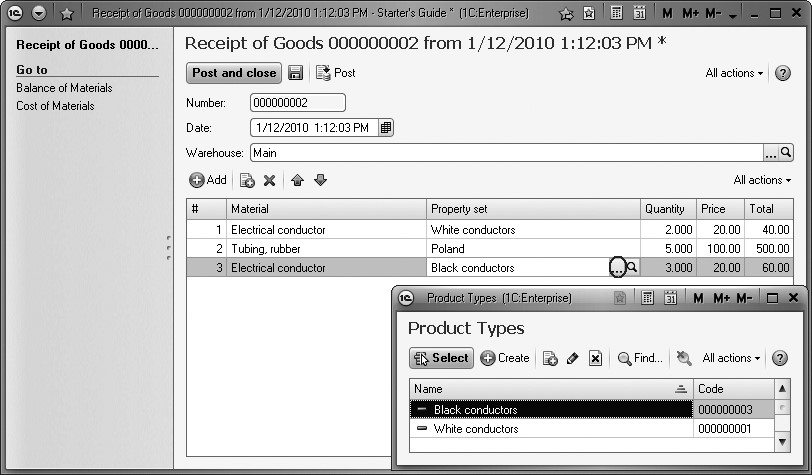
Fig. 15.43. The Receipt Of Goods No. 2 document
Click Post and use the Balance Of Materials command in the navigation panel of the document form to test the records added by the document to the BalanceOfMaterials register (fig. 15.44).

Fig. 15.44. Records added by the Receipt Of Goods No. 2 document to the Balance Of Materials register
Now open the document Services Rendered No. 1 and indicate that a Polish rubber tubing has been used (fig. 15.45).
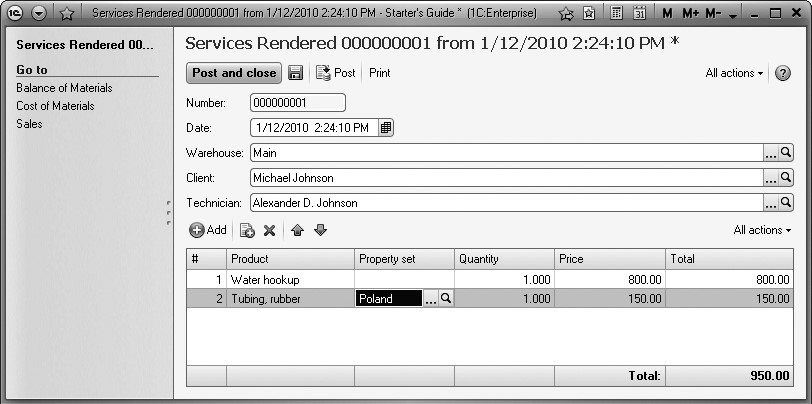
Fig. 15.45. The Services Rendered No. 1 document
Click Post and use the Balance Of Materials command in the navigation panel of the document form to test the records added by the document to the BalanceOfMaterials register (fig. 15.46).

Fig. 15.46. Records added by the Services Rendered No. 1 document to the Balance Of Materials register
A Report Using Characteristics
To polish the results, we will create a report that will demonstrate availability of materials with certain specific properties. To create the report, we will use the features provided by the data composition system to handle characteristics (fig. 15.47).
Briefly, a data set for the data composition system will be quite a simple query to the register BalanceOfMaterials and we will also describe the arrangement of our characteristics mechanism.

Based on these definitions, the data composition system will generate quite a straightforward and user-friendly interface to handle characteristics and will generate the required database queries based on the user-selected values.
In the Designer Mode
Add a new Report configuration object.
Enter BalanceOfMaterialsByProperties for the report name and run the data composition schema wizard. Add a new Data Set - Query and open the query wizard.
Query for a Data Set
For the query data source select the virtual table of the BalanceOfMate- rials.BalanceAndTurnovers accumulation register. Select the following fields from this table (fig. 15.48):
- Material;
- PropertySet;
- QuantityOpeningBalance;
- QuantityReceipt;
- QuantityExpense;
- QuantityClosingBalance.

Fig. 15.48. Selected fields
Next on the Unions/Aliases tab enter aliases for the numerical fields, leaving out the word Quantity (fig. 15.49).
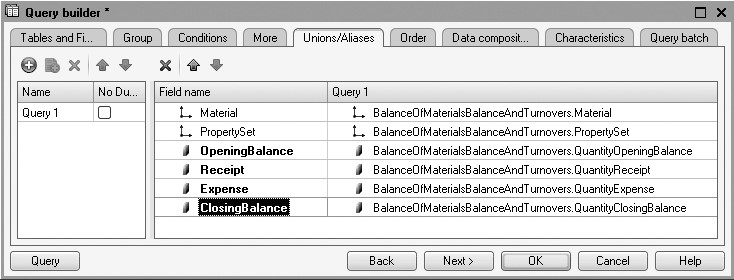
Characteristics
Now proceed to defining characteristics.
To do so, navigate to the Characteristics tab and click Add.
The first field that should be defined is Value Type.
Here specify the type of the field our characteristics will belong to.
In this case (see the chart on the fig. 15.4) the field is PropertySet of the BalanceOfMaterials register that has the value type as
CatalogRef.ProductTypes.

Fig. 15.50. Defining a value type
The next step is describing where the data composition system should get the list of characteristics from. To do so, indicate the source of characteristic list and explain the purposes of specific fields in this source.
Either an existing database table or a result of some query to tables may serve as a source for data composition system.
In this situation everything is quite simple: the list of all characteristics is stored in the chart of characteristic types named ProductProperties.
So for the source we will specify Table and in the field List of Characteristics select ChartOfCharacteristicTypes.ProductProperties (fig. 15.51).

Fig. 15.51. Defining a list of characteristics
Next you should describe the purpose of the fields in the source that delivers the list of characteristics. These are default attributes of the chart of characteristic types named ProductProperties.
In the Identifier field select Ref, in the Name field enter Description and for the Type field select ValueType (fig. 15.52).

Fig. 15.52. Defining a list of characteristics
Now proceed to describing the source of characteristic values.
In our situation the information register named ProductPropertyValues serves as the source of characteristic values so in the Source field select Table while for the Characteristic Value enter InformationRegister.ProductPropertyValues.
Next describe the purpose of register fields.
In the Object field select the dimension PropertySet, in the Identifier field enter PropertyType, and in the Value field select the resource of the register named Value (fig. 15.53).

On the following chart you can track the connection between configuration objects and characteristic definitions in the query wizard (fig. 15.54).
Analysis of the Query Text
This completes creating the query.
Click OK and review the query text generated by the wizard for the data composition schema (listing 15.6).
Listing 15.6. Query text
SELECT
	BalanceOfMaterialsBalanceAndTurnovers.Material,
	BalanceOfMaterialsBalanceAndTurnovers.PropertySet,
	BalanceOfMaterialsBalanceAndTurnovers.QuantityOpeningBalance AS OpeningBalance,
	BalanceOfMaterialsBalanceAndTurnovers.QuantityReceipt AS Receipt,
	BalanceOfMaterialsBalanceAndTurnovers.QuantityExpense AS Expense,
	BalanceOfMaterialsBalanceAndTurnovers.QuantityClosingBalance AS ClosingBalance
FROM
	AccumulationRegister.BalanceOfMaterials.BalanceAndTurnovers AS BalanceOfMaterialsBalanceAndTurnovers
{CHARACTERISTICS
TYPE(Catalog.ProductTypes)
LIST ChartOfCharacteristicTypes.ProductProperties
ID Ref
NAME Description
VALUETYPE ValueType
VALUES InformationRegister.ProductPropertyValues
OBJECT PropertySet
CHARACTERISTIC PropertyType
VALUE Value }

Fig. 15.54. Relation between configuration objects and characteristic definitions in the Query Wizard
The important section of this query is the part after the keyword CHARACTERISTICS. This section defines the characteristics that will be used in this report for the data composition system. The text of the section is enclosed in braces. It means that this code is not a part of the query and is basically an instruction for the data composition system.
Resources
Proceed to editing of the data composition schema.
First on the Resources tab select all the available resources (fig. 15.55).

Settings
Switch to the Settings tab.
Create a report structure: add a grouping named Detailed Records.
Next on the Selected Fields tab select the fields to be displayed in the report:
Material, PropertySet, OpeningBalance, Receipt, Expense, and ClosingBalance
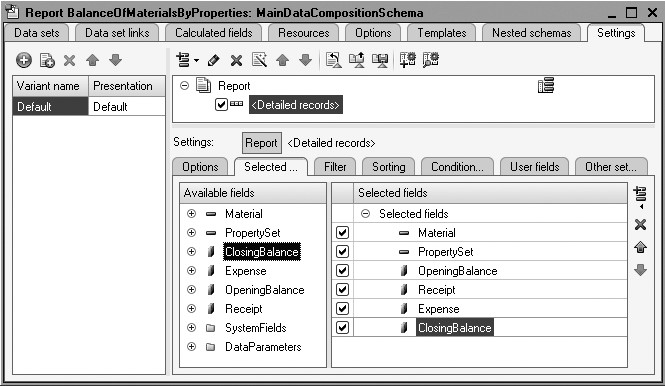
Fig. 15.56. Report groupings and fields
Now navigate to Other Settings tab and enter a title for the report as Balance Of Materials by Properties.
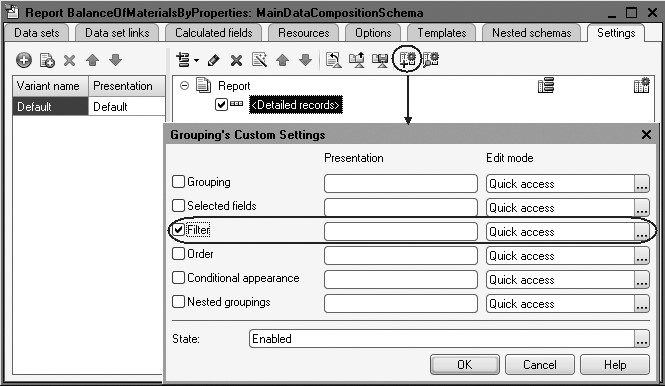
To be able to test our report, include the Filter setting to the list of quick custom settings.
To do so, click Properties of custom settings item located above in the command bar of the settings window.
In the window that opens you can edit the assortment of custom settings for a report. Check the Filter setting and leave the default value of the property Edit Mode unchanged as Quick (fig. 15.57).
Finally, we will define the subsystems where our report will be displayed.
Close the data composition schema wizard and in the editor of the BalanceOfMaterialsByProperties Report configuration object navigate to the Subsystems tab.
Select the following subsystems in the list of configuration subsystems: Goods Management and Accounting.
With that, we have completed creating the query.
In the 1C:Enterprise Mode
Now launch 1C:Enterprise in the debugging mode and review the results that can be obtained with this report.
In the Goods Management section use the command to open the report Balance Of Materials by Properties (fig. 15.58).

You now see the Filter setting located in the report form. It enables users to obtain balance of materials based on their characteristics.
First review the materials available with a cross-section of 2.5 sq.mm.
To do so, in the field of Filter setting click the selection
button  (see fig. 15.58). In the Edit Filter window that opens you see
the list of available report fields on the left.
Expand the Property Set field (fig. 15.59).
Note that the data composition system has added all the characteristics defined for various property sets in the database to the default attributes of the ProductTypes catalog: Manufacturer, Cross-Section, and Color. So filtering a report by values of some characteristics is quite straightforward and intuitive.
To get to know the materials available with the cross-section of 2.5 sq.mm, it is sufficient to select the field Cross-Section, sq.mm and define the condition as equal to 2.5.

Click OK.
In the report window click Generate to get the results as follows (fig. 15.60).

Now check which of our materials are black in color.
To do so, in the Filter field click the selection button  again and remove the
previous filter by clicking the button Delete over the list of filter conditions.
Next double-click the Color field to select it from the list of available fields.
Next in the Value field click the selection button and select the value Black from the list of available products properties (fig. 15.61).

Fig. 15.61. Creating a Filter
Click OK. In the report window click Generate to get the results as follows (fig. 15.62).

And finally, to make sure that the report operates properly, obtain the number of black rubber tubing units.
In the Filter field click the selection button  again and add another
filter item.
To do so, double-click the Material field to select it from the list of available fields.
Next in the Value field click the selection button  and select the value Rubber Tubing from the list of products (fig. 15.63).

Fig. 15.63. Creating a filter
Click OK.
In the report window click Generate to get the results as follows (fig. 15.64).

Fig. 15.64. Report results
So we can be sure that, by using this logical design, we can now account for materials based on any number of their properties and values of such properties.
It is worth mentioning that the example we have covered in this chapter is not the final solution for this configuration. We have simply demonstrated that such accounting is available. In order for our configuration to fully use the properties of materials, we need to make appropriate changes in the remaining registers, documents, and some reports.
Quiz
- What is the purpose of the Chart of Characteristic Types configuration object?
- What is the fundamental differences between a chart of characteristic types and a catalog?
- What is a type of characteristic values?
- Why does one need additional characteristic values?
- How does one arrange for accounting based on a variable number of characteristics using chart of characteristic types?
- How does one create a chart of characteristic types?
- What is a choice parameter link?
- How does one create a synonym for a default attribute?
- How does one edit a form title?
- How does one hide form controls containing subordinate information when it is created?
- How does one define characteristics in the data composition schema?
- How does one use characteristics for report generation?
