
1C:Enterprise 8.3. User Manual. Taxi Interface. Contents
CHAPTER 3. LISTS
Various lists are most frequently used in 1C:Enterprise to display information.
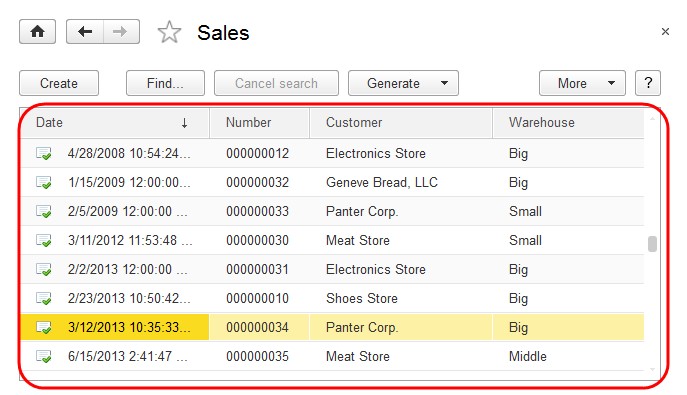
Fig. 55. The list of "sales of goods" documents and the command bar
If this is not prohibited in a specific configuration or for a specific user, a list can be edited on the fly: new entries can be added while the existing ones can be edited or removed.
Lists are managed in two forms: list form and item selection form.
To switch to a form containing a list of objects, you should normally select the respective link of the navigation panel.
A list is only opened in the selection form when you enter a form attribute value by clicking the selection button or pressing F4. Various forms for selecting items and folders may be defined in the configuration.
Normally a selection form provides for locating the cursor in the required list item and press Enter to select the current item as the value for the edited attribute or to create a new object. In a list form pressing Enter for the current item opens an editing form. You can change the software behavior for when Enter is pressed during configuration development.
3.1. VIEWING A LIST
General methods used to work with tables are also applicable to viewing lists. These methods are described in details in "Table" on the page 37.

Fig. 56. Form of the goods list
A list form is usually a table displaying a list of items. The assortment of the columns in the table is defined in the configuration.
The assortment and positions of the columns in a table may vary. That is, a configuration may provide for multiple visual representations of the same list.
NOTE
The text is not displayed in full in the table cell if it includes over 2000 characters.
Left-clicking a column of a list will sort the information in the list by the value in the column.
A user can customize the assortment of the displayed columns using More – Change form menu item. The procedure of forms customization is described in "Form Setup" on the page 142.
If a list contains numerous items (rows) and columns, only a part of the list is displayed in the form with scroll bars available at the bottom and on the right of the list.
Both items and folders of a list can be marked for deletion. They are usually marked with struck out icons in the leftmost column of the list.
Resizing column height in the lists is recorded. The size is saved and is used when the window is next opened. If a list is opened in a new window, the width of the columns is saved accompanied by the size and location of the window itself.
3.1.1. Hierarchical Lists
You can use the 1C:Enterprise platform to manage hierarchical lists having an unlimited number of nested levels (the limitation can be applied during configuration development).
Hierarchical lists include items belonging to various levels with the items of the lower levels subordinating to those of the higher levels. There are two types of hierarchy of lists: hierarchy of folders and items and hierarchy of items. A specific type is defined in the configuration.
A list that has hierarchy of groups and items includes two types of items: folders and the items themselves. A folder is a node that includes other (subordinate) groups and items. An item is a specific object.
In the lists with hierarchy of items any item can be both a node and an individual object. A list of departments can be quoted as an example. Every department may include other departments but all the departments will have the same assortment of properties.
A hierarchical list has the following view modes: hierarchical list, list, tree. The modes are switched using More – View mode menu item.
The current view mode is designated by a "clicked icon" (this icon has a frame next to the menu item).
List Mode. If you select List as a view mode, the form will display all the items of the list. Folders and items are displayed together without separation.
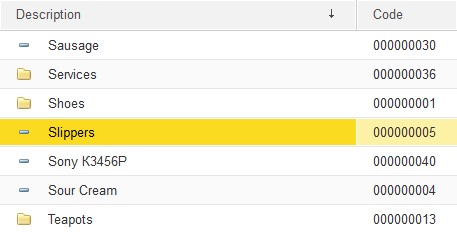
Fig. 57. List view mode
Hierarchical List Mode. If the Hierarchical list mode is enabled for items having a hierarchy of folders and items, only the top level items are displayed, while only items that are subordinate to a folder are shown when you switch to this folder.
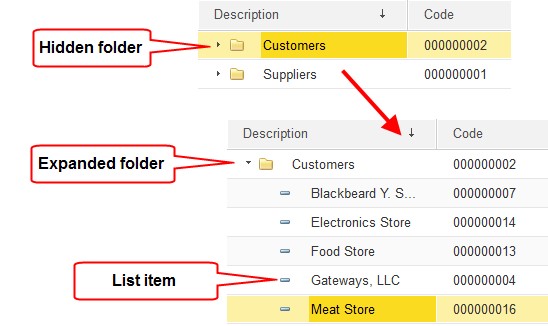
Fig. 58. Contractors list in the hierarchical list mode
Hidden folder – a row corresponds to a folder of items. Left-clicking this icon will expand the folder so that you could switch to management of items included in the folder.
Expanded folder – the row contains the name of the folder opened for viewing. This row is always located in the top of the table, right under the column headers of the list. Left-clicking the icon in the row collapses the folder.
List item – the row is an item of the list.
A folder in a list can be expanded in one of the following ways:
double-clicking the line in the list that contains the name of the group,
left-clicking [+] in the line with the name of the group,
placing the cursor in the row containing the name of the desired folder and pressing Ctrl + Down Arrow,
placing the cursor in the row containing the name of the folder and pressing + on the NumPad,
placing the cursor in the row containing the name of the desired folder and selecting More – Down one level.
To return to the previous level, you can press Ctrl + Up Arrow while in any row of the folder or select More – Up one level.
Tree Mode. If you select Tree as the view mode, the items of the list will be displayed as a tree (see fig. 59).
You can expand and collapse a tree for convenience. The + (plus) sign in the branch node indicates that this branch can be expanded. Left-clicking this sign will expand the next level of the branch for viewing and the + (plus) sign will switch to - (minus). You can collapse a branch of a tree by clicking the - (minus) sign.
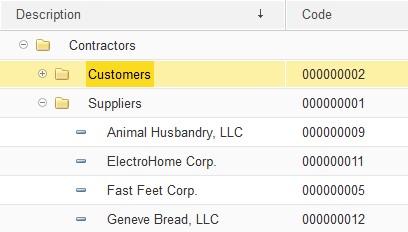
Fig. 59. Hierarchical list in the tree mode
If a tree is expanded, use the Up Arrow and Down Arrow keys to move to the required folder.
To expand a folder and simultaneously switch to a lower-level folder, use the Ctrl + Down Arrow keyboard shortcut. To move to the parent folder, use Ctrl + Up Arrow.
To collapse a tree node and all its subordinate nodes, use Shift + Alt + Minus Sign on the numeric keypad.
To collapse all the tree nodes, use Ctrl + Shift + Alt + Minus Sign on the numeric keypad.
To expand a tree node and all its subordinate nodes, use Shift + Alt + Plus Sign on the numeric keypad.
To expand all the tree nodes, use Ctrl + Shift + Alt + Plus Sign on the numeric keypad.
Also in any view mode both a tree and a list can have a tree node expanded using Plus Sign on the numeric keypad or collapsed using Minus Sign on the numeric keypad.
To quickly navigate to the beginning or to the end of a list, you can use Home and End keys, respectively.
The lists with hierarchy of items in the Tree mode are viewed similarly to viewing the lists with hierarchy of folders and items. At that the icons used are the same for the lists with hierarchy of items.

Fig. 60. List with hierarchy of items in the tree view mode
3.2. CREATING A LIST ITEM
To create a new item, use More – Create command in the form of the list or simply press Insert.
If a new item that is added to a hierarchical list should be located in a specific folder of the list right away, you should switch to this folder before creating the item (Hierarchical list or Tree mode should be enabled).
NOTE
If List view mode is selected for a hierarchical list, a new item will be created in the root folder.
If an item form includes a Folder attribute, you can specify any other folder the item should belong to irrespective of the mode and current folder.
When a new item is added to a list, the data is edited in a displayed editing form (window) of this item.
The appearance of this window, its properties and behavior of the controls are defined in the configuration.
General methods of working with a form are used to edit attributes of a list item. Detailed information about these methods is provided in "General Techniques of Working with Forms" on the page 27.
Validity and completeness of the data can be verified when a user works in the form that creates a list item. Error messages may be displayed in case of incorrect input. When you are done entering the attributes, click Write and close or another similar button intended to save the results of editing to record the created item in the list or close the form using the button intended to close the window. When you are prompted to save changes, select Yes to record the newly created item to the list or No not to save it.
Press Esc to cancel adding the new item to the list.
TIP
To add a new item to a list, use a command of the Create group of the action panel.
3.2.1. Creating a Folder in a List
To create a new folder, use the More – Create group menu item in the list form.
If the newly created folder to be added to a list should be located in a specific folder of this list, you should switch to this folder before adding the new one (Hierarchical list or Tree mode should be enabled).
If the Folder attribute is available in the form used to add a new folder, you can specify any other folder for the newly added folder to belong to irrespective of the mode and current folder.
Similarly to creating a new list item, when you create a new folder, the attributes of the folder are edited in the folder form displayed.
The system does not differentiate between the codes of list items or item folders; that is, folder codes and item codes cannot coincide.
Otherwise the methods of adding a list folder and editing it are the same as those used to create an item.
3.2.2. Copying a List Item
A new item or a folder can be added to a list by copying an existing item or folder. To do so, locate the cursor in the row containing the item or folder to be used as a template and select More – Copy.
This will display the form intended to create a new item. At that all the attributes will be copied from the attributes of the template item. If automatic code assignment is not specified for the list, the code of the new item will be copied from the template item.
You can edit the attributes using the general rules described in "Editing List Items" below.
3.3. EDITING LIST ITEMS
To edit an item, locate your cursor in any cell of the row that you want to edit the attributes for, and press Enter or double-click anywhere in the row or press F2. This will open the list item editing form where you can edit the required attributes.
When a list item form is opened (or multiple forms are opened), the list form is still available for operations in the application window: you can add new items and folders, delete them or move items from one folder to another – that is, you can use all the operations with lists provided by the software.
If a list is read-only, the information in the opened form will not be available for editing.
3.3.1. List Rearrangement
When you work with hierarchical lists, you may need to rearrange the items of a list, i.e. to move items or folders of items from one folder to another.
To move an item or a folder to another folder of the list:
1. Highlight the row in the list that contains the item or the folder that should be moved to another location of the list.
2. Select More – Move to folder.
3. In the dialog that opens select the folder where you want the selected item to be located.
TIP
List elements may be dragged between the groups with a mouse. Please note that there is no way to drag an element to the parent group in a hierarchical list.
If the configuration supports unique list item codes, the code of the moved item must be different from the codes of the items that already exist in the destination folder. If the codes match, the following message is displayed: <Field name> field value not unique. At that, you need to correct the code of the moved item.
3.3.2. Selecting a Value from a List
A list can be opened to select an item from this list. In this situation, a list is opened by clicking the selection button or by pressing F4 when an attribute is entered from a list.
When a list is opened to select a value, the window of the list may be somewhat different from that displayed when it is simply opened (e.g. the assortment and position of columns in the list may be different, a folder tree may be absent or located in a different position, etc). You can create various forms for different modes of working with lists. As a rule, a selection form contains the minimum required information; it frequently consists only of the name and code columns.
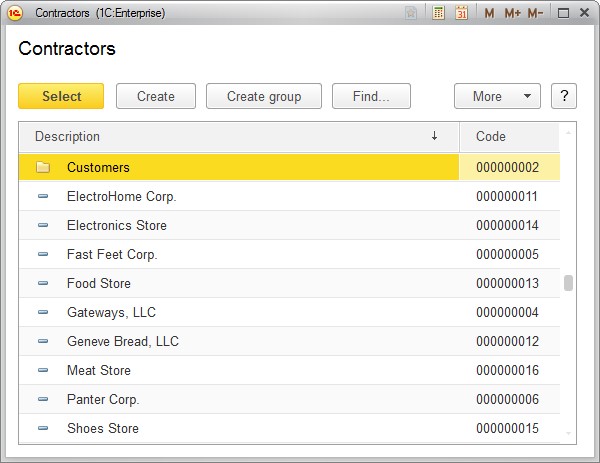
Fig. 61. Selecting an attribute value from a list
The item selection form supports the same actions that are available in the list form: adding new items to a list, editing additional attributes of the existing list items, moving items to other folders (if the window contains a folder tree), etc.
For example, if a list of companies does not have the company you need, you can enter it right here and select it immediately to use as a document attribute. You can also edit some attributes of an existing company (if this is available for a specific user).
NOTE
Please note that the Enter key behavior has major differences in different forms. In a selection form, pressing Enter results in selecting and closing the required item (unless otherwise specified in the configuration), while in the forms of lists it results in opening the form to view and edit it. To edit a list item in the selection form, use commands of the More menu or F2.
Information in the selection form is synchronized with that available in the list form so all the changes that you make in one window will be reflected in the other one.
To select a list item, you should locate the cursor in the row with the desired item and press Enter or click the Select button on the command bar (if it is provided for in the configuration).
For the hierarchical lists in the forms of items you can specify a folder this item belongs to (if it is provided for in the configuration).
For some attributes you can select both items and folders. You can use the standard selection method, by holding the Shift key down to select a folder quickly.
TIP
The selection form is not actually required to select data from a list. It is sufficient to type the code or begin typing the name of the required item in the text box. Codes are particularly convenient when such codes are frequently used and are easy to remember (e.g. the numbers of departments) or are available in the primary documents (e.g. a part number or barcode for some goods).
3.3.2.1. Predefined List Items
A list may have predefined items (if it is provided for in the configuration). These items are added during configuration development and cannot be deleted in the 1C:Enterprise mode. You can only edit attributes of such items.
3.3.3. Search in Lists
There are several ways of searching for the required information in a list. They are described below.
3.3.3.1. Quick Search
To quickly switch to the desired row in a list, you can use quick search mode. To perform a quick search, simply begin typing the desired value on your keyboard.
This will automatically open the normal search window with the value displayed in the field named Find.
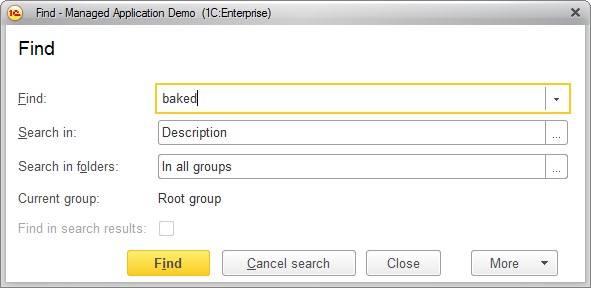
Fig. 62. Search window
To search non-exact matches for reference-type attributes in the Search in field, select a name of an attribute marked with (by string).
The Find in search results checkbox will become available during the search. If you select this checkbox, you will be able to search within the results of the previous search.
Search results will be displayed in the current work area as a flat list.
To return to the previous state of the list, click Cancel search or press Ctrl + Q.
3.3.3.2. Custom Search
You can search within any column of a list.
To carry out a custom search:
1. Click Find in the command bar or press Ctrl + F.
2. Specify search criteria in the search dialog.
3. Click Find in the Find dialog.
This will display all the rows meeting the specified conditions in the current window. If no such rows can be identified, the list will be empty.
To return to the previous data presentation, use the Cancel search command or press Ctrl + Q.
Find field is intended to enter the value of the data type contained in the column selected in the Search in field. Search by a substring is used for rows (if the entered search string is shorter than the field to be searched in) while the attributes containing a date can have search by date without accounting for time used.
Exact match is searched for the remaining values. To search non-exact matches for reference-type attributes in the Search in field, select the name of an attribute marked with (by string).
If hierarchical data is displayed in a list, you can search for data taking their hierarchy into account (Search in folders parameter): in the entire list (In all groups), In the current group and in child groups or In the current group without child groups.
If you select In the current group and in child groups, search will be carried out in the data of the currently opened folder and its subfolders.
If you select In the current group without child groups, search will only be carried out in the data of the opened folder while the data of the subfolders will be ignored.
Search history is stored for the user to be able to use the previously searched for values by selecting them from the dropdown list of the Find field.
3.4. LIST CUSTOMIZATION
You can customize the order of columns in a list, their visibility and the behavior of the list when data is opened and managed, in the Form Customization dialog. The dialog is opened using More – Change form command. For details on form customization, see "Form Setup" on the page 142.
Customization of data display, sorting of a list rows, grouping of a list in a table and list layout is carried out in the List Options dialog. The dialog is opened using More – Configure list command.
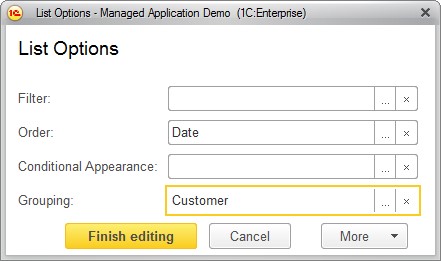
Fig. 63. List settings form
This dialog is intended to customize:
List filtering
The fields to order by
The fields to group the data by
Conditional appearance of the list
The settings are displayed in the lists arranged in four tabs of the window. A setting is applied to a list if it is checked. You can specify the order for elements of one setting to be applied.
You can customize data display in the list same as you customize the report variant in the data composition system.
Click ÎK to apply a setting.
3.4.1. Filter
To apply a filter to a list, in the list customization dialog press the select button in the Filter setting and in the window that opens select the filter value. To do so, select the Value column in the item row and click Select or press F4.

Fig. 64. List customization filter
To add a filter item, click Add new item or drag the required field from the Available fields list.
Select Comparison type in the list that pops up when you click Select from list in the Comparison type column.
If required, you can define an order for the criteria to be applied to the list. This is done using Move the current item up and Move the current item down buttons of the command bar.
To apply a filter to a list, click OK.
For details on using filters and the comparison types, see page 107.
3.4.2. Sorting
To apply sorting to a list, in the list customization dialog press the select button in the Sorting setting and in the window that opens select the sorting.
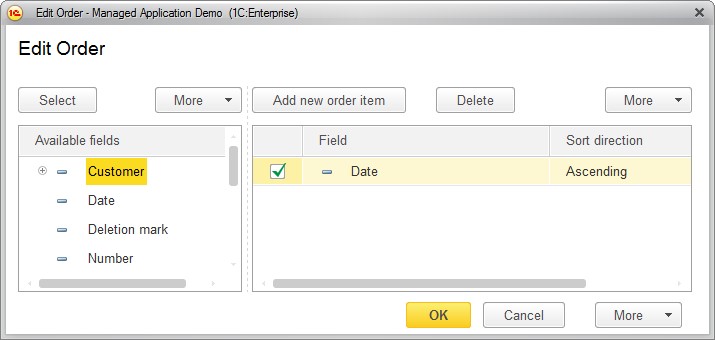
Fig. 65. Adjusting a list sorting
To add a sorting item, click Add new order item or drag a field from the Available fields list and select Sort direction (Ascending/Descending).
If required, specify an order for the sorting items using Move the current item up and Move the current item down buttons.
If there are several sorting fields in the list, data will be sorted by the first, second, etc. fields.
To apply a sorting to a list, click OK.
For details on using sorting, see "Sorting" on the page 110.
NOTE
It is impossible to sort lists by the fields that contain unlimited length strings.
3.4.3. Grouping
To add a grouping a list, in the list customization dialog press the select button in the Grouping setting and in the window that opens select a grouping field. If multiple fields are selected, the records in the list will be grouped in succession in the order specified for the fields of the group.
Click OK to apply a group setting.
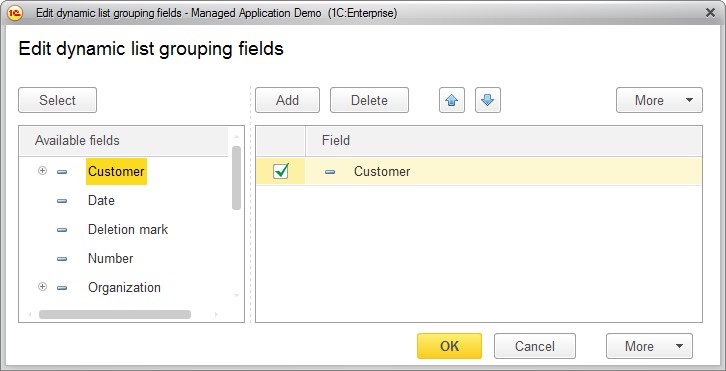
Fig. 66. Adjusting a list grouping
NOTE
It is impossible to group lists by the fields that contain unlimited length strings.
3.4.4. Conditional Appearance
To set up the conditional appearance you should click the select button in the Conditional Appearance field of the settings dialog box and add the required items in the settings dialog box that opens.
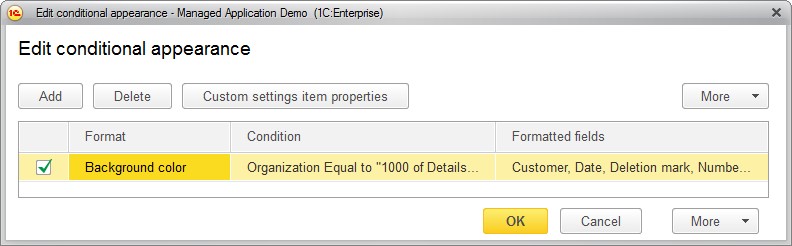
Fig. 67. Setting the conditional appearance in the list
To create an element of conditional appearance, click Add on the Conditional Appearance window. Elements of conditional appearance are edited in a separate window.
Select the required appearance parameters on the Format tab: background color, font color, etc.
Specify the condition for formatting to be applied to the fields on the Condition tab. A condition is specified in the same manner as it is for filter.
On the Formatted fields tab from the list of available fields select those fields for appearance to be applied to if the condition is satisfied.
If required, define the order for the used appearance elements with Move the current item up and Move the current item down buttons.
The order of appearance elements defines the sequence for appearance to be applied to report elements. If two different appearances apply to a report area, the one that is the last in the list of conditional appearance elements is applied.
For details on customization of conditional appearance, see "Conditional Appearance" on the page 110.
Click OK to apply a conditional appearance settings.
3.4.4.1. Saving Settings between Sessions
Depending on configuration settings, the dynamic list settings can be saved between sessions when user closes form and are automatically loaded when the form is opened in a new session.
The list view mode (Hierarchical list / List / Tree) is saved automatically.
3.4.5. Visibility Interval
For some lists it is possible to limit the displayed data to a specific period.
The interval is specified in the Select period dialog opened using More – Set date range.
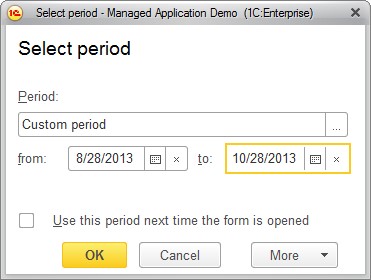
Fig. 68. Customization of a period in a list
By default, the data in a list are displayed without any limitation by period and the Period parameter has the value Without limitations.
To define a custom date range, select Custom period in the Period list and specify the start and end dates in the fields From and To as shown on fig. 68.
It is also possible to select one of the standard periods that also support automatic tracking of date changes. For example, if you select Today as the standard period on the 12th of May, 2013, the next day the filter will still be valid because it will point to the 13th of May, 2013.
If you check Use this period next time the form is opened, the form will be opened with the selected visibility interval.
3.5. PRINT LIST
To export a list to a text or spreadsheet document, select More – Output list.
In the dialog that opens, select the type of the document and the required columns.
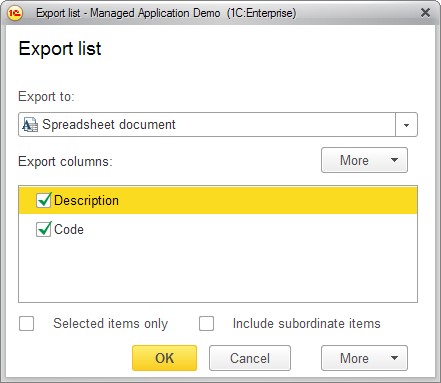
Fig. 69. List output customization dialog
If the list supports multiple row selection, you can use this dialog to only print the selected rows (Selected items only check box).
If a hierarchical list is displayed in a table, in the dialog box you can specify the mode of printing data with all the subordinate folders and items (Include subordinate items check box).