
1C:Enterprise 8.3. User Manual. Taxi Interface. Contents
CHAPTER 8. SOFTWARE CONFIGURATION
This chapter covers 1C:Enterprise configuration in details. It is possible to configure the application interface both globally and for every form independently (provided that it is supported by the configuration), to define system options, manage display of text and spreadsheet documents and windows location.
8.1. INTERFACE
1C:Enterprise supports customization of the application interface, including:
Start page
Sections panel
Navigation panel (both for the main and the auxiliary windows)
Action panel
Auxiliary window toolbar
You can select commands from the lists of available commands and manage their locations.
Various setup dialogs are opened from the 1C:Enterprise main menu (View item of the main menu).
It is also possible to open the setup window for every panel from this panel's context menu.
8.1.1. Start Page
The system allows the user to select forms to be displayed on the start page. You can only manage the forms that are displayed on the start page.
To navigate to the start page setup dialog, select View – Start page setup in the main menu.
The setup is performed in the dialog, which contains three lists: Available forms and groups of columns, i.e. Left column of starting page, Right column of starting page. The Available forms list displays the forms that are not listed in either of the columns.
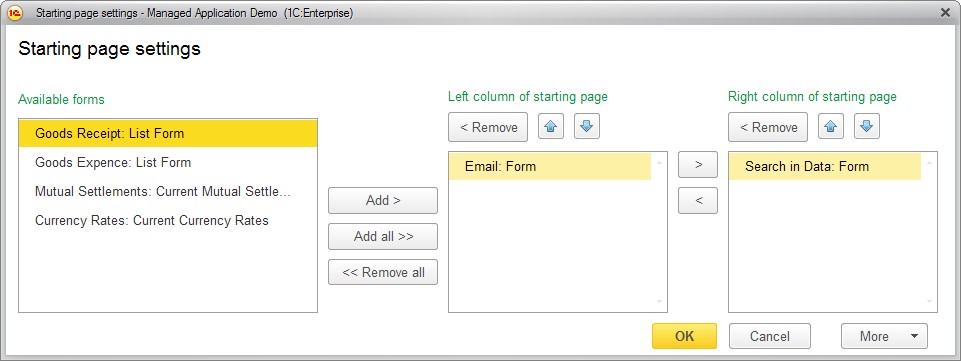
Fig. 161. Start page setup dialog
Use the Add >, Add all >> buttons to drag the forms from one list to another, and > and < to move them between the columns. To remove a form from the column (return it to the list of available forms), select it in the list and press < Remove, or simply click its name in the list. To remove all forms from the start page, click << Remove all. Use the Move form up and Move form down buttons to change the order of the forms in the columns. The forms are displayed on the start page in the same order as specified in the settings.
During the setup, a user can cancel the changes made in this session or in earlier sessions and reset the configuration settings. Use Restore default settings in the More menu. This command does not immediately change the command interface. After performing this command you can continue with the setup. Press OK to apply the settings.
8.1.2. Setting the Panel View
The navigation and action panels can be displayed even when they do not contain any commands. Please also note that switching between sections does not change the height of the action panel.
To set up or to hide the panels, use the relevant View main menu commands (see fig. 162).
This submenu allows you to control how the panel is viewed and the contents of the Sections and Navigation panels and Start page. This allows more space for forms and reduces the possibility of scroll bars appearing. To hide all the panels, use the View – Hide all panes main menu command or press Ctrl + Shift + `. Note the following feature: the Hide all panes command will not be executed if the Sections, Navigation, and Actions panels are hidden using the View menu.

Fig. 162. View menu
8.1.3. Sections Panel
In the process of Sections panel customization a user defines a list of commands to navigate to sections.
The sections panel setup dialog is opened using Sections panel setup command of the panel context menu or using the View menu.
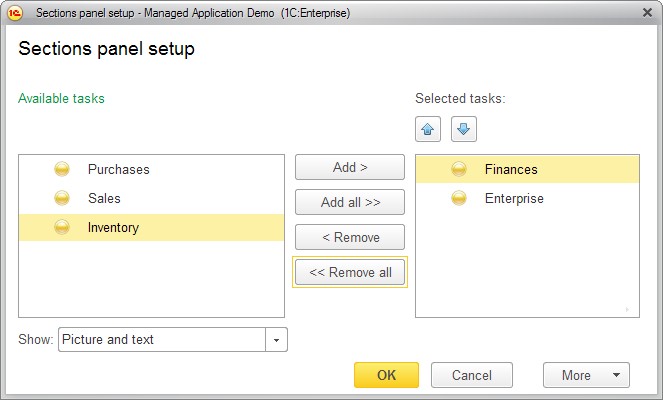
Fig. 163. Sections panel setup form
To add a section to the panel, highlight it in the list of available sections and click Add >. In the setup dialog you can move list items with your mouse and select multiple rows simultaneously.
To add all the available sections to the panel, click Add all >>. You can also move sections between lists by double-clicking a section in the list.
To remove commands from the panel, use << Remove and << Remove all buttons.
The sequence of sections on the panel is managed using the buttons on the command bar of the list of selected items (see fig. 163).
You can configure presentation for every section. To do so, highlight an item and select the required presentation mode in the list Show: Picture, Text, Picture and text.
To apply the selected settings and close the form, click OK. This saves the settings in the infobase.
During the customization process, you can cancel the changes made in this session or earlier and recover the configuration settings. To do so, select More – Set standard settings. This command does not change the command interface immediately. After executing this command you can continue customization.
8.1.4. Navigation Panel
The arrangement of commands on the navigation panel is customized in the Form navigation panel setup.
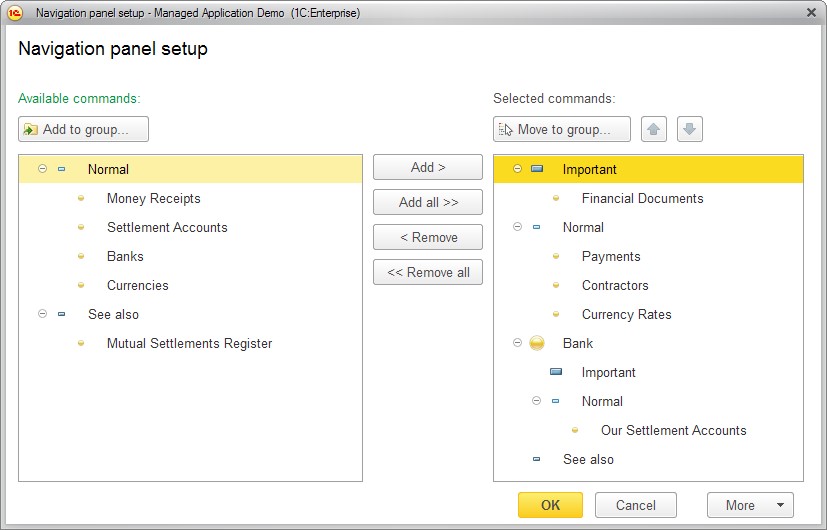
Fig. 164. Navigation Panel Setup
Commands to switch to forms of lists, e.g. Payments, Contractors.
Subordinate sections (for example, on the fig. 164 the current section has the section named Bank as its subordinate with Our settlement accounts command defined for it).
All the commands are arranged in groups:
Important
Normal
See also
To add a command to the panel, highlight it in the list of available commands and click Add >.
To add all the available commands to the panel, click Add all >>. You can also move commands between lists by double-clicking a section in the list.
To remove commands from the panel, use << Remove and << Remove all buttons.
The sequence of commands is managed using the arrows on the command bar of the list of selected commands (see fig. 164).
To add a command from the list of available commands to the group of selected commands, highlight it and click Add to group.
To move a command to a required group in the list of selected commands, highlight the command and click Move to group or drag the command to the required group with your mouse. If a group or a subsection is highlighted at this moment, the operation is applied to all the commands in the group/subsection.
The setup dialogs support dragging of commands between lists and multiple selection.
NOTE
If a command is included into a subsection, it can only be moved to another group as part of the subsection it belongs to. For example, on the fig. 164 the Our settlement accounts command can only be moved to the group Important of the Bank subsection.
The exception is the group See also that may contain any commands.
To apply the selected settings and close the form, click OK.
Note that the order can only be customized for commands.
8.1.5. Action Panel
The arrangement of commands on the action panel is customized in the Action panel setup (see fig. 165).
The commands to create new objects (for example, Contractor) – in the standard New group.
The commands to open reports (for example, Report on Mutual Settlements) – in the standard Reports group.
Commands to open data processors – in the standard Tools group.
Other commands created in the configuration.
Action panel is customized in the same manner as the navigation panel (see above).

Fig. 165. Action Panel Setup
8.1.6. The Panel Editor
To open the panel editor, click View – Pane settings in the main menu.
The panel editor form displays on the screen.
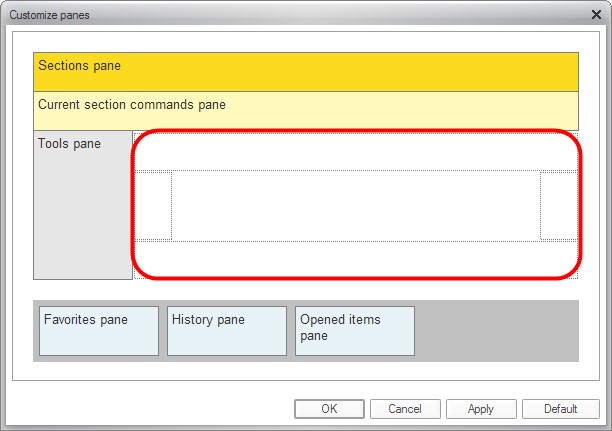
Fig. 166. The panel editor
The lower part of the window (shaded grey) contains panels that are not currently displayed in the program window but that may be added to the interface.
The upper part of the window contains areas in dotted boxes where the panels can be dragged.
To add a panel to the interface, drag it using the mouse to the area of available panels. If another panel is already present in the required area, the new one will be placed near it. Use the mouse to change the display area of the panels that are already present.
To remove a panel from the interface, drag it using the mouse from the area of the displayed panels to the area containing the unused panels.
To return to the default panel location, click Default.
To view the results from changing the positions of the panels, click Apply.
To finish editing the panel display, click ÎÊ.
TIP
To hide all panels displayed, select View – Hide all panes, or press Ctrl + Shift +`. All panels except for the toolbar will be hidden. To display the panels once again, select Hide all panes again, or use the hot key.
8.1.7. System Commands Area of the Main and Auxiliary Windows
To add or remove buttons from the standard command bar of the main or auxiliary windows, click Other buttons. In the menu that opens hover your mouse over Add or Remove buttons and in the displayed menu check or uncheck the name of the command.
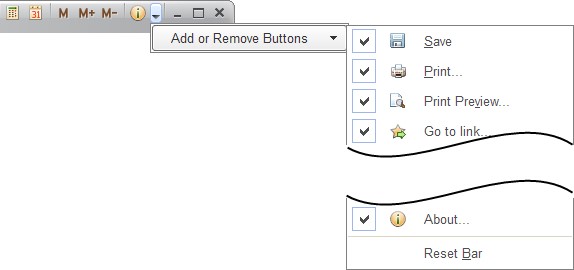
Fig. 167. Setup of window command bar
A checked command will be displayed in the system commands area of the window.
An unchecked command will be hidden from the area.
To resume the initial view of the panel, use Reset Bar menu item.
8.2. FORM SETUP
Custom form setup can be available in 1C:Enterprise. Unless otherwise defined in the configuration, using More – Change form on the form’s command bar will open an editor window.
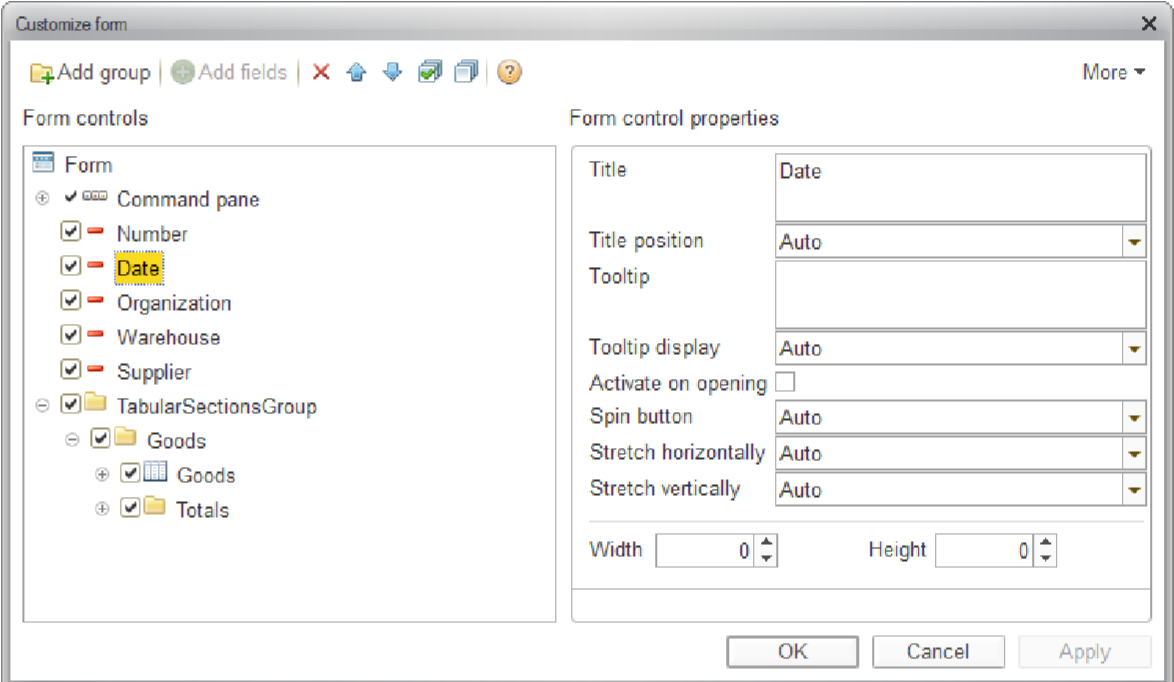
Fig. 168. Form Setup
The left portion displays a structure of form elements as a tree. The right portion displays a list of properties of a selected form element.
The content and appearance of a form are defined by the assortment of elements included in the form (that can belong to several types).
groups (several types)
tables
fields (several types)
buttons
These elements have properties that affect their display on the form. Hierarchy of the elements defines their layout on the form.
A user can change the assortment of elements, their positions with respect to each other, their grouping and properties.
Relocation of elements. To relocate elements in hierarchy, use the Move up and Move down buttons or drag an item to the required location with your mouse.
Element properties. For every element properties are configured in the form element properties. Description of every property is displayed in the bottom of the panel when this property is highlighted.
Visibility Setup. To change visibility of elements on a form (show or hide them), use check boxes near the elements. Note that it is impossible to toggle visibility of the root Form element and form setup button. Also it is impossible to toggle visibility of the command bar that includes the Change form button.
Creating groups. To add a group to a form, select the Form root element in the structure tree and click Add group. In the group properties select the required type (Regular group, Pages, Command bar).
Adding fields. Some fields may have Add fields button available. This means that the data displayed in the field/column have attributes that can also be displayed in the field/column. To add the field attributes to the form, click Add fields and select the required attributes in the window that opens.
Applying settings. The settings are applied either when the editor is closed by clicking OK or using the Apply command. At this moment the settings are stored in the infobase so they can be used later when the form is opened.
During the customization process, you can cancel the changes made in this session or earlier and recover the form settings defined in the configuration. To do so, select the Set standard settings command from the More menu. This command does not cause an immediate change of the form. After executing this command you can continue customization. The settings are only applied when you click OK or Apply.
8.2.1. Sample Form Setup
Let us consider the procedure of form customization using the form of the Sales document as an example.
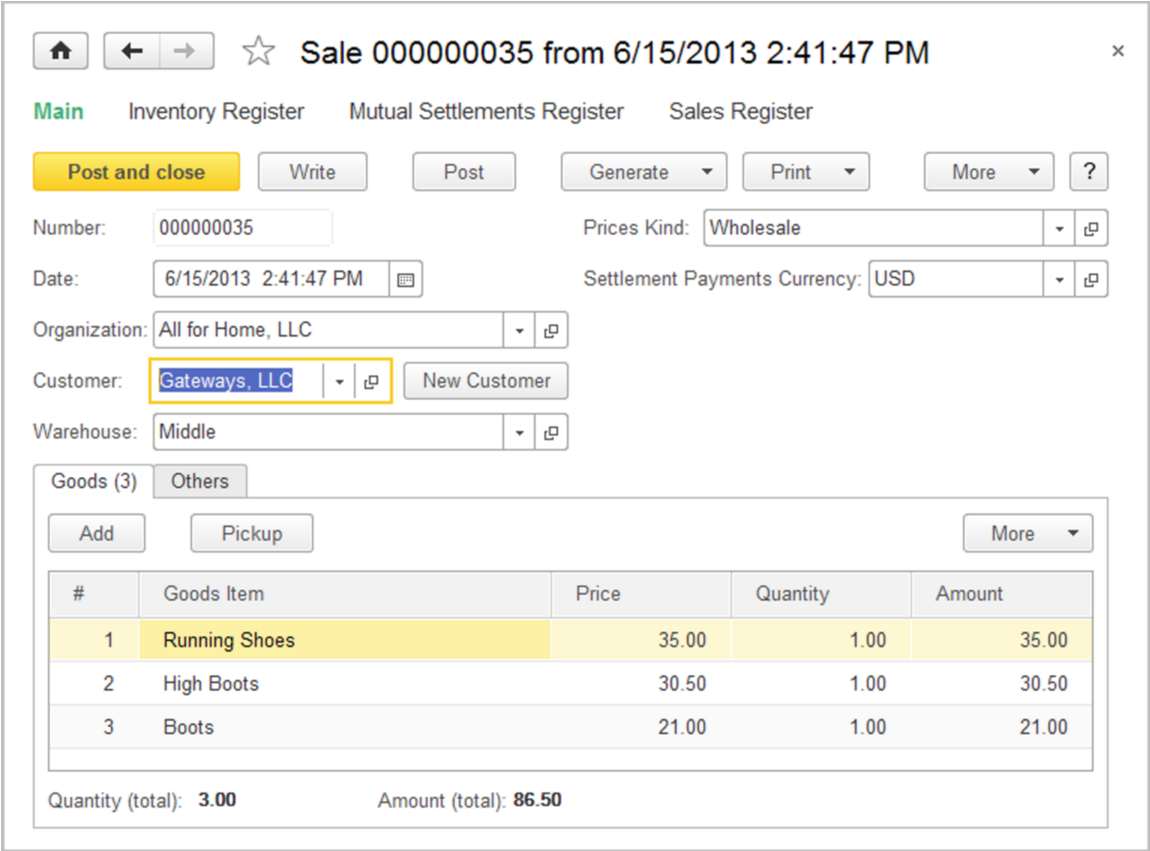
Fig. 169. "Sale" document form
Suppose that we need to display the part number (SKU) and the supplier of goods in the table named Goods. To do so, we will use More – Change form in the form of the document.
In the setup form we will expand the group named Tabular sections group – Goods, select Goods field and click Add fields as shown below.
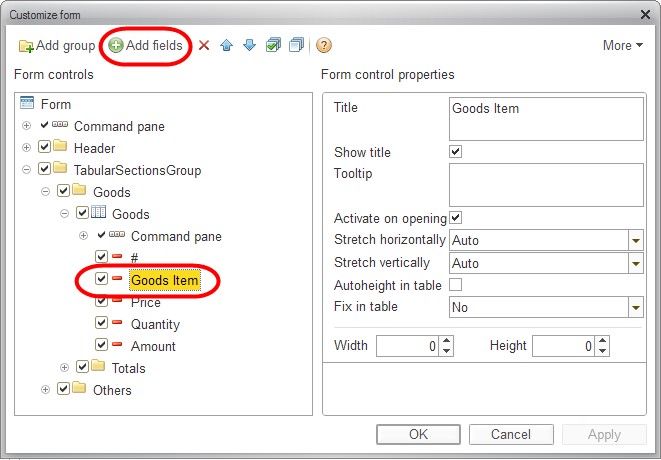
Fig. 170. Adding fields in form settings
In the window that opens select the fields SKU and Supplier as shown below.
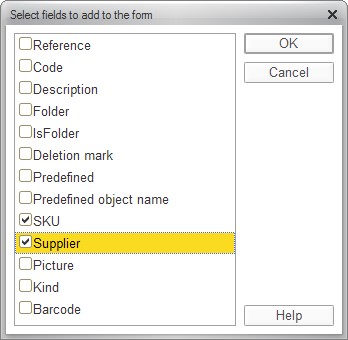
Fig. 171. Selecting fields
And click OK. In the form setup dialog we will also click OK or Apply. The Sales document will change its view as follows:

Fig. 172. "Sales" document form
Suppose we need to display the country of the supplier of goods. To do so, we will select Supplier field in the form settings and click Add fields. In the window that opens we will select the Country field and click OK.
The table structure will change as follows:
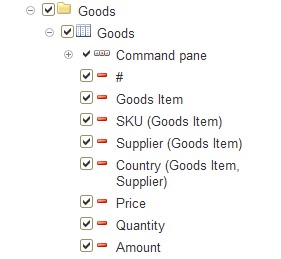
Fig. 173. Table structure in the "Sales" document
Now let us group the columns of the table. To do so, we will create two groups in the Goods table (by clicking Add group). One of the groups will display the information about the goods: fields Goods and SKU. The other group will display the information on the supplier: Supplier and Country fields. Now let us define an order for display of fields in the columns using the arrows on the setup form panel.
The structure of the document table will change as follows:
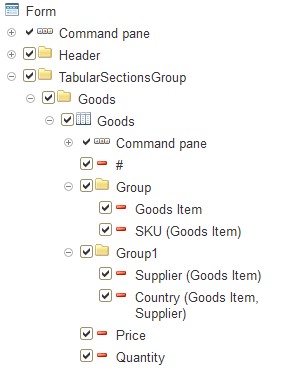
Fig. 174. Table structure in the "Sales" document
And the modified form will look as shown below:
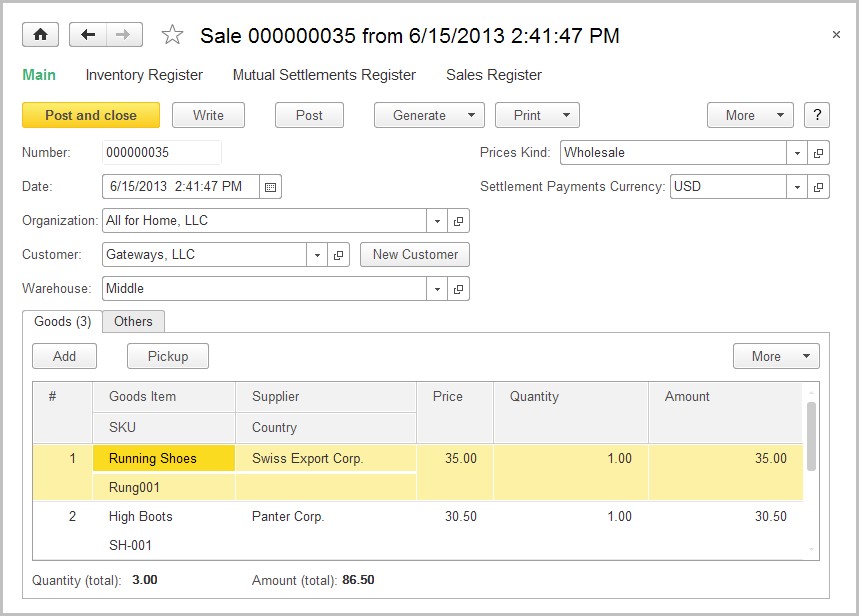
Fig. 175. "Sales" document form
When the quantity of goods is changed in the Quantity column, the row sum and the total document sum are recalculated automatically. This means that the Recalculate button is not needed. Let us hide the Recalculate button in the form settings by unchecking visibility near the Recalculate button as shown on the fig. 176 and click OK.
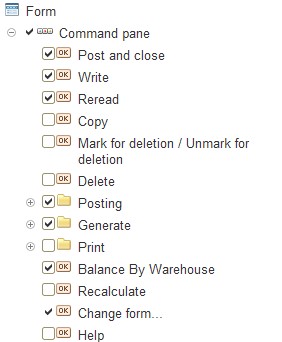
Fig. 176. Selecting invisibility for recalculate button
The command bar of the document form will look as follows:

Fig. 177. "Sales" document command bar
Usually the Sales documents only list indivisible items. This means that we do not need precision of two decimal digits in the Quantity (total) column.
Hence, in the form settings we will highlight Quantity (total) field and in the Format property we will press the selection button as shown in the figure (see fig. 178).
In the format string designer window that opens check Precision and click OK. Now let us apply the form settings.
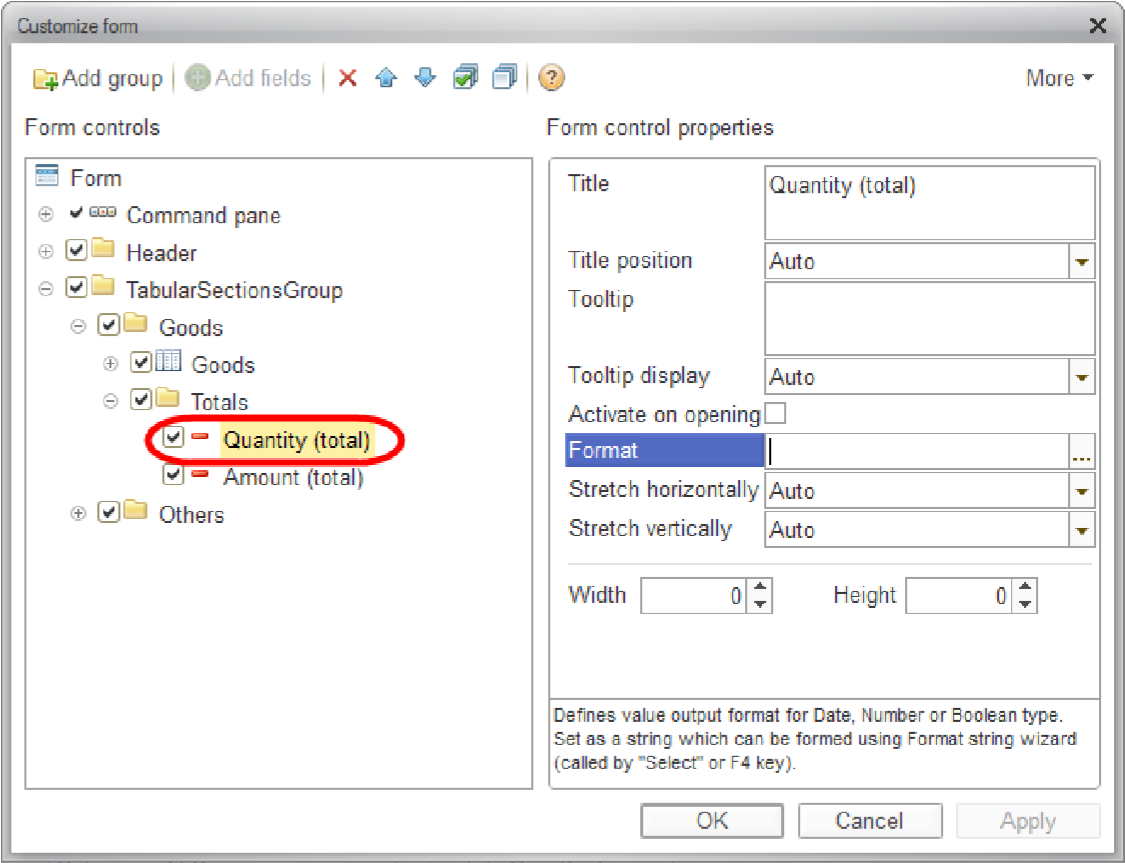
Fig. 178. Opening format string wizard
The Sales document will look as follows:
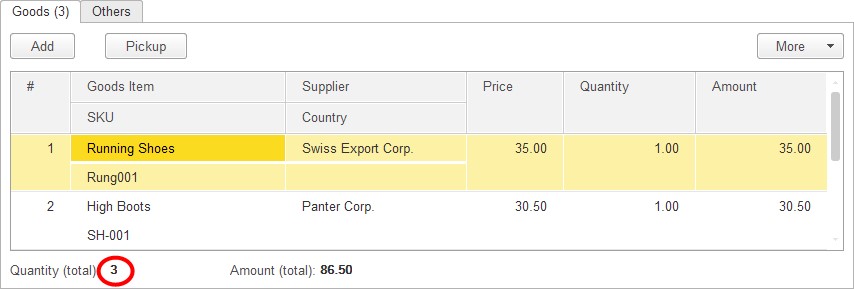
Fig. 179. Resulting form of the "Sales" document
In this manner, in the 1C:Enterprise mode you can join related elements into groups, position them in a convenient order, hide the elements that are not required and change the display settings of the elements on a form.
8.3. SYSTEM OPTIONS
The system options setup dialog is intended to customize debugging modes by the developer or the administrator.
To open 1C:Enterprise system parameters setup dialog, use Tools – Options command of the main menu.
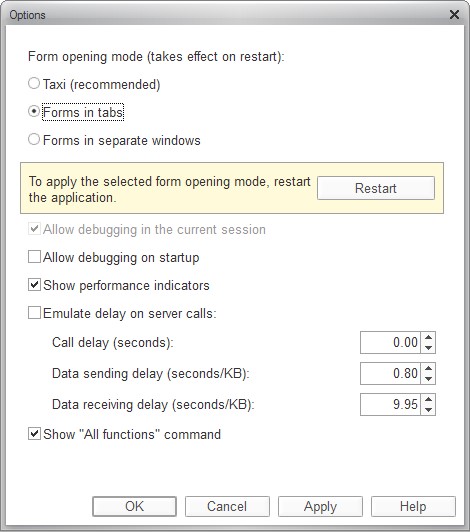
Fig. 180. Options setup dialog
Allow debugging in the current session. If this checkbox is selected, you can debug in the instance of 1C:Enterprise currently running.
Allow debugging on startup. If this checkbox is selected, debugging will be enabled the next time application instances are launched.
Show performance indicators. If this checkbox is selected, these indicators are displayed in a separate window at the lower left part of the screen (by default).
Emulate delay on server calls. This setting is used to test the configuration in slow-channel connections.
Show "All functions" command. If this checkbox is selected, the All functions command that enables different actions is added to the menu. All configuration objects are included in the list regardless of whether they are included in the system interface or not. This setting is available if a user is authorized to use the All functions mode.
For details on how system settings impact operation, see the "1C:Enterprise 8.3. Developer Guide".
8.4. WINDOW LAYOUT MANAGEMENT
Multiple auxiliary windows can be opened during operation in addition to the main window. The platform supports window layout management and navigation between windows.
To open window layout management dialog, use Windows – All windows item of the main menu. The dialog will display a list of all the currently opened windows.
To switch to a required window, select it from the list and click Switch to. The Windows dialog is closed automatically.
To close multiple windows simultaneously, select them with your mouse while holding Shift down and click Close windows. It is impossible to close the main window using this dialog.
Also to switch between windows within the same session, you can use the keyboard shortcuts Ctrl + Tab, Ctrl + Shift + Tab, Ctrl + Shift + F6. To switch to the next active window, press Ctrl + Tab or Ctrl + F6. To switch to the previous window, press Ctrl + Shift + Tab or Ctrl + Shift + F6. At that opened modal and locking windows are taken into account: if a window is overlapped by a locking window, this window will not be activated.
8.4.1. Windows of Text and Spreadsheet Documents
In addition to various forms that are used for accounting purposes, 1C:Enterprise supports operations with text and spreadsheet documents (reports and spreadsheet documents created by a user). For these types of windows, menu items that provide additional services can be used when viewing and editing.
The Split Window Horizontally and Split Window Vertically items can be used to view various parts of a window within one window. These menu items are only available if a text or a spreadsheet document window is active. The selected window is split into two equal parts. If you want to change the proportion, place the mouse pointer to the window separator. Depending on the type of the selected separator type, the mouse pointer is changed into double vertical or horizontal arrow. Left-click and move the mouse to change the subwindows size.
Undoing splitting of the text editor. Select Windows – Remove Window Split menu item or drag the separator line to one of the text editor borders to cancel splitting of the window.
8.4.2. Restoring Window Position
You can change the location, size and status of windows. When a window is closed, the latest window display options are saved, and when this window is reopened, the most recent display options are used.
To restore the initial location, size, and status of the window, select Windows – Restore Window Position from the main menu. The stored display options are reset, and the original options are restored.