
1C:Enterprise 8.3. User Manual. Taxi Interface. Contents
CHAPTER 7. SERVICE FEATURES
1C:Enterprise provides various service features for navigation within the application: links (references), history, favorites.
It is also possible to use built-in calculator, calendar, file comparison feature, etc.
This chapter covers the above mentioned features.
7.1. SEARCHING FOR DATA
To start searching for data, press Search on the toolbar.

Fig. 135. The search button
Ctrl + Shift + F can also be used.
A search form opens up in the work area. Enter a word or phrase into the search field and press Find (or Enter). To perform a more accurate search, use full-text data search statements (for more details, see chapter "Format of Search Expressions" on page 161), see fig. 136.
The form displays a list of links to the objects that contain this string. To enable a more effective use of the search function, the most recent queries are displayed in a separate list.
If no objects were found in the search, a search prompt is displayed on the screen.
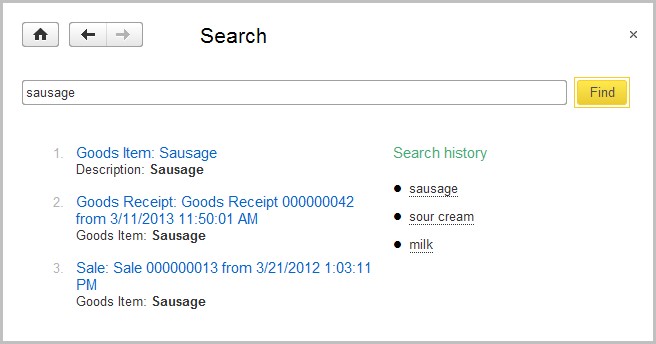
Fig. 136. Data Search
When the user enters a navigation link into the search box he or she is taken to this address.
7.2. LINKS
It is possible to obtain a text link to any software interface section, report, or data processor as well as to infobase objects (documents, items of lists, etc.).
NOTE
You can not obtain a link to a section.
The obtained link can be stored and used later for navigation. As the links are text fragments, it is possible to send them to other users by e-mail or using other tools.
To obtain a link, use Tools – Get link item of the main menu or click Get link of the system commands area.
For example, let us obtain a link to the list Sales of the Sales section:
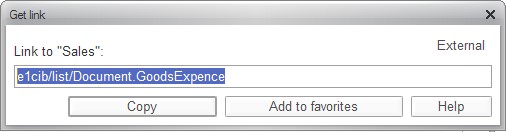
Fig. 137. Obtaining a reference to the sales list
If you want the resulting link to be used in the web browser address bar, click the External button.
To copy a link to the clipboard, click Copy.
To add a link to a favorites list, press Add to favorites.
To navigate a link, use the Tools – Go to link command, specify the link text saved earlier in the dialog opened and press the Go to button or Enter. To distinguish 1C:Enterprise links from other types of links (http or file), an e1c schema ID is used. If an external 1C:Enterprise link whose beginning does not correspond to that of an infobase navigation link is transferred to the link navigation dialog, an attempt to navigate using its inner part (which is specified after the e1c ID) will be made when you are navigating the link. If the navigation attempt fails, the external link transferred will be navigated instead.
7.3. FAVORITES
If a Favorites panel is not used, click Favorites on the toolbar to call the Favorites form.

Fig. 138. The favorites button
The favorites panel contains links to the commands and data that has been added to the Favorites list. Links are displayed in the order of importance, i.e. the most important elements are shown at the start of the list.
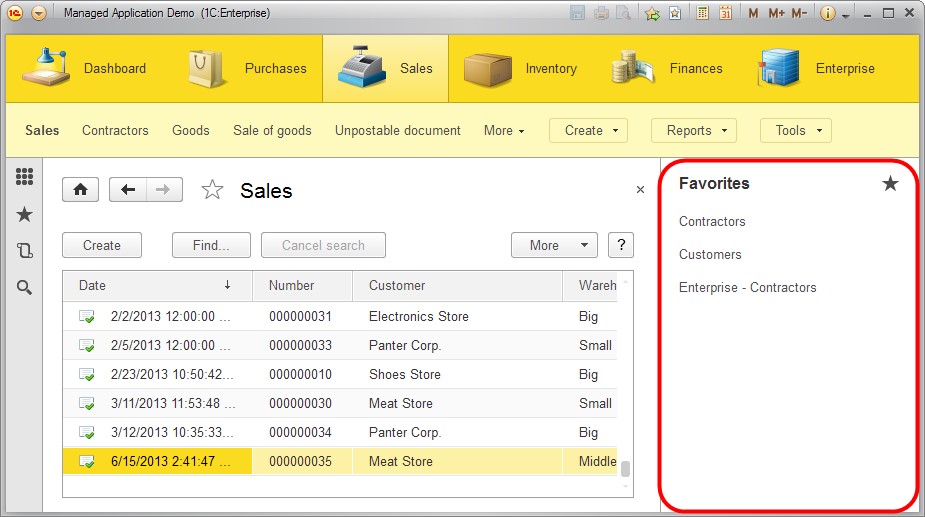
Fig. 139. The favorites panel
When an item is selected, either the corresponding object form opens or a command is executed. When the bar header is clicked, the Favorites form opens.
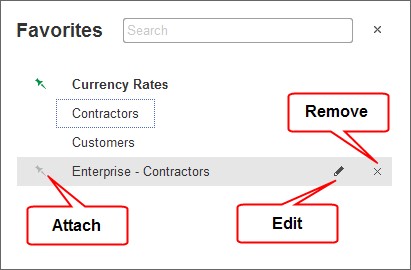
Fig. 140. The favorites form
An icon to the left of the element’s name is used to add (icon is active) or remove (icon is inactive) an element selected from a list of attached elements.
To rename an item in the list, click Edit (a pencil icon) on an item line, or press F2.
To change the order of items, drag the selected Favorites item higher or lower in the list using the mouse.
To remove an item from the list, press Remove.
All changes in the list are saved when the Favorites form is closed.
Searching in Favorites. To search through a list of favorites, use the search field or click Ctrl + F, or start typing the name of the object to be found (the program then sets focus in the search box). The Favorites list only displays items that contain the entered string. All substrings that are found are highlighted. To stop the search and return to the full list of Favorites, clear the search box.
7.4. HISTORY
The History panel contains hyperlinks to the forms ordered up until the time of the current launch (except for the start page). An object form is opened when a list item is selected (see fig. 141).
When the bar header or icon in the header is clicked, the History form opens (see fig. 142).
All items are grouped by date. If one form was opened multiple times on different days, each day will contain a link to this form. Links are not repeated within a single day, and the form is displayed together with the last time it was opened.
If a history item is included in the list of favorites, an asterisk is shown beside it. Switching the asterisk in an item line adds or removes an item from a list of favorites.
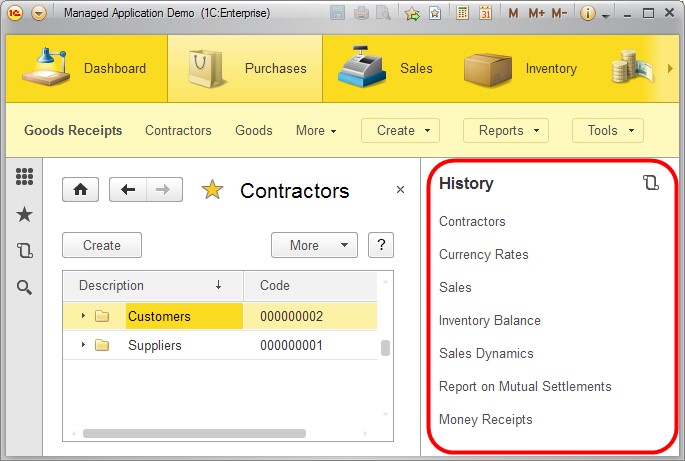
Fig. 141. History

Fig. 142. The history form
Searching the History. To search the History, use a search box or press Ctrl + F, or simply start typing. A search of the History starts when text is typed into the search box. A History list will only display the items that contain the string entered. All substrings that are found are highlighted. Items in the list are not grouped by days during the search; the last time/date the item was opened is displayed next to the item. To stop searching and return to the full History list, clear the search box.
7.5. ALL FUNCTIONS
It possible to open all the available forms. This is done using the list displayed when you use All functions command of the main menu. This command is available if the corresponding system parameters option is set and the user is authorized to call this mode (for details, see "System Options" on the page 149).
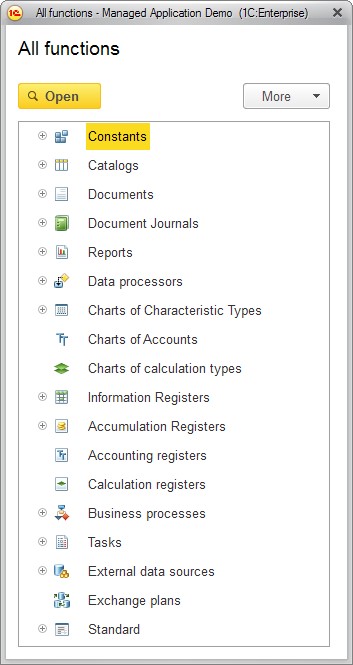
Fig. 143. The list of all software functions
If a user does not have a right to view a specific object, such an object will not be included in the list.
The Standard folder includes standard features (list of active users, event log, etc.). For details on standard features, see "1C:Enterprise 8.3. Administrator Guide".
To switch to an object, double-click this object in the tree of objects or highlight it in the tree and click the Open button.
7.6. NOTIFICATIONS
Notifications are intended to alert the user about specific actions executed by the application. Notifications can be created by the software or by an application solution developer.
A notification is displayed in a window that is attached to the system tray of the operating system. If a notification is associated with some link, its description will also serve as a hyperlink. Clicking the hyperlink opens the object it is linked to. The description will also serve as a hyperlink if this notification is generated automatically (when an object is recorded/edited interactively).
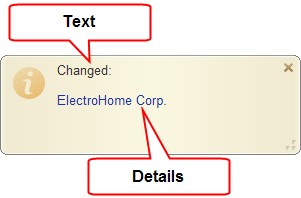
Fig. 144. Notification of "Cash Receipt" document modification
Text – reason for the notification. If multiple objects are modified, the number of modified objects is specified in brackets.
Details – further description.
A notification window is hidden after a certain delay. But if you hover your mouse over the window, it will stay displayed until you close the window or reposition your cursor away.
If multiple different notifications are generated in the process of application operation, the notification text in brackets will include the number of modified objects and the name of the list will be used for details.
When the list of notifications is displayed in the information panel, they are aligned right. The latest notification will be displayed near the right border of the panel. If more than five notifications exist, only the last five notifications are displayed.
NOTE
The list of notifications is cleared when you close the main application window.
7.6.1. Messages
Should a situation that requires the user’s attention occur, a message panel is displayed in the lower part of the window.
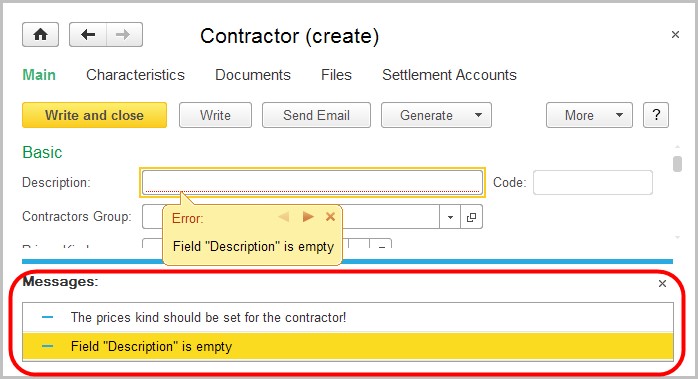
Fig. 145. Error messages
Working with messages here is similar to working with messages in a standard interface. Up to 5 messages can be displayed simultaneously. To see the messages that do not fit in the message pane, scroll through the list using the mouse or Up Arrow and Down Arrow keys.
7.7. STATUS OF A LENGTHY PROCESS
In the process of operation situations may occur when a specific process takes some time. It may happen, for example, when you attempt to post numerous documents or execute resourceful calculations. In this situation a message is displayed demonstrating the status of such a lengthy process, see fig. 146.
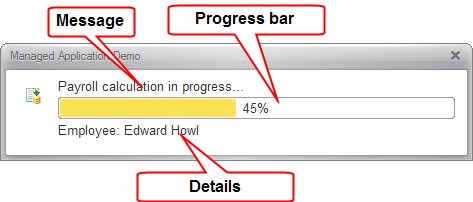
Fig. 146. Status of a process progress
The message automatically extinguishes after some time. The message reappears when you hover your mouse over it. Depending on the configuration, it may be possible to abort the process by pressing Ctrl + Break.
7.8. CALCULATOR
To execute simple current calculations, 1C:Enterprise has a built-in calculator. It can be opened in any program mode (except when the program is awaiting a response to a request) by selecting Tools – Calculator.
The calculator can be dragged to any part of the screen and its window can be resized. All the controls located in the calculator form change their size in proportion to the window size.
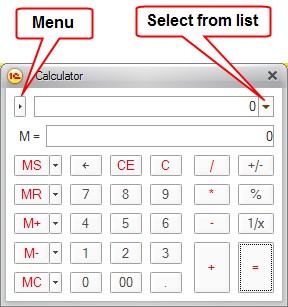
Fig. 147. Calculator
The calculator can be used to perform any arithmetic operations, calculate percentages and reciprocal values, save numbers, and add or subtract saved values. When inputting values, you can edit the inputted value and delete any digits that were input by mistake.
You can use both your mouse and your keyboard to work with the calculator. In terms of functions, this numeric calculator resembles a real calculator.
The calculator can save the last 15 calculations. To view the result of any calculation, click the Select from list button located to the right of the text box and select the required calculation.
The calculator has 10 memory registers to save values and use them in calculations. To operate the first register, use the buttons MR, M+, M- and MC.
Click the MS button to save calculation results in the first register.
The field M= displays the value of the clipboard if the clipboard contains a number.
Click the MR button to read a saved value from the first register to the text box. Click the M+ button for the value saved in the first register to be added to calculation results; click the M- button for the value saved in the first register to be subtracted from calculation results. Use the MC button to clear the first register content.
To save a number to another register, get the number to the display (by typing it or as a result of calculation). Click the selection button near the MS button.
A list of registers is displayed:
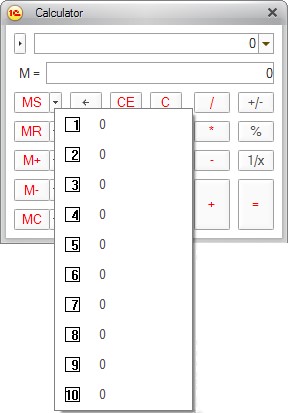
Fig. 148. The list of available registers
To save a number to a register, click the button for this register.
To obtain a number from a register, click the button, located next to the MR, M+, and M- buttons, depending on the type of the action, and select the register. You should perform a similar procedure to clear the register (MC button).

Fig. 149. Buttons for operations with registers
The calculator works in various modes. You can select a mode by clicking the Menu button of the calculator (see fig. 147) and selecting the required item from the context menu. Formula calculator and Microcalculator items available in the menu are intended to toggle the respective calculator modes.
The Setup item of the context menu is intended to define precision of the calculator. A setup dialog is displayed where the desired number of digits after the decimal point should be specified for presentation of results.
In the Microcalculator mode, all the actions are performed using the keyboard. The calculator has a simplified form:
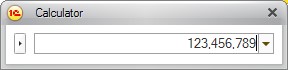
Fig. 150. Calculator in the microcalculator mode
Use the keyboard keys to input numbers. Use the C key to clear the text box.
Formula calculator. In this mode all the actions are entered into the calculator string sequentially. Brackets can be used to organize a specific sequence of actions and enter complex formulas.
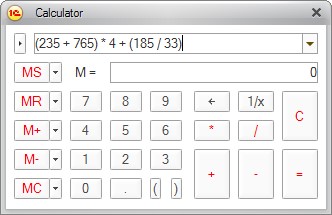
Fig. 151. Formula calculator
The calculator can be opened to select an attribute value of the Number type in the text box by clicking the selection button or pressing F4. With the calculator you can enter more digits after the decimal point than defined for the attribute. Clicking OK rounding off is applied in compliance with established rules. To adjust precision of the calculator, click the Menu button and select Setup. A setup dialog is displayed where the desired number of digits after the decimal point should be specified for presentation of results.
7.8.1. Working with Clipboard
For operations with the clipboard, 1C:Enterprise provides an enhanced tool for operations with numbers. In addition to simply copying a number to the clipboard, a number can also be added to the value in the clipboard or subtracted from this value.
Normally you can use the M, M+ and M- buttons of the standard command bar to do this.
When you click M (or press Shift + Asterisk Sign (*) on the numeric keypad keyboard shortcut), the highlighted value is copied to the clipboard.
The M+ button (Shift + Plus Sign on the numeric keypad keyboard shortcut) adds the currently highlighted value to the value stored in the clipboard.
The M- button (Shift + Minus Sign on the numeric keypad keyboard shortcut) subtracts the current value from the value stored in the clipboard.
These actions are available in all the forms for numeric values and also for operations with tables. When working with a spreadsheet document, actions can also be performed with multiple cells simultaneously: for example, you can highlight multiple cells and then copy it or add their sum to the clipboard using the specified actions.
The results in the clipboard can be used in any forms, for example, the values can be inserted using Shift + Ins or the corresponding menu items.
A numeric value of the current value stored in the clipboard can be viewed in the formula calculator mode in the M= field.
If you want to copy a number from the 1C:Enterprise environment to the Windows calculator or to a Microsoft Office Excel cell, use M, M+, M- commands to save the number instead of the commands that copy the value to the clipboard.
Note that for the formula calculator and the immediate window a number is saved in compliance with regional infobase settings but without group separators, while decimal separators are replaced by decimal points.
For other clipboard targets, a number is saved with regional operating system settings and without group separators.
7.9. CALENDAR
1C:Enterprise features a built-in calendar. You can open it in any mode of the application by selecting the Tools – Calendar menu item. The calendar is also used to enter dates (see fig. 152).
The window displays the current month’s calendar. The month name and the year appear in the first line. Below is the weekdays bar. The current date is highlighted with a green border, and this date is displayed as a hyperlink in the bottom line of the window. You can select a different date with your mouse, a yellow border will appear around the selected date.
TIP
When selecting a year, you can jump between years using Page Up and Page Down buttons.
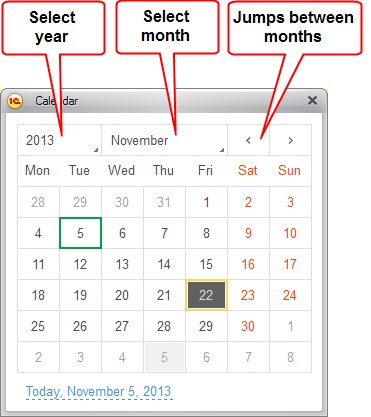
Fig. 152. Calendar window
To quickly select the current date, click the Today, <date> hyperlink below the calendar.
NOTE
Use Home and End buttons for jumping to the same date of the previous month.
To navigate between months and to change the year, use the corresponding buttons in the the window.
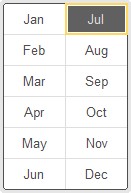
Fig. 153. Select month
If you click the cell containing the name of the month and the year, a list of years or months available for selection will be displayed. Move the mouse pointer up or down to scroll through the list to the desired value. Select the required row of the list to change the year or month.
You can drag the calendar to any place on the screen and resize its window.
At that when the window size is increased, calendars for multiple months are displayed.
Months are added when the size of the window is increased in any direction. When the size is decreased, additional months are hidden.
The calendar can also be located as a form control linked to a specific attribute containing a date. In addition, for the dates located in a form as an text box, the value can be selected using the calendar that is opened by clicking the selection button or pressing F4.
The methods for working with these calendars are similar to those described above.
7.10. FILES COMPARISON
In the file comparison mode, you can compare any two files. Use the File – Compare Files option of the main menu to compare files. A dialog will open where you will be able to select the files to compare.
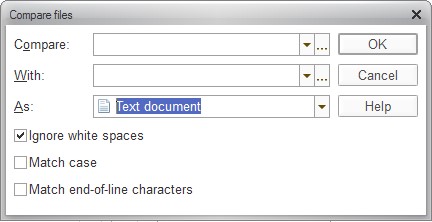
Fig. 154. Dialog to select files to compare
In the Compare and With fields, specify the names of the files to be compared. You can enter file names manually, select them from the dropdown list or use the Select button to locate the files in the standard file opening dialog. You can specify any type of the source file in the File Type field of the dialog.
Use the As field to specify how the files are to be compared. Text and spreadsheet documents can be compared. Binary comparison is possible. In this case, the comparison result will tell you whether the files are different or not.
If files of different types are specified in the fields Compare and With, upon comparison the selected files will be cast to the type specified in the As field. And then the actual comparison will be performed, and comparison results will be displayed.
If Match end-of-line characters is checked, the symbols used as line splitters will be taken into account during comparison. Click OK to initiate the comparison process.
If you select Text document as a comparison type, the selected files will be interpreted as text documents for comparison, although the Compare and With fields can contain non-text files (according to file extensions). If one or both specified files cannot be interpreted as text files, a binary comparison will be performed.
7.10.1. Text Files Comparison
Check the white spaces option to omit space in the comparison for text files.
Use the Match case option for case sensitive comparison. If this option is checked, uppercase and lowercase letters are considered to be different symbols.
The Match end-of-line characters check box means that line splitters will be taken into account for files comparison.
Before comparing, the program sequentially attempts to read files in UTF-8, UTF-16 and ANSI encoding. If the files can be read and do not contain 0 when read in ANSI encoding, the application compares them as text documents. If the read attempts fail (or 0 is contained for ANSI), the application compares them as binary data.
Upon completion of a text files comparison, a window with a list of differences will open. The compared texts will be located in two columns of this window. Deleted, modified and added (new) strings will be highlighted by different colors in the texts. The window contains a toolbar with the standard 1C:Enterprise text editor search and tab buttons and two buttons specific to the window.

Fig. 155. Text files comparison dialog
These buttons are large arrows pointing up and down. The arrows are intended to navigate to the beginning of the previous or next modified text. They can be used to quickly move to the next or previous differing text.

Fig. 156. Files comparison toolbar
Clicking LF results in line splitters displayed as letters LF and CR in the texts.
Text color is used to highlight differences in the compared texts. The text color can be customized (the color setup window is opened when you click the Set comparison view parameters button). By default, deleted text is highlighted in blue, green is used for added text, and modified text is marked in red.
The left portion of the window displays the text of the file specified in the Compare field while the right portion is for the file from the With field. Clicking Change Comparison Order button switches the locations of the compared files. When you switch files, color markings will also change. If the left part originally contained deleted text, after switching, this text will be shown in the right file as added text.
7.10.2. Spreadsheet Documents Comparison
If you compare spreadsheet documents, a window will be displayed to highlight the differences.
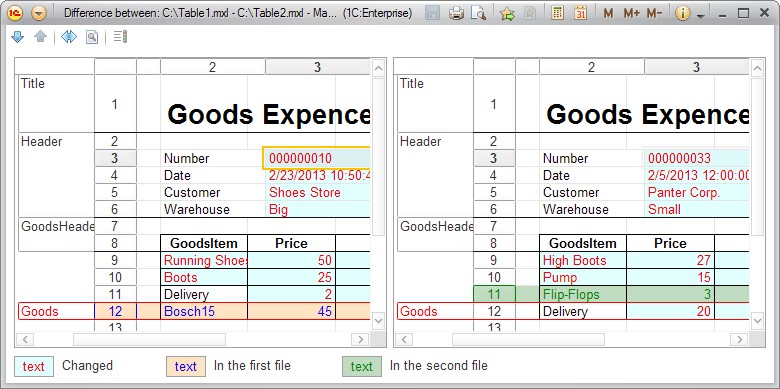
Fig. 157. Spreadsheet documents comparison window
This window consists of two sections (left and right). The source documents are placed in both sections of this window. Use command bar buttons to manage display and customize colors.
The Next difference and Previous Difference buttons take you to the next or previous difference.
The differences are highlighted using background and text colors. The meanings of the colors are listed in the legend.
Use the Set comparison view parameters button to open the differences display settings dialog.

Fig. 158. Differences display options customization
You can save values of the settings as schemas. To do so, click Save As and enter the name for the settings in the opened dialog. Then click OK.
If you have multiple settings schemas, you can select the required one in the Schema field of the settings dialog.
To restore the standard color settings, click Default.
Differences in cells, rows, properties of rows and columns are shown as background color and text color.
Differences in cell combinations are shown with a surrounding frame of the same color as the text.
Differences in groupings and named areas are shown with text color.
Differences in figures are shown by a surrounding frame of text color, except for rectangles, lines and ovals, which are drawn in text color.
Modified, deleted and added rows are displayed in different colors in the window (in both files).
For selected cells you can get a detailed report of invisible differences (text, font, format, merger, names, etc.). To do so, click the Details button.
7.11. ERROR MESSAGES
If an error occurs during application operation, an error message is displayed (it can contain various numbers of buttons where the buttons may also have various purposes). A sample error message is shown below:

Fig. 159. Convertation error
An error message may also contain the hyperlink Show technical support information.
A separate error log window opens when you click a hyperlink. The log displays information about both the session (the platform version, configuration name, working mode, type of client and localization information) as well as the last 50 errors during the same session, along with nested errors (the time of the error and other error details are displayed).
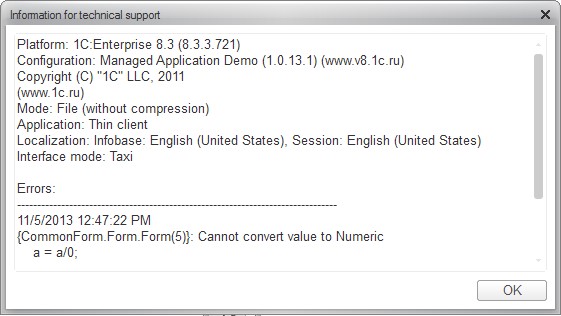
Fig. 160. Technical support information
Should you experience 1C:Enterprise system failure, the system will display a dialog with information on the dump recording process. This dialog closes automatically after recording is completed.