
1C:Enterprise 8.3. User Manual. Taxi Interface. Contents
CHAPTER 1. TAXI INTERFACE
1C:Enterprise supports three types of interface (modes):
Taxi
Forms in tabs
Forms in separate windows
This manual contains information on operation in the Taxi interface.
For a description of the Forms in tabs and Forms in separate windows interfaces, see the "1C:Enterprise 8.3. User Manual."
A 1C:Enterprise user works with a system of windows. There are two types of windows: Main windows and Auxiliary windows.
The main window of the application supports navigation around the application, calling different commands, and working with the specific objects of an infobase (i.e. documents and list items). Auxiliary windows open system functions such as a calendar, calculator, etc.
To open a form, the user can find the required command in the interface (open list, enter document, etc.) and execute it by selecting it with the mouse or by pressing Enter).
The type of interface to be used may be set by the developer or selected by the user in the system parameters, provided this is allowed by the developer. For more information on switching types of interfaces, see section "System Options" on page 149.
When the system is launched, the main program window is displayed. The window is used to navigate through the program, call different commands, and work with data. This window presents the whole structure of the application to a user.
The main functions of the program are divided and presented as a section panel.
In general, the main application window looks as follows:
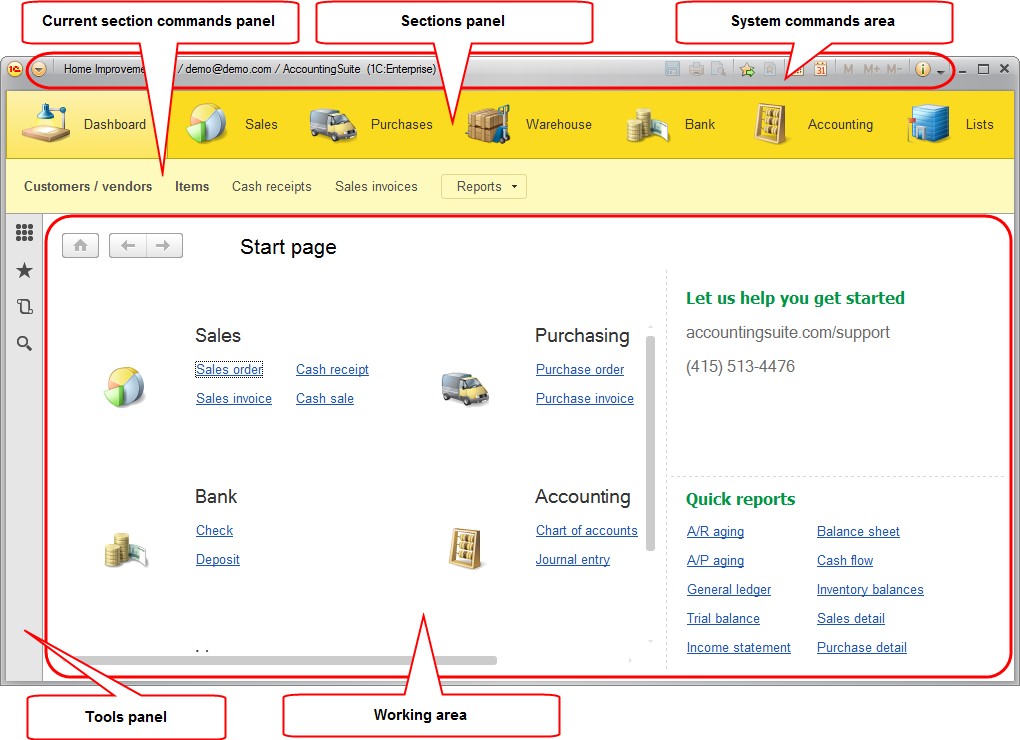
Fig. 1. Main program window
The structure of this window facilitates working with the program, navigating around different areas of the program, and switching between open forms and windows.
The main window can be resized using the mouse.
1.1. THE START PAGE
A start page is displayed when the program is launched (provided that forms already exist for this page), see fig. 2.
The start page can be customized (if this is supported at the development stage). To customize the start page, select View – Start page setup in the main menu. For information on how to set up the start page, see page 135.
Use the F6 key to switch between the different forms of the start page.

Fig. 2. The start page
To return to the start page from any other open forms, press the home button in the header.

Fig. 3. The "return to start page" button in a form header
If the program does not have any content for the start page, the home button will be unavailable.
1.2. THE SECTIONS PANEL
The sections panel includes a list of sections included in the program.

Fig. 4. A sample sections panel
If the width does not allow the sections to fit into a list, you will see a scroll button.

Fig. 5. A sample scroll button on the sections panel
The sections panel can be customized. To open a sections panel setup dialog, click View – Sections panel setup. For detailed information on customizing the panel, see section "Sections Panel" on page 137.
If the command bar of the current section (see page 20) is displayed, the commands available in this section are displayed when the section is selected on the command bar.
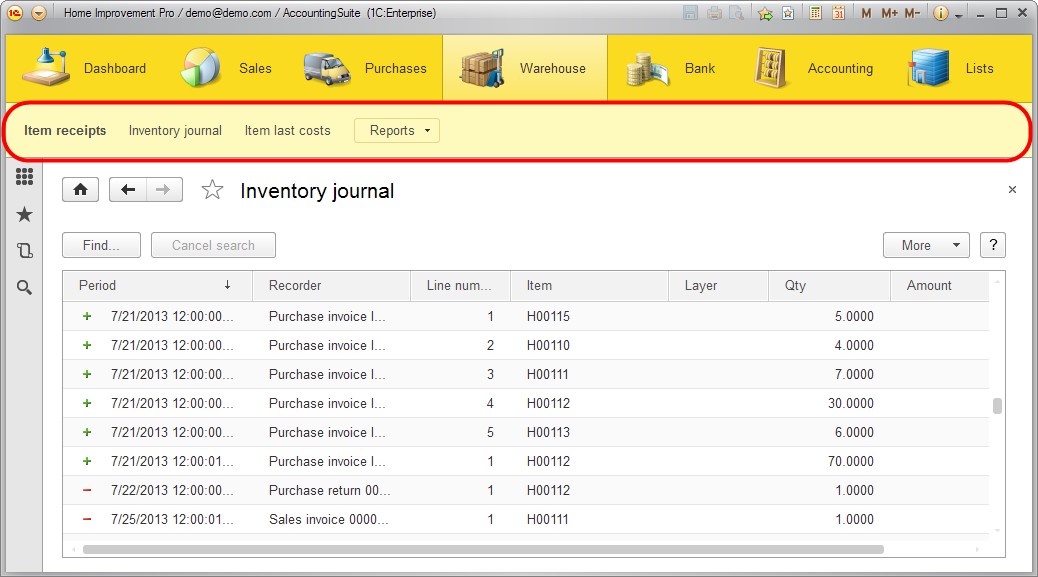
Fig. 6. Command bar of the Warehouse section
When the section is selected again, the function menu, i.e. a list of all commands of the selected section, is displayed (see fig. 7).
There are navigation commands and action commands in the function menu (Create, Reports and Tools sections). For details, see section "Navigation Commands" on page 18 and section "Action Commands" on page 19.
Click a hyperlink to execute a command (open a list form, create a new object, launch a report, etc.).
If the command bar of the current section is hidden, a function menu will display when a section is selected.
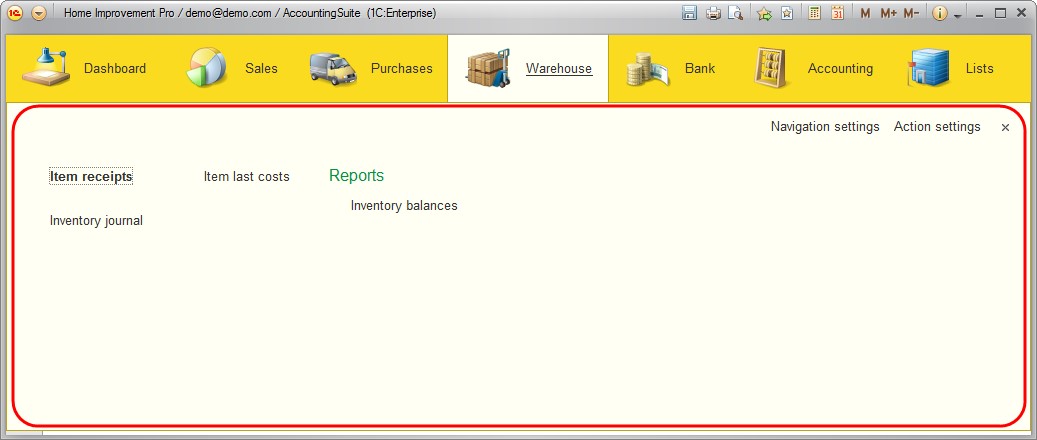
Fig. 7. A list of all the commands of the selected section
If a sections panel is hidden (via program settings or by a user in the panel editor), a list of sections will display above the function menu, and the commands of this section will display when a section is selected.
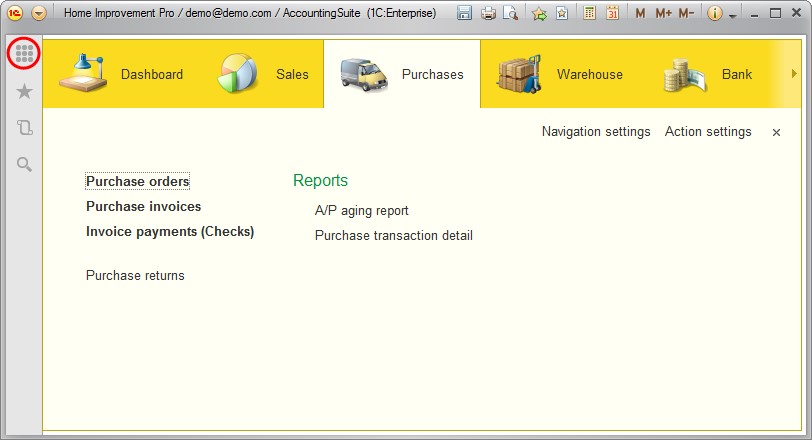
Fig. 8. Sections panel in the actions menu
When Navigation settings and Actions settings are selected, a command setup dialog for the current section opens. For more information on setting a list of navigation commands, see page 138. For more information on setting a list of action commands for the section, see page 139.
To enable quick access to the commands, a user can add commands from the function menu to Favorites. Click the asterisk (*) to the left of the command.
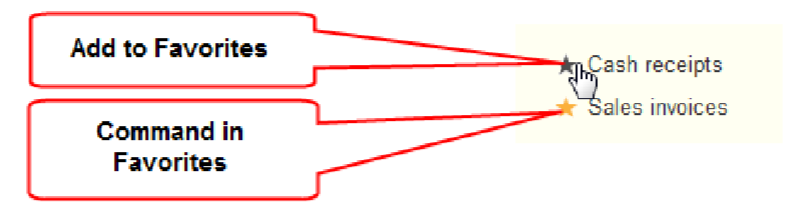
Fig. 9. Adding commands to Favorites
1.2.1. Navigation Commands
The list of navigation commands in the function menu reflects the structure of the current section. If a section has subsections, they will be displayed as separate groups.
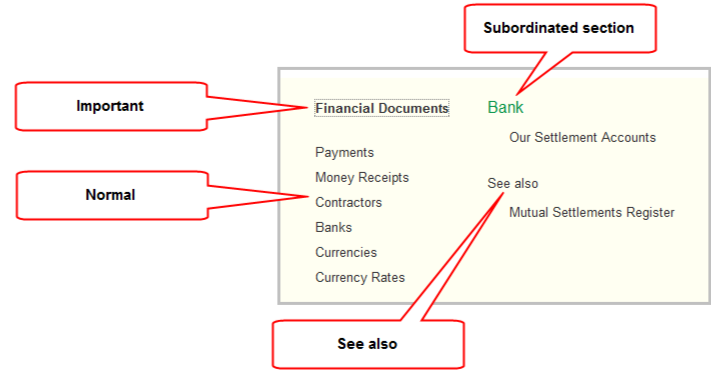
Fig. 10. Navigation commands
There are three types of navigation commands:
Important – commands that navigate to the important data areas within the context of the current section,
Normal – commands that take you to the data of the current section,
See also – references to additional information that may not be directly related to the data of the current section, but may be of use in some cases.
The composition of such commands and their group affiliation are defined by the developer.
TIP
To navigate to a navigation panel of the current section using the keyboard, press Alt + 2.
A list of navigation commands supports customization as well. To open a list customization dialog, click Navigation settings in the section’s function menu. For information on customizing a list of navigation commands, see section "Navigation Panel" on page 138.
1.2.2. Action Commands
The command bar of the section displays lists of action commands available for the section.
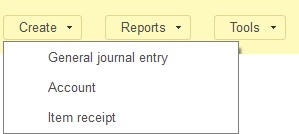
Fig. 11. The action commands on the command bar of the current section
The commands are divided among three groups: Create, Reports, Tools. Other groups that have been created during the configuration may also exist.
The Create group includes commands to create new infobase objects, i.e. documents or list items.
The Reports group contains commands to open report forms.
The Tools group displays commands to call utility tools. If the group contains no commands, it is not displayed. The width and height of the panel are customizable.
When you hover the mouse cursor over a command, a tooltip displays that may contain additional information on an action or a link to such information.
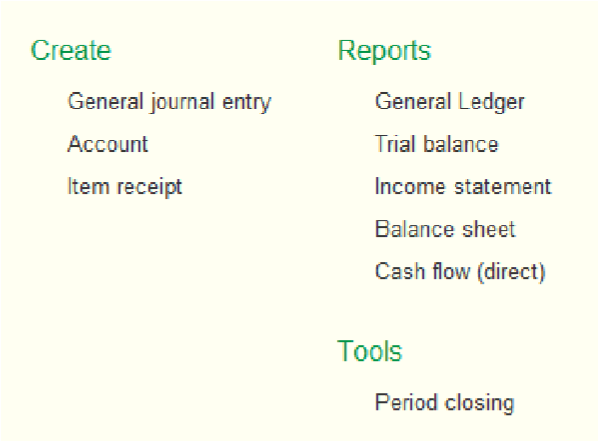
Fig. 12. Action commands
TIP
To navigate to the actions panel of the current section using the keyboard, press Alt + 3.
The contents and order of action commands grouped in the function menu may be customized as a configuration (see section "Navigation Panel" on page 138). To open a setup dialog for a list of action commands, click Action settings in the function menu.
1.3. CURRENT SECTION COMMAND PANEL
This command panel displays commands for the selected section. For instance, the Item receipts (a command that opens a list of item receipts) and Inventory journal commands are displayed in the command bar for the Warehouse section.

Fig. 13. The current section command bar
Clicking the hyperlink of a command bar element executes the corresponding command (for instance, an Item receipts form opens).
If the command bar of the section is in vertical position, clicking Function menu will open its function menu.
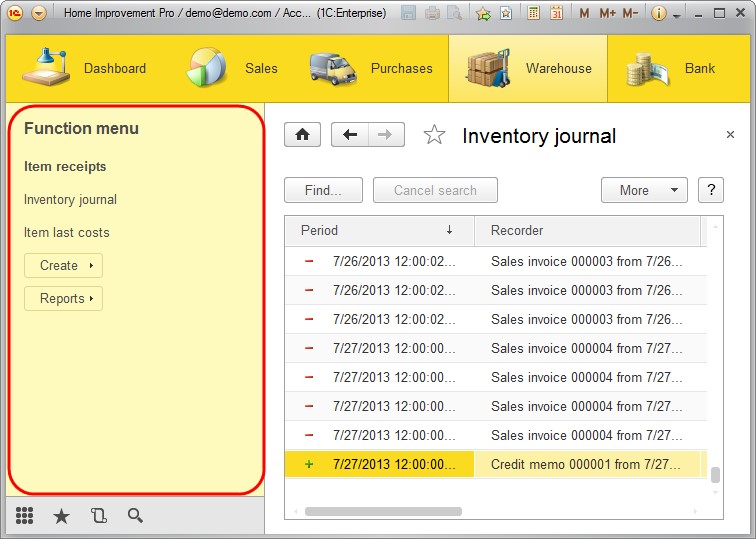
Fig. 14. The function menu on the command bar of the current section
1.4. THE OPEN FORMS PANEL
The panel contains a list of the open forms.
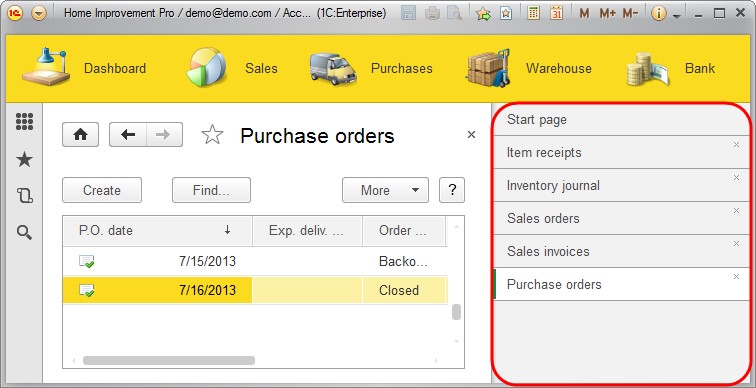
Fig. 15. The open forms panel
If any forms are visible on the start page, the list will include Start page. Lines in the list are sorted according to when they were opened (new ones are displayed at the end of the list). When an item is selected, the corresponding form is activated.
To close the form from the panel, click on the cross in the list.
1.5. THE TOOLBAR
By default, the toolbar is located to the left of the main work area and looks as follows:

Fig. 16. The toolbar
The toolbar contains commands to open the following forms:
Function menu for the current section (Function menu), see page 20.
Favorites form (Favorites), see the "Favorites" section on page 119.
History form (History), see the "History" section on page 120.
Search form (Search), see the "Searching for Data" section on page 117.
1.6. THE SYSTEM COMMANDS AREA
The left part of the title includes the main menu, the Back/Forward buttons to navigate between software areas, and the menu to work with favorites (Favorites).

Fig. 17. Main menu command bar
The main menu only includes general commands. These are the commands for operations on files, windows management commands, service commands, etc.
TIP
Press F10 to go to the main menu of the active window when you use your keyboard.
The application title is located in the center.

Fig. 18. Right part of the system commands area
By default the right part of the system commands area includes the commands for operations on files, to work with references and standard features such as opening a calendar, a calculator, etc.
To close the main window and exit the application, use File – Exit command of the main menu or click the Close button of the main window. You can navigate the application using your keyboard. The built-in help includes the tables listing keyboard shortcuts used for navigation.
1.7. THE OBJECT FORM
The header of the form contains buttons for navigating to a start page, from where you can navigate to open forms, etc.
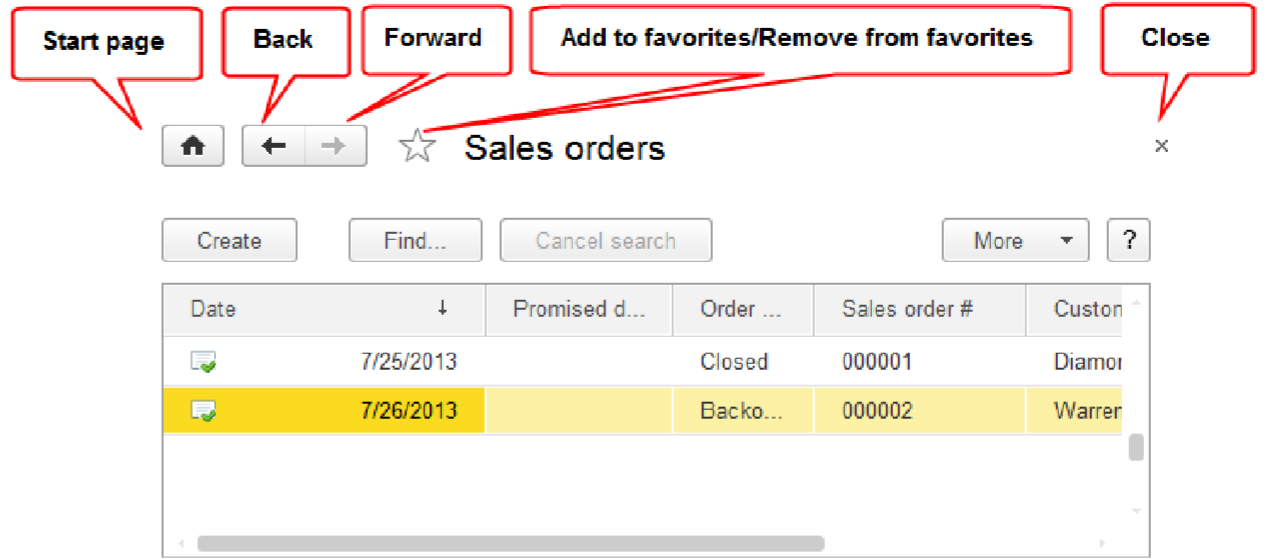
Fig. 19. The object form
To activate the start page, click Home. This option is active if start page forms are set in the program.
To return to the last active form, click Back.
To navigate to a form that was active after the current one, click Forward. If the form was the last one active, the navigation button will be unavailable.
To add an open form to a favorites list or remove the form from the list, use a star radio button (if the "star" is active, a link to the item is included in the list of favorites; for more information on working with favorites, see the section "Favorites" on page 119).
To close the form, click Close.
1.7.1. The Form Navigation Panel
If a navigation panel is implemented for the form, it is displayed horizontally beneath the header.
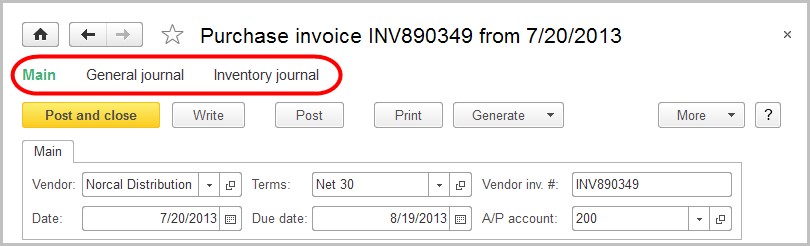
Fig. 20. The form navigation panel
The panel can be used to navigate and view different information that is logically related to the data displayed in the main form of the object.
The command of the current form in the panel is highlighted. When a user clicks Main, the main form of the current object is activated. When a user clicks a link in the navigation panel of the form, the auxiliary form of the object is activated (see the fig. below).
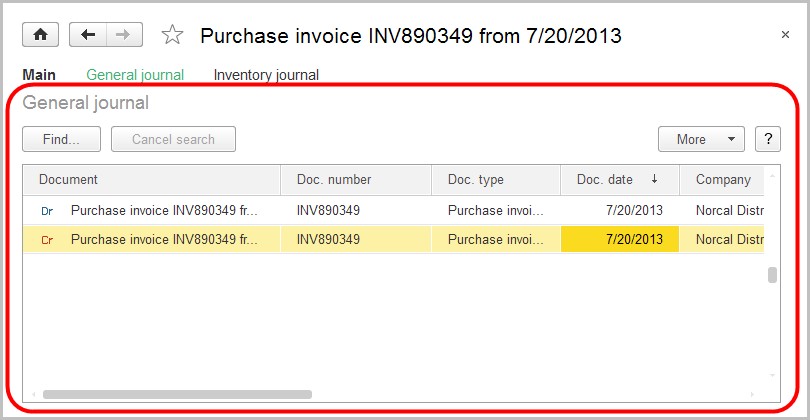
Fig. 21. An (auxiliary) form of a general journal for the purchase invoice
The navigation panel may host commands from the Go to and See also groups. Depending on the program, the navigation panel may also display other commands.
If the user clicks on a link to an object that has not been saved, the system displays the following warning: Data has not yet been recorded. Switching to "<window name>" is allowed only after the data is recorded. The data will be recorded.
Clicking OK saves the current data and takes the user to the selected data area. If a user clicks on Cancel, the data is not saved, the user is not taken elsewhere and he or she may continue editing the current data.
To customize a form's navigation panel, select View – Form navigation panel setup in the main menu. A list of navigation commands can be customized in a similar way as a list of navigation commands for the section. For more details, see section "Navigation Panel" on page 138.
1.7.2. Form Command Bar
A command bar of a form includes the commands that are directly related to the object displayed in the default form. The commands are displayed on the panel as buttons.
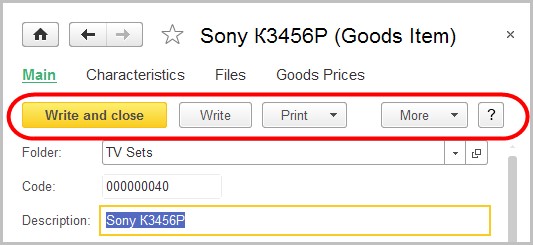
Fig. 22. Form command bar
The default button (the one used when Enter is pressed) is marked on a panel by bold text and a special form. On the form command bar in an auxiliary form the default button is Write and close.